MYXfitness MYX User manual

1
®
Product Manual

2
Contents
PRODUCT SAFETY 3
PRODUCT OVERVIEW
Specications 4
Diagram 4
HARDWARE SETUP
Moving the Bike 5
Touchscreen and Mounting Arm 6
Connect Power Cord 7
Adjusting Seat and Handlebar Height 7
Adjusting Seat and Handlebar Depth 8
Using Pedal Clips and Cage 9
Adjusting Resistance 9
HEART RATE MONITOR SETUP
Charge Battery 10
Using Your Heart Rate Monitor 10
TOUCHSCREEN SETUP
Powering On the Touchscreen 11
Connecting to Internet 11
TOUCHSCREEN FEATURES
Zone Based Training 11
Your MYX Score 12
Touchscreen App Features 12
CARING FOR YOUR MYX
Maintenance 13
Cleaning 13
APPENDIX
Warranty Information 14
Contact 14

3
Product Safety
Before using this equipment, obey the following
warnings:
• This machine is not intended to be used by persons
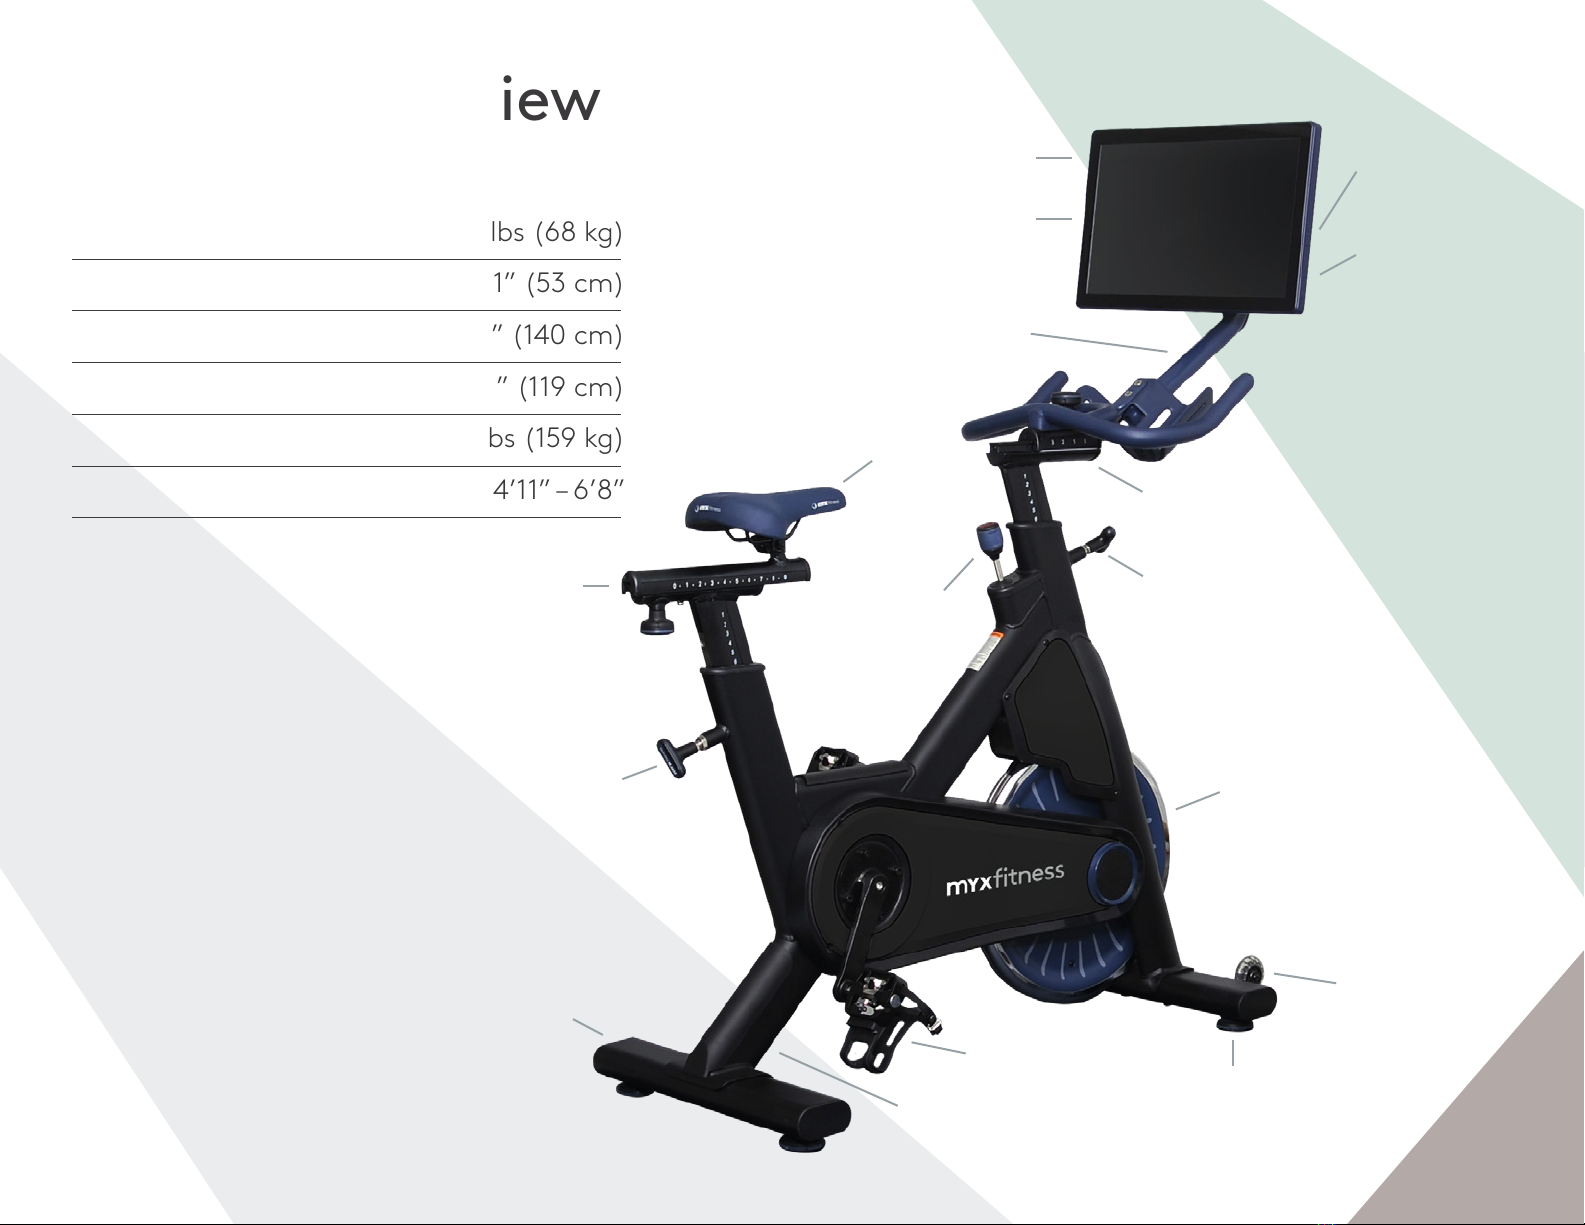
over 350 lbs (159 kgs) or by children.
• It is not intended to be used by persons with reduced
physical, sensory, or mental capabilities or lack of
experience and knowledge, unless given instruction
and under the personal supervision concerning the
use of the machine by a person responsible for
their safety.
• Consult a physician before you start an exercise
program. Stop exercising if you feel pain or tightness
in your chest, become short of breath, or feel faint.
Contact your doctor before you use the machine
again. Use the value calculated or measured by the
console for reference purposes only.
• If you have a pacemaker or other implanted electronic
device, consult your physician before using a wireless
chest strap or other telemetric heart rate monitor.
• Do not use or put the device into service until it
has been fully assembled and inspected for correct
performance in accordance with this guide.
Caution: Make sure you have read and understand the
complete Product Manual before using your MYX bike.
Danger: Pedals that have not been tested and
qualied by MYXtness should never be used on MYX
bikes. Unqualied pedals can lead to pedal failure and
serious injury to the rider.

Product Overview
SPECIFICATIONS
Weight 150 lbs (68 kg)
Width 21” (53 cm)
Length 55” (140 cm)
Height 47” (119 cm)
Max User Weight 350 lbs (159 kg)
Recommended User Height 4’11” – 6’8”
SEAT HEIGHT
ADJUSTMENT PIN
SEAT SLIDER
SEAT
HANDLEBAR SLIDER
RESISTANCE
KNOB
PEDAL
SERIAL LABEL
FLYWHEEL
TRANSPORT
WHEELS
LEVELING FOOT
TOUCHSCREEN
USB PORT POWER
BUTTON
VOLUME
CONTROL
TOUCHSCREEN
MOUNTING ARM
STABILIZER
HANDLEBAR HEIGHT
ADJUSTMENT PIN
4

5
Hardware Setup
MOVING THE BIKE
We recommend using two people to move the bike,
since the MYX weighs 150 lbs.
1. Have one person lift the rear stabilizer so the bike
tilts forward onto the transport wheels, while the
other person holds the handlebars.
2. Roll the bike forward to the new location.
3. Lower the rear stabilizer to the oor.
4. Unscrew leveling feet if needed to prevent rocking
on uneven oors.
1
2 3 4

6
TOUCHSCREEN AND MOUNTING ARM
Your touchscreen will be assembled by the setup team,
but it can be easily removed and reattached for ease of
transportation later.
Disassembly
1. Have one person support the touchscreen while the
other person removes the four 4mm screws at the
back of the touchscreen.
2. Lift o the touchscreen and set the screws aside.
3. Have one person support the mounting arm, while
the other loosens and removes the two 9mm screws.
4. Remove the mounting arm and the oval mounting
plate.
Assembly
1. Align oval mounting plate with the two holes at the
center of the bottle holder bracket.
2. Align mounting arm below the bottle holder bracket.
3. Insert and tighten two 9mm mounting screws
through the oval plate, bracket holes, and into the
holes on the mounting arm.
4. Align the touchscreen with the 4-hole plate at the
top of the mounting arm.
5. Insert four 4 mm screws through the plate and into
the mounting holes in the back of touchscreen and
tighten.
12
3
2
1
5
4
34

7
ADJUSTING SEAT AND HANDLEBAR HEIGHT
Seat and handlebars can be raised and lowered with
the adjustment pins at the front and rear of the bike
frame, shown in the diagram on page 4.
1. Turn pins counterclockwise to unscrew.
2. If adjusting the handlebars, have your assistant
support the weight of the handbars from beneath.
3. Pull the pin outward and have raise or lower
the post.
4. Release the pin so it locks into the post at the desired
height, and tighten the knob to secure it in place.
Do not lift the seat or handlebar posts
above the MAX mark.
We recommend adjusting the handlebars
with two people, due to the weight of the
handlebars with touchscreen attached.
4
3
2
1
12 3
CONNECT POWER CORD
Thread the small end of the power cord from the
bottom of the mounting arm to the hole at the bend in
the arm. Pull the wire through the hole and connect to
touchscreen, allowing 8-10” of slack so the tablet can
swivel freely. Insert power cord plug into a grounded
120V outlet.
8-10”

8
ADJUSTING SEAT AND HANDLEBAR DEPTH
Seat Depth
1. Loosen the knob under the seat slider by turning it
clockwise, as shown in the diagram.
2. Push the seat forward or backward to adjust
position, and tighten the knob to secure into place.
4
3
2
1
123456789
1
2
Handlebar Depth
1. Loosen the knob between the handlebars by turning
it counterclockwise, as shown in the diagram.
2. While supporting the weight of the touchscreen
arm with one hand, slide the handlebars forward or
backward to adjust position.
3. Tighten the knob to secure into place.
4
3
2
1
3210
2
1
3

9
USING PEDAL CLIPS AND CAGE
To use the MYX bike with SPD clips:
1. Make sure the pedal is at and right-side up
(diagram A).
2. Place the cleat on your shoe into the clip and push
down, and you’ll feel yourself clip into the pedal.
3. To release the clip, simply twist your heel away from
the bike.
To use with regular athletic shoes:
You’ll use the cages on the reverse of the pedal
(diagram B).
1. First, make sure your shoelaces are tied and not
dangling over your foot.
2. Align the ball of your foot over the center of the
pedal, and pull the strap to tighten the cage. Thread
the excess strap through the metal clip.
3. Repeat on the other side and you’re good to go!
4. To loosen the cages, squeeze and release the bottom
of the metal clip to release the tension grip.
ADJUSTING RESISTANCE
The resistance knob is located at the base of the
handlebar post (see diagram on page 4). Note that it
takes several full turns to feel changes in resistance.
1. Rotate right to increase resistance.
2. Rotate left to decrease resistance.
3. Press down on the knob to stop the ywheel.
1
A
B
2 3

10
Heart Rate Monitor Setup
CHARGE BATTERY
A red light indicates your heart rate monitor needs to
be charged.
1. Place the OH1 sensor into the USB adapter so that
the metal contacts meet.
2. Plug the USB adapter into a computer USB port
or USB power wall outlet. A ashing yellow light
indicates it is charging. A green light indicates that
it is fully charged.
If your MYX bike is plugged in you can charge your OH1 with the
USB port on the left side of the touchscreen. Check for the orange
light which indicates the USB has been inserted correctly.
USING YOUR HEART RATE MONITOR
1. Remove the sensor from the charging adaptor, and
place it in the holder on the arm band so the sensing
side is exposed.
2. Put the arm band on your upper forearm or bicep so
that the sensor touches your skin.
3. Press the silver button once to turn on. A blinking
green light means it has detected your heartbeat.
4. Choose a workout on the MYX touchscreen. At the
top right of the workout details screen, choose Tap
to Pair “HR Monitor”.
Your heart rate monitor can also be paired by pressing the heart-
shaped icon during a workout.
5. After your workout, press and hold the OH1 button
to turn o the heart rate monitor.
1
1
2
3

11
Touchscreen Setup
POWERING ON THE TOUCHSCREEN
Ensure the touchscreen is connected to a power
source. Press and hold the power button on the right
side of the touchscreen for ve seconds to power on.
To enter or exit sleep mode, quickly press the
power button.
To turn o the touchscreen, press and hold the power
button for one second, and select Power O on
the screen.
CONNECTING TO INTERNET
A strong internet connection with a minimum
download speed of 10-15 MBPS is required to stream
MYXtness content. After powering on your device,
follow on screen instructions to select your network.
To use ethernet, run an ethernet cord from your router
to the leftmost port at the bottom of the touchscreen,
and your device should automatically join the network.
Touchscreen Features
ZONEBASED TRAINING
We use three personalized zones to represent dierent
stages of your heart rate training. These zones help you
work out as eciently as possible for your tness level.
Zone 1 - Blue
• Low to easy-moderate intensity
• Feels sustainable, like you could be there all day
• For active recovery
Zone 2 - Green
• Moderate to hard intensity
• the “fat burning zone”
• Boosts tness by increasing endurance
Zone 3 - Orange
• High intensity and maximum eort
• Only sustainable for short periods of time
• Increases your ability to take in and use
oxygen eciently
• Burns calories faster
Check in with your doctor before beginning
any exercise program.

12
YOUR MYX SCORE
The MYX Score represents cardiovascular tness
and customizes your heart rate zones to maximize
eciency in each and every workout!
Your score is determined by a twenty minute ride you
take as a baseline shortly after joining MYX. Retake the
assessment every six weeks to see progress over time.
TOUCHSCREEN APP FEATURES
Home Screen
1. Account Settings Menu
2. Filter workouts by category
3. Access workouts scheduled from the mobile app
4. Dashboard with MYX Score, badges, and progress
5. Easily browse workouts by category
In-Workout Screen
6. Heart rate, current zone, and calories burned
7. Pair heart rate monitor or Bluetooth headphones
8. Pause, go back, or skip ahead in workout
9. Adjust volume of coach and music independently
1 2 3
4
5
6
7
98
intervals recovery
rest
baseline

13
Caring for Your MYX
MAINTENANCE
Preventative maintenance can increase the life of your
product and signicantly reduce equipment failures.
The chart provided is our recommended maintenance
schedule. It is your responsibility to ensure that regular
maintenance is performed.
CLEANING
We recommend wiping down and cleaning the bike
frame daily. For a deeper clean use water with a
non-abrasive soap, car wash soap, or bike cleaner.
Wipe with water and dry. Avoid spraying any liquids
directly onto the bike. Instead, spray onto a clean
towel rst then wipe the unit. You may also seal the
frame with wax or bike polish.
Checklist
Inspect for loose nuts or bolts on
handlebar and seat assembly and
tighten as necessary.
Verify that pedal bolts connecting
pedals to bike crank are tight
after the rst 10 hours of use and
every 100 hours of use thereafter.
Tighten (clockwise) with Allen
Wrench.
Inspect pedals for excessive
wobble or side-to-side movement.
If loose, they need to be replaced.
Check ywheel alignment.
Realign ywheel nuts as
necessary.
Tighten seat hardware (bolt
connecting seat to post)
Lubricate horizontal and vertical
sliders (for seat and handlebars)
with dry lm lubricant with PTFE
or wet lm lubricant with PTFE.
Apply a layer and use a cloth to
clean up excess.
Inspect welds for any signs of
cracking
Inspect leveling feet
Weekly Monthly
Worn or damaged parts must be replaced
immediately, and should not be used until
the repair is made.

14
Appendix
WARRANTY INFORMATION
Visit myxtness.com/warranty
CONTACT
Help Center
help.myxtness.com
Customer Support
support@myxtness.com
Myx Fitness, LLC
19 West Elm St
Greenwich, CT 06830
Please supply the serial number of your machine and
the date of purchase when you contact us. The serial
number is found under the rear leg of the machine
(see diagram on page 4.)
Table of contents
Other MYXfitness Exercise Bike manuals