N-audio Two Amps To Cabinet User manual


THANK YOU for choosing the N-audio Two Amps To
Cabinet switcher, and welcome to the N-audio family.
Introduction
The Two Amps To Cabinet is an amp cabinet switcher with a
wide range of capabilities. Its primary functions involve
switching between two amplifiers to a single speaker cabinet or
one amplifier to two speaker cabinets. It features a
footcontroller and either one (Mono set) or two (Stereo set) relay
switching units.
One of the outstanding features of this device is its seamless
compatibility with any type of amplifier, including tube, solid-
state, and bridged mono amplifiers. It also includes built-in
protections, such as resistive loads for the non-working
amplifier, to ensure the safety of your amplifiers. The signal path
consists solely of relays, ensuring a pure tone with no active
electronics. A special circuit has been implemented to reduce
pops when switching, and there are no dead spots when
toggling between the amplifiers or the cabinets, making it
perfect for both stage performances and studio recording
sessions to capture your favorite guitar tones.
Controls and connectors
Footcontroller:
1. DC Input – Use an external DC BOSS-style center
negative power supply adapter (not provided). It powers
the footcontroller and the relay units.
2. MIDI In – Use it to remotely switch via MIDI from your MIDI
controller or multi-FX processor.
3. External control outputs – Use a mono guitar cable
between the footcontroller and relay box. It provides a
control voltage for the relay unit only. Both outputs are
identical, and you can control up to two relay units.

4. Footswitch for toggling between the amplifiers.
5. MIDI Learn LED – Stays on when programming or flashes
when the unit receives MIDI messages.
6. Active Amp LEDs – Indicate the activated amplifier (or
cabinet when using one amplifier for two cabinets).
Relay unit:
1. Guitar Input – Plug your guitar here.
2. To input Amp A and B jack plugs for connecting to the
inputs of your amplifiers, where you would normally plug in
your guitar.
3. External control inputs – Use a mono jack to connect the
relay unit to the footcontroller.
4. Speaker Out Amp A and B jack plugs for connecting the
speaker outputs from your amplifiers, where you would
normally plug in your cabinet.
5. Speaker Cabinet – Plug your speaker cabinet here when
playing with two amps to one cabinet.
Amp type selector
HOLD FOR MIDI LEARN
AMP SELECTOR
MIDI
LEARN
ACTIVE AMP
EXT. CONTROL
A B
MIDI INDC

The relay units have a dual DIP switch with two positions on
the bottom. The function of this switch is to reduce pops when
switching between different amplifier types. Use the 'TUBE'
position for the corresponding amplifier when using a tube or a
vintage solid-state amplifier. The 'BRIDGED' position is for
bridged mono solid-state amplifiers like Kemper amps, Orange
Micro Terror, BIAS amps, and others. Playing in the 'BRIDGED'
position with a tube amp may result in some pops when
switching, but it won't harm your amplifier. Playing in the 'TUBE'
position with bridged mono amplifiers will make audible issues
and could potentially damage your amplifier. If you are unsure
about the type of your solid-state amplifier, the 'BRIDGED'
position is the safer choice.
Using the Two Amps To Cabinet switching system
It's important to ensure that you have the right cables for your
setup. There are two types of cables commonly used: guitar
cables and speaker cables. It's highly recommended to use
quality shielded guitar cables and proper speaker cables with a
cable thickness of 2x1.5mm² or 2x2.5mm². You can use any
inexpensive mono guitar cable between the footcontroller and
the relay units.
Place the relay unit close to the amplifiers, preferably on top
of them, to prevent long speaker cable runs. Position the
footcontroller on your pedalboard and power it from your power
supply. Connect a shielded guitar cable from the input on the
first amplifier, where you would typically plug your guitar into the
'To input Amp A' jack. Also, connect a speaker cable from the
back of this amplifier, where you would normally connect an
external speaker cabinet, to the 'Speaker Out Amp A' jack. Do
the same for the other amplifier.
It is crucial to connect each amplifier to the same A or B
jacks. Double-check it!

When the footswitch is pressed, the two amplifiers, A and B,
are toggled one after the other. Additionally, you can switch
them remotely from your MIDI controller.
Power On/Off sequences
Power-on sequence:
1. Power the Two Amps To Cabinet switcher.
2. Turn on the amplifiers.
3. Test each amplifier and cabinet with reduced volume.
Power-off sequence:
1. Turn off the amplifiers.
2. Power off the Two Amps To Cabinet switcher.
MIDI Programming
The Two Amps to a Cabinet switcher receives MIDI data and
saves it to a given preset. Unlike many other MIDI devices,
when using this device, you do not need to understand how
MIDI works. MIDI programming itself is very quick and easy.
Simply press and hold the footswitch until the MIDI Learn
LED turns on. Keep in mind that the active amplifier will change.
Then send a MIDI message from your controller. The MIDI
Learn LED will turn off and you are done! You have already
programmed one preset. Repeat the same process for the next
amplifier. If you have pressed and held the footswitch, enabling
MIDI programming mode, and you want to exit that mode,
simply press the footswitch once.
MIDI Controller
Send MIDI
message
HOLD FOR MIDI LEARN
AMP SELECTOR
MIDI
LEARN
ACTIVE AMP
EXT. CONTROL
A B
MIDI INDC
Press
and hold
HOLD FOR MIDI LEARN
AMP SELECTOR
MIDI
LEARN
ACTIVE AMP
EXT. CONTROL
A B
MIDI INDC

The MIDI messages can be on different MIDI channels or
feature varying types of messages. For example, you can use a
control change message on one MIDI channel for a selected
amplifier and a program change message on a different MIDI
channel for the other amplifier. The switcher supports program
changes, control changes, and note on/off messages, and it
ignores velocity values.
When programming over a previously programmed preset,
the device automatically overwrites the new MIDI data and
deletes the previous ones. There is only one MIDI message for a
given selected amplifier.
To delete all saved MIDI messages from the internal memory,
press and hold the footswitch, and then power on the switcher.
Wait a few seconds until the MIDI Learn LED stops flashing, and
release the footswitch.
To control multiple guitar effects with a single button press on
your MIDI controller, send all MIDI messages sequentially,
starting with the one directed to the Two Amps To Cabinet
switcher. It will detect and store only the first message.
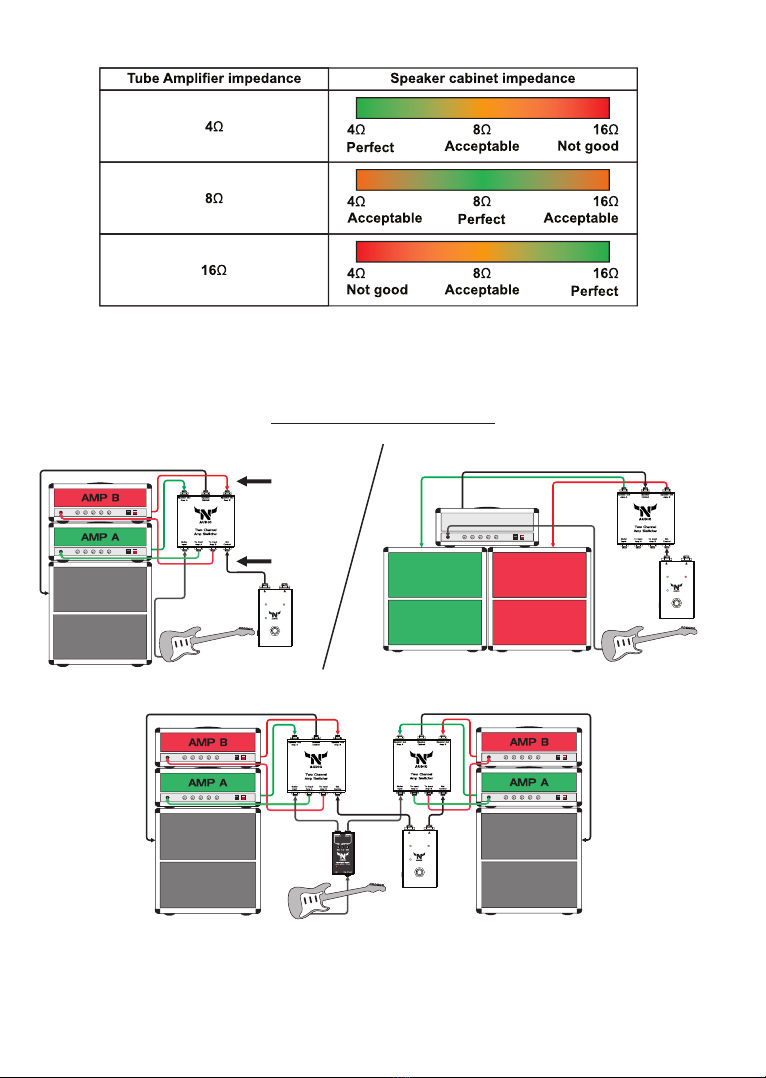
Amplifier and Cabinet Impedance Tips
When using two amplifiers with one cabinet, set the output
impedance of your amplifiers to match the impedance of the
cabinet. For a setup with one amplifier and two cabinets, try to
use cabinets with the same speaker impedance that matches
the amplifier's impedance. You can use cabinets with different
impedances, but make sure the impedance ratio between the
amplifier and the cabinet is one impedance step. For example, 4
Ohm and 8 Ohm or 8 Ohm and 16 Ohm. A good practice when
dealing with impedance mismatch is to set the output
impedance of the amplifier at 8 Ohm. When dealing with an
impedance mismatch, it's recommended to keep the maximum
master volume control set 20-30% lower than its maximum.
Avoid pushing your amplifier to its limits.

Avoid playing with a two-step impedance mismatch, such as
using a 4 Ohm amplifier with a 16 Ohm cabinet.
Practical examples:
Two amplifier to a single cabinet - Stereo set
Two amplifier to a single cabinet One amplifier to two cabinets
When using a stereo setup with two amps to cabinet system, it is
recommended to prevent ground loops by isolating the input signals
of the amplifiers with a transformer-isolated splitter.
CABINET BCABINET A
HOLD FOR MIDI LEARN
AMP SELECTOR
MIDI
LEARN
ACTIVE AMP
EXT. CONTROL
A B
MIDI INDC
Speaker cables
Guitar cables
HOLD FOR MIDI LEARN
AMP SELECTOR
MIDI
LEARN
ACTIVE AMP
EXT. CONTROL
A B
MIDI INDC
Splitter
HOLD FOR MIDI LEARN
AMP SELECTOR
MIDI
LEARN
ACTIVE AMP
EXT. CONTROL
A B
MIDI INDC

COMBO A COMBO B
HOLD FOR MIDI LEARN
AMP SELECTOR
MIDI
LEARN
ACTIVE AMP
EXT. CONTROL
A B
MIDI INDC
Switching between two combox
What is in the box
When you purchase the N-audio Amp Cabinet Switcher, you
will receive one footcontroller and one (for MONO setup) or two
(for STEREO setup) relay units plus a user manual.
Technical specifications
Dimensions: Footcontroller W/D/H – 6/10/4 cm
Relay unit W/D/H – 10/11/3,5 cm
Power supply: 7-15VDC center negative (not included)
Current consumption: Mono version – 120mA at 9VDC
Stereo version – 240mA at 9VDC
Speaker relays are 16 Amps rated
Warranty
N-audio Two Amps To Cabinet comes with a lifetime warranty.
HOLD FOR MIDI LEARN
AMP SELECTOR
MIDI
LEARN
ACTIVE AMP
EXT. CONTROL
A B
MIDI INDC
Using with an external power attenuator
HOLD FOR MIDI LEARN
AMP SELECTOR
MIDI
LEARN
ACTIVE AMP
EXT. CONTROL
A B
MIDI INDC
Table of contents
Other N-audio Switch manuals
Popular Switch manuals by other brands

cable matters
cable matters 201063 user manual

Cisco
Cisco Catalyst 2960 Series Getting started guide

Extreme Networks
Extreme Networks Alpine 3804 installation guide

Server Technology
Server Technology CDU CW-24VD Specification sheet

iHome
iHome IH-U560SB quick start guide

Avocent
Avocent AutoView 2030 brochure

ATEN
ATEN ATEN VanCryst VM1600A quick start guide

Aruba Networks
Aruba Networks PowerConnect W Clearpass 100 Software manual

Meraki
Meraki Cisco MS425 Series installation guide

Pinter
Pinter MINICOMB-EDS operating instructions

MSTRONIC
MSTRONIC PSE-SW5G25B4-IP66 user manual

Generac Power Systems
Generac Power Systems HTS owner's manual