N-Com B3 Instruction Manual

EN B3
B3 - 18/01/2016 14:21:00
USER INSTRUCTIONS AND SAFETY
Congratulations on your purchase of an N-Com product.
N-Com B3 was made using the most advanced technologies and the best
materials. Long-running tests and thorough system development have allowed
the highest audio quality to be achieved.
For additional information about B3 visit the website www.n-com.it
Firmware version: 4.0x
REFERENCE STANDARDS
The products of the N-Com line are in compliance with standards as per the table
below:
B3
The Bluetooth system complies with the main safety
requirements and other applicable provisions of Directive
99/5/CE, Directive 2009/65/EC, Directive 2011/65/CE, Directive
2012/19/EU
Battery
charger
Directive 2006/95, 2004/108, 2009/65/EC, 2011/65/CE,
2012/19/EU, 2009/125/CE
Battery Directive 2006/66/CE
The Declarations of Compliance can be downloaded from the website www.n-
com.it (Download section).
FccID: Y6MNCOM3 R-NZ
Bluetooth is a registered trademark property of Bluetooth SIG, Inc.


Contents
1. WARNINGS AND SAFETY.................................................................................................4
1.1.Road safety ................................................................................................................................................................4
1.2.Switching on the system in safe environments ......................................................................................... 4
1.3.Interferences..............................................................................................................................................................4
1.4.Appropriate use ....................................................................................................................................................... 5
1.5.Qualified personnel................................................................................................................................................ 5
1.6.Accessories and batteries.................................................................................................................................... 5
1.7. Disposal ..................................................................................................................................................................... 6
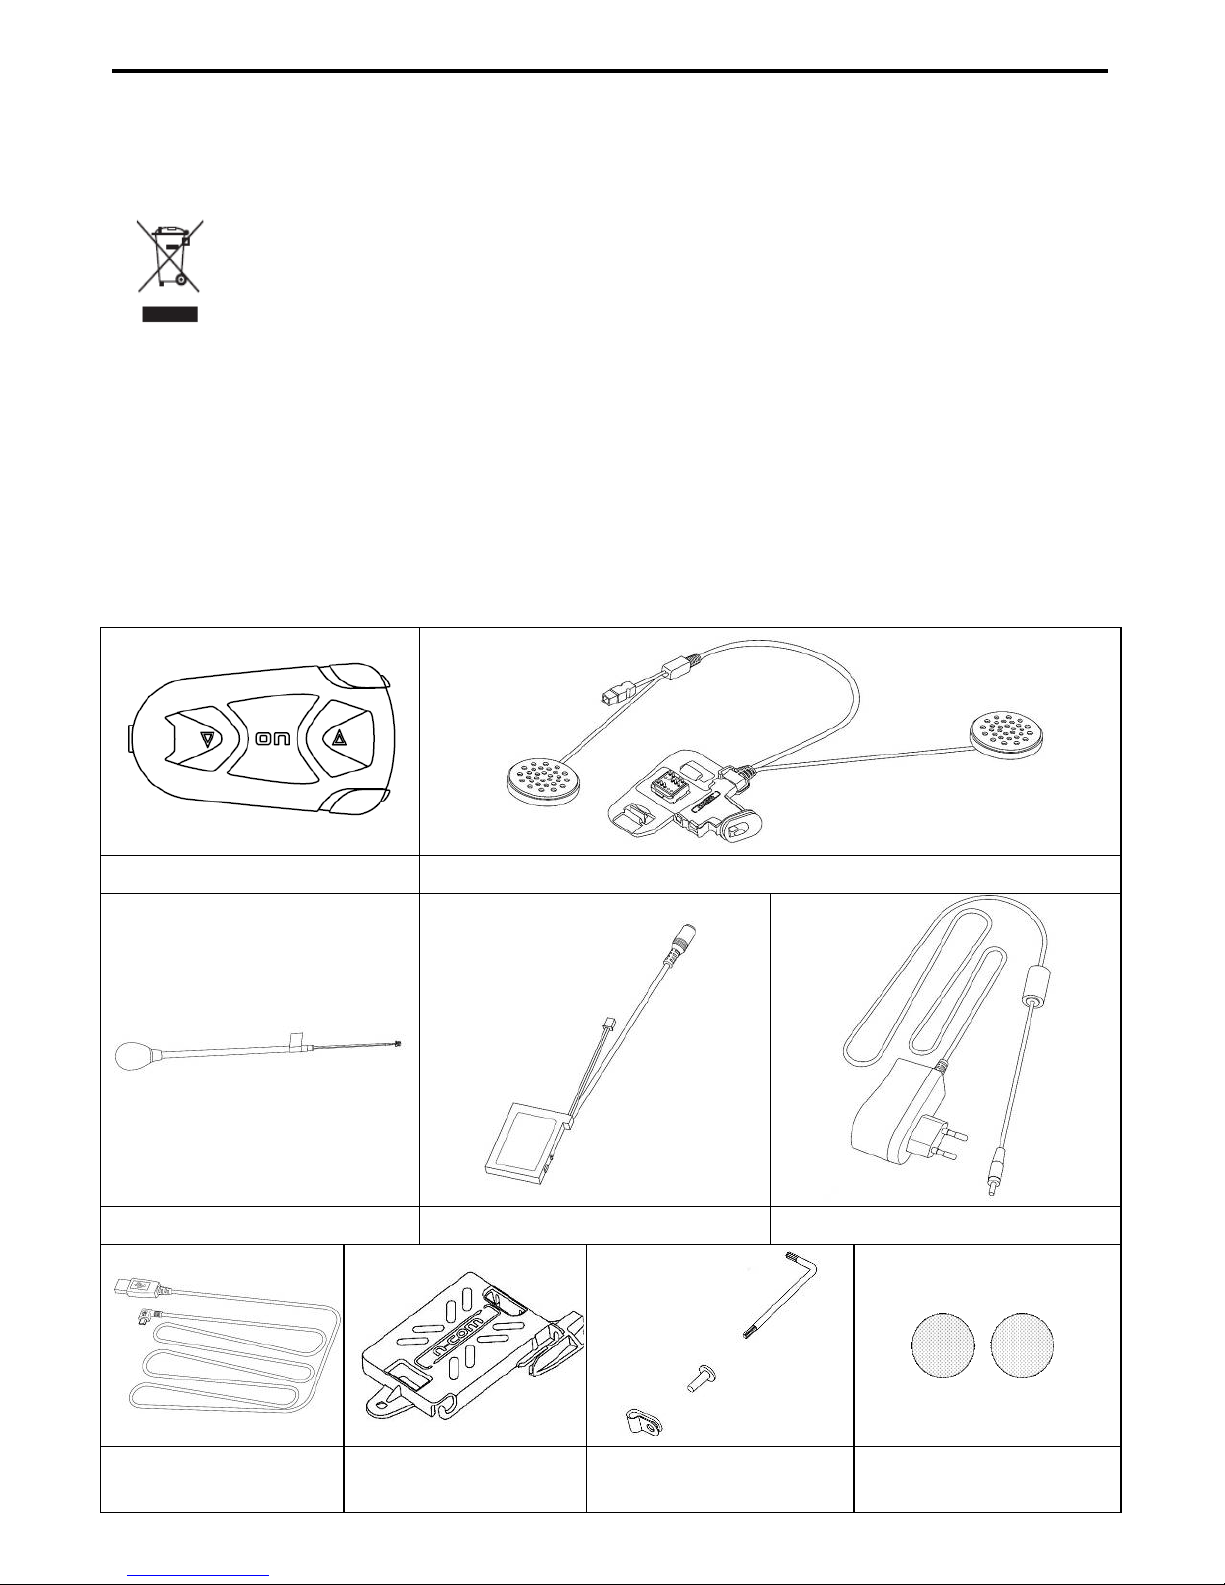
2. CONTENT OF THE PACKAGING ......................................................................................6
3. INSTALLATION....................................................................................................................7
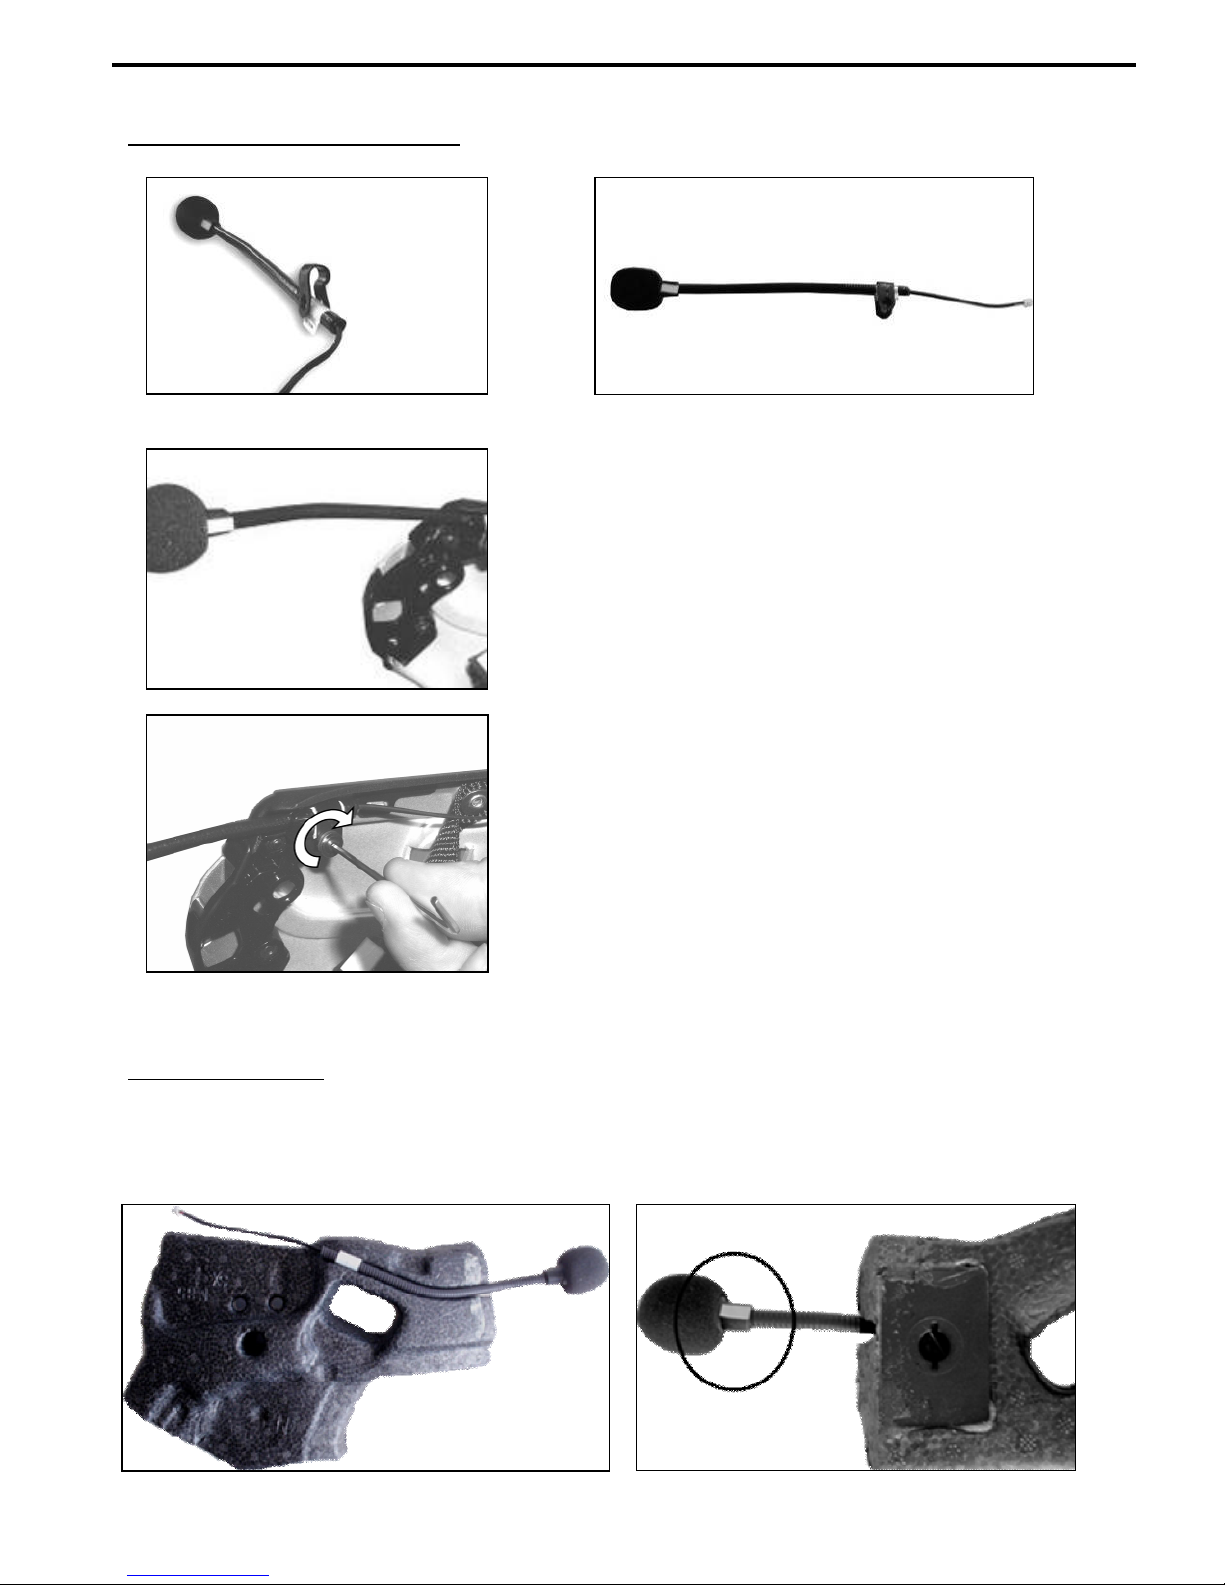
3.1.Installing the microphone ................................................................................................................................... 9
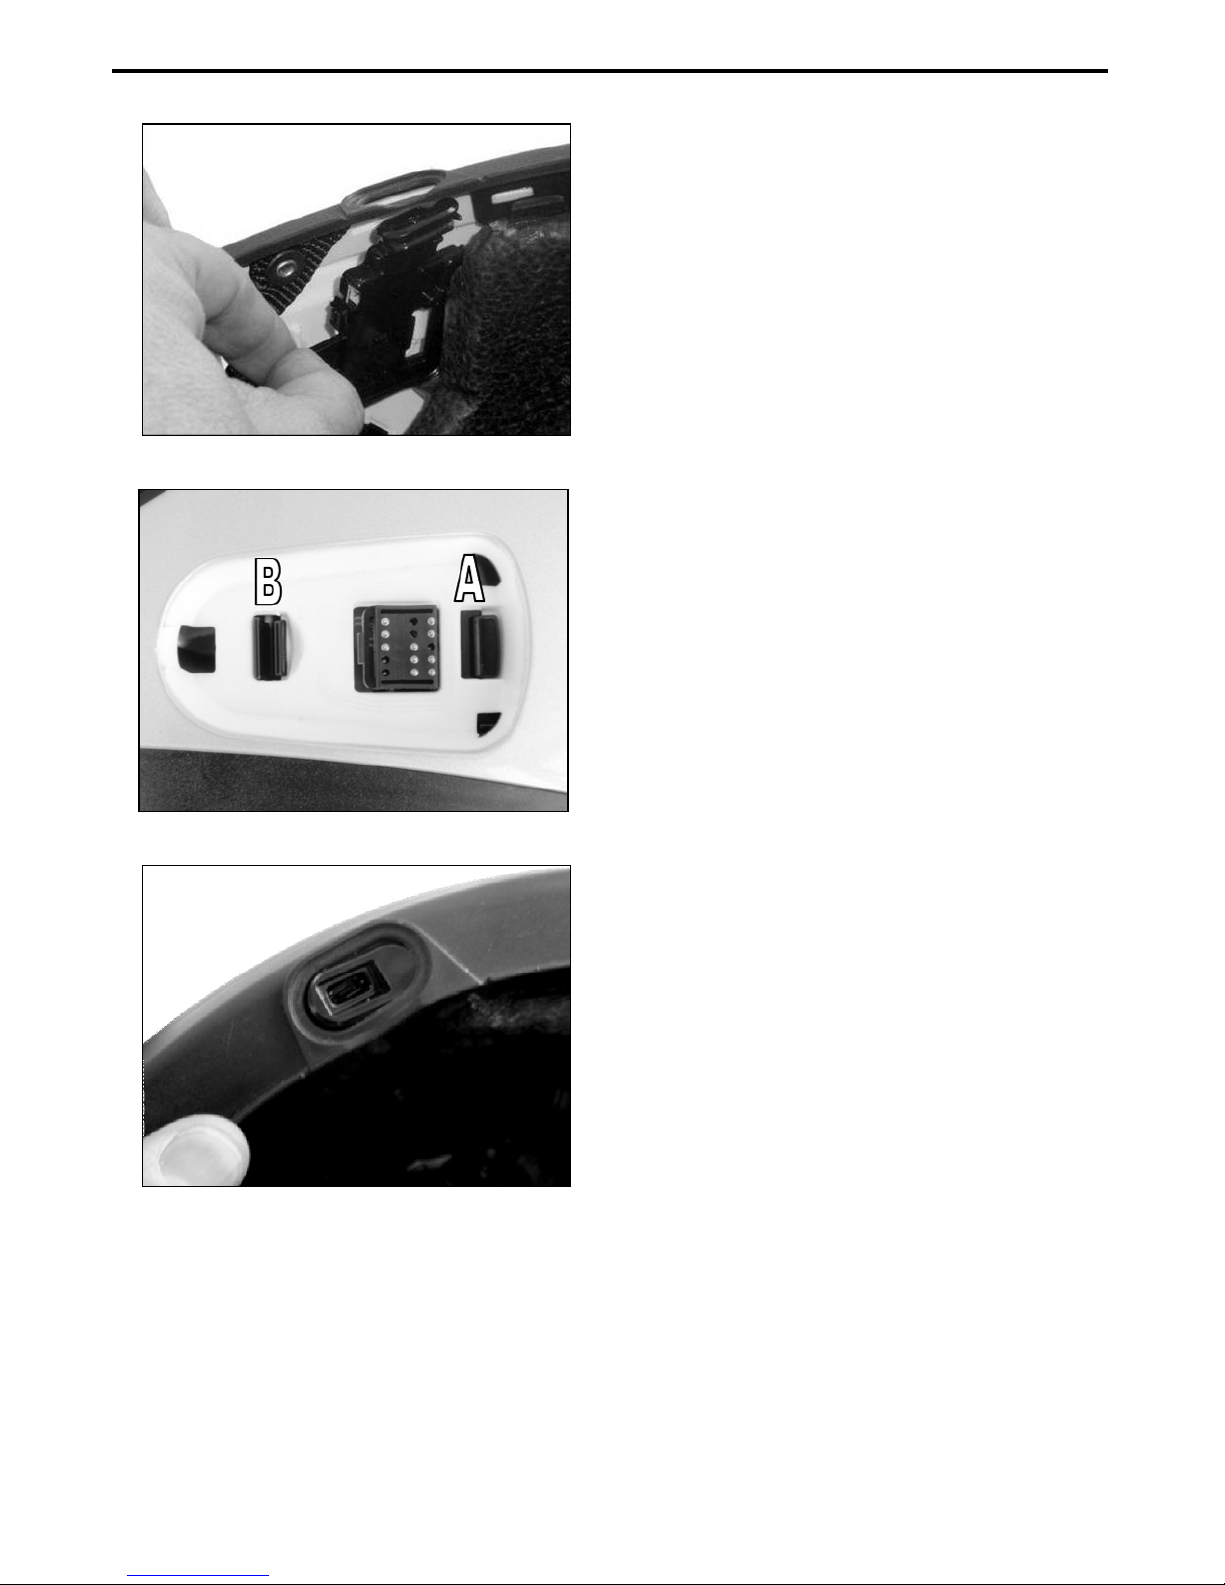
3.2.Installing the system on the helmet .............................................................................................................10
4. REMOVING THE SYSTEM................................................................................................13
5. BASIC FUNCTIONS...........................................................................................................14
5.1.System menu...........................................................................................................................................................14
5.2.N-Com Wizard........................................................................................................................................................15
5.3.N-Com App..............................................................................................................................................................15
6. PAIRING UP BLUETOOTH DEVICES ..............................................................................15
6.1.Affiliation reset function ....................................................................................................................................16
7. MOBILE PHONE FUNCTIONS.........................................................................................16
8. GPS SATELLITE NAVIGATOR FUNCTIONS...................................................................17
9. STEREO FM RADIO...........................................................................................................17
10. MUSIC VIA BLUETOOTH.................................................................................................18
11. MUSIC PLAYER VIA CABLE .............................................................................................18
12. N-COM RIDER-PASSENGER INTERCOM MODE ........................................................19
12.1.Intercom affiliation.............................................................................................................................................19
12.2.Intercom function...............................................................................................................................................19
13. N-COM BIKE-TO-BIKE INTERCOM................................................................................19
13.1.Bike-to-Bike pair up ..........................................................................................................................................19
13.2.Making a Bike-to-Bike call..............................................................................................................................20
13.3.Taking a Bike-to-Bike call ...............................................................................................................................20
14. “UNIVERSAL INTERCOM” ...............................................................................................21
14.1.Pairing up the UNIVERSAL INTERCOM.....................................................................................................21
14.2.UNIVERSAL INTERCOM function.................................................................................................................21
14.3.UNIVERSAL INTERCOM Bike-to-Bike ........................................................................................................21
15. BATTERY.............................................................................................................................22
15.1.Battery discharged signal................................................................................................................................22
16. SUMMARY TABLE OF CONTROLS ................................................................................23
17. LIMITED WARRANTY .......................................................................................................25
17.1.Warranty coverage.............................................................................................................................................25
17.2.Exclusions and limitations of the coverage ............................................................................................25
17.3.Validity of this limited warranty ...................................................................................................................26
17.4.Procedure for the forwarding of claims ...................................................................................................26
17.5.Product identification .......................................................................................................................................27
18. WARRANTY REGISTRATION FORM..............................................................................28

EN
4
1. WARNINGS AND SAFETY
Read this User Manual carefully, as well as the User Manuals for other N-Com kits that you will be
using with the N-Com B3. Read the simple rules listed below. Failure to comply with these rules may
lead to dangerous situations.
Caution: The product cannot be used in official or non-official competitions, motordromes, circuits,
racing tracks and the like.
Caution: Installation of the N-Com B3 system results in a weight increase of approximately 110g,
which is added to the weight of the helmet and of the other accessories.
Warning: The electronic components of the N-Com system mounted inside the helmet are not
waterproof. Consequently, make sure the inside of the helmet, including the comfort padding,
does not get wet in order to avoid damage to the system. If it does, remove the N-Com system
and the helmet comfort padding and let it air dry. Disconnect the battery connector and let it
dry as well.
1.1. Road safety
Always obey all Traffic Regulations in force. While riding the motorcycle, your hands should always be
engaged in actually riding the vehicle. Any operation to the N-Com system must be carried out with
the vehicle stopped. Specifically:
Set your cell phone on automatic answer (see the cell phone instructions to do this).
If your cell phone is not equipped with this function, first stop your vehicle in a safe area, in
compliance with Traffic Regulations and then answer the call.
Do not make any calls while riding. Stop your vehicle in a safe place in compliance with Traffic
Regulations, and then make the call.
Adjust the volume so that it does not cause a disturbance or distraction while riding and at the
same time allows you to distinctively hear background noises.
Do not operate your cell phone or other devices connected to N-Com while riding your
motorcycle.
In all cases, obey the Traffic Regulations and remember that riding the motorcycle has absolute
priority over any other maneuver.
1.2. Switching on the system in safe environments
When using the N-Com system, comply with all limitations and instructions related to the use of
cell phones.
Do not turn on your cell phone or the N-Com system whenever their use is forbidden or when
the devices can cause interference or dangerous situations.
Turn off while refueling. Do not use the N-Com system in filling stations. Do not use the device
near combustible materials or chemical products.
Turn off in proximity to explosive materials.
1.3. Interferences
All phones and devices with wireless signal transmission are subject to interferences that may affect
the performance of the device connected to them. These interferences are not ascribable to a defect
of the N-Com system.

B3
5
1.4. Appropriate use
Use the device only in the normal position, as described in the product documentation. Do not
attempt to disassemble, tamper with or modify any part of the N-Com system.
Caution: Adjust the volume of the N-Com system (where provided) and of the audio sources
connected to it before you use the system on the road.
Caution: Adjusting the volume to very high levels may cause damage to your hearing.
Caution: Adjust the volume of the N-Com system (where provided) and of the audio sources
connected to it so as to avoid audio reproduction at high volumes. Constant exposure to high
audio volumes may damage your hearing.
Caution: An incorrect installation of the system in the helmet may alter the aerodynamic and safety
characteristics of the helmet itself, thus creating dangerous conditions. Install the N-Com system
according to the instructions provided in the product documentation. In case of doubt, please
contact your local N-Com dealer.
Warning: Listening to other equipment should not interfere with driving the vehicle, which must be
the top priority at all times. Carry out all operations on the electronic equipment and on the N-
Com system with the vehicle stopped, in compliance with Traffic Regulations.
Caution: B3 allows radio reception. Any radio licence fees are to the user’s charge.
1.5. Qualified personnel
Only qualified personnel can carry out technical assistance on this product. In case of any
malfunction, always turn to your local dealer.
The helmet is a safety device. Tampering with it and/or with the electronic system inside the
helmet, in addition to invalidating the product warranty, can also lead to dangerous situations.
1.6. Accessories and batteries
Only use the type of batteries, battery chargers and accessories approved by Nolan for the
specific model.
The use of a battery type different from the recommended one may lead to dangerous
situations and invalidate the warranty.
Contact your local dealer to see about the availability of approved accessories.
When disconnecting the power supply cable of any accessory or of the battery charger, always
grab and pull the plug not the cable.
Do not use batteries for purposes other than the prescribed ones.
Never use batteries or battery chargers that turn out to be damaged.
Do not short-circuit the battery.
Keep the battery at a temperature between 0° / +45°C (charging); -20° / +60 °C (in use).
Danger of fire or explosion: do not throw the batteries into a fire nor expose them to high
temperatures!
Do not throw out batteries together with household refuse. The batteries should be disposed of
in compliance with local regulations
Do not wear the helmet while the battery is recharging.
The helmet should never be left within the reach of unsupervised children in order to prevent
damage to their health caused by access to the batteries.
Battery Lithium Ion593847 Lithium 3,7V – 800mAh
Battery charger FY0901000 110/240v – 50/60 Hz

EN
6
1.7. Disposal
Refer to this user manual and to manuals related to other parts of the N-Com system in order to
disassemble the system from the helmet. Once the system has been disassembled, dispose of it
according to the following instructions:
The presence of a crossed-out wheelie bin indicates that in the European Union the
product is subject to separate collection at the end of its useful life (European
Directive 2002/96/EC).
Do not dispose of these products together with undifferentiated urban waste.
The proper disposal of obsolete equipment contributes to preventing possible negative
consequences on people’s health and on the environment.
For more detailed information on the disposal of obsolete equipment, contact your
municipality, a waste disposal service or the store where the product was purchased.
2. CONTENT OF THE PACKAGING
The N-Com B3 package contains:
e-box B3 Electronic plate
Microphone Rechargeable battery Battery charger
PC connection cable Battery holder Key, screw, clamp
Microphone-Stop
Adhesive Velcro pads

B3
7
3. INSTALLATION
You can download the installation video from www.n-com.it N-Com / Download section.
Fig. 1
Fig. 2
Fig. 3
Remove the “N-Com” protection plate located
on the helmet shell (Fig. 1) and open the
helmet chin guard (flip up helmets).
Remove the right and left cheek pads from the
helmet (see specific instructions provided in
the user manual of the helmet).
Remove the Noise Reducers from the two
cheek pads, and tear off the pre-cut plastic (if
equipped).
Fig. 4
Fig. 5
Fig. 6
Remove the back of the comfort padding by
pulling on the neck roll until it separates from
the shell (Fig. 4).
Temporarily put the padding on the outside of
the helmet (Fig. 5).
Remove the N-Com cover from the helmet
border gasket. Push from the inside of the
helmet to facilitate the removal (Fig. 6).

EN
8
Fig. 7
ONLY FOR FULL-FACE HELMETS
Remove the chin guard by pulling on the
special red tab.
Fig. 8
Remove the right and left polystyrene cheek
pads by gently pulling them out of the helmet.
The helmet shell can be opened slightly to
facilitate the removal of the cheek pad.
Caution: In case the polystyrene cheek pad is
damaged during this operation, turn to your
local dealer for its replacement.

B3
9
3.1. Installing the microphone
JET HELMETS OR FLIP-UP HELMETS
Fig. 9
Fig. 10
Fig. 11
Fig. 12
Prepare the microphone by inserting the microphone
clamp, being careful to position it properly (Fig. 9)
Note: the flat part of the clamp must be facing upward
when the microphone is positioned as shown in figure 11.
Position the microphone in its support as shown in
figure 10, being careful that the fluorescent clamp is
facing toward the inside of the helmet.
Insert screw in the microphone clamp; use the key to
screw in the microphone securing screw to the shell
frame.
FULL-FACE HELMETS
Take the polystyrene cheek pad (left-hand side) and position the microphone in its housing, as
shown in fig. 13, making sure that the fluorescent band stays facing the inside of the helmet. (Fig.
14)
Fig. 13
Fig. 14

EN
10
3.2. Installing the system on the helmet
Fig. 15
Position the system inside the helmet as shown
in figure 15, next to the N-Com housing in the
shell.
Fig. 16
Looking at the helmet from the outside, slide
the rear positioning tab into groove A as
shown in the figure;
Press in the area marked PUSH from inside the
helmet until the fastening clasp B clicks (Fig.
16).
Fig. 17
Pull out the connectors area from the helmet
gasket: the gasket will have to be slightly
deformed to facilitate the insertion.

B3
11
Insert the microphone connector in the micro USB electronic plate.
Before you place the speaker in its housing, apply the Velcro pad to the polystyrene cheek pad (Fig.
19).
Fig. 18
Fig. 19
Fig. 20
Position the loudspeaker in the special
housing obtained in the polystyrene cheek
pad (Fig. 20).
Fig. 21
Replace the polystyrene cheek pad (left side),
positioning the cable in the groove that you
see in the cheek pad (Fig. 20).
Note: Make sure the cheek pad is properly
positioned in its housing, pushing in the
lined corner underneath the ribbing on the
shell (Fig. 21).

EN
12
Fig. 22
ONLY FOR JET HELMETS OR FLIP-UP HELMETS
Secure the battery-holder support to the right
side of the helmet, lining up the holes with the
pins on the shell (Fig. 22)
Fig. 23
ONLY FOR FULL FACE HELMETS
Position the battery in the right polystyrene
cheek pad housing (Fig. 23).
Before you place the speaker in its housing, apply the Velcro pad to the polystyrene cheek pad
(right side).
Position the loudspeaker in its housing obtained in the polystyrene cheek pad (right side).
Replace the polystyrene cheek pad (right side), positioning the cable in the groove you see in the
cheek pad.
Fig. 24
ONLY FOR FULL-FACE HELMETS
Insert the chin guard (microphone side), gently
placing the microphone in its housing. Then
press down on the red tab until the chin guard
is locked in place on the helmet. (Fig. 24)

B3
13
Fig. 25
Fig. 26
Position the comfort padding in its housing (see specific instructions provided in the helmet user
manual), hooking the neck roll (Fig. 25).
Position both the comfort cheek pads in their housing (see specific instructions provided in the
helmet user manual) making sure that all the press-studs click.
Note: Carefully check the proper final positioning of the cheek pad, pulling the chinstrap toward the
inside of the helmet and testing the press-studs.
Caution: Make sure that there are no cables sticking out of the helmet and that the loudspeakers are
in their housing.
Caution: Always verify the proper length of the chinstrap and adjust it as necessary, once again
referring to the specific helmet instructions.
Position the e-box in the relevant housing. First insert the front part, then press down on the e-box
until both hooks fully click. To remove the e-box, press the two sliding hooks at the same time until
the e-box comes out.
Warning: Do not leave the helmet exposed to atmospheric agents without the e-box or the
protection plate provided with the helmet.
4. REMOVING THE SYSTEM
Fig. 27
To remove the system from the helmet,
remove the earphone and the comfort cheek
pads as shown in the assembly operations.
Then remove the polystyrene cheek pads.
Remove the protection plate, then, looking at
the helmet from the outside, release the
connector by acting on the fastening clasp as
illustrated in the figure.
After releasing the connector from the shell, also remove the right part by releasing the battery
holder.
Now remove the entire system from the helmet.

EN
14
5. BASIC FUNCTIONS
All N-Com system functions are available through the operation of three pushbuttons: “”, “on” and
“”. Every time the system is given a command, a special acoustic signal can be heard, which varies
depending on the function being requested, or on the vocal command given. This way, all the
functions can be used while wearing the helmet.
The type of command given to the system depends on how long the pushbutton is pressed.
System ON Press “on” and keep it pressed for about 2 seconds, until the LEDs turn
on and you hear a beep in the headset.
System OFF Press “on” and keep it pressed for about 4 seconds, until the LEDs turn
off and you hear a beep in the headset.
Increase Volume Briefly press “” to increase the volume. A double tone signals the
highest volume level.
Decrease Volume Briefly press “” to decrease the volume. A double tone signals the
lowest volume level.
5.1. System menu
B3 features a menu with 3 functions: BASE, RADIO, BIKE TO BIKE (activated upon request).
To scroll the card functions menu, press “on” for 2 seconds (with system turned on).
The switch from one function to the next is confirmed by a vocal message that indicates the system
status.
When B3 is turned on, the menu is always in the “BASE” mode. Depending on the menu position, you
can manage the various audio devices and the available functions:
Menu Functions
Base
Management of an external source connected via cable
Use of Mobile phone/GPS with Bluetooth connection
Use of the intercom “Rider–Pillion Passenger” or “Universal Intercom”
Listening to and management of Bluetooth A2DP player
Radio
Listening to and management of FM Radio
Use of Mobile phone/GPS with Bluetooth connection
Use of the intercom “Rider–Pillion Passenger” or “Universal Intercom”
Bike to
Bike
Use of the intercom “Bike to Bike”
Use of the intercom “Rider–Pillion Passenger” or “Universal Intercom”
Functions concerning Bluetooth mobile phone management are available in all menu positions.
Note: The “Bike-to-Bike” menu must be specifically activated from the system (see chapter 13) or by
using the N-Com Wizard programme.

B3
15
5.2. N-Com Wizard
“N-Com Wizard” is the PC application that can be used to manage and configure the B3
system.
The programme can be downloaded from the Internet site www.n-com.it, in the “Download” section.
In order to use it, a helmet equipped with B3 must be connected to the PC, using the USB cable
supplied with the system.
N-Com Wizard allows you to customize your B3, specifically:
Setting the system audio levels
Pre-set and manage your favourite radio stations
Update the device firmware
Turn on or off the Bike-to-Bike menu
Manage connections with other bikes
5.3. N-Com App
The N-Com system is pre-set for connection to the “N-Com App”, the Android application
used to configure and control the N-Com system directly from a Smartphone.
With the N-Com App, you can carry out most of the functions included in the N-Com Wizard program
or, alternatively, it can be used as a wireless Bluetooth keypad.
The N-Com APP can be downloaded free of charge from Google Play.
For additional details, please visit the website www.n-com.it
6. PAIRING UP BLUETOOTH DEVICES
In order for the B3 system to be connected to another Bluetooth device, the latter needs to be first
paired up with the N-Com system.
The pairing up procedure is the same for all Bluetooth devices: mobile phones, MP3 Bluetooth
players, satellite navigators, etc.
1. Make sure the B3 is turned off;
2. Press “on” and keep it pressed (for more than 4 seconds), until the LEDs start to flash
quickly and you hear a sharp beep in the headset, indicating the “Pair-up mode”;
3. On the Bluetooth device, turn on the search for Bluetooth devices (refer to the instructions
manual of your device for the proper pairing up procedure, as it varies depending on the
brand and model of the device);
4. After a few seconds, the mobile phone will display the name “N-Com B3 v.X.XX”, followed
by the manufacturer’s identification data;
5. Select the N-Com device. If a password is requested, enter 0000 (four zeros);
6. B3 will confirm the pairing up by means of a tone in the headset, and the LEDs will stop
flashing;
7. Turn off and on both the mobile phone and the B3 to store the pairing up data.

EN
16
Note: The affiliation is stored in the helmet and in the cell phone and it is not lost when the two
devices are turned off. As a result it needs to be carried out only once.
Note: If a Bluetooth device (mobile phone or GPS) equipped with music player with Bluetooth A2DP
player has already been paired up, the pairing up DOES NOT have to be repeated as the A2DP
protocol has already been stored in the B3.
Once the Bluetooth device has been paired up, connection is automatic when the system is turned
on.
In case connection is not automatically initiated after a few seconds, you can connect from the
Bluetooth device or by pressing “on” for 4 seconds.
6.1. Affiliation reset function
You can remove all affiliated devices from the system memory. This operation is not reversible; right
after resetting, you will have to repeat the affiliation procedure for the cell phone (or for other
compatible Bluetooth devices).
To erase all devices previously affiliated, proceed as follows:
Press “on” and keep it pressed (for more than 4 seconds), until the LEDs start to flash quickly and
you hear a sharp beep in the headset, indicating the “Pair-up mode”;
Press “” and “” at the same time for 4 seconds, and release them when you hear a beep. The
N-Com will emit a special acoustic signal to confirm and will then turn itself off.
This function can also be turned on through PC using the “N-Com Wizard” programme.
7. MOBILE PHONE FUNCTIONS
Answering a phone call Briefly press any key when you hear the incoming call signal
Hanging up/rejecting a
phone call
Press “on” and keep it pressed for about 2 seconds (until you hear the
acoustic signal)
Voice call (if equipped) Press “on” and keep it pressed for about 4 seconds (until you hear the
acoustic signal)
Redial last number Briefly press “” and “” at the same time
Transferring a call from
helmet to mobile phone
To transfer an ongoing call from the helmet to the mobile phone, press
both “” and “” at the same time and keep them pressed for 4
seconds
Conference call function
B3 allows a conference call with Rider and Pillion Passenger.
When a call comes in on a mobile phone connected via Bluetooth to B3, the Rider-Pillion Passenger
intercom is temporarily turned off. However, if you wish to share the phone call with the other helmet,
simply turn on the intercom manually during the phone call (by briefly pressing “on”).
Caution: this function is available only if the Pillion Passenger helmet is also equipped with a N-Com
system provided with the same function.
If you are using the “Universal Intercom”, you need to check whether the other intercom
supports the Conference feature.

B3
17
8. GPS SATELLITE NAVIGATOR FUNCTIONS
B3 is compatible with the most common satellite navigators for motorcycles. By connecting the N-
Com system to the GPS, all instructions will be transferred to the helmet.
Every time the navigator communicates instructions, the intercom via Bluetooth with the Pillion
Passenger is cut off and automatically restored at the end of the communication.
Note: If the navigator is pre-set for connection to a Bluetooth mobile phone, you will be able to
receive the phone call audio directly in the helmet through the GPS. In this case, you can answer
the call directly from the navigator.
GPS Conference Call Function
The Conference function allows you to keep the “Rider-Pillion Passenger” intercom open even while
the satellite navigator is giving instructions, thus preventing the intercom mode to be turned off every
time the navigator gives instructions. However, if you wish to activate the Conference GPS function,
simply turn on the intercom manually during the GPS directions (by briefly pressing “on”).
Caution: this function is available only if the Pillion Passenger helmet is also equipped with a N-Com
system provided with the same function.
If you are using the “Universal Intercom”, you need to check whether the other intercom
supports the Conference feature.
At the end of the GPS communication, the intercom with the second helmet stays open and the
"Conference" setting is stored for future GPS communications.
In case of “Bike-to-Bike” intercom, GPS instructions are only forwarded to the helmet connected to
the navigator, and the intercom communication stays open.
9. STEREO FM RADIO
B3 is equipped with Stereo FM radio with RDS (Radio Data System) technology, which automatically
selects the strongest signal available for the FM radio you want to listen to, regardless of your
location.
Turning on the radio The radio turns on automatically by selecting the “Radio” menu
(scroll through the menu by pressing “on” for 2 seconds).
Turning off the radio The radio turns off when you change the menu item (scroll
through the menu by pressing “on” for 2 seconds)
New station automatic search Press “” and keep it pressed for 2 seconds
Pre-setting a radio station (max.
6 stations) Press “” and keep it pressed for 4 seconds.
This function can also be turned on through PC
using the “N-Com Wizard” programme or
through the “App N-Com” for Smartphone
Android.
Changing radio stations (among
the pre-set ones) Press “” and keep it pressed for 2 seconds
Note: Radio operation does not cut off the audio coming from external audio sources connected via
cable.

EN
18
10. MUSIC VIA BLUETOOTH
You can listen to high quality music by connecting the N-Com system to a device equipped with
Bluetooth A2DP (Advanced Audio Distribution Profile) protocol.
The N-Com system is also equipped with Bluetooth AVRCP (Audio Video Remote Control Profile)
protocol, which allows you to stop and resume music reproduction directly from the helmet (with
devices equipped with AVRCP).
Play music (Play) Press the “” button and keep it pressed for 2 seconds.
Pause function (Pause) When the player is connected and playing music, press “” for 2
seconds.
Next track (Skip) When the player is playing music, press “” for 4 about seconds.
Stop playing music (Stop) Press “” for 2 seconds. The music stops and the A2DP player is
disconnected.
By moving to another function with the menu key, the system automatically disconnects the A2DP
device.
Note: The Bluetooth intercom does not work while listening to an A2DP audio source.
11. MUSIC PLAYER VIA CABLE
N-Com B3 allows connection via cable (sold separately) to audio sources equipped with the 3.5mm
output generally used by these devices for the headsets.
To listen to the audio source, connect the cable to the helmet using the micro-USB port, then start
playing the audio file on the device, then activate the audio peripheral device using the specific key.
Once it is turned on, cable connection stays active even in the subsequent menus. Consequently, you
can hear the device connected via cable even while listening to music via A2DP or via RADIO.

B3
19
12. N-COM RIDER-PASSENGER INTERCOM MODE
In order for two N-Com systems to communicate with one another, they have to be paired up first.
12.1. Intercom affiliation
1. Make sure both N-Com Bluetooth systems are turned off;
2. Set both N-Com Bluetooth systems in Pairing up mode by pressing “on” (for more than 4
seconds), until the LEDS start to flash quickly;
3. On either one of the two helmets, press “on” briefly;
4. After a few seconds, the helmets “recognize” each another, a beep is emitted to signal the pair up
was successful and intercom communication is activated;
5. Turn off both N-Com Bluetooth systems and turn them back on to store the pair up data.
12.2. Intercom function
After carrying out the proper pair up procedure, turn on the two helmets. Intercom connection will be
established automatically (this will take a few seconds. Wait until you hear the vocal confirmation
message). If automatic connection is not possible, proceed with the manual connection.
Manual intercom activation With B3 turned on, briefly press “on”.
Manual intercom deactivation With B3 turned on, briefly press “on”.
13. N-COM BIKE-TO-BIKE INTERCOM
The N-Com system is used for bike-to-bike communication up to a distance of about 500 m (open
terrain, no obstacles).
N.B.: The range and quality of the communication may very significantly depending on the presence
of obstacles, weather conditions, magnetic fields.
N.B.: The range of the communication varies depending on the N-Com systems used.
The B3 system stores up to 4 different B3 systems, so that “calls” can be made to these devices.
So that two B3 systems can communicate with one another in the Bike-to-Bike mode, they must be
paired up first.
13.1. Bike-to-Bike pair up
1. Make sure both N-Com systems are turned off;
2. Set both N-Com systems in Pairing up mode by pressing “on” (for more than 4 seconds),
until the LEDS start to flash quickly;
3. On Helmet 1 press the “memory” button where you wish to store Helmet 2;
Position Button Confirmation beep
A 2 sec. 2 acute beeps
B 2 sec. 2 grave beeps
C 4 sec. 4 acute beeps
D 4 sec. 4 grave beeps
N.B.: If the selected memory setting is taken, you will hear an error beep after which a different
combination must be entered.

EN
20
4. After a few seconds, the helmets “recognize” one another: a confirmation beep is given in
Helmet 2 that indicates the memory setting where Helmet 1 is stored and Intercom
communication is established;
N.B.: if all the memory settings are free, Helmet 2 will store Helmet 1 in position A (see diagram in
Chapter 13.1). In case that setting is taken, the following one will be selected according to the
sequence listed in the table.
You can display the memory settings of your device (and check the names of the
paired up devices) using the “N-Com Wizard” programme for PC or through the
“App N-Com” for Smartphone Android.
To make it easier to recognize the N-Com systems paired up in “Bike-to-Bike”
mode, you can rename them using the “N-Com Wizard”.
13.2. Making a Bike-to-Bike call
To make a call to another bike that has been previously paired up, go to the Bike-to-Bike menu and
press the button assigned to the helmet to which you want to make the call.
The corresponding tone will be heard in your helmet, after which the call to the selected helmet is
made.
N.B.: In case the memory setting is empty, or the other helmet cannot be reached, an error tone will
sound in your helmet.
13.3. Taking a Bike-to-Bike call
Four calling tones will sound in the helmet receiving the Bike-to-Bike call, and all open audio
functions will be temporarily cut off (including the Rider – Pillion Passenger intercom, if any). The call
can be answered by briefly pressing any key when you hear the ringtone signal.
In case you take the call, communication is automatically established. In case the call is not answered,
the system returns to the situation prior to receiving the call.
N.B.: you can cut off Bike-to-Bike communication from anywhere in the menu by briefly pressing “on”.
Bike-to-Bike intercom communication differs from the Rider-Pillion Passenger kind for certain specific
characteristics:
The audio coming from an external source (connected via cable or Bluetooth) IS NOT shared
with the helmet connected in Bike-to-Bike Intercom mode.
The audio coming from the radio IS NOT shared with the helmet connected in Bike-to-Bike
Intercom mode.
In case the bike-to-bike intercom mode is on and there is no connection with the other Rider
due to out-of-range distances, the two helmets will be automatically reconnected as soon as
the distance is reduced within a range where communication is possible. The search for
automatic reconnection lasts 2 minutes, at the end of which reconnection must be carried out
through the “Bike-to-Bike Call”.
For additional information, please visit the website www.n-com.it
Table of contents
Other N-Com Automobile Accessories manuals