Nailor BAC-8001-36 User manual

Nailor reserves the right to change any information concerning product or specification without notice or obligation.
IOM-EZVAVINST
Date: 10-2016 Supersedes: 7-2016
www.nailor.com
EZvav Digital Controls

IOM-EZVAVINST
Date: 10-2016 Supersedes: 7-2016
Nailor reserves the right to change any information concerning product or specification without notice or obligation.
Page 2 of 48
Installation and Operation Manual ●EZvav Digital Controls
CONTENTS
SECTION 1: About the controllers ............................................4
Specicaons.....................................................................5
Safetyconsideraons ..............................................................7
SECTION2:Installingthecontrollers..........................................7
Sengtherotaonlimits...........................................................7
MounngonaVAVTerminalUnit ....................................................8
Connecnganairowsensor ........................................................9
Connecnginputsandoutputs ......................................................9
Connecngroomtemperaturesensors ................................................9
ConnecngaDATsensor...........................................................10
Connecngpower ................................................................10
Maintenance ....................................................................10
SECTION3:InstallingtheRoomSensors......................................11
Choosingasensorlocaon .........................................................11
Rough-inpreparaon .............................................................11
Mount the sensors ...............................................................11
Operaon.......................................................................12
Maintenance ....................................................................12
Planninggotmoonsensing .......................................................12
SECTION4:Changingtheroomsetpoint .....................................13
SECTION5:Conguringthecontrollers. . . . . . . . . . . . . . . . . . . . . . . . . . . . . . . . . . . . . . . 14
Gengstartedwithconguraon...................................................14
Enteringsystemtemperaturesetpointsandlimits .....................................15
ConguringtheVAVTerminalUnitopons ............................................17
Settheairowsetpoints ..........................................................19
Advancedopons ................................................................21
Restoreapplicaon ...............................................................23
SECTION6:Balancingairow ..............................................24
Quickstartconguraonguide-EZvavsensors&controllers .............................28

IOM-EZVAVINST
Date: 10-2016 Supersedes: 7-2016
Nailor reserves the right to change any information concerning product or specification without notice or obligation.
Page 3 of 48
Installation and Operation Manual ●EZvav Digital Controls
CONTENTS (Con’t)
SECTION7:Applicaondrawings ...........................................29
Coolingorheangwithoutreheat ...................................................29
Stagedreheat....................................................................30
Modulangreheat ...............................................................31
Floangreheat. . . . . . . . . . . . . . . . . . . . . . . . . . . . . . . . . . . . . . . . . . . . . . . . . . . . . . . . . . . . . . . . . . .32
Dual-ductapplicaon .............................................................33
SECTION8:Sequencesofoperaon .........................................34
Input sources ....................................................................34
Occupancysequence..............................................................35
Spacesetpoints..................................................................35
PIDcontrolloops .................................................................36
AirowSetpointsSequence........................................................36
Changeover .....................................................................36
DischargeAirTemperature(DAT)liming .............................................37
Systemdiagnoscs ...............................................................37
Damperoperaon ................................................................38
Fanoperaon....................................................................38
Reheatsequence .................................................................39
Balancingairowsequence ........................................................40
Dualduct .......................................................................40
SECTION9:Systemintegraonandnetworking ...............................41
ConnecngtoanMS/TPnetwork ...................................................41
Sengupnetworkcommunicaons .................................................42
BACnet objects ..................................................................44
ADDITIONALTOPICS
DiamondowsensorK-factorsforVAVTerminalUnits ..................................47
Accessoriesandreplacementparts ..................................................48

IOM-EZVAVINST
Date: 10-2016 Supersedes: 7-2016
Nailor reserves the right to change any information concerning product or specification without notice or obligation.
Page 4 of 48
Installation and Operation Manual ●EZvav Digital Controls
Secon 1: About the Controllers
This secon provides a descripon of the EZvav series of controllers. It also introduces safety informaon. Review this material
before selecng, installing, or operang the controllers.
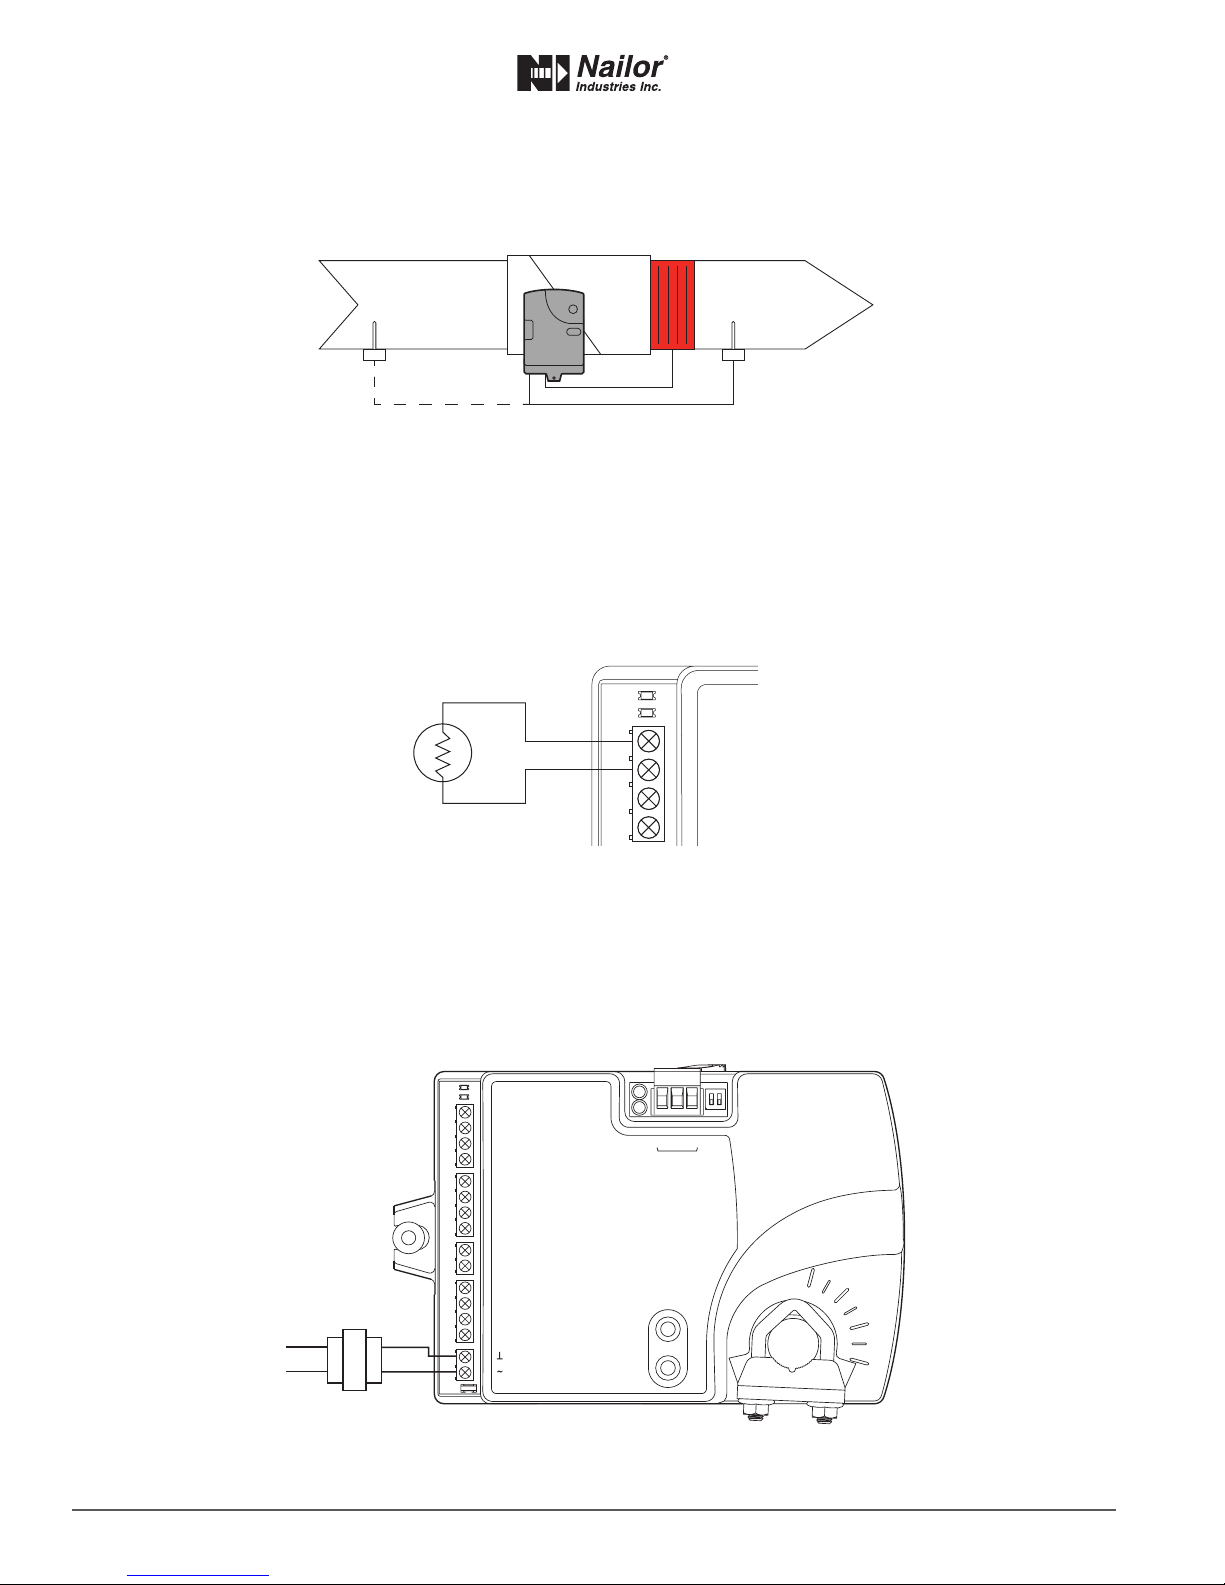
The EZvav series of controllers are an easy and unique approach to operang a wide variety of VAV terminal units. The integrated
actuators, internal airow sensors, and wide variety of applicaon programs make these BACnet Applicaon Specic controllers
ideal for either new or retrot installaons.
The controllers feature simple, menu driven setup choices when used with a EZvav digital sensor. No special programming skills
or soware tools are required to choose applicaons, enter set points, set network addressing, and balance airow. All opons
can be set by using a STE-8001W36 sensor and can be installed as the permanent room sensor or temporarily connected as a
technician’s service tool.
All models are BACnet Applicaon Specic Controllers that are ready to connect to a BACnet MS/TP network. Device instance,
MAC address, and baud rate are set from an STE-8001W36 without special soware.
Model BAC-8001-36 is supplied with inputs, outputs, and sequences of operaon for the following funcons.
• Single duct heang and cooling VAV.
• Automac heang/cooling changeover including morning warm up.
• Occupancy setback—requires STE-8201W36.
• System diagnosc indicators.
• Airow balancing.
Model BAC-8005-36 and BAC-8205-36 are supplied with inputs, outputs, and sequences of operaon for the following funcons.
• Single duct heang and cooling VAV.
• Modulang, oang, and staged reheat.
• Series and parallel fan control.
• Automac heang/cooling changeover including morning warm up.
• Discharge air temperature liming.
• Occupancy setback—requires STE-8201W36.
• Actuator posion feedback for true damper posioning (BAC-8205-36 only).
• System diagnosc indicators.
• Airow balancing.
Model BAC-8007-36 is supplied with inputs, outputs, and sequences of operaon for the following funcons.
• Dual duct VAV heang and cooling.
• Occupancy setback—requires STE-8201W36.
• System diagnosc indicators.
• Airow balancing.
Addional topics in this secon
Specicaons ......................................................................................................................................5
Safety consideraons ..........................................................................................................................7

IOM-EZVAVINST
Date: 10-2016 Supersedes: 7-2016
Nailor reserves the right to change any information concerning product or specification without notice or obligation.
Page 5 of 48
Installation and Operation Manual ●EZvav Digital Controls
Specicaons
EZvav specicaons are subject to change without noce.
Inputsandoutputs
All inputs and outputs are factory programmed and applicaon specic. No eld conguraon is required. For details on input and
output connecons, see the topic Applicaon drawings on page 29. For a detailed lisng of input and output objects, see the topic
BACnet objects on 44.
Analoginputs
Analog inputs represent BACnet analog input. Not all input are applicable or required for all models.
Key features IP/SI standard units of measure.
Overvoltage input protecon
Connectors RJ-45 room sensor jack
Screw terminals for wire sizes 12 – 26 AWG
Conversion 12 – bit analog–to–digital conversion
Input range Passive, 10 kΩ pull-up to 3.3 volts DC
Analogoutputs
Analog outputs are congured to represent BACnet analog output objects. No eld conguraon is required. For details on
applicaon specic output connecons see the secon Applicaon drawings on page 29.
Key features Output short protecon
IP/SI standard units of measure
Connector Screw terminals for wire size 12 – 26 AWG
Conversion 12 – bit digital-to-analog conversion
Output voltage 0 – 10 VDC
Output current 30 mA per output, 30 mA total for all analog outputs
Binaryoutputs
Binary outputs are congured to represent BACnet binary output objects. No eld conguraon is required. For details on
applicaon specic output connecons see the secon Applicaon drawings on page 29.
Key features Opcally isolated triac output
Connector Screw terminals for wire size 12 – 26 AWG
Output range Maximum switching 24 Volts AC
1 ampere per external output, 3 amperes total
Communicaons—BACnetMS/TP
• EIA – 485 operang at rates up to 76.8 kilobaud.
• Removable screw terminal block.
• Wire size 12 – 26 AWG.
• Switch selected end of line terminaon.
Memory
• Programs and program parameters are stored in nonvolale memory.
• Auto restart on power failure.
Airowsensorfeatures
• Congured as BACnet analog input object.
• CMOS dierenal pressure 0 – 2 inches of water (0 – 500 Pa) measurement range. Internally linearized and temperature
compensated.
• Span accuracy 4.5% of reading.
• Zero point accuracy 0.0008 in. H2O/0.2 Pa at 77°F (25°C).
• Barbed connecons for 1/4 inch (6.35 mm) FR tubing.

IOM-EZVAVINST
Date: 10-2016 Supersedes: 7-2016
Nailor reserves the right to change any information concerning product or specification without notice or obligation.
Page 6 of 48
Installation and Operation Manual ●EZvav Digital Controls
ActuatorSpecicaons
Torque 40 in-lb. (4.5 N.m)
Angular rotaon 0 to 95°
Adjustable end stops at 45° and 60° rotaon
Motor ming 90 sec./90° at 60 Hz
BAC-8001-36,BAC-8005-36, BAC-8007-36 108 sec./90° at 50 Hz
Motor ming BAC-8205-36 60 sec./90° at 60 Hz
Sha size Directly mounts on 3/8 to 5/8 inch (9.5 to 16 mm) round or 3/8 to 7/16 inch
(9.5 to 11 mm) square damper shas.
Regulatory
• UL 916 Energy Management Equipment.
• BACnet Tesng Laboratory listed as an applicaon specic controller (ASC).
• CE compliant.
• SASO PCP Registraon KSA R-103263.
• FCC Class B, Part 15, Subpart B and complies with Canadian ICES-003 Class B.
This device complies with part 15 of the FCC Rules. Operaon is subject to the following two condions: (1) This device
may not cause harmful interference, and (2) this device must accept any interference received, including interference that
may cause undesired operaon.
Installaon
Supply voltage 24 volts AC, -15%, +20% 5 VA, 50/60 Hz
Weight 13.2 ounces (376 grams)
Case material Flame retardant plasc
Environmentallimits
Operang 32 to 120° F (0 to 49° C)
Shipping –40 to 140° F (–40 to 60° C)
Humidity 5 – 93% relave humidity (non condensing)
Dimensions
1.92" (49)
4.25" (108)
0.77"
(19)
6"
(152)
6.53"
(166)
4.89"
(124)
4.14" (54)

IOM-EZVAVINST
Date: 10-2016 Supersedes: 7-2016
Nailor reserves the right to change any information concerning product or specification without notice or obligation.
Page 7 of 48
Installation and Operation Manual ●EZvav Digital Controls
SafetyConsideraons
Nailor assumes the responsibility for providing you a safe product and safety guidelines during its use. Safety means protecon to
all individuals who install, operate, and service the equipment as well as protecon of the equipment itself. To promote safety, we
use hazard alert labeling in this manual. Follow the associated guidelines to avoid hazards.
Note: Notes provide addional informaon that is important.
Tip: Provides programing ps and shortcuts that may save me.
Secon2:InstallingtheControllers
This secon provides important instrucons and guidelines for installing the Nailor EZvav controllers. Carefully review this
informaon before installing the controller.
Installing Nailor EZvav includes the following topics that are covered in this secon.
Installaon topics in this secon
Seng the rotaon limits ...................................................................................................................7
Mounng on a VAV terminal box ........................................................................................................8
Connecng an airow sensor .............................................................................................................9
Connecng inputs and outputs ..........................................................................................................9
Connecng room temperature sensors ..............................................................................................9
Connecng a DAT sensor ..................................................................................................................10
Connecng power.............................................................................................................................10
Maintenance .....................................................................................................................................10
SengtheRotaonLimits
Nailor EZvav controllers are manufactured for a damper that rotates 90 degrees from open to close. If the VAV damper is not a 90
degree damper, set the rotaon limits to 45 or 60 degrees before mounng the controller.
DANGER represents the most severe hazard
alert. Bodily harm or death will occur if danger
guidelines are not followed.
CAUTION indicates potenal personal injury or
equipment or property damage if instrucons
are not followed.
WARNING represents hazards that could result
in severe injury or death.
CAUTION Seng rotaon limits that do not
match the VAV damper may result in improper
operaon or equipment damage.

IOM-EZVAVINST
Date: 10-2016 Supersedes: 7-2016
Nailor reserves the right to change any information concerning product or specification without notice or obligation.
Page 8 of 48
Installation and Operation Manual ●EZvav Digital Controls
Figure2-1 Controllerrotaonlimitselecons
To set the rotaonal limits, do the following:
1. Turn the controller over so you have access to the back.
2. Manually rotate the actuator fully clockwise as viewed from the back.
3. Remove the stop screw from its storage locaon and clean any debris from the threads.
4. Insert the screw into the correct stop posion hole.
5. Tighten the screw only unl the head touches the plasc in the boom of the recess.
MounngonaVAVTerminalUnit
Mount the controller inside of a metal enclosure. To maintain RF emissions specicaons, use either shielded connecng cables
or enclose all cables in conduit.
Mount the controller directly over the damper sha. A minimum sha length of 2.0 inch (51 mm) is required.
Note: Nailor EZvav controllers are designed to directly mount to 3/8 to 5/8 inch (9.5 to 16 mm) round or 3/8 to 7/16 inch (9.5 to
11 mm) square damper shas.
Figure2-2 Controlandindicators
45
60
Position notch as shown
Stop position holes
Stop screw in storage
Rotate CW
ON CTS
1 2
COMM
READY
AI1
AI5
GND
AO4
AO3
SC
BO8
BO5
BO6
SC
BO7
24VAC
AI6
GND
AI7
T-STAT/
SENSOR
-A
+B
S
EOL
BACnet MS/TP
Status LEDs
Mounting
tab
Mounting
bushing
Gear clutch button
Drive hub
and V-bolt
Mount the controller as follows:
1. Manually rotate the damper on the VAV box to the fully closed posion.
2. On the controller, press the gear clutch buon and rotate the drive hub in the same direcon that closed the
damper. Turn the hub unl it reaches a rotaon limit, then rotate 2° in the opposite direcon and release clutch.
3. Loosen the nuts on the V-bolt unl the damper sha can t through the collar.
4. Place the controller over the damper sha.
5. Finger ghten the nuts on the V-bolt to posion the sha in the drive hub
6. Center the mounng bushing in the mounng tab and fasten it with a #8 sheet metal screw.
7. Evenly ghten the V-bolt nuts on the drive hub to 30-35 in-lbs (3.34 – 3.95 N.m).

IOM-EZVAVINST
Date: 10-2016 Supersedes: 7-2016
Nailor reserves the right to change any information concerning product or specification without notice or obligation.
Page 9 of 48
Installation and Operation Manual ●EZvav Digital Controls
ConnecnganAirowSensor
An airow sensor is incorporated as one of the inputs to the controller. Remove the plugs and connect the tubing from the pitot
assembly to the airow sensor inputs next to the drive hub.
Figure2-3 Airowsensorinputs
Diamond ow sensors are supplied by Nailor as part of the VAV terminal unit. If a sensor is needed, choose a sensor listed in the
topic Accessories and Replacement Parts on page 48. For more informaon on Nailor’s ‘Diamond Flow’ Sensor, see page 48 or
refer to Nailor website.
ConnecngInputsandOutputs
Nailor EZvav series controllers have precongured inputs and outputs to support only the supplied programs and applicaons.
• For input and output connecon informaon, see the topic Applicaon drawings on page 29.
• To connect room temperature sensors, see the topic Connecng room temperature sensors on page 9.
• To connect a DAT sensor, see the topic Connecng a DAT sensor on page 10.
• For the BACnet object descripons of the inputs and outputs, see the topic BACnet objects on page 44.
ConnecngRoomTemperatureSensors
Connect any of the following sensors to the RJ-45 thermostat and sensor jack. The controller automacally detects the type of
sensor. No programming or conguraon is required.
• STE-6014W36
• STE-8001W36
• STE-8201W36
Connect the controller to sensors with standard Ethernet cables up to 75 feet long.
Figure2-4 Connecngtoasensor
Ethernet cable
Maximum 75 feet
ON CTS
1 2
COMM
READY
24VAC
T-STAT/
SENSOR
-A
+B
S
EOL
BACnet MS/TP
Static airflow (low)
Static airflow
(low)
Total airflow
(high)
Diamond Flow
Sensor
Total airflow (high)
EZvav
Digital Controller

IOM-EZVAVINST
Date: 10-2016 Supersedes: 7-2016
Nailor reserves the right to change any information concerning product or specification without notice or obligation.
Page 10 of 48
Installation and Operation Manual ●EZvav Digital Controls
ConnecngaDATSensor
The Discharge Air Temperature sensor is required for automac changeover and for VAV terminal units with reheat.
Figure2-5 Dischargeairtemperaturesensorlocaon
Connect a 10 kΩ, Type 3 thermistor temperature probe to the discharge air temperature input. The input includes the internal
pull-up resistor. An STE-1401 sensor is suitable for this applicaon. Follow the instrucons supplied with the sensor for installaon,
or refer to pages 11-12 for this informaon.
• For DAT liming and reheat, install the sensor in the airow aer the reheat secon. See the topic, Advanced opons on
page 21 to enable discharge air temperature control.
• When the DAT sensor is used only to detect primary air temperature, the sensor can be placed in either locaon shown in
the Figure Discharge air temperature sensor locaon.
Figure2-6 Dischargeairtemperatureinputdetails
ConnecngPower
The controllers require a 24 volt, AC power source. Use the following guidelines when choosing and wiring transformers to the
controller.
• A Class – 2 transformer is supplied with each unit.
Connect the 24 volt AC power supply to the power terminal block on the lower right side of the controller. Connect the ground
side of the transformer to the ground terminal and the AC phase to the phase terminal. Power is applied to the controller when
the transformer is connected to power.
Figure2-7 Controllerpowerterminals
Maintenance
Nailor EZvav controllers require no roune maintenance. If necessary, clean with a damp cloth and mild soap.
T
COMM
READY
AI1
GND
AO4
AO3
24 VAC
Class 2
ON CTS
1 2
COMM
READY
AI1
AI5
GND
AO4
AO3
SC
BO8
BO5
BO6
SC
BO7
24VAC
AI6
GND
AI7
T-STAT/
SENSOR
-A
+B
S
EOL
BACnet MS/TP
DAT sensor
Preferred location
DAT sensor
Changeover only

IOM-EZVAVINST
Date: 10-2016 Supersedes: 7-2016
Nailor reserves the right to change any information concerning product or specification without notice or obligation.
Page 11 of 48
Installation and Operation Manual ●EZvav Digital Controls
Secon3:InstallingtheRoomSensors
An airow sensor is incorporated as one of the inputs to the controller. Remove the plugs and connect the tubing from the pitot
assembly to the airow sensor inputs next to the drive hub.
EZvavSensors:
This applies to EZvav digital display wall sensors connected to EZvav controllers.
Choosingasensorlocaon
Install the sensor on an inside wall where it can sense the average room temperature. Avoid locaons with direct sunlight, heat
sources, windows, air vents, and air circulaon obstrucons such as curtains or furniture.
For models with moon sensing, see the topic on the page 12, Planning for moon sensing.
Rough-inpreparaon
Complete rough-in wiring at each sensor locaon prior to sensor installaon. This includes the following items:
• If required, install an appropriate backplate.
• Route an Ethernet connecng cable from the sensor to the controller locaon.
• Maximum cable length is 75 feet (22.9 meters). Plenum-rated preassembled cables are recommended.
Mount the sensors
To install the sensor on a mounng base, do the following:
1. Turn the Allen screws in the base of the sensor clockwise unl they clear the case. Swing the sensor away from the
mounng base to remove it.
STE-8001W36
DigitalDisplay
STE-8201W36
DigitalDisplaywithOccupancySensor
Mounng
Base
EthernetConnecng
Cable
Maximum75feet
(22.9meters) Allen
Screws
Turnscrewsclockwiseto
removesensorcasefrombase.

IOM-EZVAVINST
Date: 10-2016 Supersedes: 7-2016
Nailor reserves the right to change any information concerning product or specification without notice or obligation.
Page 12 of 48
Installation and Operation Manual ●EZvav Digital Controls
Turncounterclockwiseunlthe
screwsengagethecase.
2. Route the Ethernet cable through the mounng base.
3. Fasten the mounng base directly to a 2 x 4 inch (51 x 102 mm) outlet box or a backplate with the Allen screws toward
the oor.
4. Insert the Ethernet cable coming from the base into the sensor.
5. Place the top of the sensor over the top of the mounng base and swing it down over the Allen screw brackets. Be
careful not to pinch any wiring.
6. Turn the Allen screws counterclockwise unl they back out of the mounng base and engage the case of the sensor.
Operaon
The sensor will become operaonal as soon as it is connected to an operaonal controller. See the following pages to change room
set points or congure a EZvav controller with the sensor.
Maintenance
Remove dust as necessary from holes in top and boom. Clean the display with so, damp cloth and mild soap.
Planningformoonsensing
For moon sensing models only — Mount the sensor on a wall that will
have an unobstructed view of the typical trac in the coverage area. When
choosing a locaon, do not install the sensor in the following areas.
• Behind curtains or other obstrucons.
• In locaons that will expose it to direct sunlight or heat sources.
• Near a heang or cooling inlet or outlet.
The eecve detecon range is approximately 33 feet (10 meters). Factors
that may reduce the range may include the following items.
• The dierence between the surface temperature of the object and
the background temperature of the room is too small.
• Object movement in a direct line toward the sensor.
• Very slow or very fast object movement.
• Obstrucons in the shaded area of the diagram
Typical moon sensing coverage.
False detecons may be triggered by any of the following
condions.
• The temperature inside the detecon range
suddenly changes because of the entry of cold or
warm air from an air-condioning or heang unit.
• The sensor being directly exposed to sunlight, an
incandescent light, or other source of far-infrared
rays.
• Small animal movement.
Typicalmoonsensingcoverage
Moonsensorvercalandhorizontalpaerns
Sideview Topview

IOM-EZVAVINST
Date: 10-2016 Supersedes: 7-2016
Nailor reserves the right to change any information concerning product or specification without notice or obligation.
Page 13 of 48
Installation and Operation Manual ●EZvav Digital Controls
Secon4: ChangingtheRoomSetPoint
This secon covers topics for the end user.
Changing the EZvav user funcons with an STE-8001W36 or STE-8201W36 are limited to changing the acve set points in a room.
The set points are entered or changed using the buons and display on the front of the sensor.
Quick start to changing set points
1. Press any buon to begin changing set points.
2. If required, enter Password 1.
3. Press the up
∆
or down
∆
buons to change a set point value.
4. Press the buon to save the value or advance to the next funcon.
To enter or change the acve set points you may need Password 1 .
Tip: Once the following procedure is started, all steps must be completed in order.
ChangingRoomSetPoints
PROCEDURE STEPS STEDISPLAY
1 Starng display Start from the temperature display.
2 Enter Password 1
1. Press any buon. The display changes to PSW1.
2. Press the
∆
or
buons to change the rst digit.
3. Press the buon to select the next digit. Repeat
for all four digits.
Note: If Password 1 has not previously been entered,
the display will change to the occupied cooling set point
display aer Step 1.
3 Set the acve cooling set point.
1. Press the
∆
or
buons to change the cooling
set point temperature. The set point changes in
increments of 0.5 degrees.
2. Press the buon to save the value.
The display advances to set the heang set point.
4 Set the acve heang set point.
1. Press the
∆
or
buons to change the heang
set point temperature. The set point changes in
increments of 0.5 degrees.
2. Press the buon to save the value.
The display returns to the temperature display.
∆
∆
∆

IOM-EZVAVINST
Date: 10-2016 Supersedes: 7-2016
Nailor reserves the right to change any information concerning product or specification without notice or obligation.
Page 14 of 48
Installation and Operation Manual ●EZvav Digital Controls
Secon5:ConguringtheControllers
This topics in this secon are advanced topics for control technicians and engineers.
The conguraon funcons that are accessible through an STE-8000 series sensor are all of the values and sengs that are
entered during the installaon and commissioning of a VAV terminal unit. Typically, these funcons do not change aer the
installaon and commissioning process.
To set up the conguraon funcons, you will need the following items and informaon.
• Details about the VAV terminal unit including the conguraon for fans and reheat.
• An STE-8001W36 or STE-8201W36 to use as a conguraon tool.
• The building automaon system plans for controllers connected to a network.
Users may change the acve heang and cooling set points without accessing the conguraon funcons. This procedure is
covered in the topic Changing the Room Set Point on page 13.
Note: The instrucons for the conguraon funcons cover all of the funcons that an STE-8000 sensor can set up in the EZvav
series of controllers. Not all funcons are available on every model of controller.
Conguraontopics
Geng started with conguraon ...................................................................................................14
Entering system temperature set points and limits ..........................................................................15
Conguring the VAV Terminal Unit opons ......................................................................................17
Set the airow set points ..................................................................................................................19
Advanced opons .............................................................................................................................21
Restore Applicaon ...........................................................................................................................23
GengStartedwithConguraon
For access to the conguraon funcons you will need Password 2 .
• If the controller has not been previously set up, no password is required.
• A new Password 2 can be entered or changed in the advance funcons. See the topic Advanced opons on page 21
Entertheconguraonmode
PROCEDURE STEPS STEDISPLAY
1 Starng display
1. Start at the temperature display.
2. Press the
∆
and
buons together.
• If Password 2 is not required, the display changes to CNFG.
• If required, enter Password 2. The display changes to CNFG
when Password 2 is correct.
2 Enter Password 2
1. Press the
∆
and
buons together and hold them down unl the
display changes to PSW2.
2. Press the
∆
or
buon to change the rst digit.
3. Press the buon to select the next digit. Repeat for all four digits.
4. When the buon is pushed for the fourth correct digit, the display
changes to COMM.
Note: If Password 2 has not previously been entered the display will
change to the CNFG display aer Step 1.
3 Select a
conguraon
funcon.
Access to the conguraon funcons always start at the CNFG display.
∆
∆
∆

IOM-EZVAVINST
Date: 10-2016 Supersedes: 7-2016
Nailor reserves the right to change any information concerning product or specification without notice or obligation.
Page 15 of 48
Installation and Operation Manual ●EZvav Digital Controls
EnteringSystemTemperatureSetPointsandLimits
The system temperature set points set the operaonal parameters and limits for the VAV terminal unit.
The temperature set points include the following items.
• Minimum cooling and maximum heang set points
• Occupied and unoccupied cooling set points
• Occupied and unoccupied heang set points
• Changeover dierenal set point
• Standby dierenal set point
Seng the temperature set points requires entering Password 2 which is described in detail in the topic Geng started with
conguraon on page 14.
Tip: Once the following procedure is started, all steps must be completed in order.
Proceduretosetthetemperaturesetpoints
PROCEDURE STEPS STEDISPLAY
1 Start at the temperature display.
1. Start at the temperature display.
2. Press the
∆
and
buons together.
• If Password 2 is not required, the display changes
to CNFG.
• If required, enter Password 2. The display changes
to CNFG when Password 2 is correct.
2 Set the minimum cooling set
point.
1. From the CNFG display, press the
∆
or
buons
to show STPT.
2. Press the buon to select the CNFG opons.
The display changes to STPT.
3. Press the buon to select STPT. The display
changes to MIN.
3 Set the maximum heang set
point.
This set point limits the highest temperature a user can
enter as the acve set point.
1. Press the
∆
or
buons to set the maximum
heang set point. The set point will change in 0.5°
increments.
2. Press the buon to save the set point and
advance to the next funcon.
4 Set the occupied cooling set point.
This set point is used as the acve set point when the
space is occupied.
1. Press the
∆
or
buons to set the occupied
cooling set point. The set point will change in 0.5°
increments.
2. Press the buon to save the set point and
advance to the next funcon.
∆
∆
∆
∆

IOM-EZVAVINST
Date: 10-2016 Supersedes: 7-2016
Nailor reserves the right to change any information concerning product or specification without notice or obligation.
Page 16 of 48
Installation and Operation Manual ●EZvav Digital Controls
Proceduretosetthetemperaturesetpoints(connue)
PROCEDURE STEPS STEDISPLAY
5 Set the occupied cooling set point.
This set point is used as the acve set point when the
space is occupied.
1. Press the
∆
or
buons to set the occupied
cooling set point. The set point will change in 0.5°
increments.
2. Press the buon to save the set point and
advance to the next funcon.
Note: This set point can also be changed as described in
the topic Changing the room set point on page 13.
6 Set the occupied heang set
point.
This set point is used as the acve set point when the
space is occupied.
1. Press the
∆
or
buons to set the occupied
heang set point. The set point will change in 0.5°
increments.
2. Press the buon to save the set point and
advance to the next funcon.
Note: This set point can also be changed as described in
the secon Changing the room set point on page 13.
7 Set the unoccupied cooling set
point.
This set point is used as the acve set point when the
space is unoccupied.
1. Press the
∆
or
buons to set the unoccupied
cooling set point. The set point will change in 0.5°
increments.
2. Press the buon to save the set point and
advance to the next funcon.
8 Set the unoccupied heang set
point.
This set point is used as the acve set point when the
space is unoccupied.
1. Press the
∆
or
buons to set the unoccupied
heang set point. The set point will change in 0.5°
increments.
2. Press the buon to save the set point and
advance to the next funcon.
9 Set the supply air temperature
changeover set point.
Not used in all models.
This set point sets the supply air temperature at which
the controller will change between heang to cooling.
1. Press the
∆
or
buons to set the changeover set
point. The set point will change in 1° increments.
2. Press the buon to save the set point and
advance to the next funcon.
10 Set the minimum temperature
dierenal set point.
The minimum allowable temperature value between
the cooling and heang set points.
1. Press the
∆
or
buons to set the dierenal set
point. The set point will change in 1° increments.
2. Press the buon to save the set point and
advance to the next funcon.
∆
∆
∆
∆
∆
∆

IOM-EZVAVINST
Date: 10-2016 Supersedes: 7-2016
Nailor reserves the right to change any information concerning product or specification without notice or obligation.
Page 17 of 48
Installation and Operation Manual ●EZvav Digital Controls
Proceduretosetthetemperaturesetpoints(connue)
ConguringtheVAVTerminalUnitOpons
The unit opons set the controller for the specic mechanical installaon of the VAV terminal unit. The unit opons include the
following items.
• The K-factor for the VAV terminal unit. If the K-factor is not available, see the topic K-factors on page 47.
• Reheat conguraon (oponal)
• Fan conguraon (oponal)
• Direcon of damper to close
Seng the unit opons requires entering Password 2 which is described in the topic Geng started with conguraon on page 14.
Tip: Once the following procedure is started, all steps must be completed in order.
ProceduretosettheTerminalUnitfuncons
PROCEDURE STEPS STEDISPLAY
11 Set the standby dierenal set
point.
The standby set point is calculated by adding or
subtracng the oset value to or from the value of the
occupied set point.
1. Press the
∆
or
buons to set the standby
dierenal set point. The set point will change in 1°
increments.
2. Press the buon to save the set point and
advance to the next funcon.
12 Select a new conguraon
funcon or exit.
1. Press the
∆
or
buons to select one of the
following:
•
BOX, FLOW, ADVC, or RSTR opons
•
BACK to choose another conguraon
funcon.
•
EXIT to return to the temperature display.
2. Press the buon to select the next funcon.
PROCEDURE STEPS STEDISPLAY
1 Starng display
1. Start at the temperature display.
2. Press the
∆
and buons together.
• If Password 2 is not required, the display changes to
CNFG.
• If required, enter Password 2. The display changes to
CNFG when Password 2 is correct.
∆
∆
∆

IOM-EZVAVINST
Date: 10-2016 Supersedes: 7-2016
Nailor reserves the right to change any information concerning product or specification without notice or obligation.
Page 18 of 48
Installation and Operation Manual ●EZvav Digital Controls
ProceduretosettheTerminalUnitfuncons(connue)
PROCEDURE STEPS STEDISPLAY
2 Select the box sengs display.
1. From the CNFG display, press the
∆
or buons
to show the BOX display.
2. Press the buon to select the CNFG opons.
The display changes to STPT.
3. Press the
∆
or buons to change the display to
BOX.
4. Press the buon to select BOX.
3 Set the primary VAV terminal unit
K factor.
Refer to the K-factor label on the controls enclosure
door of the terminal unit for appropriate value. You can
also refer to page 43, visit www.nailor.com or contact
your local Nailor Representave for more details.
1. Press the
∆
or buons to set the primary K-factor.
2. Press the buon to save the entry and advance to
the next funcon.
4 Set the secondary VAV terminal
unit K factor.
Not used in all models.
1. Press the
∆
or buons to set the secondary
K-factor.
2. Press the buon to save the entry and advance to
the next funcon.
5 Set the mode of reheat for the
terminal unit.
Not used in all models.
1. Press the
∆
or buons to choose one of the
following reheat opons.
None—Reheat is not enabled.
Staged—Enables staged reheat.
Modulang—The analog reheat output varies from
0—10 volts DC.
Floang—The reheat outputs control a tristate
actuator.
2. Press the buon to save the reheat opon and
advance to the next funcon.
6 Set the fan opon.
Not used in all models.
1. Press the
∆
or buons to choose one of the
following fan opons.
None—No fan is connected to the controller.
• Models: 3001, 30RE and 30RW, 3600
Series—The VAV unit includes a series fan.
• Model Series: 35S(ST), 35SE(ST), 35SW(ST),
37S(ST), 37SE(ST) and 37SW(ST), 38S/SE/SW
Parallel—The VAV unit includes a parallel fan.
• Models: 35N, 37N, 35NE, 35NW, 37NE and 37NW
2. Press the buon to save the fan opon and
advance to the next funcon.
∆
∆
∆
∆
∆
∆

IOM-EZVAVINST
Date: 10-2016 Supersedes: 7-2016
Nailor reserves the right to change any information concerning product or specification without notice or obligation.
Page 19 of 48
Installation and Operation Manual ●EZvav Digital Controls
ProceduretosettheTerminalUnitfuncons(connue)
SettheAirowSetPoints
The airow set points set the airow limits for the VAV terminal unit.
• Airow heang and cooling minimum and maximum limits
• Auxiliary ow set point (oponal)
• Minimum and maximum fan speeds (oponal)
Seng the airow set points requires entering Password 2 which is described in the topic Geng started with conguraon on
page 14.
Note: If the VAV unit is a heat only or cooling only unit, the airow set points for the unused mode must be set within the range
of the mode in use. Failure to set the unused set points correctly will result in unpredictable or erroneous air balancing sengs.
Tip: Once the following procedure is started, all steps must be completed in order.
Proceduretosettheairowsetpoints
PROCEDURE STEPS STEDISPLAY
7 Set the damper direcon to close.
1. Press the
∆
or buons to which direcon to
damper moves to close.
CCW—The actuator turns counterclockwise to close
the damper.
CW—The actuator turns clockwise to close the
damper. (Default)
2. Press the buon to save the damper opon and
advance to the next funcon.
8 Select a new conguraon
funcon or exit.
1. Press the
∆
or buons to select one of the
following:
• STPT, FLOW, ADVC or RSTR opons
• BACK to choose another conguraon funcon
• EXIT to return to the temperature display.
2. Press the buon to select the next funcon.
∆
∆
PROCEDURE STEPS STEDISPLAY
1 Starng display
1. Start at the temperature display.
2. Press the
∆
and buons together.
• If Password 2 is not required, the display changes to
CNFG.
• If required, enter Password 2. The display changes to
CNFG when Password 2 is correct.
∆

IOM-EZVAVINST
Date: 10-2016 Supersedes: 7-2016
Nailor reserves the right to change any information concerning product or specification without notice or obligation.
Page 20 of 48
Installation and Operation Manual ●EZvav Digital Controls
Proceduretosettheairowsetpoints(connue)
PROCEDURE STEPS STEDISPLAY
2 Select the set point sengs
display.
1. From the CNFG display, press the
∆
or buons
to show the CNFG display.
2. Press the buon to select the CNFG opons.
The display changes to STPT.
3. Press the
∆
or buons to change the display to
FLOW.
4. Press the buon to select FLOW. The display
changes to MNCL.
3 Set the cooling minimum airow
limit.
1. Press the
∆
or buons to set the minimum limit
for cooling airow. The set point changes in 1 CFM
increments.
2. Press the buon to save the set point and
advance to the next funcon.
4 Set the cooling maximum airow
limit.
1. Press the
∆
or buons to set the maximum limit
for cooling airow. The set point changes in 1 CFM
increments.
2. Press the buon to save the set point and
advance to the next funcon.
5 Set the auxiliary airow set point.
Not used in all models.
Tip: Set value to match Min.
Cooling airow if not required.
This set point sets the airow for when reheat is acve.
1. Press the
∆
or buons to set a value for the
auxiliary airow. The set point changes in 1 CFM
increments.
2. Press the buon to save the set point and
advance to the next funcon.
6 Set the heang minimum airow
limit.
1. Press the
∆
or buons to set the minimum limit
for heang airow. The set point will change in 1
CFM increments.
2. Press the buon to save the set point and
advance to the next funcon.
7 Set the heang maximum airow
limit.
1. Press the
∆
or buons to set the maximum limit
for heang airow. The set point will change in 1
CFM increments.
2. Press the buon to save the set point and
advance to the next funcon.
8 Set the minimum limit for fan
speed.
Not used in all models.
1. Press the
∆
or buons to set the minimum limit
for the fan speed. The set point will change in 1%
increments.
2. Press the buon to save the set point and
advance to the next funcon.
∆
∆
∆
∆
∆
∆
∆
∆
This manual suits for next models
3
Table of contents
Popular Control Unit manuals by other brands

VAT
VAT 590 Series Installation, operating, & maintenance instructions

Kathrein
Kathrein HDS 66 quick start guide

Immergas
Immergas Trio Base V2 Instructions and warnings

Festo
Festo VZWM-L-M22C operating instructions

Sentiotec
Sentiotec PRO-B3 Instructions for installation and use

sks
sks 300057 installation instructions