Nannio FollowMe User manual

ENGLISH
ESPAÑOL
DEUTSCH
ITALIANO FRANÇAIS

Product Layout / Description du produit / Esquema del producto
/ Produktübersicht / Struttura del prodotto
Figures and Quick Guide / Figures et Guide d'utilisation rapide
/ Figuras y guía rápida / Abbildungen und Schnellanleitung
/ Figure e Guida rapida
Camera / Caméra / Cámara / Kamera / Telecamera
Fig. 1
i
Monitor / Moniteur
Fig. 2
12 13 14 15 16
6
5
3
7
8
2
4
11
10
9
1
17
18

Setup / Installation / Configuración / Einrichtung / Installazione
1
Fig. 3
ii
Camera Setup / Installation de la caméra / Configuración de la cámara
/ Kameraeinrichtung / Installazione della telecamera
1.1 Power Supply - Using AC Power
Alimentation - Avec alimentation secteur
Fuente de alimentación - Utilizar la alimentación de CA
Stromversorgung – über Netzstrom
Alimentazione - Uso dell'alimentazione CA

iii
21
Using AC Power / Utilisation de l'alimentation secteur
/ Uso de la alimentación de CA / Netzstrom verwenden
/ Uso dell'alimentazione CA
Fig. 5
1
2
3
Fig. 4
11
2
2Monitor Setup / Installation du moniteur / Configuración del monitor
/ Monitoreinrichtung / Installazione del monitor
Power Supply / Alimentation / Fuente de alimentación / Stromversorgung
/ Alimentazione
2.1
Loading the Battery / Installation de la batterie / Insertar las pilas
/ Akku einlegen / Inserimento delle batterie

iv
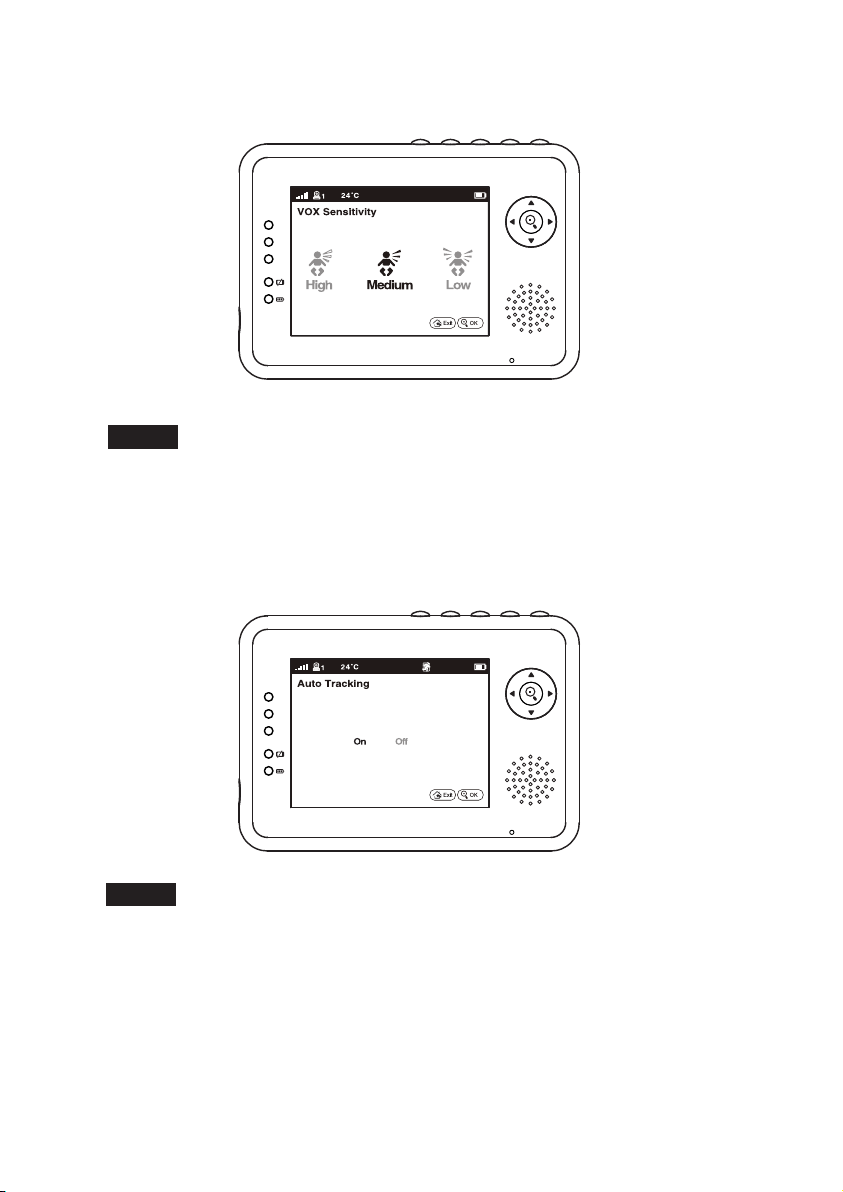
2.4 VOX (Voice-Operated Transmission) Function
Fonction TCV (Transmission de Commande Vocale)
Función VOX (transmisión de activación por voz)
VOX-Funktion (geräuschaktivierte Übertragung)
Funzione VOX (trasmissione attivata a voce)
2.3 Zoom in Function / Fonction de zoom
/ Función de zoom de ampliación / Vergrößern-Funktion
/ Funzione ingrandimento
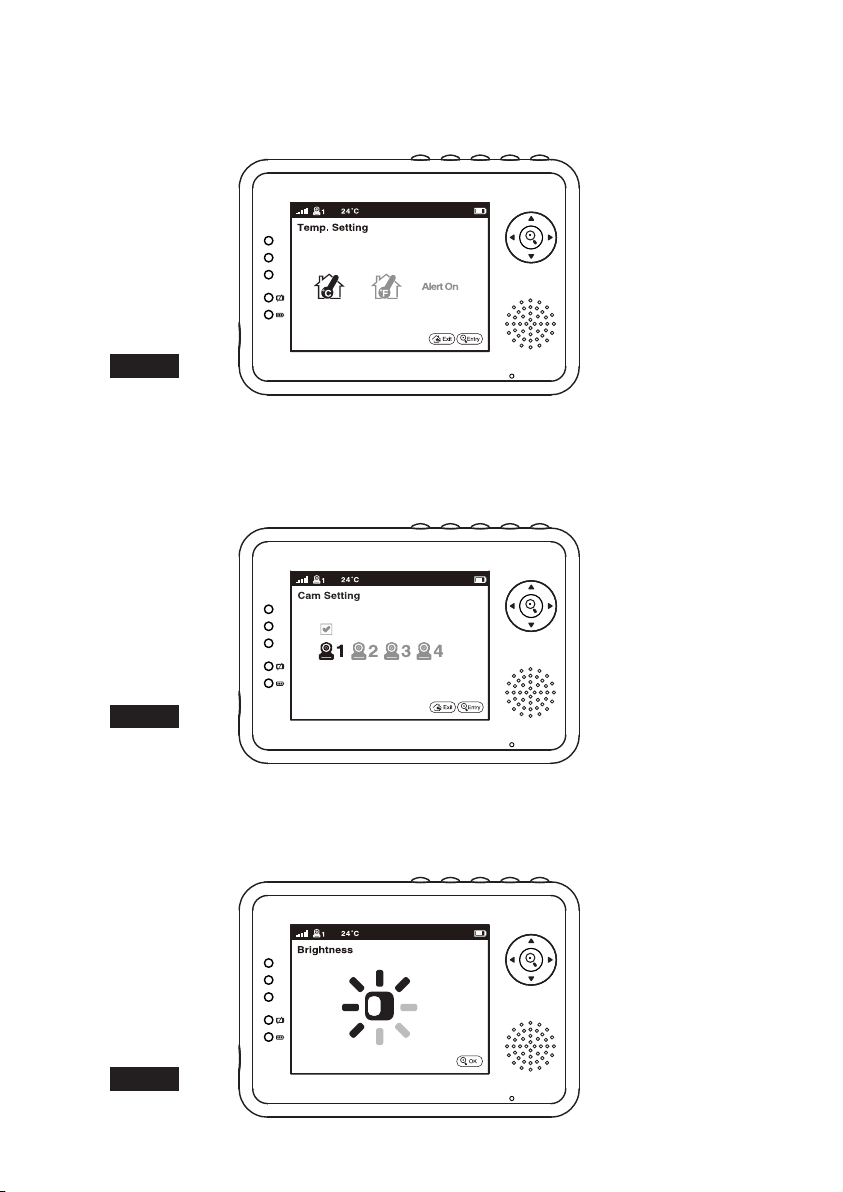
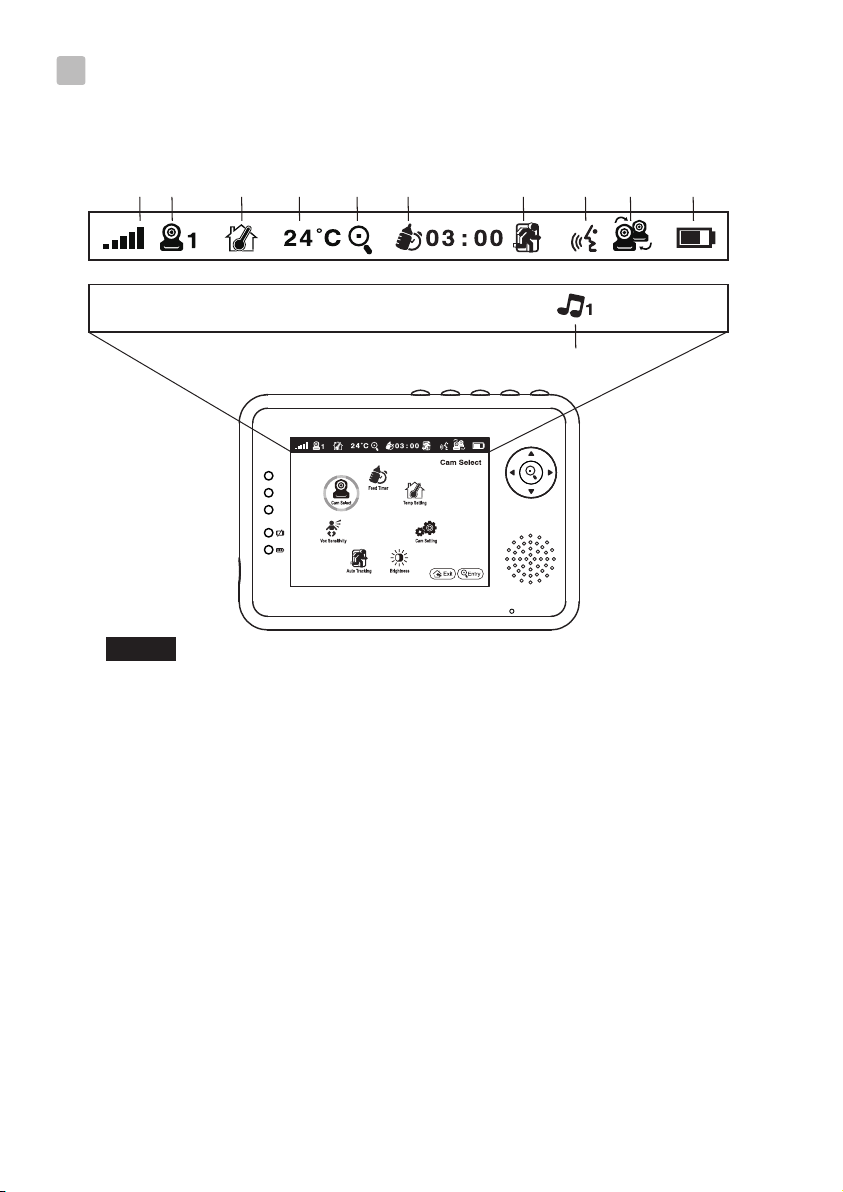
2.2 Monitor Remote Control Function
Fonction télécommande du moniteur
Función del mando a distancia del monitor
Monitorfernbedienungsfunktion
Funzioni del telecomando del monitor
Fig. 6
Fig. 7
Fig. 8

v
2.5 Volume Setting / Réglage du volume
/ Configuración del volumen
/ Lautstärkeeinstellung / Impostazione del volume
Fig. 9
2.6 Talkback Function / Fonction de réponse
/ Función de intercomunicador
/ Gegensprechfunktion / Funzione interfono
Fig. 10
2.7 Lullaby Function / Fonction de musique / Función de música
/ Musikfunktion / Funzione musica
Fig. 11

vi
3Menu Options / Options du menu / Opciones del menú
/ Menüoptionen / Opzioni del menu
3.2 Feed Timer Setting / Paramètre du minuteur d'alimentation
/ Configuración del temporizador de fuentes
/ Fütterungstimer-Einstellung / Impostazione timer alimentazione
Fig. 14
3.1 Camera Selection / Sélection de la caméra / Selección de la cámara
/ Kameraauswahl / Selezione telecamera
Fig. 13
Fig. 12

vii
Temperature Setting / Réglage de la température
/ Configuración de la temperatura / Temperatureinstellung
/ Impostazione temperatura
3.3
3.5 Brightness Setting / Réglage de la luminosité / Configuración del brillo
/ Helligkeitseinstellung / Impostazione della luminosità
Fig. 17
Fig. 15
3.4 Camera Setting / Paramètre caméra
/ Configuración de la cámara
/ Kameraeinstellung / Impostazione videocamera
Fig. 16

viii
Fig. 18
VOX Sensitivity / Sensibilité VOX / Sensibilidad de VOX
/ VOX-Empfindlichkeit / Sensibilità VOX
3.6
Fig. 19
Auto tracking / Suivi automatique / Seguimiento automático
/ Auto-Verfolgung / Tracking automatico
3.7

2 3 4 5 6 8 91 7 10
11
Fig. 20
4Status Information / Informations de statut
/ Información de estado / Statusinformationen
/ Informazioni di stato
ix

1
Package Contents
Camera x1
Monitor x1
PowerAdapter x1
6V/ 800mA DC Plug Adapter x1
Battery for Monitor ( 3.7V 2600mAh Li-ion )
CableClips x2
Wallmount kit x1
Product Layout
Camera (Fig. 1)
1. Light sensor
Microphone2.
Lens3.
Infrared LEDs4.
Speaker5.
Power adapter plug6.
Power/Pairing button7.
Antenna8.
Temperature sensor9.
Power indicator LED10.
Monitor (Fig. 2)
1. LCD screen
Left button2.
Up button3.
Zoom/OK button4.
Right button5.
Down button6.
Speaker7.
Microphone8.
Power indicator LED9.
VOX indicator LED10.
Volume indicator LEDs11.
Power/VOX button12.
13. Lullaby button
14. Volume setup button
15. Talkback button
16. Menu button
17. Battery compartment
18. DC Jack
ENGLISH

Monitor Setup
Power Supply
The monitor uses 3.7V 2600mAh (Li-ion) battery or the household AC power
current.
Changing the Battery
1. Open the battery compartment cover on the rear of the monitor (See Fig. 5).
2. Pull out the battery and remove the cable. Re-attach the cable with new
battery (See Fig. 4).
3. Close the battery compartment cover, and make sure it is locked securely.
4. Press the POWER button and keep it around 3 seconds to turn the
monitor on (See Fig. 4).
Note 1: When power is sufficient, the "Power/Charging" LED will light up
(green light); When battery is low, the red LED light will start blinking.
2
Setup
Camera Setup
Power Supply - Using AC Power
1. Plug one end of the provided power adapter into a wall outlet and the other
end into the back of the camera. See Fig. 3.
Note : Use the adapter labeled OUTPUT: 6V DC with the camera.
2. Press the POWER button less than 1 second to turn on the camera.
The LED on the camera will light up (green light). See Fig. 3.
Note : Press the POWER button less than 1 second to turn off the
camera.
Fine Tuning
Place the camera in a convenient location, point the lens toward the observation
area.
Night Vision
The camera has eight high-intensity LEDs for picking up clear images in the
dark. When the light sensor detects low ambient light levels, the LEDs will be
automatically activated.
Room Temperature Measurement
Temperature sensor can measure room temperature on camera side and the room
temperature indicator will be displayed on the screen of the monitor unit.
1
1.1
1.2
1.3
1.4
2.1
2

3
Using AC Power
1. Plug one end of the provided power adapter into a wall outlet and the other end
into the monitor (See Fig. 5).
Note : Use the adapter labeled OUTPUT: 6V DC with the monitor.
2. Press the POWER/VOX button and keep it around 3 seconds to turn the
monitor on (See Fig. 5).
Note 1: When power on the monitor, "Power" LED will light up (green light).
Note 2: "Out of Range" will be displayed on the LCD screen if the monitor
exceeds the range (unlink).
Note 3: Press the POWER/VOX button and keep it around 3 seconds to turn off
the monitor.
Monitor Remote Control Function
The monitor can control the movement of the camera. The camera head has the
ability to rotate up, down, right and left. Press the up or down buttons
on monitor to move the camera up or down. Press the left or right buttons
on monitor to move the camera left or to the right (See Fig. 6).
Note 1: Besides manual camera movement, the camera can also track moving
objects by using the auto tracking function. Auto tracking can be
enabled or disabled in the menu.
Note 2: The audio will be muted when the motor rotates.
Zoom in Function
Press the Zoom/OK button on monitor once for a 2X zoom of image and press
again to change back to normal view (See Fig. 7).
Note : When the zoom in function is enabled, auto tracking will be disabled until
the user zooms out.
VOX ( Voice-Operated Transmission) Function
1. Press and hold the POWER/VOX button for less than one second on the
monitor unit to enable the VOX function. This will turn the screen OFF but the
VOX LED will remain ON (green) to remind the user that the VOX
function is enabled. Please (see Fig. 8).
2. When the sound from the camera reaches the setting level (See Fig. 18), the
screen will turn ON automatically. It will turn OFF again after 30 seconds. If
the sound from the camera still reaches the setting level during the 30 seconds,
it will extend 30 seconds to turn OFF the screen from the last voice event.
2.2
2.3
2.4

4
Menu Options
1. Press the menu button on the monitor unit to display the main menu on
the screen(See Fig. 12).
2. Use the left and right buttons to navigate through the menu.
3. Press the Zoom/OK button to confirm a setting.
4. The main menu contains 7 submenus.
Camera Selection ( Camera Select )
In this submenu you can select between multiple cameras if the cameras have
been paired. Also, you can tap the auto-scan icon for auto-scan function.An
auto-scan feature will display images from each camera in eight-second
intervals (See Fig. 13).
Feed Timer Setting ( Feed Timer )
In this submenu you can set up feed timer to remind you the timing(See Fig.
14).
Temperature Setting ( Temp. Setting )
1. In this submenu you can choose the temperature unit between degrees
Celsius or degrees Fahrenheit (See Fig. 15).
2. You can set the temperature range of the temperature alert. If you select"Alert
On" to enable the temperature alert and the temperature is outside
the range, a warning sound will be emitted from the monitor unit (See Fig. 15).
Camera Setting ( Camera Setting )
The system comes with a camera unit that has already been paired with the
monitor unit. The"Cam Setting" function gives each baby unit a separate
channel on the monitor unit. This is necessary for configuring additional
camera units.
3
3.1
3.2
3.3
3.4
Volume Setting
1. Press the volume setup button to enter volume setup. See Fig. 9.
2. Press up or down buttons to adjust volume level, and then press ok
button to confirm the setting (SeeFig. 9).
Talkback Function
Press the talkback button to speak through the camera unit, and the icon
.will then be displayed on the screen (See Fig. 10)
Lullaby Function
There are three lullabies can be selected to play on camera unit for your baby.
1. Press the music button , the camera will play music (See Fig. 11).
2. Press the music button again, the camera will play the next song.
2.7
2.6
2.5

5
1. If you want to add a new camera, please choose which number of cameras
you want to add, and then select add camera icon and press the button
to confirm your selection (See Fig. 16).
The screen will show"Press the pairing button on the Baby unit" , and then
please also press and hold the power button around 3 seconds on the camera
side at the same time.
2. If you want to delete a paired camera, please choose which number of cameras
you want to delete, and then select delete camera icon to delete the camera
(See Fig. 16).
Brightness Setting ( Brightness )
In this submenu you can adjust brightness of the screen (See Fig. 17).
VOX Sensitivity Setting ( VOX Sensitivity )
This submenu lets you choose the VOX (voice activation) sensitivity level.
When the level set to high, the screen will turn on by lower sounds.
(See Fig. 18).
Auto Tracking Setting ( Auto Tracking )
In the submenu you can select"On" to enable the auto tracking function or select
"Off " to disable it. When auto tracking is enabled, the camera will track moving
objects in the camera viewing range. Please (see Fig. 19).
Note 1: The audio will be muted when motor rotates.
Note 2: When the zoom in function is enabled, auto tracking will be disabled
until the user zooms out.
3.6
Status Information
The status bar will be displayed on the top of the screen (See Fig. 20).
1. Signal strength indicator
2. Camera number indicator
3. Temperature alert on/off indicator
4. Room temperature indicator
5. Zoom in indicator
6. Feed timer indicator
7. Auto tracking indicator
8. Talkback indicator
9. Auto-scan indicator
10. Battery status/Charging indicator
11. Music indicator
4
3.7
3.5

6
Troubleshooting
You don't getting any signal at all
ŸMake sure the camera and the monitor are turned on.
ŸMake sure the power plugs are pushed all the way in.
If the signal is poor, or there is interference
ŸIf there is a microwave oven in use in the path between the camera and
monitor, remove the microwave oven or turn it off.
ŸMake sure the camera and the monitor are within range of each other
(range of approximately 1000 feet; 300 meters in a clear line of sight).
ŸIf the power LED is on but only voice signal input is detected, the monitor
can be in voice-activated mode. Press the VOX button to turn on the screen.
Care and Maintenance
ŸKeep all parts and accessories out of children's reach.
Ÿ Fingerprints or dirt on the lens surface can adversely affect camera
performances. Avoid touching the lens surface with your fingers.
Ÿ Should the lens become dirty, use a blower to blow off dirt and dust, or a
soft, dry cloth to wipe off the lens.
Ÿ Keep the camera dry. Precipitation, humidity, and other liquids contain
minerals will corrode electronic circuits.
Ÿ Do not use or store in dusty, dirty areas.
Ÿ Do not store in hot areas. High temperatures can shorten the life of
electronic devices and warp or melt certain plastics.
Ÿ Do not store in very cold areas. When the system warms up (to its normal
temperature), moisture can form inside the case, which may damage
electronic circuit boards.
Ÿ Do not attempt to open the case. Non-expert handling of the device may
damage the system.
Ÿ Avoid dropping or strong shocks.
Ÿ Operate this product using only with the power supply included or provided
as an accessory.
Ÿ Do not overload electrical outlets or extension cords this can result in fire
or electric shocks.

7
FCC Information
This device complies with part 15 of the FCC Rules. Operation is subject to the
following two conditions: (1) This device may not cause harmful interference, and (2)
this device must accept any interference received, including interference that may cause
undesired operation.
Industry Canada (IC) Compliance Statement
This device complies with Industry Canada licence-exempt RSS standard(s). Operation is
subject to the following two conditions: (1) this device may not cause interference, and
(2) this device must accept any interference, including interference that may cause
undesired operation of the device.
Industrie Canada (IC) Déclaration de
conformité
Le présent appareil est conforme aux CNR d'Industrie Canada applicables aux
appareils radio exempts de licence. L'exploitation est autorisée aux deux conditions
suivantes : (1) l'appareil ne doit pas produire de brouillage, et (2) l'utilisateur de
l'appareil doit accepter tout brouillage radioélectrique subi, même si le brouillage est
susceptible d'en compromettre le fonctionnement.
CAUTION:
‧ To comply with FCC RF exposure compliance requirements, a separation distance of
at least 20 cm must be maintained between the antenna of this device and all persons.
‧ This Transmitter must not be co-located or operating in conjunction with any other
antenna or transmitter.
‧ Changes or modifications to this unit not expressly approved by the party responsible
for compliance could void the user authority to operate the equipment.
NOTE: This equipment has been tested and found to comply with the limits for a
Class B digital device, pursuant to Part 15 of the FCC Rules and ICES-003 of Industry
Canada. These limits are designed to provide reasonable protection against harmful
interference in a residential installation. This equipment generates, uses and can radiate
radio frequency energy and, if not installed and used in accordance with the instructions,
may cause harmful interference to radio communications. However, there is no guarantee
that interference will not occur in a particular installation. If this equipment does cause
harmful interference to radio or television reception, which can be determined by turning
the equipment off and on, the user is encouraged to try to correct the interference by one
or more of the following measures:
‧ Reorient or relocate the receiving antenna.
‧ Increase the separation between the equipment and receiver.
‧ Connect the equipment to an outlet on a circuit different from that to which the
receiver is connected.
‧ Consult the dealer or an experienced radio/TV technician for help.

8
This item is in compliance with the essential requirements and other relevant provisions of Directive 1999/5/EC.
Following the safety tips
To prevent deaths and injuries associated with
baby monitor cords :
ŸMake sure the baby unit and AC adapter cords are always out of reach of the
baby at least 3 feet (1 meter) away.
Note : It's important even if your baby is not yet standing or mobile.
ŸUse a wireless baby monitor to avoid risk of strangulation.
ŸNever use extension cords with AC adapters. Only use the AC adapters
provided.
Monitor
Frequency
Antenna
Modulation
Display
Display colors
Brightness Control
VOX
Dimensions
Weight
Power
Operating temperature
2.4 GHz
Monopole antenna
GFSK, FHSS
3.5" LCD panel
Full-color
8 levels
Voice activation
12(W) x 8.3(H) x 4. (D) cm 7
1 g80
DC 6V, 800mA or Li battery
0 ~ 40 (32 ~ 104 )℃ ℃ ℉ ℉
Specifications
Specifications subject to change without notice
Camera
Frequency
Antenna
Transmission distance
Modulation
Image Sensor
Lens
IR LED
Dimensions
Weight
Power
Operating temperature
2.4 GHz
Dipole antenna
300 M (Line of Sight)
GFSK, FHSS
CMOS image sensor
f 3.0mm, F 2.4
8 pcs
8.5(W) x 11(H) x 10(D) cm
237g
DC 6V, 800mA
0℃ ~ 40℃ (32℉ ~ 104℉)

9
FRANÇAIS
Contenus de la boîte
Caméra x 1
Moniteur x 1
Adaptateur x 1
Adaptateur Fiche CC 6 V/800 mA x 1
Batterie pour le moniteur (3,7 V 2600 mAh Li-ion)
Attaches de câbles x 2
Kit de montage mural x 1
Description du produit
Caméra (Fig. 1)
1. Capteur de lumière
2. Microphone
3. Objectif
4. DEL infrarouges
5. Haut-parleur
6. Prise de l'adaptateur de courant
7. Bouton d'alimentation/appariement
8. Antenne
9. Capteur de température
10. Voyant d'alimentation DEL
Moniteur (Fig. 2)
1. Écran LCD
2. Bouton gauche
3. Bouton haut
4. Bouton Zoom/OK
5. Bouton droite
6. Bouton bas
7. Haut-parleur
8. Microphone
9. Voyant d'alimentation
10. Voyant de TCV DEL
11. Voyant de volume DEL
12. Bouton d'alimentation/VOX
13. Bouton Berceuse
14. Bouton de configuration du volume
15. Bouton de réponse
16. Bouton menu
17. Compartiment des piles
18. Prise CC

Installation du moniteur
Alimentation
Le moniteur utilise une batterie 3,7 V 2600 mAh (Li-ion) ou le courant secteur CA
domestique.
Remplacement de la batterie
1. Ouvrez le couvercle du compartiment de la batterie à l'arrière du moniteur (Voir Fig. 5).
2. Retirez la batterie et enlevez le câble. Remettez le câble avec une batterie neuve
(Voir Fig. 5).
3. Fermez le couvercle du compartiment de la batterie et vérifiez qu'il est bien fermé.
4. Appuyez sur le bouton ALIMENTATION sans arrêter pendant environ 3
secondes pour allumer le moniteur (Voir Fig. 5).
Remarque 1: Lorsque l'alimentation est suffisante, le voyant "Alimentation/
Recharge" est allumé (en vert) ; lorsque la batterie est faible,
le voyant DEL rouge commence à clignoter.
Installation
Installation de la caméra
Alimentation - Avec alimentation secteur
1. Branchez un coté de l’adaptateur d'alimentation fourni sur une prise de
courant et l’autre coté sur la prise à l'arrière de la caméra (Voir Fig. 3).
Remarque : Utilisez l'adaptateur indiqué SORTIE : 6V DC avec la caméra.
2. Appuyez sur le bouton ALIMENTATION et maintenez-le 1 seconde
pour allumer la caméra. Le DEL de la caméra s'allumera (couleur verte)
(Voir Fig. 3).
Remarque : Appuyez sur le bouton ALIMENTATION et maintenez-le
1 seconde pour éteindre la caméra.
Réglages précis
Placez la caméra à un endroit pratique, pointez l'objectif vers la zone d'observation.
Vision nocturne
La caméra possède huit DEL haute intensité pour prendre des images claires
dans l'obscurité. Quand le détecteur de lumière détecte des niveaux de lumière
ambiante faibles, les DEL seront activées automatiquement.
Mesure de la température de la pièce
Le capteur de température peut mesurer la température de la pièce où la caméra
a été installée et l'indicateur de température de pièce sera affiché sur l'écran de
l'unité du moniteur.
1
1.1
1.2
1.3
1.4
10
2.1
2
Table of contents
Languages:
Other Nannio Baby Monitor manuals