nannyVac BL Series User manual

Thank you for purchasing this product. Please Read all the instructions carefully before
attempting to operate this product and save this instruction manual for future reference.
Gyro-Navigation Robot Vacuum Cleaner
Instruction Manual
This instruction manual applicable for BL series Gyro-Navigation version

CONTENTS
................................................................................
1
2-3
3
4-6
4-5
5
7-10
7
7
8
9
11
12
2-3
1. SAFETY INSTRUCTION
2. COMPONENTS
3. OPERATION INSTRUCTION
2.1 PARTS NAME
2.2 TECHNICAL PARAMETER
3.1 QUICK USER GUIDE
3.2 CLEAN/PAUSE/CHARGE/STAND-BY/TURN OFF
4. MAINTENACE
5. FAILURE CHECKING
6. ACCESSORIES LIST
4.1 CLEANING SIDE BRUSHES
4.2 CLEANING THE DUSTBIN BOX AND FILTER
4.3 CLEANING THE INFRARED SENSOR
AND CHARGING CONNETOR
.............................................................................................
..............................................................................................
...........................................................................
........................................................................
....................................................................................
..............................................
6
3.3 CLEANING MODE SELECTION
........................................................................
.................................................................................................
...........................................................................
.................................................
............................................................
4.4 INSTALLING AND USING WATER TANK...........................................................
...................................................................................
...................................................................................
104.5 REPLACEMENT OF BATTERY........................................................................

1. SAFETY INSTRUCTION
1
small repair
any let
get close the product
Always remember
Make sure
are properly
let
liquid
properly
cause
longer
have not read this
byintended
Caution
Attention
The product, mainly applicable to home, hotel rooms and small office is good for cleaning
Thin-carpet, wood floor, hard floor, ceramic tile, etc. But not suitable for high-pile carpet or
very dark-colored floors.
Applicability:

2.COMPONENTS
2.1 PARTS NAME
ON / OFF & Auto - cleaning button
Infront bumper / Mechanical bumper
Infrared sensors
Top cover
Universal wheel
Ground sensor
Charging contactor
Left side brush
Right side brush
Right wheel
HEPA Filter
Dustbin box lock
Primary Filter
Main body
2
Top cover
Dustbin box
Dustbin box handle
Charging hole
Infrared receiver window
Air outlet
Infrared Receiver
Auto - charging button
Ground sensor Ground sensor
Suction channel
Left wheel
Dustbin box
Dustbin box cover

2.COMPONENTS
Docking hole
Infrared signal emitter window
Charging electrode
Functional keys
Remote controller
Docking station / Charging base
1.Start working:related function key blue light flashing.
2.Error:2 buttons bule light flashing and with notify sound.
3.Charging:2 buttons blue light flashing.
4.Full charging: 2 buttons blue light keep lighting.
3
2.2 TECHNICAL PARAMETER
Specification Item
15W
DC 12V 1A
7.4V 2600mA Li-ion battery
2.0kg
0.6L
310*81mm
1. Turn off power & Cancell key
2. Speed selection(Normal/Slowly)
3. Forward button
4. Turn left button
5. Turn right button
6. Backward button
7. Mute button
8. Spot cleaning mode
9. Auto cleaning mode
10. Mopping mode
11. Auto - recharging button
POWER SPEED
AUTO SPOT
MOPCHARGE
Indicator light:
10
98
7 6
5
4
3
21
Power indicator light
Parameter
Product size
Weight
Dustbin capacity
Power rated
Power input
Battery specification
11
VOICE
Auto-charging
Auto-cleaning/ ON/OFF/Pause

4
3.1 QUICK USER GUIDE
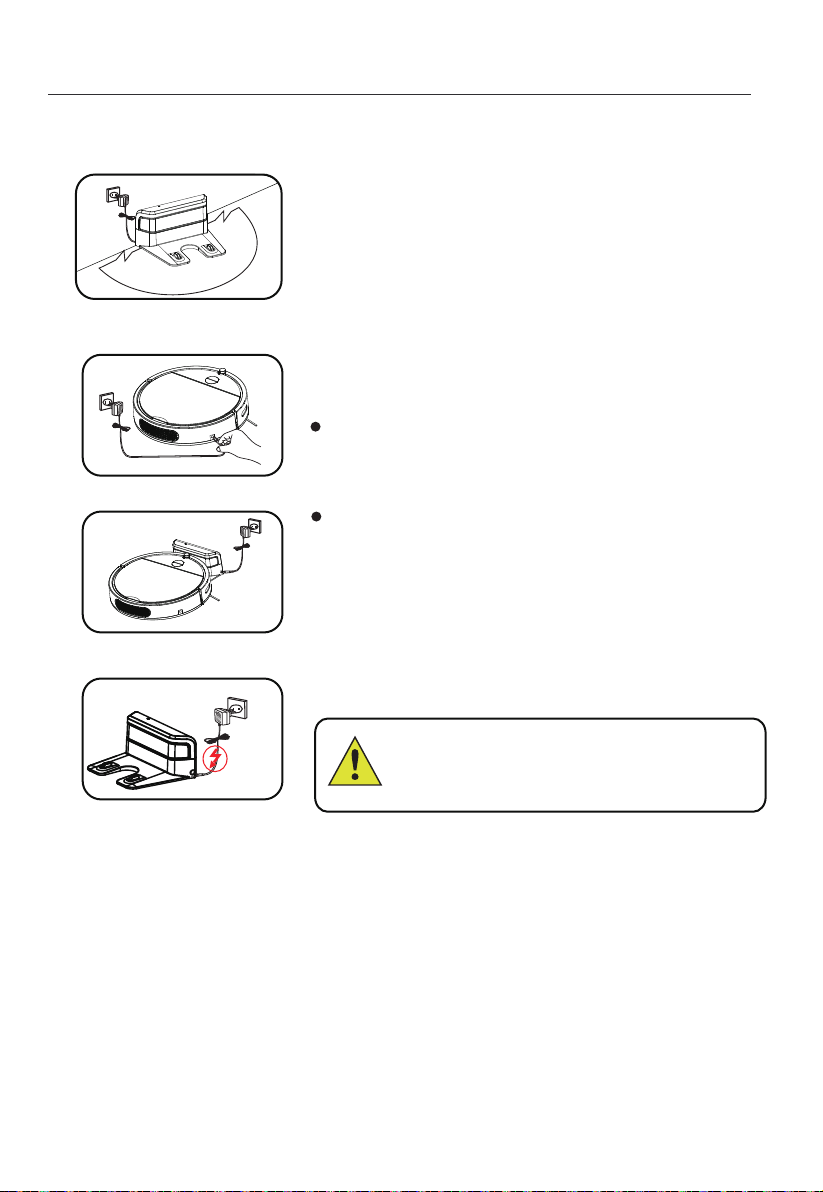
1.Position the charging base
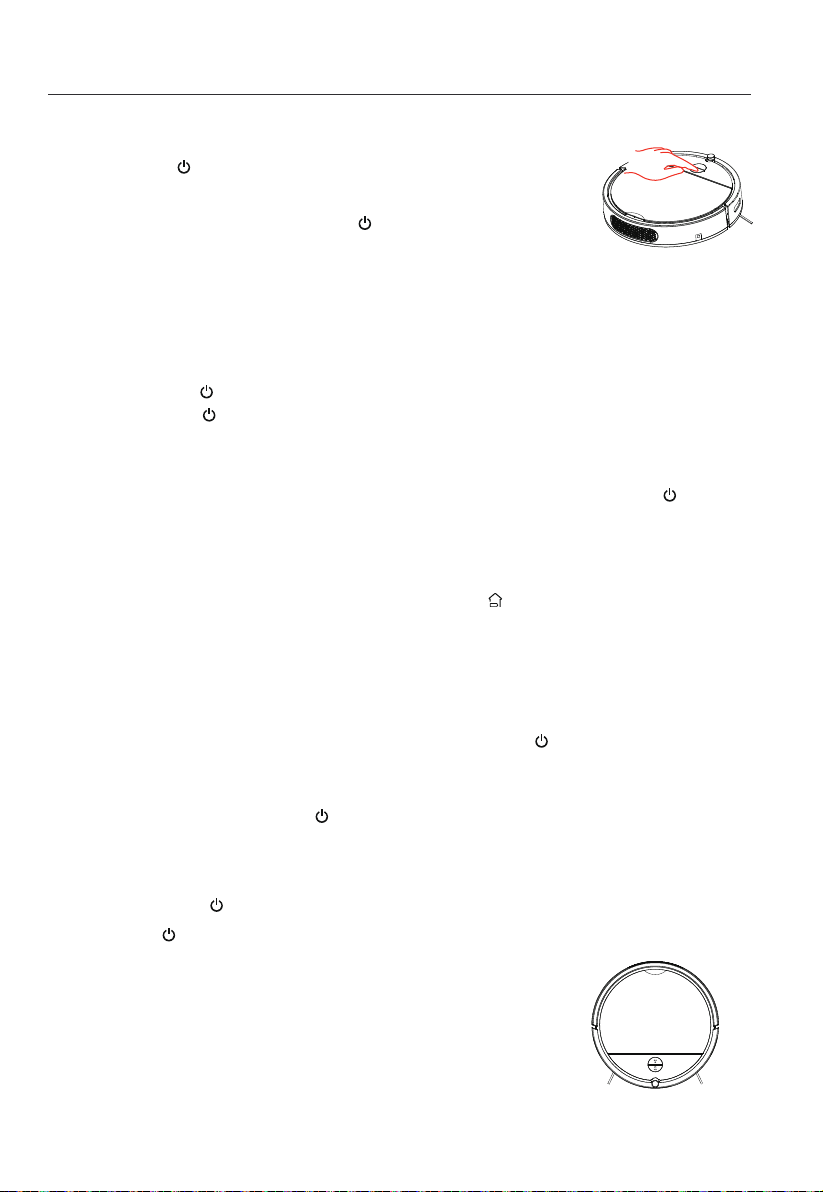
2.Two charging methods
3.OPERATION INSTRUCTION
1M
1M
2M
Install the charging base on the flat ground firmly
and against the vertical wall (fixed on the wall with
the charging base sticker).
Ensure no obstacles or hollow areas 2M away from
the charging base in front and 1M on left and right.
Connect the AC-DC adaptor with the charging hole on unit.
Control the unit return to the charging base under stand-by
or working mode. (Press the auto recharge button on remote
controller or press the charge button on unit.)
3. Auto recharge
Connected the charging station, the cleaner will auto return to
charging base when power lower than 20%.
Attention:
Please keep the charging base well connected
with power socket, otherwise, the cleaner cannot
find charging station to perform auto recharge.
*
Switch off the power switch on unit when not in use, and disconnect
with the charging.
NOTE:
1. The indicator light of operation button will flash when charging the unit. After fully charged,
the indicator light will keep lighting.
2. If the battery power too low it may caused fail to turn on the unit, Please manually to put
the unit on charging base for charging
3. Please fully charged the unit and turn off the power switch if not using the unit for a long time.
4. Store it in a dry and safety environment. Meanwhile, for avoiding battery failure, please keep to
charging the unit every 3 months.

3.OPERATION INSTRUCTION
5
2.PAUSE
4.STAND-BY
5.TURN OFF
3.CHARGE
*Attention
4.TURN ON THE UNIT
Long press the “ ” button for 3 seconds to turn on the unit, blue flashing.
*Under stand-by mode, long press the “ ” button for 3 seconds
after the sound to turn off the unit.
3.2 CLEAN/PAUSE/RECHARGE/STAND-BY/TURN OFF
A. Long press the “ ” button to turn on the unit.
B. Short press the “ ” button on unit or press “ Auto” button on Apps or remote to start working.
1. CLEAN
Pause means to switch off the unit from clean mode to stand-by mode, short press “ ” button,
the unit paused working.
A. Press “ CHARGE” button on Apps or on remote or press “ ” button on unit for charging.
B. When finish the cleaning task or battery power lower than 20%, then unit will return to
charging base for charging automatically.
If the unit is idle for 1 minute ,it will be into sleep mode, press the “ ” button to wake up the unit.
Under stand-by mode, press the “ ” on unit also can wake up it.
1.
Long press the “ ” button on unit for 3 seconds after the sound to turn off the unit.
2. Press the “ ” button on remote to turn off the power ( this button can’t turn on the power ).

3.OPERATION INSTRUCTION
2. SPOT CLEANING
6
3.3 CLEANING MODE SELECTION
Press “SPOT” button on remote controller, this mode is usually used to clean floors
where dirt is more concentrated. It will clean the area within 1m2and clean by spiral
mode automatic operate in around 2-3 minutes.
..........................................................
...............................................
Room A Room B
Room D -- next step Room C --- Cleaning
1. AUTO MODE (SMART CLEAN)
Press” Auto” on remote or “Smart Clean” on Apps. After cleaning task started, combined along with
Gyro-Sensor + SLAM technology to collect the room envrionment for analysis and calculate,
Path planned, step by step, orderly and efficiently to clean the floors in high coverage. After finish
the cleaning, the unit returnsback to origin or docking station for charging.
*
*
The Robot plans path automatically when working, if being moved, it will be rebuild the plan path
and clean again. Please DO NOT move the Robot randomly to ensure high efficiently cleaning.
After cleaning task started, the robot will stop a while to search in place and build clean path,
depends on the room’s complexity .
Attention:
3. AUTO MOP
Press “MOP” on Apps or remote to start mopping. Assembly the mop pad or mechanical water
tank onto the unit before using this mode. Under mop mode, the vacuum cleaning mode will stop
working (no suction power) and the mop route are the same as smart cleaning routes.

4. MAINTENACE
4.1 CLEANING SIDE BRUSHES
*NOTE
4.2 CLEANING THE DUSTBIN BOX AND FILTER
*NOTE
1.Take out the dustbin box and remove the HEPA filter.
2.Please gently shake the HEPA filter and clean it using the brush.
3.Clean the HEPA filter every15-30 days and replace it every 6 months.
4.Empty the dustbin box and clean it using the brush and/or wash it.
5.After having wiped all components, assemblethem being careful to insert the
Hepa filter into the housing
7
2. Please clean side brush regularly and replace it if necessary.
1. Please install the side brush at first use, align side brush and fixed shaft and then press them.
When replacing the side brush, please grasp the soft rubber and pull out.When installing, align the
square hole of the side brush with the side brush to fix the convex shaft, and press it gently to install it.
Please clean the dust box each time after working, cleaning steps as following figures.
C
C D E
A B

4. MAINTENANCE
4.3 CLEANING THE INFRARED SENSOR AND CHARGING CONNECTOR
*NOTE
8
Clean the ground detection sensors and charging electrodes
Clean the infrared sensors
Please use a dry and soft cloth to clean the infrared receiver and charging connector
as following figures.
1. Please clean the charging electrode on time to avoid charging issues.
2. Before cleaning, please make sure the power switch is turned off.
Clean the charging electrode
Clean the infrared signal emitter

4.MAINTENACE
4.4 INSTALLING AND USING WATER TANK
9
1. Insert the front part of water tank into mop cloth and paste mop cloth with magic patch as following.
Mechanical water tank Mop cloth
2. Open water filling nozzle and pour water into water tank.
3. Place the bottom of the unit upward, align the positioning column of the water tank with the
positioning hole of the unit and then press the water tank.
Note:
1. The water will be leaked automatically once the water tank is filled with water. Hence, please DO NOT leave
the unit stay at the same area for long time to prevent wet.
2. If you do not want to add water to the water tank. You could make the mop wet for the mopping function.
3.The water tank can not stop leaking after water injection, please remove it after each use or before
charging orstorage.
4. Pay attention on water tank when using, add water or clean it on time and remove it before adding water.
5. DO NOT to use water tank on carpet, when using water tank to mop the floor, please fold the edge of capet
to avoid foreign matter making carpet dirty.
6. It is not suggested to add any detergent into the water tank. You can add the detergent on the mop cloth.
7. After mopping, please dry the mop cloth to use it later.

4.MAINTENACE
10
4.5 REPLACEMENT OF BATTERY
Battery replacement of the Remote controller
1.Release the screw with the screw-driver, open its base plate and then take out the battery.
2.Please place the positive and negative electrode correctly for new replacement battery.
3.Please set the Robot in charging state to keep the best of the battery while the Robot is unused.
1.Open the battery cover and then replace the battery.
2.Please place the battery(not included) with correct polarity(+/-).
3.Please take out the battery if it was unused for long time.
Battery replacement of Robot
1.Please DO NOT forget to take out the battery before discarding the Robot.
2.Please turn off the power switch before taking out the battery from the Robot .
3.Please DO NOT place the battery in High-temperature environment above 45℃
or in the water.
4.Please DO NOT exert external force to the battery or drop them from heigh.
5.The battery should be recycled with safe disposal. Please DO NOT discard it freely
or throw it into fire for fear of explosion!
6.If the battery has leakage, avoid the liquid to skin or clothes, use dry mop to clean it
touched and send the battery to recycle bin or mainteance service.

5. FAILURE CHECKING
FAILURE TABLE
11
Abnormal speed
NO
1
2
3
4
5
6
7
Cause Solution
Under fault state, the unit stops working,blue flashing and buzzer with voice reporting
to remind the fault state.
This failure table for users to solve the trobles that may occurred in use process.
Attention:
If the failures still occur, please try:
Switch off the power switch and turn it on again.
If restart the unit still can not fix the failure, please contact
the service center for checking.
Left wheel stucked
8
9
Left wheel has been stucked, please help to check and clean it
Right wheel stucked Right wheel has been stucked, please help to check and clean it
Detected the cliff The ground is not flat, please move the unit to a new place then
start again
Side brush stucked Please help to check and clean the side brush
Please check the speed sensor and repair or replace it
Detected the collision The anti-collision sensors stucked, please help to tap the mechanical
bumper and start again
Anti-falling sensor invalid The ground sensor disabled, please check and clean it.
Suction fan overflow Check if there are foreign objects block suction fan and help to clean it
Excessive electricity Abnormal working current, please check it and help to clean the
moving parts

*NOTE
6. ACCESSORIES LIST
NO. Accessories Q’ty
1
2
3
4
5
6
7
8
9
1
1
1
1
Robot Cleaner(included battery)
Docking Station
Instruction manual
Warranty card
10 1
12
1
2
4
1
Adaptor
Remote controller (battery not included)
HEPA filter(1pc installed in dustbin box)
Side brushes
Mop cloth
Mechanical water tank
2
1.This Instruction Manual may be modified or revised from time to time without prior notice.
2.To provide innovative products to users, this product may be updated or modified by our
company without prior notice.
Table of contents
Other nannyVac Vacuum Cleaner manuals