manuals.online logo
Brands
  1. Home
  2. •
  3. Brands
  4. •
  5. Napoleon
  6. •
  7. Grill
  8. •
  9. Napoleon BUILT-IN Series User manual

Napoleon BUILT-IN Series User manual

BUILT-IN SERIES
Owner's Manual
BIG32, BIG38, BIG44, BIB10 & BIB18.
Grills illustrated in this manual may differ from model purchased.
Apply Serial Number
We Want Your Feedback!
Visit Napoleon.com to write a review
and register your grill.
2| Welcome Napoleon.com | BUILT-IN Series
Welcome
DANGER!
IF YOU SMELL GAS:
• Shut off gas to the appliance
• Extinguish any open flame
• Open lid
• If odor continues, keep away from the appliance
and immediately call your gas supplier, or fire
department.
WARNING!
Do not try to light this appliance without reading the
“LIGHTING” instructions section of this manual
Do not store or use gasoline, or other flammable liquids
or vapors in the vicinity of this or any other appliance
An L.P. (propane) cylinder not connected for use
must not be stored in the vicinity of this or any other
appliance
If the information in these instructions is not followed
exactly, a fire or explosion may result and cause
property damage, personal injury, or death
!
!
Alert adults and children about the hazard of hot surface temperatures. Supervise young children near the grill.
NOTICE TO INSTALLER: Leave these instructions with the grill owner for future reference.
NOTICE TO CONSUMER: Keep these instructions for future reference.
CONGRATULATIONS
ON YOUR NAPOLEON GRILL!
You’ve Just Upgraded Your Grilling Game.
WE WANT YOUR GRILLING EXPERIENCE TO BE MEMORABLE AND SAFE.
Please read and follow this Owner’s Manual before using your grill to avoid property damage, personal injury, or death.
Remove all packaging material, promotional labels and cards from the grill before use.
USE OUTDOORS IN A WELL-VENTILATED SPACE
Napoleon.com | BUILT-IN Series Welcome | 3
Welcome
Welcome to Napoleon!
FC
ES
27
EMAIL
[email protected]
ONLINE
www.napoleon.com
PHONE:
1-866-820-8686 53
CONTENTS
Welcome to Napoleon! 3
Safety First
Full System Features 4
Getting Started 5
Cut-Out Dimensions
Gas Connections
Leak Test
Operation 10
Lighting your grill
Grilling Instructions
How to use the Rear Burner & Rotisserie
The Grilling Experience Checklist
How to season cast iron cooking grids
Infrared Grilling Guide 16
Cleaning Instructions 17
Maintenance Instructions 20
Combustion in air adjustment
Stainless in harsh environments
Troubleshooting 22
Diagram for Electrical Connections
Warranty 25
Safety firSt
WARNING General Information
This grill should be installed in conformity with local codes. In
absence of local codes, install to the current Natural Gas and Propane
Installation Code CSA B149.1 in Canada, or the National Fuel Gas Code
ANSI Z223.1/NFPA 54 in the United States.
If a rotisserie motor is used, it must be electrically grounded in
accordance with local codes. In absence of local codes, follow the
current Canadian Electrical Code CSA C22.1 in Canada, or the National
Electrical Code ANSI/NFPA 70 in the United States.
WARNING! Electrical Precautions
Keep all electrical supply cords and fuel supply hoses away from
all heated surfaces.
First connect all electrical components to appliance, then plug into
outlet. Use only a Ground Fault Interrupter (GFI) protected circuit with
this outdoor cooking appliance.
Never remove the grounding plug. Never use with an adapter of 2 prongs.
Use only extension cords with a 3 prong grounding plug that has been
rated for the power of the equipment and approved for outdoor use with
W-A marking.
WARNING! Operation
Read this entire Owner’s Manual before operating this grill.
Leak Test this grill before each use, annually and when any gas
components are replaced.
Follow the lighting instructions carefully.
WARNING! Installation & Assembly
Assemble this grill exactly as instructed in the Assembly Guide.
If the grill was assembled in-store, review the assembly instructions to
ensure it is done correctly.
Perform the required Leak Test before operating the grill.
Do not modify this grill under any circumstances.
Do not use a cylinder that is not equipped with a QCC1 type connection.
Only use the pressure regulator and hose assembly supplied with this grill
or replacement parts specifically recommended by Napoleon.
WARNING! Storage & Disuse
Turn off gas at the propane cylinder or natural gas supply valve.
Disconnect the hose between the propane cylinder and grill.
Remove the propane cylinder and store outdoors in a well-ventilated
space away from children.
DO NOT store propane cylinders in a building, garage, shed, or any other
enclosed space.
Disconnect the natural gas hook-up from the supply when storing the grill
indoors.
WARNING! California Proposition 65
This product can expose you to chemicals including soot, which
are known to the State of California to cause cancer, and chemicals
including carbon monoxide, which are known to the State of California to
cause birth defects or other reproductive harm. For more information go
to www.P65Warnings.ca.gov.
!
!
!
!
!
!
4| Features Napoleon.com | BUILT-IN Series
Features
Full System Features
Easy access to drip pan with
stainless steel roller bearings
for efficient maintenance
Back-lit Control Knobs
for late night entertaining
Large stainless steel
Iconic
WAVE™
rod
cooking grids with
dual position for those
distinctive sear marks
Dual-level Stainless
Steel Sear Plates for
consistent even heating
and vaporizing drippings
for more flavourful food
Heavy Gauge
Stainless Steel
Burners for long
lasting quality
Instant
JETFIRE™
Ignition for quick
and ease start-up
ACCU-PROBE™
Temperature Gauge to
easily read the temperature for
perfect results Large chrome plated
Warming Rack for
increased cooking area
Dual Rear Infrared Rotisserie
Burner. Perfect for high heat
searing and slow spit roasting
Cooking system
with dedicated Dual
infrared
SIZZLE ZONE™
Burner for perfectly
grilled steaks
Integrated storage
for rotisserie kits
for more
convenience
Rotisserie mount brackets for
convenient assembly on both
sides of grill
Dual Range Top Burner
for versatile grilling
options to create
delicious side dishes,
sauces and more
Collapsible rotisserie
forks pack neatly in the
storage compartment
Seamless Stainless Steel
Construction for flawless
installation and long
lasting quality
The grills illustrated in this Owner’s Manual may differ from the model you purchased. Featured model: BIG 44
!
Napoleon.com | BUILT-IN Series Getting Started | 5
Getting Started
Getting Started
CAUTION! The hook-up and installation of the gas and hose connection must be performed by a licensed gas fitter, and
leak tested before operating the grill.
CAUTION! Ensure the hoses do not contact any high temperature surfaces of the grill.
CAUTION! Do not move the grill when operating and hot.
!
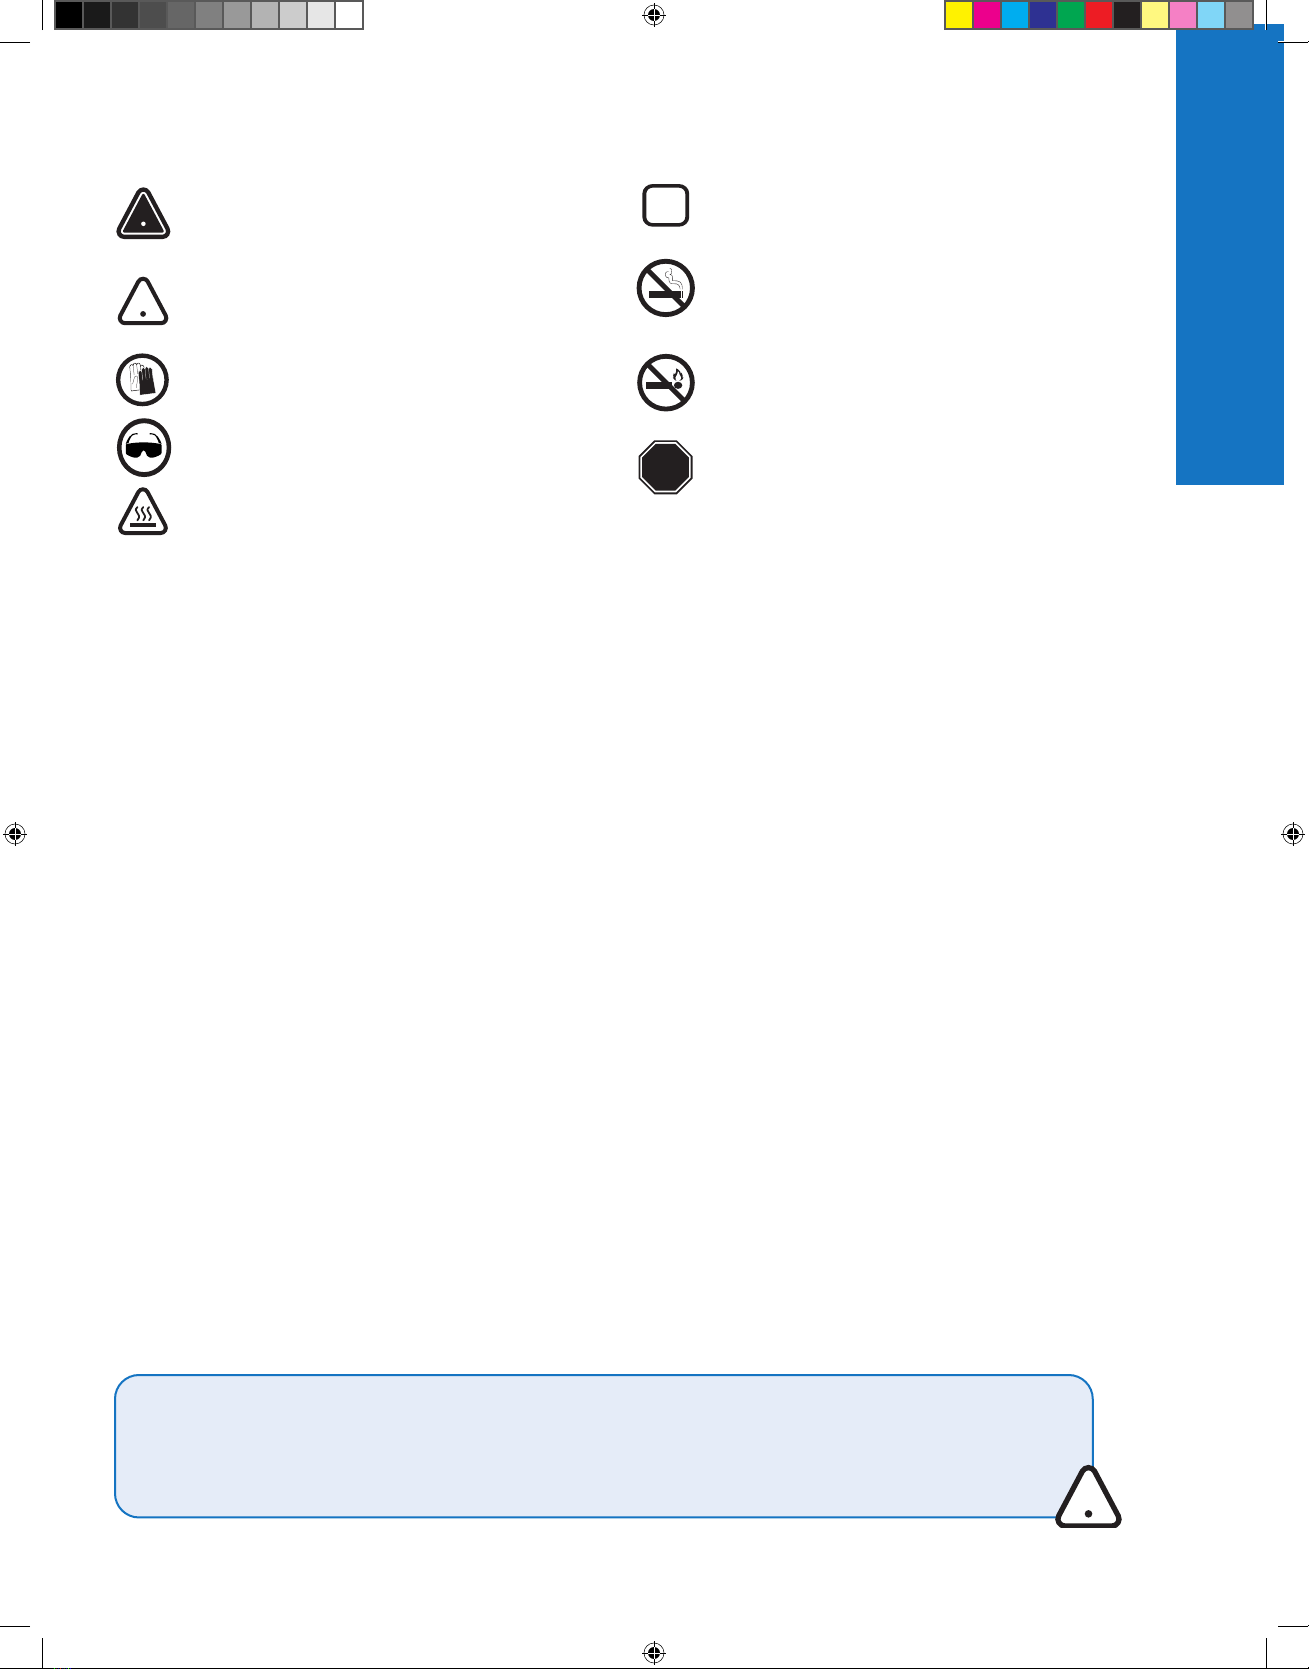
DANGER / WARNING! Advises of a hazard that
could result in a fire, explosion, death or serious
physical injury.
WANING / CAUTION! Advises of a hazard that
could result in minor physical injury or property
damage.
Wear protective gloves.
Wear safety glasses.
CAUTION! Hot surface.
!
!
Important information
Do not smoke while performing a gas leak test. Sparks
or flames will cause a fire, explosion, damage to
property, serious physical injury, or death.
Never use an open flame to check for gas leaks.
Sparks or flames will cause a fire, explosion, damage
to property, serious physical injury, or death.
DANGER! Immediately shut off the gas supply and
disconnect.
!
STOP
• Do not route the hose underneath the drip pan. Maintain
proper hose clearance to the bottom of the unit.
• Ensure sear plates are positioned properly according to
sear plate installation instructions.
• Burner controls must be off when turning the propane
cylinder valve on.
• Do not light burners with the lid closed.
• Do not operate the rear burner(s) with the main burners.
• Do not close the side burner lid when operating or hot.
• Do not deep fry food on the side burner.
• Do not adjust the cooking grids when operating or hot.
• Maintenance should only be done when the grill is cool.
• Do not store lighters, matches or any other combustibles in
the condiment tray.
• Keep all electrical supply cords and fuel supply hoses away
from all heated surfaces.
• Clean the grease tray, drip pan, and sear plates regularly to
avoid build-up and grease fires.
• Keep the infrared burner and main burner venturi
tubes free from spider webs and other obstructions by
inspecting and cleaning it regularly.
• Do not allow cold water (rain, sprinkler, hose etc.) to
contact the heated grill. An immediate temperature
change will chip the porcelain and crack the ceramic
burners.
• Do not use a pressure washer to clean any part of the
grill.
• Do not locate this grill where it can be exposed to high
winds, especially when the wind can come from directly
behind the grill.
• Never cover more than 75% of the cooking surface with
solid metal
• Always maintain proper clearance to combustibles 20”
(508mm) to rear of unit, 7” (178mm) to sides.
• Additional clearance of 24” (610mm) is recommended
near vinyl siding or panes of glass.
additional Safe operating practiceS
• Always maintain a minimum wall distance to
combustibles of 17" (431mm) to the rear and 9"
(228.6mm) to the sides.
• Always maintain a minimum distance of 15" (381mm)
between other additional appliances.
6| Getting Started Napoleon.com | BUILT-IN Series
Getting Started
cut-out dimenSionS
MODEL OPENING DIMENSIONS (INCH / CM) OPENING DIMENSIONS (INCH / CM)
INSTALLING ZERO CLEARANCE LINER
W D H W D H
BIG32 Min. 30 / 76.2 19.4 / 49.3 10.25 / 26.0 36 / 91.4 22.25 / 56.5 11.25 / 28.6
Max. 32 / 81.3 19.75 / 50.2 - - - -
BIG38 Min. 36 / 91.4 19.4 / 49.3 10.25 / 26.0 42 / 106.7 22.25 / 56.5 11.25 / 28.6
Max. 38 / 96.5 19.75 / 50.2 - - - -
BIG44 Min. 42 / 106.7 19.4 / 49.3 10.25 / 26.0 48 / 121.9 22.25 / 56.5 11.25 / 28.6
Max. 44 / 111.8 19.75 / 50.2 - - - -
BIB18 Min. 18 / 45.7 19.4 / 49.3 10.25 / 26.0 24 / 61.0 22.25 / 56.5 11.25 / 28.6
Max. 20 / 50.8 19.75 / 50.2 - - - -
BIB10 Min. 10 / 25.4 18.75 / 47.6 6 / 15.2 - - -
Max. 12 / 30.5 20.75 / 52.7 - - - -
Minimum
10 sq.in. of
ventilation
(64.5 cm)
D
W
AB
A = 6.5" (16.5 cm)
B = 6.5" (16.5 cm)
H
WARNING! The cabinet frame, the cabinet and the counter top MUST be made from non-combustible material
when the appliance is not installed with the Zero Clearance Liner corresponding to your unit. Refer to the parts
list in your Assembly Guide for specific information.
!
Getting Started
Napoleon.com | BUILT-IN Series Getting Started | 7
Getting Started
gaS connectionS
This grill must operate with a gas supply pressure of 11 inches water column (0.39 psi) for propane and 7 inches water column
(0.25 psi) for natural gas. If the gas supply exceeds these requirements a regulator must be installed upstream of the grill’s
components. If the gas supply is lower than the requirements, the unit will be under fired and will not reach the maximum
temperatures.
To a House Gas Supply Line
The piping up to the grill is the responsibility of the installer.
• The gas pipe must be sized to supply the BTU/h specified on the
rating plate, based on the length of the piping run.
• If you are installing a side burner, a separate gas line must be
branched off to the unit through a specific opening in that location.
1. A readily accessible manual shut-off valve must be installed
upstream of the unit. A flexible metal connector is included to
simplify the installation. Connect the other end of the connector to
the gas piping.
2. Tighten using two wrenches. Do not use thread sealer or pipe dope.
3. Ensure that the connector does not pass through a wall, floor,
ceiling or partition, and is protected from damage.
4. Leak test all joints prior to operating the grill. See "Leak Test".
To a Portable Propane Cylinder
Only use a propane cylinder constructed and marked in accordance
with the Specifications for LP gas Cylinders of the U.S. Department
of Transportation (D.O.T.) or the Standard for Cylinders, Spheres and
Tubes for Transportation of Dangerous Goods and Commission, CAN/
CSA-B339, as applicable.
The cylinder connection device must be compatible with the
connection for this outdoor appliance.
The propane cylinder must have:
• A shutoff valve with a QCC1 connection
• A safety relief device
• A collar to protect the valve
• A listed Overfill Protection Device
1. Check the cylinder for dents or rust, and have it inspected by
your propane supplier.
2. Ensure the gas regulator hose has no kinks.
3. Do not route the hose in close proximity to the drip pan.
4. Remove the cap or plug from the cylinder fuel valve.
5. Insert the black QCC1 regulator nipple onto the QCC1 fuel valve.
Hand tighten to right. Do not use tools.
6. Ensure the hose does not contact any high temperature surfaces
of the grill because it will melt and cause a fire.
7. Leak test all joints prior to operating the grill.
See "Leak Test".
(BIG 44/38/32
)
(BIB 18 /10)
(BIB 18/10)
WARNING! The connectors must be of rigid pipe, copper tube or approved flexible metal which must comply
with Z21.24/CSA 6.10 or ANSI Z21.75/CSA 6.27
WARNING! Do not store a spare propane cylinder below the grill head or side burners.
WARNING! Never use a propane cylinder that is beyond 80% full.
WARNING! Follow all specifications and instructions exactly to prevent fire, explosion, property damage, personal
injury, or death.
WARNING! Disconnect the grill and its individual shutoff valve from the gas supply piping system during any
pressure testing in excess of ½ psi (3.5 kPa).
Getting Started
!
!
(BIB 18/10)
8| Getting Started Napoleon.com | BUILT-IN Series
Getting Started
Opening A
Opening B
5"
(12.7 cm)
5"
(12.7 cm)
1" (2.54 cm)
34"
(86.36 cm)
2" (5.1cm)
If placing the Cylinder in a Built-in Enclosure
• The design of the enclosure should allow for the gas cylinder to be connected, disconnected, and the connections inspected
and tested outside of it. The connections that could possibly be disturbed when installing the cylinder in the enclosure can
be leak tested inside.
• The cylinder must be isolated from the grill enclosure, and protected from radiation, flames, hot drippings, and other foreign
or hazardous materials.
• A door on the enclosure to access the cylinder is acceptable if it is non-locking and can be opened without using tools.
• There must be a minimum clearance of 2in (5.08cm) between the floor of the cylinder enclosure and the ground.
• Ensure there are at least two unobstructed ventilation openings on the exposed exterior side of enclosure, one within
5inches (12.7cm) of the top of the enclosure, and another within 1inch (2.54cm) of the cylinder opening’s bottom
surface.
• The top opening must have a total free area of more than 20in2(130cm2) for a 20lb (9.1kg) cylinder and 30in2(195cm2)
for a 30lb (13.6kg) cylinder
• The bottom opening must have a total free area of more than 10in2(65cm2) for a 20lb (9.1kg) cylinder and 15in2
(100cm2) for a 30lb (13.6kg) cylinder.
The upper edge must be no more than 5in (127mm) above the floor level.
• Every opening must be large enough to permit the entrance of a 1/8in (3.2mm) rod.
• The opening must have a free area depending on the cylinder size:
Cylinder size Opening A area Opening B area
20 lb (9.1 kg) 20 inches² (130 cm²) 10 inches (65 cm²)
30 lb (13.6 kg) 30 inches² (195 cm²) 15 inches² (100 cm²)
WARNING! Close the individual shutoff valve to isolate the grill from the gas supply piping system during any
pressure testing equal to or less than ½ Psi (3.5 kPa).
WARNING! Check the hose for evidence of excessive abrasion, melting, cuts or cracks. If the hose is damaged,
it must be replaced with an assembly specifically recommended by Napoleon.
Getting Started
!

Other manuals for BUILT-IN Series

6

This manual suits for next models

5

Other Napoleon Grill manuals

Napoleon Gourmet Gas Grill Manual

Napoleon

Napoleon Gourmet Gas Grill Manual

Napoleon VPrestige PF450 User manual

Napoleon

Napoleon VPrestige PF450 User manual

Napoleon PRO665-3 User manual

Napoleon

Napoleon PRO665-3 User manual

Napoleon NK22CK-L User manual

Napoleon

Napoleon NK22CK-L User manual

Napoleon 410 User manual

Napoleon

Napoleon 410 User manual

Napoleon NK22CK-C User manual

Napoleon

Napoleon NK22CK-C User manual

Napoleon BILEX 605 User manual

Napoleon

Napoleon BILEX 605 User manual

Napoleon 325SB User manual

Napoleon

Napoleon 325SB User manual

Napoleon BIPRO665RBNSS3 User manual

Napoleon

Napoleon BIPRO665RBNSS3 User manual

Napoleon ROGUE Series User manual

Napoleon

Napoleon ROGUE Series User manual

Napoleon Prestige Pro Series User manual

Napoleon

Napoleon Prestige Pro Series User manual

Napoleon PRO285E User manual

Napoleon

Napoleon PRO285E User manual

Napoleon PRESTIGE V 450 User manual

Napoleon

Napoleon PRESTIGE V 450 User manual

Napoleon O-Grill 3000 User manual

Napoleon

Napoleon O-Grill 3000 User manual

Napoleon NK18K-LEG User manual

Napoleon

Napoleon NK18K-LEG User manual

Napoleon PRO285EBK User manual

Napoleon

Napoleon PRO285EBK User manual

Napoleon RSE525RSIB User manual

Napoleon

Napoleon RSE525RSIB User manual

Napoleon PRO500-3 User manual

Napoleon

Napoleon PRO500-3 User manual

Napoleon BIPRO825RBISS-3 User manual

Napoleon

Napoleon BIPRO825RBISS-3 User manual

Napoleon MIRAGE 605 User manual

Napoleon

Napoleon MIRAGE 605 User manual

Napoleon ROGUE 425 User manual

Napoleon

Napoleon ROGUE 425 User manual

Napoleon PRO285X-MK-PHM User manual

Napoleon

Napoleon PRO285X-MK-PHM User manual

Napoleon ROGUE SE Series User manual

Napoleon

Napoleon ROGUE SE Series User manual

Napoleon BI12 User manual

Napoleon

Napoleon BI12 User manual

Popular Grill manuals by other brands

Traeger BBQ400.04 Assembly instructions

Traeger

Traeger BBQ400.04 Assembly instructions

Thermador Char Glo CGB30CZLP installation instructions

Thermador

Thermador Char Glo CGB30CZLP installation instructions

Weber ELECTRIC GRILL owner's manual

Weber

Weber ELECTRIC GRILL owner's manual

Falcon G9622 instruction manual

Falcon

Falcon G9622 instruction manual

GRILLWERK KENA instruction manual

GRILLWERK

GRILLWERK KENA instruction manual

ACME GE-200 user manual

ACME

ACME GE-200 user manual

HIGH ONE 973807 Instructions for use

HIGH ONE

HIGH ONE 973807 Instructions for use

Living & Co Brazier with grill Assembly instructions

Living & Co

Living & Co Brazier with grill Assembly instructions

Toya 99641 manual

Toya

Toya 99641 manual

BBQ 60079 manual

BBQ

BBQ 60079 manual

Rowenta OPTIGRILL+ GR712D21 Instructions for use

Rowenta

Rowenta OPTIGRILL+ GR712D21 Instructions for use

RUSTA PAMPAS XL manual

RUSTA

RUSTA PAMPAS XL manual

Bosch TFB440 Series operating instructions

Bosch

Bosch TFB440 Series operating instructions

Nouvel 401931 Instructions for use

Nouvel

Nouvel 401931 Instructions for use

Char-Broil Basic C58G4 Product guide

Char-Broil

Char-Broil Basic C58G4 Product guide

Livoo DOC232 manual

Livoo

Livoo DOC232 manual

nedis FCRA210FBK6 quick start guide

nedis

nedis FCRA210FBK6 quick start guide

Weber Performer Touch-N-Go Ignition owner's manual

Weber

Weber Performer Touch-N-Go Ignition owner's manual

manuals.online logo
manuals.online logoBrands
  • About & Mission
  • Contact us
  • Privacy Policy
  • Terms and Conditions

Copyright 2025 Manuals.Online. All Rights Reserved.