Napoleon IR3-1 User manual

W415-1198 /05.24.13
EN
IR3-1 REMOTE OPERATING INSTRUCTIONS
IF YOU DO NOT FOLLOW THESE INSTRUCTIONS EXACTLY, A FIRE OR EXPLOSION MAY RESULT
CAUSING PROPERTY DAMAGE, PERSONAL INJURY OR LOSS OF LIFE.
ALWAYS LIGHT THE PILOT WHETHER FOR THE FIRST TIME OR IF THE GAS SUPPLY HAS RUN OUT WITH
THE GLASS DOOR OPENED OR REMOVED.
!
WARNING
MANTEMPTIMER
P1
P2
F
Cam
pm
:
LOW BATTERY
INDICTOR
SIGNAL INDICTOR
TEMPERATURE
DISPLAY
TIME DISPLAY
MODES OF
OPERATION
TIMER DISPLAY
ON/OFF
TEMPERATURE
SETTING
SET BUTTON
OFF BUTTON
LARGE FLAME BUTTON
SMALL FLAME BUTTON
6.2.1 GENERAL REMOTE TRANSMITTER LAYOUT
6.2.2 PROGRAMMING
A. Press and hold the receiver's reset button until you hear two beeps. (First beep is short, second beep
is long.) Release the button after the second beep, refer to "INSTALLATION OVERVIEW" for receiver
location.
B. Within the subsequent 20 seconds press and hold the small flame button on the remote transmitter
until you hear two additional short beeps confirming the code is set, refer to "GENERAL REMOTE
TRANSMITTER LAYOUT". (NOTE: One long beep indicates the sequence has failed or wiring is
incorrect).
NOTE: This is a one time setting only, and is not required after changing the batteries of the remote or receiver.

W415-1198 / 05.24.13
EN
A. Using the remote transmitter press the "OFF" button.
NOTE: To turn the appliance on after pressing the "OFF" button, you must wait 30 seconds. The
appliance will shut off if no change has occured to the flame height or if the appliance has not turned
on for a period of 5 days.
A. Press the "Set" button to change modes.
B. The modes change in the following order:
NOTE: Refer to "GENERAL REMOTE TRANSMITTER LAYOUT".
MAN TEMP TEMP TIMER MAN
• For flame height adjustment in Manual Mode MAN double click the large flame button to
increase to the highest flame height. Double click the small flame button to decrease to the
lowest flame height. Press the large flame button to increase flame height or the small flame
button to decrease flame height. NOTE: Holding the small flame button for too long
will switch the appliance to pilot mode. To turn the appliance off completely press the
"OFF" button.
• For Daytime Temperature Mode TEMP the appliance must be set to standby mode (pilot
ignited). The default temperature setting for this mode is 23°C / 74°F. (Daytime Temperature
mode is set by comparing the set temperature and room temperature, the flame height is then
adjusted automatically to achieve this Daytime Temperature setting.)
• For Nighttime Temperature Mode TEMP the appliance must be set to standby mode (pilot
ignited). (Nighttime Temperature mode is set by comparing the night time set temperature and
room temperature, the flame height is then adjusted automatically to achieve this Nighttime
Temperature setting.)
• Timer Mode
TIMER the appliance must be set to standby mode (pilot ignited). There are two
timer settings available (P1 and P2) allowing the appliance turn off and to turn on at specified
times. NOTE: The "TIMER DISPLAY" indicates the set temperature every 30 seconds.
6.2.3 TURNING "ON" THE APPLIANCE
A. Place the "ON/OFF" switch in the "ON" position by the receiver, refer to "INSTALLATION OVERVIEW"
for location.
B. Using the remote transmitter simultaneously press the large flame button and the OFF button until
you hear a short beep, this confirms the start of the appliance, you can then release both buttons. (The
ignition process has begun once continuous beeping has begun).
C. Wait several seconds for the appliance to ignite. After main ignition the remote will default to the
Daytime Temperature Mode TEMP .
NOTE: Refer to "GENERAL REMOTE TRANSMITTER LAYOUT".
6.2.4 TURNING "OFF" THE APPLIANCE
6.2.5 HAND HELD REMOTE TRANSMITTER OPERATIONS

W415-1198 /05.24.13
EN
A. Using the remote transmitter you may set the flame directly to the "HI" setting by double clicking the
large flame button . Increasing the flame height can also be done by pressing and holding the large
flame button .
B. Using the remote transmitter you may set the flame directly to the "LO" setting by double clicking the
small flame button . Decrease the flame height can also be done by pressing and holding the small
flame button .
NOTE: For fine adjustment tap the large flame button or small flame button when using the remote
transmitter. If the small flame button is held too long the main burner will turn off.
NOTE: Time display will flash upon battery installation or when the large and small flame buttons are
pressed simultaneously.
A. To set the hour press the large flame button .
B. To set the minutes press the small flame button .
C. Press the "OFF" button to set the time.
A. To set the Timer Mode quickly press the SET button, scrolling to the desired mode.
B. To scroll through P1 , P1 , P2 ,P2 briefly press the set button.
C. Once the desired timer function is shown on the display and the time flashes, press the large flame
button to adjust the hour and the small flame button to adjust the minutes. Press the "OFF" button
to set the time.
NOTE: The default setting for the Timer Function is as follows:
P1 6:00am and P2 8:00pm, P2
11:50 and P2 11:50, refer to "GENERAL REMOTE TRANSMITTER LAYOUT".
NOTE:
Press the "OFF" button and the small flame button simultaneously until the temperature
display changes from Fahrenheit to Celsius, and vice versa.
When changing from Fahrenheit to Celsius
the clock will change from a 12 hour to 24 hour clock, r
efer to "GENERAL REMOTE TRANSMITTER
LAYOUT".
A. To set Daytime Temperature Mode quickly press the SET button, scrolling to the desired mode, then
hold the SET button until the "TEMP" on the display flashes.
B. To increase the Daytime Temperature press the large flame button . To decrease the Daytime
Temperature press the small flame button . To use this setting as the new temperature press the OFF
button.
C. To set Nighttime Temperature Mode quickly press the SET button, scrolling to the desired mode, then
hold the SET button untill the "TEMP" on the display flashes.
D. To increase the Nighttime Temperature press the large flame button . To decrease the Nighttime
Temperature press the small flame button . To use this setting as the new temperature press the OFF
button.
NOTE: When in regular operation the remote will always show the room temperature.
6.2.6 TEMPERATURE DISPLAY
6.2.7 SETTING THE TIME
6.2.8 SETTING THE TIMER FUNCTION
6.2.9 FLAME HEIGHT

W415-1198 / 05.24.13
EN
A. Frequent beeping for 3 seconds when the appliance turns on indicates low battery on the remote
receiver. The battery pack is located on the bottom right side of the appliance, refer to "INSTALLATION
OVERVIEW" for location.
B. Low battery indicator is in the top right corner of the remote, we also recommend replacing the
batteries every two years.
NOTE: When low battery occurs the appliance will shut down. The appliance will shut off if no change
has occurred to the flame height or the appliance has not turned on for a period of 5 days.
6.2.10 LOW BATTERY
To view a video of this installation VISIT OUR WEBSITE at: www.napoleonfireplaces.com/productsupport/ir3-1/
NOTE: FOR MORE DETAILED INSTRUCTIONS REFER TO YOUR INSTALLATION MANUAL.

FR
W415-1198 / 05.29.13
MANTEMPTIMER
P1
P2
F
Cam
pm
:
ALARME DE
PILE FAIBLE
INDICATEUR DE SIGNAL
TEMPÉRATURE
RÉGLÉE
AFFICHAGE DE L’HEURE
MODES DE
FONCTIONNEMENT
AFFICHAGE DE
LA MINUTERIE
MARCHE/ARRÊT
RÉGLAGE DE LA
TEMPÉRATURE
BOUTON DE
RÉGLAGE
(“SET”)
BOUTON
D’ÉTEINDRE
(“OFF”)
BOUTON DU
FLAMME HAUT
BOUTON DU
FLAMME BAS
35.26
6.2.1 DESSIN GÉNÉRAL DE LA TÉLÉCOMMANDE
6.2.2 PROGRAMMATION
A. Appuyez sur le bouton RESET du récepteur et maintenez-le enfoncé jusqu’à ce que vous entendiez
deux bips. (Le premier bip est bref et le second bip est long.) Relâchez le bouton après le deuxième bip.
B. Dans les 20 secondes qui suivent, appuyez sur le bouton de la télécommande accompagné d’une
petite flamme jusqu’à ce que vous entendiez deux bips brefs supplémentaires confirmant que le
code est réglé, consultez la section « DESSIN GÉNÉRAL DE LATÉLÉCOMMANDE » pour avoir une
représentation de la télécommande. (REMARQUE : Un long bip indique que la séquence a échoué ou
que le raccordement par fil est incorrect.)
REMARQUE: Il s’agit d’un réglage unique qui ne sera pas requis après le changement des piles de la
télécommande ou du récepteur.
SI CES INSTRUCTIONS NE SONT PAS SUIVIES À LA LETTRE, UN INCENDIE OU UNE EXPLOSION
POURRAIENT S’ENSUIVRE, CAUSANT DES DOMMAGES MATÉRIELS,DES BLESSURES CORPORELLES OU
DES PERTES DE VIE.
ALLUMEZ TOUJOURS LA VEILLEUSE, QUE CE SOIT POUR LA PREMIÈRE FOIS OU LORSQUE
L’APPROVISIONNEMENT EN GAZ EST ÉPUISÉ, AVEC LA PORTE VITRÉE OUVERTE OU RETIRÉE.
!
AVERTISSEMENT
INSTRUCTIONS DE FONCTIONNEMENT DU TÉLÉCOMMANDE DU MODÈLE IR3-1

FR
W415-1198 / 05.29.13
A. Appuyez sur le bouton « OFF » de la télécommande.
REMARQUE: Pour mettre l’appareil en marche après avoir appuyé sur le bouton « OFF », vous devez
attendre 30 secondes. L’appareil s’éteint si aucun changement n’est apporté à la hauteur de la flamme
pendant une période de 5 jours
A. Appuyez sur le bouton « Set » pour changer de mode.
B. modes changent selon l’ordre suivant:
REMARQUE: Consultez la section « DESSIN GÉNÉRAL DE LA TÉLÉCOMMANDE » pour avoir une
représentation de la télécommande.
MAN TEMP TEMP TIMER MAN
• Pour régler la hauteur de la flamme en mode manuel MAN , appuyez deux fois sur le
bouton accompagné d’une grande flamme pour augmenter la hauteur de la flamme
jusqu’à la hauteur la plus élevée. Appuyez deux fois sur le bouton accompagné d’une
petite flamme pour diminuer la hauteur de la flamme jusqu’à la hauteur la plus basse.
Appuyez sur le bouton accompagné d’une grande flamme pour augmenter la hauteur de
la flamme ou sur le bouton accompagné d’une petite flamme pour diminuer la hauteur de
la flamme. REMARQUE : Si vous maintenez le bouton accompagné d’une petite flamme
enfoncé pendant trop longtemps, l’appareil passera en veilleuse. Pour éteindre l’appareil
complètement, appuyez sur le bouton « OFF ».
• Pour le mode température de jour TEMP , l’appareil doit être réglé en mode veille
(ignition du pilote). Le réglage de la température par défaut de ce mode est de 23°C / 74°F.
(Le mode de température de jour est défini en comparant la température configurée et la
température ambiante. La hauteur de la flamme s’ajuste alors automatiquement pour obtenir
la température correspondant au réglage de jour.)
• Pour le mode température de nuit TEMP , l’appareil doit être réglé en mode veille
(ignition du pilote). (Le mode de température de nuit est défini en comparant la température
configurée pour la nuit et la température ambiante. La hauteur de la flamme s’ajuste alors
automatiquement pour obtenir la température correspondant au réglage de nuit.)
• Pour le mode minuterie TIMER , l’appareil doit être réglé en mode veille (ignition du pilote).
Deux réglages de minuterie sont disponibles (P1 et P2) et permettent à l’appareil de
s’éteindre et de s’allumer à des moments précis. REMARQUE: L’« AFFICHAGE DE LA
MINUTERIE » indique la température de consigne toutes les 30 secondes.
6.2.3 ALLUMÉE L'APAREIL
A. Placez le commutateur « MARCHE/ARRÊT » en position « ON » avec le récepteur, consultez la
section « DESSIN GÉNÉRAL DE LATÉLÉCOMMANDE » pour la location du récepteur.
B. À l’aide de la télécommande, appuyez simultanément sur le bouton de la grande flamme et sur le
bouton OFF jusqu’à ce que vous entendiez un bip bref; cela confirme le démarrage de l’appareil et
vous pouvez alors relâcher les deux boutons. (Le processus d’allumage commence dès le début du
bip continu.)
C. Attendez quelques secondes pour que le feu s’allume dans l’appareil. Après l’allumage principal, la
télécommande se réglera par défaut à la mode température de jour TEMP .
REMARQUE: Consultez la section « DESSIN GÉNÉRAL DE LA TÉLÉCOMMANDE ».
6.2.4 ÉTEINDRE L'APPAREIL
6.2.5 FONCTIONEMENT DE LA TÉLÉCOMMANDE

FR
W415-1198 / 05.29.13
A. À l’aide de la télécommande, vous pouvez régler la hauteur de la flamme à « ÉLEVÉ » en appuyant
deux fois sur le bouton accompagné d’une grande flamme . Vous pouvez également augmenter
la hauteur de la flamme en appuyant sur le bouton accompagné d’une grande flamme et en le
maintenant enfoncé.
B. À l’aide de la télécommande, vous pouvez régler la hauteur de la flamme à « BAS » en appuyant deux
fois sur le bouton accompagné d’une petite flamme . Vous pouvez également diminuer la hauteur de
la flamme en appuyant sur le bouton accompagné d’une petite flamme et en le maintenant enfoncé.
REMARQUE: Pour un réglage précis, appuyez et relâchez aussitôt le bouton accompagné d’une grande
flamme ou le bouton accompagné d’une petite flamme lorsque vous utilisez la télécommande. Si le
bouton accompagné d’une petite flamme est maintenu enfoncé trop longtemps, le brûleur principal s’éteint.
REMARQUE: L’affichage de l’heure se met à clignoter à la suite de l’installation des piles ou lorsque les
boutons accompagnés d’une grande et d’une petite flamme sont enfoncés simultanément.
A. Pour ajuster l’heure, appuyez sur le bouton accompagné d’une grande flamme .
B. Pour ajuster les minutes, appuyez sur le bouton accompagné d’une petite flamme .
C. Appuyez sur le bouton« OFF » pour régler l’heure.
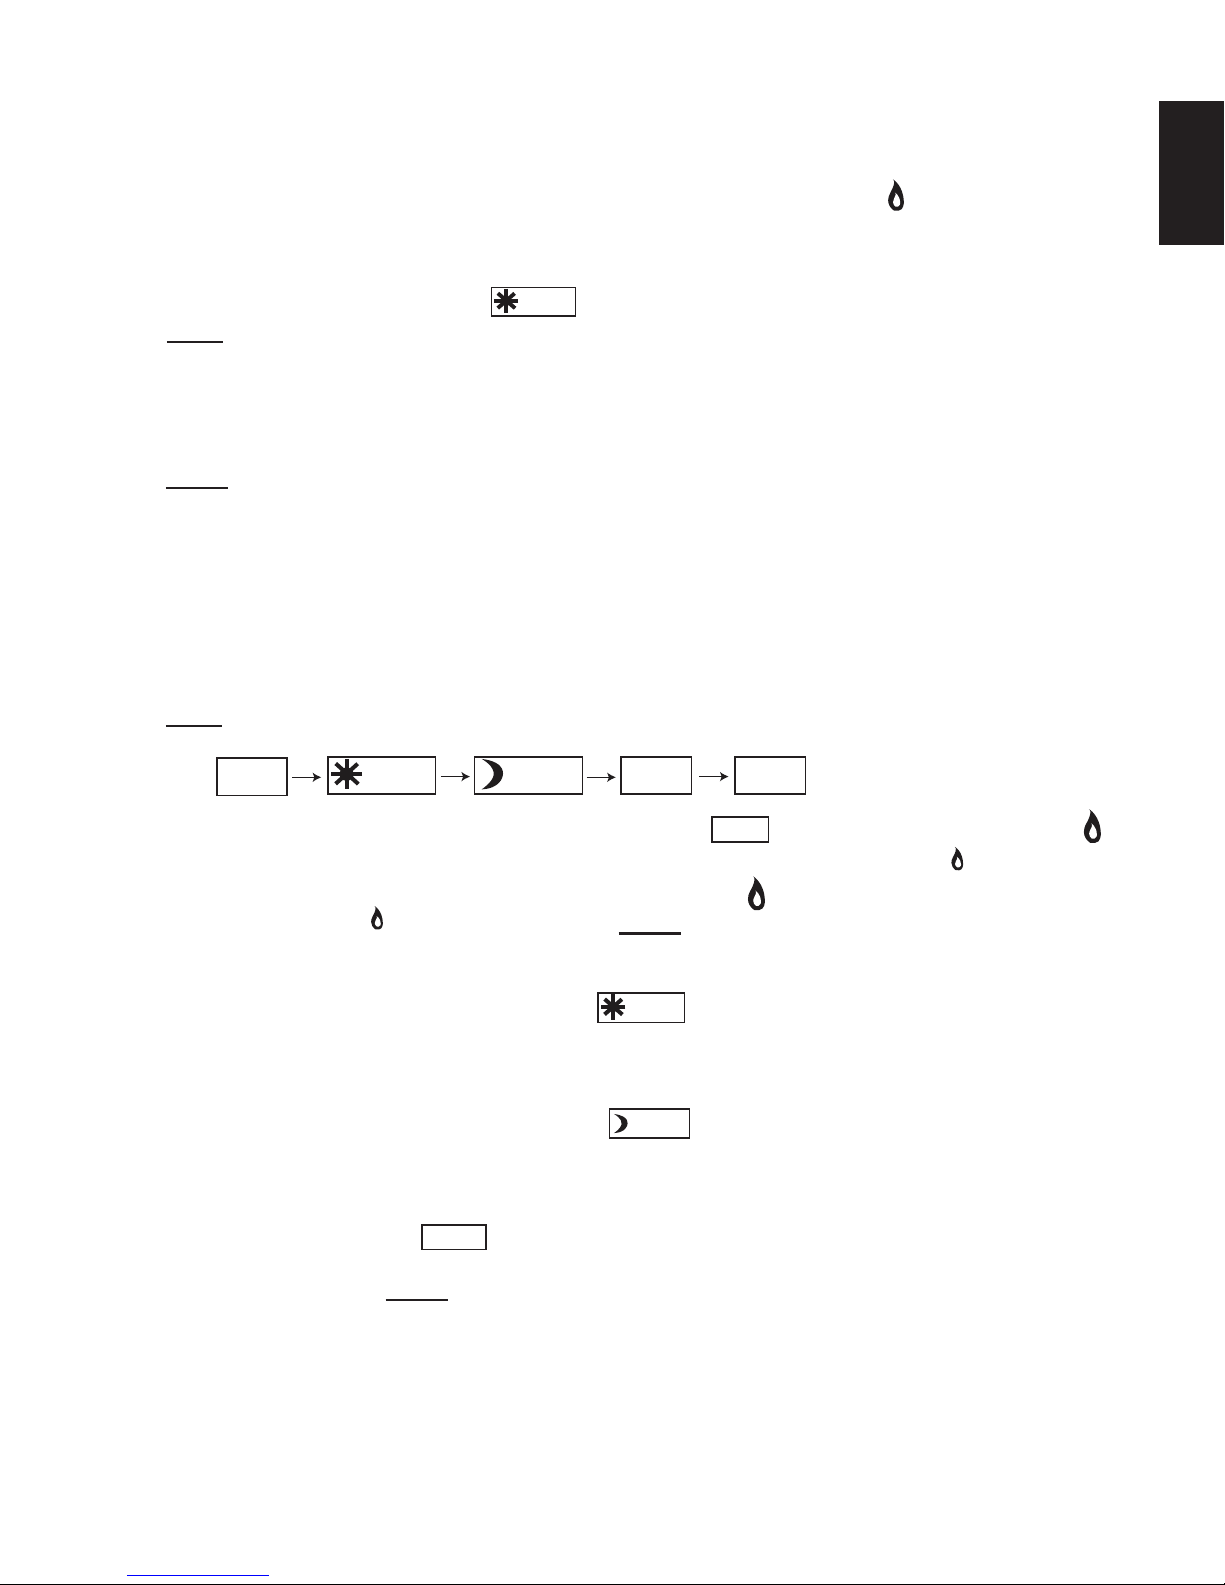
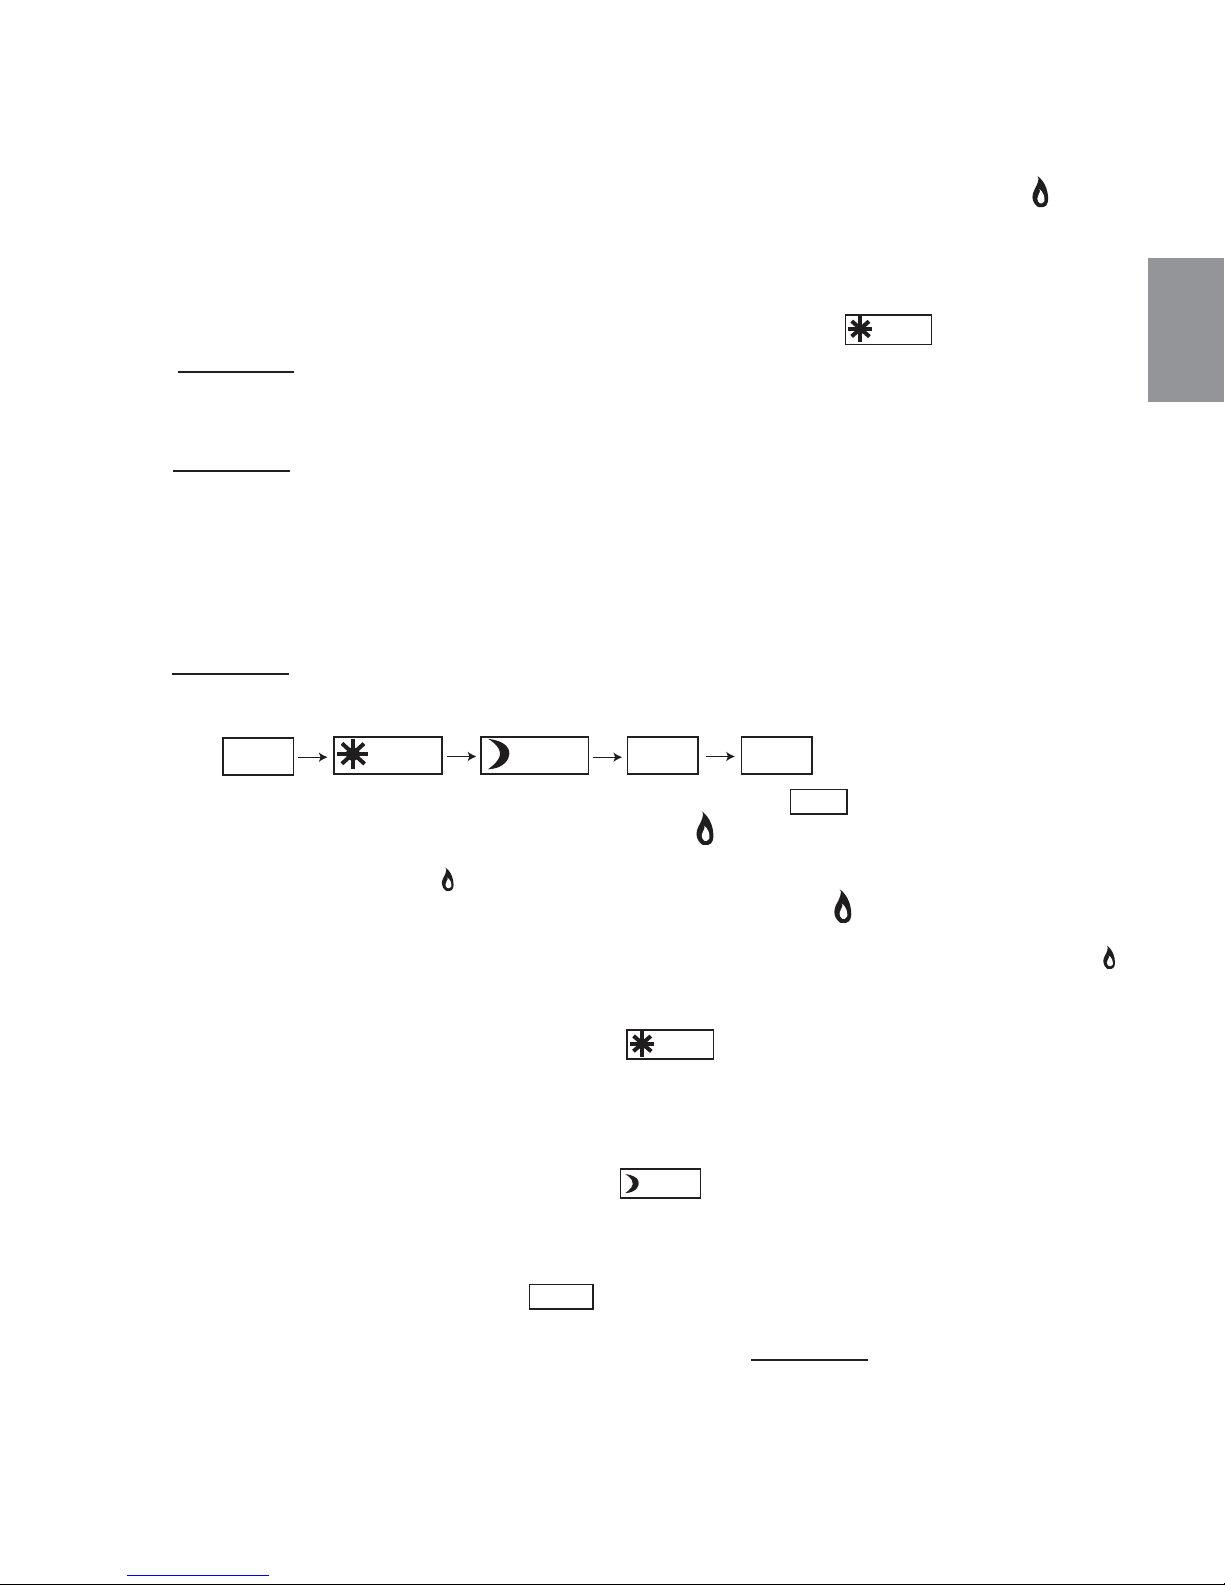
A. Pour régler le mode minuterie, appuyez brièvement sur le bouton SET et faites défiler jusqu’au mode désiré.
B. Défiler entre P1 , P1 , P2 , P2 par appuyez sur le bouton SET.
C. Après que le temps desirées du minuterie est montré et l’heures clignote, appuyez sur le bouton
accompagné d’une grande la flamme pour ajuster l’heure et sur le bouton accompagné d’une petite
flamme pour ajuster les minutes. Appuyez sur le bouton « OFF » pour régler l’heure.
REMARQUE: Le réglage par défaut de la fonction de minuterie est le suivant : P1 6 h et P2 8 h,
P2 11 h 50 et P2 11 h 50, consultez la section « DESSIN GÉNÉRAL DE LA TÉLÉCOMMANDE ».
REMARQUE: Appuyez simultanément sur le bouton « OFF » et sur le bouton accompagné d’une petite
flamme jusqu’à ce que l’affichage de la température en degrés Fahrenheit passe en Celsius, et vice
versa. Lors du changement de Fahrenheit en Celsius l’horloge passera du mode 12 heures au mode 24
heures, consultez la section « DESSIN GÉNÉRAL DE LA TÉLÉCOMMANDE » .
A.
Pour régler le mode de température de jour, appuyez brièvement sur le bouton SET, faites défiler jusqu’au
mode désiré, puis maintenez le bouton SET enfoncé jusqu’à ce que «TEMP» clignote à l’écran
.
B. Pour augmenter la température de jour, appuyez sur le bouton accompagné d’une grande flamme .
Pour diminuer la température de jour, appuyez sur le bouton accompagné d’une petite flamme . Pour
faire de ce paramètre la nouvelle température configurée, appuyez sur le bouton OFF.
C. Pour régler le mode de température de nuit, appuyez brièvement sur le bouton SET, faites défiler jusqu’au
mode désiré, puis maintenez le bouton SET enfoncé jusqu’à ce que « TEMP » clignote à l’écran.
D. Pour augmenter la température de nuit, appuyer sur le bouton accompagné d’une grande flamme .
Pour diminuer la température de nuit, appuyez sur le bouton accompagné d’une petite flamme . Pour
faire de ce paramètre la nouvelle température configurée, appuyez sur le bouton OFF.
REMARQUE: En fonctionnement normal, la télécommande affiche toujours la température ambiante.
6.2.6 AFFICHEUR DE TEMPÉRATURE
6.2.7 RÉGLÉR L'HEURE
6.2.8 RÉGLÉR LA MINUTERIE
6.2.9 HAUTEUR DE LA FLAMME

FR
W415-1198 / 05.29.13
A. Des bips répétitifs pendant 3 secondes lorsque l’appareil se met en marche indiquent que les piles
du récepteur sont faibles. Le support de piles est située à la côté droite aux bas de l'appareil, voir la
section «VUE D’ENSEMBLE DE L’INSTALLATION » pour l'emplacement.
B. L’indicateur de pile est situé dans le coin supérieur droit de la télécommande. Nous vous
recommandons de remplacer les piles tous les deux ans.
REMARQUE: Lorsque les piles sont faibles, l’appareil s’éteint; cela ne se produira pas si l’alimentation
électrique est interrompue. L’appareil s’éteint si aucun changement n’est apporté à la hauteur de la
flamme pendant une période de 5 jours.
6.2.10 PILES FAIBLES
Pour regarder une vidéo de cette installation visiter notre site web: www.napoleonfireplaces.com/productsupport/ir3-1/
NOTE: VOIR LE MANUEL D’INSTRUCTIONS D’INSTALLATION POUR LES INSTRUCTIONS PLUS DÉTAILLÉES
Table of contents
Languages:
Other Napoleon Remote Control manuals
Popular Remote Control manuals by other brands

TLW
TLW VEW K30-2034CCTZ installation guide

ACR Electronics
ACR Electronics 1933 Product support manual

CARDIN ELETTRONIC
CARDIN ELETTRONIC S449 Series instructions

Fingertips Lab
Fingertips Lab O6 quick start guide

Philips
Philips Prestigo SRU8112 Specifications

Toshiba
Toshiba Carrier RBC-AX22CUL installation manual