NASAB 35HD-DUAL-NAS User manual

SUOMI
ENGLISH
38-2447
Dual HDD NAS Unit
Ulkoinen kotelo
Model/Malli 35HD-DUAL-NAS


ENGLISH
Dual HDD NAS Unit
Art.no 38-2447, modell 35HD-DUAL-NAS
Please read the entire instruction manual before using and save it for future use.
We apologise for any text or photo errors and any changes of technical data.
If you have any questions concerning technical problems please contact our
Customer Service Department (see address on reverse.)
Product Description
This unit contains:
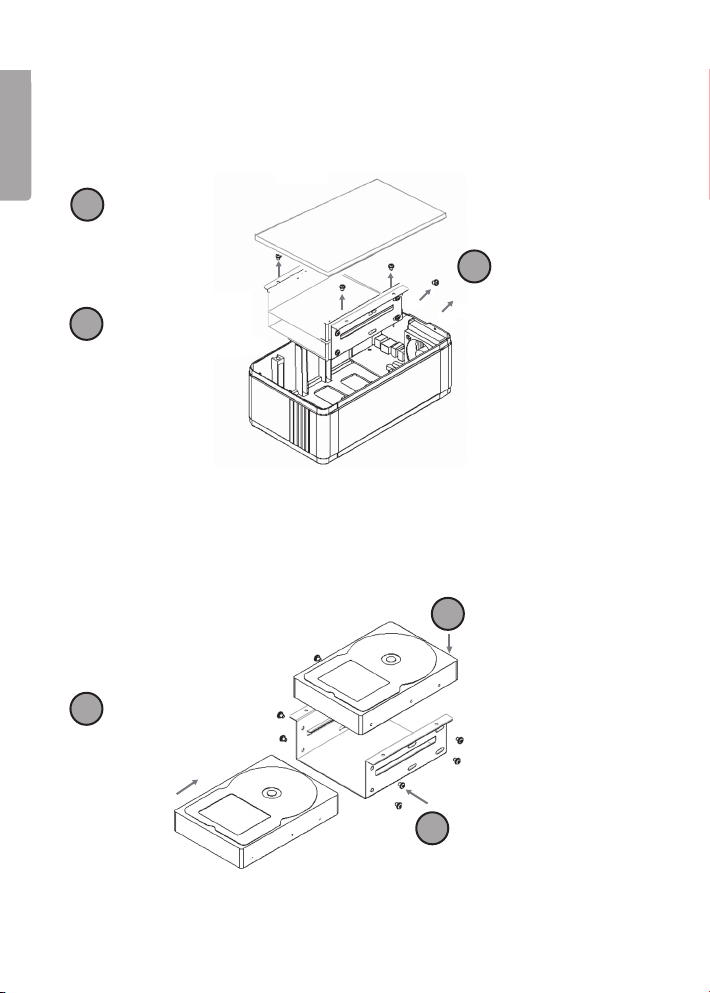
- Box with room for two hard disks
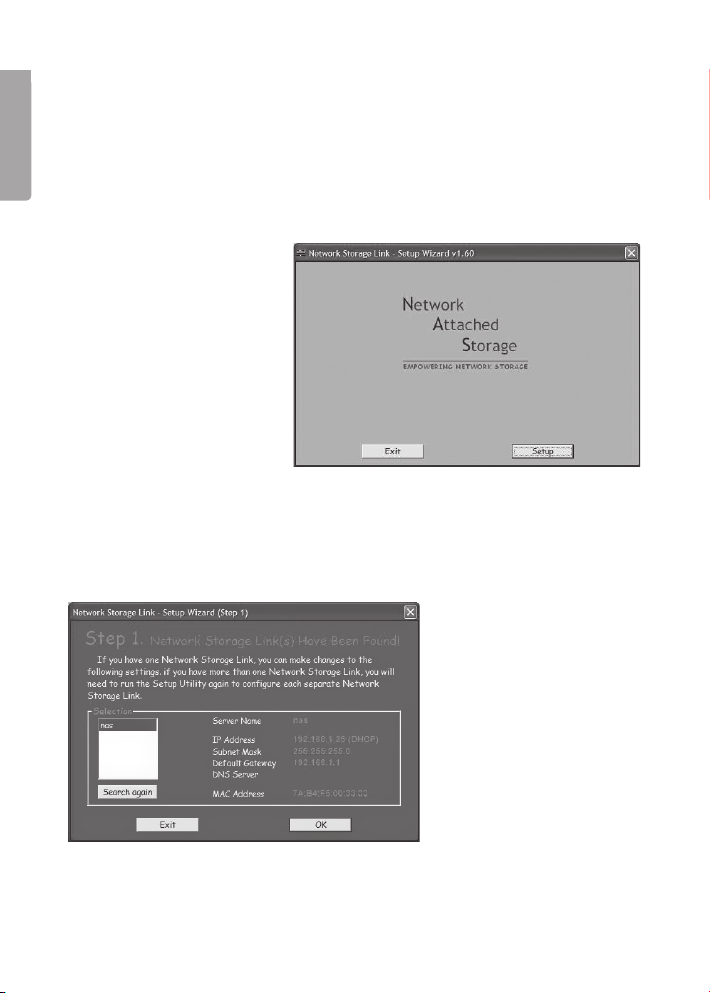
- CD-ROM containing the installation program and installation instructions in
English
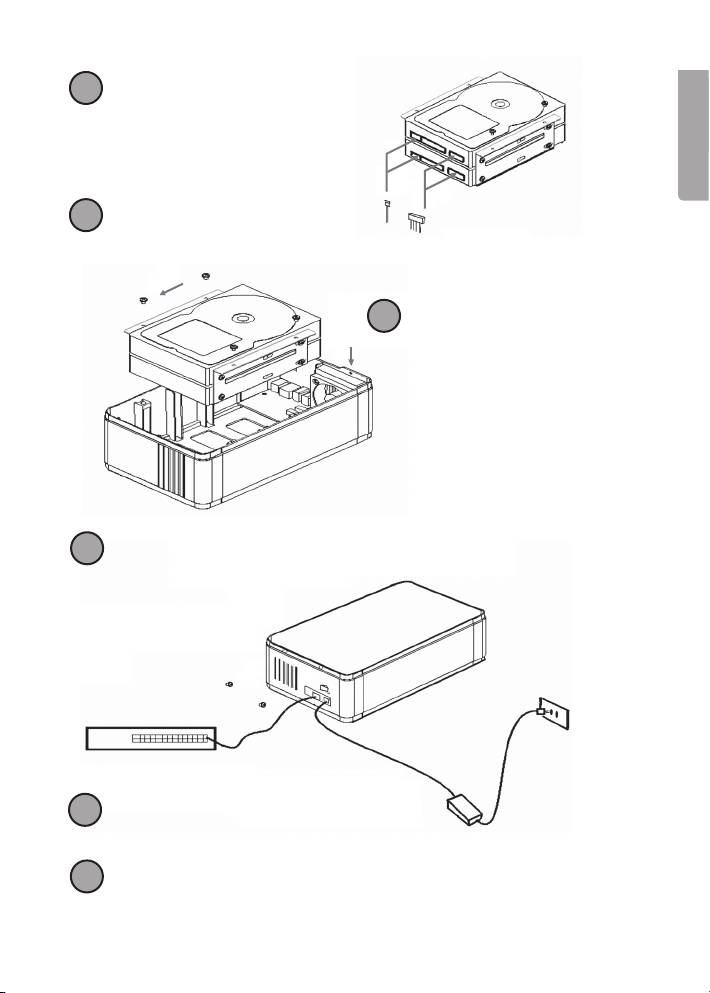
- Network Cable, 1 metre (CAT5 UTP)
- Power adaptor (1 V DC, 4 A)
Buttons and Functions
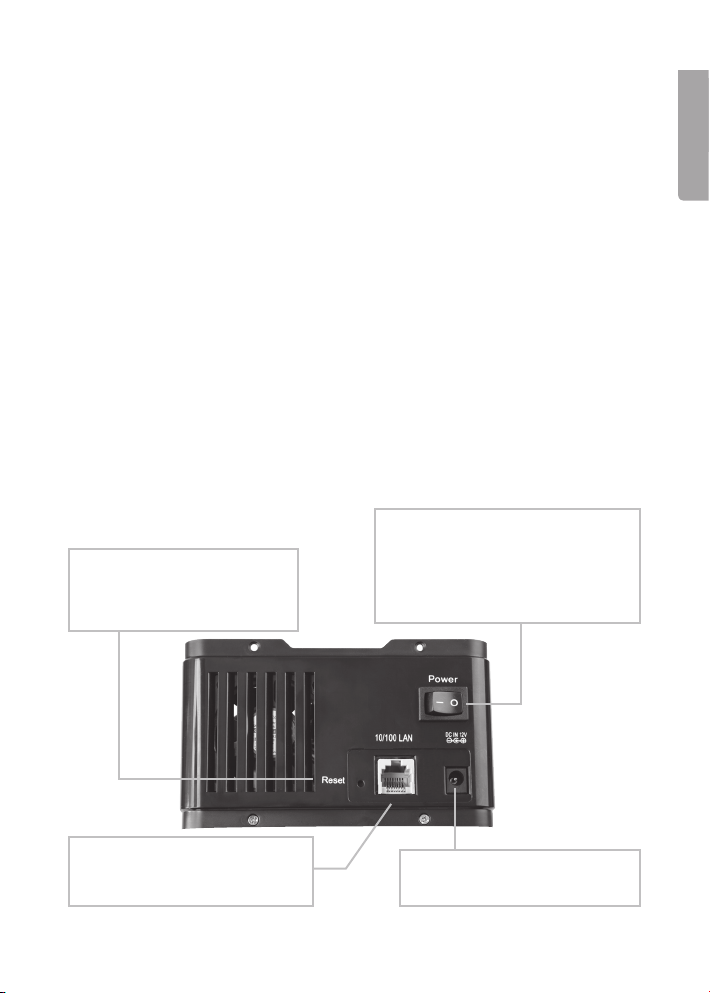
The back of the unit
POWER
Press this button to turn the unit
on or off. It takes approximately
minutes to both start and stop the
unit’s operative system.
Reset
Press this button to reset the
unit to its factory settings.
10/100 LAN
Connection for network cable
to router/switch.
DC IN 12 V
Connection for power adaptor.

4
ENGLISH
The front of the unit
PWR – Lights when the
unit is turned on.
LINK – Lights when the
camera is connected to
the network.
ACT – Flashes when
data is transferred.
Menus
The main menus will be shown in the upper part of the web conguration.
Sub-menus will appear when a choice has been made in the main menu.
Basic
- Quick Setup – Guide for conguring users and groups.

5
ENGLISH
Control Panel
- Users and Groups – For conguring users and groups.
- File and Print – For conguring le servers and FTP servers.
- System – For conguring networks, time and dates. Starts or shuts off the
unit. Shows information about the hard disks.
- Network Service – Activates/deactivates the DHCP server.
- Maintenance – congures the hard disks for e.g. RAID. Updates the unit’s
software or resets it to the factory settings.
- Log le – Shows the system’s log les.
Personal Info
- Personal Information – Change your password and language.

ENGLISH
1. Unscrew the two
screws on the back
of the lid, as shown
in the picture.
1
Installation
Installing Hard Disks
. Remove the lid by
lifting it straight up
on the side with
the screw holes.
. Unscrew the four
screws holding
the Hard Disk
Mount and lift it
straight up.
2
3
If two hard disks are to be used, they can be placed over one another in the
Hard Disk Mount.
4. Insert the rst hard
disk into the lower
mount.
5. Place the second
hard disk in the
upper mount.
. Fasten the hard disks in
place using the included
screws.
4
5
6

ENGLISH
. Connect both the SATA cables and
power cables to the hard disks.
8. Reinsert the Hard Disk Mount
into the unit.
9. Tighten the screws.
10. Replace the lid and the
two screws.
7
9
8
10
11. Connect the network cable and the
power adaptor to the unit.
1. Turn on the unit using the power switch.
11
12

8
ENGLISH
Conguration
Note!
The following installation instructions apply for Windows XP with Service pack
installed.
1. Insert the CD-ROM supplied and run the SetupUtil.exe le.
. Click on “Setup” to start
the conguration guide
or “Exit” to quit.
. The software will now search for the unit in the network. Available units will
be displayed on the screen. If no unit is displayed, click on “Search again”
to make another search.
4. Mark ”nas” in the list
and click on “OK”.

9
ENGLISH
5. Enter you password when it is asked for and click on ”OK”. The preset
password is set to “admin”.
. Make your choices and then click “Next” to continue.
o “Automatically obtain an IP address (DHCP)”
automatically gets you an IP address from your router.
o ”Set IP conguration manually”
Allows you to congure the IP address manually.

10
ENGLISH
. Select your time zone, date and time then click on “Next”.
8. Your old and new settings will be displayed. Click on “Save” to save or
“Back” to go back and change your settings. The settings will be saved and
the rst dialogue window will appear.

11
ENGLISH
9. Double click on the name of the unit, in this case ”nas”.
10. Your web browser will start and the login page will appear. Enter the user
name “admin” and the password “admin” and then click on “Login”.

1
ENGLISH
11. If the hard disks are unformatted or formatted with NTFS, they rst need to
be reformatted to EXT, EXT or FAT.
If the hard disk/s are already formatted, go to step 1.
i. Click on “Maintenance” in the left menu and then “Disk Utility”.

1
ENGLISH
ii. Select the desired le format from the scroll list and click on “Format”.
iii. The time needed to format the hard disk can vary depending on the size
of the hard disk.

14
ENGLISH
iv. Wait until the formating is complete and click on “Login” when the
dialogue box appears.
v. Note!
The unit cannot be be used with NTFS formated hard disks.
1. If the installed hard disks are formatted, the following start page will appear
after you have logged in:
RAID conguration
If two hard disks of the same capacity are installed, they can be RAID
congured.
- Select “Control Panel” in the upper menu, and then in the sub-menu
“Maintenance” > “RAID Setting”.
o None
No RAID function.
o RAID 1
If the two disks are to be ”mirrored” so that both contain an ex-
act copy of the same data, you should select RAID 1. If one of
the disks breaks, the same data will be saved on the other disk.
The total capacity will be the same as that of one of the disks.
o Select this setting if the two disks are to be added together
to build an array, increasing the storage capacity and access
speed. The total storage capacity is the sum of the individual
disk capacities. However, should one of the disks break, the
data stored on both disks will be lost.
o Format
Select the le format for the disk/s, EXT or EXT (Linux).
o Save
Click to save settings and begin the formatting.

15
ENGLISH
Using the guide (Wizard)
1. Preference Language Setting
Select ”Set from browser options” to select the same language for the menu
as the web browser.
2. New Password Setting
Change the administration password.
3. Hostname Setting
Change the unit’s name in the network.

1
ENGLISH
4. Internet Protocol Setting (Change IP address)
Congures an IP address and DNS server addresses.
5. Time Settings (Time and date)
Change the time and date settings.
6. Wizard Setting Conrmation
Displays completed settings.

1
ENGLISH
Samba Server Conguration
Create a new user
1. Select “Basic” in the upper menu, and then sub-menu “Quick Setup” >
“Add User”.
. Enter a user name and a password. Check the box “Create Private Folder
(Share)”, and then click on “Next”.
. Select whether or not the user is to be a member of a user group. Mark
the group and click on “Add” to add to the members of the group. Click on
“Next” to continue.

18
ENGLISH
4. Select the level of access your user is to be granted. Mark in the list and
click on “Read Only” if the user is only to be granted permission to read the
data or “Writable” if the user is allowed to amend the data.
5. Click on “Complete” to exit the guide.
. When the new user has been added there should be a folder with the same
name in ”My network place” (in this case, user1).
Adding a new user group
1. Select “Basic” in the upper menu, and then sub-menu “Quick Setup” >
“Add Group”.

19
ENGLISH
. Enter a name for the new group. Click on “Next” to continue.
. Select which users are to be members of the user group. Mark the mem-
bers and click on “Add” to add the members to the group. Click on “Next”
to continue.
4. Select the level of access your group is to be granted. Mark in the list and
click on “Read Only” if the user is only to be granted permission to read
the data or “Writable” if the user is allowed to amend the data.
5. Click on “Complete” to exit the guide.
The user can now access his/her folder in the unit via the network using his/her
user name and password.

0
ENGLISH
FTP server conguration
By conguring an FTP server, folders can be shared via the Internet. In order to
add to the user account you rst need to create a new user. Read the section
“Create a new user”.
1. Select “Basic” in the upper menu, and then sub-menu “Quick Setup” >
“Add Share”.
. Enter a name for the FTP server. Click on “Next” to continue.
. Select which users are to have access to the FTP server. Mark a user or
group in the right hand list and click on “Read Only” if the user/group is only
to be granted permission to read the data or “Writable” if the user/group is
allowed to amend the data. Click on “Next” to continue.
Table of contents
Languages:
Other NASAB Storage manuals