Naterial NORI 2 User manual

NORI 2
AW3 RM 2.95x2
AW3 RM 3.95x3
AW3 RM 4.95x3
EAN CODE :
3276007182880
3276007182446
3276007182507
3276007182569
3276007182637
3276007182682
3276007182750
2020/12-V01
EN
BR
Tradução das Instruções originais / Original instruction manual
FR
Notice de montage -
Utilisation - Entretien
ES
Instrucciones de Montaje,
Utilización y Mantenimiento
PT
Instruções de Montagem,
Utilização e Manutenção
IT
Istruzioni per il Montaggio,
l’Uso e la Manutenzione
EL
Εγχειρίδιο συναρμολόγησης,
χρήσης και συντήρησης
PL
Instrukcja Montażu,
Użytkowania і Konserwacji
RU
Руководство По Сборке
и Эксплуатации
KZ
Жннау, лайдалану жэне
техникалық қызмет
көрсету нұсқаулығы
UA
Керівництво По Збірці і
Експлуатації
RO
Manual asamblare,
utilizare și întreținere
EN
Assembly - Use -
Maintenance Manual
NORI 2
Traduction de la version originale du mode d’emploi / Traducción de las Instrucciones originales / Tradução das Instruções Originais / Traduzione delle istruzioni originali / Μετάφραση τωνπρωτότυπωνοδηγιών /
Tłumaczenie instrukcji oryginalnej / Перевод оригинала инструкции / Түпнұсқа нұсқаулар / Переклад оригінальної інструкції / Traducerea instrucțiunilor originale / Original Instructions
2020/11-V01
2018/04 - V01
AW3 RM 2.95x2
AW3 RM 3.95x3
AW3 RM 4.95x3
EAN CODE :
3276007182774
3276007182798
3276007182811
3276007182835
3276007182859
3276007182903
3276007182927
3276007182958
3276007182989
3276007182361
3276007182385
3276007182408

x2 (295x200 cm)
x3 (395x300 cm)
x4 (495x300 cm)
x4 (295x200 cm)
x6 (395x300 cm)
x8 (495x300 cm)
IP54
x8 (295x200cm)
x12 (395x300cm)
x16 (495x300cm)
Conteúdo
Ferramentas Necessárias (não Inclusas)
DC90 CONTROLE REMOTO
Elementos
de fixação

x2 (295x200 cm)
x3 (395x300 cm)
x4 (495x300 cm)
x4 (295x200 cm)
x6 (395x300 cm)
x8 (495x300 cm)
IP54
x8 (295x200cm)
x12 (395x300cm)
x16 (495x300cm)
B1
B2
(M1x30)
B3
(Ø1)
B4
(M1)
(295x200 cm) x2
(395x300 cm) x3
(295x200 cm) x8
(395x300 cm) x12
(295x200 cm) x8
(395x300 cm) x12
(295x200 cm) x8
(395x300 cm) x12
(295x200 cm) x8
(395x300 cm) x12
O14x100
(295x200 cm) x2
(395x300 cm) x3
(não Inclusas)
(295x200cm) x 8
(395x300cm) x 12
(495x300cm) x 16
(295x200cm) x2
(395x300cm) x 3
(495x300cm) x 4
(295x200cm) x2
(395x300cm) x 3
(495x300cm) x 4
(295x200cm) x8
(395x300cm) x 12
(495x300cm) x 16
(295x200cm) x8
(395x300cm) x 12
(495x300cm) x 16
(295x200cm) x8
(395x300cm) x 12
(495x300cm) x 16

BR : Instalação / EN : Assembly
18-24
BR : Uso / EN : Use
25-26
BR : Manutenção / EN : Maintenance
27-28

BR/ AVISO :
Para evitar todo risco de tombamento, esse gabinete/objeto deve
ser fixado na parede de forma segura. Verifique a adequabilidade e a
resistência da parede para se certificar que possa suportat a carga
do gabinete/objeto e resistir às forças aplicadas a nível das fixações.
Uma montagem incorreta pode originar a queda do gabinete/objeto e
provocar danos pessoais graves. Em caso de dúvida quanto à instalação,
consulte um vendedor especializado ou contate um profissional.
*Use parafusos, arruelas e cavilhas adaptadas ao tipo de material de
sua parede. Esses acessórios de fixação não estão incluidos. Para obter
conselhos sobre os parafusos e acessórios adequados para sua parede,
entre em contato com um revendedor espercializado.
EN/ WARNING:
To avoid any risk of toppling, this furniture item/object must be securely
attached to the ceilling. Improper installation can result in the fumiture/
object falling and cause serious injuries to people. In case of a doubt
regarding the installation, ask for advice from a specialised sales
assistant or contact a professional.
*Use screws, washers and plugs suited to the type of material of your
wall.These are not included. To obtain advice on the screws and fittings
suited to your wall, ask a specialised sales assistant.

6
BR
EN
ATENÇÃO! POR FAVOR, LEIA ESTE MANUAL DO
USUÁRIO ANTES DE QUALQUER INSTALAÇÃO E USO
DESTE PRODUTO.
AVISO: Instruções importantes de segurança.
É fundamental que você siga essas instruções
para garantir a segurança pessoal. Guarde essas
instruções.
BAntes de abrir o toldo, certifique-se que as fixações e os elementos de
segurança foram instalados corretamente.
Você deve sempre fechar o toldo quando o vento estiver soprando, durante
uma chuva torrencial e quando não o estiver usando.
O não cumprimento dessas instruções pode resultar em danos materiais e
estruturais.
Os braços do toldo estão tensos e podem causar ferimentos e danos se forem
abertos repentinamente.
Nunca tente desmontar ou reparar esse toldo sozinho.
Chame um técnico qualificado.
CUIDADO: Instruções importantes de segurança. Siga todas
as instruções, pois uma instalação inadequada pode causar
ferimentos graves.
Observe as instruções de segurança para evitar danos por uso incorreto! Obedeça a todos os
avisos escritos no toldo.
Guarde este manual do usuário para referência futura. Se ceder este toldo para terceiros, este
manual de instruções também deve ser entregue a eles.
Use este toldo apenas para o uso a que se destina.
Não aceitamos qualquer responsabilidade por quaisquer danos causados por uso impróprio ou
falha em seguir as instruções.
1. GERAL
CUIDADO: Instruções importantes de segurança. Siga todas as instruções, pois uma instalação
inadequada pode causar ferimentos graves.
Observe as instruções de segurança para evitar danos por uso incorreto! Obedeça a todos os
avisos escritos no toldo.
Guarde este manual do usuário para referência futura. Se ceder este toldo para terceiros, este

7
BR
EN
manual de instruções também deve ser entregue a eles.
Use este toldo apenas para o uso a que se destina.
Não aceitamos qualquer responsabilidade por quaisquer danos causados por uso impróprio ou
falha em seguir as instruções..
2. INSTALAÇÃO
Mantenha uma distância horizontal de pelo menos 0,4m entre a parte motorizada implantada
e qualquer instalação permanente/fixa.
Os fios elétricos devem ser conectados de acordo com as normas elétricas em vigor na França
(norma NF C15100). Em caso de dúvida, entre em contato com um eletricista licenciado.
Quando estiver pronto para desembalar e montar o produto, certifique-se de ter todas as
ferramentas adequadas, pessoas suficientes (três pessoas são recomendadas) e espaço e que
você disponha de uma área limpa e seca para proceder à instalação.
3. SEGURANÇA ELÉTRICA
ATENÇÃO, a instalação deve estar em conformidade com NCF15-100. Para sua segurança,
antes de qualquer operação de instalação e conexão, certifique-se de que a alimentação esteja
desligada.
Antes de conectar o toldo a uma fonte de energia, verifique se a voltagem dessa fonte de
energia e a voltagem nominal correspondem às especificações de energia figurando na placa
de identificação do toldo.
Um meio de desconexão deve estar previsto nas tubulações fixas de acordo com as regras de
instalação.
Perigo de choque elétrico! Não tente reparar o toldo sozinho. Em caso de avaria, os reparos
só devem ser efectuados por pessoal qualificado. Alterar o desenho ou configuração do
equipamento sem consultar o fabricante ou seu representante autorizado pode levar a uma
situação perigosa.
O cabo de alimentação deste motor só pode ser substituído pelo mesmo tipo de cabo fornecido
pelo fabricante do motorização.
No caso de danos ao cabo de alimentação, confie a substituição apenas para o fabricante, seu
Material necessário: Material não fornecido:
> Caixas de junção estanques (IP54)
> Cabos >
PILHA
(CR2450 3V)x 1

8
BR
EN
serviço de reparo ou pessoal qualificado para evitar qualquer perigo.
Antes de qualquer inspeção ou manutenção dos componentes elétricos, o toldo deve ser
desconectado da fonte de alimentação de forma segura e confiável.
4. USO
Carga máxima da parte não retrátil: 800 Pa. O atuador deve ser acessível a partir de uma
altura inferior a 1,3 m. Não faça alterações no toldo!
Nunca abra a caixa eletrônica (cancelamento da garantia).
Nunca use acessórios não recomendados pelo fabricante. Isso poderia criar riscos para o
usuário e danificar o toldo. Use apenas peças e acessórios originais.
Não pendure nada na estrutura ou nos braços dobráveis do toldo. Ele pode cair e causar danos
materiais ou ferimentos pessoais.
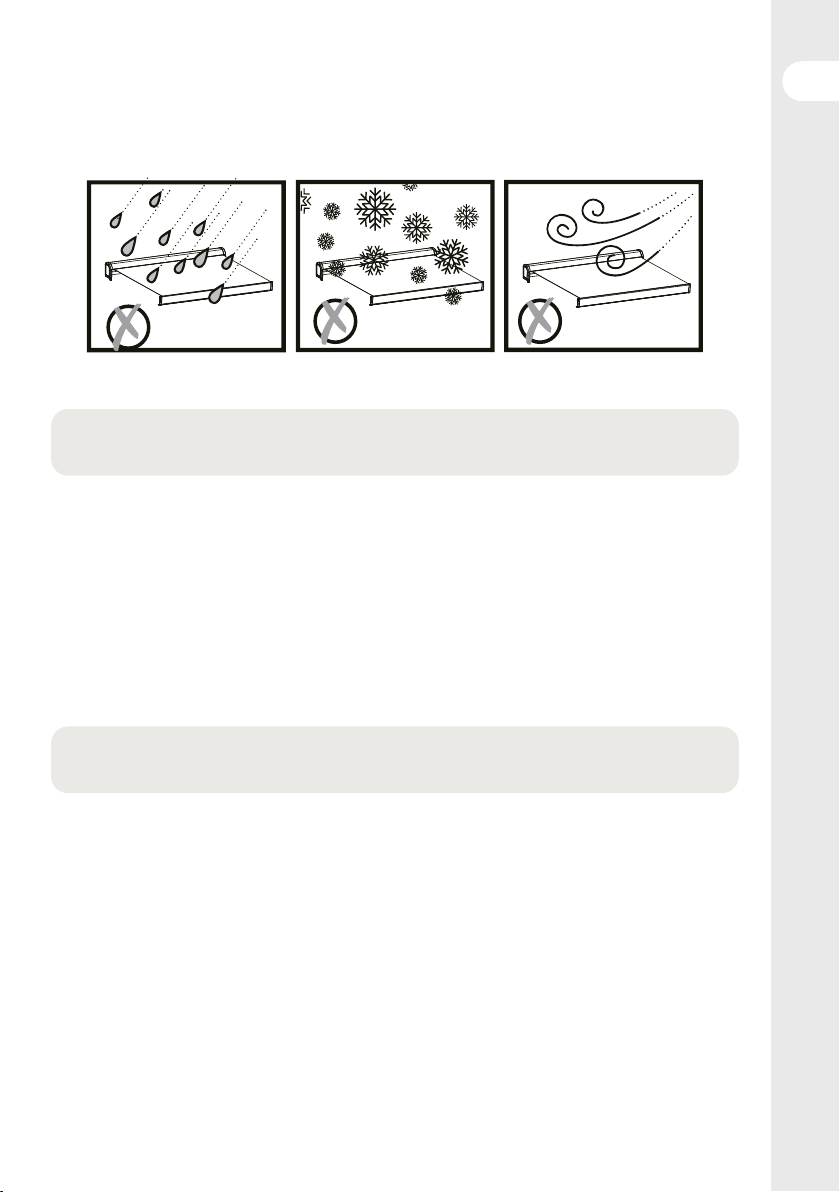
Não use o toldo em más condições climáticas. Quando a velocidade do vento for maior que 4 na
escala Beaufort (> 21 km/h), enrole o toldo.
Não use o toldo em dias chuvosos.
Não use o toldo em locais expostos a altas temperaturas, como paredes próximas a fornos.
O uso em condições de congelamento pode danificar o toldo.
Certifique-se de deixar espaço suficiente ao redor do toldo ao enrolá-lo ou desenrolá-lo.
Não coloque uma churrasqueira sob o toldo nem acenda fogo nas proximidades.
Verifique o toldo uma vez a cada 3 meses para se certificar que todos as fixações estão seguras
e o toldo está livre de danos.
Inspecione regularmente o estado da instalação, verifique se não tem desequilíbrio e se
os cabos e molas não apresentam sinais de desgaste ou danos. Não use esse toldo se for
necessário reparo ou ajuste.
Nunca use um produto danificado! Desconecte o toldo da fonte de alimentação (interruptor
ou fusível) e entre em contato com o revendedor em caso de danos. Sem o conselho de um
técnico, não use o toldo se for necessário reparar ou ajustar.
Tenha cuidado ao desdobrar o toldo externa, ele pode desenrolar rapidamente se a mola
estiver fraca ou danificada.
Observe o toldo em movimento e mantenha as pessoas afastadas até que o toldo esteja
totalmente fechado.
Tenha cuidado ao operar a botoneira manual com o toldo retraído, pois pode desenrolar
rapidamente devido a molas fracas ou partidas.
Não solicite o motor abra/feche além do número de ciclos atribuídos (3000 vezes).
Não opere o toldo quando operações de manutenção, como limpeza de janelas, são realizadas

9
BR
EN
nas proximidades.
Desconecte o toldo da fonte de alimentação ao fazer manutenção doméstica, como limpar
janelas, nas proximidades.
5. PROTEÇÃO DAS CRIANÇAS
Não deixe as crianças brincar com os controles fixos. Mantenha os dispositivos de controle
remoto fora do alcance das crianças.
Este dispositivo pode ser usado por crianças de pelo menos 8 anos de idade e por pessoas com
capacidades físicas, sensoriais ou mentais reduzidas ou sem experiência ou conhecimento, se
forem devidamente supervisionados ou se lhes tiverem sido dadas instruções relativas ao uso
seguro do dispositivo e se os riscos envolvidos foram detectados e entendidos. A limpeza e a
manutenção pelo usuário não devem ser realizadas por crianças sem vigilância.
Observe suas crianças para ter certeza de que elas não brincam com o toldo.
6. PILHAS: SE CONTROLE REMOTO
Perigo de explosão! NUNCA incinere, provoque curto-circuito, desmonte, recarregue ou tente
reativar as pilhas.
Não exponha as pilhas a temperaturas extremas. Não coloque o controle remoto em cima de
um radiador. O vazamento de ácido das pilhas pode causar danos.
Substitua as pilhas velhas apenas por pilhas do mesmo tipo.
Atenção! Perigo de explosão! Nunca insira pilhas na ordem inversa. Se elas vazarem, remova-
as do compartimento de pilhas com um pano.
Descarte suas pilhas de acordo com os regulamentos aplicáveis. Se o ácido vazar da pilha,
evite o contato com a pele, olhos e membranas mucosas. Enxague as áreas afetadas
imediatamente após o contato com o ácido e enxague abundantemente com água. Ver um
médico.

10
BR
EN
Engolir pilhas pode ser fatal. Mantenha as pilhas fora do alcance de crianças e animais de
estimação.
Procure orientação médica imediatamente se uma pilha for engolida.
Remova as pilhas usadas do controle remoto. Remova as pilhas do controle remoto quando não
for usá-lo por um longo período de tempo.
Proteção térmica :
O motor entra em proteção térmica após 2 descidas e 2 subidas successivas.
7. AJUSTE EM CASO DE TROCA DE CONTROLE REMOTO
Passo 1: Desligue a energia. Prepare uma interface de alimentação de 230 V. Em seguida,
conecte os cabos elétricos marrom e azul do motor à interface de energia (ou com o cabo
elétrico do motor conectado a um painel de energia).
Passo 2: Pegue no controle remoto e coloque a pilha no lugar, a luz do indutor acenderá. Se não
estiver no lugar, a luz do indutor não acenderá. Não é necessário colocar a tampa da pilha no
lugar antes de emparelhar.
Passo 3: mantenha o ouvido próximo ao cabeçote do motor e ligue o dispositivo em um
ambiente silencioso (antes de ligar o dispositivo, ele deve ficar desligado por mais de 10
segundos) e ao mesmo tempo, você ouvirá um som “Di” claro, mas fraco e curto. Isso mostra
que está funcionando bem. Se você não ouvir esse som, verifique a conexão do cabo ou a
alimentação.
Passo 4: Localize o botão "P2" no compartimento da pilha. Mantenha o ouvido próximo à
cabeça do motor em um ambiente calmo e pressione o botão "P2" 2 vezes seguidas. Ao mesmo
tempo, você ouvirá um som “Di-Di” mais baixo e mais curto.
Passo 5: Após o som “Di-Di”, pressione o botão “Open”(Abrir) por 3 segundos e depois solte,
você ouvirá sucessivamente um breve som de “Di-Di ---” ao mesmo tempo que quando
pressiona o botão "open"(abrir). Isso significa que o emparelhamento do motor está
funcionando.
Passo 6: Verifique se o motor está funcionando. Se o motor estiver funcionando, pressione o
X1 troca de pilha

11
BR
EN
botão “close”(fechar) por 3 segundos. Se o motor girar na direção oposta, como ao abrir com
o botão "open"(abrir), significa que o motor pode funcionar normalmente. (Se o motor não
estiver funcionando, então seu limite necessita ser ajustado. (Veja Método de Ajuste do Limite
do Motor)).
8. AVISO
Atenção: Certifique-se de concluir o programa de ajuste de todos os componentes elétricos
para que não seja necessário reajustar o motor.
O usuário poderá ajustar os interruptores de limite para uma direção de cada vez, sem ajustar
os dois ao mesmo tempo.
Não force os botões, use o controle remoto para verificar os interruptores de limite girando-o
meio ciclo de cada vez até a configuração desejada.
AVISO
•
As pilhas devem ser substituídas e instaladas por um adulto.
•
Remova as pilha usadas do produto.
•
Não exponha as pilhas ao fogo, risco de vazamento ou explosão.
•
Não provoque curto-circuito nos terminais da pilha.
•
Não misture pilhas novas com velhas.
•
Não use acumuladores (baterias recarregáveis) neste produto.
•
Não recarregue pilhas que não sejam recarregáveis.
•
Use apenas o tipo de pilhas recomendado.
•
Mantenha este produto fora do alcance das crianças.
•
Descarte as pilhas usadas nos coletores fornecidos para esse fim.
•
AVISO: Desligue a energia ao limpar, fazer a manutenção e substituir peças.
•
Certifique-se de que o toldo está bem fixado antes de limpar.
•
Limpe as superfícies metálicas do toldo com um pano ligeiramente úmido.
•
Limpe o controle remoto e os suportes de parede com um pano ligeiramente úmido.
•
Quando o toldo estiver sujo ou quando você não o usar por muito tempo, limpe o tecido com
um pano macio e seco para limpar a sujeira.
•
Não use produtos de limpeza abrasivos, como produtos químicos, benzina ou álcool.
•
Não retraia o toldo quando ele estiver molhado.
•
Deixe o tecido secar ao ar livre quando molhado.
•
Desligue a fonte de alimentação elétrica quando não for usar o toldo por um longo período.

12
BR
EN
9. ESPECIFICAÇÕES TÉCNICAS
Alimentação elétrica: 230V ~50 Hz, 0.86A
Potência nominal: 198 W
Velocidade de rotação: 15 rpm
Torque: 40 Nm
Número estimado de ciclos: 2
Classe de proteção: IPX4
Modelo do motor: Dooya DM45RM-40/15
Modelo do contrôle remoto: DC90
Potência máxima de transmissão FR
(frequência de recepção) 10 dBm
Classe de proteção elétrica: Classe I
Nível de pressão sonora emitido <70 dB(A)
AW2 RM 2,95X2 Lona acrílica 2780mm X 2200 mm
AW2 RM 3,95X3 Lona acrílica 3780mm X 3200 mm
AW2 RM 4,95X3 Lona acrílica 4780mm X 3200 mm
10.PROTEÇÃO DO MEIO AMBIENTE
ATENÇÃO!
Este produto está marcado com um símbolo relacionado ao descarte de resíduos de
produtos elétricos e eletrônicos.
Isso significa que este produto não deve ser descartado com o lixo doméstico, mas
deve ser entregue a um sistema de recuperação de acordo com a Diretiva Europeia 2012/19/EU.
Isso significa que este produto deve ser reciclado ou desmontado, a fim de reduzir seu impacto
sobre o ambiente. Os equipamentos elétricos contêm substâncias perigosas que podem
representar um risco para o meio ambiente e para a saúde humana.

13
BR
EN
WARNING! THIS INSTRUCTION MANUAL SHALL BE
READ
BEFORE THE USE AND THE INSTALLATION OF THE
PRODUCT
WARNING: Important safety instructions. It is
important for the safety of persons to follow these
instructions. Save these instructions.
Before opening the awning, make sure all the fixing bolts and
security devices are properly installed and tightened.
Always close the awning during rainy days, windy days or the awning is not in
use.
Failed to observe the instruction may lead to material and constructional
damage of the awning.
The folding arms of the awning are under tension and can cause damage and
injury when they are open up suddenly.
Never try to disassemble the awning or repair the awning by yourself. Consult
a competent technician for help.
1. GENERAL
WARNING: Important safety instructions. Please follow all the
instructions because a faulty setup may result in serious injuries.
FFollow all safety instructions to avoid damage through improper use! Follow all warning
notices on the appliance.
Keep this instruction manual for future use. Should this appliance be passed on to a third
party, this instruction manual must be included.
Use this appliance only for its intended use.
No responsibility is accepted for damage resulting from improper use or non-compliance with
these Instructions.
2. ASSEMBLY
The installation must be conform to the regulation of the country.
A horizontal distance of at least 0.4 m is to be maintained between fully unrolled driven part
and any permanent object.
Means for disconnection having a contact separation in all poles must be incorporated in the
fixed wiring in accordance with the wiring rules.
When you are ready to unpack and assemble the awning, make sure that you have the

14
BR
EN
appropriate tools, sucient operators (3 persons are suggested) and space, and a clean and
dry area to perform the installation.
Switch the power o before cable installation.
Before installing the product, remove the unnecessary cord and disable any equipment not
needed for power operation.
Choosing a safe location
Never install it in high and windy places, as the sunshade may drop and hurt people. The
location for mounting your automation device: this location must allow for the automation
device to pick up the signals easily to ensure maximum sensitivity of the command box.
Do not use it in places that have vibrations or impulsions.
In case of use of a command box, the electronics board must be set vertically and sheltered
from the weather.
The installation can be made by non-professionals assuming the instruction is followed
correctly. Should you have any trouble during assembly, please consult a qualified person for
help.
Please use all the screws and nuts correctly during installation as it is very dangerous if you
leave it loose.
Be careful with your fingers around moving parts of the product during installation.
3. ELECTRICAL SAFETY
CAUTION: The installation must be conform to the regulation of the country.For your safety,
please make sure that the electric current is switched o before carrying out any setup or
connection operation.
What you will need: hardware not provided:
> Waterproof junction box (P54)
> Cables >
BATTERIES
(CR2450 3V)x 1
Before connecting the appliance to the power supply, check that the power supply voltage and
current rating corresponds with the power supply details shown on the appliance rating label.
A readily accessible disconnect device must be incorporated in the fixed wiring in compliance
with setup regulations.
Danger of electric shock! Do not attempt to repair the appliance yourself. In case of
malfunction, repairs are to be conducted by qualified personnel only.
The modification of the design or configuration of the equipment without consulting the
manufacturer or his authorized representative may create a dangerous situation.

15
BR
EN
The power cable for this motor can only be replaced with the same type of cable supplied by
the motor manufacturer.
If the supply cord is damaged, it must be replaced by the manufacturer, its service agent or
similarly qualified persons in order to avoid a hazard.
Foran inspection or maintenance of the electrical parts, the external blind shall be
disconnected from the energy supply in a reliable way.
4. USE
Max. load for non-retractable parts: 800Pa
The controller shall be fixed lower than 1.3m.
Do not modify the appliance in any way!
Never open the electronic command box (this will void the warranty).
Never use accessories which are not recommended by the manufacturer. They could pose
a safety risk to the user and might damage the appliance. Only use original parts and
accessories.
Do not hang anything on the frame or on the folding arms as the awning may fall down and
cause damage or personal injury.
Do not use this appliance in adverse weather conditions. If wind speeds are stronger than 4 on
the Beaufort wind force scale, retract the awning.
Never use the appliance on rainy days.
Do not use it in places of high temperature such as walls near furnaces.
The operation in frosty conditions may damage the awning.
Save enough free space around the awning while rolling or unrolling.
Do not barbecue under the awning or ignite a fire near to the awning.
Check the awning every 3 months to ensure all fixing are tightened and no damage on the
products.
Frequently examine the installation for imbalance and signs of wear or damage to cables and
springs. Do not use if repair or adjustment is necessary.
Never use a damaged appliance! Disconnect the appliance from the power supply and contact
your supplier if it is damaged.
Unless advised to the contrary by a technician, do not attempt to use the awning if repair or
adjustment is needed.
Take care when operating the manual release with the external blind retracted since it may
fall rapidly due to weak or broken springs.

16
BR
EN
Watch the moving shutter and keep people away until the shutter is completely closed.
Take care when operating the manual release with the external blind retracted since it may
fall rapidly due to weak or broken springs.
Please do not use the motor for any opening/dosing operations beyond the assigned number of
cycles (3000 times).
Do not operate the awning when maintenance, such as window cleaning, is being carried out
in the vicinity.
Disconnect the awning from the supply when maintenance, such as window cleaning, is being
carried out in the vicinity.
5. PR0TECTI0N OF CHILDREN
o not allow children to play with fixed controls. Keep remote controls away from children.
The awning is not Intended for use by persons (including children) with reduced
physical, sensory or mental capabilities, or lack of experience and knowledge, unless
they have been given supervision or instruction concerning use of the awning by a person
responsible for their safety.
Children should be supervised to ensure that they do not play with the appliance.
6. BATTERIES IF REMOTE CONTROL
Danger of explosion! The batteries may not be charged or re-activated by other means,
disassembled, thrown into fire, or short-circuited.
Do not expose batteries to extreme temperatures. Do not place the remote control on heaters.
Leaked battery add can cause damages.
Replace all used batteries with the same type only.
Attention! Danger of explosion! Never insert batteries inversely.
If batteries should leak, remove them with a cloth from the battery compartment.

17
BR
EN
Dispose of batteries according to the regulations. If battery acid has leaked avoid contact to
skin, eyes and mucous membranes. Rinse aected areas immediately after contact with the
acid and wash with plenty of clean water. Visit a physician.
Swallowed batteries are lethal. Keep batteries out of reach of children and pets. Immediately
ask for medical assistance if a battery is swallowed.
Remove exhausted batteries from the remote control. Remove the batteries from the remote
control, if you will not use it for an extended period of time.
Overheat protection:
The motor will automatically go into overheat-protection mode after two
consecutive extending (down) and retracting (up) operations
7. ADJUSTMENT WHEN CHANGING THE REMOTE
CONTROL
Step 1: Prepare a power interface of 230V, turn o the power firstly. Then connect brown and
blue electric cords of motor to the power interface (Or with electric cord of motor plugged in a
power panel, but firstly need to cut the power o).
Step 2: Take out the controller and keep the battery in place, the inductor light will be on. If not
in place, the inductor light will not be on. No need to cover the battery lid before well-coding.
Step 3: Keep ear close to the head of motor and then turn on the power under a quite
environment (before turn on the power it must be o more than 10 seconds), Then at the same
time, you will hear a clear but small and short sound «Di». This shows it work well. If without
that sound, you need to check the cord-connecting or the power.
Step 4: 1. Find «P2» button in the battery slot firstly 2. Keep ear near to the head of motor under
quite environment and then press «P2» button 2 times successively. At the same time you will
hear «Di-Di», small and more shorter.
X1 Changing batteries

18
BR
EN
Step 5: After the sound of «Di-Di», press «Open» button for 3 seconds and then release, you will
hear successive short sound of «Di-Di---» at the same time when you press the «open» button.
That means motor-coding works
Step 6: 1. Check whether motor is working. 2. If motor is on the work, press «close» button for
3 seconds. If motor turns in the contrary direction as when opening «open» button. It means
motor can work normally. (If motor refuse to turn, then it needs to adjust its limit. (See Method
for adjusting motor limit)).
8. WARNING
Attention: Well finish the setting program already for all electric items, final client no need
adjust the motor again.
The user can adjust the limit of one direction at one time, do not adjust two knobs at the same
time.
Do not turn knobs fiercely, please check the limit with remote control per revolute about half
cycle, and check if the setting you satisfied.
WARNING
•
The replacement and installation of batteries must be done by an adult.
•
Remove the worn out batteries of this product.
•
Do not expose the batteries to fire, they may leak or explode.
•
Do not short-circuit the battery terminals.
•
Do not mix old batteries with new ones.
•
Do not use rechargeable batteries in this product.
•
Do not recharge batteries that are not rechargeable.
•
Use only the recommended type of batteries.
•
Keep this product away from the reach of children.
•
Dispose o the batteries only in a recycling place.
•
The drive shall be disconnected from its power source during cleaning, maintenance and
when replacing parts.
•
WARNING: the drive shall be disconnected from its power source during cleaning,
maintenance and when replacing parts.
Maintenance
Check to make sure that the awning is fixed tightly and securely before cleaning.
•
Clean the metal surfaces of the awning with a slightly damp cloth.
•
Clean the remote control and wall mount base with a slightly damp cloth.

19
BR
EN
•
Wipe o debris from the fabric cover using a dry, soft cloth when the awning is not clean or
when it is not used for longer period of time.
•
Do not use any abrasive cleansers like chemicals, benzene or alcohol.
•
Do not roll-in the awning when wet.
•
Dry the fabric cover naturally when it is wet.
•
Turn o the power when the awning is not used for a longer period of time.
9. TECHNICAL SPECIFICATIONS
SupplyVoltage and Current: 230V ~50Hz, 0.86A
Nominal power: 198W
Rotation speed: 15rpm
Torque: 40Nm
Evaluated cycle number: 2
Protection class: IPX4
Model of the engine: Dooya DM45M-40/15
Model of the remote control: DC90
Protection against electric shock: Classe I
Emission sound pressure level <70 db(A)
AW2 RM 2,95X2 Acrylic fabric 2780mm X 2200 mm
AW2 RM 3,95X3 Acrylic fabric 3780mm X 3200 mm
AW2 RM 4,95X3 Acrylic fabric 4780mm X 3200 mm
10.DISPOSAL AND RECYCLING
This product is equipped with the sign for separate collection and sorting of waste
electrical and electronic equipment (WEEE). This means that when this type of
product is processed and dismantled, it must comply with the requirements of
European Directive 2012/19/EU, to reduce the negative impact on the environment.
For more information, contact your local or regional authorities.
Electronic products that have not been separately collected and sorted, may be dangerous for
the environment and human health due to the presence of harmful substances.

70 90
70 90
p.88
p.94
Altura final
C = altura de fixação
Altura final
C = altura de fixação
p.21
p.27
Other manuals for NORI 2
2
This manual suits for next models
7
Table of contents
Languages:
Other Naterial Accessories manuals
Popular Accessories manuals by other brands

Milesight
Milesight VS132 user guide

Mirabella International
Mirabella International 43061068 quick start guide

VitaSound Audio
VitaSound Audio PAE-300 user manual

Germozap
Germozap W5VUSB Instruction guide

Invacare
Invacare Personal Seat VF Installation and operating instructions

Heatit Controls
Heatit Controls Z-HAN2 quick guide

AGI
AGI DC Assembly and operators manual

IFM
IFM SAxx04 Series operating instructions

Baumer
Baumer OM70-11216510 manual

Dometic
Dometic PERFECTWALL PW1100 installation manual

Sea-Bird Electronics
Sea-Bird Electronics SBE 63 user manual

HoMedics
HoMedics COMFORT PRO TRANSFORM HCM-T210GYQVC-GB instruction manual