National Geographic 90-11400 User manual

Art.No. 90-11400
DIGITALES MIKROSKOP
DIGITAL MICROSCOPE
20X/80X/350X
Bedienungsanleitung
Operating instructions
Mode d’emploi
Handleiding
Istruzioni per l’uso
Instrucciones de uso
Руководство по эксплуатации
DE
EN
FR
NL
IT
ES
RU

Lieferumfang · Contents · Contenu de la livraison · Inhoud · Accessori in dotazione
Artículos incluidos en la entrega · Material fornecido · Комплект поставки
Aufbau · Setup · Structure · Montage · Montaggio · Estructura · Устройство
2

3
Handhabung · Handling · Maniement · Bediening · Uso · Manejo · Использование
IIII OFF
✔✘
20X 80X 350X
II

4
Allgemeine Warnhinweise
• Für die Arbeit mit diesem Gerät werden häufig scharfkantige und spitze Hilfsmittel eingesetzt.
Bewahren Sie deshalb dieses Gerät sowie alle Zubehörteile und Hilfsmittel an einem für Kinder
unzugänglichen Ort auf. Es besteht VERLETZUNGSGEFAHR!
• Dieses Gerät beinhaltet Elektronikteile, die über eine Stromquelle (Netzteil) betrieben werden. Die
Nutzung darf nur wie in der Anleitung beschrieben erfolgen, andernfalls besteht GEFAHR eines
STROMSCHLAGS!
• Setzen Sie das Gerät keinen hohen Temperaturen aus. Benutzen Sie nur das mitgelieferte Netzteil.
Gerät nicht kurzschließen oder ins Feuer werfen! Durch übermäßige Hitze und unsachgemäße
Handhabung können Kurzschlüsse, Brände und sogar Explosionen ausgelöst werden!
• Strom- und Verbindungskabel sowie Verlängerungen und Anschlussstücke niemals knicken,
quetschen, zerren oder überfahren. Schützen sie Kabel vor scharfen Kanten und Hitze. Überprüfen
Sie das Gerät, die Kabel und Anschlüsse vor Inbetriebnahme auf Beschädigungen. Beschädigtes
Gerät oder ein Gerät mit beschädigten stromführenden Teilen niemals in Betrieb nehmen!
Beschädigte Teile müssen umgehend von einem autorisierten Service-Betrieb ausgetauscht
werden.
• Kinder dürfen das Gerät nur unter Aufsicht benutzen. Verpackungsmaterialien (Plastiktüten,
Gummibänder, etc.) von Kindern fernhalten! Es besteht ERSTICKUNGSGEFAHR!
• Trennen Sie das Gerät vor der Reinigung von der Stromquelle (Netzstecker ziehen)!
• Platzieren Sie Ihr Gerät so, dass es jederzeit vom Stromnetz getrennt werden kann.
Die Netzsteckdose sollte sich immer in der Nähe Ihres Geräts befinden und gut zugänglich sein,
da der Stecker des Netzkabels als Trennvorrichtung zum Stromnetz dient.
• Um das Gerät vom Stromnetz zu trennen, ziehen Sie immer am Netzstecker und niemals am Kabel!
• Bauen Sie das Gerät nicht auseinander! Wenden Sie sich im Falle eines Defekts an Ihren
Fachhändler.
Er nimmt mit dem Service-Center Kontakt auf und kann das Gerät ggf. zwecks Reparatur
einschicken.
• Setzen Sie das Gerät keinen Temperaturen über 45 °C aus!
EG-Konformitätserklärung
Eine „Konformitätserklärung“ in Übereinstimmung mit den anwendbaren Richtlinien und ent-
sprechenden Normen ist von der Bresser GmbH erstellt worden. Diese kann auf Anfrage jeder-
zeit eingesehen werden.

5
DE
Alle Teile Ihres Mikroskops:
1. Mikroskopkörper
2. Kameraauslöser
3. Einstellungsrad für die Vergrößerung
4. Mikroskopkamera
5. Auflichtbeleuchtung
6. Kamerahalterung
7. Mikroskoptisch
8. Durchlichtbeleuchtung
9. Objektklammern
10. Objektträger
11. Einstellungsräder für die Bildschärfe
(Fokussierung)
12. Mikroskopstandfuß
13. Metallfeder für den Stromkontakt
14. Führungsschiene für den Stromkontakt
15. Tasten für die Einstellung der Lichtstärke (+/-)
16. Ein/Aus-Taste für die Beleuchtungsart
17. USB-Port am Mikroskop
18. Präparate-box mit 5 Dauerpräparaten, 5 leeren Objektträgern und 10 Deckgläsern
19. Mikroskopbesteck
20. Staubschutzhülle
21. Software-CD
22. USB-Anschlusskabel
1. Das Digital Mikroskop aufbauen
Bevor Sie Ihr Mikroskop zum ersten Mal benutzen können, müssen Sie es richtig aufbauen. Nehmen
Sie dazu zuerst alle Teile aus der Verpackung. Stellen Sie den Mikroskopkörper (1) mit dem Standfuß
(12) auf einen Tisch. Schieben Sie die Mikroskopkamera (4) von oben in die Kamerahalterung (6).
Wichtig:
Achten Sie beim Einsetzen darauf, dass die Metallfeder (13) an der Kamera (4) in die Führungsschiene (14) der
Kamerahalterung (6) läuft. Stecken Sie die Seite des USB-Anschlusskabels (22) mit dem kleineren Stecker in
den USB-Port am Mikroskop (17).
2. Verwendung der Software-CD
In der Verpackung Ihres neuen Mikroskops finden Sie auch eine Software-CD mit Treiber- und Bildbe-
arbeitungssoftware. Diese können Sie auf Ihrem Computer installieren. Wenn Sie dann Ihr Mikroskop
über das USB-Kabel mit Ihrem PC verbinden, können Sie die Bilder über die Software „CamApp“ am
Computer-Bildschirm ansehen und speichern. Mit der Photomizer-Software können Sie die Bilder be-
arbeiten. Wie Sie die Software richtig installieren, erfahren Sie in den nachfolgenden Kapiteln.
Hinweis:
Um dauerhaft mit dem Digital Mikroskop zu arbeiten, empfiehlt es sich das Digital Mikroskop immer an
ein und demselben USB-Port zu betreiben.

6
2.1 Installation der Software
Wichtig: Bevor Sie die CD einlegen, stecken Sie zuerst das USB-Kabel in den USB-Anschluss an Ihrem
PC. Windows erkennt jetzt das ein neues Gerät gefunden wurde und zeigt dies durch ein Hinweisfenster
an. Klicken Sie jetzt bitte auf „Abbrechen“, da der Treiber für das Gerät später automatisch installiert wird.
1. Sicheren Sie alle aktuellen Daten und schließen Sie alle offenen Programme.
2. Legen Sie nun die mitgelieferte CD-ROM in das CD/DVD-Laufwerk Ihres Computers ein. Das In-
stallations-Menü startet jetzt automatisch. Sollte das nicht der Fall sein, wechseln Sie bitte in den
Windows-Explorer und wählen Sie Ihr CD/DVD-Laufwerk aus (meistens ist das „D:“; es kann aber
auch einen anderen Buchstaben haben). Starten Sie von dort die Datei „menu.exe“ mit einem Dop-
pelklick auf die linke Maustaste.
2.2 Treiberinstallation
Zum Installieren der Treiber-Software führen Sie den Mauszeiger auf den Menüpunkt „Install Driver“ und
klicken Sie einmal auf die linke Maustaste. Folgen Sie anschließend den Anweisungen des Installations-
programms. Während der Installation der Treiber-Software wird der passende Gerätetreiber für das von
Ihnen verwendete Betriebssystem automatisch installiert. Sie müssen hierzu keine weitere manuelle
Anpassung vornehmen. Nach dem Neustart ist der Treiber installiert. In einigen Fällen kann es vorkom-
men, dass das Gerät vom Computer nicht erkannt wird. In der Regel ist es dann ausreichend, wenn
Sie den Treiber (von der CD) nochmals neu installieren. Wählen Sie dazu den Menüpunkt „Programm
reparieren“ während der Installation des Treibers aus. Führen Sie nach der Installation des Treibers
einen Neustart des Computers durch. Sollte dies nicht den gewünschten Erfolg bringen, lesen Sie
hierzu bitte das nachfolgende Kapitel zur Problembehebung.
2.3 Installation der Bildbearbeitungssoftware Photomizer
Auf der Software-CD befindet sich die Bildbearbeitungssoftware „Photomizer“. Hiermit können Sie Ihre
Bilder bearbeiten.
Hinweis: Die Software „Photomizer“ benötigt „Microsoft .NET Framework 3.5“, was zuerst installiert
werden muss, sofern es noch nicht auf Ihrem Betriebssystem vorhanden ist. Ein direkter Download ist
möglich:
http://www.microsoft.com/downloads/en/details.aspx?FamilyID=333325fd-ae52-4e35-b531-
508d977d32a6
Bitte beachten Sie, dass der Hersteller keine Gewähr auf Virenfreiheit, Erreichbarkeit der Seite oder
einwandfreie Funktion des Downloads respektive der Software übernehmen kann.
1. Zum Installieren der Software führen Sie den Mauszeiger auf den Menüpunkt „Install Software“ und
klicken Sie einmal auf die linke Maustaste.
2. Es erscheint ein Auswahlfenster, in dem Sie Ihre bevorzugte Sprache aussuchen können. Stellen
Sie diese ein und bestätigen Sie mit einem Klick auf „OK“.
3. Bei “Willkommen“ klicken Sie auf „Weiter“.
4. Im nächsten Fenster werden Sie nach dem „Zielpfad“ bzw. dem „Programmordner“ gefragt. Kli-
cken Sie hier einfach auf „Weiter“.
5. Im Fenster „Benutzerdefinierte Installation“ klicken Sie auf „Weiter“.
6. Die Optionen „Erstelle Desktopverknüpfung“, bzw. „Verknüpfung in Schnellstartleiste“ sorgen für
die Einrichtung von Programmverknüpfungen auf Ihrem Desktop und in der Taskleiste.
7. Nun erscheint das Fenster mit dem Setup-Status, in dem Sie über die laufende Installation mit
einem Fortschrittsbalken informiert werden. Dieser Vorgang kann einige Minuten dauern.

7
DE
8. Zum Schluss erscheint das Fenster „Photomizer wurde installiert“. Klicken Sie hier auf „Fertigstel-
len“. Die Installation ist hiermit abgeschlossen.
2.4 Problembehebung: Gerät wird vom Computer (USB) nicht erkannt
1. Dieser Umstand tritt vereinzelt bei bestimmten OEM-Versionen von Windows Vista und XP auf! Es
liegt kein Defekt des Gerätes vor! Ein Update des USB-Treibers des Notebooks oder PCs löst in den
meisten Fällen dieses Problem!
2. Wurde nach der Installation des Treibers versucht das Gerät an einem anderen USB-Port zu betrei-
ben, muss der Treiber unter Umständen noch einmal mit Hilfe der CD installiert werden. Wählen Sie
während der Installation des Treibers dazu den Menüpunkt „Programm reparieren“ aus. Führen Sie
nach der Installation des Treibers einen Neustart des Computers durch.
3. Kann durch die Aktualisierung des Treibers keine zufriedenstellende Lösung erreicht werden, können
Sie, wie nachfolgend beschrieben, vorgehen. (Der Hersteller übernimmt hierfür keine Haftung!1).
Löschen Sie sogenannte Geistergeräte! Dies sind Geräte, die z.Zt. nicht an Ihrem Computer ange-
schlossen sind. Hintergrund: Windows generiert für jedes neue USB-Gerät (z.B. USB-Stick) an den
unterschiedlichen USB-Ports jedes Mal einen Eintrag in den Systemeinstellungen. Bei jedem Start
sucht Windows dann auch nach diesem Geistergerät. Das verzögert die Erkennung eines USB-
Geräts sowie den Start von Windows und ist für das Nicht-Erkennen am USB-Port verantwortlich!
Sie sollten daher Ihr System-Umfeld „aufräumen“ und nicht verwendete Geräte entfernen. Klicken
Sie dazu mit der rechten Maustaste auf ARBEITSPLATZ (unter Vista: COMPUTER) und öffnen Sie
den Punkt EIGENSCHAFTEN im Kontextmenü. Dann klicken Sie im Fenster auf den Reiter ERWEI-
TERT (unter Vista: ERWEITERTE SYSTEMEINSTELLUNGEN) und danach auf UMGEBUNGSVARI-
ABLEN. Wählen Sie nun im unteren Teil unter UMGEBUNGSVARIABLE die Option NEU aus. Geben
Sie bei NAME DER VARIABLEN folgenden Text ein: devmgr_show_nonpresent_devices
Bei WERT DER VARIABLEN geben Sie die Zahl „1“ ein. Bestätigen Sie die Eingabe mit OK und
starten Sie den Rechner neu! Nach dem Neustart wechseln Sie in den Gerätemanager. Aktivieren
Sie im Menüpunkt ANSICHT die Option AUSGEBLENDETE GERÄTE ANZEIGEN. Die zuvor aus-
geblendeten „Geistergeräte“ werden nun hellgrau dargestellt. Kontrollieren Sie die verschiedene
Kategorien wie USB, Speichervolumes, etc. und löschen Sie nur die Einträge für Geräte, die Sie
nicht mehr verwenden, aus dem Gerätemanager.1
1Quelle: Microsoft Knowledge Base
http://support.microsoft.com/kb/315539/de
3. Arbeiten mit dem Digital Mikroskop
3.1 Die Beleuchtung einstellen
Für die Beleuchtung benötigen Sie kein zusätzliches Stromkabel, denn den Strom für das Licht erhält
das Digital Mikroskop über das USB-Kabel.
Das Digital Mikroskop bietet Ihnen insgesamt drei Beleuchtungsmöglichkeiten, die abhängig von dem
Objekt, das Sie beobachten möchten (siehe Kapitel 3.4), eingesetzt werden können:
a) Auflicht (Licht von oben),
b) Durchlicht (Licht von unten)
c) Auf- und Durchlicht
(Licht von oben und unten gleichzeitig).

8
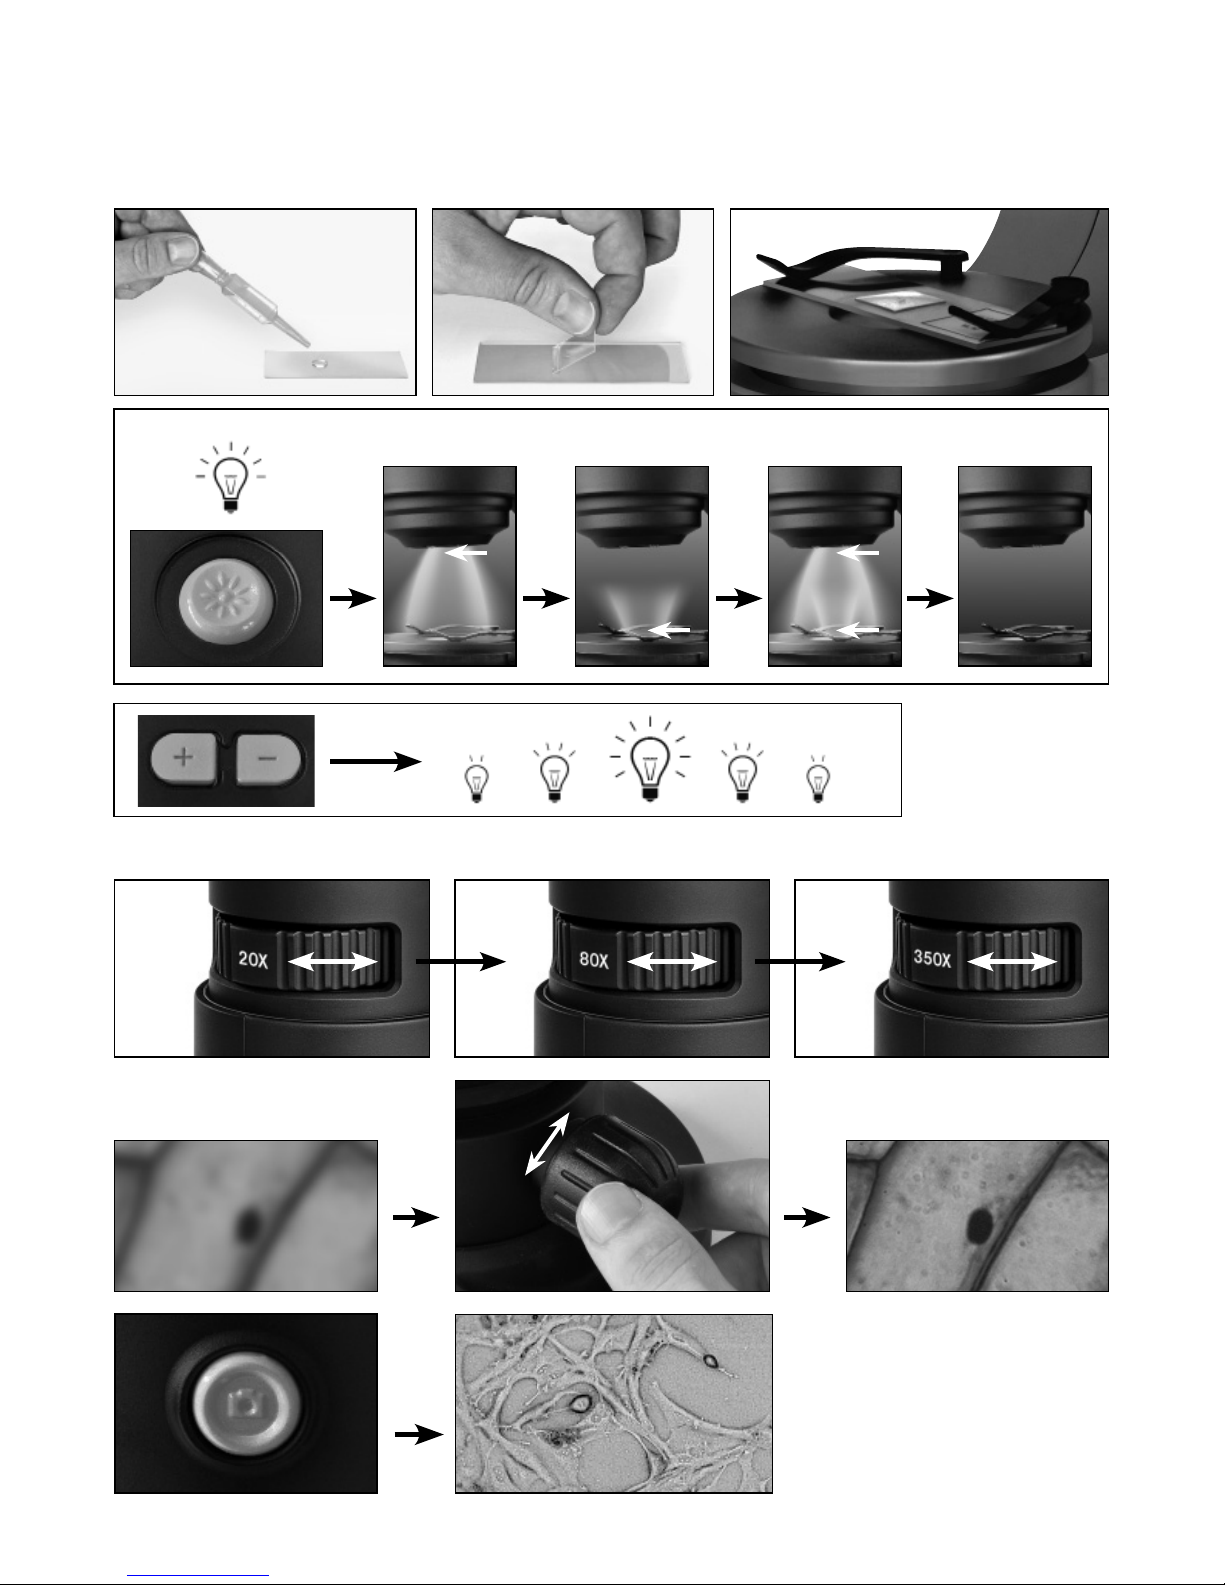
Wenn Sie einmal auf die Ein/Aus-Taste (16) drücken, wird die Auflichtbeleuchtung (5) eingeschaltet.
Drücken Sie ein zweites Mal auf die Taste, schaltet die Beleuchtung auf Durchlicht (8). Drücken Sie
dann ein drittes Mal die Taste, so werden Auf- und Durchlicht gleichzeitig eingeschaltet. Ein weiteres
Drücken der Taste schaltet die Beleuchtung komplett aus. Die Wahl der richtigen Beleuchtung hängt
davon ab, was Sie beobachten möchten (siehe Kapitel 3.4).
3.2 Live-Beobachtung
Betätigen Sie den Kameraauslöser (2) Ihres Mikroskops, es öffnet sich das Fenster „CamApp“.
Sollte das Programm „CamApp“ nicht automatisch starten, wechseln Sie bitte zu „Alle Programme“.
Unter „USB2.0 PC Camera“ können Sie das Programm „CamApp“ auch manuell starten.
Ein (unscharfes) Live-Bild wird auf dem Bildschirm angezeigt. Stellen Sie das Live-Bild durch Drehen
der Einstellungsräder für die Bildschärfe (11) scharf.
3.3 Vergrößerungseinstellungen wählen
Ihre ersten Beobachtungen sollten Sie mit der kleinsten Vergrößerung (20x) beginnen. Die Bildeinstel-
lung ist so wesentlich leichter. Denn je höher die Vergrößerung ist, umso sorgfältiger muss das Beobach-
tungsobjekt (bei der Durchlicht-Mikroskopie z.B. ein Objektträger) ausgerichtet sein. Drehen Sie also
das Einstellrad für die Vergrößerung (3) auf „20x“ ein. Drehen Sie nun an den Einstellrädern (11) um das
Objekt scharf zu stellen. Der Mikroskoptisch (7) fährt dabei rauf oder runter.
Dann drehen Sie den Mikroskoptisch (7) über die Einstellungsräder für die Scharfeinstellung (11) ganz
nach unten.
3.4 Ein Objekt betrachten
Beim Mikroskopieren unterscheidet man durchsichtige und undurchsichtige Objekte. Während durch-
sichtige Objekte meist ganz flach oder auch flüssig sein können (z.B. Insektenflügel, Wassertropfen,
etc.), sind undurchsichtige Objekte meistens größer und nicht so flach (z.B. kleinere Insekten, Pflan-
zensamen, Steine, Münzen, usw.).
3.4.1 Durchsichtige Objekte betrachten
Ihrem Digital Mikroskop liegen sogenannte Dauerpräparate bei. Das sind Objektträger, auf denen schon
durchsichtige Objekte für die Beobachtung mit dem Mikroskop vorbereitet wurden. Legen Sie eines die-
ser Dauerpräparate auf den Mikroskoptisch (7). Damit sich während der Beobachtung nichts verschieben
kann, schieben Sie den Objektträger unter die beiden Objektklammern (9) des Mikroskoptisches. Stellen
Sie dann das Licht über die Ein/Aus-Taste für die Beleuchtung (16) wie im Kapitel 3.1 beschrieben auf
Durchlicht (8). Im nächsten Schritt verschieben Sie das Dauerpräparat so, dass das zu beobachtende
Objekt im Vorschaufeld der Kamerasoftware auf dem Monitor gut zu sehen ist. Drehen Sie nun langsam
am Einstellungsrad für die Bildschärfe (11) bis das Bild scharf abgebildet wird. Mit den Tasten für die
Lichtstärke (+/–) (15) können Sie durch mehrmaliges Drücken die Beleuchtung so einstellen, dass die
Feinheiten des Beobachtungsobjekts auch auf dem Monitor klar und deutlich zu erkennen sind. Möchten
Sie eine höhere Vergrößerung einstellen, drehen Sie das Einstellungsrad für die Vergrößerung (3) nach
links auf die Position „80x“ oder „350x“.
Wichtig:
Bei jeder Neueinstellung der Vergrößerung müssen Sie mit dem Einstellungsrad für die Vergrößerung (3) auch
die Schärfe neu einstellen.

9
DE
3.4.2 Undurchsichtige Objekte beobachten
Möchten Sie undurchsichtige Objekte mit diesem Mikroskop betrachten, muss das Objekt von oben aus-
geleuchtet werden. Stellen Sie deshalb das Licht über die Ein/Aus-Taste für die Beleuchtung (16) wie im
Kapitel 3.1 beschrieben auf Auflicht (5). Legen Sie das zu beobachtende Objekt auf die kleine runde Platte
in der Tischmitte. Über das Einstellungsrad für die Bildschärfe (11) stellen Sie das Bild scharf. Es wird
gleichzeitig auf dem Monitor scharf dargestellt. Eventuell müssen Sie das Beobachtungsobjekt ein wenig
verschieben damit es auf dem Monitor richtig abgebildet wird. Mit den Tasten für die Lichtstärke (+/-) (15)
können Sie die Helligkeit der Beleuchtung einstellen bis auch die Feinheiten im Monitor gut zu erkennen
sind. Mit dem Digital Mikroskop können Sie Objekte bis 6 mm Höhe betrachten.
Hinweis:
Bei der Betrachtung von nur leicht durchsichtigen Objekten (z.B. Mineralien, Sandkörner, etc.)
können Sie die Abbildungsqualität durch die gleichzeitige Verwendung von Auf- und Durchlicht (Kapitel
3.1) verbessern. Über die Tasten für die Einstellung der Lichtstärke (+/-) (15) wird dann die Lichtstärke
für beide Beleuchtungsarten gemeinsam eingestellt.
Wichtig:
Wenn Sie in hellen Räumen oder direkt am Fenster bei Sonnenlicht die Beleuchtung am Digital Mikroskop
einschalten, kann das Bild auf dem Monitor viel zu hell erscheinen. Das liegt daran, dass die Kamera sehr emp-
findlich ist. Zu viel Licht überstrahlt deshalb die Feinheiten Ihres Beobachtungsobjekts. In diesem Fall müssen
Sie die Beleuchtung am Digital Mikroskop komplett ausschalten, damit auf dem Monitor alle Feinheiten wieder
zu erkennen sind.
3.5 Anfertigung von Bildern
Mit dem Kameraauslöser (2) haben Sie die Möglichkeit ein Bild aufzunehmen und als JPG Bild abzu-
speichern.
1. Betätigen Sie den Kameraauslöser (2) oder wählen Sie im Programm „CamApp“, im Menü
„Capture(R)“, den Menüpunkt „Still image capture“ aus.
2. Es erscheint das Fenster „Photo“ mit einem Bild auf dem Bildschirm.
3. Unter dem Menüpunkt „File“ können Sie mit „Save“ oder „Save As“ Ihr Bild abspeichern.
3.6 Anfertigung von Filmen
Das Programm „CamAPP“ ermöglicht Ihnen mit dem Mikroskop Filme aufzunehmen und als AVI Datei
abzuspeichern.
1. Unter dem Menüpunkt „File“ können Sie mit „Set capture file Folder“ den Ordner zum abspeichern
der AVI Datei angeben. Zum Beispiel „Eigene Dateien“-> „Eigene Videos“.
2. Unter dem Menü „Capture(R)“ können Sie mit „Start Capture“ die Aufnahme starten.
3. Beenden können Sie Ihre Aufnahme unter dem Menü „Capture“ mit „Stop Capture“.
4. Mit einem Wiedergabe-Programm für Multimedia-Dateien können Sie nun Ihre Filme auf dem PC-
Bildschirm anschauen.
4. Starten und Verwenden der Photomizer Software
1. Starten Sie die Software Photomizer auf Ihrem Computer.
2. Klicken Sie im Programmfenster auf „Von Kamera Importieren“
3. Falls Sie mehr als ein Gerät angeschlossen haben, können Sie in der folgenden Auswahl das
gewünschte Gerät wählen. Bei nur einem angeschlossenen Gerät entfällt dieser Schritt.

10
4. Jetzt sollten Sie das Bild der Kamera auf Ihrem Bildschirm sehen können. Stellen Sie das Bild am
Mikroskop scharf indem Sie die Einstellungsräder für die Bildschärfe (11) drehen.
5. Klicken Sie auf „Aufnehmen“, um ein Bild, das Sie speichern möchten, zu erfassen. Dies wird
dann rechts in der Leiste angezeigt.
6. Wählen Sie dieses Bild durch einen einfachen Klick mit der Maus aus und klicken Sie dann auf
„Bild übertragen“.
7. Sie verlassen dann die Bilderfassung und gelangen zurück zum Programmfenster.
8. Klicken Sie jetzt oben auf „Datei“ und dann auf „Datei speichern“, um das Bild zu sichern.
Hinweis:
Wenn Sie Fragen oder Probleme mit der Software „Photomizer“ haben, dann können Sie jederzeit in
der Menüleiste des Programms auf „?“ und dann auf „Hilfe öffnen“ klicken. Bei Fragen oder Problemen
können Sie auf der Internetseite www.photomizer.net suchen.
5. Zubehör
Objektträger: Auf den Objektträger legen Sie das Präparat. Nachdem Sie es mit etwas Wasser oder
Gum-Media bedeckt haben, können Sie es mit einem Deckglas abdecken.
Deckgläser: Präparate, die Sie auf einem Objektträger zum Mikroskopieren vorbereitet haben, de-
cken Sie mit einem Deckglas ab.
Pinzette: Dies ist eine Art Zange, mit der Sie kleinere Objekte besser greifen können.
Präpariernadel: Eine Präpariernadel können Sie vielfältig verwenden. Sie können damit die Oberflä-
che eines Präparats ankratzen, Objekte fixieren oder sie zum Umrühren von Flüssigkeiten benutzen.
6. Pflege und Wartung
Ihr Mikroskop ist ein hochwertiges optisches Gerät. Deshalb sollten Sie vermeiden, dass Staub oder
Feuchtigkeit mit Ihrem Mikroskop in Berührung kommt. Vermeiden Sie auch Fingerabdrücke auf allen
optischen Flächen. Sollte dennoch Schmutz oder Staub auf Ihr Mikroskop oder das Zubehör geraten,
entfernen Sie diesen zuerst mit einem weichen Pinsel. Danach reinigen Sie die verschmutzte Stelle mit
einem weichen, fusselfreien Tuch. Fingerabdrücke auf den optischen Flächen entfernen Sie mit einem
fusselfreien, weichen Tuch, auf das Sie vorher etwas Alkohol gegeben haben.
7. Technische Daten
Leuchtdioden (LEDs): 5 Stück
Systemvoraussetzungen: PC mit Intel Pentium IV oder höherem Prozessor; Betriebssystem Windows
XP, Windows Vista oder Windows 7; mind. 1024 MB RAM Arbeitsspeicher; mind. 500 MB freier Fest-
plattenspeicher; freier USB 2.0-Port; DirectX; Service Pack 3 für Windows XP, Service Pack 2 für
Windows Vista; .NET Framework 3.5; Internetzugang.

11
DE
Garantie und Garantiezeitverlängerung
Die Garantiezeit beträgt 2 Jahre und beginnt am Tag des Kaufs. Bitte bewahren Sie die Rechnung auf.
Sie können die Garantiezeit auf 5 Jahre verlängern, wenn Sie sich auf www.bresser.de/garantie
registrieren und den kurzen Fragebogen ausfüllen. Zur Inanspruchnahme der 5-Jahre-Garantie müs-
sen Sie die Registrierung innerhalb von 3 Monaten nach dem Kauf (es gilt das Datum des Kaufbelegs)
durchführen. Danach erlischt der Anspruch auf die verlängerte Garantie. Sollten Sie Probleme mit
Ihrem Gerät haben, wenden Sie sich bitte an unseren Service. Bitte senden Sie uns keine Artikel ohne
vorherige telefonische Rücksprache. Viele Probleme lassen sich bereits am Telefon erledigen. Sollte
das Problem nach Ablauf der Garantie auftreten, oder nicht von der Garantie gedeckt sein, so erhalten
Sie von uns kostenfrei einen Kostenvoranschlag über die Reparaturkosten.
Service Hotline: +49 (0) 2872 - 80 74-210
Wichtig bei Rücksendungen:
Um Transportschäden zu vermeiden achten Sie bitte darauf, dass das Gerät sorgfältig verpackt in der
Original-Verpackung zurückgegeben wird. Bitte den Kassenbon (oder eine Kopie) sowie die Fehlerbe-
schreibung beifügen. Ihre gesetzlichen Rechte werden durch diese Garantie nicht eingeschränkt.
Ihr Fachhändler: .......................................... Art. Nr.:......................................................
Fehlerbeschreibung: .............................................................................................................
..........................................................................................................................................
..........................................................................................................................................
Name: .......................................................
Straße:.......................................................
PLZ/Ort:....................................................
Telefon:......................................................
Kaufdatum:.................................................
Unterschrift: ...............................................

12
General Warning
• Tools with sharp edges and points are often used when working with this device. Because there is
a risk of injury from such tools, store this device and all tools and accessories in a location that is
out of the reach of children.
• This device contains electronic components which operate via a power source (power supply and/
or batteries). Only use the device as described in the manual, or you run the risk of an electric
shock.
• Do not expose the device to high temperatures. Use only the power adapter supplied. Do not
short-circuit the device or batteries, or throw them into a fire. Excessive heat or improper handling
could trigger a short-circuit, a fire or even an explosion.
• Never bend, pinch, pull or run over the power and connecting cables, extensions and adapters.
Protect the cables from sharp edges and heat. Before operating, check the device, cables
and connections for damage. Never use a damaged unit or a unit with damaged power cables.
Damaged parts must be exchanged immediately by an authorised service centre.
• Children should only use the device under adult supervision. Keep packaging material, like plastic
bags and rubber bands, out of the reach of children, as they pose a choking hazard.
• Before cleaning the device, disconnect the device from the power supply by removing the plug.
• Position your device so that it can be disconnected from the power supply at any time. The wall
socket you use should be located near the device and easily accessible, since the plug on the
power cable serves as a disconnecting device for the power supply.
• Always pull on the plug to separate the device from the power supply. Never pull on the cable.
• Do not disassemble the device. In the event of a defect, please contact your dealer. The dealer will
contact the Service Centre and can send the device in to be repaired, if necessary.
• Do not expose the device to temperatures above 45°C.
Declaration of Conformity
Bresser GmbH has issued a ‘Declaration of Conformity’ in accordance with applicable guide-
lines and corresponding standards. This can be viewed any time upon request.

13
EN
The Parts of your Microscope
1. Microscope body
2. Camera shutter release
3. Magnification adjustment knob
4. Microscope camera
5. Surface illumination
6. Camera mount
7. Microscope stage
8. Substage illumination
9. Slide clips
10. Slide
11. Focus adjustment knobs
12. Microscope stand foot
13. Metal spring for electrical contact
14. Guide bar for electrical contact
15. Buttons for adjusting the brightness (+/-)
16. On/off button for type of illumination
17. USB port on the microscope
18. Slide box with 5 permanent slide preparations, 5 empty slides and 10 cover slips
19. Set of instruments for microscope
20. Dust cover
21. Software CD
22. USB connection cable
1. Assembling the Digital Microscope
Before you can use your microscope for the first time, you must assemble it properly. First, remove all
parts from the packaging. Place the microscope body (1) with the stand foot (12) on a table. Screw the
microscope camera (4) into the camera mount (6) from above.
Important:
When inserting the camera, be sure that the metal spring (13) on the camera (4) leads into the guide bar (14) on
the camera mount (6). Plug the USB connection cable (22) into the USB port on the microscope (17), inserting
the end with the smaller connector.
2. Using the Software CD
You’ll find a software CD with the driver and image-processing software packaged along with your new
microscope. You can install the software on your computer. When you connect your microscope to
your computer with the USB cable, you can look at the pictures on the computer monitor and save them
using the ‘CamApp’ software. You can edit the pictures with the ‘Photomizer’ software. You‘ll learn how
to properly install the software in the next sections.
Note:
In order to work with the Digital Microscope for the long term, we recommend that you always connect
it to the same USB port.

14
2.1 Installation of the Software
Important: Before inserting the CD into your computer, first plug the USB cable into the USB port on
your PC. Windows will recognize the new device and will indicate this in a notification window. Click on
‘Cancel’, since the driver for the device will be installed automatically later.
1. Save all current data and close any open programs.
2. Now insert the CD-ROM that came with your microscope into the CD/DVD drive of your computer.
The installation menu starts automatically. If it does not, go to the Windows explorer and select the
CD/DVD drive (most of the time, it’s the ‘D’ drive, but it can have another letter). From there, start
the file ‘menu.exe’ by double-clicking with the left mouse button.
2.2 Driver installation
To install the driver software, click on ‘Install Driver’ on the menu with the mouse cursor. Then follow the
installation programme instructions. During the software installation the correct driver for your operat-
ing system will be installed automatically. No manual input is needed. Once the computer restarts, the
driver is installed. In rare cases the device may not be recognised by your computer. If this occurs, you
need to install the driver manually from the CD. Select the menu item ‘Repair Program’ during the instal-
lation of the driver. After the driver has been installed, restart the computer. If this fails, please refer to
the troubleshooting chapter that follows.
2.3 Installation of the Image Editing Software Photomizer
The image editing software ‘Photomizer’ is located on the software CD. You can edit your pictures
here.
Note: The ‘Photomizer’ software requires ‘Microsoft .NET Framework 3.5’. This must be installed first,
if it has not been installed on your operating system already.
You can directly download this here:
http://www.microsoft.com/downloads/en/details.aspx?FamilyID=333325fd-ae52-4e35-b531-
508d977d32a6
Please note that the manufacturer cannot guarantee the accessibility of the site or that it is free from
viruses. Likewise, they cannot guarantee the functionality of the software.
1. To install the software, click once on the menu item ‘Install Software’ with the left mouse button.
2. A selection window appears in which you can select the preferred language. Select the preferred
language and confirm with ‘OK’.
3. In the welcome window, please click on ‘Continue’.
4. In the next window, you will be asked for the ‘Destination Folder’. Here, just click on ‘Next’.
5. Click on ‘Continue’ in the ‘User-defined Installation’ window.
6. The options ‘Create Desktop Shortcut’ or ‘Link in the Quick Launch Bar’ set up program shortcuts
on your desktop and taskbar.
7. Now, the window with the setup status will appear. A progress bar will inform you about the ongoing
installation. This process can take a few minutes.
8. The window ‘Photomizer is being installed’ appears. Click on ‘Finish’. The installation ends.
2.4 Troubleshooting: The device isn’t recognised by the computer (USB).
1. This occurs in rare cases with some OEM Windows Vista or XP versions. The device is not defective.
Updating the notebook or PC USB driver usually fixes this problem.
2. If, after installation of the driver, the computer tries to operate the device on another USB port, the
driver may need to be re-installed from the CD. Select the menu item ‘Repair Program’ during the
installation of the driver. After the driver has been installed, restart the computer.

15
EN
3. If not, proceed as below. (The maker cannot accept any liability whatsoever in these cases1). Delete
ghost devices. These are devices not actually currently connected to your computer. The reason
ghost devices appear is that Windows generates a system settings entry for each USB device (e.g.
USB drive) on each port. Windows then seeks that device each time it’s started. This slows down
USB device recognition and Windows booting and causes nonrecognition of USB ports. Cleaning
up the system environment and deleting devices that are no longer in use helps here. To do so, right
click ‘Workplace’ (‘Computer’ in Vista) and open the ‘Properties’ menu. Then click the ‘Advanced’
tab (‘Advanced System Settings’ in Vista) and then ‘Environment Variables’. Choose the ‘New’ option.
Enter the following under ‘Variable Name’: devmgr_show_nonpresent_devices.
Under ‘Variable Value’ enter ‘1’. Confirm your input with ‘OK’ and then reboot the computer. Change
to the device manager. In the ‘View’ menu activate the ‘Show Devices Option’. The ghost devices
previously not shown will now be displayed in light grey. Check the various categories including USB
and memory size. Only delete entries for devices you no longer use.1
1Source: Microsoft Knowledge Base
http://support.microsoft.com/kb/315539/en
3. Working with the Digital Microscope
3.1 Setting the illumination
You do not need any extra electrical cord for the light, because the Digital Microscope gets the electric-
ity for the light via the USB cable. The Digital Microscope offers you three illumination options:
a) surface illumination (light from above),
b) substage illumination (light from below) or
c) surface and substage illumination
(light from above and below at the same time).
Their use depends on the object you would like to observe (see section 3.4). If you press the on/off
button (16) once, the surface illumination (5) will be turned on. If you press the button a second time,
the illumination switches to substage (8). If you then press the button a third time, both surface and
substage illumination are engaged. Another press of the button turns the lighting completely off again.
Choosing the right lighting depends on what you would like to look at (see section 3.4).
3.2 Live Observation
If you press the camera shutter release (2) on your microscope, the ‘CamApp’ window opens.
If the program ‘CamApp’ does not start automatically, switch to ‘All Programs’. You can start the
‘CamApp’ program manually under ‘USB2.0 PC Camera’.
A live image (in general, blurry) is displayed on the monitor. Focus the live image by turning the setting
wheels for the image sharpness (11).
3.3 Choosing the Magnification Settings
You should begin your first observation with the smallest magnification (20X). This makes adjusting the
image much easier, because the higher the magnification, the more carefully the object of observation
must be positioned (with the transmitted-light microscope, for instance, a slide would be the object of
observation). Therefore, turn the magnification adjustment knob (3) to “20X”. Then, adjust the micro-
scope stage (7) to its lowest position using the focus adjustment knobs (11).

16
3.4 Observing an Object
When observing objects through a microscope, you must distinguish between transparent and opaque
objects. Transparent objects are generally completely flat or liquid (e.g. insect wings, a drop from a
puddle, etc.); opaque objects are generally larger and not so flat (e.g. smaller insects, plant pollen,
rocks, coins, etc.).
3.4.1 Observing Transparent Objects
Your Digital Microscope comes with permanent slide preparations. These are slides on which transpar-
ent objects have already been mounted and prepared for observation with a microscope. Set one of
these permanent slide preparations onto the microscope stage (7). Push the slide underneath both
slide clips on the microscope stage, so that nothing can move about during the observation. Then, turn
the light to substage illumination (8) by pressing the on/off button for the light (16) as described in sec-
tion 3.1. Next, adjust the permanent slide so that the observation object is clearly visible on the monitor,
in the preview area of the camera software. Now, slowly turn the focus adjustment knob (11) left or right
until the image is in focus. By pushing multiple times on the buttons for light brightness (+/-) (15), you
can set the illumination so that the fine details of the observation object appear clearly on the monitor.
If you would like to switch to a higher magnification, turn the magnification adjustment knob (3) to the
left, to the position 80X or 350X.
Important:
Each time you adjust the magnification, you must also use the magnification adjustment knob (3) to change the
focus.
3.4.2 Observing Opaque Objects
If you would like to observe opaque objects with this microscope, the object must be lit from above.
Therefore, use the on/off button for the illumination (16) to set the lighting to surface illumination (5),
as described in section 3.1. Place the observation object on the small, round disk in the middle of the
microscope stage. Using the focus adjustment knob (11), focus the image. It will also appear in focus
on the monitor. You might have to move the observation object around a little bit so that it is displayed
properly on the monitor. By pushing multiple times on the buttons for light brightness (+/-) (15), you
can set the illumination so that the fine details of the observation object appear clearly on the monitor.
The Digital Microscope allows you to observe objects with a height of up to 6 mm.
Tip:
If you are observing objects that are only slightly transparent (e.g. minerals, grains of sand, etc.), you
can improve the picture quality by using surface and substage illumination at the same time (section
3.1.). The brightness for both lighting types is set with the appropriate keys (+/-) (15).

17
EN
Important:
If you turn on the illumination on the Digital Microscope in a very bright room or near a window on a sunny day,
the image on the monitor can appear much too bright. This is because the camera is very sensitive. Too much
light overpowers the fine details of the observation object. In this case, you must completely shut off the light on
the Digital Microscope, so that all the details are visible on the monitor.
3.5 Taking Pictures
Using the camera shutter (2), you can take a picture and save it as a JPG file.
1. Press the camera shutter (2) or select ‘Still image capture’ in the menu ‘Capture(R)’ in the
‘CamApp’ program.
2. The ‘Photo’ window appears on the screen with a picture.
3. To save the image, click ‘File’ and ‘Save’ or ‘Save As’.
3.6 Making Movies
The ‘CamApp’ program allows you to make movies with the microscope and save them as AVI files.
1. By choosing ‘File’ from the menu, you can specify a folder to save your AVI files to under ‘Set Capture
File Folder’. For example, ‘Own Files’ -> ‘Own Videos’.
2. You can prepare to film with ‘Capture(R)’ and start filming with ‘Start Capture’ from the menu.
3. Under the ‘Capture’ menu, you can end your filming with ‘Stop Capture’.
4. You can watch your film on your PC monitor using a playback program for multimedia files.
4. Starting and Using the ‘Photomizer’ Software
1. Start the ‘Photomizer’ software on your computer.
2. In the program window, click ‘Open Camera’.
3. If you have more than one device connected to your PC, you can choose the desired device in the
next step. If you only have one connected device, you can skip this step.
4. Now, you should be able to see the image from the camera on your monitor. On the microscope,
bring the image into focus by turning the focus adjustment knobs (11).
5. Click ‘Capture’ in order to capture an image you would like to save. This will be shown on the right
in the menu bar.
6. Select this image with a single mouse click, then click on ‘Transfer Image’.
7. You will now leave the image-capture stage, and go back to the program window.
8. Now click on ‘File’ at the top of the screen and then on ‘Save File’ in order to save the image.
Tip:
If you have questions or problems with the ‘Photomizer’ software, you can always go to the program’s
menu bar, and click on ‘?’ and then on ‘Open Help’. For questions or problems, you can look on the
website www.photomizer.net. Please ask your parents before using the Internet.

18
5. Accessories
Slides: Place the specimen you wish to observe on a slide. After you have covered it with some water
or gum media, you can place a cover slip on top.
Cover slips: Use the cover slips to cover specimens that you have placed on a slide in order to protect
them while you observe them with the microscope.
Tweezers: These are a type of pincers that you can use to pick up small objects.
Dissecting needle: A dissecting needle can be used for many things. You can use it to scratch the
surface of a specimen, to fix objects in place or to stir liquids.
6. Care and maintenance
The microscope is a high-quality optical appliance. Therefore you should make sure that dust and
moisture do not come into contact with your microscope. Avoid putting fingerprints on any optical
surfaces.
If dust or dirt has gotten onto your microscope or the accessories, you should first remove the dirt with
a soft brush. Then clean the soiled area with a soft, lint-free cloth. To remove fingerprints from the opti-
cal surfaces, it is best to use a lint-free, soft cloth, to which you have applied some alcohol.
7. Technical Data
LEDs: 5 pieces
System requirements: PC with Intel Pentium IV processor or higher; Operating System: Windows XP,
Windows Vista or Windows 7; at least 1024 MB RAM memory; at least 500 MB free hard disk space;
free USB 2.0 port; DirectX; Service Pack 3 for Windows XP, Service Pack 2 for Windows Vista; .NET
Framework 3.5; Internet Access

19
EN
Warranty and warranty term extension
The warranty term is two years from the date of purchase. Please keep your proof of purchase. Register
at www.bresser.de/warranty and fill out a brief questionnaire to get your warranty term extended to
five years. Registration must be completed within three months of purchase (date of receipt) to validate
the warranty. If you register thereafter, the warranty term will not be extended. If you have problems with
your device, please contact our customer service first. Do not send any products without consulting
us first by telephone. Many problems with your device can be solved over the phone. If the problem
occurred after the warranty ended or it is not covered by our warranty terms, you will receive a free
estimate of repair costs.
Service Hotline: +49 (0) 2872 - 80 74-210
Important for any returns:
Please make sure to return the device carefully packed in the original packaging in order to prevent
damage during transport. Also, please enclose your receipt for the device (or a copy) and a description
of the defect. This warranty does not imply any restriction of your statutory rights.
Your dealer:................................................ Art. No.:.....................................................
Description of problem: .........................................................................................................
..........................................................................................................................................
..........................................................................................................................................
Name: .......................................................
Street: .......................................................
City/Postcode:............................................
Telephone: .................................................
Date of purchase:........................................
Signature: ..................................................

20
Consignes générales de sécurité
• L’utilisation de cet appareil exige souvent l’utilisation d’accessoires tranchants et/ou pointus. Ainsi,
il convient de conserver l’appareil et ses accessoires et produits à un endroit se trouvant hors de la
portée des enfants. RISQUES DE BLESSURES !
• Cet appareil contient des pièces électroniques raccordées à une source d’alimentation électrique
(par bloc d’alimentation). L’utilisation de l’appareil doit se faire exclusivement comme décrit dans ce
manuel, faute de quoi un RISQUE d’ELECTROCUTION peut exister !
• Ne pas exposer l’appareil à des températures trop élevées. N’utilisez que le bloc d’alimentation
fournis avec l‘appareil. L’appareil ne doit pas être court-circuité ou jeter dans le feu ! Toute
surchauffe ou manipulation inappropriée peut déclencher courts-circuits, incendies voire conduire à
des explosions !
• Les câbles électriques sous tensions ainsi que les rallonges et les cosses ne doivent pas subir
de forces de torsions ou de traction, être coincés ou écrasés. Protégez les câbles des objets
tranchants et de la chaleur. Vérifiez l’appareil, les câbles et les raccordements avant de les mettre
en service pour vous assurer qu’ils ne soient pas endommagés. Aucun appareil endommagé ou
dont les pièces sous tensions sont endommagées ne doit mis en service ! Les pièces dégradées
doivent être remplacés par les professionnels de maintenance compétents dans les meilleurs
délais.
• Les enfants ne doivent utiliser cet appareil que sous surveillance. Maintenez les enfants
éloignés des matériaux d’emballage (sacs plastiques, bandes en caoutchouc, etc.) ! RISQUE
D’ETOUFFEMENT !
• Avant de nettoyer l’appareil, veuillez le couper de son alimentation électrique (tirez le câble
d’alimentation)
• Placez votre appareil de façon à ce qu’il puisse être déconnecté à tout moment de l’alimentation.
La prise de courant doit toujours être située près de l’appareil et être facilement accessible, dans la
mesure ou la prise sur le cordon d’alimentation sert de dispositif déconnexion de l’alimentation.
• Utilisez toujours le prise pour débrancher l’appareil de la prise de courant. Ne jamais tirer sur le
cordon.
• Ne pas démonter l’appareil ! En cas de défaut, veuillez vous adresser à votre revendeur spécialisé.
Celui-ci prendra contact avec le service client pour, éventuellement, envoyer l’appareil en réparation.
• Ne jamais exposer l’appareil à des températures de plus de 45 °C !
Déclaration de conformité CE
Bresser GmbH a émis une « déclaration de conformité » conformément aux lignes directrices
applicables et aux normes correspondantes. Celle-ci peut être consultée à tout moment sur
demande.
Table of contents
Languages:
Other National Geographic Microscope manuals

National Geographic
National Geographic 40-1024X User manual

National Geographic
National Geographic 80-60101 User manual

National Geographic
National Geographic 1200X User manual

National Geographic
National Geographic BRESSER 90-39000 Programming manual

National Geographic
National Geographic 90-39100 User manual

National Geographic
National Geographic 40X-640X MICROSCOPE User manual

National Geographic
National Geographic 80-20104 User manual

National Geographic
National Geographic 80-10201 User manual

National Geographic
National Geographic 300X-1200X User manual

National Geographic
National Geographic 40 1024X User manual