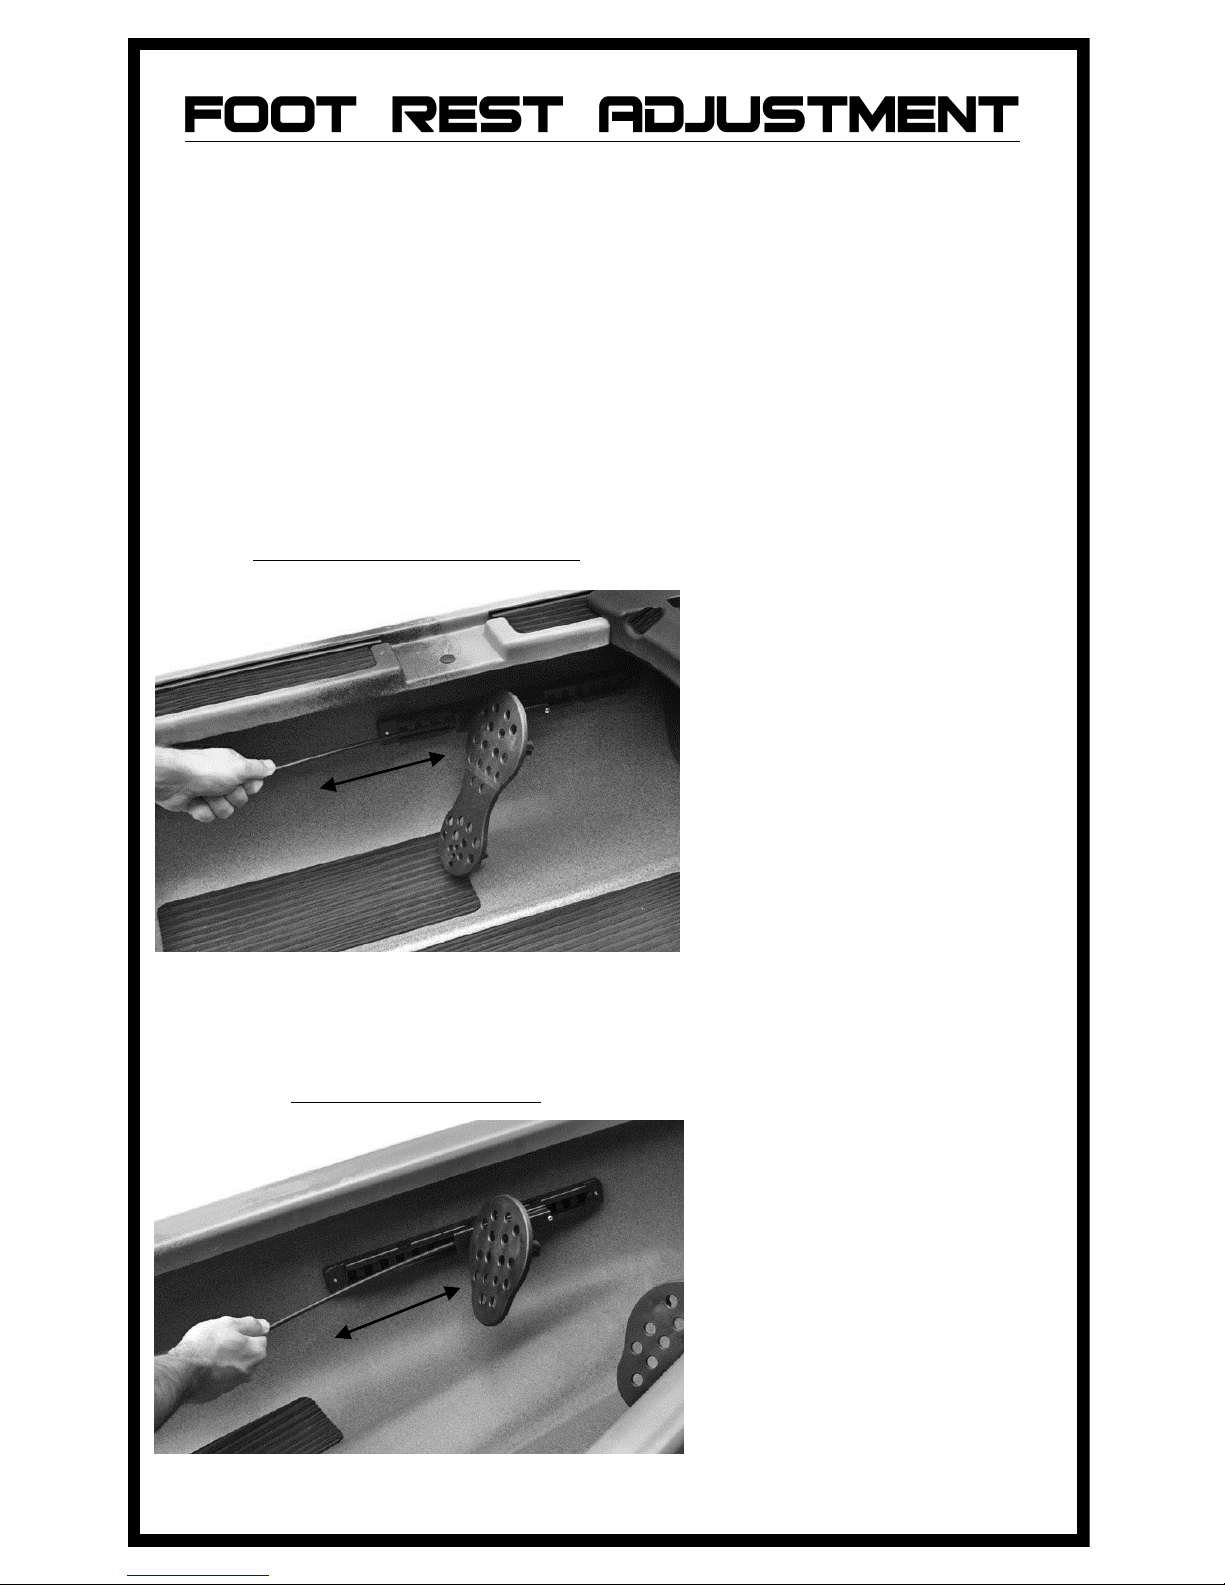
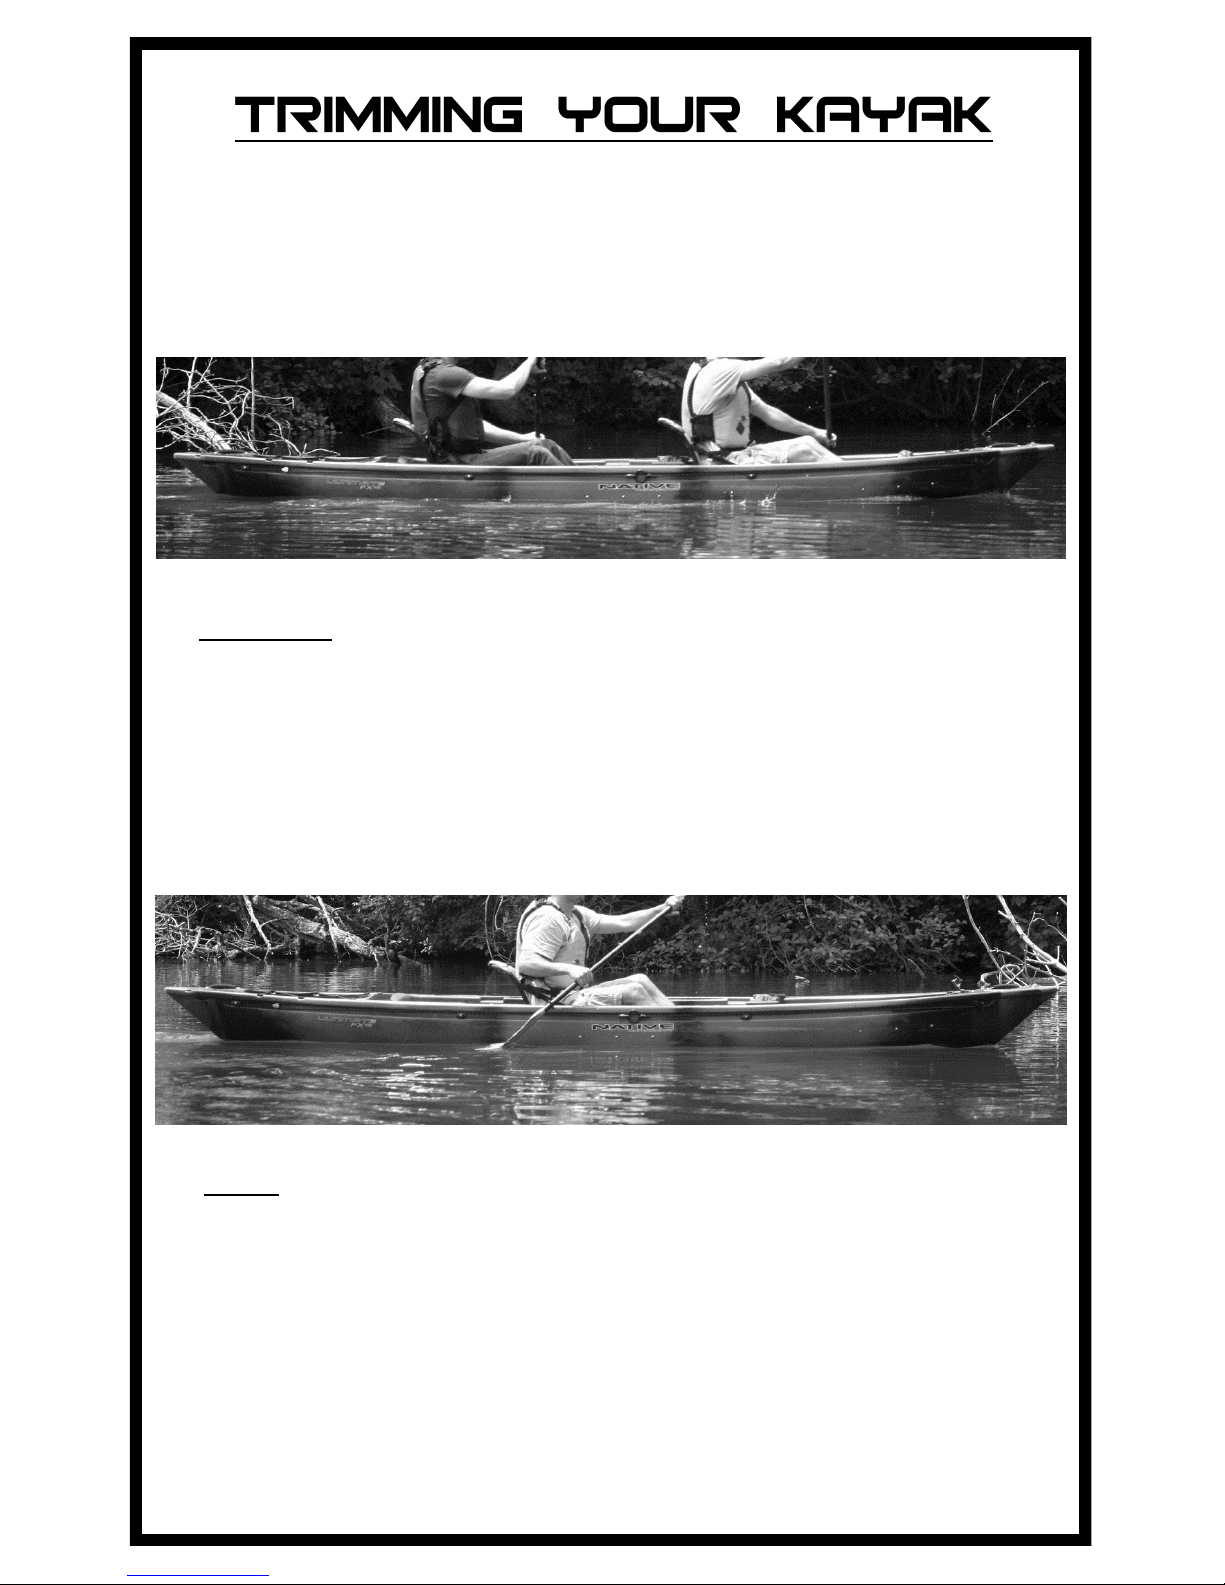
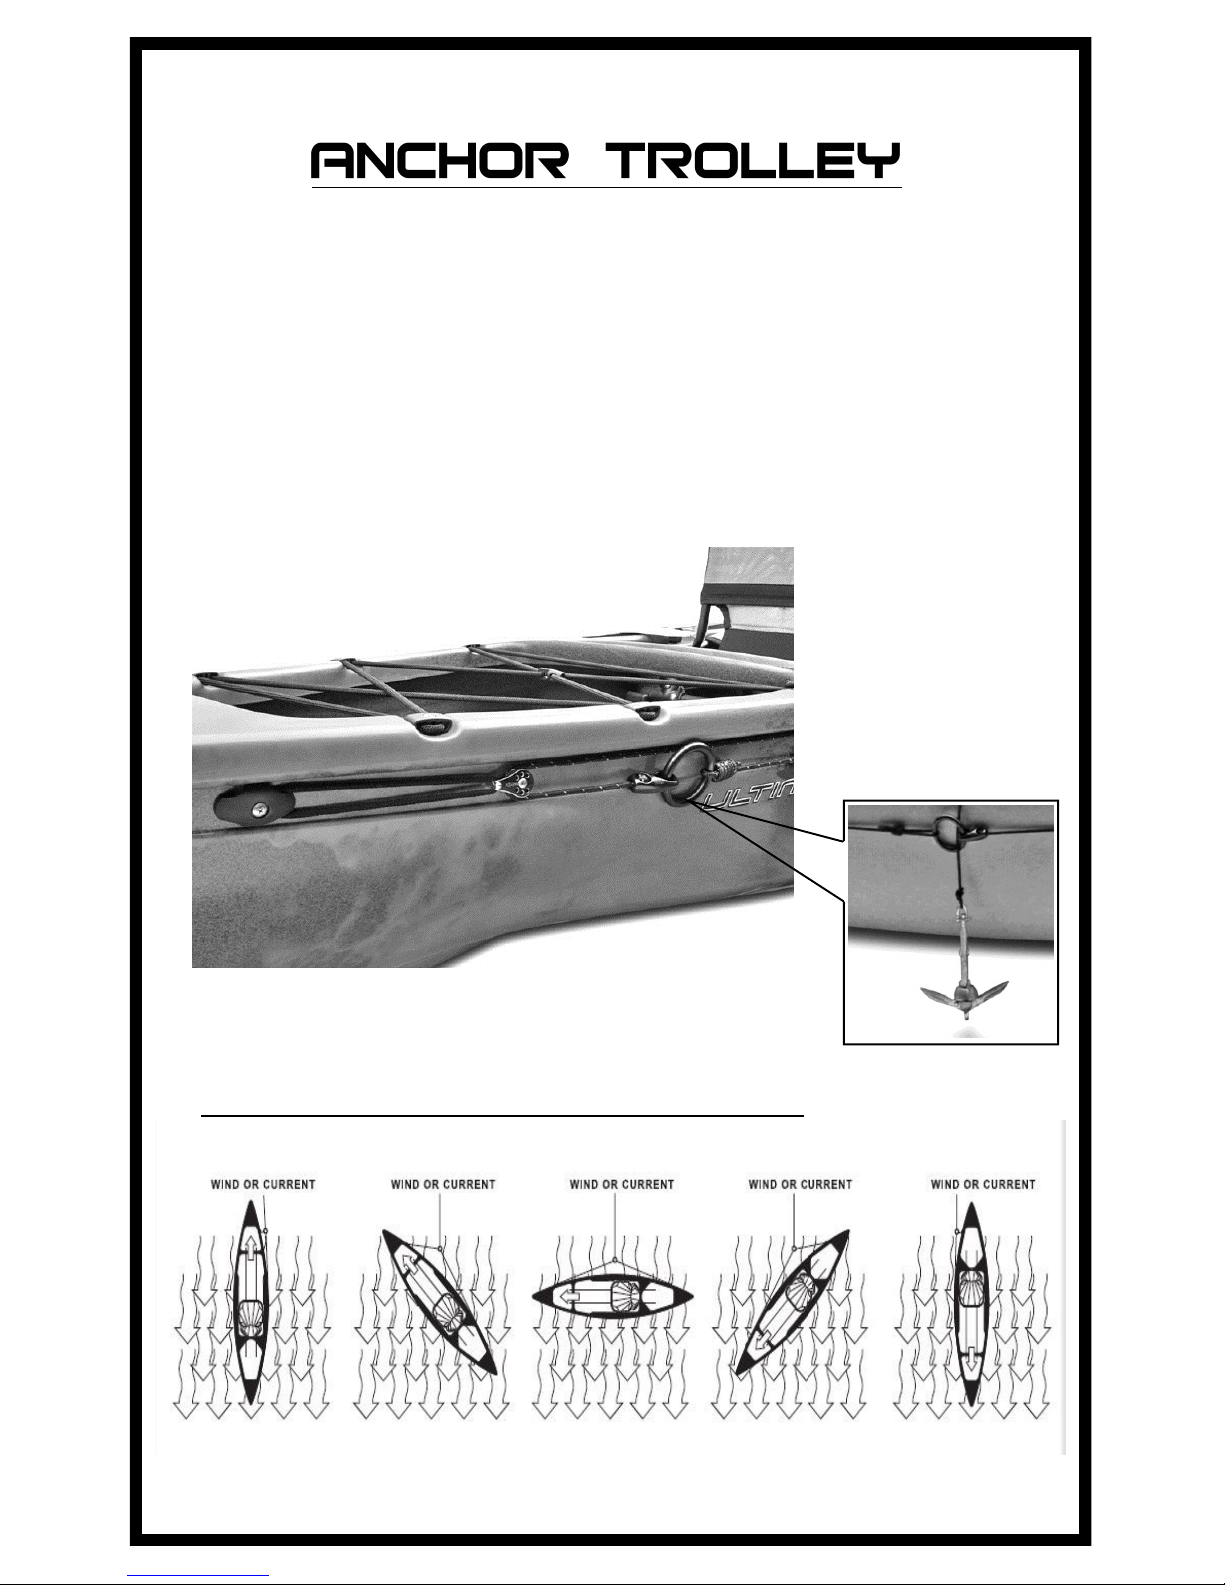
manuals.online logo
Brands
  1. Home
  2. •
  3. Brands
  4. •
  5. Native Watercraft
  6. •
  7. Boat
  8. •
  9. Native Watercraft Ultimate FX 15 User manual

Native Watercraft Ultimate FX 15 User manual

Other Native Watercraft Boat manuals

Native Watercraft Inuit User manual

Native Watercraft

Native Watercraft Inuit User manual

Native Watercraft Mariner User manual

Native Watercraft

Native Watercraft Mariner User manual

Native Watercraft Ultimate FX 12 User manual

Native Watercraft

Native Watercraft Ultimate FX 12 User manual

Popular Boat manuals by other brands

Windworks 38' Catalina Reference notes

Windworks

Windworks 38' Catalina Reference notes

J 105 owner's manual

J

J 105 owner's manual

GELEX G500 light user manual

GELEX

GELEX G500 light user manual

Monterey Boats Sport Yacht 330 owner's manual

Monterey Boats

Monterey Boats Sport Yacht 330 owner's manual

PURSUIT OS 335 owner's manual

PURSUIT

PURSUIT OS 335 owner's manual

Boston Whaler CONQUEST 345 owner's manual

Boston Whaler

Boston Whaler CONQUEST 345 owner's manual

Jeanneau SUN ODYSSEY 41 DS owner's manual

Jeanneau

Jeanneau SUN ODYSSEY 41 DS owner's manual

Meridian 490 Pilothouse owner's manual

Meridian

Meridian 490 Pilothouse owner's manual

Advanced Elements AdvancedFrame Expedition AE1009 owner's manual

Advanced Elements

Advanced Elements AdvancedFrame Expedition AE1009 owner's manual

Robo Marine Indonesia GEOMAR user manual

Robo Marine Indonesia

Robo Marine Indonesia GEOMAR user manual

Swallow Boats BayRaider owner's manual

Swallow Boats

Swallow Boats BayRaider owner's manual

X SHORE EELEX 8000 owner's manual

X SHORE

X SHORE EELEX 8000 owner's manual

Crivit DINGHY Instructions for use

Crivit

Crivit DINGHY Instructions for use

Mercury Sport 220/240 manual

Mercury

Mercury Sport 220/240 manual

Marquis 720 FLY owner's guide

Marquis

Marquis 720 FLY owner's guide

Sportime Seestürmer user manual

Sportime

Sportime Seestürmer user manual

Sportime Seestürmer user manual

Sportime

Sportime Seestürmer user manual

Raymarine ST70 Instrument User reference handbook

Raymarine

Raymarine ST70 Instrument User reference handbook

manuals.online logo
manuals.online logoBrands
  • About & Mission
  • Contact us
  • Privacy Policy
  • Terms and Conditions

Copyright 2025 Manuals.Online. All Rights Reserved.

OWNERS MANUAL
Get to know your kayak
2
Pg. 3
Pg. 4
Pg. 5
Pg. 6
Pg. 7
Pg. 8
Pg. 9-12
Pg. 13
Pg. 15
 Seat Adjustment
 Foot Rest Adjustment
 Trimming Your Kayak
 Groove Track
 Anchor Trolley
 Draining
 Convert Tandem to Solo
 Cleaning and Storage
 Warranty/Registration
3
NOTE: The front seat base in the tandem does not adjust.
Knobs should not be removed unless converting to solo!
Loosening both knobs 4 turns
each will allow the seat to
slide freely forward and back.
The seat will adjust while
seated.
Locate Adjustment Knobs, for the
Stern or Solo seat.
Both seat bases are designed with a high/low seat feature.
Try the low position while paddling and the high position
while fishing.
NOTE: The higher position will be less stable.
High Low
4
To adjust the foot rests
to your desired length,
simply grab firmly on
the push/pull rod, and
pull to bring closer to
you or push to get a
further distance.
All Ultimate FX models are equipped with the Easy Foot rest
system. Your FX15 is equipped with either 2 or 4 depending
on if it is a solo or tandem.
NOTE: This procedure can be done on or off of the water.
It is best done after the seat is adjusted (pg.2) and the boat
is trimmed properly (pg.5).
(Back (Tandem) or Solo paddler)
(Front (Tandem) Paddler)
To remove the foot
rests completely, pull it
toward you and out of
the rail.
NOTE: The foot rests
cannot be removed by
pushing forward.
5
Tandem
Your trim in the tandem will vary depending on the
weight of the front paddler. The back seat may need
to be adjusted accordingly (pg.2).
When “trimming” your kayak you are distributing the load so
that it is balanced in the water. A level waterline or a waterline
with the nose slightly higher is ideal.
Solo
Your trim in the solo will vary depending on load
distribution.
6
Below are just a few accessories offered for the Groove Track system.
Call or visit your local dealer for more info.
The Groove Track is our exclusive accessory attachment
system. Components such as rod holders and depth finders
slide on-off to meet your needs. You can lock them down
anywhere along the rail system, loosen and move them
easily.
Cam-Lok Paddle Holders
Scotty Gearhead
Groove Adapter Slugs Kit
7
Every FX15 is outfitted with 2 Tight Line Anchor
Trolley Systems. The system uses two pulleys and a
bungee provides constant tension. Adjusting the rope
allows you to change the direction you are facing
without needing to reposition your anchor.
Anchor (sold separately)
rope should pass through
large ring and be tied
when desired depth is
reached in the water.
Example of how the system is used.
8
All Ultimate FX’s are equipped with a large drain
hole located at the front of the boat. This is
plugged with our Super Seal Plug which creates a
high pressure seal to keep water from entering.
When draining an Ultimate FX, remove the Super
Seal Plug, lift up on the back and allow water to go
to the front. Once the water is in the front, slowly
roll the kayak upside down, keep the back raised to
allow water to drain.
9
To begin drop the seat in the low position, then push the seat as
far to one side of the seat base as possible. Then lift the opposite
side of the seat up and slide it out of the base and boat. To
remove the seat base, first unscrew the 2 adjustment knobs
completely and slide the seat back until it stops. Then find the
pull straps located on the opposite side of the base from you
(pictured below). Grab the strap through the finger loop and pull
slightly up and toward the middle of the boat. You will need to
use some force to pop the seat base out from under the gunnel of
the boat. Once it pops the base will lift out easily.
Your Ultimate FX 15 can easily be converted from a
tandem kayak to a solo kayak in a few simple steps.
1. Remove Foot Rests and set aside (reference pg. 4)
2. Remove Thwart and set aside
3. Remove Front Seat and Seat Base
This is done by removing 2
wings nuts (one on each side
of the thwart) located under
the rails. Then lift up on the
thwart.
NOTE: Only tool needed is a Flathead Screwdriver!
10
Location
4. Remove 4 Black Buttons
5. Remove Rear Seat Knobs and Slide Seat Base Forward
to Solo Position
NOTE: In this step you will need your flathead screwdriver.
Use your flathead screwdriver to
pop the buttons apart.
When reattaching the seat base in the solo position,
make sure you locate the brass slider that is in the track
on the seat base. Once located, align the tapped hole
with the hole in boat and re-insert the knob.
You may want to keep these
in a safe place for later use.