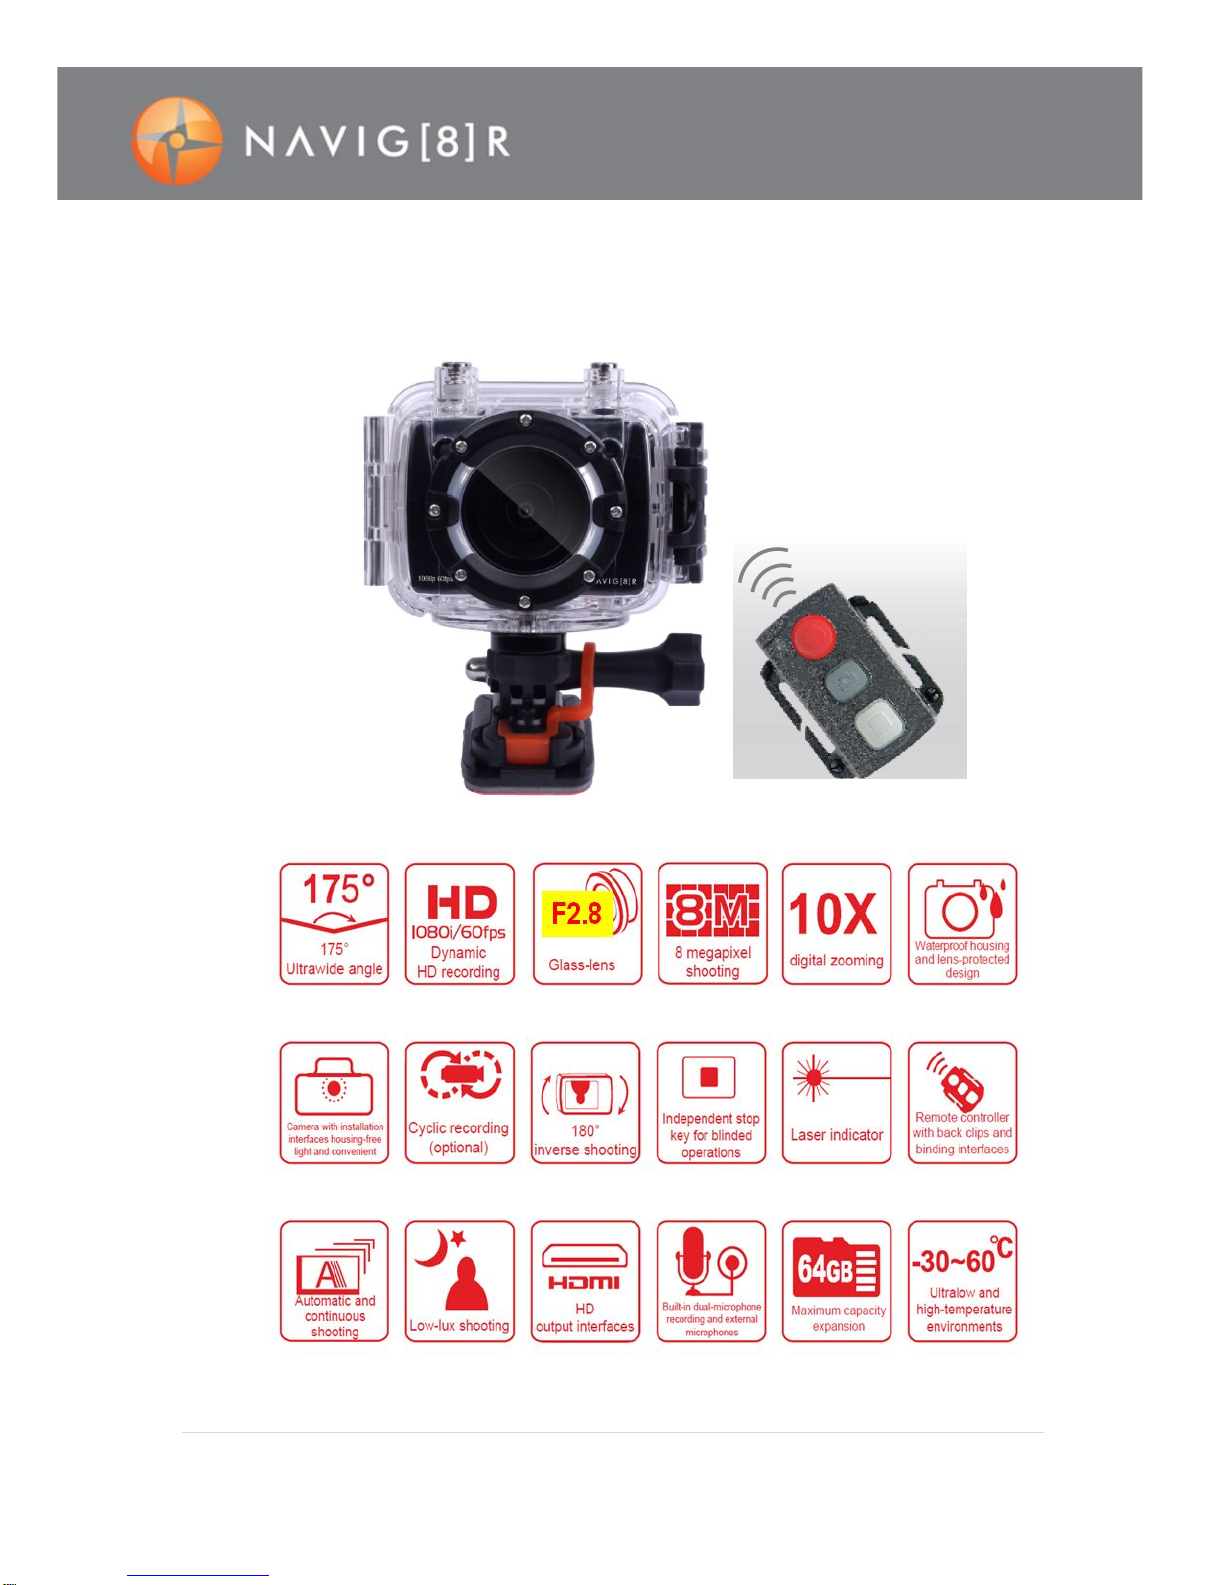
Navig8r NAVSPORTPRO User manual

1 | P a g e
NAVSPORTPRO USER GUIDE

2 | P a g e
IMPORTANT SAFETY INSTRUCTIONS AND PRECAUTIONS
Notice
Do not drop, knock, shake or throw the sports camera.
Do not put the sports camera close or next to objects that generate a strong magnetic field,
such as a magnet or a motor.
Do notput the sports camera close to objects that emit radio waves, such as an antenna.
Do not expose the sports camera to high temperature, extreme heat or direct sunlight.
During continuous use, the surface temperature of your NAVSPORTPRO may increase. This is
partof normal operation.
Removeboth batteries when the camera is in storage for extended periods. It is recommended
to recharge the batteries every six months to preserve life expectancy.
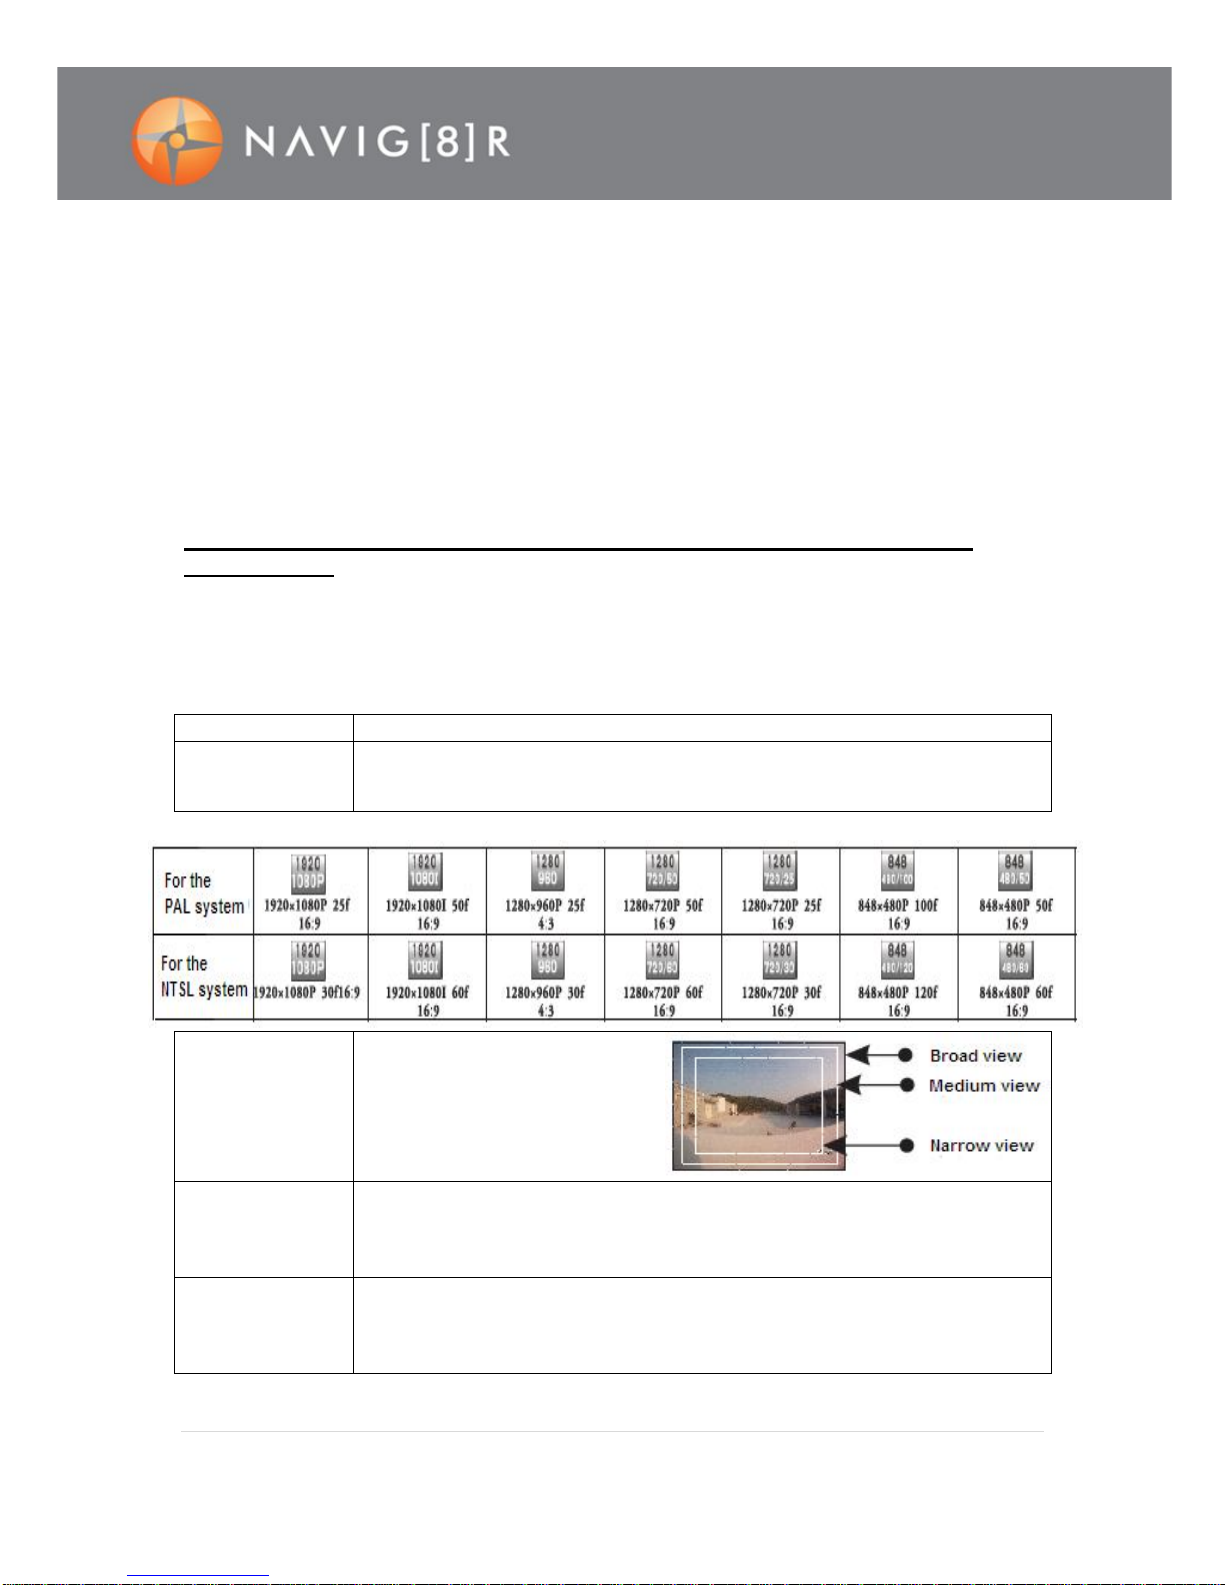
During recording, the digital zoom function may reduce image quality.
Viewing angles between Video and DSC (Camera) modes may differ.
Large recorded files should be reviewed on a computer to ensuresmooth playback. The
primary purpose of this device is to be a camera as opposed to a media player.
Practice good data managementand keep yourSD card “defragged” and formatted to ensure
against data loss and corruption. Backing up data is also good practice.
Read all instructions carefully before use
Retain this product manual for future reference.
Use this product only in the manner described.
Only use awater-dampened soft-cloth to clean the surface ofthe camera.
Remove particulate such as dirtor grease beforehand to avoid scratching the case.
The camera is not waterproof when it is outside its waterproof case
Be aware of environmental conditions such extreme heat and cold, humidity, dusty, salty or
sandy environments.In extremelycold weather and after prolonged usage, condensation may
form inside the case which may cause the lens to fog up. We would recommend to stop using
the camera and let the condensation evaporate (i.e. Don’ttry to wipe it off)
For first time use, it is recommended to charge batteries overnight to ensure a full battery
charge. Subsequent charges can be as required.
During charging, or extended use, the product may become warm.
There are no user serviceable parts in this product.
Un-authorized attempts to dismantle orrepair this product will void your warranty
Do notpoint the cameradirectly at the sun as this may damage the video sensor
Do not wipe the lens surface with your fingers.Instead use an appropriate lens cleaning cloth or lens
cleaning solution.

3 | P a g e
INDEX
SPORTS CAMERA AND ACCESSORIES IN THE BOX Page 4
OPTIONAL ACCESSORIES Page 4
PRODUCTBUTTONS AND CONNECTIONS Page 5
CHARGING Page 6
MOUNTING PRECAUTIONS Page 6
INSTALLING THE WATERPROOF HOUSING Page 6
INSTALLING THE REMOTE CONTROLLER Page 7
INSERTING A MICRO SD CARD Page 7
FORMATTING MICRO SD CARD’S Page 7
SETTING THE DATE AND TIME (INITIAL USE) Page 7
STORAGE AND PLAY OF A FILE Page 8
MAIN UNIT AND LCDSCREEN ICONS Page 9
MAIN MENU SCREEN Page 10
VIDEO MENUSETTINGS Page 10
CAMERA MENU SETTINGS Page 11
SYSTEM MENU SETTINGS Page 12
PLAYING BACK AN IMAGE FILE (PHOTOS /VIDEOS) Page 12
PLAYING AN AUDIO FILE Page 13
DELETING, PROTECTING,AND AUTO-PLAYBACK Page 14
REMOTE CONTROL Page 14
AV OUTPUT Page 15
HDMI OUTPUT Page 15
USB MODE Page 15
LASER POINTER HELPER Page 15
TURNING ON/OFF THE LCD SCREEN Page 15
FAQ Page 15
TECHNICAL SPECIFICATIONS Page 16

4 | P a g e
SPORTS CAMERA AND ACCESSORIES IN THE BOX
1 x NAVSPORTPRO
1 x Slide-in Camera Mount
1 x Waterproof case
1 x Mount Locking Pin
1 x Remote Control 1 x Hand Lanyard
1 x Detachable LCD Screen 1 x USB Cable
1 x (Removable) Built-in Battery
1 x (Removable) Detachable Battery
1 x AV Composite Cable
1 x Flat Mounting kit
1 x Flat Mount Spare Base
1 x Carry Pouch
OPTIONAL ACCESSORIES
**The optional WI-FI MODULE is used in conjunction with an iPhoneor Android application (app). It
allows real time previews, control of camera settings and can operate at a distance of up to 50 metres
from the camera (line of sight)
View our full range of SPORTS CAM accessories at www.navig8r.com.au.
Accessories are sold separately.

5 | P a g e
PRODUCT BUTTONS AND CONNECTIONS
1. LCD screen 7.OK
(confirmation)key
13. AV Out/
Audio in
18.Operating/
Recharging
indicator (Red)
23.Video/Photo
indicator Green
2. Menu key 8.accessory
release button 14. Record key 19.LCD
status display 24.Laser pointer
3. Up key /
Zoom In whilst
recording
9.Wrist strap
attach point
15. Video/Audio
recording
indicator (Green) 20.Shutterkey 25.HDMIoutput
4. Left key 10.
speaker 16. Power switch 21. Stop key 26. Mini USB
port
5. Down key
/ Zoom out whilst
recording
11. Micro SD
card slot 17. Microphone 22. Lens 27.tripod
mountingpoint
6. Playback key 12. Right key

6 | P a g e
CHARGING
Before using your NAVSPORTPRO, check whether the battery has sufficient charge. If the power
level is low, use the supplied USB cable to recharge the battery/s. Once connected, the red
indicator lamp willblink slowly. When fully charged the red indicator willbe constantly on. A
full charge time takes approximately three hours.
During video recording, if the battery power runs low or the memorycard is full, the system
saves thecurrentfile(if recording) displayinga prompt of“Low Battery” or “Card full”on the
LCD screen, before entering standby mode.
MOUNTING PRECAUTIONS
Waterproof Housing
The O-ring, lens cover and allother parts of the waterproof housing are notuserreplaceable.
Tampering with the case will void the warranty.
Avoid contact with chemical or other corrosive substances, such as strong acid’s or alkalis.
Do not subject the waterproof housing to temperatures over high (50°C) or lower than (-10°C)
for sustained periodsof time
If the housing were to heat substantially, the case could warp and compromise the waterproof
seal.
Before use, ensure that the O-ring is intact, the seal is clean and particulate-free, the housing is
fully sealed, and the buckle is secured and tight.
After using the housing in sea water,wash it thoroughly with fresh water.
INSTALLING THE WATERPROOF HOUSING
The NAVSPORTPRO camera can behand-heldor used with hands-free accessories. Itcan be
installed anywhere or, after being equipped with a waterproof housing, taken underwater.
1. Assemble the TFT screen/ Battery onto the
video camera. 2. Put the NAVSPORTPRO camera into the
waterproof housing.
TFT screen /
Battery Video camera
Assemble the
TFT screen
onto the
video camera
Video camera Waterproof
housing
Put the
video
camera into
the
waterproof
housing

7 | P a g e
Note 1: To remove the TFT screen, press the PUSH release button and gently remove it.
Note 2: You can test the gasket by closing the case without thecamera inside and
submersing it completely in a bowl of water for a few minutes. Remove the case from the
water, dry off the exterior with a towel, and then open the case. If the interior is dry, the
camera and case willbe safe for use under water.
Note 3: Only three buttons are required for recording video and images: theShutter Button
for both Video and Camera the stop button.
INSTALLING THE REMOTE CONTROLLER
The NAVSPORTPRO camera is equipped with an independent remote control,which can be
mounted with a strap if required.
1. Velcro
2. Back clip
3. Binding
strap (optional)
INSERTING A MICRO SD CARD
A Micro SD Card can only be inserted into the card slot ONE WAY. Do not force the card into the card
slot. Follow the diagram on the body of the camera near the slot for guidanceThe Micro SD card will
“click” into place. To take the memory card out,gently press the end of the memory card inward using
your fingernail until a click is heard. An internal spring will then release the card. You should always
have the camera off when inserting or removing memory cards.
FORMATTING MICRO SD CARD’S
Before video/audio recording and shooting pictures, format the Micro SD card on the
NAVSPORTPROcamera. If a Micro SDcard has beenused on other devices,it should also be
formatted on-board before use.
Note: Before formatting, make sure the files in the memory and Micro SD card are not needed.
Even the locked files on the video camera can be removed in formatting
We recommend the use of Micro SD cards in speed class 6 or 10 for optimum performance.
SETTING THE DATE AND TIME (INITIAL USE)
From the preview mode press the Mkey to display the menu interface.

8 | P a g e
Use the <and >keys to move to the systemsetup
interface.
Use the +and –keys to move to the date field and press OK
Use the <and >keys to move between fields while using
the +and –keys to adjust the time/date values.
Each value will turn blue once selected.
Finallypress OK and then the Mkey to exit.
STORAGE AND PLAY OF A FILE
Connecting a USB Data Cable
You can copy the recorded files to a computer for storage or playback by using a USB data cable
supplied. You can also removethe MicroSD cardand access the data using acard reader. Video
playbacksoftware such as“VLC” is recommended for playing recorded files. Otherwise you may
need to download therelevant codec to enable Windows MediaPlayer to function.
Note: Turn your NAVSPORTPRO on to transfer data. When finished turn your NAVSPORTPRO off
before disconnecting the cable.
Connecting with a HDMI Cable oran AV Cable
You can play recorded files on a TV or monitor that supports Composite (yellow RCA plug) or
HDMIconnections.

9 | P a g e
MAIN UNIT AND LCD SCREEN ICONS
Note: Please connect the LCD screen for the following.
Icon Function
(Main Unit) If visible, the camera is currently powered on. Ifnot, the camera is
either turned off or in stand-by mode.
(Main Unit) Main UnitBattery powerindicator (Shown when unitis turned on).
Note: When the video camera is in thestandby or power-offstate,
the power icon is not displayed.
(Main Unit) Connected to acomputer and the unitis turned on. Agreen
indicatorlamp will flash.
(Main Unit) Micro SDcard storage indicator when acard isinserted.
Note: When full, the green indicator lamp will illuminate.
(On LCD) Video Recording mode selected
(On LCD) Audio mode selected. Note: Restart the camera to revert back to
video mode or press the Playback button twice
(On LCD) Camera modeselected (Icon blinks when a photo is taken)
(On LCD) Backup battery power indicator
(On LCD –
Example)
Capture Resolution Note: 1080i/50 is an example for1080i Full HD
@ 50 Frames per second)
(On LCD –
Example)
Estimated time or number of images remaining in battery / Micro
SD card
(On LCD)
(Main Unit)
During recording
modes
, a duration counter is displayed both on
the Main Unitand the LCD Screen. (H= Hours, M= Minutes, S=
Seconds) Pressing the stop key stops and closes the counter. Note:
During recording the < and > keys do not function.
1080i/50
HHH:MM:SS
MMM:SS

10 | P a g e
MAIN MENU SCREEN
From the preview screen, press the Mkey to display the main menu options.
Use the <and >keys to move across between Video, Camera & System Settings.
Use the +and –keys to move up and down within each setting screen.
To enteran option press OK.Once changes have been made, press OK again to save and exit
back to the menu screen or press the Mbutton to return to the previewscreen and donot
savechanges. Finally press the M key to return to the previewscreen.
Note: After power-on, the video camera adopts all the preset settings, except for audio
recording mode.
VIDEO MENU SETTINGS
Note: During audio recording, the video camera responds only to the Stop and Power off keys.
Exe: Select between Video and Audio Only modes
Resolution Options: 1080P, 1080i, 960P, 720P, or WVGA resolution.
(NTSC/PAL table below)
View
Select between Broad,
Medium, Narrow lens views for
1080P and 1080i Video and
Camera recording ONLY.
BitRate Bitrate refers to the amount of videocompression applied to the recorded
image. Select between High or Normal bit rate. A high bit rate means better
image quality but will resultin larger file sizes
LaserPointer The laser pointer assists by illuminating the point where the camera is
filming. Turn ON or OFF (note,if left on the recorded footage will record the
red dot of the Laser pointer)

11 | P a g e
Pre Video
Turn On or Off.(Pre video buffers approx 5 seconds ofvideo. When
selected, press the record button once to activate the feature.Then press a
second time when ready to begin recording, which includes the previous 5
seconds.Note: Cannot be used in conjunction with other time based
functions like “Video Content Loop”)
Delay Timer
Shutter
The delay timer temporarily pauses the taking of a photo (for example if the
person taking thephoto wants tobe included in the shot. Choose between
OFF, 5, 10, or 20 seconds delay.
180° Photo
rollover
This function allows you to flip (invert) the LCD image by 180°. This is used
when the camera can only be mounted upside down. Note: This feature is
unavailable for video recording in WVGA/100fps and WVGA/120fps modes.
Display time This feature recordson the video or still picture the date and time of
recording. (this watermark is permanent and cannot be removed)
Note: Excluding 1080i, WVGA/100fps and WVGA/120fps modes.
CAMERA MENU SETTINGS
Resolution For picture quality on still photos. Select between 3.0 (lower), 5.0 or 8.0MP
(higher)
Single Shot One image is taken per shutterbutton press
Continuous
capture (three) Three images are taken per shutterbutton press
Auto cont.
capture Continuous imagecapture of 0.5,1, 2, 3, 5, 10, 20, 30 or 60 seconds until
stop button pressed, memory is full or battery runs flat
Timed shooting
(also known as time lapse)
Select between OFF,3, 5 or 10 seconds. A
photo
will be taken automatically at the preset intervals. Note: This feature must
manually be turned off afterwards
Note: The timed shooting function and other shooting functions cannotbe simultaneously
enabled. Settimed shooting to OFF to restore the other shooting modes.Otherwise, the camera
is defaulted in timed shooting mode. In single shot mode,the Auto cont. capture setting is
automatically set to OFF. IfAuto cont capture is set to 1s, the time display function is
unavailable.

12 | P a g e
SYSTEM MENU SETTINGS
Warning tone
Turn key tones (clicks) ON orOFF
Status indicator Turn ON or OFF
Video content
loop ON = Recording files auto-saved at15 min intervals
OFF = Recording files auto-saved at30 min intervals
Auto to standby Select between OFF, 2, 5 or 10 mins. Note: Press the Video, Photo or Stop to
wake.
TV output system
Select between NTSC or PAL
Contrast Selectbetween Standard or Enhanced fornighttime shooting
ISO sensitivity Select between AUTO or LOW LUX for night time shooting
Metering
Select AVERAGE for general shooting, CENTRAL AREA ifcentr
e
image is dark
with bright surrounds, orCENTRALSPOT ifcentre image is bright with dark
surrounds
Language
Select between
the
available languages
provided
Date/time Adjust time and date Note:not supported in 1080i/50 and 1080i/60 modes
Format FormatMicro SD Card / Remove ALL files when inserted
Recover factory
setting
Return all settings back to factory defaults and default time (which will
need to also be updated)
Ver: Display software version number
PLAYING BACK AN IMAGE FILE (PHOTOS /VIDEOS)
Press to display the playback screen (or to exit).Then usethe arrow keys to either:
Select to view a recorded video files, then press OK;
or, Select to view aphoto files, then press OK.
or, Select to view all the video, audio, and photo files, then press OK.
Note: If there are many files, it may take the screen a few seconds to refresh.
Then use the > or < keys to move and select a file by pressing the OK button.

13 | P a g e
When playing a video file, the shortcut key functions are:
Key Description Key Description
+ Increase volume - Decrease volume.
<
Long p
ress and hold
to
slow
rewind
Shortpress and hold to fast
rewind
>
Long press and hold to
slow forward
Short press and hold to fast forward
Resets and plays a filefrom the
beginning, OR returns to the
playback screen
OK Starts or Pauses file playback
When viewing photos, the shortcut key functions are:
Key
Description
Key
Description
+ Zooms in - Zoomsout
< Moves a picture right. > Moves a picture left.
Resets and plays a file from the
beginning, OR returns to the
playback screen
PLAYING AN AUDIO FILE
From the Video & photo screen press the > or < key to display all the audio files in audio mode.
Selectthe required file, and press OK to begin playback.
When playing back audio files, the shortcutkey functions are:
Key Description Key Description
+ Increase volume. - Decrease volume.
Resets and plays a file from the
beginning, OR returns to the
playback screen
OK Play or Pause file playback.
Note: The fastforward and rewind functions are not available when playing an audio file.

14 | P a g e
DELETING, PROTECTING, AND AUTO-PLAYBACK
From the playback mode, press the Mkey to access the following options:
Deleting a file
From the video, photo or video/photo mode, highlight or open a file and press the Mkey
Then select between “delete single” (Delete current file only) or “delete all” (deletes all
unprotected files). Then confirm your choice using the tick or cross boxes and press OK.
Protecting a file
From the video, photo, or video/photo mode, highlight or open a file and press the Mkey
then select File Protection. Select between the following and press OK to confirm:
Protect single: protects a file; Protect all: protects all the files. Once complete, an icon of a
padlock appears on the bottom left side of the image “thumbnail”. To unlock a file use the
above instruction but in reverse.
Automatically Play a file
Select Autoplay for a slideshow presentation that changes every five seconds.
REMOTE CONTROL
The remote can control the video camera as well as turn ON/OFF laser pointer.
To connect your remote control to your camera;
Press and hold the Record key on the camera
whilst power is off.
Turn the powerswitch to the ON position.
Release the Record key, and within 3 seconds,
press the Video and Stop keyson the remote at
the same time.
When the remote control has successfully paired, the
camera will chime twice.
The remote can control the following camera functions: start/stop video recording, shutter
button, wake from standby mode and turn ON/OFF the laser pointer.Each operation is
accompaniedby a chime sound. The remote is an Infra-Red connection so the distance must be
less than 10 meters and without any obstacle in between. You can also press any key on the
remote to wake the camera from stand-by mode.
Note: in the standby mode, the system does not wake up when you press any key on the LCD
screen.

15 | P a g e
AV OUTPUT
From the preview mode, connect the camera to a display device (like a TV) using the supplied
AV cables. During playback all camera functions can be used normally.
HDMI OUTPUT
From the preview mode, connect the camera to a HDMI compatible display device (like a HD TV
or monitor)using the supplied HDMI cable. Duringplayback all camera functions can beused
normally.
USB MODE
Connect the camera via Mini USB to either charge the camera battery or transfer data (if
connected to a PC).Onceconnected successfully,a USB icon willappear on the device screen
and the green indicator lamp willblink slowly.
Note: After cable connection, the camera might need to berestarted.
LASER POINTER HELPER
Press and hold the Record button for three seconds to turn the laser pointerON or OFF (during
any operation).
TURNING ON/OFF THE LCD SCREEN
Press and hold thephoto button for threeseconds to turn the LCDScreen ON or OFF.
Note: The photo button on theremote does notsupport this function.
FAQ
How long does the battery last on a full
charge?
Yo
u can continuously record video for up to
four hours and record audioonly forup to
seven hours.
I cannot work out any user controls when I
playback to a monitor or TV
M
ake sure the LCD screen has been connected
to give you access to theuser buttons.
Can Iadjust the volume of the audio recording
using the volume buttons No. The volume buttons can only be operated
during playback.

16 | P a g e
TECHNICAL SPECIFICATIONS
Option Specifications
View angle 175° ultra-wide-angel f/2.8 lens
Number of pixels
8
MP
Battery Rechargable 1000 mAh lithiumbattery + 1100
mAh backup battery
Powerconsumption
650 mA @ 3.7 V (Max.)
Maximum video recording time Up to 4 hours
Maximum audio recording time Up to 7 hours
Standby duration
Up to
200 hours
Recharging duration Approximately 3 hours
Capacity ofthe Micro SD card Up to 64 GBSDHC card
Operating humidity 15%–85% RH
Storage temperature
-
20°C
–
+60°C
Operating temperature -10°C–+50°C
Format for video recording (in PAL
system)
1080P 1920 x 1080P @25fps
1080i 1920 x 1080i @50fps*
960P 1280 x 960P @25fps
720P 1280 x 720P @25fps
720P 1280 x 720P @50fps
WVGA 848 x 480P @50fps
WVGA 848 x 480P @100fp
Note: Dueto scanning frequency capabilities in
PAL and NTSC formats, 60fps is available only on
NTSC display devices. PAL devices will show 50fps
WVGA modes do not support time display,
zooming, and 180° photo rollover functions.
Video recording file
.
MOV format
Audio recording file .WAV format
Shooting 3M, 5M, 8M JPEG images
USB port
Mini
USB
Digital Zoom 10X
Note:Zooming is not available in WVGA/100fps,
and WVGA/120fps video recording modes.
Distance for remote control Up to 10 meters
Operating system Windows XP, Vista orAbove,Windows 7 or 8, or
Mac OS
Weather proof case Shock/drop-proof,
IP68 rated waterproof housing
(Up to 100m)
Weight
80 g (without the screen)
105 g (with the screen)

17 | P a g e
Warranty against Defects
Laser CorporationPty Ltd(“Laser”) warrants yournewproductto be free from defectsin materialsand workmanship for12
months, from thedate ofpurchase,provided thatthe productisused in accordancewith accompanyingrecommendationsor
instructionswhereprovided. The benefitof this warranty is inaddition to your rights underthe Australian Consumer Law and
to otherrights and remediesof theconsumerundera law in relationto the goodsor services to which thewarranty relates.
Througha network of retailers and resellers, Laser will provideyou with your choiceof a refund,repair or exchange (where
possible) for this productif it becomesdefective withinthe warranty period. This warranty will no longer apply where the
defect isa result of alteration, accident, misuse, abuse,normalwear and tear,neglect or improper storage.
Pleaseretainyour receiptasproof of purchase.
How to makea product warrantyclaim:
Step 1: Find yourreceiptwhichproves the dateof purchase. Wherethe date of purchase cannotbe verified, your placeof
purchaseor Laser will makean assessment based on the dateof manufacture, the condition of the Laser product and the type
of defect.
Step 2a): Contact your placeofpurchase.They willassess the natureof thefault and refund or replace the product as per
their storerefundorwarrantypolicy.
Step 2b): If your placeofpurchasecannotbe contacted, then you can contactLaserCustomer Service with details ofyour
defective Laser Product Phone(02) 9870 3355; or Email: service@laserco.com.auoronlinewww.laserco.net/support/warranty
(click on “Consumers(End Users)”). Our business address is at1/6-8 Byfield Street, NorthRyde, NSW 2113
Step 3: Laserwill issue you with a ReturnAuthorisation (RA)numberwithin48 hours.Whenrequested, send usthedefective
productand acopy of your receipt. Laserwillcover thecost ofthe return delivery.
Step 4: Wait for usto contactyou. Once wehavereceived your defective Laser productfor inspection, we will inform you of
ourassessmentofyour claim within7 days. Whenwe contactyou, wewillfirstly letyou knowwhether you havea valid claim
underthis Warranty, and if so, we will inform you whether your defective Laser product will be replacedor repaired, together
with the number of days you canexpect to waitto receive your replaced or repaired Laser product.
Our goods come with guarantees thatcannot be excluded under the Australian Consumer Law. You are entitled to a
replacementor refund for amajor failure and compensation for any otherreasonably foreseeable loss or damage. You arealso
entitled to havethe goodsrepairedor replaced if the goods fail to beof acceptable quality and the failuredoesnot amountto a
major failure.
Table of contents
Other Navig8r Action Camera manuals