Navigator CCD-420 User manual

Navigator
User'sManual
WIRELESS2,5"COLOR
TFT
LGD
MONITORING
SYSTEM
-Portable
2.5"ColorTFTLCDwithReceiver
- Wireless
ColorCamera
PLEASE
READCAREFULLY
AND
SAVE
Thismanual
contains
imporiantinformation
about
this
product's
operation.
lf
you
areinstallingthis
product
foruse
byothers
you
must
leavethis
manual
-or
acopv-
withthe
enduser.
@ffiHMEffi

Installing
the
Camera
2 Low battery indicator
3Power
indicator
4 Eye ball cameralens
5Power
ON/OFF
switch
6
Microphone
dry
good
air
circulation
ATTENTIONi
Prlor
lo
dr,,l:ng
ari.nsaittr:E:he
scie..!s
rra<e
sLreIhal
th.,.e
are
no
erectnc
cabtes
o,oes
etc.|n
ihe walllhat
may
becone
damaged.
7 IRLED
8 Camera
ON/OFF
switch
(cameraKitbaby monitof)
I Channel
switch
10
OC
Power
11
Power
adaptor
plug
with
lowvoltage
swttch
Installing
andConnecting
the Devic.es
Selecl
asuitabie
installation
silefrom
whichyou
want
tomonitor
thedesired
object.
A suitable
installalion
sitehasthefollowing
teatures:
asdust-free
aspossible . litfle
vibralions
withawall
ou|et in close
vicinjty
[€ selecl
an
installaiion
site
that'snotscfeened
offby
reinforced
concrete
was,minors,
metal
shetves,
etc.
ctose
lothesender
respeai"ai
,"""""iG"i" .tiitj-no, o" "ny
apprrances
wthsirong
elecric
fieids,
e.g.
ce pt
*'"", vl"rti""r"riL",
Ji"lrii" "ngin".,
"t".
The
abovepoinls
could
severely
impair
radio
transmission
aespeciively
reduce
the
range.
Fastening
thewallbracket
wattmount
slol
attach
sland
to
mounting
surface
battery
compartment
Lookiora suitableplace
for
mounting
(with
asocket
close_bv)
Screwthe
wall
bfacket
with
the
supplied
screws
toasujtable
lvall
ofasuilableplatform,
use
dowelsifrelevant.
Alignthe
camefa
and
screw
lhe
corrugated
plastic
sleeve
tight. t
I
^-^--^
.X / c.\ Yo

Connecting
the
camera
Conne.c
he
small
voltageplug
ofthe
power_unll
to
the
vollage
supply
lack
of
lheca,
era.
Pay
al'enr,on'o
lhe
correcr
oLlprrl
voj.age
of
7.5V
DC,
.rnseitfe plLg.in
power
un.r;nto
as.titaole
narn
socket.
. Thecamera
isnovr'ready
ioruse,
Installing
the
Receiver
l:o ToniJgr
approx .lmaboveground
(better
feceiving
conditions).
There
must
beofe
power
oLltlet
inproxtrniiy
lo thereceivjng
stte.
ATTENTIONi
?-"]Ill"-". tl" I3"(g, onrugged
and
stabje
surfaces.
Sensitive
suriac:s
ofsurtaces
lhal
dissolve
sofienefs
ma),/
become
damageC.
Usa
a
s!iiaai:
i_a::,:."
.-----:?.
*1?
'--Ei_,
1VOL.
Control
2Brightness
Control
3CH
Select
4
AN Output
5LCDPower
ON/OFF
aF ParGR
cN
!L ar"rElqbir
5 DC
Power
7 Antenna
I Channet
LED
9 Power
LED
1O
BAT,LOW
LED
]1ffi;;X"*"' ntrs
with
tow
vottase
slvitch
Connecting
the
receiver
. Connecl
lneAV
cable
as
oepicred
to
asutraDle
monttor
orTV
systern
with
an
AV
cjnch
,nput
and
thereceiver
fwhile/reo
ptuq
=auC,o
(lone
in
mono),
yellow
pluq
=
vrdeot.-
. Lonnect
lhe
smal'voltage
plLg
ot
the
po,ver
unrr
lo
lne
vollage
supplyjack
ofthe
recelvef.
r€yvallention
io lhecorrecl
outpul
vol3ge
. Insert
theplug-in
powef
unit
jnto
asujlabte
matn
socket
- The
feceiver
isnow
ready
foruse. ir.

System
lnstallation
when installing
thecamera,
check
thereception
ofthemonitorbefofeflnaiinstallation.
Have
someone
hold
thecamera
inlhe afea
lo bemonitored.Have
another
person
moveihe monitor
to avariety
of
Iocalions
ihroughout
lhehouse
tocheckreception.lf interferenceorother
problems
occur,
refer
tothe
T.oubleshooting
Guide.
Wireless
2.5"Color
TFT
LCD
Monitoring
Sysetem
To install
thesystem,
followthesestep!: -
Monitor:
1.Plugthe5VAC/DCadapter
cord
into
the DCInputJack
onthesideofthemonitor.
2. Plug
theadapter
into
astandard
(1.10V-240V)
AC ouflet.
press
ihe power
buttonio iurn onthe
monltot.
3.,4^/oulputs
ontheLCD
monitor
canbeconnected
totheA / inputona TV setfora lafgescreen
display,
orto theFJVinputs
ona VCRfor recofdinq.
4 YoucanuseeitherAC/DC
adapter
foflongtimeu; of 4 "A,qA'
batteryfofmobiteuse.
The lifetime
oJ
4 "AArq"
bahery
operationis45 minutes.
Gamera:
1.Plug
the7.5V
AC/DC
adapter
cord
intothe DCinDut
iackonthebackofthe came|a.
2. Plug
theadapterinto
a standard
(.1.10V_240V)
AC ouitet.
3.Youca_n
use
eitherAC/DC
adapter
forlongtjmeuseor2 "AA"
batteryformobileuse.
The l;fe
time
of2 "AA"battery
operationis .l.Shr
Wo lR tunctionandthr W lRfunclon.
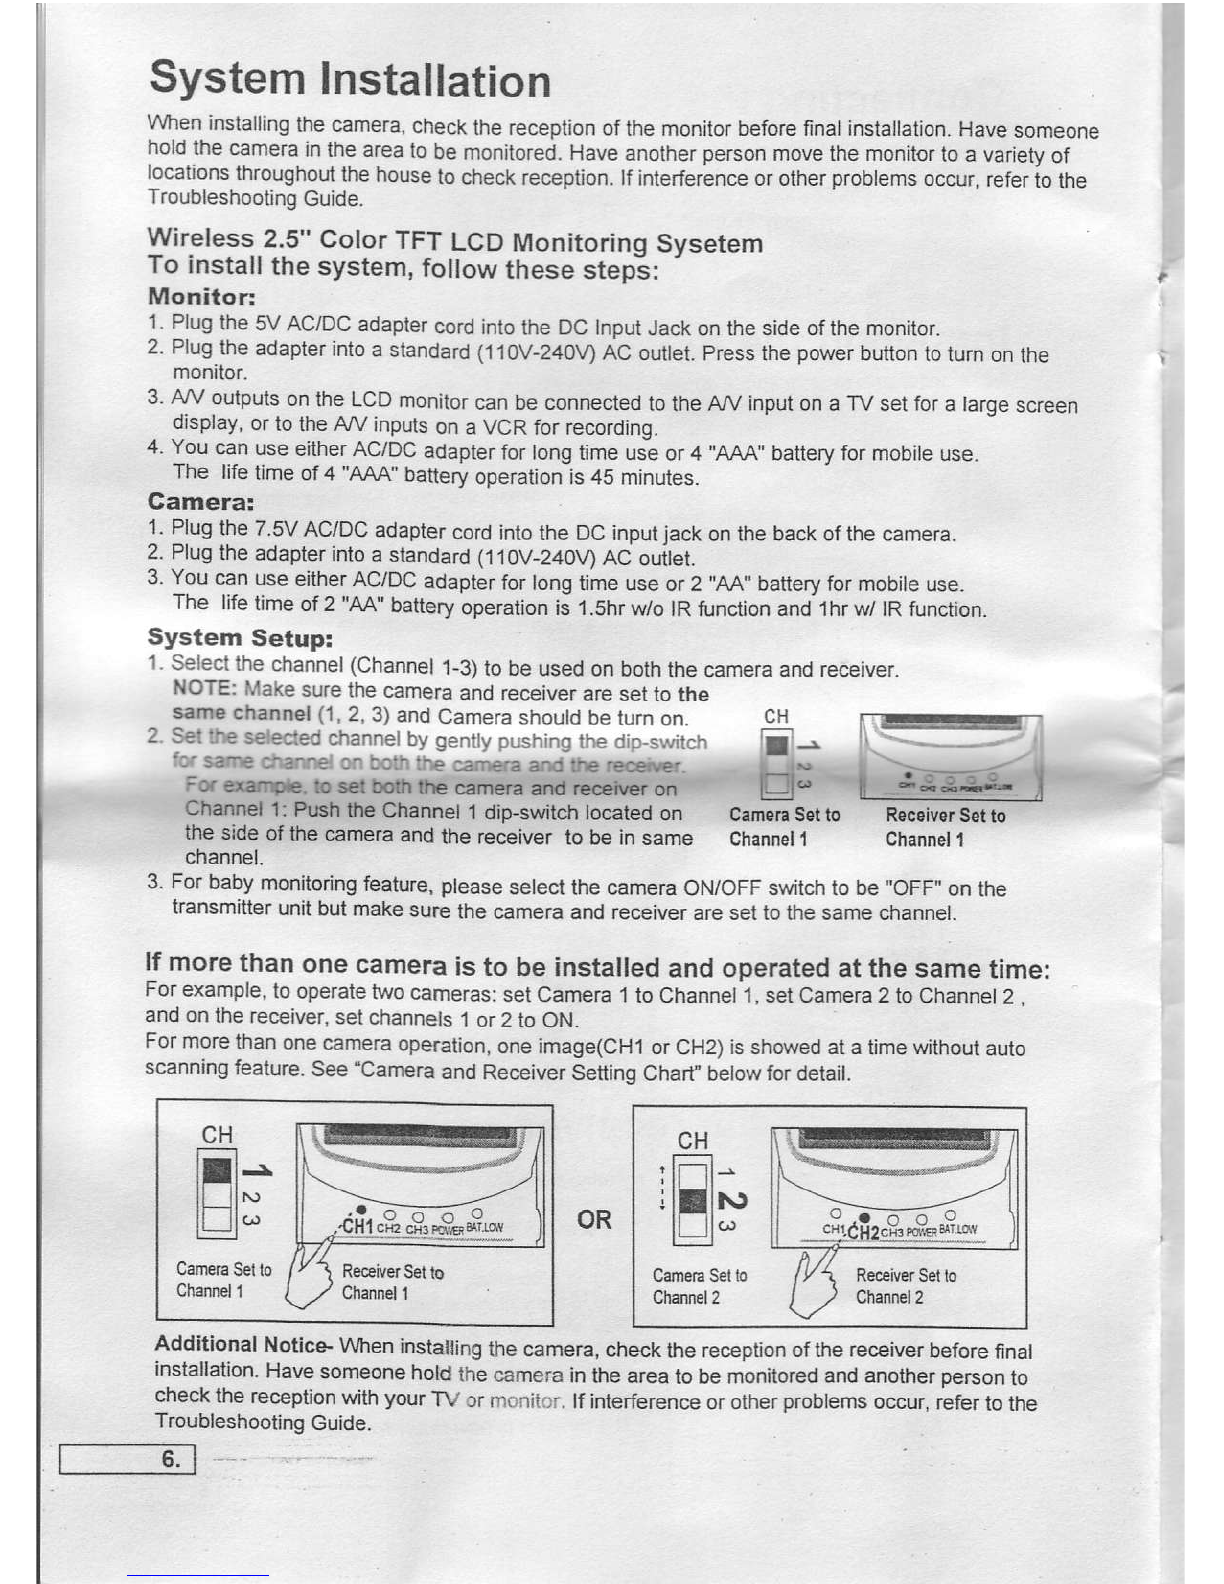
System Setup:
1 Select
lhe channel(Channel
1-3)
tobe used
on both
lhe camera
andreceiver.
NOTE:
N4ake
sure
thecamera
andreceiver
aresetto the
same
channel(1,2,3) and
Camera
shouldbe
turnon_ CH
2 S€tl}E seleded
charnet
bygent
y pushrng
lhed
p_slvitcf E-
ic{ s€rnE
ct€nrE1 on mth the carrEfa arE|ttE tecgt€r I tD
Fd €rpts, b s.t bo0t tE cam€ia ard .ecelEr on Efo -
Channet 'l: Pnsh lhe Channel 1dip-switch tocatedon Camfr'Setto
theside
oflhecamera
andthereceiverto be insame Channel
,l
r,:==
lH-t
ReceiverS€t
to
Channel
1
channel.
3. Forbaby
monitoring
teature,
please
select
thecamera
ON/OFF
switchto be"OFF,'on
the
transmitter
unitbutmake
surc thecameraandaeceiver
aresettothesamechannel.
lf more
thanonecamera
isto beinstalled
and
operatedat
thesame
time:
Forexample,
tooperatetwo
camefas:
setCamera
1to Channel
.j,
setCame[a2 toChannel2 ,
andonthereceiver,
selchannels
1of 2toON.
Formore
thanone
camefa
operation,
oneimage(CH1
orCH2)isshowedatatime
without
auto
scanningfeature.
See
"Carnera
andReceiverSettinq
Chart"below
fordetail.
CH
rFl-
jlllt')
CameE
Sel
io
Channel2
Additional Notice-
Vvheninstalling
lhecamera,
check
iherecepiionofthe receiver
before
final
installation.
Have
someone
holcl
the
camerainlhearea
tobemonitored
andanother
person
to
check
thereception
with
your
TV crmcnit.i. lf interference
orother
probtems
occur,
refef
tothe
Troubleshooting
cuide.
f---------------
CarrFlaSello
Channell
OR

Technical
Data
Camera Receiver
Operating
voltage 7.5
V
DC(plug-inpower
unit)
Batteryoperation2xAA
Alkaline
5V DC
(plug-in
power
unii)
Batteryoperaiion4xAAA
Alkaline
Current
consumption 200
mA 600
mA
TEnsmittino
frequencv 2.4-Ghz 2.4-Ghz
Modulation FM
Channels 33
Light
sensitivity 0 Lux
Video
output
level 1!E-p
/7s
ohm
Audio
outputlevel,
mono i Vp-p
/600ohm
Audio^/ideo
Connection
jacks 3.5mm
jad(->cindl
Picufe sensor
>>* :rc|rcSdrr
rerborlla
!!q|eo.fsc)
Ztr TFT
Resolution gTVrEftaizdtd). 4&Y2U
a@+t-:
Picture LOtCf
Range 100m/300ft
@rating temperahlre 14
b 12?F/
-lfc b +5O"C
Mass
approx.(without
fipod)1579 rd)g
Aerial /cxJJxl:,2(mm)
LXWxH 75x 33x 13O
(rrn)
LxWxH
Plug-inpovyer
units
r-:-----i---
llpglating
vottage i@
Maintenance
The
devices
arc
maintenance-fee,
so
Dever.open
them.
Theguarantee
becomes
votd
whenyou
openrhe
apptiance.onty
ctean
theoutside
of
the
oevices
withi soft,
JrV
"tit "i " Lrrn. pri",
t"
cleaning,
remove
thedevices
from
allvoltage
sour@s.
n Donot
useany
carboxylic
cleaning
agents
or
petrol,
alcohol
or
simita..
/t\ These.attack
the
surfaces
or
trec-eviius-
ees;l-;ljr;;;;;';
/d:.\\ nazaroous
ro
your
heatth
and
exptosive.
Do
not
use
any
jharp
eogeo
toots.scrcw
divers,
metalbrushes
orsimilar
for
cleanino
17.
Table of contents
Other Navigator Baby Monitor manuals