Naxa NX-665 User manual

CarDVDPlayerwithAM/FM
Radio&3.5LCDScreen
InstructionManual
FullyCompatibletoThese
FormatsofFiles:DVD,VCD,
JPEG,MP4,MP3,WMA,CD.
Remark:Anyinformationsubjecttochangewithoutfurthernotice
U.S.PatentNos.4,631,603;4,577,216;4,819,098;4,907,093;5,315,448and6,516,132.
THISPRODUCTINCORPORATESCOPYRIGHTPROTECTION
TECHNOLOGYTHATISPROTECTEDBYU.S.PATENTSAND
OTHERINTELLECTUALPROPERTYRIGHTS.USEOFTHIS
COPYRIGHTPROTECTIONTECHNOLOGYMUSTBE
AUTHORIZEDBYMACROVISION,ANDISINTENDEDFOR
HOMEANDOTHERLIMITEDVIEWINGUSESONLYUNLESS
OTHERWISEAUTHORIZEDBYMACROVISION.REVERSE
ENGINEERINGORDISASSEMBLYISPROHIBITED.
ManufacturedunderlicensefromDolbyLaboratories.
Dolbyandthedouble-DsymbolaretrademarksofDolbyLaboratories.
7.Specification
GeneralSpecification
PowerSupplyRequirement..................................................DC12V
MaximumPowerOutput...................4x25W(measuredatDC14.4V)
Dimensions(wxhxd)...........................................178x50x167mm
DVDDeckSpecification
Format....................................DVD/VCD/JPEG/MP4/MP3/WMA/CD
VideoSystem..................................PAL/PAL-M/PAL-N/NTSC/AUTO
AudioSystem..............................................................24bit/96KHz
LoadingSystem..........................................................AutoLoading
MountingAngle.................................................................0to+/-30
Video
VideoType...................................................................16:9and4:3
VideoOutputlevel......................................Composite:1.00.2Vp-p
Loadimpedance:75ohms
HorizontalResolution................................................................500
Audio
AudioOutput(Analogaudio)..........................................2.0Vrms
Frequency Response.............................20Hz~20KHz(at1KHz0dB)
S/NRatio(Audio).............................................90dB
Separation..............................................................................50dB
Radio
FMSection
Frequencyrange..............................................87.5MHz-107.9MHz
Usablesensitivity......................................................................3uV
I.FFrequency....................................................................10.7MHz
AMSection
Frequency..........................................................530KHz-1710KHz
Specification
Specification
(at1KHz0dB)
Specification
≥
+0-1.0
NX-665

2626
11
!
CAUTION
RISK OF ELECTRICSHOCK
DO NOT OPEN
!
CAUTION: TO REDUCE THE RISK OF ELECTRICSHOCK, DO NOTREMOVE
COVER (OR BACK).NO USER SERVICEABLE PARTS INSIDE. REFER
SERVICING TOQUALIFIED SERVICE PERSONNEL.
The lightening flashwith arrowhead symbol,within an equilateraltriangle, is
intended to alertthe user tothe presence ofuninsulated dangerous voltage
within the productsenclosure that maybe of sufficientmagnitude to constitute
a risk ofelectric shock topersons.
The exclamation pointwithin an equilateraltriangle is intendedto alert userto
the presence ofimportant operating andmaintenance (servicing) instructions
in the literatureaccompanying the appliance.
CLASS 1 LASER PRODUCT
Laser product symbol:located on therear panel ofthe unit, indicatethis player isa class
laser product, onlyuse weak laserand no hazardousradiation outside ofthe unit.
1.Read through thisinstruction manual beforeinstallation and use.
2.Do not touchthe power plugwith wet hand.
3.Switch off themain power when the unit is not in use. (Disconnect the power plug from
the power outletwhen you do not intend to use the unit for a prolonged period of time.)
Before moving theunit, remove the disc from the unit/ tray first.
4.Do not openthe cover ortouch any ofthe components exposedout of theunit, only for
qualified technicians.
5.Do not exposethe unit underdirect sunlight ornearby objects thatradiate heat toavoid
damage the unit.
6.Do not placethe unit inmoist and humidconditions, which effectthe pick-up of the unit
lead to outof work.
7.Place the uniton a flatsurface and ventilativecondition. Please ensurethe ventilation
holes are notcovered to avoid overheating and malfunction.
8.Clear the paneland case withsoft dry clothonly, donot apply any kind of thinner,
alcohol or sprays.
9.The apparatus shallnot be exposedto dripping orsplashing and thatno objects filled
with liquids, suchas vases, shallbe placed onthe apparatus .
WARNING: TOREDUCE THE
RISK OF FIREOR ELECTRIC
SHOCK, DO NOTEXPOSE
THIS APPLIANCETO RAIN OR
MOISTURE.
PRECAUTION
6. The Trouble Shooting
Please read theuser’s manual carefully before using theDVD player.If you have any troubles
in using thisplayer, tryto solve the problems by the suggestions mentioned below. If youcan
not remove thetrouble after usingall the suggestions, please contact the company or the
technical service centerauthorized by us.For the sake of your safety, please donot open the
cover and repairthe player byyourself, if that, it may cause electric shock.
NO PICTURE, SOUNDAND INDICATION
* Ensure thatthe power switchis on.
* Ensure thatthe wall inletis ok.
* Ensure thatthe power cordis not damaged or the fuse is not blown.
* Ensure thatthe power plugis connected to the inlet tightly.
NO SOUND BUTHAVE PICTURE
* Ensure thatthe player’s audio output has agood connection withmonitor’s audio input.
* Check whetherthe audio connectoris damaged.
* Check whetheryou have turneddown the volume.
* Ensure thatyou have setthe right AUDIO setup of the player.
* Ensure thatthe audio isnot under mute.
NO PICTURE BUTHAVE SOUND
* Ensure thatthe player’s video output has agood connection withmonitor’s video input.
* Ensure thatyou have turnedyour monitor to the AV input channelconnecting to yourplayer.
* Check whetherthe video connectoris damaged.
* Ensure thatyou have setthe right VIDEO settings of the player.
BLACK ANDWHITE PICTURE ORSCREEN ROLLING
* Ensure thatyou have setthe right TV SYSTEM (e.g. PAL, NTSC) setting.
FLAWS OF PICTURE OR SOUND
* Check whetherthe setting ofAUDIO is right.
* Check whetherthe disc isscratched or stained.
* Check whetherthe AV connector andthe output terminalis stained.
* Check whetherthere is condensationinside the Lens. If so, leave the player off for an hour
or so, then try again.
* Check whetherthe installation angleis less than 30¡ã.
DISPLAY NO DISC OR BAD DISC
* Ensure thatyou have putthe disc on the tray.
* Check whetherthe disc isput in the reverse side.
* Check whetherthe disc isdistorted.
* Check whetherthe disc isstained or scratched badly.
* Ensure thatthe disc formatis compatible to the player.
* Ensure thatthe temperature insidethe car is not too high. If so, cool off till theambient
temperature returns tonormal.
* Replace anotherdisc to insertit into the disc compartment.
REMOTE CONTROL IS INSENSITIVE ORDOES NOT WORK
* Check thebatteries of remotecontrol and make sure that they are to be powerful and
good conductivity.
* Direct theremote control tothe IR sensor of the player.
* Check whetherthere are someobstacles between the remote control and IR sensor.
SOME FUNCTION BUTTONSDO NOT WORK
* Turnoff the power, then turnon again.
* Reset theunit to zero,then turn on again.
* Remove thefront panel fromthe unit, then install it again and then turn on again.
THE RADIO DOESNOT WORK
* Check whetherthe antenna cableis connected firmly. Or manuallytune for astation.

22
2525
Contents
1. Before Operation...........................................................................................3
1.1 Glossary................................................................................................3
1.2 Precautions............................................................................................3
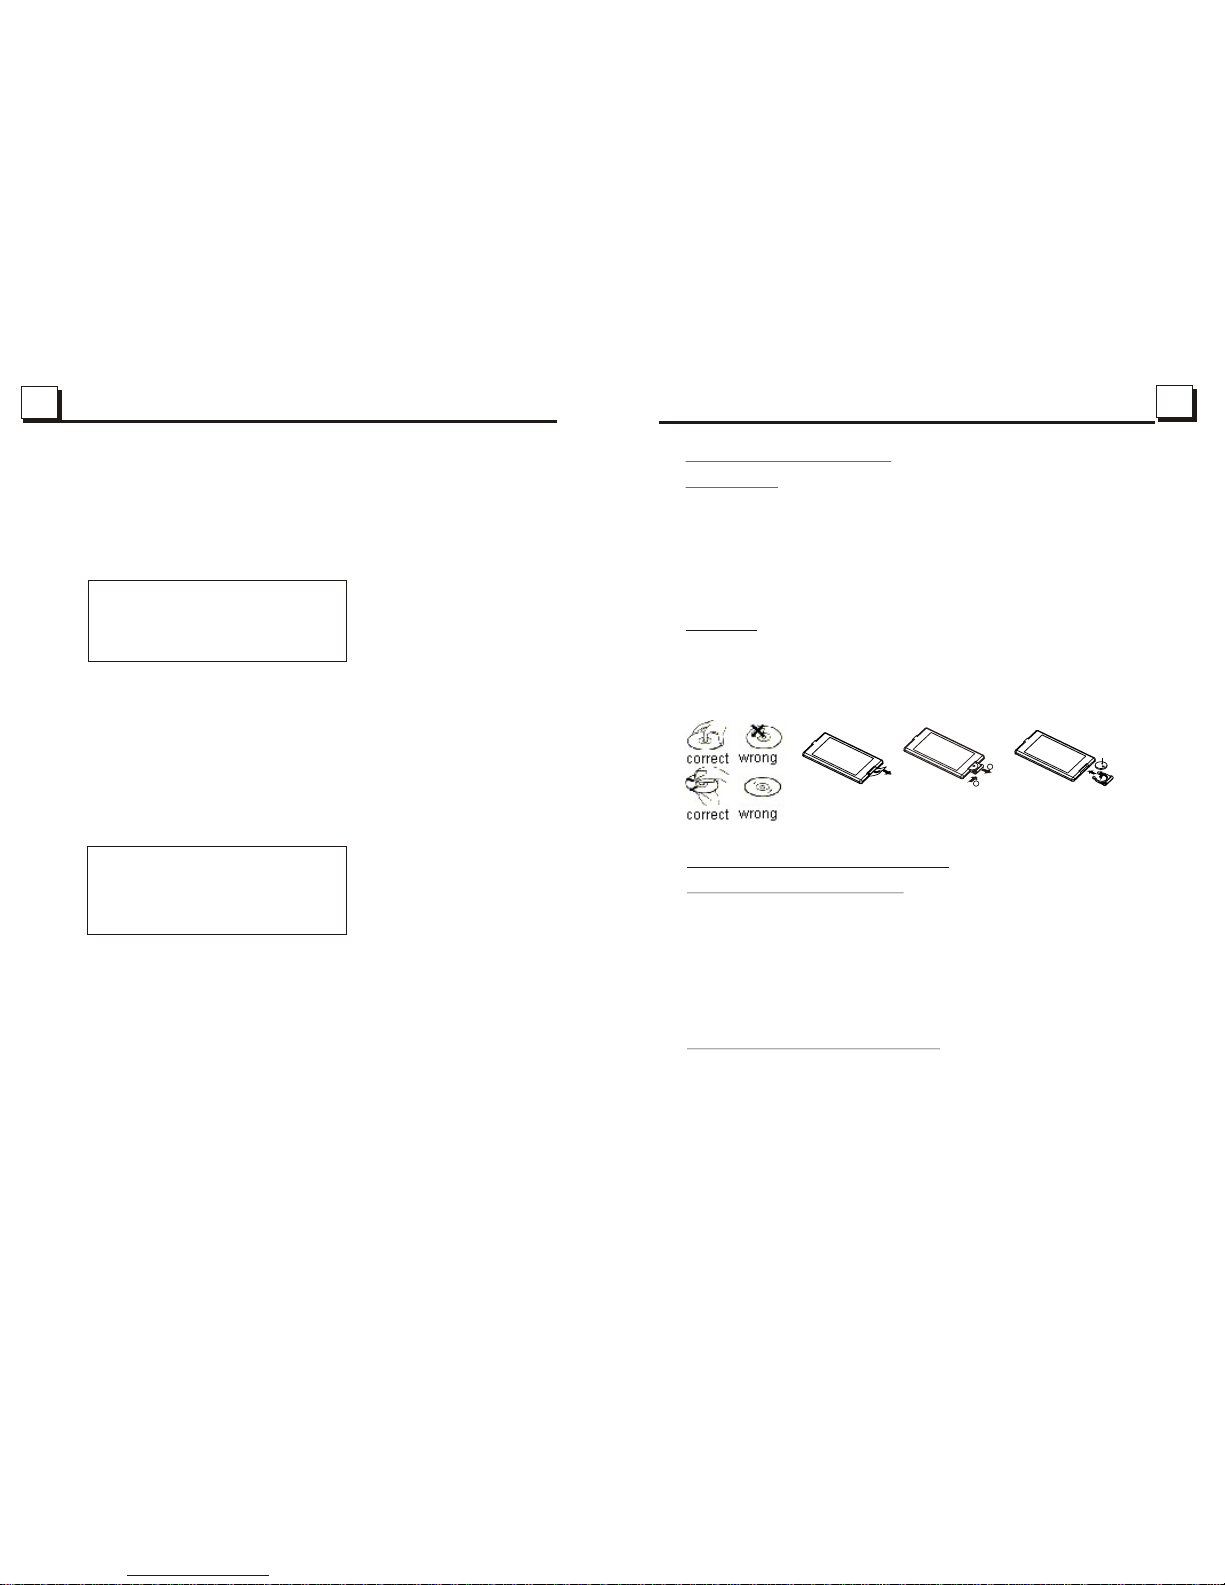
1.3 Maintenance andCleaning of Discs..........................................................4
1.4 Battery Informationof the Remote Control.................................................4
1.5 The RemoteControl Description...............................................................5
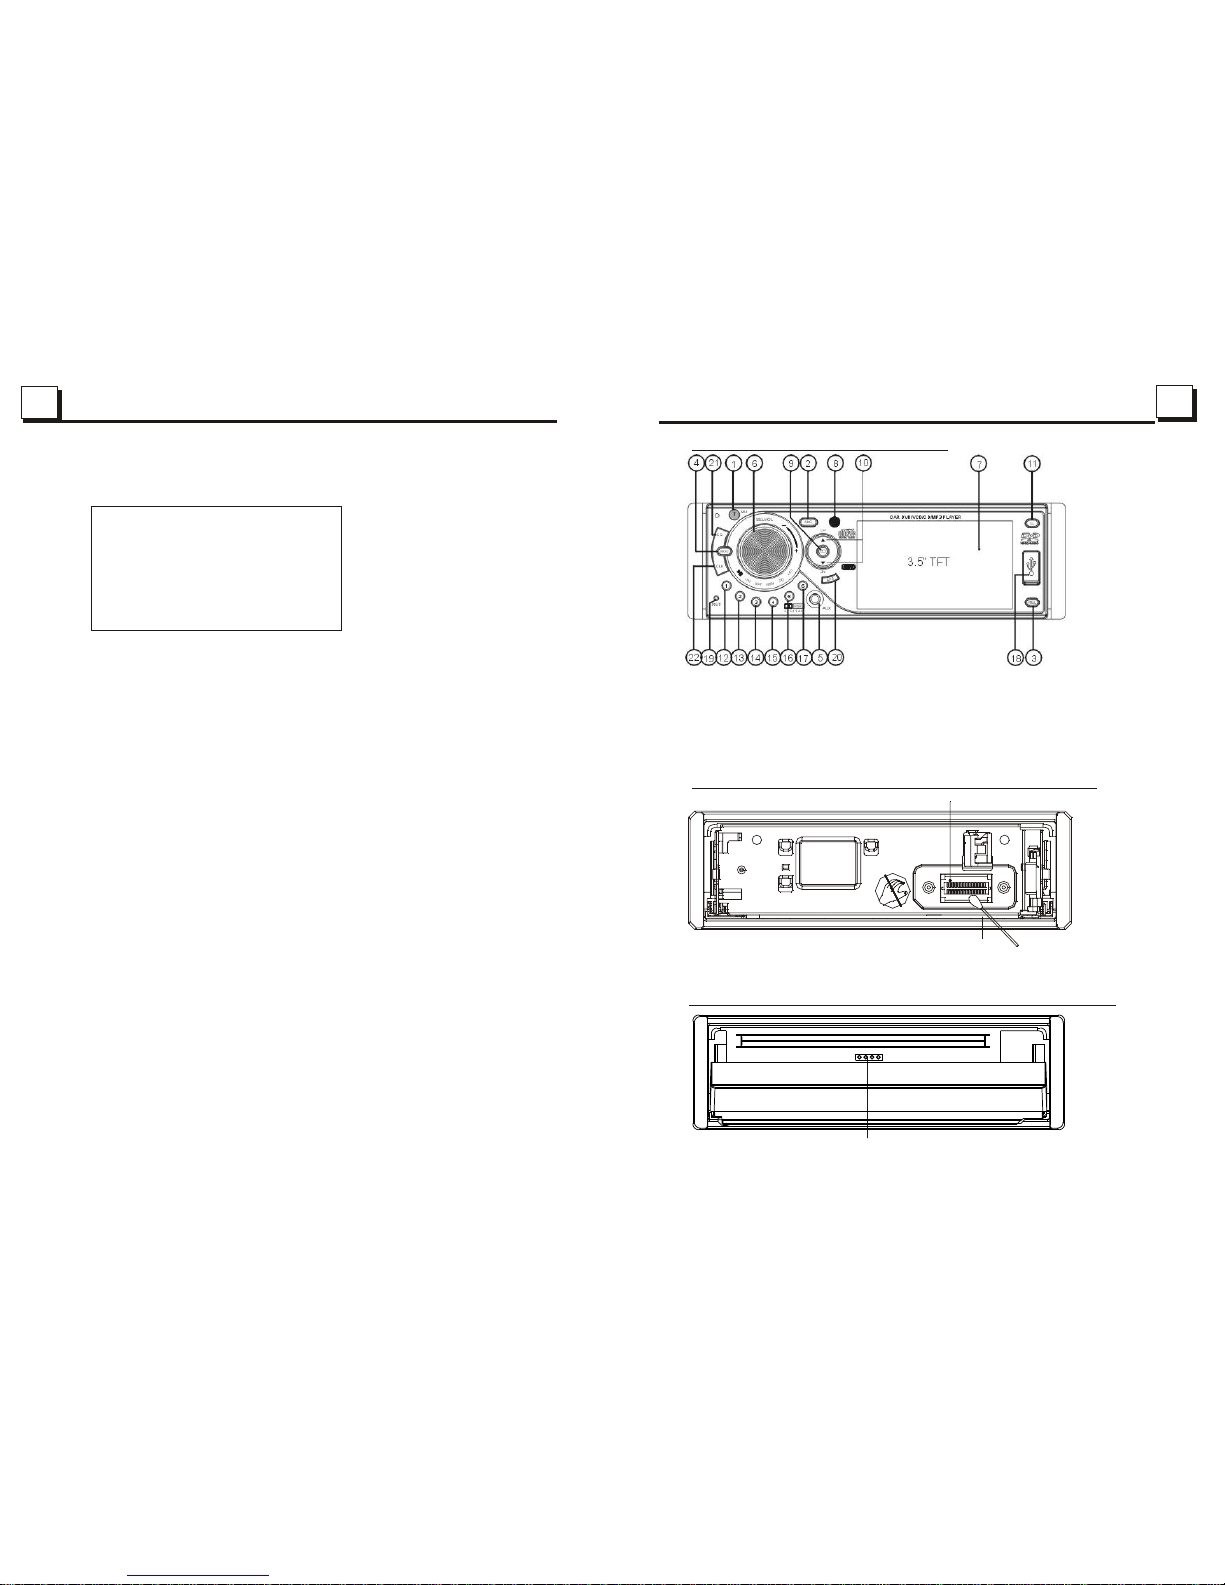
1.6 Description ofthe Face of the Front Panel.................................................6
1.7 Description ofthe Unit Chassis Facet After removing the Front Panel..........6
1.8 Description ofthe Unit Chassis Facet After Sliding Down the Front Panel.....6
1.9 Description ofthe Rear Cabinet....................... ........................................7
1.10 Description of the Input/Output Wires.......................................................7
1.11 UnitInstallation......................................................................................8
2. Common Operation........................................................................................9
3. Radio Operation..........................................................................................10
4. Basic Disc,USB or MMC/SDOperation..........................................................13
4.1 Begin Playback......................................................................................13
4.2 Pause Playback....................................................................................,14
4.3 Stop Playback .......................................................................................14
4.4 Select Chapter/Track with the UP/DN or the >>|/|<< Buttons......................14
4.5 Select Chapter/Track with the Number Buttons.........................................14
4.6 Select Chapter/Track with the Root/PBC Menu.........................................14
4.7 Terminate the Playback..........................................................................15
5. AdvancedDisc, USB orMMC/SD Operation...................................................15
5.1 Playback with Speed..............................................................................15
5.2 Playback with Slow Speed......................................................................15
5.3 Playback with Still Frame.......................................................................16
5.4 Playback Repeatedly.............................................................................16
5.4.1 One/All Repeat...................................................................................16
5.4.2 A-BRepeat.........................................................................................16
5.5 Playback in Scan Mode..........................................................................17
5.6 Playback from a specified Chapter/Track or a Specified Time....................17
5.7 Playback in Random..............................................................................17
5.8 Playback in Different Angle.....................................................................17
5.9 Playback in Zoom Mode.........................................................................17
5.10 Change the Caption Language..............................................................18
5.11 Change the Audio Language.................................................................18
5.12 Change the Video Signal System..........................................................18
5.13 Look over the Playback Status..............................................................18
5.14 Program Playback...............................................................................19
5.15 Playback the Picture CD in JPEG Format...............................................19
5.16 Mp4 OPERATION................................................................................20
5.17 ESP and ID3 Function..........................................................................20
5.18 USB and MMC/SD Reader Operation.....................................................20
5.19 The DVD System Menu Setup Operation................................................20
5.20 The Parental Control............................................................................24
5.21 The Region Code.................................................................................25
6. The Trouble Shooting...................................................................................26
7. Specification...............................................................................bottom cover
5.21 The Region Code
Q: Not beginto playback but to display REGION ERROR after inserting disc into
disc compartment. Why?
A: Because theDVD player and disc has respective region code. If the region codes
of them arenot match with each other, the DVD player can not play the disc.
Appendix: The region codeof DVD:
The Motion Picture Associationof America(MPAA) divided the worldinto 6
regions, and namedevery region a code, namely region code. The region codes
and the countriesor areas represented by the region codes as follows:
Region 1:America, Canada, East-PacificInlands;
Region 2: Japan,West Europe, North Europe, Egypt,South Africa,Middle East;
Region 3: Taiwan,Hong Kong, South Korea,
Thailand, indonesia, etc.;
Region 4:Australia, New Zealand, Central South America, South Pacific Inlands;
Region 5: Russia,Mongolia, Indian Peninsula, Middle Asia, East Europe, North
Korea, NorthAfrica, North-westAsia etc.;
Region 6: Chinamainland.
Basically, when a DVDmovie disc forthe version ofregion 6 wasdecided not to
issue, we needto purchase another DVD player that can play the DVD movie disc
for the versionof non-region 6. In order to view this disc, viewer who does not have
the non-region 6DVD player facilities will have to spend extra sum of money to buy
it. The problems caused fromthe area codeinconsistency between thedisc and the
DVD player haspushed for the production of Unlock-Version DVD player facilities,
and some DVDdisc sets allow user to modify the area codes for a limited number of
times. But notethat only thediscs produced by the 8 biggest filmmaking companies
of Americarestrict so, theyare not one of original DVD format. That is to say, the
DVD movie discsnot produced by
South-east Asiancountries include
the 8 biggestfilmmaking companies of America
were not restrictedby the rule of region code. Generally, they are called
FreeRegionCode discs orFull Region discs. The 8 biggest filmmaking companies
of Americaare as follows:
1. WarnerBros;
2. Columbia;
3. 20thCenturyFOX;
4. Paramount;
5. Universal;
6. UA(UnitedArtist);
7. MGM(MetroDogwynMayer);
8. WaltDisney

332424
1. Before Operation
1.1 Glossary
PBC (playback control)
It is akind of signal(menu) recorded in the disc with SVCDor VCD2.0
format used for the playback control. For the discs contained PBC, It can
playback interactive software with the menu displayed on monitor screen.
If the disc contain still images, it can playback high definition of still image.
Title
Generally, the title is the important part of DVD disc. for example, the
theme part ofmovie is title 1, the part described how tomake movie istitle
2, the castis title 3, etc. Every title contain a serialnumber that iseasy to
look up.
Chapter
A title can be divided into several blocks, so that every block can be operated
as a unit,the unit is called chapter. The chapter contain a unitat least.
Track
It is the biggest component of VCD. Generally, every song of karaoke disc
is a track.
1.2 Precautions
Safety
1. Power Source: The unit should be connected to power supply only of
the type described in the operating instructions or as marked on the unit.
2. The unit is designed for negative terminal of the battery which is
connected to the vehicle metal. Please confirm it before installation.
3. Do not allow the speaker wires to be shorted together when the unit is
switched on. Otherwise it may overload or burn out the power amplifier.
4. Do not install the detachable panel before connecting the wire.
5. The protective case is to safely keep the front panel(see the photo).
Environment
1. Do not use this unit when water and moisture is near it.
2. If moisture forms inside the Lens, it may not operate properly. To correct
this problem, wait about one hour for the moisture to evaporate.
3. If the car interior is extremely hot, do not use the player until the car has
been driven for a while to cool off the interior.
FRONT PANEL
PROTECTIVE CASE
5.20 The Parental Control
Q:After inserting DVD disc into disc compartment, it will appear a dialogue window
that ask me input a password of 4 digit. Why ?
A:This is because that the disc movie you are playing was rated with the Parental
Control, and the current rating level of DVD player is lower than one of current
disc. You must input right password and enter it to entry Parental Control setup
menu and then set a equal or higher rating level than one of current disc. So that
you can playback the disc.
! NOTE
* For the factory preset password of the DVD player,
* For the rating level setup of Parental Control of the DVD player, please refer to
the relative content of LOCK setup menu for details.
Accessories: Parental Control
The Parental Control function of a DVD player can control the playback of movie
rated level in a disc. Can set the DVD player(include software player in PC) to be a
certain rating level with SETUP MENU on monitor screen. If the rating level set in the
disc is higher than one set in the DVD player, the DVD player can not playback the
disc. Sometimes the Parental Control sequences in some discs are different from
each other. The rating level setup can be protected by the password. Therein, if you
select Unlock item, the Parental Control function will be invalid, the content of disc
will be played totally.
The disc movie can be designed as that the DVD player will playback the different
version of content of a same movie according to the different rating level set by
Parental Control. Depend on the DVD feature of seamless switching described above,
the scenes that are not fitting for children will be cleared or replaced by the other
fitting scene automatically.
All rating levels of Parental Control are as follows:
Unlock
1 Kid Safe
2 G
3 PG
4 PG 13
5 PG R
6 R
7 NC 17
8 Adult
please refer to the relative
content of PASSWORD setup menu for details.

44
2323
1.3 Maintenance and Cleaning of Discs
Disc Maintenance
1. To h
1.
Do not use petrel, thinner. commercially cleaner or anti-static spray can
damage the unit.
keep the disc clean, andle the disc by its edge, do not touch the disc
surface of the play side.
2. Do not stick paper or tape on the disc. If there is glue (or analog) on the
disc surface, must wipe it up before using.
3. Do not expose the disc to direct sunlight, or nearby heat sources such as
caliduct, or leave it in a car parked in direct sunlight where there can be a
considerable rise in temperature.
4. Put the disc inside disc case to keep temperature after finishing playback.
Disc Cleaning
Before playing, wipe the disc with a clean lint. wipe the disc outwards from
the disc center.
2.
1.4 Battery Informationof the RemoteControl
Replace Battery inthe Remote Control:
Note about theBattery of theRemote Control:
1.Lithium battery: CR20353V.
2.
3.
5.Do not shortthe battery.
6.Do not throwthe battery intothe fire.
7.Toavoid the riskof accident, keepthe battery outof reach ofchildren.
1.Before using theremote control forthe first time,pull the insulating
sheet out ofthe remote controlas the directionindicated by the
arrow.(see fig.1)
2.Press the movableblock hold asthe direction indicatedby theA arrow
(See fig.2), thenpull the batteryholder out ofthe remote controlas
the direction indicatedby the Barrow(see fig.2).
3.Replace the oldbattery by anew battery with(+) polarity sideupward.
(See fig.3).
4.Insert the batteryholder to theoriginal position inremote control.
(See fig.3).
Battery Life: 6months with normaluse in normalroom temperature.
Improper use ofbattery may causeoverheating or explosion,so that
Result in injuryor fire .
4.Battery leakage maycause damage tothe remote control.
Fig.1 Fig.2 Fig.3
A
B
+ side up
HUE
It is foradjusting the hueof the videooutput.
SATURATION
It is foradjusting the saturationof the videooutput.
SHARPNESS
It is foradjusting the sharpnessof the videooutput.
5.19.5 SPEAKER SETUP
SPEAKER SETUP
DOWNMIX
EXIT SETUP
DOWNMIX
It is forselecting your desiredsound effectwhen there isnot central speaker
and sub-woofer.There are3 mode: LT/RT, STEREO, VSS.
LT/RT: When playinga disc withPRO LOGIC Dolbystereo effect,choose the
item, so itwill output audiosignal with vividtheatre effect.
STEREO: If youchoose the item,when outputting audiosignal with 5.1channels,
it will outputthe left andright channels ofsignal ; whenoutputting audio signal
with 2 channels,it will outputthe common 2channels of stereosignal.
VSS: If youchoose the item,when playing adisc recorded with5.1 channels,
the main channelspeakers can outputaudio signal withVSS effect.
5.l9.6 DIGITAL SETUP
DIGITALSETUP
OP MODE
DYNAMIC RANGE
DUAL MONO
EXIT SETUP
OP MODE
It is forselecting audio outputmode
LINE OUT: It canlinearly compress theaudio signal. Sothe volume levelis lower.
Youshould select theitem at night.
RF REMOD: Itcan make thevolume level higher. You should selectit at daylight.
DYNAMIC RANGE
After selecting thecompression mode ofLINE OUT, set theitem, so youcan
adjust the linearcompression ratio. Ifyou set itto be FULL,the Peak-to-Peak
value of theaudio signal isthe minimum; ifyou set itto be OFF, the Peak-to-
Peak value isthe maximum.
DUAL MONO
It is forselecting a desiredaudio output modefor the leftand right waysof signal.
It is mainlyfor Karaoke ofAc3.There are 4modes in allas follows:
STEREO, MONO L,MONO R, MIX MONO.

552222
5.19.2 LANGUAGE SETUP
LANGUAGE SETUP
OSD LANGUAGE
AUDIO LANG
SUBTITLE LANG
MENU LANG
EXIT SETUP
OSD LANGUAGE
This item is for selecting the language of the SYSTEM MENU and all operating
prompt interface displayedduring playback.
AUDIO LANG
This item is for selecting a audio language.
SUBTITLE LANG
This item is for selecting a subtitle language.
MENU LANG
This item is for selecting a disc menu language.
5.l9.3 AUDIO SETUP
AUDIO SETUP
AUDIO OUT
KEY
EXIT SETUP
AUDIO OUT
there is only ANALOG mode, i.e. SPDIF/OFF, not optional.
KEY
It is for selecting your desired basic music tone(from low tohigh).
5.l9.4 VIDEO SETUP
VIDEO SETUP
BRIGHTNESS
CONTRAST
HUE
SATURATION
SHARPNESS
EXIT SETUP
BRIGHTNESS
It is foradjusting the brightness of the video output.
CONTRAST
It is foradjusting the contrast of the video output.
1.5 The Remote Control Description
16. SEARCH BUTTON
17. RDM BUTTON
18. RPT BUTTON
19. SUBTITLE BUTTON
20. TITLE/PBC BUTTON
21. ANGLE/STBUTTON
22. ZOOM BUTTON
23. AUDIO BUTTON
24. CLK BUTTON
25. A-B BUTTON
26. INT BUTTON
27. EQ BUTTON
28. LOC/SLOW-FWD BUTTON
29. MUTE BUTTON
30. STOP BUTTON
31. VOLUME- BUTTON
32. < BUTTON
33. OK BUTTON
34. VOLUME+ BUTTON
35. BANDAND P/N BUTTON
36. PROG BUTTON
37. OSD BUTTON
38. LOUD BUTTON
39. STEP BUTTON
1. TILT BUTTON
2. MENU BUTTON
3. POWER BUTTON
4. ^ BUTTON
5. >>| BUTTON
6. > BUTTON
7. |<< BUTTON
8. v BUTTON
9. SEL BUTTON
12. 10+ BUTTON
13. SETUP BUTTON
14. MODE BUTTON
15. APS BUTTON
10. PLAY/PAUSE BUTTON
11. NUMBER(0~10,+10
-10) BUTTONS

66
2121
For the DVDSystem Menu, there are 6 setup pages in all. They display as follows:
5.19.1 SYSTEM SETUP
SYSTEM SETUP
TV SYSTEM
TV TYPE
PASSWORD
RATING
DEFAULT
EXIT SETUP
TV SYSTEM
This product supportsoutput of various TV system, including PAL ,AUTO,NTSC.
If your TV set hasonly NTSC orPAL system, the screen will blink and become
colorless when awrong TV system is selected.In this case, press the N/Pbutton
to switch theright TV system to matchthe TV color system.
TV TYPE
The setup itemis for matching TV screen size.
4:3 PS: Choosethe item when connecting a TV set with 4:3 screen. When playing
the pictures with16:9 size, the left and right parts of the video will becut out,
and display infull screen.
4:3 LB: Choosethe item when connecting a TV set with 4:3 screen. When playing
the pictures with16:9 size, the top and bottom parts of the TV screen will be
turned into ablack square respectively.
16:9: Choose theitem when connecting a TV set with 16:9 wide screen.
PASSWORD
This setup itemis for locking or unlocking the rating level of the Parental Control.
The defaulted stateis locked. The defaulted passwordis 0000.
You can set a new password thatyou like: Selectthe PASSWORD item and then
press the >button to enter it, then input the original password 0000, and then
press the OKbutton to unlock it. Press the > button to enter it again,then input
a new passwordthat you like and then press the OK button to make iteffective.
Before the otherpersons see the Manual, you should get the password in mind
and cut outthe part of PASSWORD in the Manual.
RATING
The item isfor setting a new rating level of the Parental Control.
1. Select thePASSWORD item and thenpress the > button to enter it, then input
the password mentionedabove, and thenpress the OK button to unlock the
setting of therating level ofthe Parental Control.
2. Select theRATING item and thenpress the > button to enter it, then use the
direction buttons toselect your desiredrating level, then press the OK button
to confirm.
3. Select thePASSWORD item again andthen press the > button to enter it, then
input the password,and then pressthe OK button to lock the new setting of
the rating levelof the ParentalControl.
DEFAULT
This item isfor making all setup items change back to original status.
1.6 Description of the Face of the Front Panel
1. POWER/MUTE BUTTON 8 16. 5/-10 BUTTON
2. ANG(i.e.TILT) BUTTON . BAND BUTTON 17. 6/+10 BUTTON
3. RELEASE BUTTON 10. UP andDN BUTTONS 18. USB SOCKET
4. MODE BUTTON 11. EJECTBUTTON 19. RESET BUTTON
5. AUX INSOCKET 12. 1/PLAY/PAUSE BUTTON 20. APS BUTTON
6. SEL BUTTON 13. 2/INT BUTTON 21. EQ BUTTON
AND VOLKNOB 14. 3/RPT BUTTON 22. CLK BUTTON
7. SMALL MONITOR 15. 4/RDM BUTTON
. IR REMOTE SENSOR
9
1.7 Description of the Unit Chassis Facet After removing the Front Panel
26 PIN FEMALECONNECTOR
TAMPON-PICK
26 PIN FEMALECONNECTOR: when thereis some dirt on the connector,
please wipe itaway from theconnector.
1.8 Description of the Unit Chassis Facet After Sliding Down the Front Panel
LED indicators
* The LEDindicators light all the time, they can help you operate during darkness.

772020
1.10 Description of the Input/Output Wires
YELLOW
MEMORY B+
BLACK(GND)
IGNITION SWITCH
BLUE AUTO ANT
GREEN
WOOFER LINE OUT(optional)
RED
FRONT
REAR
RIGHT
SP
FRONT WHITE
WHITE / BLACK
GREEN / BLACK VIOLET / BLACK
GRAY / BLACK
GRAY
VIOLETGREEN
REAR
LEFT
SP
++
++++
++
RED R
WHITE L
RCA LINE OUT
FUSED
FILTER
BOX 1A
& 10A
FUSES
WIRING CONNECTING SOCKET
WIRING CONNECTING PLUG
1.9 Description of the Rear Cabinet
Connecting the parkingbrake line to the parking brake system built inthe car
Parking brake
Parking brake switch
(inside the car)
Parking brake line(light blue)
To metallic bodyor chassis of thecar
3. During JPEG playback, press one of the >/</^/vbuttons to change the angle of
viewing picture thatis displaying asfollows:
>: 90 degcw; <: 90degccw; ^:UP<-->DOWN; v:LEFT<-->RIGHT
During JPEG playback,press the PROGbutton to changethe mode of refresh picture.
During JPEG playback,press the STOP button to stop playing and return to the root
menu.
* During JPEGplayback, the followingbuttons are not available: SLOW-FWD,
SUBTITLE, TITLE, ANGLE, STEP, SEARCH, INTand A-B.
* In JPEGmode,the other operationsare same as ones in MP3/WMAmode.
5.16 MP4 Operation
1. The root menu isdisplayed on monitorwhen beginning toswitch on DISCmode, then
it will automaticallyplay the firstfile.
During playback, pressthe STOP button to stop playing and return to the root menu.
2. When displaying the root menu, press the direction buttons to select your desired
FOLDER or file,then press theOK or PLAY button to open the FOLDER, or play the
selected file.
When displaying theroot menu, you can also use the number buttons to select the
serial number ofthe file andplay the file.
* The ANGLE, PROG,RDM, INT and TITLE/PBC button are notvalid.
* The other functions aresame as ones in DVD disc;but the RPT function is same as
one in MP3/WMA.
5.17 ESP and ID3 Function
There is ESP function for all formats of discs.
In MP3/WMAmode, during playback,the information of the file name, folder name,
song s title,artist and albumwill be scrolling on the LCD display. As longas the
current playing MP3music contains relevantID3 tag informationin version 1.0/2.0
format, the 3items underlined abovewill be scrolling on the LCD display; otherwise,
they will not.
5.18 USB andMMC/SD Reader Operation
Power on theDVD player,then insert the USB storage or MMC/SD Card, and then the
monitor will displaythe root menuof the USB storage or MMC/SD Card.
All theoperations are sameas ones of the corresponding format.
When you wantto insert aCard, need to tilt the front panel to the degree of the ANG3
or ANG4;When you wantto pull out the Card, firstly push it, and then pull it out.
5.19 The DVD System Menu Setup Operation
1. Press the SETUP button on the remotecontrol to accessthe DVD SystemMenu on
the monitor.
2. There are 6 setuppages in allfor the SystemMenu. Press the> or < button to select
an desired setuppage.
3. Press the ^ or v button to select an setup item in the selected setup page.
4. Press the > button to enter the setup item. Then press the vor ^ button to select a
desired mode ofthe setup item,finally press the OK button to confirm it.
* Press the< button toreturn to the upper level.
* Press theSETUP button again or usethe direction buttonsto highlight theitem of the
EXIT SETUP and then press the OK button to exit the System Menu.
Card socket
NOTES:
1. Only speakers with4 ohms impedance maybe used.
2. Ensure that theblue auto antenna cabledoes not make contact
with any ground connection.
AM/FM Antenna
BLACK
BLACK
BLACK
Rear View Camera
YELLOW
Reversal line White
WIRING CONNECTING
SOCKET
Parking Line GREEN
GRAY
GRAY
VIDEO OUT
YELLOW
YELLOW
Note: 1. after connecting the Parking Line, the video on the small monitor of the front panel will be display only after braking the car.
2. Use the clip end of a Ground Line provided by manufacturer to connect the Fixing Screw Bolt, use another end of the Ground
Line to connect the negative pole of the power source. Otherwise, the video on screen maybe flashes.
Fixing Screw Bolt

1919 88
1.11 UNIT INSTALLATION
5.14 Program Playback
It allows you to enter the order in which you want some chapters/tracks in
DVD/VCD/MP3/WMA/CD disc to play.
1 During playback, press the PROG button to enter a program interface as
follows:
for DVD discs for VCD/MP3/WMA/CD discs
2 Use the direction buttons to move cursor onto the desired place for inputting
the sequence number.
3 Use the number button to input desired sequence number of title/chapter/
track with desired sequence.
4 Use the direction button to move cursor onto Play item, then press the OK
button to play the programmed titles/chapters/tracks in programmed order;
only pressing the PLAYbutton also can play the programmed titles/chapters
/tracks in programmed order.
* To exit program playback, firstly press the STOP button, then press the PLAY
button to enter sequence playback; or press the PROG button twice again.
* To remove the all programmed sequence numbers, move the cursor onto
Clear item, then press the OK button.
* To change the programmed sequence, move the cursor onto the item you
want to change, input the desired sequence number.
* During VCD playback, if it is in PBC ON mode, at the same time of entering
the state of program playback, it turns off PBC mode.
5.15 Playback the Picture CD in JPEG Format
1. The root menu is displayed on the monitor when beginning to switch on DISC
mode. At the time, it plays MP3/WMA file.(the TITLE or MENU button is not
available).
In the root menu, the left file sort icon is for MP3/WMA file; the middle file sort
icon is for JPEG file; the right file sort icon is for VIDEO file. If one of these 3
file sort does not exist, you can not move cursor onto the file sort icon.
2. When displaying the root menu, press the direction buttons to select your
desired FOLDER, file or file sort icon, then press the OK or PLAY button to
open the FOLDER, or play the selected file, or play only this sort of file.
When displaying the root menu, you can also use the number buttons to
select the serial number of the file and play the file.
When you select a JPEG file sort icon, press the ^ or > button to select the
first JPEG file, then press the v button to select the desired JPEG file, finally
press the OK or PLAY/PAUSE button to display the JPEG picture in full screen
from the selected JPEG picture.
PROG
T C T C T C T C
1__:__ 5__:__ 9 __:__13 __:__
2
3
4
Play Clear
__:__ 6__:__ 10__:__14__:__
__:__ 7__:__ 11__:__15__:__
__:__ 8__:__ 12__:__16__:__
PROG
1____ 5 ____ 9____ 13 ____
2
3
4
Play Clear
____ 6 ____ 10____ 14 ____
____ 7 ____ 11____ 15 ____
____ 8 ____ 12____ 16 ____

991818
2. Common Operation
1. To turn on/off the unit
Under power off mode, press the POWER buttonto turn onthe unit.
Under power on mode, long press the POWER button on the front panel or
briefly press thePOWER button on the remote controlto turn off the unit.
2. To select function mode
Press the MODE button toselect TUNER, DISC(After inserting a disc), USB
(After inserting a USB storage), Card(After inserting a MMC or SD card) or
AUX mode.
3. To adjust sound level
Rotate the VOL knob on the front panel or press or hold the + or - button on
the remote control to directly adjust the volume level.
4. To mute sound
Press the MUTE button on the remote control to turn on/off MUTE mode.
Briefly pressing the POWER button on the front panel also can turn on/off
MUTE mode.
In MUTE mode, the MUTE mode can be released by pressing the following
buttons: MUTE, EJECT, VOL or +/-, SEL, POWER(on the front panel), MODE.
5. To display andadjust the clocktime
Press the CLK button to display clock time on the small monitor of the front
panel.
Then long press the CLKbutton to change the color of the hour ofthe clock,
then rotate the VOL knob on the front panel or press the + or - button on the
remote control toadjust the hour; and then brieflypress the SELbutton to
change the color of the minute of the clock, then rotate the VOL knob on the
front panel or press the + or - button on the remote control to adjust the
minute.
6. To select a preset EQ mode
Press the EQbutton to select the preset musicequalizer curves: POP, ROCK,
CLAS, FLAT . The sound effect will be changed.
7. To remove the front panel
Press the RELEASE button on the front panel to detach the front panel from
the unit, then you can remove the front panel.
8. To select a optimal angle of the front panel
Press the TILT button repeatedly to select a optimalangle as follows:
-->ANGLE0-->ANGLE1-->ANGLE2--> ANGLE3-->ANGLE4-->
9. To turn on/off LOUD mode
Press the LOUD button on the remote control to turn on/off LOUD mode.
When turning on LOUD mode, it will enhance bass level immediately when
the bass is not enough.
10.To reset the unit
Press the RESET button to rehabilitate the distorted program to zero when
the display is wrong or the function buttons are not effective.
11.To adjust the sound equalizer curves
To adjust the sound equalizer curves,briefly and repeatedlypress the SEL
button to select the sound equalizer curves of VOL, BAS(without preset EQ),
TRE (without preset EQ), BAL, FAD, then rotate the VOL knob on the front
panel or press the + or - button to adjust level.
ZOOMx2,ZOOMx3,ZOOMx4,ZOOMx1/2,ZOOMx1/3,ZOOMx1/4,ZOOM OFF.
Press one of the ^/v/>/< buttons to select the area you want to enlarge.
5.10 Change the Caption Language
In the stateof DVD disc playing, press theSUBTITLE button repeatedlyto
select the language of the caption or turn off the caption.(depend on the
disc used.)
In the state of VCD/MP3/WMA/CD disc playing, the button is not available.
5.11 Change the Audio Language
1. In the state of DVD disc playing, press the AUDIO button repeatedly
on the IR remote control to select the desired language type.
(depend on the disc used)
2. In the state of VCD disc playing, pressthe AUDIO button repeatedly to
select the sound mode of the MONO L, MONO R, and Stereo, no language
function.
3. In the state of CD/WMA/MP3 disc playing, the AUDIO button is invalid.
5.12 Change the Video Signal System
During playback of DVD/VCD disc, press the BAND(P/N) button on the front
panel or on the remote control repeatedly to changethe VIDEO SIGNAL
SYSTEM mode asfollows:
--> PAL --> AUTO --> NTSC -->
5.13 Look over the Playback Status
1. In the state of DVD disc playing, press the OSD button repeatedly on the
remote control to turn on/off the playback status. When it is on, it will
display the information such as: the serial number of the playing title, the
serial number of the playing chapter, the elapsed time of the playing chapter,
the remained time of the playing chapter, the elapsed time of the playing title,
the remained timeof the playing title, etc.
2. In the state of VCD/CD disc playing, press the OSD button repeatedly on the
remote control to turn on/off the playback status. When it is on, it will
display the information such as: the serial number of the playing track, the
elapsed time of the playing track, the remained time of the playing track, the
elapsted time ofthe disc, the remained time ofthe disc.
3. In the state of MP3/WMAdisc playing, press the OSD button repeatedly on
the remote control to turn on/off the playback status. When it is on, it will
display the information such as: the serial number of the playing track, the
elapsed time ofthe playing track, the remained timeof the playingtrack.

1717 1010
3. Radio Operation
1. BAND BUTTON
In RADIO mode, press the BAND button on the remote control or on the front panel to
select your desired radio band of FM1, FM2, FM3, AM1 and AM2, and the word means which
band is selected will be displayed on the small monitor of the front panel.
2. TUNE/SEEK UP/DOWN BUTTONS
In RADIO mode:
1) Long press the UP/DN button on the front panel or the >>|/ |<< button on the remote control
to automatically search up/down for a available station from the current frequency.
2) Briefly press the UP/DN button on the front panel or the >>| / |<< button on the remote control
to manually search up or down with step by step for your desired station from the current
frequency.
3. APS BUTTON
In RADIO mode:
1) When long pressing the APS button, the radio searches from the lowest frequency and checks
the signal strength level until 1 cycle search is finished. And then the 6 strongest stations are
preset to the corresponding preset number memory bank. The AS operation is implemented in
the each bank of the selected band. When the AS operation is finished, it will resume broad-
casting on the M1.(It can store 3x6 stations for FM and 2x6 stations for AM in all)
2) When briefly pressing the APS button , the radio searches for each preset station from the M1.
When the field strength level is more than the threshold level of the stop level, the radio is holding
at that preset number for few seconds with releasing mute, and then searches again. After finishing
a circle of searching, it will stop searching on the M1.
NOTE: In FM band, FM1,FM2,FM3 is checked one at a time.
In AM band, AM1, AM2 is checked one at a time.
4. PRESET STATION [ 1-6 ] BUTTONS
In RADIO mode:
1) To memorize the current frequency on the current band, long press any one of the six preset
buttons (1-6) .
2) To recall the preset memory on the current band, press one of the preset buttons [1-6] .
5. STEREO/MONO BUTTON
Press the ST button on the remote control to select the STEREO or MONO sound mode for
FM band.
6. LOC BUTTON
1) In RADIO mode, when the signal of the distance radio station are very weak and the receiving
effect is bad during tuning, check whether there is the word LOC on LCD. If there is the word
LOC on LCD, press this button to turn off the LOC function, then tune again for the distance
radio station;
2) In RADIO mode, when the signal of the local radio station are too strong to lead that the
interference to the receiving effect during tuning, press this button to turn on the LOC function
to display the word LOC on LCD, then tune again for the local radio station.
5.5 Playback in Scan Mode
1. In the state of VCD(PBC OFF)/CD disc playing, press the INT button to play
the previous 10 seconds part of each track on the disc. Press the INT button
again to resumenormal playback.
2. In the state of DVD/MP3/WMAdisc playing, the INT button is not available.
5.6 Playback from a specified chapter/track or a specifiedtime
1. In the state of DVD disc playing, press the SEARCH button to display a
interface and highlight the title item, then use the number buttons to input
the serial number of the title; use the direction buttons to highlight the chapter
item, then use the number buttons to input the serialnumber of the chapter;
you can still use the direction buttons to highlight the time item, then use the
number buttons to input the desired time to start playback; finally press the
OK or PLAY button to play the selected chapter or play from the selected time.
2. In the state of VCD/MP3/WMA/CD disc playing, pressthe SEARCH buttonto
display a interface and highlight the track item, then use the number buttons
to input the serial number of the track; you can still use the direction buttons
to highlight the time item, then use the number buttons to input the desired
time to start playback; finally press the OK or PLAY button to play the selected
track or play from the selected time.
5.7 Playback in Random
In the state of DVD/VCD(PBC OFF)/MP3/WMA/CD disc playing, press the
RDM button to switch between RANDOM (ON)/RANDOM OFF. When in
RANDOM (ON) mode, it will play in random.
5.8 Playback in Different Angle
1. In the state of VCD/MP3/WMA/CD disc playing, the ANGLE button on the
IR remote control is not available.
2. In the state of DVD disc playing, press the ANGLE button repeatedly on
the IR remote control to view in different angle.(This function is only
for the DVD discs with ANGLE function)
5.9 Playback in Zoom Mode
In DVD/VCD mode,during playback, press the ZOOM button continuously
to enlarge a certain area of the images onthe screen withthese multiples:

1111 1616
During slow forward,press the PLAY button to resume normal playback.
The function is only for video.
5.3 Playback with still frame
If the unit is currently running DVD/VCD disc, press the STEP button
consecutively to display the still frame forward with step by step.
Press the PLAY button to resume normalplayback.
5.4 Playback Repeatedly
5.4.1 ONE/ALL Repeat
1. In the mode ofDVD disc playback:
Press the RPTbutton to selectRPT CHAPTER, RPT TITLE and RPT
ALL.
2. In the mode ofVCD(PBC OFF)/CD disc playback:
press the RPT button to select RPT 1, RPT ALL.
When it isin the stateof PBC ON, during VCD disc playing, the RPT
button are not available.
3. In the mode ofMP3/WMA disc playback:
Press the RPT button to select RPT 1, RPT DIR, RPT ALL.
5.4.2 A-B Repeat
Press the A-B button if you want to repeat aspecific segment on a disc
that you define:
1. Press the A-B button at a point (A) where you want it to be the start point
of the repeat segment. Press the A-B button again at a point (B) where you
want it to be the terminal point of the repeat segment. Then it will play the
segment repeatedly.
2. To cancel the A-B repeat mode and resume normal playback, press the A-B
button for the third time.
Note:
During VCD/MP3/WMA/CD playback, points A and B must be within the
same track.
During DVD playback,points Aand B can be selected fromdifferent chapters.

1212
1515
In VCD mode
1. When starting to turn on the PBC function, it will play from the beginning of
the disc till it display the PBC menu on monitor screen if the disc include the
PBC menu.
2. Press the number buttons to select your desired track to play.
In MP3/WMA mode
1. Theroot menu is displayed on the monitor screen all the time(and the TITLE
or MENU button is not available).
2. Press the direction buttons to select your desired FOLDER, then press the
OK or PLAY button to open the FOLDER, and then press the direction buttons
to select your desired file, finally press the OK button to play the selected file.
In CD mode, the TITLE, PBC, MENU buttons are disabled.
4.7 Terminate the Playback
1. Press the EJECT button to slidedown the front panel, then the disc in thedisc
compartment will come out automatically. and then remove the disc away.
2. Long pressthe POWER button on thefront panel or briefly press the POWER
button on the remote control to turn off the DVD player.
5. AdvancedDisc, USB orMMC/SD Operation
5.1 Playback with Speed
During normal playback, long press the UP/DN button on the front panel or
the >>|/|<< button on the remote control continuously to fast forwards
or backwards at the following speeds: x2, x4, x8, x16, x20, normal.
During speed playback,press the PLAY button to resume normal playback.
5.2 Playback with Slow Speed
During playback , press the SLOW_FWD button to execute the Slow
Forward function.
With each consecutivepressing of theSLOW_FWD button, the playback
speed decreases. The speed levelsin Slow Forwardas follows:
x1/2,x1/3,x1/4,x1/5,x1/6,x1/7,normal.

1313 1414
4.2 Pause Playback
In the stateof DVD/VCD/CD/MP3/WMA disc playing, press the PAUSE
button on IRremote control to pause the playback, press the PLAY
button to resumenormal playback.
4.3 Stop Playback
In the stateof DVD/VCD/MP3/WMA/CD disc playing, press the STOP button
once to pausethe playback, then press the PLAY button to resume thenormal
playback; press theSTOP button twice to fullstop the playback,then press
the PLAY button to start playback from the beginning of the firstchapter/track.
4.4 Select Chapter/Track with theUP/DN or the >>| / |<< Button
Press the UP/DNbutton on the front panel or the >>| / |<< button on the
remote control duringplayback to select the next or last chapter/track to
playback.
Note: Press theUP/DN or the >>|/|<< button multiple times to advance
multiple chapters/tracks forward or backward.
4.5 Select Chapter/Track with theNumber Buttons
In the stateof DVD/VCD(PBC OFF)/MP3/WMA/CD disc playing, press one
of the 1~9and the 0/10 number buttons to directly select and play the 1stto
10th track/chapter (the0/10 button is used as the 10 button).
If you wantto play the track/chapter that s serial number is bigger than 10,
use the 10+,1~9 and 0/10 button. For example 1, to play the 13th track/
chapter, firstlypress the 10+ button once, then press the 3 button. For
example 2, toplay the 34th track/chapter, firstly press the 10+ button for 3
times, then pressthe 4 button.(the 0/10 button is used as the 0 button)
Note: long pressingthe +10 or -10 button can play the next 10 or last10
chapter/track(only for MP3/WMA).
4.6 Select Chapter/Track with theRoot/PBC Menu (If the disc includes the
root/PBC menu)
In the stateof DVD disc playing
1. Press theTITLE button on the remotecontrol to displaythe title list.
2. Press thedirection buttons toselect your desired title, and then press the OK
or PLAY button to open the root menu of the selected title.
3. Press thedirection buttons toselect your desired chapter, finally press the
OK or PLAY button to play the selected chapter.
During playback, pressingthe MENU button can directly display the root
menu of thetitle that is playing.
4. Basic Disc, USB or MMC/SD Operation
4.1 Begin playback
1. Press the POWER button briefly to turn on the DVD player.
After turning on the DVD player, please turn on the monitor, and ensure that
the video output of the monitor is the video input from the DVD player
connected with the monitor.
? Common Question
Q: There is not anything is displayed on TV screen when the DVD player is
turned on. How to solve the problem?
A: Ensure that the TV was set to right video input(not TV channel); for
example, if you make VIDEO1 INPUT of TV and DVD player connected
with each other, then you need set TV to VIDEO1.
2. Press the EJECT button to slide down thefront panel.
3. Insert a disc into the Disc Compartment(Label surfaceup), then the
front panel willslide back to the previous angle.
! NOTE
1. For some discs that are seriously scratched or poor manufacturing or
recording quality, it may not play.
2. If the player can not read disc under normal condition, please try to
eject and reload the disc again.
3. Remark:
1) In addition to normal CD and DVD, this unit supports to play CD-R,
CD-R/W, DVD-R and DVD-R/W as well; however, depending on the
conditions of the recording equipment, recordingprogram or the disc
itself, some CD-R, CD-R/W, DVD-R or DVD-R/W may not play.
2) When dealing with CD-R, CD-R/W, DVD-R or DVD-R/W recording,
too high recording speed may result in poor signal quality and therefore,
it is recommendable to select as lower as possible recording speed.
Table of contents
Other Naxa Car Video System manuals
Popular Car Video System manuals by other brands

Sony
Sony XM-GS100 Limited warranty

Directed Video
Directed Video OHV 1000 Owner's installation guide

Boss Audio Systems
Boss Audio Systems BV9967BI user manual

Pioneer
Pioneer AVH-P4150DVD Service manual

Farenheit
Farenheit T-7000MHR owner's manual

Toyota
Toyota Navigation and Multimedia System owner's manual