logo
Brands
  1. Home
  2. •
  3. Brands
  4. •
  5. Naxa
  6. •
  7. Car Video System
  8. •
  9. Naxa NCD-730 User manual

Naxa NCD-730 User manual

Other manuals for NCD-730

1

Other Naxa Car Video System manuals

Naxa NCD-687 User manual

Naxa

Naxa NCD-687 User manual

Naxa NCV-573 User manual

Naxa

Naxa NCV-573 User manual

Naxa NCD-706 User manual

Naxa

Naxa NCD-706 User manual

Naxa NCD-702 User manual

Naxa

Naxa NCD-702 User manual

Naxa NX-665 User manual

Naxa

Naxa NX-665 User manual

Popular Car Video System manuals by other brands

Stinger HEIGH10 RB10RAM13B installation manual

Stinger

Stinger HEIGH10 RB10RAM13B installation manual

Eonon E1057 instructions

Eonon

Eonon E1057 instructions

Milion D2223 user manual

Milion

Milion D2223 user manual

Metra Electronics 99-8153 installation instructions

Metra Electronics

Metra Electronics 99-8153 installation instructions

Voxx Electronics HR8MA1 owner's manual

Voxx Electronics

Voxx Electronics HR8MA1 owner's manual

Axxera AV604Bi quick start guide

Axxera

Axxera AV604Bi quick start guide

Clarion NX706E owner's manual

Clarion

Clarion NX706E owner's manual

Pyle view PLDN74BTi owner's manual

Pyle view

Pyle view PLDN74BTi owner's manual

Clarion NX602 quick start guide

Clarion

Clarion NX602 quick start guide

RCA DRC6296 - Twin 9" Mobile DVD System Manual Del Usuario

RCA

RCA DRC6296 - Twin 9" Mobile DVD System Manual Del Usuario

Kia MTXM100YPPE user manual

Kia

Kia MTXM100YPPE user manual

Lanzar SVDVD5 owner's manual

Lanzar

Lanzar SVDVD5 owner's manual

Eonon E1060 instructions

Eonon

Eonon E1060 instructions

Macrom M-AN900 user manual

Macrom

Macrom M-AN900 user manual

Hyundai BAPE-L3000N user manual

Hyundai

Hyundai BAPE-L3000N user manual

r.LiNK RL2-UCON8-SM manual

r.LiNK

r.LiNK RL2-UCON8-SM manual

Blaupunkt DVP 01C operating instructions

Blaupunkt

Blaupunkt DVP 01C operating instructions

DP Audio Video dbd807nav Operation manual

DP Audio Video

DP Audio Video dbd807nav Operation manual

https://manuals.online logo
https://manuals.online logoBrands
  • About & Mission
  • Contact us
  • Privacy Policy
  • Terms and Conditions

Copyright 2026 Manuals.Online. All Rights Reserved.

Page 1
Class 1 laser product
This car multi-media player is a class 1 laser product. However
This car multi-media player uses a visible/invisible laser beam
which could cause hazardous radiation exposure if directed.
Be sure to operate the car multi-media player correctly as
instructed. Use of controls or adjustments or performance of
procedures other than those specified herein may result in
hazardous radiation exposure. Do not open covers and do not
repair yourself. Refer servicing to qualified personnel.
Precaution
Page 2
Precaution............................................................................................
Content.................................................................................................
Installation diagram..............................................................................
Wiring diagram......................................................................................
General knowledge about remote control..............................................
Locations and Names of controls on main unit.......................................
Locations and Names of controls on remote control..............................
Same functions in any work source mode..............................................
Radio operation...................................................................................
Disc/USB/card operation......................................................................
1. Loading or unloading a disc, USB or card........................................
1.1 Loading a disc, USB or card...........................................................
1.2 Unloading a disc, USB or card.......................................................
2. Popping up Function Icons-board...................................................
2.1 Function Icons-board of Digital Video/VCD/MPEG4/Image
/MP3/WMA.....................................................................................
2.2 CD interface..................................................................................
3. Function of controls on the touch screen/main unit/remote
control............................................................................................
* Region Code...................................................................................
* Parental Control..............................................................................
AUX IN operation..................................................................................
Rear View Camera................................................................................
Troubleshooting...................................................................................
Specification........................................................................................
1
2
3
4
5
6
7
8
11
13
13
13
14
14
14
15
16
25
26
27
28
29
30
Content
Page 3
Installation diagram
MOUNTING BRACKET
MOUNTING BRACKET
MOUNTING BOLTS
Installation diagram
HEX NUT
SPRING WASHER
PLAIN WASHER
TAPPING SCREW
DASH BOARD
METAL MOUNTING
STRAP
CONSOLE
HEX BOLT
PLASTIC FRAME
Page 4
Wiring diagram
NOTE:
1. Must use 4 ohms impedance of speakers.
2. After connecting parking Line, video on screen of control panel
will be displayed only after
3. Before finishing wiring, do not attach control panel onto chassis.
applying parking brake.
IGNITION SWITCH
RED
WHITE
WHITE/BLACK
GREY
GREY/BLACK
GREEN
GREEN/BLACK
VIOLET
VIOLET/BLACK
YELLOW
CONSTANT 12 VOLTS
BLACK
GROUND(B-)
BLUE
AUTO ANTENNA
FRONT
Lch SPK.
REAR
Lch SPK.
FRONT
Rch SPK.
REAR
Rch SPK.
(B-) PARKING BRAKE
PINK
RADIO ANTENNA JACK
(B+) 12V
REAR CAMERA SWITCH
REAR CAMERA INPUT
YELLOW
GREY
SUB WOOFER
AUDIO R OUT (red)
AUDIO L OUT (white)
FUSE
Wiring diagram
VIDEO OUT (BROWN)
BROWN
ISO CONNECTOR
1. Removing insulating sheet
If
)
)
)
.
)
)
)
.
)
)
using remote control for the first time, you
can see an insulating sheet at the bottom
side of remote control as right.
you must remove the insulating sheet as right.
Otherwise, the remote control is disabled.
2. Replace lithium cell
If the electric energy of lithium cell is weak,
replace it.
1 Press and hold the movable block as direction
indicated by arrow 1 as right, at one time pull
cell holder out of remote control as direction
indicated by arrow 2 as right.
2 Replace the old cell by a new one with (+)
polarity side upward as right.
3 Insert the cell holder into remote control again
as right.
3 Note about using remote control
1 You should face the emitting window of remote control towards the sensor
window of the unit.
2 Operation angle for front panel: About 30 degree
3 The distance between the emitting window of remote control and the sensor
window of the unit : < 5M .
4 Warning for lithium cells of remote control
leakage may cause damage to remote control.1 Cell
2 Do not throw cells into fire, it may cause explosion.
.
3.To avoid risk of accident, keep cells out of reach of children.
GENERAL KNOWLEDGE ABOUT REMOTE CONTROL
Page 5
General knowledge about remote control
Page 6
Locations and names of controls on main unit
Top Front View Dr awi ng after Flipping down Control Panel
1. POWER BUTTON
2.
4.
MUTE BUTTON
>|| or CH1~6 BUTTON
3. RESET BUTTON
SEL BUTTON and VOL KNOB
5. OPEN BUTTON
6. USB PORT and COVER
7. AUX IN JACK
8.
9. EQ BUTTON
10. BAND BUTTON
11. REL BUTTON
12. IR SENSOR WINDOW
13. DISC SLOT
14. EJECT BUTTON
15. CARD SLOT
Front View Dr awi ng after Remo ving Control Panel
14
13
15
Control Panel
1
7
2
3
4
6
9
8
10
11
12
5
CH1~6
MUTE
EQBND
REL
IR
RESE T
PUSH
SEL
+
VOL
_
OPEN
AUX IN
Locations and Names of Controls on Remote Control
Page 7
1
2
6
10
11
3
20
21
33
9
12
17
34
23
4
5
7
8
1314
1516
18
19
22
24
2526
2728
2930
31
32
16. VOL- BUTTON
17. SEL BUTTON
18. SETUP BUTTON
19. GOTO BUTTON
20. >|| BUTTON
21. STOP BUTTON
22. AUDIO or MO/ST BUTTON
23. ANGLE BUTTON
24. EQ BUTTON
25. CLK BUTTON
29. > BUTTON
30. V BUTTON
31. |<< BUTTON
32. INT BUTTON
33. NUMBER(0~9) BUTTON
34. +10 BUTTON
26. ^ BUTTON
27. >>| BUTTON
28. ENTER BUTTON
1. POWER BUTTON
2. MUTE BUTTON
3. REPEAT BUTTON
4. ZOOM BUTTON
5. MODE BUTTON
6. MENU or SW BUTTON
7. >> BUTTON
8. SUBTITLE or LO/DX BUTTON
9. < BUTTON
BAND or OSD
<< BUTTON
12. A/PS or TITLE/PBC BUTTON
13. TOP BUTTON
14. VOL+ BUTTON
15. RDM BUTTON
10. BUTTON
11.
MENUMENU
SETUP SETUP
ENTERENTER
112233
445566
778899
00
VOLVOL
SELSEL
A/PSA/PS
MUTEMUTE STOPSTOP
MO/STMO/ST
REPEATREPEAT
POWERPOWER
CLKCLK
PLAY/PAUSEPLAY/PAUSE
EQEQ
ANGLEANGLE
MODE MODE
BANDBAND
VOLVOL
OSDOSD
TITLE/PBCTITLE/PBC
LO/DXLO/DX
GOTOGOTO +10+10
TOP INT
RDM
ZOOMZOOM
Page 8
Same functions in any work source mode
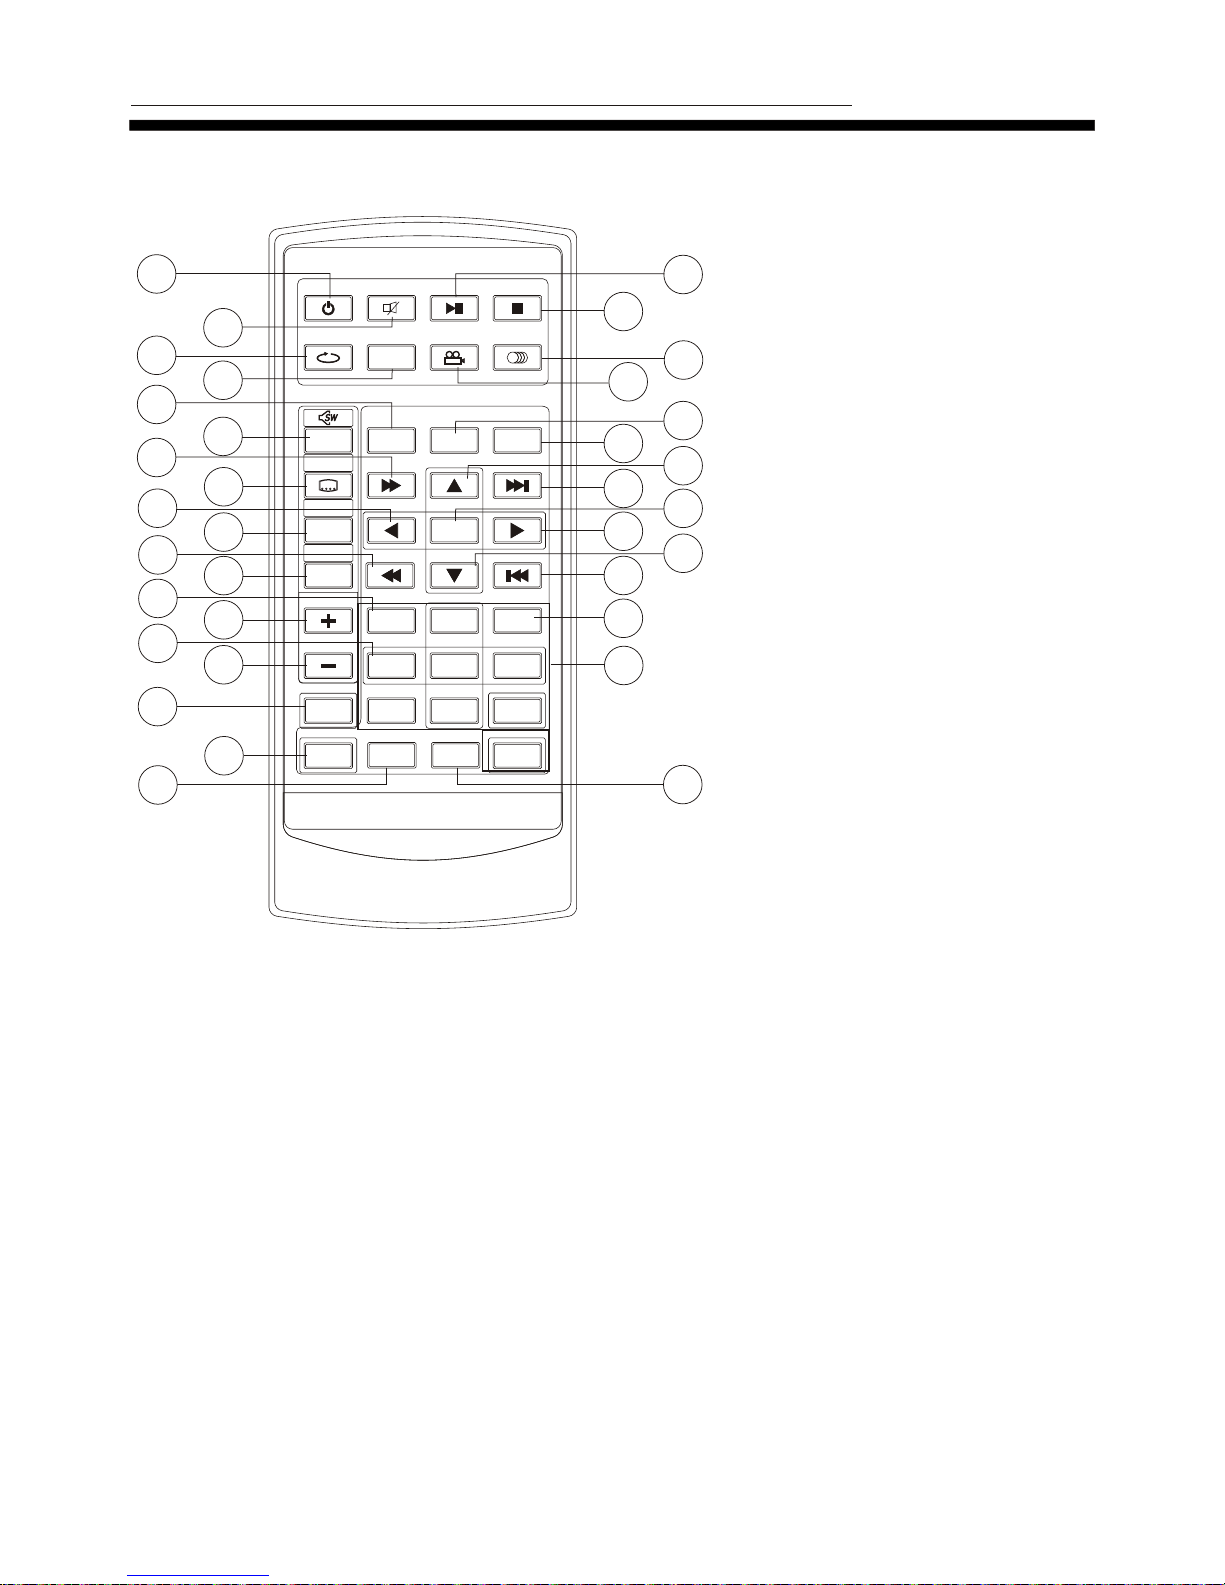
1. POWER button and icon
In power off mode, pressing POWER button on remote control or pressing POWER button on
control panel powers on main unit.
In power on mode, pressing POWER button on remote control or pressing POWER button on
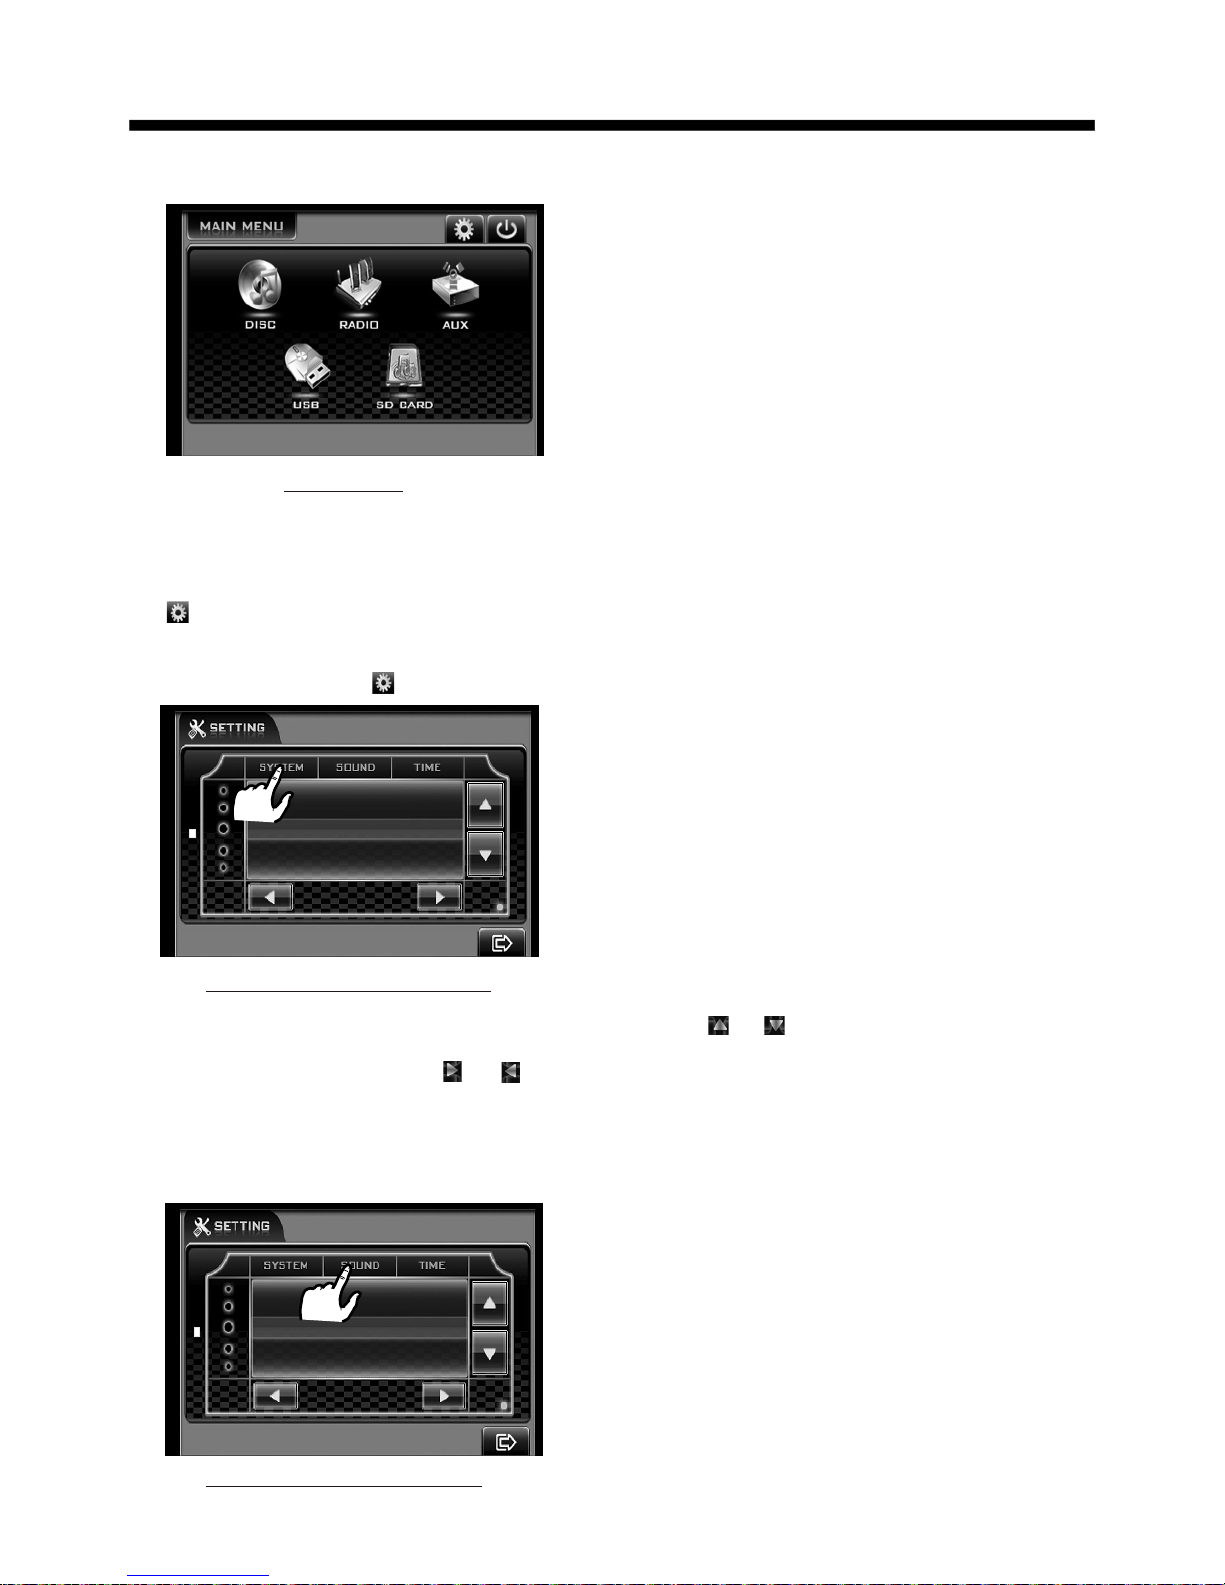
control panel or touching icon on source menu(see Source menu fig.on next page)
powers off main unit.
2. VOL knob & VOL+/VOL- buttons
To adjust volume level, rotate VOL knob on control panel or press or hold VOL+ or VOL- button
on remote control.
3. SEL button
To switch between BASS,TREBLE,BALANCE, FADE,COLOR,BRIGHTNESS,CONTRAST, TINT
and VOLUME, briefly and repeatedly press SEL button.
After switching on the desired mode above, rotate VOL knob or press VOL+/VOL- buttons to set it.
To switch between LOUD, SWF, EQ, DX/LOCAL(in radio mode), STEREO/MONO(in radio mode),
TIME 12H/24H, CLOCK, BUZZ,EUR/USA FREQ,ANIMATION and BG , long press SEL button to switch
on LOUD, then briefly and repeatedly press SEL button.
After switching on the desired mode above, rotate VOL knob or press VOL+/VOL- buttons to set it.
4. MUTE button
To switch MUTE mode on or off, press MUTE button on remote control or on control panel.
5. EQ button
To select a desired preset EQ mode from JAZZ, CLASSIC, POP , ROCK and USER, press EQ
button on remote control or on control panel continuously.
6. To switch LOUD mode
To switch on or off LOUD mode, long press EQ button on remote control or on control panel .
7. SW button
To switch on or off SUBWOOFER mode, long press SW button on remote control.
8. CLK button
Press CLK button on remote control to display clock time .
9. MODE button and source menu
To switch work source between RADIO, DISC(after inserting a disc), USB(after inserting a USB
storage), CARD(after inserting a card) and AUX IN , press MODE button on remote control
continuously.
During disc(non-CD)/USB/card playback, touch screen to pop up Function Icons-board and then
touch the icon in the Function Icons-board to enter the source menu(refer to Disc/USB/Card
Operation) .
During AUX IN playback, touch screen to pop up AUX interface and then touch icon to enter
the source menu(refer to AUX Operation).
In radio or CD mode, touch icon to enter the source menu(refer to Radio Operation and Disc
/USB/Card Operation).
Page 9
Same functions in any work source mode
The source menu displays as follows:
In source menu, touch one icon of DISC, RADIO, AUX, USB and SD Card
to enter one work source of DISC, RADIO, AUX IN, USB and SD Card.
10. icon
1) SETTING SYSTEM
In source menu, touch icon to display SYSTEM page of SETUP menu as follows:
In the SYSTEM page of SETUP menu, repeatedly touch the or icon to highlight one setting
item of BRIGHTNESS, CONTRAST, COLOR, TINT, ANIMATION and WALLPAPER. After highlighting a
desired setting item, touch the or icon to set it.
2) SETTING SOUND
In SETUP menu, touch SOUND icon to display SOUND page of SETUP menu as follows:
Source Menu
System page of SETTING menu
Sound page of SETTING menu
CONTRAST
COLOR
15
BRIGHTNESS
BASS
BALANCE
+03
TREBLE