Naxa NTH-4002 User manual

MODEL NO.: NTH-4002
40” LED WIDESCREEN FHD
TELEVISION


LED
LED
LED
LED
LED
LED
LED
LED

Table of Contents
Remote Control ..................................................... 1
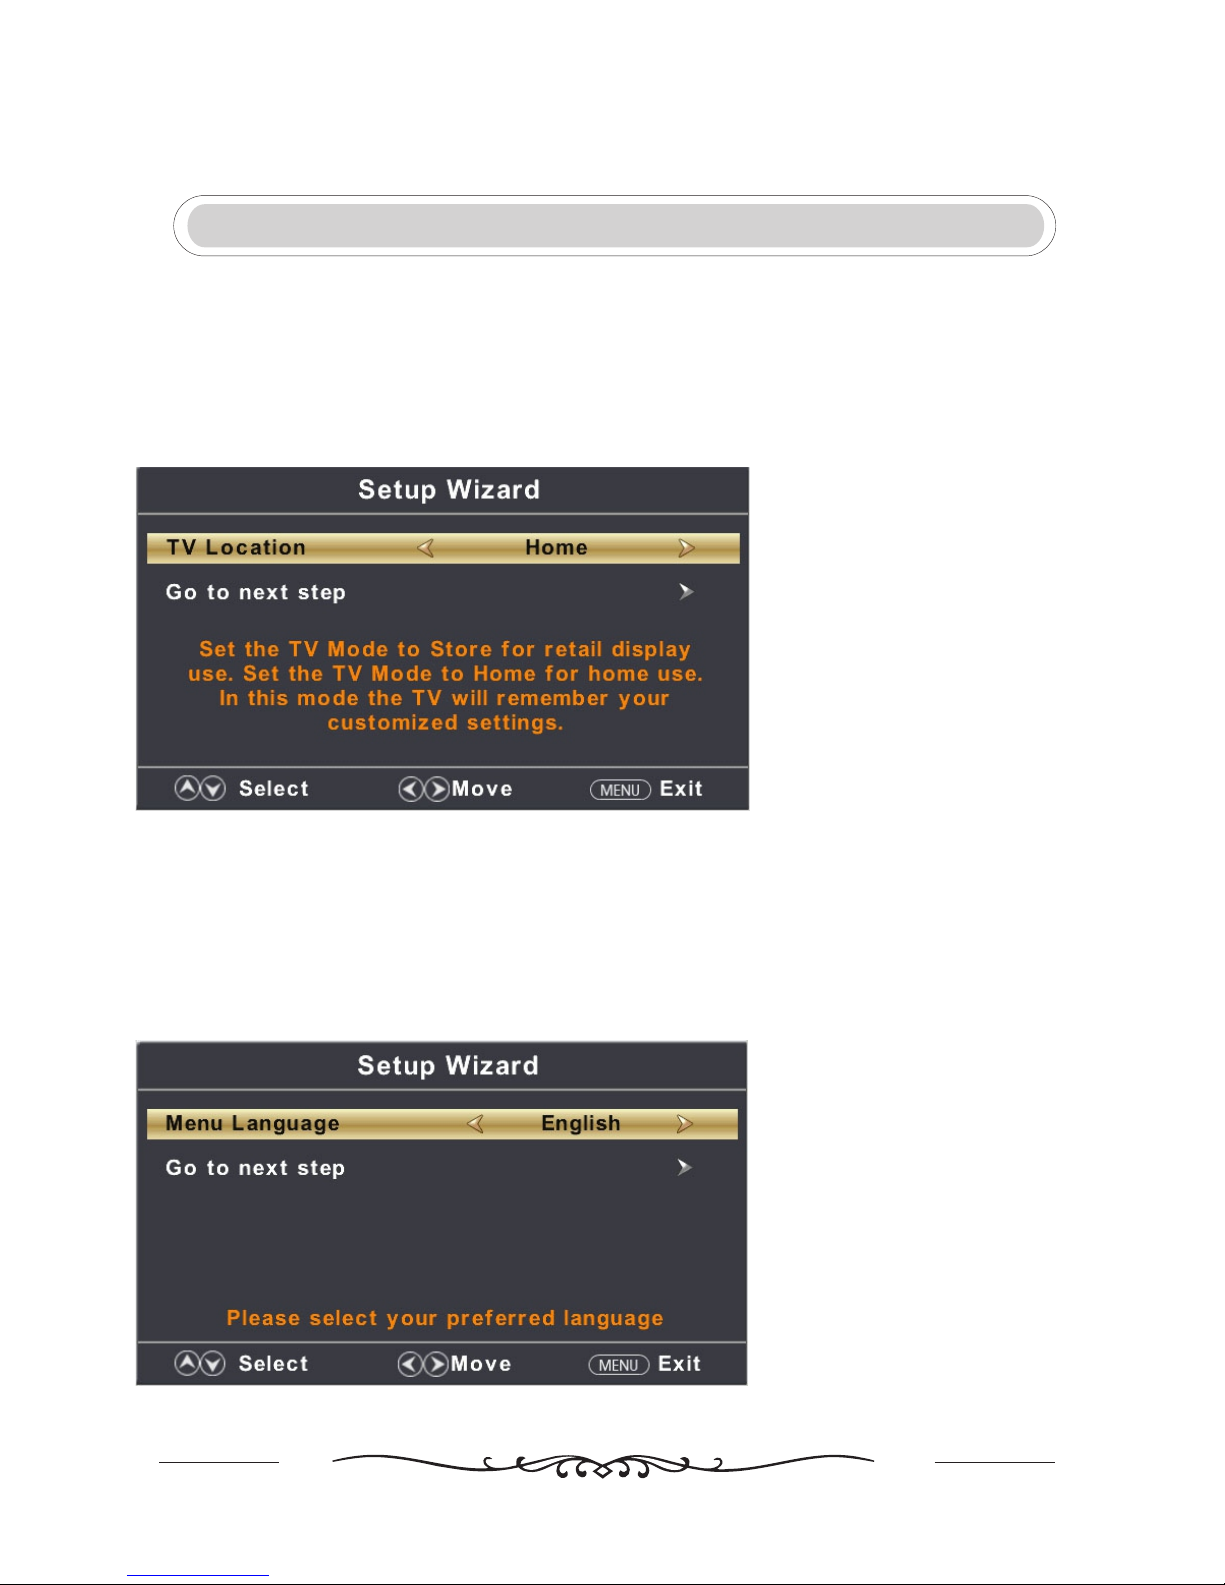
Setup Wizard ......................................................... 2
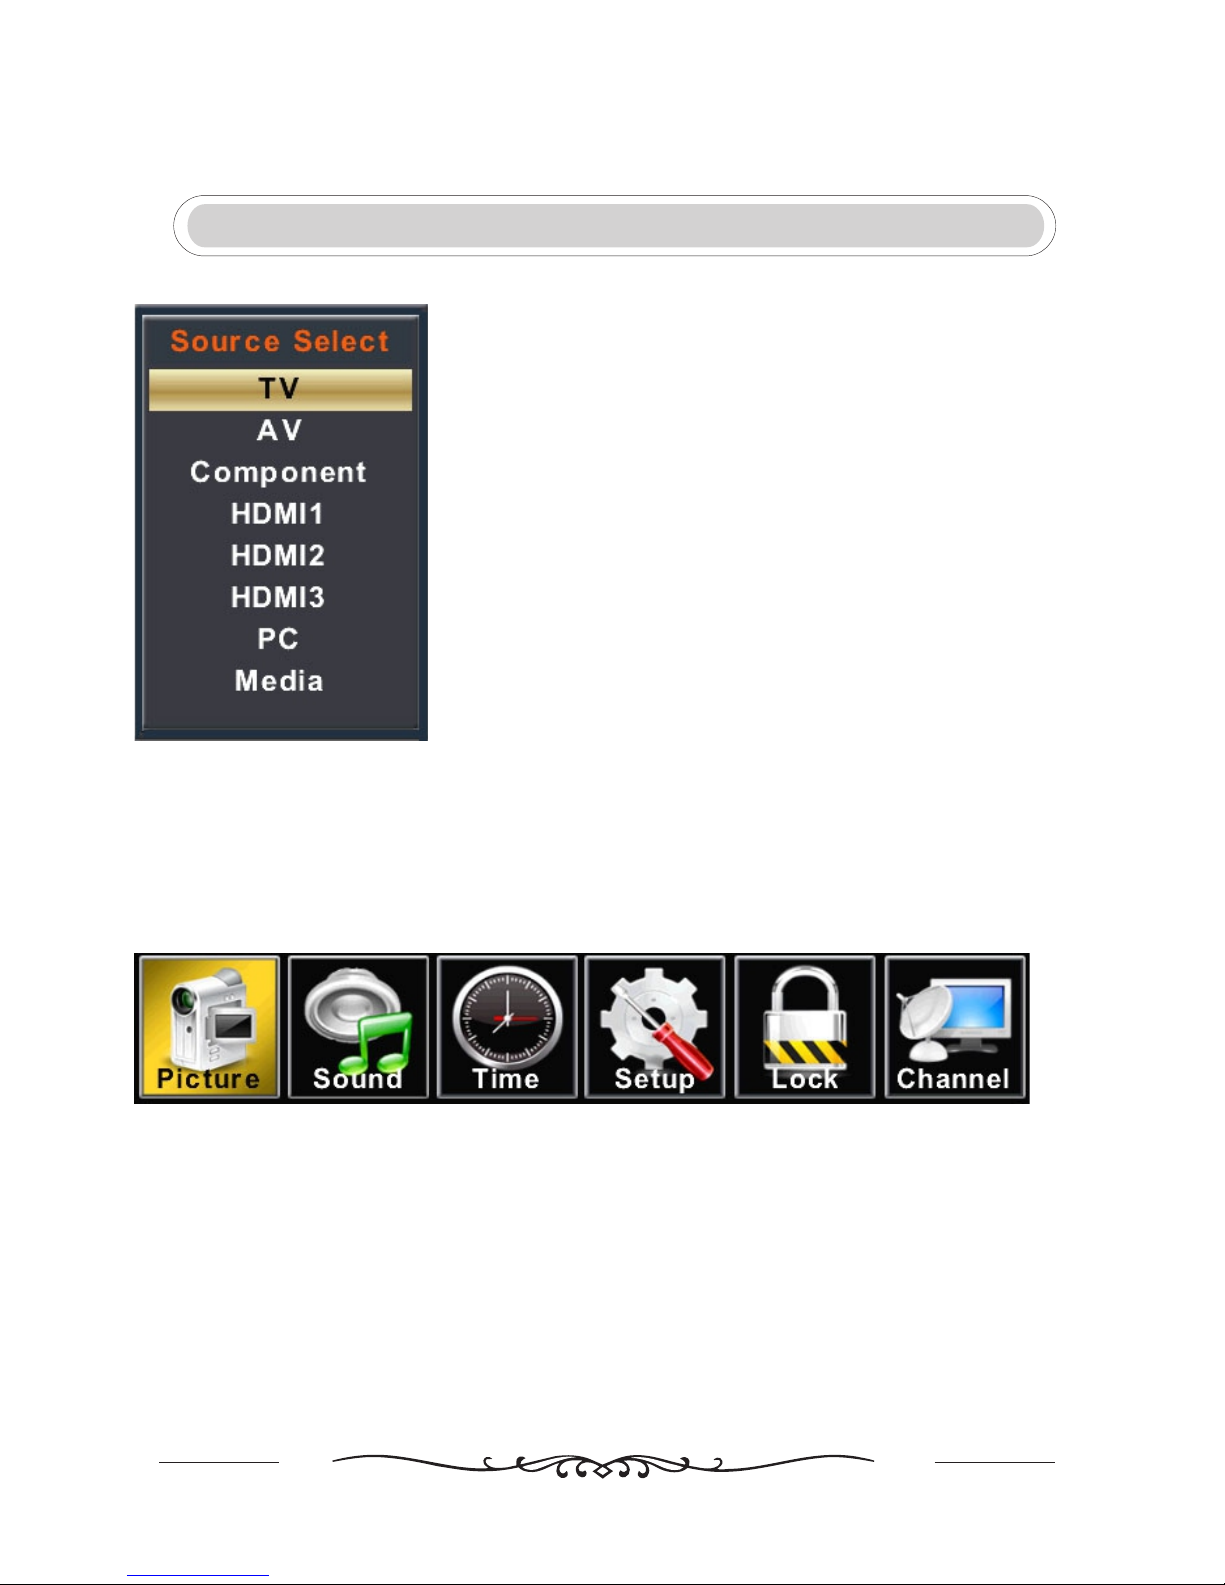
Select Input Source ................................................ 4
Main Menu Operation ............................................. 5
Picture Menu ...................................................... 5
Sound Menu ....................................................... 7
Time Menu .......................................................... 9
Setup Menu ....................................................... 10
Lock Menu ......................................................... 15
Channel Menu ................................................... 20
PC Menu ............................................................ 22
Media Operation ..................................................... 25
Photo Menu ........................................................ 26
Music Menu ........................................................ 27

ENTER
LED
Press to search through an individual chapter or track.
Press to skip back between chapters or tracks.
Press to skip forward between chapters or tracks.
Press to choose a specified section.
Press to repeat the current selection or track.
1

Setup WizardSetup Wizard
Connect RF cable to your TV Aerial socket.
TV Location
Set the TV Mode to Home or Retail display use.
Press button to select(Home / Store).◄ / ►
Press ▼ / ▲ button to select and press ENTER/► button to enter the sub-menu.
Note:
This page is only enable when you have Energy Star request.
Select Language
Press ◄ / ► button to select the language to be used for menus and message.
Press ▼ / ▲ button to select and press ENTER/► button to enter the sub-menu.
2
C

3
Select Time
Press ▼ / ▲ button to select the time zone, daylight saving time and time format you want.
Press ◄ / ► button on the remote control to adjust.
Press ▼ / ▲ button on the remote control to select and press ENTER/► button to enter the sub-menu.
Auto Scan
Press ◄ / ► button to select the antenna type.
Press ▼ / ▲ button to select and press ENTER/► button to start auto scan.
C

4
Press INPUT button to display the input source list.
Press ▼ / ▲ button to select the input source you want.
Press ENTER button to enter the input source.
Press EXIT button to quit.
SELECT INPUT SOURCE
Main Menu
Press MENU to display the main menu or return to the previous menu or close the main menu.
Press ◄/► to highlight the desired menu icon, and press ENTER to select.
If no buttons are pressed, the menu will close automatically after about 10 seconds.
C

5
Main Menu Operation
Picture Menu
ENU to enter the main menu,Press button to select.Press M ◄ / ►
Press to enter.ENTER / ▼
ENU again to exit or back to parent menu.Press M
button to select among Picture Mode /Brightness/ Contrast / Color / Tint / Sharpness / Color Temperature/ Press ▼ / ▲
Advanced Settings.
Press to enter. ENTER / ▼
Press button to adjust.◄ / ►
ENU again or back to parent menu. Press M
【Picture Mode】
Adjust picture mode to change picture appearance.
Press button to select(Standard / Dynamic / Soft / User/Power Saving).◄ / ►
Note:The brightness,contrast,color, tint and sharpness are only available in User mode,you can adjust as you like.
Standard Produces a highly defined image in a normally lit room.
Dynamic Produces a highly defined image in a brightly lit room.
Soft Produces a highly defined image in a soft lit room.
Power Saving Save energy.
User Select to customize picture settings.
【Brightness】
Adjust the visual perception output of the entire picture, it will effect the iuminousness of the picture.
Press button to adjust.◄ / ►
【Contrast】
Adjust the highlight intensity of the picture, but the shadow of the picture is invariable.
Press button to adjust.◄ / ►
【Color】
Adjust the saturation of the color based on your own like.
Press button to adjust. ◄ / ►
C

6
【Tint】
Adjust the hue(Red,Green,Blue) of the picture.
Press button to adjust.◄ / ►
【Sharpness】
Adjust the peaking in the detail of the picture.
Press button to adjust.◄ / ►
【Color Temperature】
Increase or reduce warm color of the picture personally(red),and the cool color personally(blue) according to your like.
Normal Increase the sex-linked colors for the white.
Warm Increase the red color for the white.
Cool Increase the blue tone for the white.
【Advanced Settings】
Adjust advanced video features to fine tune the picture.
Press button to enter .► sub-menu
Aspect
Adjust how the picture fills the screen.
Normal Automatically adjust Aspect Ratio based on TV size and TV program.
Wide Use to watch wide screen(16:9) content.
Zoom Expands image to fill screen. Top and button maybe cut off.
Cinema Stretches image at edges but keeps a clear image in the center.
Noise Reduction
Set options to reduce video noise.
Off Select to turn off video noise detection.
Low Detect and reduce low video noise.
Middle Detect and reduce moderate video noise.
High Detect and reduce enhanced video noise.
Dynamic Contrast
Automatically adjust picture detail and brightness.
Press button to select(Off/On). ◄ / ►

7
HDMI Mode
Only available in HDMI input.
Press button to select(Video/Graphic).◄ / ►
Dynamic Backlight
Adjust back light by image brightness.
Press button to select(Off/On/Low). ◄ / ►
Sound Menu
ENU to enter the main menu,Press button to select.Press M◄ / ►
Press to enter.ENTER / ▼
ENU again to exit or back to parent menu.Press M
Press ▼ / ▲ button to select among Sound Mode/Treble / Bass / Balance /MTS
Surround Sound/AVL.
Press to enter. ENTER / ▼
Press button to adjust.◄ / ►
ENU again or back to parent menu. Press M
【Sound Mode】
Select a sound mode to achieve ideal sound.
Press button to select(Standard/User/Movie/Sports/Music).◄ / ►
Note:The bass,treble and balance are only available in User mode,you can adjust as you like.
Standard Produces a balanced sound in all environments.
User Select to customize audio settings.
Movie Enhances treble and bass for a rich sound experience.
Sports Enhances vocals for TV audio.
Music Preserves the original sound.Good for musical programs.

【Treble】
Adjust the treble effect.Increases or decreases high-pitched sounds.
Press button to adjust.◄ / ►
【Bass】
Adjust the bass effect.Increases or decreases lower-pitched sounds.
Press button to adjust.◄ / ►
【Balance】
Adjust the balance between left and right speakers to adapt to your listening position.
Press button to adjust.◄ / ►
【MTS】
It is only available in TV. Configures the multi-track sound.
Press button to select(Mono/Stereo/SAP).◄ / ►
Mono Sets the sound to mono.
Stereo Sets the sound to stereo when stereo is not available,the sound is automatically switched to mono.
SAP Sets the sound to the second audio program.
【Audio Language】
. It is available Only in TV. Select the language supported by the chosen digital channel
Press button to select(English / / ).◄ / ► French Spanish
【Digital Audio Output】
Send digital audio to external audio system.
Press button to select.◄ / ►
PCM Select to output audio in 2-channel stereo.
Raw Original image coded date.
【Sorround Sound】
Select the speaker sound effect to be surround or not.Default is Off.
Press ▼ / ▲ button to select Surround Sound, then press◄ / ► button to select(On/Off).
【AVL】
Set the auto volume control.
Press ◄ / ► button to select(On/Off).
8

9
Time Menu
ENU to enter the main menu,Press button to select.Press M◄ / ►
Press to enter.ENTER / ▼
ENU again to exit or back to parent menu.Press M
button to select among Sleep Timer / Time Zone / Daylight Saving Time / Time Format / Auto Clock / Clock.Press ▼ / ▲
Press to enter. ENTER / ▼
Press button to adjust.◄ / ►
ENU again or back to parent menu. Press M
【Sleep Timer】
Set a timer for the TV to turn off automatically.
Press button to select(Off / 5min/10min /15min/ 30min / 60min / 90min / 120min/180min/240min).◄ / ►
【Time Zone】
Select your time zone.
Press button to select(Eastern / Central / Mountain / Pacific / Alaska / Hawaii / Atlantic).◄ / ►
【Daylight Saving Time】
Set the daylight saving time for your area.
Press button to select(On / Off).◄ / ►
【Time Format】
Select your time format.
Press button to select(12-hour / 24-hour).◄ / ►
【Auto Clock】
Use to synchronize the display automatically.
Press button to select(On / Off).◄ / ►

Setup Menu
ENU to enter the main menu,Press button to select.Press M◄ / ►
Press to enter.ENTER / ▼
ENU again to exit or back to parent menu.Press M
Press ▼ / ▲ button to select among Menu Language / Transparent / OSD Timeout / Closed Caption /Over Scan/ Input Label /
Other settings / Restore Default / Setup Wizard/Voice Guidance/Video Description.
Press to enter. ENTER / ▼
Press button to adjust.◄ / ►
ENU again or back to parent menu. Press M
10

11
【Menu language】
Select an OSD menu language can be displayed.Default English is selected as menu language.
Press button to select language.(English / Français / Español)◄ / ►
【Transparent】
Adjust the transparency of the OSD (on screen display) menu.
Press button to select.(0%,25%,50%,75%,100%) ◄ / ►
【OSD Time out】
Adjust the duration of the OSD (on screen display) menu.
Press button to select.(5 Sec./15Sec./30Sec./45Sec./60Sec.)◄ / ►
【Closed Caption】
Adjust Closed Captioning settings. Only available under TV and AV source.
Press ENTER / button to enter. ►
【CC Mode】
Turn Closed Captioning on/off.
Press button to select(CC Off / CC On / CC OnMute).◄ / ►
【Analog CC]
Set Closed Captioning for standard(analog) program.
Press button to select.(Off / CC1 / CC2 / CC3 / CC4 / Text1 / Text2 / Text3 / Text4)◄ / ►
【Digital CC】
Set Closed Captioning for digital program.
Press button to select.(Off / Service1 / Service2 / Service3 / Service4 / Service5 / Service6)◄ / ►
ption【O】
Adjust the digital Closed Captioning setting.
Press button to enter. ►
【Mode】
Set the look of digital Closed Captioning. Automatic uses broadcaster’s style.
Press button to select.(Default / Custom)◄ / ►
【Font Style】
Select from 8 font styles.
Press button to select.(Default / Font 0 / Font 1 / Font 2 / Font 3 / Font 4 / Font 5 / Font 6 / Font 7)◄ / ►
【Font Size】
Adjust the size of the digital Closed Captioning font.
Press button to select.(Default /Normal / Large / Small)◄ / ►
【Font Edge Style】
Adjust the edge of the digital Closed Captioning box.
Press button to select.(Default / None / Raised / Depressed / Uniform / Left Shadow / Right Shadow)◄ / ►
【Font Edge Color】
Adjust the color of the digital Closed Captioning box.
Press button to select.(Default/ Black / White / Red / Green / Blue / Yellow / Magenta / Cyan)◄ / ►
【FG Color】
Adjust the color of the digital Closed Captioning font.
Press button to select.(Default/ Black / White / Red / Green / Blue / Yellow / Magenta / Cyan)◄ / ►
【BG Color】
Adjust the digital Closed Captioning background color.
Press button to select.(Default/ Black / White / Red / Green / Blue / Yellow / Magenta / Cyan)◄ / ►
C

【FG Opacity】
Adjust the transparency of the digital Closed Captioning font.
Press button to select.(Default / Solid / Flashing / Translucent/Transparent)◄ / ►
【BG Opacity】
Adjust the digital Closed Captioning background transparency.
Press button to select.(Default / Solid / Flashing / Translucent/Transparent) ◄ / ►
*NOTE: All the options can not be adjust while the mode is Custom.
【Over Scan】
Press button to select.(On / Off)◄ / ►
【Input Labels】
Create labels for the devices connected to your TV.
Press ENTER / button to enter. ►
【Other Settings】
Set the parameter of audio only, no signal power off and no operation power off.
Press ENTER / button to enter. ►
12

Blue Screen
To select the transition type required while changing from one channel to another.
Press button to select.(On / Off) ◄ / ►
Audio Only
Play the audio with the picture turned off. When you turn the Audio Only on and exit the OSD menu, the panel will be
dark,and then press any key to exit the Audio Only status.
Press button to select.(On / Off) ◄ / ►
【Restore Default】
Change power on options or reset TV to factory default.
Press ENTER / button to enter. ►
【Setup Wizard】
Set the first time installation.
Press ENTER / button to enter. ►
For detail please refer to page 1~2.
【Voice Guidance】
Set the auto voice guidance control.
Press ◄ / ► button to select(On / Off).
13

Volume
Adjust TTS volume.
Press ◄ / ► button to select(High/Low/Middle).
Speed
Adjust TTS speed.
Press ◄ / ► button to select(Normal/Fast/Slow).
Pitch
Adjust TTS tone.
Press ◄ / ► button to select(High/Low/Middle).
14
NOTE:
Balance: This item can balance the left and right channels.
AVL: This item uses for reducing the difference between channel and program’s volume automatically.
This function reduces the fluctuation of the sound.
【Video Description】
Change from the main audio to the secondary audio stream that contains video description,and vice versa.
Press ◄ / ► button to select(On/Off).
C
Table of contents
Other Naxa LED TV manuals