Naxa NPB-262 User manual

INSTRUCTION MANUAL
MP3/CD Bass Reflex Boombox & PA System
with Bluetooth®
MODEL: NPB-262
IMPORTANT:Please read before using and keep for future reference.

1
IMPORTANT NOTES
INTRODUCTION
Thank you for buying this product.
Please read through these operating instructions, so you will know how to operate your
equipment properly. After you finished reading the instructions manual, put it in a safe place
for future reference.
CAUTION
Use of controls or adjustment or performance of procedures other than those specified herein
may result in hazardous radiation exposure.
DANGER
This Compact disc player is classified as a Class 1
LASER PRODUCT.
THE CLASS 1 LASER PRODUCT label is located
on the rear exterior.
NOTE: The manufacturer is not responsible for any radio or TV interference caused by
unauthorized modifications.
Avoid installing the unit in locations described below:
•Places exposed to direct sunlight or close to heat radiating appliances such as electric
heaters, or other equipment that radiate too much heat.
•Places subject to constant vibration.
•Unventilated or dusty places.
•Humid or moist places.
Operate buttons and switches as instructed in the manual.
Before turning on the power for the first time, make sure that the power cord is properly
installed.
Store the unit in a cool area to avoid damage from heat.
CAUTION: TO REDUCE THE RISK OF ELECTRIC SHOCK, DO NOT REMOVE THE COVER
(OR BACK). DO NOT OPEN THE UNIT. FOR SERVICE, PLEASE REFER TO
QUALIFIED SERVICE PERSONNEL.
WARNING:
-Remove batteries if exhausted or if they will not be used for a long period.
-The incorrect use of batteries can cause electrolyte leakage and will corrode the
compartment or cause the batteries to burst. Therefore:
Do not mix battery types, e.g., alkaline with zinc carbonate.
When inserting new batteries, replace all batteries at the same time.

2

3
LOCATION OF CONTROLS
NAMES OF CONTROLS
1. Display
2. USB port
3. Remote control compartment
4. DIR/MEM/10 + button
5. DIR/MEM/10 – button
6. PROG/P-MODE button
7. 6.3mm MIC input jack
8. 3.5mm AUX IN jack
9. MIC Volume + button
10. MIC Volume – button
11. Speaker guard
12. Left/Right speakers
13. NEXT/FORWARD button
14. PLAY/PAIR button
15. GUITAR Volume + button
16. GUITAR Volume – button
17. 3.5mm headphone jack
18. 6.3mm guitar input jack
19. PREVIOUS/REVERSE button
20. VOLUME dial
21. TUNING dial
22. STOP button
23. ID3 button
24. Telescopic antenna
25. EQ button
26. LIGHT button
27. FUNCTION button
28. POWER/STANDBY button
29. Left/Right Subwoofer
30. Battery compartment door
31. Carrying strap
32. Heat emission vents
33. AC power cable socket
Note:Please remove the plastic protector from the battery compartment before using for the
first time.
REMOTE HANDSET
1. FUNCTION
2. MUTE
3. MEMORY
4. EQUALIZER
5. DIRECTORY/MEMORY/10 UP & DOWN
6. PREVIOUS/REVERSE and TUNING–
7. PLAY/PAUSE
8. P-MODE (Play mode)
9. STOP
10. PAIR
11. NEXT/FORWARD and TUNING+
12. ID3 (show MP3 info tags)
13. VOLUME UP & DOWN
14. LIGHT
15. PROGRAM
16. STANDBY (POWER)
17. Remote transmitter
18. Battery compartment

4
REMOTE CONTROL OPERATION
To operate the unit with the remote control, point the remote
transmitter [17] of the remote control at the IR sensor on the front
display panel of the unit. Press the buttons on the remote control to
use it.
The remote works best at a distance of no further than 20 to 23 feet
and within 30 degrees to either side of the sensor. Bright sunlight or
other lighting conditions in the room can interfere with the remote
control. If remote operation is unsatisfactory or stops working entirely,
try using a new battery in the remote or try darkening the room.
REPLACING THE REMOTE CONTROL BATTERY
The remote control includes one CR2025 (3V) lithium battery.
Remove the plastic protector from the battery compartment before
using the remote for the first time.
To replace the battery, gently push the clasp to the right and then slide
the battery compartment tray out. Remove the old battery and install a
new lithium battery (type CR-2025) in the tray. The positive side of the
battery should face up.
Slide the tray back into the compartment until the clasp clicks into
place.
POWER SOURCE
This unit is designed to operate on or AC/DC electrical systems.
AC OPERATION
Plug one end of the power cord into the AC power input on the unit; plug the other end into a
household AC outlet. (Battery operation will be disabled automatically when AC power is used).
DC OPERATION
Open the battery compartment door [30]. Load 10 pieces of UM-1/D size batteries (not included)
into the compartment, taking care to match the +/– polarities marked inside the compartment.
CAUTION:
Remove batteries if they are empty or not being used for a long period
of time.
Batteries contain chemical substances and should be disposed of
properly. Check your local regulations before throwing batteries in the
trash.

5
BASIC FUNCTIONS
TURNING THE UNIT ON/OFF
Press the POWER button [28] to turn the unit on or off.
SETTING THE FUNCTION MODE
There are 5 function modes; press the FUNCTION button [27] to change modes. The 5 modes
are:
•FM: Listen to FM radio broadcasts. (This is the default mode when you turn the
unit on.)
•AM: Listen to AM radio broadcasts.
•CD: Play compact discs (CD-audio or CD-MP3).
•USB: Play MP3s from USB memory sticks.
•BLUETOOTH: Stream audio from wireless players with Bluetooth®.
The current function mode will be shown on the display [1] when you turn on the boombox.
NOTE:
The unit will automatically switch to AUX mode when a 3.5mm AUX cable is
connected to the AUX input jack [8]. Disconnect the cable to exit AUX mode.
ADJUSTING THE VOLUME
Turn the VOLUME dial [20] on the unit to increase or decrease volume. You may also use the
remote control to adjust the system volume.
EQUALIZER (EQ) FUNCTION
Press the EQ button [25] during playback to change equalizer presets. The presets are: FLAT,
CLASSIC, ROCK, POP, JAZZ, and 3D.
Choose a preset that best matches the style of music that is playing; the presets have been
calibrated to enhance your audio enjoyment.
ID3 (show tag) System
Some MP3 files are encoded with information such as the name of the song, the artist, and the
album. Together, this information is called an "ID3 tag".
Press the ID3 button [23] to cycle through which information to display when playing an MP3 file,
or choose not to show any ID3 information at all.

6
HEADPHONE JACK
To use headphones with your Boombox, lower the volume before connecting them to the
3.5mm Headphone jack [17]. Once connected, slowly adjust the volume to a comfortable level.
The speakers will be disabled when headphones are connected.
CAUTION: LISTENING WITH HEADPHONES AT HIGH VOLUME LEVELS MAY
CAUSE PERMANENT HEARING LOSS.
PARTY LIGHT
To change the party light effects, press the LIGHT button [26]. You can choose from five
different preset modes.
To disable the party light, press the LIGHT button [26] until the lights turn off and the display [1]
reads “LIGHT OFF”.
FM & AM TUNING MODES (Radio)
Listen to FM or AM radio broadcasts. Press the FUNCTION button [27] until the display [1]
reads FM or AM, respectively.
•To optimize reception when listening to stations on the FM band, extend the
telescopic antenna to its full length. To optimize reception for AM band stations,
gently move the unit around, or position the unit in an open place.
TUNING TO A RADIO STATION
If you know the station frequency that you want to tune to directly:
•Tune to a station by turning the TUNING dial [21]. The station frequency is
shown on the display [1].
To tune to a preset station:
•To tune to the next preset station, press the DIR/MEM/10+button [4].
•To tune to the previous preset, press the DIR/MEM/10– button [5].
AUTO PRESET MEMORY / SCAN
To scan for stations within reception range and save them to preset memory automatically,
press the PLAY/PAUSE/PAIR button [14]. After the unit is finished scanning, the unit will
automatically tune to preset number 1 (P01).
MANUAL PRESET MEMORY
Choose which stations to save in preset memory instead of scanning automatically.
1. Turn the TUNING dial [21] to tune to the station that you want to save as a preset
(e.g., 93.10).
2. Press the PROG/P-MODE button [6]. “P01” will flash on the display to indicate
that you are saving the station as Preset Memory 01. (To change the preset
memory number, press the DIR/MEM/10+[4] or DIR/MEM/10–[5] buttons.)
3. Press the PROG/P-MODE button [6] to finish saving the station (e.g., P01 is now
set to 93.10).
4. To save another station, repeat steps 1 to 3. You may save up to 30 FM stations
and 10 AM stations.

7
CD MODE (CD and MP3 Discs)
Play CDs with audio or MP3 files. Press the FUNCTION button [27] to select “CD” mode.
SUPPORTED DISC FORMATS
This unit can play all digital audio CD/MP3, finalized digital audio CD-Recordable (CD-R) discs,
finalized digital audio CD-Rewritable (CD-RW) discs, and CD-DA formatted digital audio
CD/CD-R/CD-RW discs.
LOADING A DISC
1. Press PUSH TO OPEN on the CD door to open it; the display [1] will read
“OPEN”.
2. Place the compact disc into the tray with the label side facing up.
3. Close the CD door; the display will flash “TOC READ”, and then show the total
number of playable tracks on the disc. Playback will start automatically.
4. To remove the CD, press the STOP button [22] to stop playback. Wait for the CD
to stop spinning completely!Press PUSH TO OPEN on the CD door to open it.
Remove the CD carefully taking care to handle it by its sides.
Notes:
1. Make sure the disc is completely stopped before opening the CD door.
2. To ensure good system performance, wait until the unit reads the disc
completely before doing anything else.
3. If the disc is unreadable or if no disc is loaded in the tray, the display will
read “NO DISC”.
PLAYING A DISC
Playback starts automatically from Track 1 after a compact disc has been loaded and read by
the boombox.
•To pause playback, press the PLAY/PAUSE/PAIR button [14]. The current
track time will flash on the display.
•To resume playback, press the PLAY/PAUSE/PAIR button [14] again.
•To stop playback, press the STOP button [22].
To skip tracks
Press the NEXT [13] or PREV [19] buttons to skip to the next or previous track, respectively.
Track numbers are shown on the display.
To scan quickly to a point in a track
Press and hold the NEXT [13] or PREV [19] buttons to quickly scan forward or in reverse
through a track. The track time is shown on the display.
To skip tracks quickly (for MP3 discs, only)
To skip 10 tracks at a time, press the DIR/MEM/10+button [4] to skip forward 10 tracks. Press
the DIR/MEM/10– button [5] to skip backwards 10 tracks.
To select a desired folder (for MP3 discs, only)
To select a track in a folder, press and hold the DIR/MEM/10+ [4] button each time to skip
forward a folder, then press the NEXT [13] to select desired track.

8
PROGRAMING TRACKS
You can create a custom play list from your disc when playback is stopped. You can program up
to 20 tracks for a CD disc and 99 tracks for an MP3 disc
1. While play is stopped, press the PROG/P-MODE button [6]. The display will flash
PROG and show “P01”.
2. Use the NEXT [13]/PREV [19] buttons to select the first track to be saved to the
program list, then press the PROG/P-MODE button [6] to save. The display will
now show the next program number (e.g., “P02”).
3. Repeat step 2 to save more tracks to the program list until all tracks have been
programmed.
4. Press the PLAY/PAUSE/PAIR button [14] to start playing the program list from
the beginning. The display will show which track is currently playing.
5. Press the STOP button [22] on unit to stop program playback.
To clear the program, open the CD compartment lid, making sure that the disc
has stopped spinning completely before you do so.
REPEAT/RANDOM/INTRO PLAY MODE (P-MODE)
To change the playback mode, press the PROG/P-MODE button [6] during playback; the
display will show the current P-MODE. Modes include repeat, random, and intro.
•: Repeat the current track.
•DIR: Repeat all of the tracks in the current directory/folder (MP3
playback only).
•ALL: Repeat all tracks.
•RAN: Play tracks in random order.
•INTRO: Play the first 10 seconds of each track.
To return to normal playback, press the PROG/P-MODE button [6] until there are no P-MODE
indicators on the display. P-MODE is also canceled when you stop playback.
USB MODE
Play MP3 files from USB memory sticks. Press the FUNCTION button [27] to select “USB”
mode.
PLAYING MP3s FROM USB MEMORY
1. Connect the USB memory stick to the USB port [2] found on the front of the unit.
The display will show the total number of playable tracks on the USB device.
Playback will start automatically from Track 1.
2. To pause playback, press the PLAY/PAUSE/PAIR button [14]. The current track
time will flash on the display. To resume playback, press the PLAY/PAUSE/PAIR
button [14] again.
3. To stop playback, press the STOP button [22].
To learn more about programming playlists and repeat/random/intro playback modes, please
refer to the CD/MP3 OPERATION section of this manual.
NOTICE:
To prevent harmful interference, always connect USB devices directly to the
unit. Do not use a USB extension cable to connect USB devices to the unit.

9
Bluetooth®MODE
Stream audio wirelessly from players with Bluetooth. Press the FUNCTION button [27] to select
"BLUETOOTH" mode.
Wireless players with Bluetooth may include laptops, tablets, smartphones, and more. Make
sure that your player has its Bluetooth radio enabled and that it is set to be discoverable.
CONNECTING A DEVICE FOR THE FIRST TIME (PAIRING)
Before using a wireless device with Bluetooth, you will need to establish a connection between it
and the Boombox. This process is called "pairing" and you will only have to do it once. Once two
devices are paired, they will automatically connect when they detect each other.
1. When you set the Boombox to Bluetooth mode and it does not detect a paired
device, it will automatically switch to pairing mode. (The display will flash
"Bluetooth" and the blue "PAIR" indicator will blink when the Boombox is in pairing
mode.)
2. On your wireless device, go to its Bluetooth settings menu.
3. Have your wireless device "search for devices". Select the boombox (NPB-262)
when it is found.
4. When pairing is complete, the Boombox will emit a soft tone, the display will stop
flashing, and the blue "PAIR" indicator will light a steady blue.
The boombox will automatically connect to your wireless device next time as long as it has
Bluetooth enabled, is within range, and is set to be visible to paired devices.
Note:
There are many different Bluetooth enabled devices out there; we cannot provide
instructions for all of them. Please refer to your device manufacturer's instructions
or website to learn more about connecting with Bluetooth.
PLAYING CONNECTED DEVICES
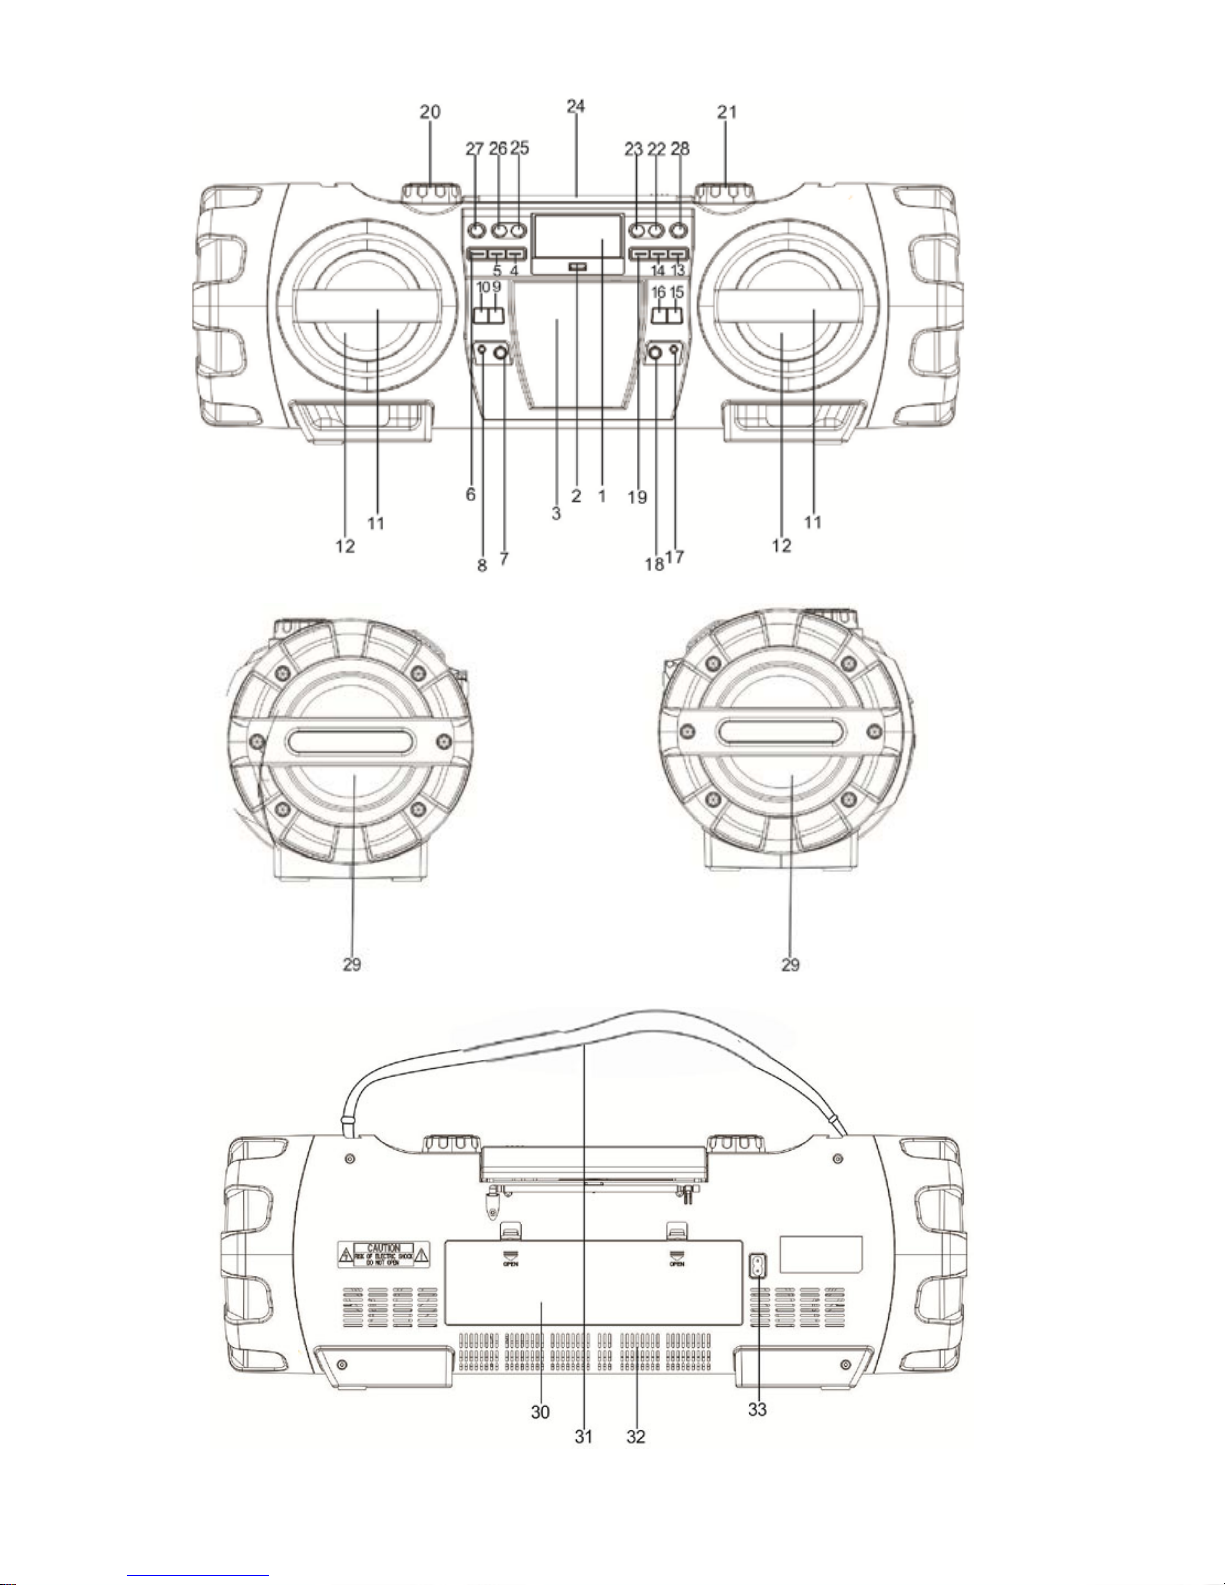
Control playback from your wireless device. The volume level may be controlled by the wireless
device or by turning the VOLUME dial [20].
Basic playback (such as play/pause, next, previous) may also be controlled by the boombox
and its remote control if your wireless device supports it.
AUX MODE
Play audio from devices connected to the AUX IN jack [8]. Connect a 3.5mm AUX cable to the
AUX IN jack [8] found on the front of the Boombox and it will switch to AUX mode automatically.
To exit AUX mode, disconnect the cable from the AUX IN jack [8].
1. Connect your audio device to the 3.5mm AUX IN jack [8] found on the front of the
unit with a 3.5mm AUX cable.
2. Set the volume level of the connected audio device to approximately 80%. Make
additional adjustments to the volume level by turning the VOLUME dial [20] of the
unit.
3. Control playback with your audio device.

10
MIC JACK OPERATION
Microphone input is available in all modes. You can speak over playback in any mode, or simply
stop playback to use the microphone by itself.
1. Connect your microphone to the 6.3mm MIC input jack [7] found on the front of the unit.
2. Press the M.VOL + button [9] or the M.VOL -button [10] to increase or decrease
the microphone input level.
GUITAR JACK OPERATION
Guitar input is available in all modes. You can play over music as a backing track, or simply play
while music playback is stopped.
1. Connect your guitar to the 6.3mm Guitar input jack [18] found on the front of the
unit.
2. Press the G.VOL + button [15] or the G.VOL - button [16] to increase or decrease
the Guitar input level.

11
SPECIFICATIONS
GENERAL
Power Requirement..............................................................................AC100-240V -60/50Hz
DC 15V UM-1 (D-Size) x 10pcs
Power consumption................................................................................................... 65 Watts
Dimensions..............................................................................219(D) x 660(W) x 224 (H) mm
Operation temperature ......................................................................................+5°C – +35°C
RECEIVER SECTION
Receiving Bands......................................................................................................AM/FM.ST
Frequency Range....................................................................................AM: 530 – 1710 KHz
FM: 87.5 – 108 MHz
COMPACT DISC SECTION
Optical Pickup ................................................................................................... 3-Beam Laser
Frequency Response ....................................................................................100 Hz – 16 KHz
AUDIO SECTION
Power output........................................................................................................... Total 60W
ACCESSORIES
Instruction Booklet................................................................................................................. 1
AC Cord................................................................................................................................. 1
Note: Specifications are subject to change for continuous
improvement without prior notice.
SUPPORT
If you have problems with your device, please consult the instructions in this manual, as well as
the latest news, alerts, and documentation which can be found by visiting us on the web at
www.naxa.com. If you need further assistance, please contact Naxa Technical Support.
NAXA Technical Support
2320 East 49th St.
Vernon, CA 90058
http://www.naxa.com/naxa_support/
Remote Control..................................................................................................................... 1

FCC NOTICE
This device complies with Part 15 of the FCC Rules. Operation is subject
to the following two conditions: (1) this device may not cause harmful
interference, and (2) this device must accept any interference received,
including interference that may cause undesired operation.
Note: This equipment has been tested and found to comply with the lim-
its for a Class B digital device, pursuant to Part 15 of the FCC Rules. These
limits are designed to provide reasonable protection against harmful in-
terference in a residential installation. This equipment generates, uses
and can radiate radio frequency energy and, if not installed and used in
accordance with the instructions, may cause harmful interference to ra-
dio communications. However, there is no guarantee that interference
will not occur in a particular installation. If this equipment does cause
harmful interference to radio or television reception, which can be de-
termined by turning the equipment off and on, the user is encouraged to
try to correct the interference by one or more of the following measures:
Reorient or relocate the receiving antenna.
Increase the separation between the equipment and receiver.
Connect the equipment into an outlet on a circuit different from that
to which the receiver is connected.
Consult the dealer or an experienced radio/TV technician for help.
12

Manual de Operación
SISTEMA DE AUDIO PORTATIL
CAJA REFLEJO DE BAJOS CON REPRODUCTOR DE
DISCO COMPACTO (CD/MP3), SISTEMA PA Y
BLUETOOTH®
MODELO: NPB-262
FAVOR DE LEER EL MANUAL COMPLETAMENTE ANTES DE OPERAR ESTE
PRODUCTO. CONSERVAR EL MANUAL PARA FUTURAS REFERENCIAS.

1
NOTAS IMPORTANTES
INTRODUCCION
•Gracias por la compra de nuestros productos.
•Favor de leer y entender completamente este manual, para saber como operar este
producto adecuadamente. Después de finalizar de leer el manual, guardarlo en un lugar
seguro para futuras referencias.
ADVERTENCIA
Para prevenir riesgos de fuego o choque eléctrico, no exponer este producto a la lluvia,
humedad, goteo o salpicadura de agua.
PRECAUCION
El uso de controles, ajustes o procedimientos diferentes a los explicados en este manual
pueden ocasionar exposición a radiación láser peligrosa.
PELIGRO
Se presenta radiación láser invisible al abrir el compartimiento del disco compacto y liberar los
seguros. Evitar la exposición directa al rayo láser, esto puede causar daños a los ojos. Nunca
tocar el lente láser para evitar daños al mismo.
Este reproductor de disco compacto es clasificado como
un Producto Láser Clase 1.
La etiqueta de Producto Láser Clase 1 esta localizada en
la parte posterior del gabinete.
NOTA: El fabricante no asume responsabilidad alguna por interferencias a cualquier radio o TV
causadas por modificaciones no autorizadas.
•Evitar instalar este producto en los lugares que se describen a continuación:
•Lugares expuestos a los rayos directos del sol, cerca de productos radiadores de
calor como calentadores eléctricos u otros equipos que radien calor.
•Lugares sujetos a vibraciones constantes.
•Lugares cerrados con poca ventilación o lugares con polvo.
•Lugares con humedad.
•La ventilación normal del producto no debe ser impedida de ninguna forma para prevenir
sobrecalentamiento interno.
•Operar los interruptores y controles como se indica en el manual.
•Antes de encender el producto por primera vez, asegurarse que el cordón de alimentación
está instalado adecuadamente y que el selector de voltaje (opcional) está ajustado
correctamente.
•Almacenar este producto en un lugar fresco para evitar daños debido al calor.
PRECAUCION: PARA REDUCIR EL RIESGO DE CHOQUE ELÉCTRICO NO REMOVER LA
CUBIERTA (O TAPA), DENTRO DE ESTE APARATO NO HAY PARTES QUE EL USUARIO PUEDA
DARLE SERVICIO, EN CASO DE SER NECESARIO ACUDIR A UN CENTRO DE SERVICIO
AUTORIZADO O CON PERSONAL CALIFICADO.
ADVERTENCIA:
•Remover las baterías si están agotadas o si el producto no va ser usado por un periodo
largo de tiempo.
•El uso incorrecto de las baterías puede causar fuga de acido, esto puede corroer el
compartimiento o causar que las baterías exploten. Por lo tanto:
•No mezclar baterías de diferente tipo, por ejemplo alcalinas con zinc carbón. No usar
baterías nuevas con usadas.
•Al reemplazar las baterías, reemplazar todas las baterías al mismo tiempo.

2
DESCRIPCION DE PARTES

3
DESCRIPCION DE PARTES – UNIDAD PRINCIPAL
1. PANTALLA
2. PUERTO USB
3. COMPARTIMIENTO DEL CONTROL
REMOTO
4. BOTÓN DE
DIRECTORIO/MEMORIA/10+ “10+”
5. BOTÓN DE
DIRECTORIO/MEMORIA/10- “10-”
6. BOTÓN DE PROGRAMA/MODO
“PROG/P-MODE”
7. CONECTOR DE ENTRADA DE 6.3 mm
PARA MICROFONO “MIC”
8. CONECTOR DE ENTRADA AUXILIAR
DE 3.5 mm “AUX”
9. BOTÓN PARA AUMENTAR VOLUMEN
MICROFONO “M VOL+”
10. BOTÓN PARA DISMINUIR VOLUMEN
MICROFONO “M VOL-“
11. PROTECTORES DE LAS BOCINAS
12. BOCINAS IZQUIERDA Y DERECHA
13. BOTÓN DE SIGUIENTE/AVANCE
RAPIDO “”
14. BOTÓN DE REPRODUCIR/PAUSAR /
SINCRONIA “”
15. BOTÓN PARA AUMENTAR VOLUMEN
GUITARRA “G VOL+”
16. BOTÓN PARA DISMINUIR VOLUMEN
GUITARRA “G VOL-”
17. CONECTOR DE ENTRADA PARA
AUDIFONOS DE 3.5 mm “AUX”
18. CONECTOR DE ENTRADA PARA GUITARRA
DE 3.5 mm “GUITAR”
19. BOTÓN DE ANTERIOR/REGRESO RAPIDO
“”
20. CONTROL DE VOLUMEN
21. CONTROL DE SINTONIA
22. BOTÓN DE DETENER “”
23. BOTÓN DE TARJETA ID3 “ID3”
24. ANTENA TELESCOPICA
25. BOTÓN DE ECUALIZADOR “EQ”
26. BOTÓN DE LUZ “LIGHT”
27. BOTÓN DE FUNCIÓN “FUNC”
28. BOTÓN DE PODER / ESPERA “STAND BY”
29. BOCINAS PASIVAS IZQUIERDA Y DERECHA
30. COMPARTIMIENTO DE LAS BATERIAS
31. CORREA
32. RANURAS DE VENTILACION
33. CONECTOR DE ENTRADA DE Vca
DESCRIPCION DE PARTES – CONTROL REMOTO
1. BOTÓN DE FUNCIÓN “FUNC”
2. BOTONES SILENCIO “MUTE”
3. BOTÓN DE MEMORIA “MEM”
4. BOTÓN DE ECUALIZADOR “EQ”
5. BOTONES DE SUBIR Y BAJAR DIRECTORIO /
MEMORIA /10 “DIR/MEM/10”
6. BOTÓN DE ANTERIOR / REGRESO RAPIDO /
SINTONIA- “/TUN-“
7. BOTÓN DE REPRODUCIR / PAUSAR “”
8. BOTÓN DE MODO DE PROGRAMA “P-MODE”
9. BOTÓN DE DETENER “”
10. BOTÓN DE SINCROINIA “PAIR”
11. BOTÓN DE SIGUIENTE / AVANCE RAPIDO /
SINTONIA+ “/ TUN+”
12. BOTÓN DE ID3 (DESPLIEGUE DE
INFORMACION EN PANTALLA) “ID3”
13. BOTONES DE CONTROL DE VOLUMEN
“VOLUME”
14. BOTÓN DE LUZ “LIGHT”
15. BOTÓN DE PROGRAMA “PROG”
16. BOTÓN DE PODER / ESPERA “STAND BY”
17. TRANSMISOR REMOTO
18. COMPARTIMIENTO DE LAS BATERIAS
Nota: Favor de remover el plástico protector del compartimiento de las baterías antes de usar
el control remoto por primera vez.

4
OPERACIÓN DEL CONTROL REMOTO
Para operar la unidad con el control remoto, apuntar directamente con el
transmisor remoto control remoto al sensor infrarrojo localizado en la
parte frontal de la unidad. Presionar un botón en el control remoto para
activar una función.
El control remoto opera adecuadamente dentro de una distancia máxima
de 6 a 7 metros y con un ángulo de 30° a la izquierda y derecha con
respecto al sensor infrarrojo. Los rayos del sol y los cuartos con mucha
luminosidad pueden interferir con la operación del control remoto. Si la
operación del control remoto es insatisfactoria o si deja de operar
completamente, reemplazar las baterías primero, entonces intentar
reducir la intensidad luminosa del cuarto.
REEMPLAZANDO LAS BATERIAS EN EL CONTROL REMOTO
•El control remoto incluye una batería de litio de 3 Vcc tipo botón
(CR2025). Remover el plástico protector del compartimiento de las
baterías antes de usar el control remoto por primera vez.
•Para reemplazar la batería, presionar suavemente hacia la derecha
sobre el seguro de la bandeja de la batería y jalar la bandeja hacia
fuera. Remover la batería gastada e instalar una batería nueva de
litio (CR2025) en la bandeja, verificando que el lado positivo de la
batería quede hacia arriba.
•Introducir la bandeja en el compartimiento hasta escuchar un clic.
FUENTES DE ALIMENTACIÓN
Esta unidad puede operar con Vca (tomacorriente) ó con baterías Vcc
OPERACIÓN CON Vca
Verificar que el voltaje de su localidad corresponde con el voltaje marcado en el producto.
Conectar el extremo correspondiente del cordón de alimentación en el conector de entrada de
Vca, entonces conectar el otro extremo del cordón de alimentación (clavija) en un
tomacorriente (si hay baterías instaladas, estas se desconectan automáticamente al conectar el
cordón de alimentación)
OPERACIÓN CON BATERÍAS (Vcc)
Remover la tapa del compartimiento de las baterías (30). Insertar 10 baterías de 1,5 Vcc
tamaño “D”, “UM-1” o equivalentes (no incluidas), verificar la correcta polaridad cómo se
observa en el interior del compartimiento. Colocar la tapa del compartimiento de las baterías
nuevamente.
PRECAUCIONES
•Remover las baterías si están agotadas o si el producto no va ser usado por un periodo
largo de tiempo.
•Las baterías contienen substancias químicas, estas deben ser desechadas de forma
adecuada para evitar daños al medioambiente.

5
FUNCIONES BASICAS
ENCENDER LA UNIDAD
Presionar el botón de “PODER/ESPERA” en la unidad o control remoto para encender la
unidad o para pasarla al modo de espera.
SELECCIONAR EL MODO DE OPERACIÓN
Para seleccionar el modo de operación, presionar continuamente “FUNC” en la unidad o control
remoto para seleccionar el modo de operación de:
•FM: Para escuchar estaciones de radio en la banda de FM (este es el modo de
operación predeterminado al encender la unidad)
•AM: Para escuchar estaciones de radio en la banda de AM.
•CD: Para reproducir discos compactos (CD de audio estándar o CD de audio MP3)
•USB: Para reproducir archivos de audio MP3 de una memoria o dispositivo USB.
•BLUETOOTH: Para reproducir archivos de audio de forma inalámbrica de reproductores
con función de Bluetooth.
La función actual se despliega en la pantalla (1) al encender la unidad.
NOTA:
El modo de entrada auxiliar no puede ser seleccionado a través del botón de función, cuando el
conector de salida de audio del dispositivo de audio externo es conectado a la entrada auxiliar
“AUX IN” de la unidad, esta cambia al modo de entrada auxiliar automáticamente.
AJUSTE DEL VOLUMEN
Girar el control de volumen en la unidad o presionar los botones de volumen en el control
remoto para ajustar el volumen al nivel deseado.
Presionar “MUTE” en el control remoto para desactivar la salida de audio (silencio), presionar
“MUTE” nuevamente para volver a activar la salida de audio.
SELECCIONAR EL MODO DE ECUALIZADOR
Esta unidad cuenta con un sistema ecualizador integrado, presionar continuamente “EQ” en la
unidad o control remoto durante la reproducción para seleccionar el modo de ecualización
deseado de: PLANO, CLÁSICA, ROCK, POP, JAZZ y 3D.
SISTEMA ID3 (DESPLIEGUE DE INFORMACION EN PANTALLA)
Algunos archivos de audio con formato MP3 están codificados con información como son el
nombre de la canción, intérprete y álbum. Esta información es conocida como Tarjeta ID3.
Presionar “ID3” en la unidad o control remoto para desplegar la información de la tarjeta ID3
durante la reproducción de los archivos MP3 o seleccionar no mostrar la información de la
tarjeta ID3.
Nombre de la canción Nombre del intérprete Nombre del álbum ID3 Desactivado
CONECTOR PARA AUDIFONOS
Para escuchar en privado, bajar el volumen de la unidad al mínimo, entonces conectar los
audífonos con conector de 3.5 mm (no incluidos) al conector de salida para audífonos de la
unidad. Ajustar suavemente el volumen a un nivel confortable. Al conectar los audífonos las
bocinas son desconectadas automáticamente.

6
PRECAUCION: ESCUCHAR A NIVELES ALTOS DE VOLUMEN POR UN PERIODO LARGO DE
TIEMPO PUEDE GENERAR DAÑOS AL SISTEMA AUDITIVO, COMO ES LA SENSACION DE RUIDO O
PERDIDA DE AUDICION.
FIESTA DE LUZ
Para seleccionar los efectos de fiesta de luz, presionar y sostener el botón de “LIGHT” en la
unidad o control remoto para seleccionar dentro de 5 diferentes modos de fiesta de luz.
Presionar y sostener el botón de “LIGHT” en la unidad o control remoto nuevamente hasta que
la pantalla despliega “LIGHT OFF” para desactivar la función de fiesta de luz.
OPERACIÓN DEL RADIO
SINTONIZANDO UNA ESTACION DE RADIO
1. Presionar “FUNCIÓN” en la unidad ó control remoto hasta que la pantalla despliega “AM”
o “FM” para seleccionar el modo de operación de Radio AM o FM.
2. Girar el control de sintonía en la unidad o presionar los botones de sintonía “TUN-“ o
“TUN+” en el control remoto para sintonizar la estación deseada.
3. Girar el control de volumen en la unidad o presionar los botones de volumen en el control
remoto para ajustar el volumen al nivel deseado.
4. Para sintonizar una estación preestablecida en memoria, presionar “DIR/MEM/10-” o
“DIR/MEM/10+” en la unidad o control remoto para sintonizar la estación preestablecida
anterior o siguiente respectivamente.
Para optimizar la recepción de la señal de radio, cuando sintoniza una estación de FM,
extender la antena telescópica completamente y girarla para una mejor recepción. Cuando
sintoniza una estación de AM, girar la unidad hasta obtener una mejor recepción ó colocarla en
un área abierta.
ESCANEO Y ALMACENAMIENTO AUTOMATICO DE LAS ESTACIONES EN MEMORIA
Para buscar y almacenar estaciones de radio automáticamente en la memoria, presionar “”
para iniciar el escaneo de las estaciones en la banda de frecuencia actual, cualquier estación
con señal fuerte encontrada es almacenada en las memorias preestablecidas. Después de
finalizar el escaneo, la unida sintoniza automáticamente la estación almacenada en el número
de memoria 1 (P01).
ALMACENAMIENTO MANUAL DE LAS ESTACIONES EN MEMORIA
Puede seleccionar las estaciones que desea almacenar en memoria, con esto puede escuchar
las estaciones deseadas de forma directa y rápida.
1. Girar el control de sintonía en la unidad o presionar los botones de sintonía “TUN-“ o
“TUN+” en el control remoto para sintonizar la estación deseada a almacenar en
memoria (por ejemplo, sintonizar la estación de 93.10).
2. Presionar “PROG/P-MODE” en la unidad o control remoto y empieza a destellar en la
pantalla el indicador de programa “P01” (para cambiar el número de memoria, presionar
DIR/MEM/10-” o “DIR/MEM/10+”)
3. Presionar “PROG/P-MODE” en la unidad o control remoto para almacenar la estación en
el número de memoria seleccionado (por ejemplo, la estación de 93.10 está ahora
almacenada en la memoria P01)
4. Repetir los pasos 1 a 3 para almacenarla en memoria las estaciones deseadas. Hasta 60
estaciones pueden almacenarse en memoria, 10 para AM y 30 para FM.
5. Una vez que las estaciones están almacenadas en memoria, presionar presionar
“DIR/MEM/10-” o “DIR/MEM/10+” en la unidad o control remoto para sintonizar las
estaciones directamente.
Other manuals for NPB-262
1
Table of contents
Languages:
Other Naxa Portable Stereo System manuals