Nebulink B2C2 SKY2PC User manual

B2C2 SKY2PC
PCI CARD
SATELLITE RECEIVER
INSTALLATION GUIDE
WINDOWS 98
(Compatible with Win 98, ME, 2000, and 2003)
YOUR LINK TO HIGH SPEED
INTERNET VIA SATELLITE
www.nebulink.net

Installing the Digital Receiver PCI Card
The digital receiver card fits into an unused PCI slot in your PC. As each PC is different, consult
your PC manufacture’s instructions.
1) Turn the PC off.
2) Open the side panel of your computer to expose the PCI slot.
3) Choose an available PCI slot. If the slot is covered by a protector, remove the slot
protector. Lay the protector on the ground to one side.
4) Insert the PCI digital receiver card firmly into the PCI slot.
5) Tighten the installation screw on the PCI card.
6) Replace the side panel of your computer.
Installing the Driver
Windows 98
When you start your PC and install the Installation CD for the first time after installing the PCI
receiver card, Windows 98 displays a dialog that says it has detected a ‘PCI Network controller.’
This is how the operating system identifies the PCI digital receiver.
1) Click Next and follow all remaining prompts, accepting defaults, until the dialog asks for
the location of the drivers.
2) Select CD Rom drive, if it is not selected already. Click Next.
3) Check that your computer’s CD-Rom drive is selected in the next dialog.
4) Click OK and follow all remaining prompts to complete the installation.
5) Reboot when prompted.
You have installed the PCI receiver card drivers and are now ready to install the software
applications.
Installing Software Applications
To install software, launch “setup.exe” from the Installation folder on the installation CD and
follow all prompts. (Do not reboot at this time)
When the installation is complete, copy EPG.MDB file from the CD-Rom and paste it to
c:\ProgramFiles\Broadband4PC\DB to replace the existing file.
Reboot the computer.
2
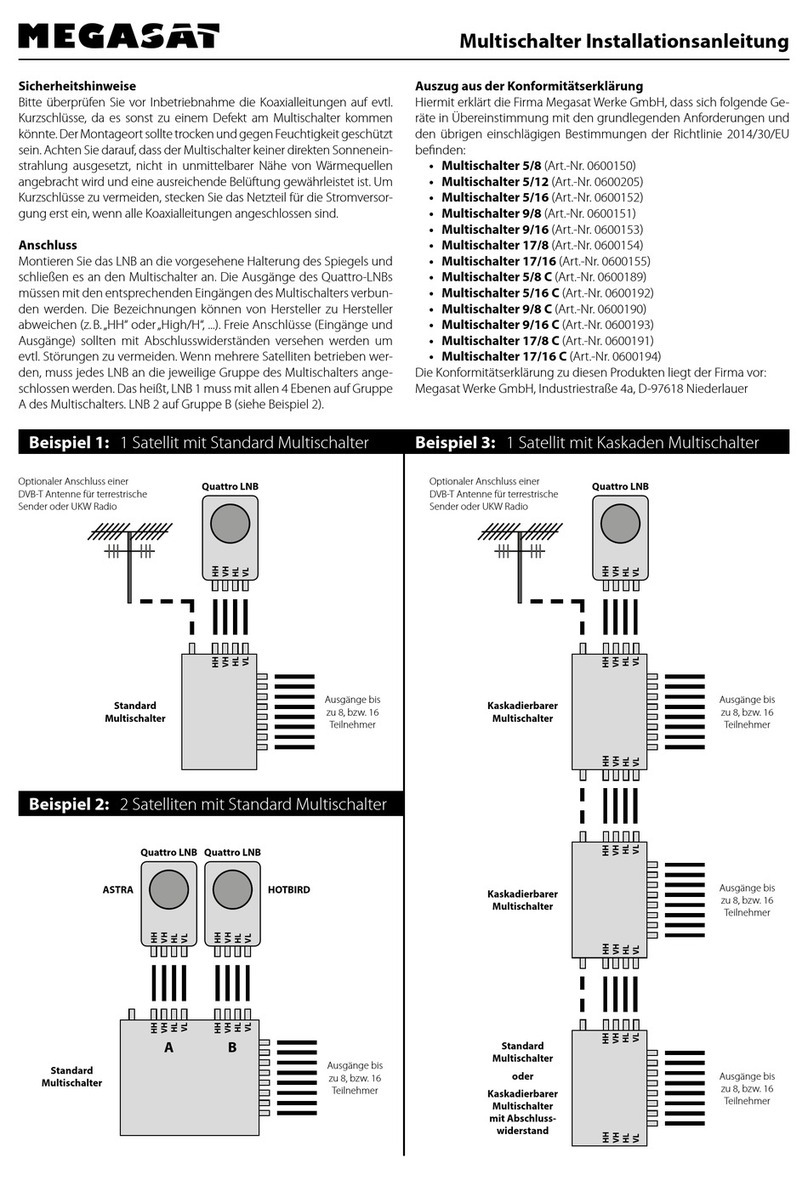

Assembly and Installation of Antenna
1) Insert the Nebulink CD in the CD-ROM drive
2) Click ‘Start’Æ‘Run’, Type [CD-ROM Drive]:\SatFinder\Satwin.exe
(Example D:\SatFinder\Satwin.exe)
3) Click ‘OK’.
4) Click ‘File’Æ‘New’Æ‘New Look Angle’
5) Click ‘Zip’, input your Zip Code, Click ‘Sat’Æ‘Telstar5’Æ‘OK’
6) Locate ‘True Azimuth’ Use your compass to locate a location for you satellite that will
not have obstructions.
7) Using the diagram on page 5 assemble the antenna
8) In the Satfinder Software locate ‘Elevation’, set satellite elevation to this setting
9) Locate ‘Polarization Offset’, Set LNB to this setting,
10)Connect Satellite antenna cable to the LNB and the corresponding antenna terminal of
the receiver card of the computer
11)Adjust Dish, using receiver card ‘signal lock’ to watch for a signal lock
3

4

Locating the Satellite
Included on you Nebulink CD-Rom is a software package for setting up your dish
to locate the satellite which our service is running.
1) To run the software, launch “Satwin.exe” from the SatFinder folder on the Nebulink CD.
2) Click “File”Æ”New”Æ”New Look Angles” (On the menu bar)
3) Click “Zip”, Type in your Zip Code for the location where the satellite will be. Click
“OK”
4) Click “Sat”, Scroll until you find “SatMex 5”, Click to highlight “SatMex5”, and Click
“OK”
5) You will see at the top of the window the Site Name and Satellite Name If this is correct
Click “OK”. If the information is incorrect please contact tech support. You can find the
contact information on the next page.
6) Look under Satellite Look Angles. This is where you have your elevation setting for the
dish, azimuth compass bearing for pointing your dish, and the polarization offset for
setting your LNBF.
7) Now you have all the information for pointing your dish.
5

Getting a Satellite Lock
Now that you have your receiver card setup and you dish pointed in the correct location we now
need to work on getting the signal locked in. To do this we will be using the receiver card and
the dish.
1) Verify you have your cable connected from the LNBF of the dish to the receiver card.
2) On the computer double click the satellite icon in the system tray. (lower right hand
corner of the screen)
3) Click the “Status” button. To the right of the window you will see the “Transponder
Information”.
4) “Signal Strength” this is what you will use to get the signal locked in. You will need a
minimum of 40% I would recommend tweaking the dish to it maximum % rate. The
higher the % the less likely it will be to lose signal during adverse weather conditions.
5) At 40% the bar will turn to green and the satellite will be locked in. The signal will only
lock in if you are on the correct satellite. After you have it locked in click “Close” and
click “Close” again. Now contact technical support to activate your username and
password. You will find the contact information on the next page.
6

PLEASE CONTACT
NEBULINK CUSTOMER SUPPORT
TO ACTIVATE
YOUR USER NAME AND PASSWORD
TOLL FREE AT (877) 634-0101
Or Send an e-mail to
7

8

Nebulink Client Appication Software
Windows 95 / 98 / ME / NT / 2000
1) Place the Nebulink CD in the CD-ROM drive
2) Click ‘Start’Æ‘RunÆ’Browse’
3) Click the down arrow, select CD-Rom drive, double click Nebulink Client, Double
click DESC133.EXE
4) Follow the instructions
5) Reboot the PC
Nebulink Client Configuration
Windows 95 / 98 / ME / NT / 2000
1) Look for a red “Capitol ‘N’ “ icon, in the system tray, in the lower right hand corner of
the screen. Double click it. This will display the Nebulink Login Client Monitor
2) Click Advanced
3) Typed in your User Name and Password. You may have to click the Enable button
above to get access to the User Name and Password. After entering your Username and
Password, Click on the Enable button again
If the Mac Address was found go to 11
If the Mac Address was not found go to 5
4) Click Advanced
5) Click on Options
6) Internet Connection Type Dial-Up Networking Connection
7) Click Advanced
8) Service Settings Login Server = 216.145.238.162, Server Port = 7000, Acknowledge
Port = 9000
9

9) RECEIVER CARDS – MAC Address Override – Type in your Mac Address of you
Receiver Card. (Can be found on the card)
10)Click OK 2 times
11)Click AdvancedÆEnabledÆHide
12)Restart PC
13)You have now completed the required installation for Nebulink
14)Go to Internet Browser Configuration
10

Internet Browser Configuration
Internet Explorer 5.0
1) Right click on the Internet Explorer Icon on the desktop
2) Select Porperties
3) Select the connections tab
4) Under Dial-Up Settings select the ISP then click on Settings
5) Make sure nothing is selected. Under Proxy Server select Use Proxy Server, then select
Advanced
6) Enter proxy.nebulink.net for the address. Then enter 8080 for the Port
7) Click on OK 3 times and you are done
Netscape Navigator 4.x
1) Open up Navigator and select Edit on the Menu bar. Then Select Preferences
2) Select Advanced and then Proxies
3) Select Manual Proxy Configuration and then click on View.
4) Enter proxy.nebulink.net for the address.. Then enter 8080 for the Port .
5) Click on OK 2 times and your done.
11

Contact Information
Address Denney & Associates
S2998 County Hwy S
Westby, WI 54667
Phone Toll Free (877) 634-0101
Office (608) 634-6350
Email [email protected]
12
Table of contents
Popular Satellite TV System manuals by other brands

Bell
Bell 6131 user manual

Kathrein
Kathrein MobiSet 3 Twin CAP 650 Translation of the original operating manual

Caro
Caro VISION II operating instructions

KVH Industries
KVH Industries TracVision R5SL user guide

RCA
RCA DRD102RW installation manual

King Controls
King Controls KD-2200 Installation and operating instructions