Nectre Fireplaces N550 Service manual

CAUTION!
Please read this entire manual before you install or use your new oven. Failure to
follow instructions may result in property damage, bodily injury, or even death. Improper
installation could void your warranty!
SAFETY NOTICE:
If this oven is not properly installed, a house re may result. For your safety, follow the
installation instructions. Never use make-shift compromises during the installation of this
oven. Contact local building or re of cials about permits, restrictions, and installation
requirements in your area.
CERTIFIED for USA & CANADA | SAFETY TESTED to UL 1482-2011 & ULC-S627-2000
N550 Wood-Fired Oven
Installation Instruction Manual
®
7215040100R00

2 www.nectre.com/usa-nectre
Table of Contents
Welcome & Congratulations . . . . . . . . . . . . . . . . . 3
CAUTIONS & WARNINGS . . . . . . . . . . . . . . . . . . 4
Installation . . . . . . . . . . . . . . . . . . . . . . . . . . . . . . . 6
Operating Instructions . . . . . . . . . . . . . . . . . . . . . 16
Warranty . . . . . . . . . . . . . . . . . . . . . . . . . . . . . . . 20
Technical Support . . . . . . . . . . . . . . . . . . . . . . . . 21
This manual covers installation and maintenance. Read carefully
before attempting to install, operate, or service the Wood-Fired Oven.
!NOTE: Procedures and techniques that are considered important
enough to emphasize.
CAUTION: Procedures and techniques which, if not carefully
followed, will result in damage to the equipment.
WARNING: Procedures and techniques which, if not carefully
followed, will expose the user to the risk of re, serious injury, or
death.
3
Welcome & Congratulations
Congratulations on the purchase of your Nectre Wood-Fired Oven! By
cooking with wood you’re helping to conserve energy.
Wood is an important renewable energy resource. Please do your part
to preserve our wood supply. Plant at least one tree each year. Future
generations will thank you.
Please carefully read and save these instructions.
CAUTION: Read all instructions and warnings carefully before
starting installation. Failure to follow these instructions may result in a
possible re hazard or serious injury and will void the warranty.
Please record your model and serial numbers below for future
reference: model and serial numbers can be found on the Model and
Serial Number Label of your wood- red oven.
NO NEED TO RETURN TO THE STORE
Questions with operation or assembly? Require Parts Information?
Product Under Manufacturer’s Warranty?
Contact us at: www.dimplex.com/customer_support
For Troubleshooting and Technical Support
OR Toll-Free 1-888-346-7539
Monday to Friday 8:00 a.m. to 4:30 p.m. EST
Please have your model number and
product serial number ready. (See above)

4 www.nectre.com/usa-nectre
CAUTIONS & WARNINGS
For use with solid wood fuel
only – preferable dry, seasoned
cord wood.
① Hot while in operation. Keep
children, clothing and furniture
away. Contact may cause skin
burns.
② Do not install in a mobile home.
③ Do not burn garbage or
ammable chemicals or uids
such as gasoline, gasoline-
type lantern fuel, kerosene,
charcoal lighter uid, naphtha,
engine oil, or similar liquids to
start or ‘freshen up’ a re in
this oven. Some of these fuels
can generate deadly carbon
monoxides. Keep all such liquids
well away from the oven while it
is in used.
④ Do not connect to any air
distribution or duct system.
⑤ Do not elevate the re by use of
a log cradle or grates. Build re
directly on a 1 inch layer of ash
spread evenly over the base of
the rebox.
⑥ Do not store fuel underneath
the oven, within the specied
installation clearance areas, or
within the space required for
charging and ash removal.
⑦ Always close the door after the
ignition. Leaving door open
can cause smoke spillage
and ames to come out of the
oven and create dangerous
and possibly life threatening
situations.
⑧ Normal operation of the
oven will result in momentary
emissions of smoke into the
room when the refueling door
is opened and closed. It is
always recommended to install
strategically placed smoke
detectors away from the oven
and to have a re extinguisher
in a convenient location. Make
sure that they are not inuenced
by small and normal wisps of
smoke that can come out of the
oven at the ignition or refueling
but close enough to provide
safety.
⑨ Never over re your oven. If any
part of the oven starts to glow
red, over ring is happening. To
correct over ring adjust the air
intake control to a lower setting.
⑩ Never put wood above the
rebrick lining of the rebox.

5
SAVE THESE INSTRUCTIONS
CAUTIONS & WARNINGS
CAUTION
DO NOT OPEN
NO USER-SERVICEABLE PARTS INSIDE

6 www.nectre.com/usa-nectre
Installation
Before Installation
After unpacking, check that the
following parts are included inside
the wood-red oven.
• 2 side bafes
• Handle for air control
• Lifter for cook plates
• Allen key for adjustment
of top air discharge
Assembling your Nectre
Wood-Fired Oven
The Nectre N550 Wood-Fired Oven
comes mostly assembled, however
some parts may need adjusting /
to be added before ring the stove.
It is important that the following
components are used ensure
compliance.
Installing the by-pass
damper
1. Before installing the ue, the
by-pass damper handle must
be tted. The handle is supplied
inside the rebox. Insert the
threaded end of the handle into
the 10 mm (0.40”) hole on left
side of the oven.
Looking down through the ue
spigot locate the threaded end of
the handle with the extended nut
attached to the by-pass damper.
Screw the handle all the way into
the nut until tight.
2. The position of the handle should
be at approximately 11 o’clock
when the damper is open, and
1 o’clock when the damper is
closed.
!
NOTE: Do not alter the damper
adjustment range to increase ring
for any reason.
Installing re bricks
The oven comes with 4 re bricks
9" x 4½" x 1½" (230 mm x 115
mm x 38 mm), a 19" (480 mm)
long brick retainer as well as two
triangular bricks 2" x 2 ¾" x 10"
(50 mm x 70 mm x 250 mm) for the
front. Refer to Figure 1.
Place the four re bricks upright, up
against the rear wall of the rebox.
Place the U-shaped brick retainer
over the top of the bricks such that
the bricks t inside the U-section.
This will hold them in place. Place
the triangular rebricks at the front
of the rebox beneath the door
opening.
Figure 1
Rear
rebrick
Brick retainer
Triangular
rebrick
Firebox side
shield
7
Installation
!NOTE:
The rebricks may
already be in place upon arrival of
your wood-red oven.
!NOTE:
The triangular re bricks
are siliconed in place for transit. After
initial use the silicon will break down
and they bricks can be removed.
Remove the side bafes by lifting
upand away from the wall prior to
removing triangular bricks
Installing bafe plate
1.
The oven comes with a 10" x
12 ¾" x 6" (250 mm(d) x 325
mm(w) x 150 mm(h) mm) bafe
plate. This rests on the two lugs
welded to the inside front of the
rebox and on the brick retainer at
the back of the oven.
2.
Position the bafe plate vertically
towards the rear of the rebox
with the 4" (100 mm) strip welded
to the bafe at the top facing
forward. Bring the top edge
towards the front of the oven so
that it slides up and over the two
support lugs with the 4" (100 mm)
strip located between them. Raise
the lower rear edge of the bafe
plate to rest on top of the brick
retainer.
3.
With the bafe plate in its correct
position, ensure it is pushed all
the way back so that it doesn’t fall.
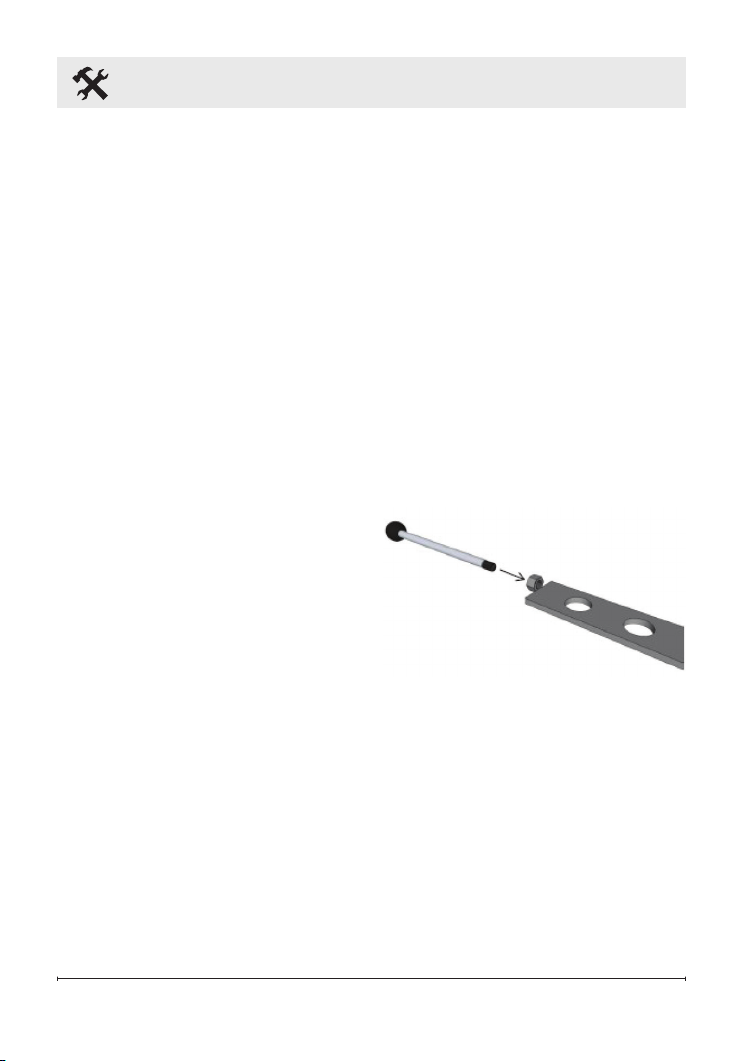
Figure 2 Top air control rod installation
Installing top air control rod
A stainless-steel rod with a thread at
one end and black knob on the other
will have been supplied in the oven.
Pass the threaded end of the rod
through the hole near the top front
corner on the left side of the oven.
Push the rod through until one can
feel it has located the nut on the air
slide, then screw rod until tight. Refer
to gure 2. Check that the rod slides
freely back and forth.
8 www.nectre.com/usa-nectre
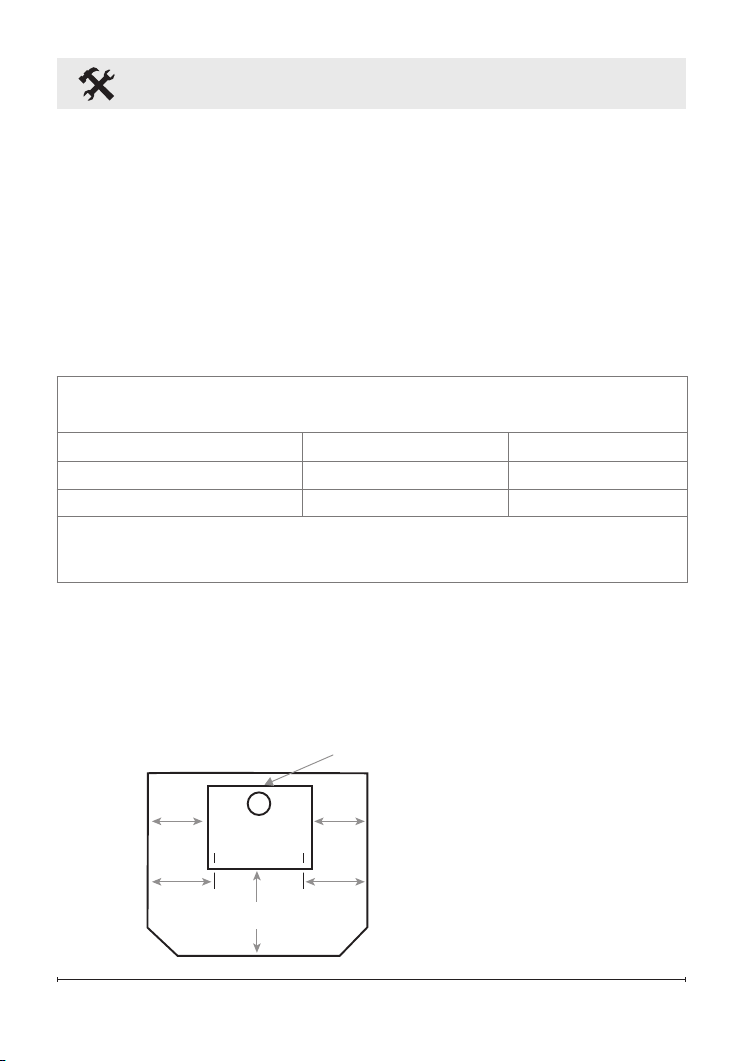
Installation
Figure 3
Non-combustible oor protector requirements
8" (200mm) - Canada
STOVE
TOP
DOOR
8" (200mm) -
Canada
8" (200mm) -
Canada
8" (200mm)
- USA
8" (200mm)
USA
Installing the oor protector
The oven must be placed on a
non-combustible oor protector with
an R-value of 2.12 or greater. For
multiple layers, add R-values of
each layer to determine the overall
R-value. When manufacturers
provide a k-factor or C-factor for the
In the USA, the oor protector must extend 8" (203 mm) beyond each side
of the ue loading door and 16" (406 mm) to the front. In Canada, the oor
protector must extend 8" (203 mm) beyond each side and the back of the
appliance and 18" (457 mm) to the front. Refer to gure 3.
Figure 2 - R=1/C EXAMPLE:
If the oor protector is 4" brick with a C-factor of 1.25, over 1/2" mineral
board with a “k” factor of 0.29, the total R-value of the system (R
total
) is:
4" brick C = 1.25 R
brick
= 1/1.25 = 0.8
1/2" mineral board K = 0.29, R
mineral
= 1/0.29 x 0.5 = 1.724
R
total
= R
brick
+ R
mineral
R
total
= 0.8 + 1.724 = 2.524
In this example, the R-value is greater than 2.12 required and therefore this
oor protector is a suitable combination that provides the required thermal
protection.
material, you will need to convert
these to the R-value.
The following equations can be
used to convert these factors to the
R-value:
• k-factor, is given with a required
thickness (T) in inches: R=1/k x T
• C-factor, is given:
In a rear vent
installation, the oor
protection must also
extend under the
stove pipe/chimney
connector and a
minimum of 2"
(51 mm) beyond
each side.
18" (457mm) - Canada
16" (406mm) USA

9
Positioning your
wood-red oven
STANDARD INSTALLATION
CLEARANCES
One of the main necessary
precautions when installing a wood
red oven is to leave sufcient space
between the oven (top, sides, back,
front, and under stove pipes) and
any other material that can catch re.
It is extremely important that
you respect required installation
distances and that you respect local
installation regulations. This is for
your safety! The manufacturer is
not responsible for the product, if
it is not installed following these
recommendations. The following
clearances may only be reduced by
means approved by the regulatory
authority.
A combustible surface is anything
that can burn (i.e. sheet rock, wall
paper, wood, fabrics etc.) These
surfaces are not limited to those that
are visible and include materials
that are behind non- combustible
materials. If you are not sure of the
combustible nature of a material,
consult your local re ofcials.
Installation
Figure 4
a) Parallel installation b) Corner installation
A D C45°
F
B
E
Table 1
Clearances to combustible surfaces
Description Dimension (in) Dimension (mm)
A – Back Wall to Flue Pipe 12.5" 318 mm
B – Side Wall to Flue Pipe 22.5" 572 mm
C – Wall to Flue Pipe 15" 381 mm
D – Back Wall to Appliance 10" 254 mm
E – Side Wall to Appliance 12" 305 mm
F – Wall to Appliance 5" 127 mm
– Ceiling to Appliance Top 51" 1296 mm
10 www.nectre.com/usa-nectre
Installation
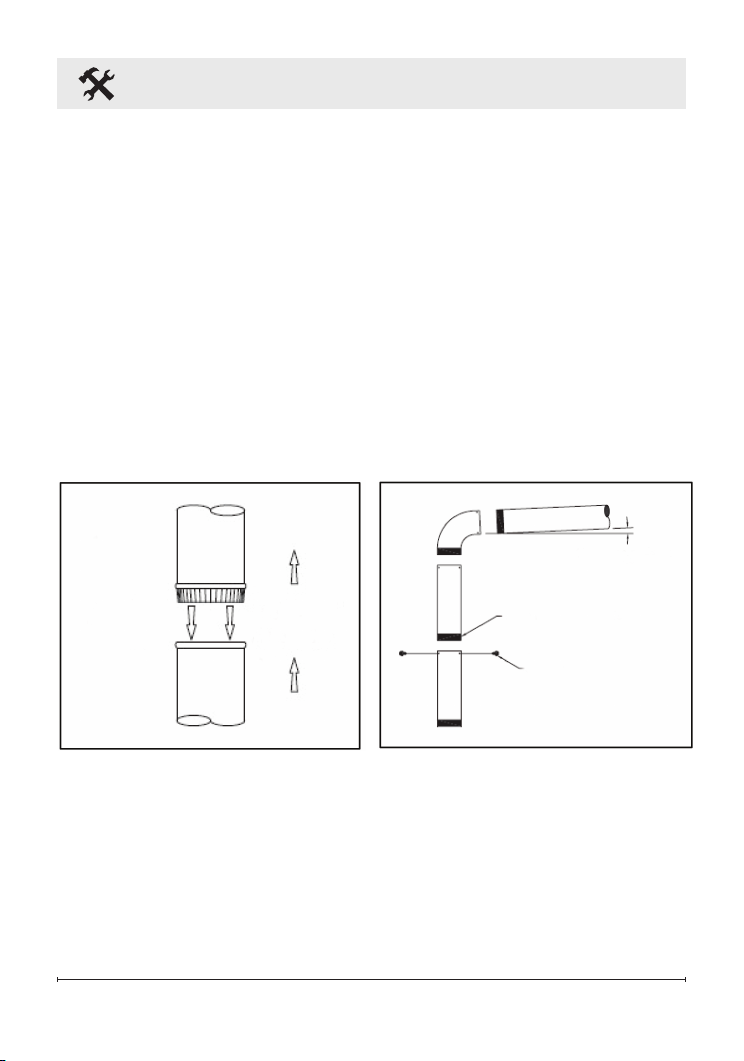
Chimney connection
The chimney connector is a single walled pipe used to connect the oven to
the chimney. For use with the N550 Wood-Fired Oven the chimney connector
MUST be 6" (152 mm) in diameter, with a minimum thickness of 24-gauge
black steel or 26-gauge blued steel. The chimney connector must be suitable
for solid fuel, in good condition, and kept clean.
Aluminum or galvanized steel pipe is not acceptable for use with the
N550 Wood-Fired Oven. These materials cannot withstand the extreme
temperatures of a wood re and can give off toxic fumes when red.
!NOTE: Do not use the connector pipe as a chimney.
Each chimney connector or ue pipe section must be installed to the oven
ue collar and to each other with the male (crimped) end toward the oven,
as per Figure 5A. Attach each of the sections to one another with three
equidistant metal screws, as per Figure 5B.
Table 5
a) Chimney connection b) Flue pipe attachment
Install crimped
end towards
stove
Flow Direction
of
Flue Gases
Male Part Downwards
1/4" slope per foot
3 screws

11
Installation
This prevents any amount of
condensed or liquid creosote from
running down the outside of the pipe
or the oven top. All joints, including
the ue collar connection must be
secured with three sheet metal
screws to ensure that the sections
do not separate.
For the best performance, the
chimney connector should be as
short and direct as possible, with
no more than two 90° elbows.
The maximum horizontal run is
36" (915 mm) and a recommended
total length of ue pipe should not
exceed 10' (3.0 m). Always slope
horizontal runs upward ¼" per foot
toward the chimney.
No part of the chimney connector
may pass through an attic, roof
space, closet, other concealed
space or through a oor or ceiling. All
sections of the chimney connectors
must be accessible for cleaning.
Where passage through a wall or
partition of combustible construction
is desired, the installation must
conform to NFPA 211 or CAN/
CSA-B365, and is also addressed in
this manual.
Chimney requirements
WARNING: Do not connect this
wood-red oven to a chimney ue
serving another appliance.
WARNING: Do not connect to
any air distribution or duct system.
This oven must be connected to a
6" (152 mm) factory built UL 103 HT
chimney (ULC S629, in Canada) or
a code - approved masonry chimney
with a ue liner.
An effective vapor barrier at the
location where the chimney or
component penetrates to the exterior
of the structure must be maintained
as per the installer’s complying
method.
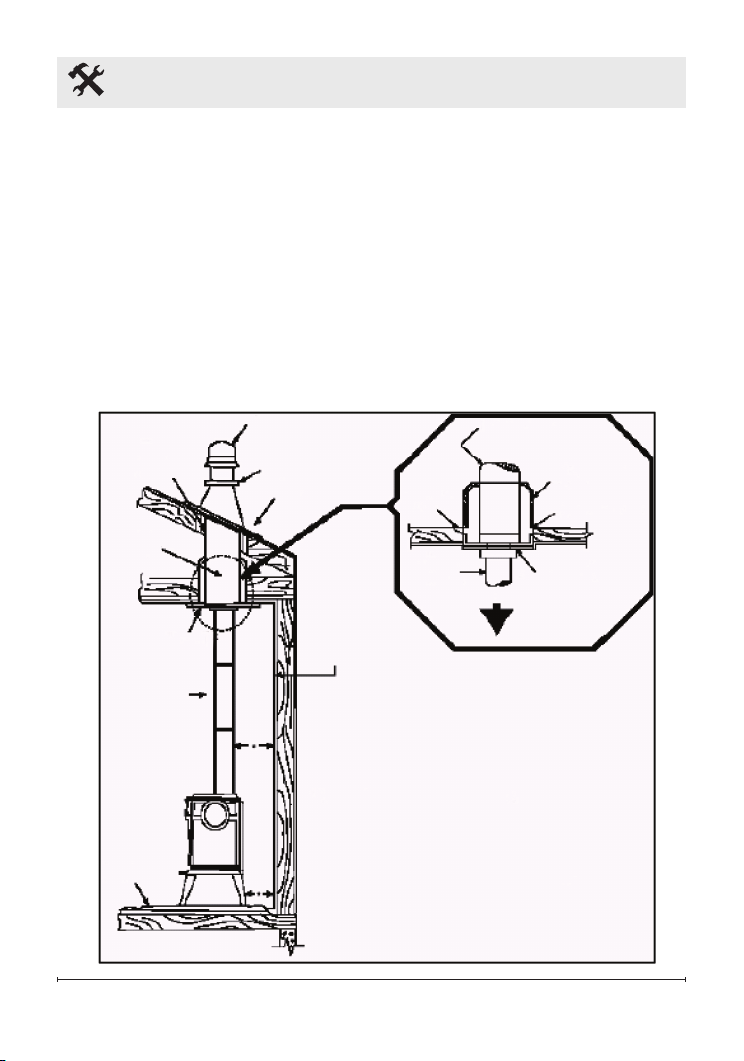
12 www.nectre.com/usa-nectre
Installation
Listed Chimney
Attic Insulation
Shield
Specied
Clearance
Ceiling
Support
To Stove
Chimney
Connector
Combustible
Ceiling
Joists
Storm Collar
Flashing
Listed Cap
Maintain 1"
Clearance
Floor
Protector
Chimney
Ceiling Support
Listed Chimney
Combustible
wall
*Refer to
Clearances to
Combustibles
Figure 6 Factory built chimney requirements
Factory Built Chimney
When a metal prefabricated chimney is used, the manufacturer’s installation
instructions must be followed. You must also purchase (from the same
manufacturer) and install the ceiling support package or wall pass-through
and “T” section package, restops (where needed), insulation shield, roof
ashing, chimney cap, etc. Maintain proper clearance to the structure as
recommended by the manufacturer. The chimney must be the required
height above the roof or other obstructions for safety and proper draft
operation. See below for chimney termination requirements.
13
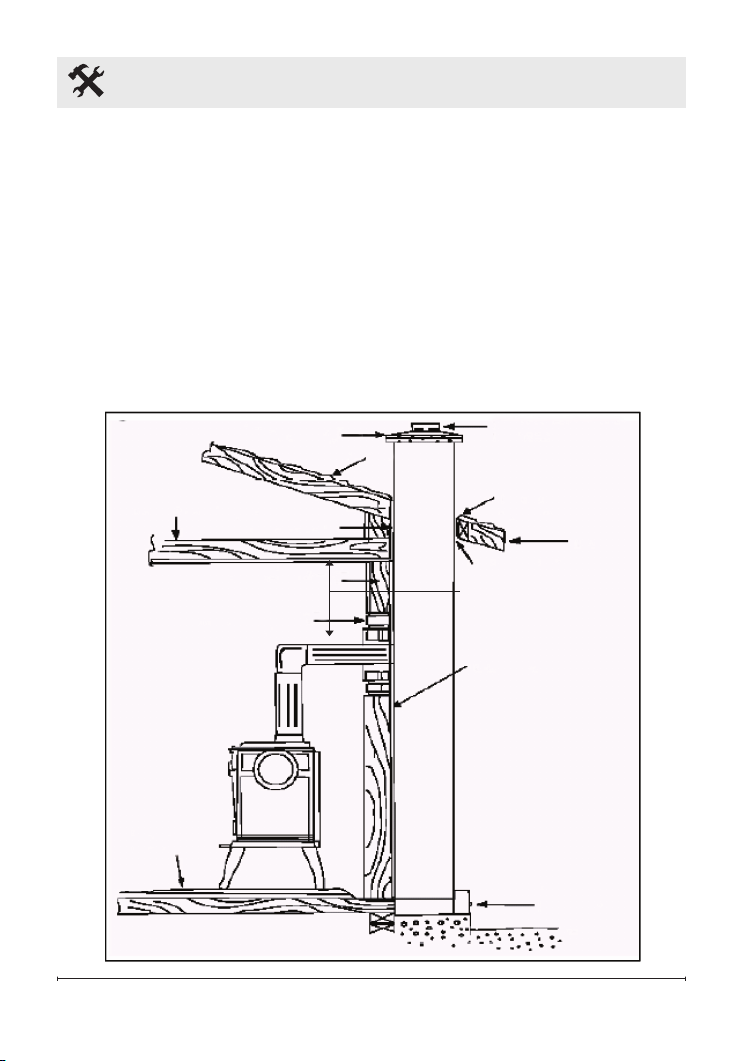
Masonry Chimney & Fireplace
When a metal prefabricated chimney is used, the oven may also be
connected to a masonry chimney, provided the chimney complies with the
construction rules found in the building code enforced locally. To ensure
that a masonry chimney meets the minimum standards of the National Fire
Protection Association (NFPA) it should be inspected by a professional to
make sure there are no cracks, loose mortar or other signs of deterioration
and blockage. Also have the chimney cleaned before the oven is installed
and operated.
Installation
Flashing
Eave
Clearance
18" minimum
Sheathing
Floor
protection
Thimble -
12" of brick
Combustible wall
Ceiling joist
Concrete cap
Rafter
Fireclay ue
liner with
airspace
Airtight
clean
door
Figure 7 Masonry chimney requirements
14 www.nectre.com/usa-nectre
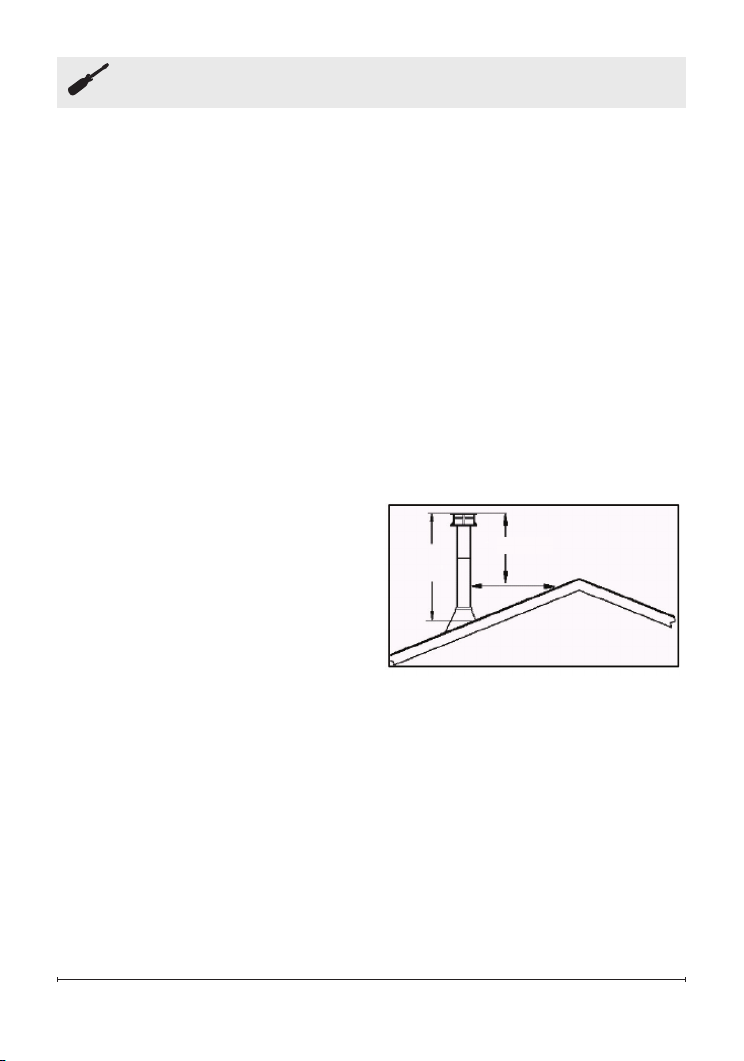
Installation
Chimney Height
A masonry chimney or a listed
factory-build chimney must be the
required height above the roof and
any other nearby obstructions. The
chimney must be at least 3' (914
mm) higher than the highest point
where it passes through the roof and
at least 2' (610 mm) higher than the
highest part of the roof or structure
that is within 10’ (3050 mm) of the
chimney, measured horizontally.
Refer to Figure 8.
When connecting the oven through
a combustible wall to a masonry
chimney, special methods are
needed. Refer to gure 7. The
chimney must have either a clay liner
or a suitably listed stainless steel
liner. If the masonry chimney has
a square or rectangular liner that is
larger in cross sectional area than a
round 6" (152 mm) ue, it should be
relined with a suitably listed
6" (152 mm) stainless steel liner.
Do not downsize the ue to less
than 6" (152 mm) unless the venting
system is straight and exceeds
25ft (7.6 m) in height. When passing
through a combustible wall, the
use of an insulated listed thimble is
required.
There are listed kits available to
connect an oven to a masonry
replace. The kit is an adapter
that is installed at the location of
the replace damper. The existing
damper may have to be removed to
allow installation.
Figure 8 Chimney height requirements
3' Min.
2' Min.
Ridge
2-10-3 RULE
10'

15
Installation
Oven Dimensions
Figure 9 Dimensions for installer
Residential installation
for Standard Clearance’s
Adjacent wall
Adjacent wall
Back wall
Sidewall
A
B
E
DC
F
45
o
N350 N550
A .. 10.5" (26.7 cm) 12.5" (31.75 cm)
B .. 18" (45.7 cm) 22.5" (57.1 cm)
C .. 15" (38.1 cm) 15" (38.1 cm)
D .. 8" (20.3 cm) 10" (25.4 cm)
E .. 10" (25.4 cm) 12" (30.5 cm)
F .. 6.5" (16.5 cm) 5" (12.7 cm)
Internal Dimensions
Firebox Oven
18.7" (47.5 cm) 19" (48.3 cm)
11.4" (29.0 cm) 12.6" (32.0 cm)
11.8" (30.0 cm) 10" (25.4 cm)
Internal Dimensions
Firebox Oven
13.5" (34.3 cm) 14" (35.6cm)
12.0" (30.0 cm) 13.5" (34.3 cm)
12.5" (31.8 cm) 11" (28.0 cm)
21-5/8"
(54.8 cm)
34"
(86.3 cm)
33"
(83.8 cm)
32-5/8"
(82.8 cm)
27-1/4"
(69.0 cm) 22-1/4"
(56.4 cm)
13-5/8"
(34.5 cm)
5-1/2" (13.7 cm)
2"
(5.1 cm)
26-5/8"
(67.5 cm)
19-3/4"
50.0 cm)
1.5"
3.6 cm)
11"
(27.9 cm)
5-1/2" (14.0 cm)
21"
(53.3 cm)

16 www.nectre.com/usa-nectre
Operating Instructions
Cooking
1. The Nectre Wood-Fired Oven
has the rebox at the top and
the oven below. Heat is directed
around the oven by closing the
damper located next to the ue
outlet.
2. Before lighting your Nectre
Wood-Fired Oven ensure that
the damper control is properly
located so that it closes and
swings open. The damper is
open when the control lever is in
the down position and closed in
the up position. Also ensure that
the steel inspection panel in the
bottom of the oven is in place
(not to be confused with the oven
tray).
3. To light your cooker, rst make
sure that the damper is open
and the air spindle control (the
spindle control is opened and
closed to control the rate of
burn) on the rebox door is also
open to its full extent. Light a re
using nely chopped wood and
establish it so that it has plenty
of ames. As soon as the re is
going briskly, close the damper.
This directs the ames and the
ue gases down the sides and
around the oven. Keep the re
burning briskly until the oven is
up to temperature.
!NOTE: The temperature
gauge on the oven door is only
a guide to the temperature in the
oven. We have found that when
the gauge is reading 100° Celsius
(212° Fahrenheit), the internal
oven temperature is more like
180° Celsius (356° Fahrenheit). It
is always recommended to use a
meat thermometer when cooking.
4. To add more fuel to the re, it is
advisable to open the damper
before opening the door. When
the rebox is loaded, close the
door and then close the damper.
This will help prevent smoke from
entering the living space.
5. For cooking, always have a brisk
re using small pieces of wood
that provide plenty of ames.
This type of re will maintain the
oven temperature. For longer
burn time, larger pieces of wood
can be used and the spindle
control closed off. The oven
temperature will drop when in
this mode of operation.
6. Your Wood-Fired Oven come
with two removable rings for
stove top cooking. Remove
the rings to use as a burner to
cook additional foods in woks or
pots suitable for wood burning
applications (contact your dealer
for more information).

17
Operating Instructions
Fueling
LOADING SUGGESTIONS
1. Once you have obtained a good
bed of embers, you should
reload the unit. In order to do so,
open the air controls to maximum
a few seconds prior to opening
the stove’s door. Then proceed
by opening the door very slowly;
open it one or two inches
(25-50 mm) for 5 to 10 seconds,
before opening it completely
to increase the draft and thus
eliminate the smoke which
is stagnant in a state of slow
combustion in the rebox. Then
bring the red embers to the front
of the rebox and reload the unit.
Be careful when operating the
Nectre Wood-Fired Oven with the
door open as coal or ash may
escape the rebox.
2. For optimal operation of your
wood-red oven we recommend
you to operate it with a wood
load approximately equivalent
to the height of re bricks. Avoid
wood from coming in contact with
glass. Also avoid over ring the
oven and burning volatile fuels
as this is unsafe and will void
warranty.
Ventilation Suggestions
It is important to note that wood
combustion consumes ambient
oxygen in the room. In the case of
negative pressure, it is a good idea
to allow fresh air in the room, either
by opening a window slightly or by
installing a fresh air intake system
on an outside wall.
WARNING: do not alter the
damper adjustment range to
increase ring for any reason.
Maintenance
DISPOSAL OF ASHES
Ashes should be removed from
the rebox every few days or when
ashes get to 2 to 3 inches deep.
Always empty the rebox when it
is cold. Ashes should be placed
in a metal container with a tight-
tting lid. The closed container
of ashes should be placed on a
noncombustible oor on the ground,
well away from all combustible
materials, pending nal disposal.
If the ashes are disposed of by
burial in soil or otherwise locally
dispersed, they should be retained
in the closed container until a
cinders have thoroughly cooled.

18 www.nectre.com/usa-nectre
Operating Instructions
CREOSOTE – FORMATION &
NEED FOR REMOVAL
1. When wood is burned slowly, it
produces tar and other organic
vapors, which combine with
expelled moisture to form
creosote. The creosote vapors
condense in the relatively cool
chimney ue of a slow- burning
re. As a result, creosote residue
accumulates on the ue lining.
When ignited this makes an
extremely hot re.
2. To prevent creosote build-up:
• Always burn dry wood. This
allows clean burns and
higher chimney temperatures,
therefore less creosote deposit
• Leave the air control fully open
for about 5 minutes every time
you reload the oven to bring
it back to proper operating
temperatures. The secondary
combustion can only take place
if the rebox is hot enough
• Always check for creosote
deposit once every two months
and have your chimney cleaned
at least once a year
3. The chimney connector and
chimney should be inspected
at minimum every two months
to determine if a creosote
buildup of 3 mm (0.1") or more
has occurred. If creosote has
accumulated it should be
removed to reduce the risk of a
chimney re.
The sides of the oven will also
need to be inspected and
potentially cleaned every two
months. To achieve this the
cooktop hotplates need to be
removed so that the sides of the
oven can be scraped. The bottom
plate of the oven will then need to
be removed in order to collect the
loose creosote.
Inspection & Cleaning
1. It is important to establish a
routine for the fuel, wood burner
and ring technique. Check
daily for creosote buildup. Be
aware that the hotter the re
the less creosote is deposited,
and weekly cleaning may be
necessary in mild weather even
though monthly cleaning may be
enough in the coldest months.
Contact your local municipal
or provincial re authority for
information on how to handle
a chimney re. Have a clearly
understood plan to handle a
chimney re.
2. Apart from removing creosote
buildup within the oven, the only
other maintenance required for
the Nectre Wood-Fired Oven is
to ensure that the door assembly
components are well maintained.

19
Operating Instructions
3. The glass on the rebox and
oven door can be cleaned with a
ne grade steel wool and water.
You MUST use ne grade steel
wool as medium or coarse steel
wools can scratch and damage
the glass. It is not advisable
to use a cleaner that contains
caustic and abrasive cleaners.
Do not clean with alcohol based
cleaners.
4. Ensure that the door seals are
well maintained; kept in good
working condition.
5. Depending on quality of
maintenance your unit may show
signs of rust (corrosion) on the
body of the unit. To correct this
sand the affected area and paint.
Replacing Glass
1.Inspect and clean the glass
regularly in order to detect any
cracks. If you spot one, allow
the re to go out and the stove
to cool before repairing. Never
wash the glass with a product
that may scratch the glass. Use
a specialized cleaning product
available from your dealer. The
glass should be washed only
when the stove is cold to facilitate
good operational practices.
2. Do not abuse the glass door by
striking or slamming shut. Do
not use the stove if the glass is
broken. If the glass on your stove
breaks, replace only with the
same 5 mm (0.2”) ceramic glass
supplied from your dealer. Never
substitute other materials for the
glass.
3. To replace the glass, remove
the screws retaining the glass
moldings inside the door.
Remove the moldings and
replace the damaged piece
with a new one. Perform the
procedure backwards after
replacing. When replacing the
glass, you should change the
glass gasket to make sure you
keep it sealed.

20 www.nectre.com/usa-nectre
Warranty
Glen Dimplex Americas Ltd. (Glen Dimplex Americas herein) warrants this
wood-red oven to be able to operate under normal use and service and
within 10 years from date of the original purchase on the terms herein shall
repair or replace without cost to the original customer any part thereof
which shall be returned to our factory which our inspection shows would
prevent operation (transportation charges prepaid). This warranty does not
apply to rebricks, brick retainer, bafe, door seal, glass nor discoloration
of the surface or tarnishing of gold ttings all of which require normal
service to maintain them.
Under the terms of this warranty, Glen Dimplex Americas assumes no
responsibility for the labor costs involved in removing or replacing the
stove. Nor shall Glen Dimplex Americas be liable for any injury, loss,
or damage (direct, indirect, or consequential) arising out of the use or
inability to use the product, or its removal and replacement. All other oven
warranties, expressed or implied are excluded to the extent possible at
law. Consumers also have rights under relevant State and Commonwealth
Laws.
The Retailer does not have the authority to alter this warranty. For further
information please contact Glen Dimplex Americas.
Other manuals for N550
2
This manual suits for next models
1
Table of contents
Languages:
Other Nectre Fireplaces Oven manuals

Nectre Fireplaces
Nectre Fireplaces N550 Instruction Manual

Nectre Fireplaces
Nectre Fireplaces Big Bakers User manual

Nectre Fireplaces
Nectre Fireplaces Baker's Oven User manual

Nectre Fireplaces
Nectre Fireplaces Baker's Oven User manual

Nectre Fireplaces
Nectre Fireplaces NBO Manual

Nectre Fireplaces
Nectre Fireplaces Baker's Oven Manual

Nectre Fireplaces
Nectre Fireplaces Big Bakers User manual

Nectre Fireplaces
Nectre Fireplaces N550 User manual

Nectre Fireplaces
Nectre Fireplaces Baker's Oven Manual


