Necvox Premium Series User manual
Premium Series User Manual
Copyrights 2014 all rights reserved by

Thank you for choosing the car audiovisual navigation system of our company!
When you use this product, please read all the information attached with it, this manual is introduced all the functions
of audiovisual navigation system, so that you can facilitate the process easier. Through it, you can obtain information
about products introduction, operation methods, make sure the operation is more convenience.
The display picture example of manual referenced may be a little different from the actual picture.
The display contents of this manual may be a little different with the actual content.
If any parameters change when products continue to update and upgrade their functions, will be added to make
without notice. Any problem please check the details with the agent, thank you for your support and cooperation!
NOTE:The information of this manual protected by copyright, any part of it without company prior written permission is not permitted
in any way to copy and photocopy. The Company reserves the final explanation about three guarantees warrant and relative informati-
on in this manual.
Foreword
Before contacting with your agent, always check https://www.necvox.com.tr/product.aspx?sID=943 to search for
updated info about your product.

Warning
In order to avoid accidents, a possible violation of applicable law, do not use other function as purposes
expect navigation when driving. In some areas, it is illegal for the drivers or other people in car to watch
the images of the display.
1) Read the Manual
2) Take good care of the manual for future use.
3) To comply with all the warning and notice of this manual.
4) To comply with all operating instructions.
5) Regarding the power supply, please refer what the
manual stated.
6) The installation and wiring distribution of this product
needs specialized skills and experience. To ensure safety,
commissioned by professional technicians for installation
and wiring.
7) There is not any parts attached with the products for user
to repair and replace, please ask the professional technici-
an with qualification of maintenance to repair and replace.
8) Ventilation: Do not plug any ventilation cooling vents, the
local shell holes and other openings are for ventilation of
heat. In order to ensure machine works stable and reliable,
long service life, not to plug the hole cooling, ventilation
environment must be maintained to avoid overheating the
machine caused by smoking, fire or other danger.
9) Avoid heat source: Heat source should be avoided and
products will be not installed on local exposure to direct
sunlight, high temperature areas; to be away from heat
sources, such as heating, heaters, heat or have other things
(including magnifier).
10) Avoid Water or Moist: Device should avoid water or
moist, do not let this machine being exposed to rain or
moisture in the environment (as when rain and car washing)
In order to avoid any injury or property damage of the user or other persons, please be sure to read in details and
abide the following notice item.
Notice for safety items
1

2
15) Appear in the following situations, please turn off the
local power supply in time, and contact with professional
technician.
A. When the power wire or connector damaged.
B. When the machines were splashed with liquid or when
the entry of foreign matter;
C. When the machine has been rained or moisture attack;
D. When the machine crashed from a height or as a result
of abnormal operation or unreasonable damage caused.
16) LCD Display: do not let the machine decline to avoid
LCD screen fragmentation, if so, when the outflow of liquid
crystal, do not touch the liquid crystal, so as not to be
harmed. Do not heat the liquid crystal display or scratching
LCD with sharp objects, touch panel is also susceptible to
scratching. The effective pixel of LCD screen is more than
99.99 percent, but 0.01 percent of the pixels could lighten
normally.
to avoid the internal machinery of the short circuit caused
the fire, electric shock or other danger.
11) Cleaning: before cleaning machines have to shut down
power, and then wipe panel Do not use volatile chemicals
(such as gasoline or thinner) to clean panel.
12) Avoid the matter or water into the device. to prevent
foreign matter or liquid into the inside of the machine, do not
insert the foreign body from the cooling hole or other
opening into the machine. If you insert foreign bodies may
cause electric shock, machine parts within a short circuit
caused the fire, such as the risk of electric shock.
13) Do not install the unit to the truck, frame, tripod, bracket
or table without the manufacturer's recommendations,
should be installed on the install fittings which come with
machines. When used in the car, pay more attention to firm
the installation of this machine, avoid the machine falling
down because of the sudden brake and resulting in
personal injury.
14) Do not operate the machine in the event of rain or
lightning for a long time, have to cut off the machine power.

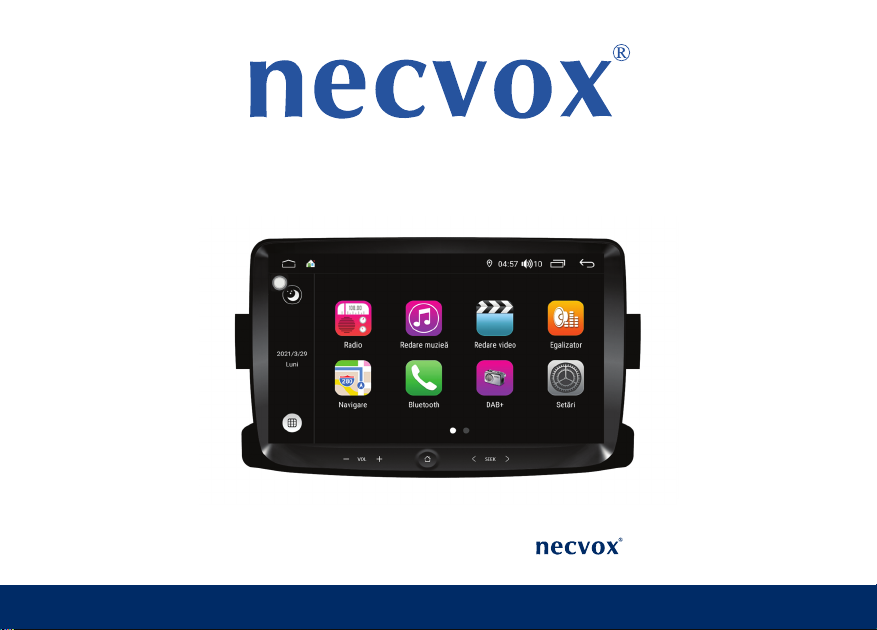
Main Menu
You can switch between main menu pages by sliding left and
right. In order to change position of icons, long press on them
and drag where you want.
1) Switch to main menu. When you press it in any sub-menu, it
backs to main menu. If music is playing, it continues.
3) Press it to enter radio function.
4) Press it to enter music player.
5) Press it to enter video player.
6) Press it to show all applications running in background and
close them.
7) Press it to enter equalizer function.
8) BACK icon helps you go back to previous menu. At last, it
backs to main menu and all sounds are stopped.
9) Press it to enter application page.
10) Press it to enter navigation function.
11) Press it to enter Bluetooth phone function.
12) It shows the page which you are in.
13) Press it to enter DAB+ function.
14) Press it to enter settings page.
15) Press it to enter Easy Connection page.
16) Press it to enter Web browser page.
17) Press it to enter Magazine Play page.
18) Press it to enter File Manager function.
19) Press it to enter Calculator function.
20) Press it to enter Galery page.
3
2) Press it to adjust screen brightness
1 3 4 5 6 7 8
9 10 11 12 13 14
2
15 16 17 18
19 20

4
Radio Menu
Press “ “ icon to enter radio function.
1) Switch between LOC-DX.
2) Switch between Stereo and Mono.
3) PTY function, it is used for choose station style.
4) TA function; when it is ON, it directs to traffic announcement
stations.
5) AF alternative frequency function; when it is ON, it automati-
cally switches to another station with higher signal when your
station signal becomes weak.
6) Magnifier icon; it allows you listen each saved frequency for
few seconds. Then you can choose whichever you want.
7) It opens pop-up screen to create favourite channel list.
8) Press it to save frequency.
9) Press it to enter radio settings page. You can adjust all radio
settings and ON/OFF RDS function in this page.
10) Switch between FM and AM.
11) Backward scan icon; short press is for manual search, long
press is for auto search function.
12) In order to enter frequency manually, press there.
13) In order to scan frequency, slide it to left and right.
14) Forward scan icon; short press is for manual search, long
press is for auto search function.
15) In order to save frequency, press and hold below favourite
frequencies.
15
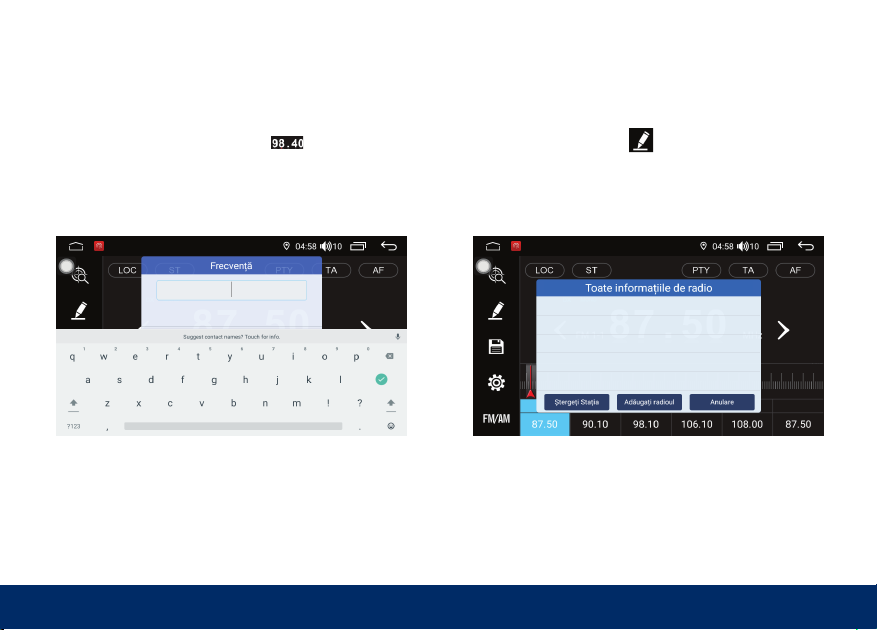
When you press current frequency “ “ icon, frequency
input keyboard will be appeared.
Enter required frequency and confirm to switch.
When you press favorite “ “ icon, you’ll enter menu as
below picture.
You can write frequency name as you want.
5
Radio Menu
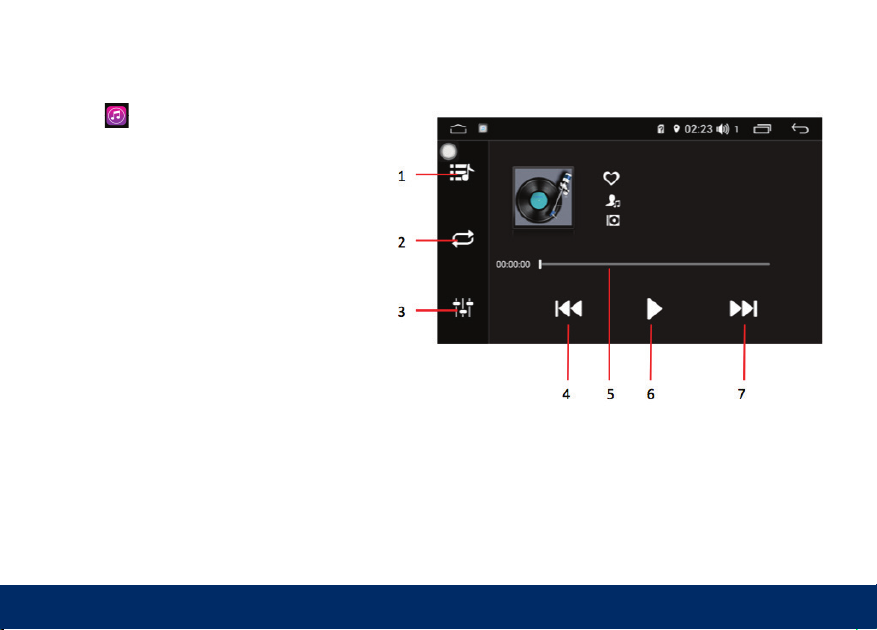
Music Player
Press “ “ icon to enter music player function.
1) List icon, it enters to page which shows all music
files.
2) Repeat and shuffle play options.
3) Press it to enter sound settings page.
4) Press it to play previous song.
5) Slide this bar left and right in order to run the song
backward and forward.
6) Play and pause icon.
7) Press it to play next song.
6

Video Player
Press “ “ icon to enter video player function.
1) List icon, it enters to page which shows all video files
and folders.
2) Slide this bar left and right in order to run the video
backward and forward.
3) Press it to play previous video.
4) Play and pause icon.
5) Press it to play next video.
6) Repeat video and repeat file options.
7) Press it to switch between full screen and small screen
options.
8) Press it to show video information screen.
7
Press “ “ icon to enter video player function.
Note: It is dangerous and forbidden to watch video
during driving. Video watch during drive option is
adjusted OFF as default by supplier company. You
are assumed full responsibility once change
settings and turn ON video watching function.

Bluetooth Main Menu
Press “ “ icon to enter Bluetooth function.
1) Press it to enter Bluetooth music page.
2) Press it to see missed, incoming and outgoing calls.
3) Keyboard icon, press it to enter to make and answer calls.
4) Phonebook icon, press it to synchronize your phonebook
with device and call person from your phonebook.
5) Press it to enter Bluetooth settings page.
6) Keyboard.
7) Press it to transfer sound from device to mobile phone or
from mobile phone to device.
8) Press it to disconnect and connect again.
9) Press it to enter page showing all available mobile
phones.
10) Answer icon.
11) Hang up icon.
8
7)
Press
from mobile phone to device.
8) Press it to disconnect and connect again.
9)
Press
Note: For better sound transfer, be sure about the
location of the microphones.
Bluetooth Phonebook
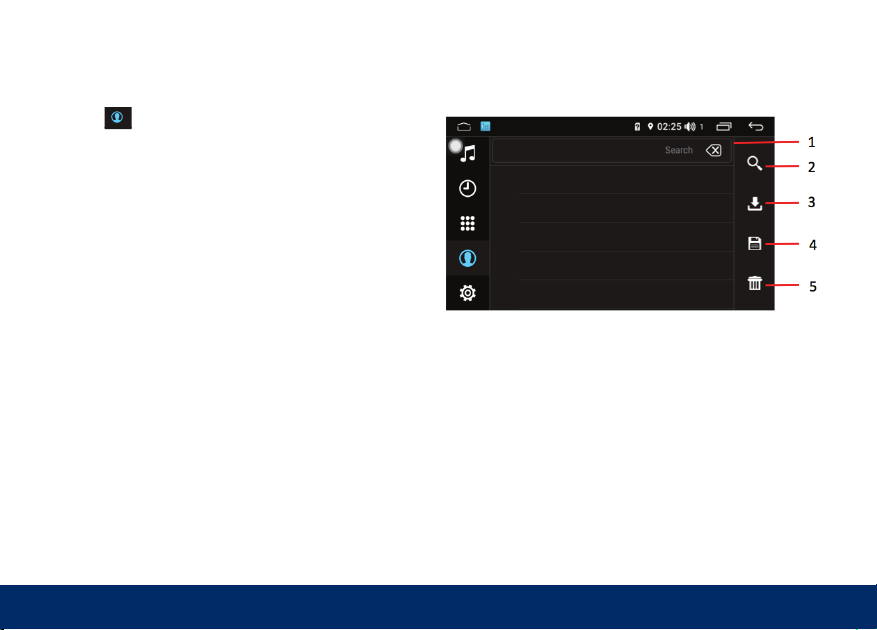
Press “ “ icon to enter Bluetooth phonebook page.
1) Press here to search names.
2) Press magnifier icon to enter name by keyboard.
3) Press it to download your phonebook to device, and please
allow for synchronization.
4) After downloading phonebook, press save icon to remember
it in next connections.
5) Press it to delete phonebook from device.
You can slide phonebook page up & down and press on name
to call it.
9

Bluetooth Pairing
You can pair mobile phone with device in two ways.
Firstly, turn ON bluetooth in mobile phone and scan for device.
When you see name of device, press it and pair. If it asks for
password, enter “0000” and press connect icon.
Secondly, press “ “ icon on device. You’ll see all available
phones around you. Press phone name you want and connect
icon.
1) Press it to disconnect.
2) Press it to start scan.
3) Press it to connect.
4) Press it to delete phone list.
10
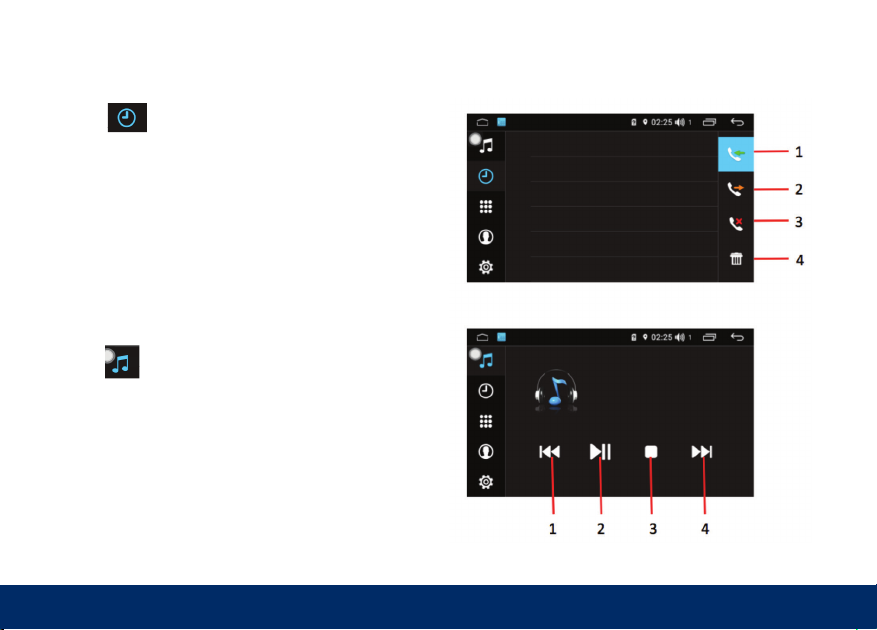
Bluetooth Call History
Press “ “ icon to enter call history page.
1) Incoming calls
2) Outgoing calls
3) Missed calls
4) Press it to delete call history
11
4) Press it to delete call history
Bluetooth Music
Press “ “ icon to enter bluetooth music function.
1) Switch to previous song
2) Play and pause icon
3) Stop icon
4) Switch to next song
12
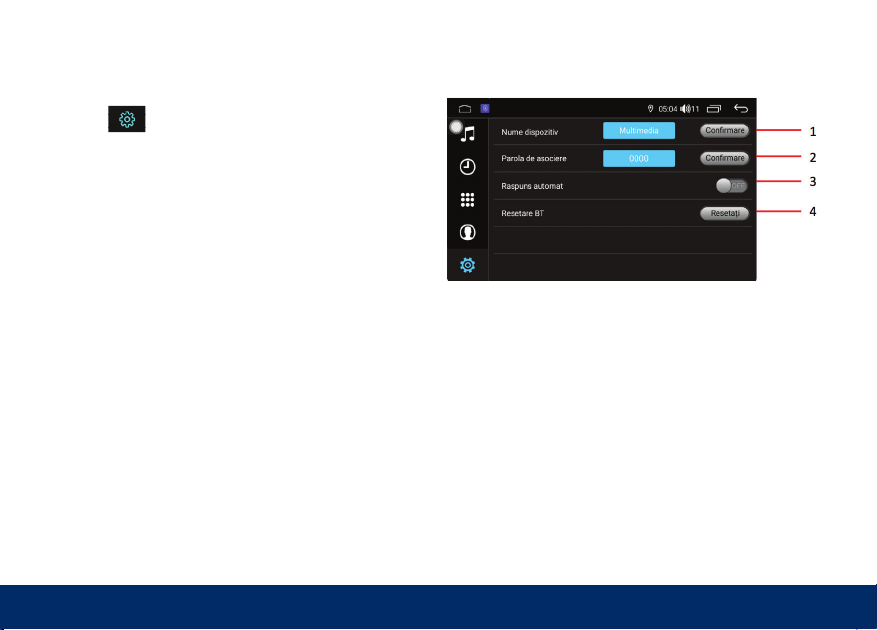
Bluetooth Settings
Press “ “ icon to enter Bluetooth settings page.
1) Change Bluetooth name
2) Change password
3) Auto answer option
4) Reset all settings

Navigation
1) New route; it enters to page where you can enter destination
address information.
2) Route with multiple destination; it enters to page where you
can enter multiple destinations.
3) Useful information; it enters menu where you can find location,
FAQ and country information.
4) Settings; it enters menu where you can find language, sound,
warning etc. settings.
5) About; you can see version and map date information.
6) Exit; press it to exit from map page.
7) Press it to see favourite addresses.
8) Press it to turn ON and OFF guide voice.
9) Press it to change zoom degree of map.
10) Press it to enter profile page and reset.
13
Note: While there is guide voice from navigation, system
stops music automatically and continue after guide voice.
Guide voice continues even if you enter different menu.
To cancel guide voice, mute sound from navigation.
7 8 9 10
1 2 3 4 5 6
Navigation
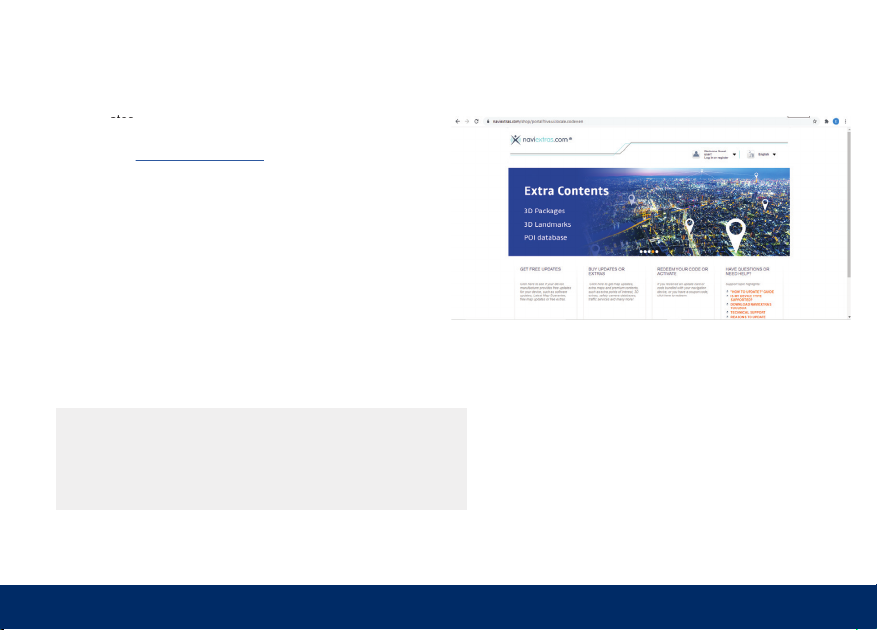
Map Updates
Please enter www.naviextras.com website for updates. Press
sign up, you’ll see device selection menu. Find ESSEGRUP tab
and your device name under it.
After sign up successfully, download Toolbox from website and
install it to your computer.
Put USB which has navigation files inside into your computer,
Toolbox will recognize it automatically and guide you about
update steps.
14
Map Updates
Map Updates
Map Updates
Note: Your device is working with IGO Next Gen navigation software.
Please check http://www.necvoxdestek.com/igo_next_gen.pdf
about all user instructions.

15
1) Click for the automatic frequency scan.
2) Click to set your favorite channels.
3) After scanning, registered channels are shown in
this screen. Click on the frequency you want to play.
4) Click on the selection in the list when you want to
make specific requency search like PTY function,
news, sports etc. and start searching.
DAB+
1
2
3
4
Note: In first installation it takes more time to be activate than
standard time. In next uses, according to the signal levels, it
may take time for DAB function to be activate. Please be
patient while waiting.
Mirrorlink
Note: Some models may not be supported because of
version differences of mobile phones. Application supplier
updates this application in time. Our company is not
responsible for problems caused by third party
applications.
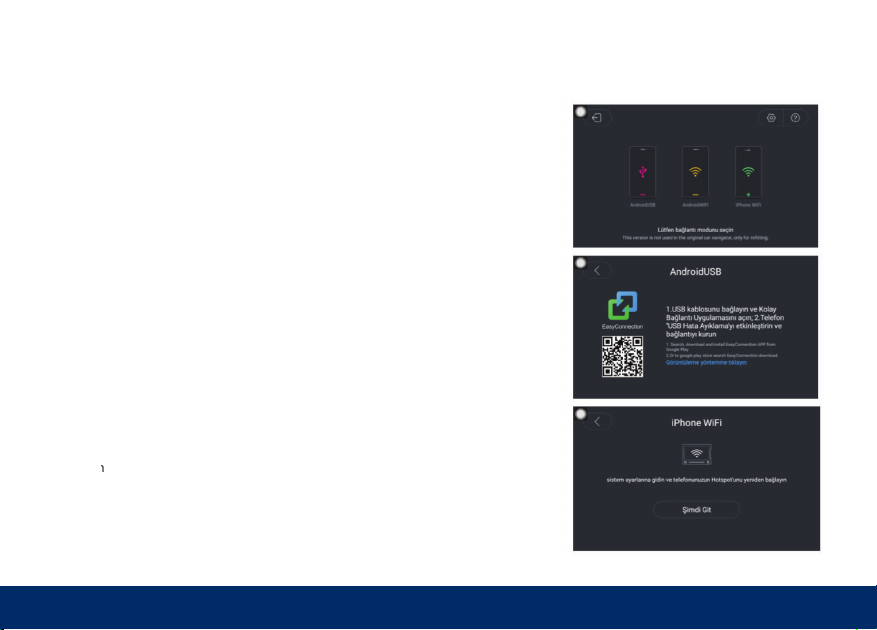
Android Phone Connection
Choose Android USB from device and download application by
scanning QR code on screen. Turn ON USB Debug function in
your mobile phone. Connect mobile phone with device by USB
cable. Choose Android USB and connection will be done
automatically.
Android Wi-Fi Connection
Connect with device via hotspot of your mobile phone. Choose
Android Wi-Fi option on device. Connect with mobile via steps
on device. During this process, you need to connect phone via
USB. After connection is done, you can take out USB.
iPhone Connection
Turn on Wi-Fi Hotspot on your mobile phone, then choose
iPhone Wi-Fi option. Choose your phone in Wi-Fi list on device
and connect. After connection is done, allow screen mirror
function on your phone.
16
on
Wi-Fi
Some
models
scanning

17
File Management
Press “ “ files icon to enter this menu.
You can do file transfers between USB and SD card. Also you
can copy your files to device internal memory in order not to keep
external flash with you.
To copy files, press box near the file name and follow instructions
appear on below part.
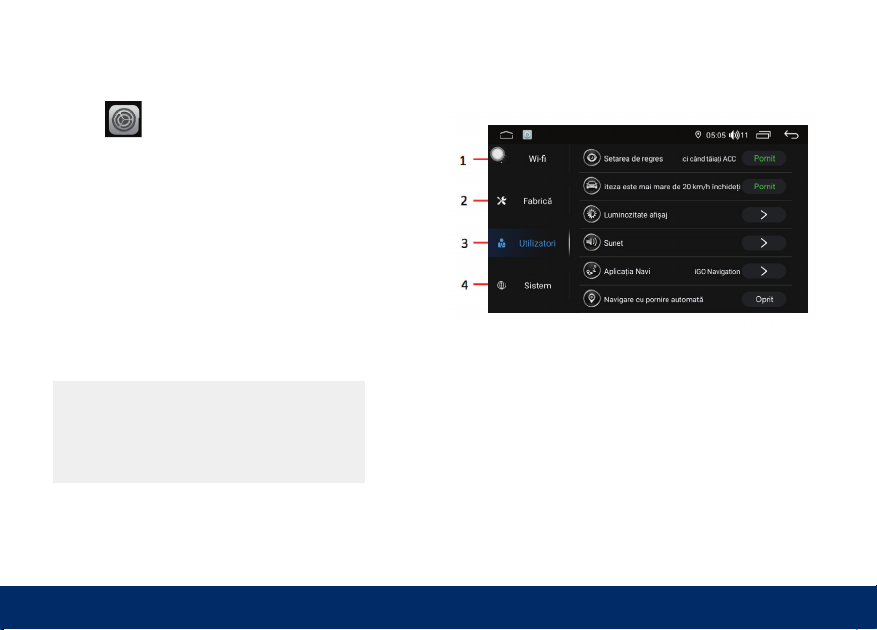
Settings
18
Press “ “ icon to enter settings page.
1) Wireless settings: You can reach Wi-Fi, data usage, sim card
and other settings here.
2) Factory settings you can reach door info, start stop function,
front camera selection, calibration settings here
3) Personal settings: You can reach sleep mode, screen light,
sound, video watching during drive, navigation, camera and
button light settings etc. here.
4) System settings: You can reach location info, security settings,
language, account info, date, time, etc. settings here.
Password is necessary for aftersales repair service.
Only for technician use.
Table of contents
Popular Car Stereo System manuals by other brands


Bosch
Bosch Blaupunkt Davos RDM 169 operating instructions

VIETA
VIETA VTC1000R owner's manual

Dual Electronics Corporation
Dual Electronics Corporation XR4115 Installation

Subaru
Subaru REAR SEAT ENTERTAINMENT SYSTEM user guide

Sony
Sony XR-CA670X Service manual

Blaupunkt
Blaupunkt CALGARY MP36 operating instructions