nedis WCAM460GN User manual

ned.is/wcam460gn
4G Full HD Wildlife
Camera
To capture animal
and human activity
WCAM460GN

aQuick start guide 6
cKurzanleitung 11
bGuide de démarrage rapide 18
dSnelstartgids 25
jGuida rapida all’avvio 31
hGuía de inicio rápido 38
iGuia de iniciação rápida 44
eSnabbstartsguide 51
gPika-aloitusopas 57
fHurtigguide 63
2Vejledning til hurtig start 69
kGyors beüzemelési útmutató 75
nPrzewodnik Szybki start 81
xΟδηγός γρήγορης εκκίνησης 88
1Rýchly návod 95
lRychlý návod 102
yGhid rapid de inițiere 108

3
1
q
w
8
7
9
2
3
4
5
6e
r
t
y
A

4
BATTERY SD CARD SIGNAL SERVER
IMEI:86764804758XXXX
9
q
3
4
1
2
5
6
7
8
B

5
2
3
4
7
8
1 6
5
C
D

6
aQuick start guide
4G Full HD Wildlife
Camera
WCAM460GN
For more information see the extended manual
online: ned.is/wcam460gn
Intended use
This product is a wildlife camera that takes photos and records
videos of animal and human activity when it detects movement
with the built-in motion sensor.
Connect the product to the Camera Trap Wireless app to
remotely manage photos, videos and settings.
This product is intended for indoor and outdoor use.
Consult the local laws and regulations for this product before
installing and using.
The product is not intended for professional use.
Any modication of the product may have consequences for
safety, warranty and proper functioning.
Main parts (image A)
1IR LEDs
2Lens
3Motion sensor
4Housing
5Power input
6AV port
7Antenna port
8Light sensor
9Camera activity LED
qAntenna
wLatch
eMicrophone
rTripod mount
tUSB-C – USB-A cable
yMounting strap
Control panel (image B)
1MicroSD card indicator
LED
2Battery indicator LED
3SIM card slot
4MicroSD card slot
5USB-C port
6Product code
7Signal indicator LED
8Server indicator LED
9Formatting button
qPower switch
Safety instructions
-
WARNING
• Ensure you have fully read and understood the instructions
in this document before you install or use the product. Keep
the packaging and this document for future reference.
• Only use the product as described in this manual.
• Do not use the product if a part is damaged or defective.
Replace a damaged or defective product immediately.

7
• Do not drop the product and avoid bumping.
• Only power the product with the voltage corresponding to
the markings on the product.
• Wipe the battery terminals with a clean dry cloth if they are
dirty.
• Do not use the product with rechargeable batteries.
• Observe the plus (+) and minus (–) marks on the cell or
battery and product and ensure correct use.
• This product can be used by children aged from 8 years and
above and persons with reduced physical, sensory or mental
capabilities or lack of experience and knowledge if they
have been given supervision or instruction concerning use
of the product in a safe way and understand the hazards
involved. Children shall not play with the product. Cleaning
and user maintenance shall not be done by children without
supervision.
• Before cleaning and maintenance, switch o the product
and disconnect the power.
• Do not use aggressive chemical cleaning agents such as
ammonia, acid or acetone when cleaning the product.
• Do not clean the inside of the product.
• Cleaning and user maintenance shall not be done by
children without supervision.
• Do not expose the product to water or moisture.
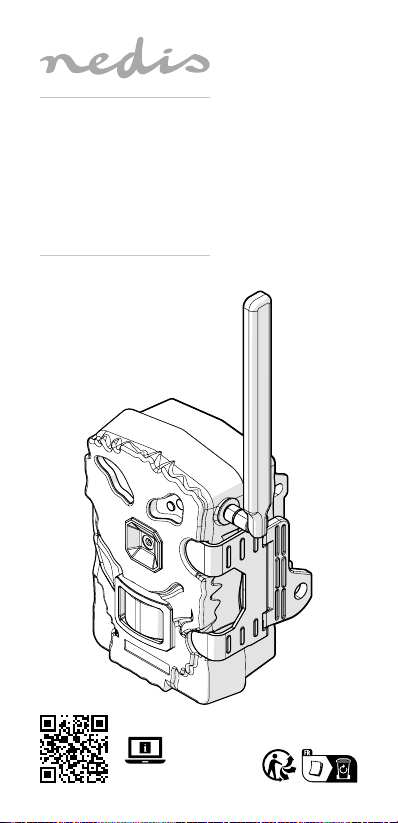
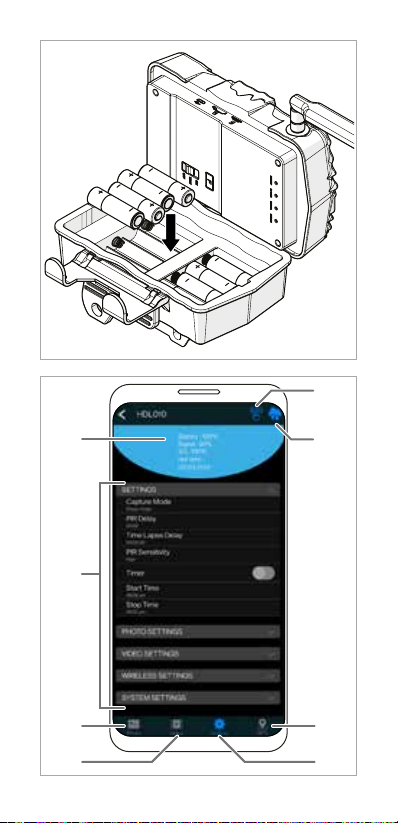
Installing the app
Use the Camera Trap Wireless app on your mobile device to view
images and videos, transfer them to your mobile device, and
change the camera settings.
For iOS devices:
1. Download and open the Camera Trap Wireless app on your
phone.
2. Create an account or login.
3. Tap Bind Camera in the app to add the product.
4. Scan the product code B6or tap Manual input in the app
to enter the product code B6manually.
5. Tap OK in the app to complete the process.
For Android devices:
1. Download and open the Camera Trap Wireless app on your
phone.
2. Create an account or login.
3. Tap +in the app to add the product.
4. Scan the product code B6or tap Manual input in the app
to enter the product code B6manually.
5. Tap OK in the app to complete the process.

8
Setting up the product
1. Screw the antenna Aqto the antenna port A7.
2. Release the latch Aw.
3. Open the housing A4.
4. Insert a formatted microSD card in the microSD card
slot B4.
4It is recommended to use a class 10 microSD card with a
minimum storage capacity of 256 GB.
5. Insert a SIM card in the SIM card slot B3.
4To transmit images and videos and to manage settings
remotely, you need a SIM card with an active data
subscription (not included).
6. Close the housing A4.
7. Close the latch Aw.
Powering the product (image C)
With batteries (not included):
1. Release the latch Aw.
2. Open the housing A4.
3. Place the batteries.
4Observe the plus (+) and minus (–) marks on the cell or
battery and product and ensure correct use.
4Do not use rechargeable batteries.
4. Close the housing A4.
5. Close the latch Aw.
With a solar panel (not included):
1. Hang the solar panel in a sunny location.
2. Connect the solar panel power output to the power A5.
Mounting the product
Mount the product using:
• The mounting strap Ay.
• A tripod (not included) with any mount with a standardised
tripod screw attached to the tripod mount Ar.
4When using the product during night, the photos and
videos will be in black and white.
Formatting the microSD card
4Formatting the microSD card will remove all les from the
microSD card. Make sure to back up all les you want to
keep before formatting the microSD card.
1. Switch the power button Bqto TEST.
2. Press and hold the format button B9until the microSD
card indicator LED B1blinks red.
The SD card indicator LED B1lights up green when
formatting is successful.

9
4If the microSD card indicator LED B1lights up red, the
formatting failed. Try again or use a dierent microSD card.
The app interface (image D)
1Product status
2Settings menu
3Photo folder tab
4Video folder tab
5Reset to default button
6Settings upload button
7Setting menu tab
8GPS location tab
Using the product
1. Switch the power button Bqto ON to switch on the
product.
4The camera is ready for use if all indicator LEDs
B1278 are switched o.
2. Open the Camera Trap Wireless app and login.
3. Select the product from the camera list.
4. To change the settings of the product:
• For iOS system: tap Options.
• For Android system: tap Setting.
5. Select the desired capture mode and adjust the settings as
desired.
Capture
mode
Switch between photo, time lapse, video or
photo + video.
PIR delay Set the interval between photos or videos.
Time lapse
delay
Adjust the interval between photos or
videos when the product is in time lapse
mode.
PIR sensitivity Set the sensitivity of the motion sensor to
low, medium or high.
Timer Switch the timer option on or o.
Set a specic time period in which the
camera takes pictures and videos every day.
Photo
resolution
Select the preferred photo resolution.
Burst number Select a photo burst amount, up to 9
photos.
Shutter speed Select the preferred shutter speed.
Video quality Select the preferred video resolution.
Video length 5 to 180 seconds.
Volume REC Select to mute or unmute the video
recordings.
Upload
frequency
Select the desired upload frequency of
photos and videos wirelessly on your
connected device.

10
Time zone Select the time zone.
Upload photo
resolution
Select the desired photo upload resolution
wirelessly on your connected device.
Date and time Date format: dd/mm/yyyy - yyyy/mm/dd
- mm/dd/yyyy.
Time format: 24h / 12h
Camera name Enter a chosen name for the product.
Information
bar
Switch on to save photos with a date and
time watermark.
Cycle storage Switch on to allow the product the continue
storing photos and videos when the
microSD card is full by deleting the oldest
photos and videos.
Temperature Select the temperature format.
Latitude and
longitude
Insert the latitude and longitude manually
or tap“Use current location”to sync with
GPS.
Format
microSD card
Conrm to delete all data on the microSD
card.
Cancel, to go back.
SWVER1 Shows the installed rmware version.
6. Tap the settings upload button D6in the app to modify
the settings on the product.
LED indicator status
LED Green Blue Red
Battery 50 % - 100 % 10 % - 49 % 0 % - 10 %
SD Card OK The microSD
card is full.
The microSD
card is locked.
The microSD
card is
corrupted.
Insert the
microSD
card.
Signal The 4G signal
is good.
The 4G signal
is weak.
There is no 4G
signal.
Server The product
is connected
to the app.
Connect the
product to
the app.
The product
cannot
connect to
the app.
Switching o the product
Switch the power button B1to OFF to switch o the product.

11
Viewing content
Viewing content on a device through the USB cable
1. Plug the USB-C – USB-A cable Atinto the USB-C port B5.
2. Plug the other end of the USB-C – USB-A cable Atinto a
computer.
Viewing content on a device with microSD card (not included).
1. Remove the microSD card from the microSD card slot B4.
2. Insert the microSD card in the microSD card slot of your
device.
Viewing content through an AV cable (not included)
1. Connect an AV cable to the AV port A6.
2. Connect the other end of the AV cable to your TV or
monitor.
DisposalThe product is designated for separate collection
at an appropriate collection point. Do not dispose
of the product with household waste.
For more information, contact the retailer or
the local authority responsible for the waste
management.
Declaration of Conformity
We, Nedis B.V. declare as manufacturer that the product
WCAM460GN from our brand Nedis®, produced in China,
has been tested according to all relevant CE standards and
regulations and that all tests have been passed successfully.
This includes, but is not limited to the RED 2014/53/EU
regulation.
The complete Declaration of Conformity (and the safety
datasheet if applicable) can be found and downloaded via:
nedis.com/WCAM460GN#support
cKurzanleitung
4G Full-HD
Wildtierkamera
WCAM460GN
Weitere Informationen nden Sie in der
erweiterten Anleitung online: ned.is/wcam460gn
Bestimmungsgemäße Verwendung
Dieses Produkt ist eine Wildtierkamera, die Fotos und Videos
von Aktivitäten tierischen und menschlichen Ursprungs
aufzeichnet, wenn vom eingebauten Bewegungssensor eine
Bewegung erkannt wird.

12
Verbinden Sie das Produkt mit der Camera Trap Wireless-App,
um Fotos, Videos und Einstellungen aus der Ferne zu verwalten.
Dieses Produkt ist zur Verwendung drinnen und draußen
gedacht.
Beachten Sie die lokalen Gesetze und Vorschriften für dieses
Produkt vor der Verwendung und Installation.
Das Produkt ist nicht für den professionellen Einsatz gedacht.
Jegliche Modikation des Produkts kann Folgen für die
Sicherheit, Garantie und ordnungsgemäße Funktionalität
haben.
Hauptbestandteile (Abbildung A)
1Infrarot-LEDs
2Objektiv
3Bewegungssensor
4Gehäuse
5Stromeingang
6AV-Anschluss
7Antennenanschluss
8Lichtsensor
9Kameraaktivität-LED
qAntenne
wRiegel
eMikrofon
rStativanschluss
tUSB-C – USB-A Kabel
yBefestigungsgurt
Bedienfeld (Abbildung B)
1MicroSD-Karten-Anzeige-
LED
2Akkuanzeige-LED
3SIM-Karten-Einschub
4Einschub für Micro-SD-
Karte
5USB-C Anschluss
6Produktcode
7Signalanzeige-LED
8Serveranzeige-LED
9Formatiertaste
qEin/Aus-Schalter
Sicherheitshinweise
-
WARNUNG
• Vergewissern Sie sich, dass Sie die Anweisungen in diesem
Dokument vollständig gelesen und verstanden haben,
bevor Sie das Produkt installieren oder verwenden. Heben
Sie die Verpackung und dieses Dokument zum späteren
Nachschlagen auf.
• Verwenden Sie das Produkt nur wie in dieser Anleitung
beschrieben.
• Verwenden Sie das Produkt nicht, wenn ein Teil beschädigt
ist oder es einen Mangel aufweist. Ersetzen Sie ein
beschädigtes oder defektes Produkt unverzüglich.
• Lassen Sie das Produkt nicht herunterfallen und vermeiden
Sie Kollisionen.
• Betreiben Sie das Produkt nur mit der auf der
Kennzeichnung auf dem Produkt angegebenen Spannung.
• Wischen Sie die Batterieanschlüsse mit einem sauberen,
trockenen Tuch ab, wenn sie verschmutzt sind.

13
• Verwenden Sie das Produkt nicht mit wiederauadbaren
Batterien.
• Achten Sie auf die Kennzeichnungen für plus (+) und minus
(-) am Akku oder den Batterien, um die korrekte
Verwendung sicher zu stellen.
• Kinder ab dem achten Lebensjahr und Personen mit
eingeschränkten körperlichen, sensorischen oder geistigen
Fähigkeiten oder ohne ausreichende Erfahrung und
Kenntnis dürfen dieses Produkt nur dann verwenden, wenn
sie beaufsichtigt werden oder in die sichere Benutzung des
Produkts eingewiesen wurden und die bestehenden
Gefahren verstehen. Kinder dürfen nicht mit dem Produkt
spielen. Reinigung und Wartung durch den Benutzer dürfen
nicht von unbeaufsichtigten Kindern durchgeführt werden.
• Schalten Sie das Produkt vor der Reinigung und Wartung
aus und trennen Sie die Verbindung zur Stromversorgung.
• Verwenden Sie keine aggressiven chemischen
Reinigungsmittel wie Ammoniak, Säuren oder Aceton zur
Reinigung des Produkts.
• Reinigen Sie nicht die Innenseite des Produkts.
• Reinigung und Wartung durch den Benutzer dürfen nicht
von unbeaufsichtigten Kindern durchgeführt werden.
• Setzen Sie das Produkt keinem Wasser oder Feuchtigkeit
aus.
Installieren der App
Verwenden Sie die Camera Trap Wireless-App auf Ihrem mobilen
Gerät, um die Bilder und Videos anzusehen, auf Ihr mobiles
Gerät zu übertragen, und die Kameraeinstellungen zu ändern.
Für iOS-Geräte:
1. Laden Sie die Camera Trap Wireless-App auf Ihr Smartphone
herunter und önen Sie sie.
2. Erstellen Sie ein Konto oder melden Sie sich an.
3. Wählen Sie Bind Camera in der App, um das Produkt
hinzuzufügen.
4. Scannen Sie den Produktcode B6oder tippen Sie in der
App auf Manual input, um den Produktcode B6manuell
einzugeben.
5. Tippen Sie in der App auf OK, um den Vorgang
abzuschließen.
Für Android-Geräte:
1. Laden Sie die Camera Trap Wireless-App auf Ihr Smartphone
herunter und önen Sie sie.
2. Erstellen Sie ein Konto oder melden Sie sich an.
3. Wählen Sie +in der App, um das Produkt hinzuzufügen.

14
4. Scannen Sie den Produktcode B6oder tippen Sie in der
App auf Manual input, um den Produktcode B6manuell
einzugeben.
5. Tippen Sie in der App auf OK, um den Vorgang
abzuschließen.
Einrichten des Produkts
1. Schrauben Sie die Antenne Aqauf den
Antennenanschluss A7.
2. Lösen Sie den Riegel Aw.
3. Önen Sie das Gehäuse A4.
4. Setzen Sie eine formatierte microSD-Karte in den microSD-
Karteneinschub B4ein.
4Es wird empfohlen, eine microSD-Karte der Klasse10
mit einer Speicherkapazität von mindestens 256GB zu
verwenden.
5. Setzen Sie eine SIM-Karte in den SIM-Karteneinschub B3
ein.
4Um Bilder und Videos zu übertragen und Einstellungen
aus der Ferne zu verwalten, benötigen Sie eine SIM-Karte
mit einem aktiven Datenvolumen (nicht im Lieferumfang
enthalten).
6. Schließen Sie das Gehäuse A4.
7. Schließen Sie den Riegel Aw.
Einschalten des Produkts (Abbildung C)
Mit Batterien (nicht im Lieferumfang enthalten):
1. Lösen Sie den Riegel Aw.
2. Önen Sie das Gehäuse A4.
3. Legen Sie die Batterien ein.
4Achten Sie auf die Kennzeichnungen für plus (+) und
minus (-) am Akku oder den Batterien, um die korrekte
Verwendung sicher zu stellen.
4Verwenden Sie keine wiederauadbaren Akkus.
4. Schließen Sie das Gehäuse A4.
5. Schließen Sie den Riegel Aw.
Mit einem Solarmodul (nicht im Lieferumfang enthalten):
1. Hängen Sie das Solarmodul an einem sonnigen Ort auf.
2. Schließen Sie den Ausgang des Solarpanels am
Stromanschluss A5an.
Montage des Produkts
Befestigen Sie das Produkt mit:
• dem Befestigungsgurt Ay.
• einem Stativ (nicht im Lieferumfang enthalten), das mit
einer Standard-Stativschraube an der Stativhalterung Ar
befestigt wird.

15
4Wenn Sie das Produkt nachts verwenden, werden die Fotos
und Videos in Schwarz-Weiss angezeigt.
Formatierender microSD-Karte
4Das Formatieren der microSD-Karte löscht alle Dateien
von der microSD-Karte. Beachten Sie, dass Sie alle Dateien
sichern, die Sie behalten möchten, bevor Sie die microSD-
Karte formatieren.
1. Stellen Sie den Ein/Aus-Schalter Bqauf TEST.
2. Halten Sie die Formatiertaste B9gedrückt, bis die
microSD-Karten-Anzeige-LED B1rot blinkt.
Die SD-Karten-Anzeige-LED B1leuchtet grün, wenn die
Formatierung erfolgreich war.
4Wenn die microSD-Karten-Anzeige-LED B1rot leuchtet, ist
die Formatierung fehlgeschlagen. Versuchen Sie es erneut
oder verwenden Sie eine andere microSD-Karte.
Die App-Benutzeroberäche (Abbildung D)
1Produktstatus
2Einstellungsmenü
3Fotoverzeichnis-
Registerkarte
4Videoverzeichnis-
Registerkarte
5Schaltäche„Auf
Standard zurücksetzen“
6Schaltäche
„Einstellungen
hochladen“
7Einstellungsmenü-
Registerkarte
8GPS-Standort-
Registerkarte
Verwenden des Produkts
1. Schieben Sie den Ein/Aus-Schalter Bqauf ON, um das
Produkt einzuschalten.
4Die Kamera ist betriebsbereit, wenn alle
Anzeige-LEDs B1278ausgeschaltet sind.
2. Önen Sie die Camera Trap Wireless-App und melden Sie
sich an.
3. Wählen Sie das Produkt aus der Kameraliste aus.
4. Um die Einstellungen des Produkts zu ändern:
• Bei iOS-Systemen: Tippen Sie auf Options.
• Bei Android-Systemen: Tippen Sie auf Setting.
5. Wählen Sie den gewünschten Aufnahmemodus und passen
Sie die Einstellungen wie gewünscht an.
Aufnahme-
modus
Umschalten zwischen Foto, Zeitraer, Video
oder Foto + Video.
PIR-
Verzögerung
Stellen Sie das Intervall zwischen zwischen
Fotos oder Videos ein.

16
Zeitraerver-
zögerung
Stellen Sie das Intervall zwischen Foto- oder
Videoaufzeichnungen ein, wenn sich das
Produkt im Zeitraermodus bendet.
PIR-Empnd-
lichkeit
Stellen Sie die Empndlichkeit des
Bewegungssensors auf niedrig, mittel oder
hoch ein.
Timer Schaltet die Timer-Option ein oder aus.
Wählen Sie einen bestimmten Zeitraum,
in dem die Kamera jeden Tag Bilder und
Videos aufnimmt.
Fotoauö-
sung
Stellen Sie eine bevorzugte Fotoauösung
ein.
Burst-Anzahl Wählen Sie eine Fotoanzahl für Burst-
Aufnahmen, bis zu 9 Fotos.
Verschlusszeit Wählen Sie die bevorzugte Verschlusszeit.
Videoqualität Stellen Sie eine bevorzugte Videoauösung
ein.
Videolänge 5 bis 180 Sekunden.
Aufnahme-
lautstärke
Wählen Sie diesen Punkt, um die
Videoaufzeichnungen stummzuschalten
oder die Stummschaltung aufzuheben.
Upload-
Frequenz
Wählen Sie die gewünschte Upload-
Frequenz, mit der Fotos und Videos kabellos
auf Ihr verbundenes Gerät hochgeladen
werden.
Zeitzone Stellen Sie sie Zeitzone ein.
Upload-Foto-
auösung
Wählen Sie die gewünschte Foto-Upload-
Auösung kabellos auf Ihr verbundenes
Gerät.
Datum und
Uhrzeit
Datumsformat: tt/mm/jjjj - jjjj/mm/tt - mm/
tt/jjjj.
Zeitformat: 24 h / 12 h
Kameraname Legen Sie einen eigenen Namen für das
Produkt fest.
Informations-
leiste
Schalten Sie diese Option ein, um Fotos
mit einem Wasserzeichen mit Datum und
Uhrzeit zu speichern.
Zyklisch
speichern
Schalten Sie diese Option ein, damit das
Produkt weiter Fotos und Videos speichern
kann, wenn die microSD-Karte voll ist,
indem die ältesten Fotos und Videos
gelöscht werden.
Temperatur Wählen Sie das Temperaturformat.

17
Breiten- und
Längengrad
Geben Sie den Breiten- und Längengrad
manuell ein oder tippen Sie auf„Use current
location“, um eine GPS-Synchronisierung
durchzuführen.
microSD-
Karte
formatieren
Bestätigen, um alle Daten auf der microSD-
Karte zu löschen.
Abbrechen, um zurückzugehen.
SWVER1 Zeigt die installierte Firmware-Version an.
6. Tippen Sie auf die Schaltäche„Einstellungen hochladen“
D6in der App, um die Einstellungen des Produkts zu
ändern.
Status der LED-Anzeige
LED Grün Blau Rot
Batterie 50 % - 100 % 10 % - 49 % 0 % - 10 %
SD-Karte OK Die microSD-
Karte ist voll.
Die microSD-
Karte ist
gesperrt.
Die MicroSD-
Karte ist
beschädigt.
Legen Sie die
microSD-.
Karte ein.
Signal Das 4G-Signal
ist gut.
Das 4G-Signal
ist schwach.
Es gibt kein
4G-Signal.
Server Das Produkt
ist mit
der App
verbunden.
Verbinden Sie
das Produkt
mit der App.
Das kann
keine
Verbindung
mit der App
herstellen.
Ausschalten des Produkts
Schieben Sie den Ein/Aus-Schalter B1auf OFF, um das
Produkt auszuschalten.
Anzeigen von Inhalten
Anzeigen von Inhalten auf einem Gerät über das USB-Kabel
1. Stecken Sie das USB-C – USB-A-Kabel Atin den USB-C
Anschluss B5.
2. Verbinden Sie das andere Ende des
USB-C – USB-A-Kabels Atmit einem Computer.
Anzeigen von Inhalten auf einem Gerät mit microSD-Karte
(nicht im Lieferumfang enthalten).
1. Entnehmen Sie die microSD-Karte aus dem microSD-
Karteneinschub B4.
2. Stecken Sie die microSD-Karte in den microSD-
Kartensteckplatz Ihres Geräts.

18
Anzeigen von Inhalten über ein AV-Kabel (nicht im
Lieferumfang enthalten)
1. Schliessen Sie ein AV-Kabel an den AV-Anschluss A6an.
2. Schliessen Sie das andere Ende des AV-Kabels an Ihren
Fernseher oder Monitor an.
Entsorgung
Dieses Produkt muss an einer entsprechenden
Sammelstelle zur Entsorgung abgegeben
werden. Entsorgen Sie das Produkt nicht mit dem
Haushaltsabfall.
Weitere Informationen erhalten Sie beim Verkäufer
oder der für die Abfallwirtschaft verantwortlichen
örtlichen Behörde.
Konformitätserklärung
Wir, Nedis B.V., erklären als Hersteller, dass das Produkt
WCAM460GN unserer Marke Nedis®, produziert in China, nach
allen geltenden CE-Standards und Vorschriften getestet wurde
und alle diese Tests erfolgreich bestanden hat. Dies gilt unter
anderem auch für die Richtlinie RED 2014/53/EU.
Die vollständige Konformitätserklärung (und das
Sicherheitsdatenblatt, falls zutreend) steht zum Download zur
Verfügung unter:
nedis.de/WCAM460GN#support
bGuide de démarrage rapide
Caméra animalière 4G Full
HD
WCAM460GN
Pour plus d'informations, consultez le manuel
détaillé en ligne : ned.is/wcam460gn
Utilisation prévue
Ce produit est une caméra animalière qui prend des photos
et enregistre des vidéos d’activités animales et humaines
lorsqu’elle détecte un mouvement grâce au capteur de
mouvement intégré.
Connectez le produit à l’application Camera Trap Wireless pour
gérer à distance les photos, les vidéos et les paramètres.
Le produit est prévu pour un usage intérieur et extérieur.
Consultez les lois et réglementations locales pour ce produit
avant installation et utilisation.
Le produit n’est pas destiné à un usage professionnel.

19
Toute modication du produit peut avoir des conséquences sur
la sécurité, la garantie et le bon fonctionnement.
Pièces principales (image A)
1LED infrarouge
2Lentille
3Capteur de mouvement
4Boîtier
5Alimentation électrique
6Port AV
7Port d’antenne
8Capteur de lumière
9LED d’activité de caméra
qAntenne
wLoquet
eMicrophone
rMonture de trépied
tCâble USB-C - USB-A
ySangle de montage
Panneau de commande (image B)
1Voyant LED de carte
microSD
2Voyant LED de batterie
3Emplacement pour carte
SIM
4Emplacement pour carte
micro SD
5Port USB-C
6Code produit
7Voyant LED de signal
8Voyant LED de serveur
9Bouton de formatage
qInterrupteur
Consignes de sécurité
-
AVERTISSEMENT
• Assurez-vous d'avoir entièrement lu et compris les
instructions de ce document avant d'installer ou d'utiliser le
produit. Conservez l'emballage et le présent document pour
référence ultérieure.
• Utilisez le produit uniquement comme décrit dans le
présent manuel.
• Ne pas utiliser le produit si une pièce est endommagée ou
défectueuse. Remplacez immédiatement un produit
endommagé ou défectueux.
• Ne pas laisser tomber le produit et éviter de le cogner.
• N’alimentez le produit qu’avec la tension correspondant aux
inscriptions gurant sur le produit.
• Essuyez les bornes de la batterie avec un chion propre et
sec si elles sont sales.
• Ne pas utiliser le produit avec des batteries rechargeables.
• Respectez les marquages positif (+) et négatif (-) sur la pile,
la batterie et le produit et assurez-vous de les utiliser
correctement.
• Ce produit peut être utilisé par des enfants âgés de 8 ans et
plus ainsi que des personnes ayant des capacités physiques,
sensorielles ou mentales réduites ou manquant
d’expérience et de connaissances s’ils sont supervisés ou ont

20
reçu des instructions sur l’utilisation du produit en toute
sécurité et comprennent les dangers impliqués. Les enfants
ne doivent pas jouer avec le produit. Le nettoyage et la
maintenance ne doivent pas être eectués par des enfants
sans surveillance.
• Avant le nettoyage et la maintenance, mettez le produit
hors tension, puis débranchez-le.
• N'utilisez pas de nettoyants chimiques agressifs tels que de
l'ammoniac, de l'acide ou de l'acétone lors du nettoyage du
produit.
• Ne pas nettoyer l'intérieur du produit.
• Le nettoyage et la maintenance par l’utilisateur ne doivent
pas être eectués par des enfants sans surveillance.
• Ne pas exposer le produit à l'eau ou à l'humidité.
Installer l'application
Utilisez l’application Camera Trap Wireless sur votre appareil
mobile pour acher des images et des vidéos, les transférer sur
votre appareil mobile et modier les paramètres de la caméra.
Pour les appareils iOS:
1. Téléchargez et ouvrez l’application Camera Trap Wireless sur
votre téléphone.
2. Créez un compte ou connectez-vous.
3. Appuyez sur Lier la caméra dans l’application pour ajouter le
produit.
4. Scannez le code produit B6ou appuyez sur Saisie
manuelle dans l’application pour saisir le code produit B6
manuellement.
5. Appuyez sur OK dans l’application pour terminer le
processus.
Pour les appareils Android:
1. Téléchargez et ouvrez l’application Camera Trap Wireless sur
votre téléphone.
2. Créez un compte ou connectez-vous.
3. Appuyez sur +dans l’application pour ajouter le produit.
4. Scannez le code produit B6ou appuyez sur Saisie
manuelle dans l’application pour saisir le code produit B6
manuellement.
5. Appuyez sur OK dans l’application pour terminer le
processus.
Congurer le produit
1. Vissez l’antenne Aqsur le port d’antenne A7.
2. Libérez le loquet Aw.
3. Ouvrez le boîtier A4.
Table of contents
Languages:
Other nedis Scouting Camera manuals
Popular Scouting Camera manuals by other brands

Spypoint
Spypoint LINK-MICRO-LTE user manual

Exodus
Exodus Trek user manual

Spypoint
Spypoint FL-7 user manual

Wildlife Monitoring Solutions
Wildlife Monitoring Solutions Wilsus Accento user manual

BRAUN Photo Technik
BRAUN Photo Technik BLACK300 user manual

Stealth Cam
Stealth Cam STC-PX18CMO instruction manual