NEEWER Q-C User manual

Q-CTTLWirelessTrigger
FCC Warning:
This equipment has been tested and found to comply with the limits for a Class B digital device,
pursuant to part 15 of the FCC Rules. These limits are designed to provide reasonable protection
against harmful interference in a residential installation. This equipment generates, uses and can
radiate radio
frequency energy and, if not installed and used in accordance with the instructions, may cause
harmful interference to radio communications. However, there is no guarantee that interference
will not occur in a particular installation. If this equipment does cause harmful interference to
radio or television reception, which can be determined by turning the equipment off and on, the
user is encouraged to try to correct the interference by one or more of the following measures:
• Reorient or relocate the receiving antenna.
• Increase the separation between the equipment and receiver.
• Connect the equipment into an outlet on a circuit different from that to which the receiver is
connected.
• Consult the dealer or an experienced radio/TV technician for help.
Caution: Any changes or modifications to this device not explicitly approved by manufacturer
could void your authority to operate this equipment.
This device complies with part 15 of the FCC Rules. Operation is subject to the following two
conditions: (1) This device may not cause harmful interference, and (2) this device must accept
any interference received, including interference that may cause undesired operation.
The device has been evaluated to meet general RF exposure requirement. The device can be used
in portable exposure condition without restriction.

TableofContents
AboutThisManual
ThankyouforpurchasingtheNEEWER®Q-CTTLWirelessTrigger.
Themanualwillcoverthefollowing:
thebasicoperationproceduresandfunctionsoftheWirelessTrigger.
theapplicationenvironmentandsafetyuseoftheWirelessTrigger.
theinstallationoftheaccessoriesoftheWirelessTrigger.
1.PackageContents
2.CompatibleDevice
3.Nomenclature
4.PowerSupplyMode
5.Mode
6.Set-upProcedures
7.SafetyNotes
8.Caution
9.Maintenance
10.ProductParameters
11.WarrantyPolicy
12.TrademarkandStatement
13.ContactUs
1
2
3
6
7
13
14
15
15
16
17
18
18
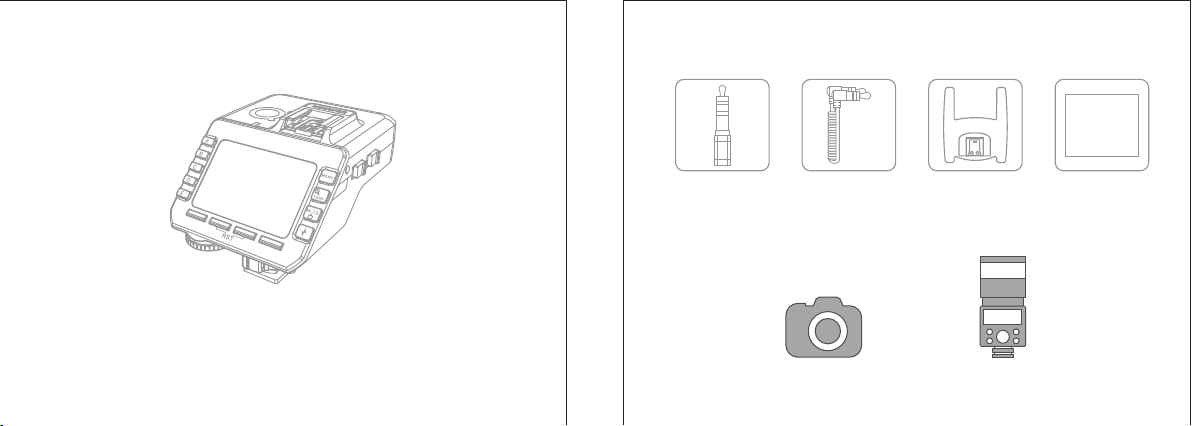
1 2
NE EWER
SyncCable
ScrewAdapter
Camera On-cameraFlash
HotShoeStand
1.PackageContents Accessories
Manual
Uponreceivingthepackage,pleasecheckwhetheralltheproductsareincluded.
Ifthereareanymissingorbrokenproducts,pleasecontactNeewerCustomerService
(support@neewer.com).
2.CompatibleDevice

3.Nomenclature
YoucanpresstheFunction2andFunction3buttontogetherforthree
secondstorestorethetriggertodefaultsettings.
Type-c
FirmwareUpdate
2.5mmSyncPort
TriggerHotshoe
Battery
Compartment
Lock/
ReleaseButton
AF-assist
illuminator
SettingDial
3 4
FlashHotshoe
AF-assistSwitch
PowerSwitch
Menu
Zoomin/TX/RX
Mode/ScreenLock
TestFlash
Group
Function1
Function1
Function1
Function1
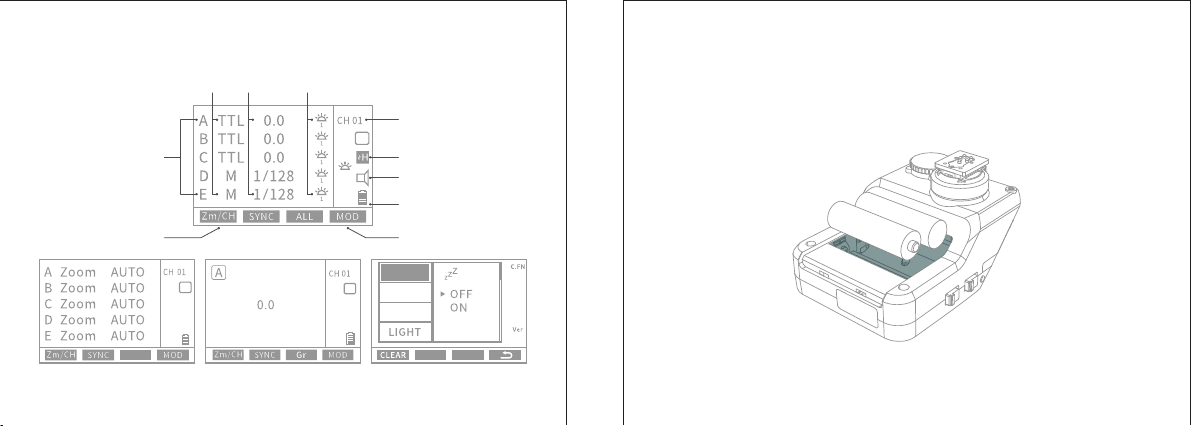
T
SE T
STBY-T
STBY-R
BEEP
2.0
Display
MultipleGroupDisplay MenuDisplay
T
Group
Mode Power ModellingLampGroup
Channel
HighSpeedSync
BatteryPower
ModellingLamp
MasterSwitch
Zoom/Channel
Buzzer
5 6
T
Zoo m
AUTO
TTL
SingleGroupDisplay
4.PowerSupplyMode
byAABattery
GroupDisplay
Whenonmultiplegroupdisplay,thetriggerwill
switchtosinglegroupdisplaywhenyouquick
pressthe“”button.Itwillswitchbacktothe
multiplegroupdisplayifyoupressthebuttonagain.
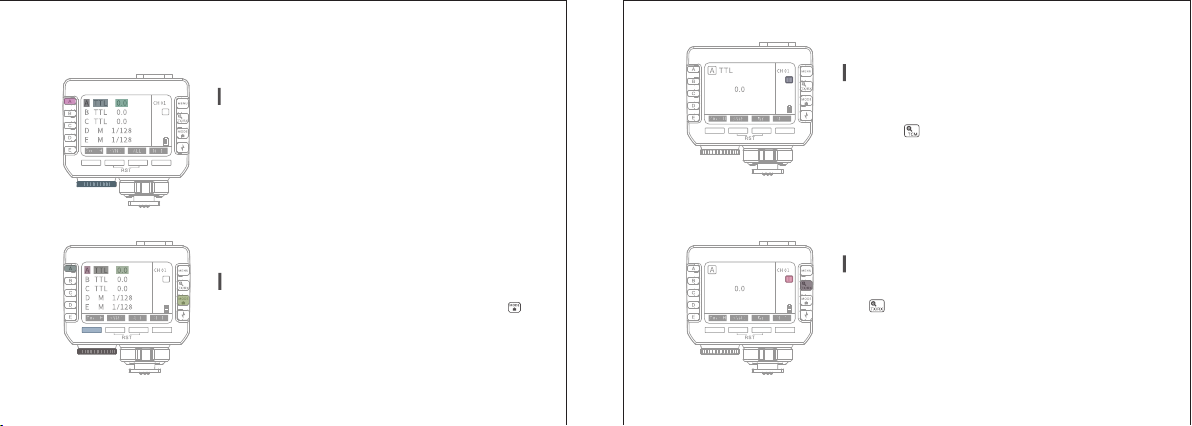
5.Mode
ModeSwitch
Chooseonegroup(demo:GroupA)andpressthe“”
buttontoswitchmodeinthefollowingorder:
TTL→M→OFF.
Inthismode,thetriggercanadjusttheflash
outputbetween-3and+3in1/3stopincrements.
Atthelevelof0,therewillbenoexposurecompensation.
ChooseaspecificgroupandrotatetheSettingDialto
changethecompensationlevel:-3.0、-2.7....0.0.....+3.0、+2.7....
ExposureCompensationSetting
7 8
T
T
T
Zo om
AU TO
T
Zo om
AU TO
TTL AsTransmitterorReceiver
Thetriggerwillworkastransmitterwhenyoupress
the“”buttonforthreesecondsuntilthesymbol
“T”appearsonthedisplay.Itwillturnintoareceiver
ifyoupressthebuttonagainfor3secondsuntilthe
“R”lettershowsonthedisplay.
RestoreDefaultSetting/HighSpeedSync
Thetriggerwillrestoretodefaultsettingswhenthe
Function2andFunction3buttonarepressedtogether
forthreeseconds.ToactivatetheHSSfunction,please
adjusttomainmenupageandpresstheFunction2
buttonuntilthe“ ”symbolappearsonthedisplay.
T
ModellingLampControl
Whennospecificgroupischosen,thetriggercanturn
on/offallmodellinglampswhenyouquickpressthe
“Function4”button.Whencontrollingaspecificgroup
oflights,pleasequickpressthe“ Function4”buttonto
changetheirlightintensityfromLevel1toLevel6.(The
modellinglampswithinthegroupcanallbeturnedoff
bypressingtheFunction4buttonfor3seconds.)
ThelightintensitylevelonlyfitsthatofQ5TTLstrobelight.
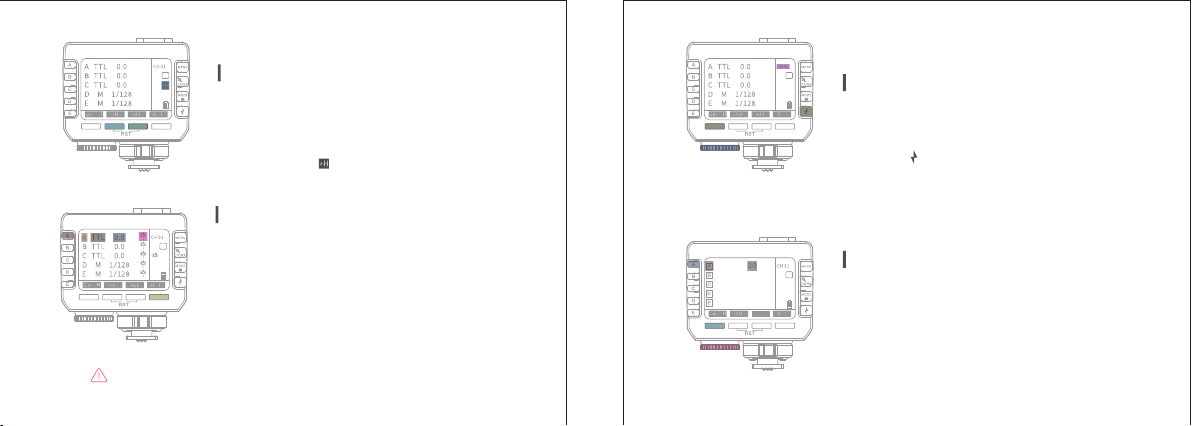
ZoomSetting
Quickpressthe“ Function1”button.Thenchoosea
specificgroupandrotatetheSettingDialtochange
zoomsettings:auto/20-200mm.ToexittheZoom
Settingpage,pleasequickpressthe“ Function1”
buttonagain.
Thetriggerfeatures32channels,availableforswitchfromChannel01toChannel32.
Pleasemakesurethatthetransmittingandreceivingdevicesareonthesamechannel.
Channel/TestFlash
Pressthe“ Function1”buttonfor3seconds.Thenyou
canrotatetheSettingDialtochooseasuitablechannel.
Thetriggercanmakeaflashlightfiretestflashwhenyou
pressthe“ ”button.
T
9 10
T
T
Zo om 20
Zo om AU TO
Zo om AU TO
Zo om AU TO
Zo om AU TO

CustomSettings
StandbyMode
ThetriggerdisplaywillturnoffIfnooperations
areperformedfor90seconds.Toactivatethe
display,pressanybuttononthetrigger.
Ifmountedonthehotshoeofacamera,thetriggercanbeactivated
bypressingthecamera'sshutterreleasebuttonhalfway.
11 12
ScreenLock
Pressthe“ ”buttonfor3secondsuntiltheword
“LOCKED”appearsonthedisplay,whichsuggeststhat
allbuttonshavebeendeactivated(exceptforthetest
flashbutton“ ”). Tounlockit,pleasepressthe
“”buttonfor3secondsuntiltheword“ LOCKED”
disappearsonthedisplay.
T
LOC KED
T
CustomSymbol
SRBY−T
SRBY−R
BEEP
LIGHT
SYNC
LCD
ID
Function
StandbyTimer
Buzzer
BacklightTimer
SyncPort
LCDContrast
WIFIID
Option
ON
OFF
30min
1H
2H
ON
OFF
12sec
OFF
ON
IN
OUT
-3-+3
OFF
01-29
Description
willturnoffwhennooperationsareperformedfor30minutes.
willturnoffwhennooperationsareperformedfor1hour.
willturnoffwhennooperationsareperformedfor2hour.
On
On
Off
Off
willturnoffwhennooperationsareperformedfor12seconds.
Alwaysoff
Alwayson
fireQ3flash
between-3and3
Off
availablefrom01to99
triggersignalinput
StandbyTimer

7.SafetyNotes
Pleaseavoidusingtheproduct
whereitwillbeexposedtohigher
temperaturesthan50degrees
Celsius.
>50℃
6.Set-upProcedures
Pleaseheedthepositiveornegativepolaritywheninsertingthebatteries.
Iftheyarewronglyplaced,thetriggerwouldn'tturnon.
InsertAAbatteriesinthebattery
compartmentandlatchthecover.
Attachthetriggerhotshoetoyour
camera'scoldshoe.Then,turnthe
knobinthepictureaboveclockwise
untilitistightened.
13 14
Pleasedonotusethelightinthe
rainorinahumidenvironment.

10.ProductParameters8.Caution
Model
SignalTransmissionDistance
Built-inWIFI
Modulation
Channel
WIFIID
Group
2.5mmSyncPort
TX/RX
FirmwareUpdate
PowerSupply
Dimension
NetWeight
Q-C
0-100m
2.4GHz
MSK
32
01-99
5
Areceiverdevicecancontrolcamerashootingwitha2.5mmsynccable.
master/slavemodeswitch
viatheType-CUSBinterfaceonthetrigger
AAbattery
about120grams
105*75*64MM
Pleasedon'tdisassembleormodifytheproductunlessprofessionallycertified.
Otherwisetheremightberiskofmalfunction.
Pleasekeeptheproductdryandavoidtouchingitwithwethands.
Pleasedon'tusethetriggernearflammableorexplosiveitems.
Pleaseavoiddisposingofbatteryinafireorkeepingitnearfiresource.
Shouldtherebemalfunctionofthetrigger,pleaseturnitoffimmediatelyandtryto
identifythepossiblecause.
Pleaseavoidusingnewandoldbatteriestogetherordifferenttypesofbattery.
Pleasedon'tshortcircuitordismantlebatteries
9.Maintenance
Softclothisrecommendedtocleanthetriggerscreen.
Pleaseremovethebatterieswhenthetriggerisleftunusedforalongperiodoftime.
Thetriggershouldbekeptinadryandwell-ventilatedenvironment.
Pleaseavoidusingthetriggerincloseproximitytomagneticdevicesandstrong
electrostaticfield,suchasradiotransmitter,otherwisethetriggermightmalfunction.
15 16

17 18
11.WarrantyPolicy
Reminder:Pleasekeepthepackageboxforatleast15daysbecauseitisnecessary
tousethepackageboxtoprotecttheproductduringtransportation.
WarrantyPeriod
YoucanregisteryourNEEWER®productforitsfree1-yearwarrantyat
www.neewer.com.Thanks!
Yourquestionsorsuggestionarehighlyvaluedandappreciated.Please
feelfreetocontactus,andwewilldoourbesttofullysatisfyyou.
E-MAIL:support@neewer.com
WarrantyRestrictions
ThefollowingconditionsareNOTcoveredbytheNEEWER®Warranty:
(1)Theproducthasexpiredtheone-yearwarrantyperiod;
(2)Theproductismalfunctionedordamagedbecausetheuserdidnotfollowthe
WirelessTriggertouse,adjust,oroperatetheproduct;
(3)Theproductismalfunctionedordamagedduetorain,hailstorm,fumigation,
medicine,chemicalsornaturalwastage;andduetoforcemajeure(includebutnot
limitedtoearthquake,Typhoon,fire,flood,violentcrime);
(4)Theusermodify,dismantle,repairtheproductanditspartswithoutpermission;
(5)TheuserdamagedthepartsofWirelessTriggerbyusingnon-originalaccessories,or
changedthecircuit,lineconfigurationwithoutpermission;
(6)Theproductismalfunctionedordamagedbycollisionorfall-offduetotheuser;
12.TrademarkandStatement
13.ContactUs
NEEWER®isaregisteredtrademarkofNEEWER®TechnologyCompany,Ltd,
whichisprotectedbylaw. NEEWER®companyreservesallrightsforthistrademark.
NEEWER®hascontinuouslydevoteditselftodevelopingandimprovingphotography
andmusicproducts.Weholditourmissiontopursueexcellenceandimprovecustomer
experience.
Theactualproductmaydifferfromthepictureinthismanualincolorand
appearance.
Yourquestionsorsuggestionarehighlyvaluedandappreciated.Pleasefeel
freetocontactus,andwewilldoourbesttooffersatisfyingservicesforyou.
E-MAIL:support@neewer.comWEB:www.neewer.com
(7)WarrantyCard,After-saleServiceCard,invoiceoritemNodoesnotconformtothe
product;
(8)Anuserchangesthewarrantyservicedateoftheproductanditspartswithout
permission;
(9)Thepanelandmainpartsarebeyondmaintenancerange;Thesecuritylabelonthe
productismissingordamaged;
(10)TheWirelessTriggerisusedasacommercialproduct;
Table of contents


