NEFF B6AVH7A.1 User manual


en
3
Table of contents
[en]INSTRUCTI ONMANUAL
8Intended use . . . . . . . . . . . . . . . . . . . . . . . . . . . . . 4
(Important safety information . . . . . . . . . . . . . . . 5
General information . . . . . . . . . . . . . . . . . . . . . . . . . . . 5
Halogen lamp. . . . . . . . . . . . . . . . . . . . . . . . . . . . . . . . 5
Steam. . . . . . . . . . . . . . . . . . . . . . . . . . . . . . . . . . . . . . 6
Cleaning function . . . . . . . . . . . . . . . . . . . . . . . . . . . . . 6
]Causes of damage . . . . . . . . . . . . . . . . . . . . . . . . 7
General information . . . . . . . . . . . . . . . . . . . . . . . . . . . 7
Steam. . . . . . . . . . . . . . . . . . . . . . . . . . . . . . . . . . . . . . 7
7Environmental protection . . . . . . . . . . . . . . . . . . 8
Saving energy . . . . . . . . . . . . . . . . . . . . . . . . . . . . . . . 8
Environmentally-friendly disposal . . . . . . . . . . . . . . . . . 8
*Getting to know your appliance . . . . . . . . . . . . . 9
Control panel . . . . . . . . . . . . . . . . . . . . . . . . . . . . . . . . 9
Buttons and display . . . . . . . . . . . . . . . . . . . . . . . . . . . 9
Types of heating and functions . . . . . . . . . . . . . . . . . 10
Temperature. . . . . . . . . . . . . . . . . . . . . . . . . . . . . . . . 11
Cooking compartment . . . . . . . . . . . . . . . . . . . . . . . . 11
_Accessories . . . . . . . . . . . . . . . . . . . . . . . . . . . . 11
Control accessories . . . . . . . . . . . . . . . . . . . . . . . . . . 11
Inserting accessories . . . . . . . . . . . . . . . . . . . . . . . . . 11
Optional accessories . . . . . . . . . . . . . . . . . . . . . . . . . 12
KBefore using for the first time. . . . . . . . . . . . . . 13
Before using for the first time . . . . . . . . . . . . . . . . . . . 13
Initial use . . . . . . . . . . . . . . . . . . . . . . . . . . . . . . . . . . 13
Cleaning the cooking compartment . . . . . . . . . . . . . . 13
Cleaning the accessories. . . . . . . . . . . . . . . . . . . . . . 13
1Operating the appliance . . . . . . . . . . . . . . . . . . 14
Switching the appliance on and off . . . . . . . . . . . . . . 14
Setting the type of heating and temperature . . . . . . . 14
Temperature display. . . . . . . . . . . . . . . . . . . . . . . . . . 14
Rapid heating. . . . . . . . . . . . . . . . . . . . . . . . . . . . . . . 14
`Steam . . . . . . . . . . . . . . . . . . . . . . . . . . . . . . . . . 15
Steam-assisted cooking . . . . . . . . . . . . . . . . . . . . . . . 15
Reheating. . . . . . . . . . . . . . . . . . . . . . . . . . . . . . . . . . 15
Filling the water tank . . . . . . . . . . . . . . . . . . . . . . . . . 15
After every steam operation . . . . . . . . . . . . . . . . . . . . 16
OTime-setting options . . . . . . . . . . . . . . . . . . . . . 17
Setting the timer . . . . . . . . . . . . . . . . . . . . . . . . . . . . . 17
Setting the cooking time . . . . . . . . . . . . . . . . . . . . . . 17
Setting the end time . . . . . . . . . . . . . . . . . . . . . . . . . . 17
Setting the time . . . . . . . . . . . . . . . . . . . . . . . . . . . . . 18
Checking, changing or deleting settings . . . . . . . . . . 18
AChildproof lock. . . . . . . . . . . . . . . . . . . . . . . . . . 18
Automatic childproof lock . . . . . . . . . . . . . . . . . . . . . .18
One-time childproof lock. . . . . . . . . . . . . . . . . . . . . . .18
QBasic settings. . . . . . . . . . . . . . . . . . . . . . . . . . . 18
List of basic settings. . . . . . . . . . . . . . . . . . . . . . . . . .18
Changing the basic settings . . . . . . . . . . . . . . . . . . . .19
PProgrammes . . . . . . . . . . . . . . . . . . . . . . . . . . . . 19
Information on the settings . . . . . . . . . . . . . . . . . . . . .19
Selecting a dish . . . . . . . . . . . . . . . . . . . . . . . . . . . . .19
Setting a program. . . . . . . . . . . . . . . . . . . . . . . . . . . .20
FSabbath mode . . . . . . . . . . . . . . . . . . . . . . . . . . 21
Starting Sabbath mode. . . . . . . . . . . . . . . . . . . . . . . .21
DCleaning agent . . . . . . . . . . . . . . . . . . . . . . . . . . 21
Suitable cleaning agents . . . . . . . . . . . . . . . . . . . . . .21
Keeping the appliance clean . . . . . . . . . . . . . . . . . . .22
.Cleaning function. . . . . . . . . . . . . . . . . . . . . . . . 22
Self-cleaning . . . . . . . . . . . . . . . . . . . . . . . . . . . . . . . .22
EasyClean . . . . . . . . . . . . . . . . . . . . . . . . . . . . . . . . .23
Descaling . . . . . . . . . . . . . . . . . . . . . . . . . . . . . . . . . .24
pRails. . . . . . . . . . . . . . . . . . . . . . . . . . . . . . . . . . . 25
Detaching and refitting the rails . . . . . . . . . . . . . . . . .25
qAppliance door . . . . . . . . . . . . . . . . . . . . . . . . . . 26
Removing and fitting the appliance door . . . . . . . . . .26
Removing and installing the door panels . . . . . . . . . .27
3Trouble shooting . . . . . . . . . . . . . . . . . . . . . . . . 29
Rectifying faults yourself . . . . . . . . . . . . . . . . . . . . . . .29
Maximum operating time . . . . . . . . . . . . . . . . . . . . . .30
Replacing the bulb in the top of the cooking
compartment . . . . . . . . . . . . . . . . . . . . . . . . . . . . . . .30
4Customer service . . . . . . . . . . . . . . . . . . . . . . . . 31
E number and FD number . . . . . . . . . . . . . . . . . . . . .31
JTested for you in our cooking studio. . . . . . . . 31
General information . . . . . . . . . . . . . . . . . . . . . . . . . .31
Cakes and pastries. . . . . . . . . . . . . . . . . . . . . . . . . . .32
Bakes and gratins . . . . . . . . . . . . . . . . . . . . . . . . . . .36
Poultry, meat and fish . . . . . . . . . . . . . . . . . . . . . . . . .36
Vegetables and side dishes . . . . . . . . . . . . . . . . . . . .39
Desserts . . . . . . . . . . . . . . . . . . . . . . . . . . . . . . . . . . .40
Acrylamide in foodstuffs . . . . . . . . . . . . . . . . . . . . . . .40
Drying . . . . . . . . . . . . . . . . . . . . . . . . . . . . . . . . . . . . .40

en Intended use
4
Preserving . . . . . . . . . . . . . . . . . . . . . . . . . . . . . . . . . 41
Prove dough. . . . . . . . . . . . . . . . . . . . . . . . . . . . . . . . 42
Defrosting. . . . . . . . . . . . . . . . . . . . . . . . . . . . . . . . . .42
Reheating. . . . . . . . . . . . . . . . . . . . . . . . . . . . . . . . . . 42
Keeping warm . . . . . . . . . . . . . . . . . . . . . . . . . . . . . .43
Test dishes. . . . . . . . . . . . . . . . . . . . . . . . . . . . . . . . . 43
Produktinfo
Additional information on products, accessories,
replacement parts and services can be found at
www.neff-international.com and in the online shop
www.neff-eshop.com
8Intended use
Intended us e
Read these instructions carefully. Only then
will you be able to operate your appliance
safely and correctly. Retain the instruction
manual and installation instructions for future
use or for subsequent owners.
This appliance is only intended to be fully fitted
in a kitchen. Observe the special installation
instructions.
Check the appliance for damage after
unpacking it. Do not connect the appliance if it
has been damaged in transport.
Only a licensed professional may connect
appliances without plugs. Damage caused by
incorrect connection is not covered under
warranty.
This appliance is intended for domestic use
only. The appliance must only be used for the
preparation of food and drink. The appliance
must be supervised during operation. Only
use this appliance indoors.
This appliance is intended for use up to a
maximum height of 4000 metres above sea
level.
This appliance may be used by children over
the age of 8 years old and by persons with
reduced physical, sensory or mental
capabilities or by persons with a lack of
experience or knowledge if they are
supervised or are instructed by a person
responsible for their safety how to use the
appliance safely and have understood the
associated hazards.
Children must not play with, on, or around the
appliance. Children must not clean the
appliance or carry out general maintenance
unless they are at least 15 years old and are
being supervised.
Keep children below the age of 8 years old at
a safe distance from the appliance and power
cable.
Always slide accessories into the cooking
compartment the right way round.
~"Accessories" on page 11

Important safety information en
5
(Important safety
information
Impor t ant safety informat i on
General information
:Warning – Risk of fire!
■Combustible items stored in the cooking
compartment may catch fire. Never store
combustible items in the cooking
compartment. Never open the appliance
door if there is smoke inside. Switch off the
appliance and unplug it from the mains or
switch off the circuit breaker in the fuse box.
Risk of fire!
■Loose food remnants, fat and meat juices
may catch fire. Before using the appliance,
remove the worst of the food remnants from
the cooking compartment, heating elements
and accessories.
Risk of fire!
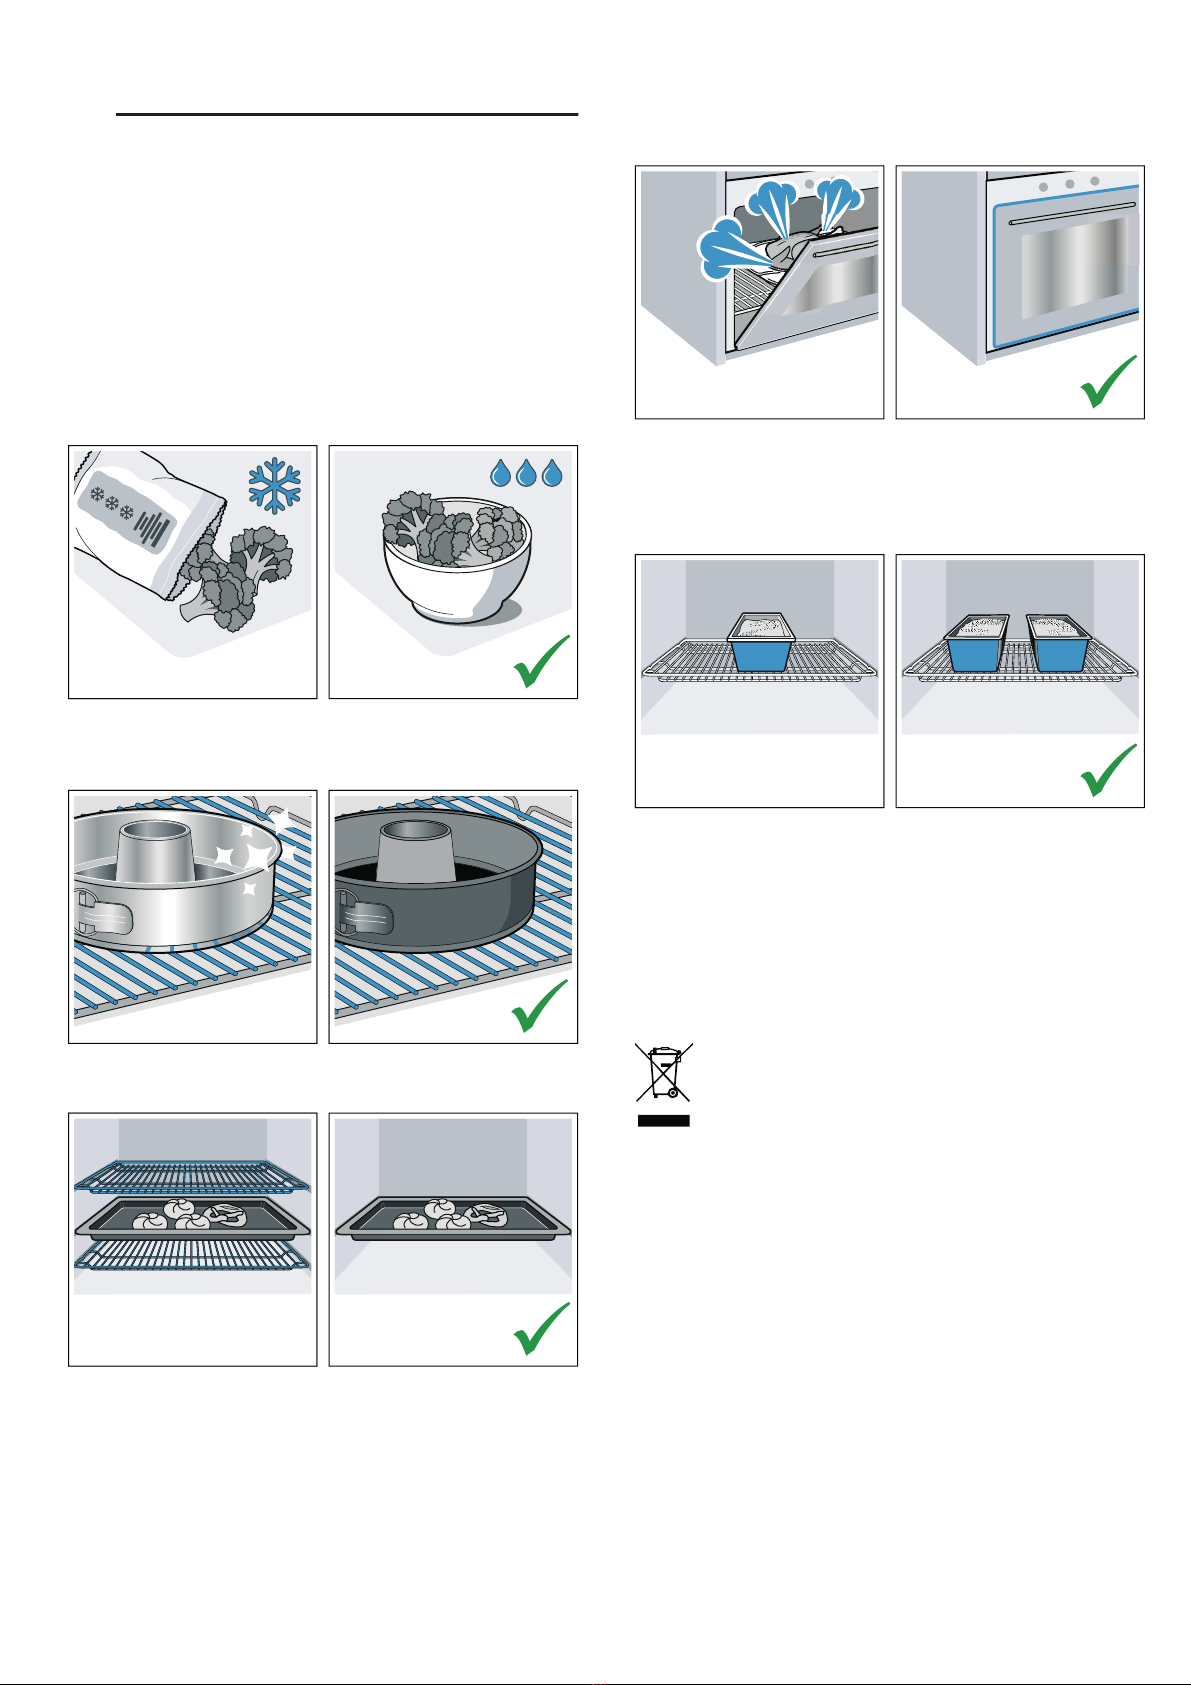
■A draught is created when the appliance
door is opened. Greaseproof paper may
come into contact with the heating element
and catch fire. Do not place greaseproof
paper loosely over accessories during
preheating. Always weight down the
greaseproof paper with a dish or a baking
tin. Only cover the surface required with
greaseproof paper. Greaseproof paper
must not protrude over the accessories.
:Warning – Risk of burns!
■The appliance becomes very hot. Never
touch the interior surfaces of the cooking
compartment or the heating elements.
Always allow the appliance to cool down.
Keep children at a safe distance.
Risk of serious burns!
■Accessories and ovenware become very
hot. Always use oven gloves to remove
accessories or ovenware from the cooking
compartment.
Risk of burns!
■Alcoholic vapours may catch fire in the hot
cooking compartment. Never prepare food
containing large quantities of drinks with a
high alcohol content. Only use small
quantities of drinks with a high alcohol
content. Open the appliance door with care.
:Warning – Risk of scalding!
■The accessible parts become hot during
operation. Never touch the hot parts. Keep
children at a safe distance.
Risk of scalding!
■When you open the appliance door, hot
steam can escape. Steam may not be
visible, depending on its temperature. When
opening, do not stand too close to the
appliance. Open the appliance door
carefully. Keep children away.
Risk of scalding!
■Water in a hot cooking compartment may
create hot steam. Never pour water into the
cooking compartment when the cooking
compartment is hot.
:Warning – Risk of injury!
■Scratched glass in the appliance door may
develop into a crack. Do not use a glass
scraper, sharp or abrasive cleaning aids or
detergents.
Risk of injury!
■The hinges on the appliance door move
when opening and closing the door, and
you may be trapped. Keep your hands away
from the hinges.
Risk of injury!
■Components inside the appliance door may
have sharp edges. Wear protective gloves.
:Warning – Risk of electric shock!
■Incorrect repairs are dangerous. Repairs
may only be carried out and damaged
power cables replaced by one of our
trained after-sales technicians. If the
appliance is defective, unplug the appliance
from the mains or switch off the circuit
breaker in the fuse box. Contact the after-
sales service.
Risk of electric shock and serious injury!
■The cable insulation on electrical
appliances may melt when touching hot
parts of the appliance. Never bring
electrical appliance cables into contact with
hot parts of the appliance.
Risk of electric shock!
■Do not use any high-pressure cleaners or
steam cleaners, which can result in an
electric shock.
Risk of electric shock!
■A defective appliance may cause electric
shock. Never switch on a defective
appliance. Unplug the appliance from the
mains or switch off the circuit breaker in the
fuse box. Contact the after-sales service.
:Warning – Hazard due to magnetism!
Permanent magnets are used in the control
panel or in the control elements. They may
affect electronic implants, e.g. heart
pacemakers or insulin pumps. Wearers of
electronic implants must stay at least 10 cm
away from the control panel.
Halogen lamp
:Warning – Risk of burns!
The bulbs in the cooking compartment
become very hot. There is still a risk of burning
your skin for some time after they have been
switched off. Do not touch the glass cover.
Avoid contact with your skin when cleaning.

en Important safety information
6
:Warning – Risk of electric shock!
When replacing the cooking compartment
bulb, the bulb socket contacts are live. Before
replacing the bulb, unplug the appliance from
the mains or switch off the circuit breaker in
the fuse box.
Steam
:Warning – Risk of scalding!
■The water in the water tank may become
very hot if you continue to operate the
appliance. Empty the water tank after every
operation with steam.
Risk of scalding!
■Hot steam is generated in the cooking
compartment. Do not reach into the
cooking compartment during any operation
with steam.
Risk of scalding!
■Hot liquid may spill over the sides of the
accessory when it is removed from the
cooking compartment. Remove hot
accessories with care and always wear
oven gloves.
:Warning – Risk of injury and risk of fire!
Flammable liquids can catch fire in the
cooking compartment when it is hot
(explosion). Do not fill the water tank with any
flammable fluids (e.g. alcoholic drinks). Only
fill the water tank with water or with the
descaling solution that is recommended by us.
Cleaning function
:Warning – Risk of fire!
■Loose food remnants, fat and meat juices
may catch fire when the cleaning function is
in progress. Before you start the cleaning
function, always remove the worst of the
food residues and remnants from the
cooking compartment.Do not use the
cleaning function for cleaning accessories.
Risk of fire!
■The appliance will become very hot on the
outside during the cleaning function. Never
hang combustible objects, e.g. tea towels,
on the door handle. Do not place anything
against the front of the appliance. Keep
children away from the appliance.
Risk of fire!
■If the door seal is damaged, a large amount
of heat will be generated around the door.
Do not scrub or remove the seal. Never
operate the appliance if the seal is
damaged or missing.
:Warning – Risk of serious harm to health!
The appliance becomes very hot when the
cleaning function is in progress. The non-stick
coating on baking trays and tins is destroyed
and noxious gases are released. Never clean
non-stick baking trays or baking tins using the
cleaning function. In general, you must not use
the cleaning function for cleaning accessories.
:Warning – Risk of harm to health!
The cleaning function heats up the cooking
compartment to a very high temperature so
that food remnants left over from roasting,
grilling and baking will burn off.This process
releases vapours, which can irritate the
mucous membranes. While the cleaning
function is running, keep the kitchen well
ventilated. Do not remain in the room for long
periods. Keep children and pets away. Follow
the instructions even when using the Delayed
start function with a delayed end time.
:Warning – Risk of burns!
■The cooking compartment becomes
extremely hot during the cleaning function.
Never open the appliance door. Allow the
appliance to cool down. Keep children
away from the appliance.
Risk of burns!
■;The appliance becomes very hot on the
outside during the cleaning function. Never
touch the appliance door. Allow the
appliance to cool down. Keep children at a
safe distance.

Causes of damage en
7
]Causes of damage
Causes of damage
General information
Caution!
■Accessories, foil, greaseproof paper or ovenware on
the cooking compartment floor: do not place
accessories on the cooking compartment floor. Do
not cover the cooking compartment floor with any
sort of foil or greaseproof paper. Do not place
ovenware on the cooking compartment floor if a
temperature of over 50 ºC has been set. This will
cause heat to accumulate. The baking and roasting
times will no longer be correct and the enamel will
be damaged.
■Aluminium foil: Aluminium foil in the cooking
compartment must not come into contact with the
door glass. This could cause permanent
discolouration of the door glass.
■Water in a hot cooking compartment: do not pour
water into the cooking compartment when it is hot.
This will cause steam. The temperature change can
cause damage to the enamel.
■Moisture in the cooking compartment: Over an
extended period of time, moisture in the cooking
compartment may lead to corrosion. Allow the
cooking compartment to dry after use. Do not keep
moist food in the closed cooking compartment for
extended periods of time. Do not store food in the
cooking compartment.
■Cooling with the appliance door open: Following
operation at high temperatures, only allow the
cooking compartment to cool down with the door
closed. Do not trap anything in the appliance door.
Even if the door is only left open a crack, the front of
nearby furniture may become damaged over time.
Only leave the cooking compartment to dry with the
door open if a lot of moisture was produced whilst
the oven was operating.
■Fruit juice: when baking particularly juicy fruit pies,
do not pack the baking tray too generously. Fruit
juice dripping from the baking tray leaves stains that
cannot be removed. If possible, use the deeper
universal pan.
■Extremely dirty seal: If the seal is very dirty, the
appliance door will no longer close properly during
operation. The fronts of adjacent units could be
damaged. Always keep the seal clean. Never
operate the appliance if the seal is damaged or
missing.
■Appliance door as a seat, shelf or worktop: Do not
sit on the appliance door, or place or hang anything
on it. Do not place any cookware or accessories on
the appliance door.
■Inserting accessories: depending on the appliance
model, accessories can scratch the door panel
when closing the appliance door. Always insert the
accessories into the cooking compartment as far as
they will go.
■Carrying the appliance: do not carry or hold the
appliance by the door handle. The door handle
cannot support the weight of the appliance and
could break.
Steam
Caution!
■Baking tins: Ovenware must be heat and steam
resistant. Silicone baking tins are not suitable for
combined operation with steam.
■Ovenware with areas of rust: Do not use any
ovenware which displays areas of rust. Even the
smallest spots of rust can lead to corrosion in the
cooking compartment.
■Hot water in the water tank: Hot water may damage
the steam system. Only fill the water tank with cold
water.
■Enamel damage: Do not start any operations when
there is water on the cooking compartment floor.
Before operation, wipe away the water from the
cooking compartment floor.
■Descaling solution: Do not allow any descaling
solution to come into contact with the control panel
or other surfaces on the appliance. This damages
the surfaces. If this does happen, remove the
descaling solution immediately with water.
■Cleaning the water tank: Do not clean the water tank
in the dishwasher. Otherwise, the water tank will be
damaged. Clean the water tank with a soft cloth and
standard washing-up liquid.

en Environmental protection
8
7Environmental protection
Envi r onment al pr ot ec t i on
Your new appliance is particularly energy-efficient.
Here you can find tips on how to save even more
energy when using the appliance, and how to dispose
of your appliance properly.
Saving energy
■Only preheat the appliance if this is specified in the
recipe or in the tables in the operating instructions.
■Leave frozen food to defrost before placing it in the
cooking compartment.
■Use baking tins that are dark-coloured, painted black
or have an enamel coating. These absorb the heat
particularly well.
■Remove any unnecessary accessories from the
cooking compartment.
■Open the appliance door as infrequently as possible
when the appliance is in use.
■It is best to bake several cakes one after the other.
The cooking compartment stays warm. This reduces
the baking time for the second cake. You can place
two cake tins next to each other in the cooking
compartment.
■For longer cooking times, you can switch the
appliance off 10 minutes before the end of the
cooking time and use the residual heat to finish
cooking.
Environmentally-friendly disposal
Dispose of packaging in an environmentally-friendly
manner.
This appliance is labelled in accordance with
European Directive 2012/19/EU concerning
used electrical and electronic appliances
(waste electrical and electronic equipment -
WEEE). The guideline determines the
framework for the return and recycling of used
appliances as applicable throughout the EU.

Getting to know your appliance en
9
*Getting to know your
appliance
Get t i ng to know your appl i ance
In this section, we will explain the indicators and
controls. You will also find out about the various
functions of your appliance.
Note: Depending on the appliance model, individual
details and colours may differ.
Control panel
You can set your appliance's various functions on the
control panel. Below, you will see an overview of the
control panel and the layout of the controls.
Note: On some appliances, the control knobs can be
pushed in. To push the control knob in and engage it or
to release it again, turn it to the "Off" position.
Buttons and display
You can use the buttons to set various additional
functions on your appliance. You will be able to see the
values for these on the display.
--------
Ö
#
(Buttons and display
The buttons are touch keys with sensors
underneath. Simply touch a symbol to select the
function.
The display shows symbols for active functions
and the time-setting options.
0Function selector
Use the function selector to set the heating
function or other functions.
You can turn the function selector clockwise or
anti-clockwise from the "Off" position.
8Temperature selector
Use the temperature selector to set the
temperature for the heating function or select the
setting for other functions.
You can also turn the temperature selector
clockwise or anti-clockwise. It does not have an
"Off" position.
@Water tank
Filling and emptying the water tank ~"Filling the
water tank" on page 15
Symbol Meaning
Buttons
vTime-setting options Tap the symbol repeatedly to select
the time v, timer U, duration x
and end time y.
(
)
Minus
Plus
Reduce setting values.
Increase setting values.
ŽSteam-assisted cook-
ing
Switching on steam-assisted cooking
°Rapid heating Starts or cancels rapid heating for the
cooking compartment.
!Information Displays current temperature in the
cooking compartment.
Basic settings Basic settings e.g. activate child
safety lock.
Display
´* Empty water tank Prompt to empty the water tank
³* Fill water tank Prompt to fill the water tank
,* Descale Descale the appliance
* Symbol appears on the display, depending on the situation

en Getting to know your appliance
10
Display
The cooking compartment temperature you set using
the temperature selector will be shown on the display.
In addition, you can read the settings for the time-setting
options. The value that can be set at the present time or
that is elapsing will be shown in large digits on the
display. To use the individual time-setting options, touch
the vbutton several times. If there is a red bar above
or below a symbol, this means that the value being
shown in large digits on the display refers to the
function that this symbol represents.
Types of heating and functions
Use the function selector to set the types of heating and
other functions.
To make sure you always use the right type of heating
to cook your food, we have explained the differences
and applications below.
--------
Note: For each heating function, the appliance specifies
a default temperature or level. You can accept this
value or change it in the appropriate area.
Other functions
Your new oven has yet more functions; see below for a
brief description of these.
Type of heating Temperature Use
‚CircoTherm hot air* 30 - 200 °C For baking and cooking on one or more levels.
The fan distributes the heat from the ring-shaped heating element in the back panel
evenly around the cooking compartment.
¼CircoTherm gentle 125-200 °C For gently cooking selected types of food on one level without preheating.
The fan distributes the heat from the ring-shaped heating element in the back panel
around the cooking compartment.
This heating function is used to measure both the energy consumption in air recircula-
tion mode and the energy efficiency class.
…Bread-baking setting* 180 - 240 °C For baking bread, bread rolls and baked goods that require high temperatures.
¿Reheating** 80 - 180 °C For gently reheating food or for crisping up baked goods.
„Pizza setting 30 - 275 °C For cooking pizza and dishes that require a lot of heat from underneath.
The bottom heating element and the ring-shaped heating element in the back panel
heat the cooking compartment.
†Bottom heating 30 - 250 °C For cooking in a bain marie and for baking food for extra time.
Heat is emitted from below.
ˆGrill, large area 30 - 275 °C For grilling flat items, such as steaks or sausages, for making toast, and for browning
food.
The whole area below the grill element becomes hot.
Grill, intensive from 275 °C: ‚Ÿ£
‡Circo-roasting* 30 - 250 °C For roasting poultry, whole fish and larger pieces of meat.
The grill element and the fan switch on and off alternately. The fan circulates the hot
air around the food.
ƒTop/bottom heating* 30 - 275 °C For traditional baking and roasting on one level. Especially suitable for cakes with
moist toppings.
Heat is emitted evenly from above and below. This type of heating is used to measure
the energy consumption in the conventional mode.
* Steam assistance possible with this type of heating from 80 °C and over (water tank must be full before appliance is operated)
** Steam heating function (water tank must be full before appliance is operated)
Function Use
AInterior lighting Switches on the interior lighting; all other functions remain off.
Makes it easier to clean the cooking compartment, for example.

Accessories en
11
--------
Temperature
Use the temperature selector to set the temperature in
the cooking compartment. It can also be used to select
the grill and cleaning settings, for example.
The settings appear in the display.
Notes
■The temperature can be set in 1-degree increments
up to 100 °C, and in 5-degree increments thereafter.
■For temperature settings above 275 °C for the Grill
type of heating, the appliance reduces the
temperature to approx. 250 °C after approx.
20 minutes.
Cooking compartment
Various functions in the cooking compartment make
your appliance easier to use. For example, the cooking
compartment is well lit and a cooling fan prevents the
appliance from overheating.
Opening the appliance door
If you open the appliance door when the appliance is in
operation, the appliance will continue to operate as
before.
Interior lighting
With most heating functions and other functions, the
interior lighting in the cooking compartment will remain
lit while the oven is in operation. When the function
selector is turned to bring operation to an end, the
lighting will go out.
By turning the function selector to the interior lighting
setting, you can switch on the lighting without heating
the oven. This makes it easier to clean your appliance,
for example.
Cooling fan
The cooling fan switches on and off as required. The
hot air escapes above the door.
Caution!
Do not cover the ventilation slots. Otherwise, the
appliance may overheat.
So that the cooking compartment cools down more
quickly after operation, the cooling fan continues to run
for a certain period afterwards.
_Accessories
Ac c e s s o r i e s
Your appliance is accompanied by a range of
accessories. Here, you can find an overview of the
accessories included and information on how to use
them correctly.
Control accessories
The accessories supplied may differ depending on the
appliance model.
--------
Only use original accessories. They are specially
adapted for your appliance.
You can buy accessories from the after-sales service,
from specialist retailers or online.
Note: The accessories may deform when they become
hot. This does not affect their function. Once they have
cooled down again, they regain their original shape.
Inserting accessories
The cooking compartment has four shelf positions. The
shelf positions are counted from the bottom up.
Always insert accessories between the two guide rods
for the shelf position.
Accessories can be pulled out approximately halfway
without tipping.
2Cleaning functions
~"Cleaning function" on page 22
EasyClean šcan be used to clean the cooking compartment when it is slightly dirty.
The self-cleaning function ˜cleans the cooking compartment virtually by itself.
Descaling ,your appliance keeps it working properly.
©Programs For many types of food, the appliance has preprogrammed setting values that you can
use.
~"Programmes" on page 19
Wire rack
For ovenware, cake tins and ovenproof
dishes.
For roasts, grilled items and frozen
meals.
Universal pan
For moist cakes, pastries, frozen meals
and large roasts.
It can be used to catch dripping fat when
you are grilling directly on the wire rack.

en Accessories
12
Notes
■Make sure that you always insert the accessories
into the cooking compartment the right way round.
■Always insert the accessories fully into the cooking
compartment so that they do not touch the appliance
door.
■Take any accessories that you will not be using out
of the cooking compartment.
■The shelves can be taken out of the cooking
compartment for cleaning. ~Page 25
Locking function
The accessories can be pulled out approximately
halfway until they lock in place. The locking function
prevents the accessories from tilting when they are
pulled out. The accessories must be inserted into the
cooking compartment correctly for the tilt protection to
work properly.
When inserting the wire rack, ensure that lug ‚is at the
rear and is facing downwards. The open side must be
facing the appliance door and the outer rail must be
facing downwards ¾.
When inserting baking trays, make sure that the recess
‚is at the rear and is facing downwards. The sloping
edge of the accessory ƒmust be facing towards the
appliance door.
Example in the picture: Universal pan
Combining accessories
You can insert the wire rack and the universal pan at
the same time to catch drops of liquid.
When inserting the wire rack, ensure that both spacers
‚are at the rear edge. When inserting the universal
pan, the wire rack is on top of the upper guide rod of
the shelf position.
Example in the picture: Universal pan
Optional accessories
You can purchase optional accessories from the after-
sales service and specialist retailers, or on the Internet.
You will find a comprehensive range of products for
your appliance in our brochures and on the Internet.
Both availability and whether it is possible to order
online differ between countries. Please see your sales
documents for more details.
Note: Not all optional accessories are suitable for every
appliance. When purchasing, please always quote the
exact designation (E no.) of your appliance.
~"Customer service" on page 31
--------
DD
D
D
E
Accessories
Baking and roasting shelf
Baking tray
Universal pan
Baking tray, non-stick
Universal pan, non-stick
Extra-deep pan
Steaming set for ovens
Profi pan
Lid for the Profi pan
Pizza tray
Grill tray
Ceramic brick
Glass roasting dish, 5.1 litres
Glass pan
ComfortFlex rail (1 level)*
3 x fully extendable pull-out rack*
*Accessory does not fit in every appliance, quote the E no. when order-
ing
D
D
D

Before using for the first time en
13
KBefore using for the first
time
Be f o r e us i ng for the first ti me
Before you can use your new appliance, you must
make some settings. You must also clean the cooking
compartment and accessories.
Before using for the first time
Before using the appliance for the first time, ask your
water supplier about the hardness of your tap water.
Caution!
■Damage to the appliance caused by the water
hardness being set incorrectly. The appliance cannot
remind you to descale it at the right time. Ensure that
the water hardness is set correctly.
■Using unsuitable liquids may damage the appliance.
Do not use distilled water, highly chlorinated tap
water (>40 mg/l) or other liquids.
Only use cold, fresh tap water, softened water or
non-carbonated mineral water.
Notes
■If your water is very hard, we recommend that you
use softened water.
■If you only use softened water, you can set the water
hardness range to "softened".
■If you use mineral water, set the water hardness
range to "very hard".
■If you use mineral water, you must only use non-
carbonated mineral water.
Initial use
As soon as the appliance is connected to the power
supply, ‚ƒ:‹‹ flashes in the display.
Setting the time
Use the (or )buttons to set the current time.
After a few seconds, the time that has been set is
adopted.
Changing the time
1. Press the vbutton repeatedly until the vsymbol
lights up.
2. Use the (or )button to change the time.
After a few seconds, the time that has been set is
adopted.
Setting the water hardness
Set the water hardness in the basic settings. ~"Basic
settings" on page 18
Cleaning the cooking compartment
To eliminate the new-appliance smell, heat up the
cooking compartment without anything in it and with the
oven door closed.
1. Remove the accessories from the cooking
compartment.
2. Remove any leftover packaging, such as polystyrene
pellets, from the cooking compartment.
3. Before heating the appliance, wipe the smooth
surfaces in the cooking compartment with a soft,
damp cloth.
4. Fill the water tank. ~"Filling the water tank"
on page 15
5. Set the specified type of heating and temperature for
steam-assisted heating. ~"Operating the
appliance" on page 14 ~"Steam" on page 15
6. After heating up the appliance with steam
assistance, heat it without steam assistance.
7. Set the specified type of heating and temperature for
heating without steam assistance.
8. Keep the kitchen ventilated while the appliance is
heating.
9. Switch off the appliance after the specified cooking
time.
10. Wait until the cooking compartment has cooled
down.
11. Clean the smooth surfaces with soapy water and a
dish cloth.
12. Empty the water tank and dry the cooking
compartment. ~"After every steam operation"
on page 16
Cleaning the accessories
Clean the accessories thoroughly using soapy water
and a dish cloth or soft brush.
Setting Water hardness range
mmol/l German
(°dH)
French (°fH)
™‚‚ ‹= softened - - -
™‚‚ ‚ = soft Up to 1.3 Up to 7.3 Up to 13
™‚‚ ƒ = medium 1.3–2.5 7.3–14 13–25
™‚‚ „ = hard 2.5–3.8 14–21.3 25–38
™‚‚ … = very hard Above 3.8 Above 21.3 Above 38
Steam-assisted heating
Type of heating CircoTherm ‚steam-assisted programme
¥
Temperature 200 °C
Cooking time 30 minutes
Heating without steam assistance
Type of heating Top/bottom heating ƒ
Temperature 240 °C
Cooking time 30 minutes
Setting Water hardness range
mmol/l German
(°dH)
French (°fH)

en Operating the appliance
14
1Operating the appliance
Oper at i ng the appl i ance
You have already learnt about the controls and how
they work. Now we will explain how to apply settings on
your appliance.
Switching the appliance on and off
Use the function selector to switch the appliance on or
off. Turning the function selector to any position other
than the "Off" position switches on the appliance. To
switch off the appliance, always turn the function
selector to the "Off" position.
Setting the type of heating and temperature
It is very easy to use the function and temperature
selector to make settings for your appliance. To find out
which type of heating is best for which type of food,
refer to the beginning of the instruction manual.
~"Getting to know your appliance" on page 9
Example in the picture: CircoTherm Hot Air ‚at
160 °C.
1. Use the function selector to set the type of heating.
2. Use the temperature selector to set the temperature
or grill setting.
The appliance starts to heat up after a few seconds.
Note: If œflashes in the display, the temperature in the
cooking compartment is too high for the selected
operating mode. Switch the appliance off, wait until it
has cooled down and then switch it back on again.
Once your food is cooked, turn the function selector to
the "Off" position to switch the appliance off.
Note: You can set both a cooking time and an end time
on the appliance. ~"Time-setting options" on page 17
Changing
The heating function and temperature can be changed
at any time using the relevant selector.
If you change the heating function, the temperature will
be changed to the corresponding default value.
Temperature display
As soon as the appliance heats up, the /symbol
appears in the display. The lines are filled from the
bottom to the top as the cooking compartment heats
up.
When you are preheating the appliance, the optimal
time to place your food in the cooking compartment is
when the /symbol first goes out.
■Appliance heats up (fig. !)
■Temperature has been reached (fig. ")
Residual heat
When the appliance is switched off, the temperature
indicator shows the residual heat in the cooking
compartment. The lower the temperature drops, the
less the indicator is filled.
Notes
■The temperature indicator only shows the increasing
temperature for types of heating for which a
temperature is set. With cleaning functions, for
example, it is filled immediately.
■Due to thermal inertia, the temperature displayed
may be slightly different to the actual temperature
inside the cooking compartment.
Rapid heating
With Rapid heating, you can shorten the heat-up time.
Suitable heating functions include:
■‚CircoTherm hot air
■…Bread-baking setting
■ƒTop/bottom heating
Only use rapid heating when a temperature of over
100 °C has been selected.
To achieve an even cooking result, do not place your
food into the cooking compartment until rapid heating is
complete.
1. Set the type of heating and temperature.
2. Touch the °button.
The /symbol appears in the display, and the
%arrows are filled from the bottom to the top.
The oven starts to heat up after a few seconds.
Once rapid heating is complete, an audible signal
sounds and the °symbol goes out. Place your food in
the cooking compartment.
&
2
1

Steam en
15
`Steam
St e a m
Cook food with steam assistance.
:Warning – Risk of scalding!
When you open the appliance door, hot steam can
escape. Steam may not be visible, depending on its
temperature. When opening, do not stand too close to
the appliance. Open the appliance door carefully. Keep
children away.
:Warning – Risk of scalding!
The water tank may heat up while the appliance is in
operation. Allow the water tank to cool down before
emptying it.
Steam-assisted cooking
When you cook with steam assistance, steam is
introduced into the cooking compartment at various
intervals and with varying degrees of intensity. This
gives you a better cooking result.
Your food
■Becomes crispy on the outside
■Develops a glossy surface
■Is succulent and tender on the inside
■Only undergoes a minimal reduction in volume
Use the settings in the tables.~"Tested for you in our
cooking studio" on page 31~"Programmes"
on page 19
Steam intensity
Different intensity levels are available for steam-assisted
cooking:
■low = ™
■high = ¥
Suitable heating functions
You can switch on steam assistance for the following
heating functions:
■CircoTherm hot air ‚
■Top/bottom heating ƒ
■Circo-roasting ‡
■Bread-baking setting …
Starting
1. Fill the water tank.
2. Set the type of heating and temperature.
Note: When you cook with steam, the appliance can
be set to between 80 and 240 °C.
3. Touch the Žbutton to switch on the steam intensity
you require.
The appliance starts.
Cancelling steam addition
To switch off the added steam function early, touch the
Žbutton repeatedly until the steam intensity has been
deactivated.
Note: The appliance will continue to operate, but steam
will not be injected into the cooking compartment.
Finishing
To switch off the appliance, turn the function selector to
the "Off" position. ~"After every steam operation"
on page 16
Reheating
With the "Reheat" heating function ¿, you can gently
reheat food that has already been cooked or crisp up
day-old baked goods. The added steam function is
activated automatically.
Starting
1. Wait until the cooking compartment has cooled
down.
2. Fill the water tank.
3. Use the function selector to set "Reheating ¿".
4. Use the temperature selector to set the temperature.
The appliance starts.
Finishing
To switch off the appliance, turn the function selector to
the "Off" position. ~"After every steam operation"
on page 16
Filling the water tank
Make that you have set the correct water hardness
range. ~"Basic settings" on page 18
:Warning – Risk of injury and risk of fire!
Only fill the water tank with water or with the descaling
solution that is recommended by us. Do not pour any
flammable liquids (e.g. alcoholic drinks) into the water
tank. Due to hot surfaces, vapours from flammable
liquids may catch fire in the cooking compartment
(explosion). The appliance door may spring open. Hot
steam and jets of flame may escape.
:Warning – Risk of burns!
The water tank may heat up while the appliance is in
operation. Wait until the water tank has cooled down
after the previous appliance operation. Remove the
water tank from the water tank recess.
Caution!
The appliance may become damaged due to the use of
unsuitable liquids.
Do not use distilled water, highly chlorinated tap water
(> 40 mg/l) or other liquids.
Only use cold, fresh tap water, softened water or
uncarbonated mineral water.
Notes
■If your water is very hard, we recommend that you
use softened water.
■If you only use softened water, you can set the water
hardness range to "softened".
■If you use mineral water, set the water hardness
range to "very hard".
■If you use mineral water, you must only use non-
carbonated mineral water.

en Steam
16
1. Press on the water tank (Fig. !).
2. Pull out the water tank (Fig. ").
3. Press the lid of the water tank down and unscrew it
(Fig. #).
4. Fill with water (Fig. $).
5. Screw the lid of the water tank closed (Fig. %).
6. Place the water tank back in the opening and press
it down until it clicks into place (Fig. &).
Refilling the water tank
If the water tank is empty, an audible signal sounds and
the "Fill water tank" symbol appears on the
display.~"Getting to know your appliance" on page 9
1. Remove and refill the water tank.
2. Insert the full water tank.
Note: If you do not refill the water tank, operation
continues without steam-assisted cooking.
After every steam operation
:Warning – Risk of scalding!
When you open the appliance door, hot steam can
escape. Steam may not be visible, depending on its
temperature. When opening, do not stand too close to
the appliance. Open the appliance door carefully. Keep
children away.
:Warning – Risk of burns!
The appliance becomes hot during operation. Allow the
appliance to cool down before cleaning.
:Warning – Risk of scalding!
The water tank may heat up while the appliance is in
operation. Allow the water tank to cool down before
emptying it.
Caution!
Enamel damage: Do not start any operations when
there is water on the cooking compartment floor. Before
operation, wipe away the water from the cooking
compartment floor.
The remaining water is pumped back into the water
tank after every operation with steam. Then empty and
dry the water tank. Moisture remains in the cooking
compartment. Dry the cooking compartment.
Note: Remove limescale marks with a cloth soaked in
vinegar, then rinse with clean water and dry with a soft
cloth.
Emptying the water tank
Caution!
■Do not dry the water tank in the hot cooking
compartment. This will damage the water tank.
■Do not clean the water tank in the dishwasher. This
will damage the water tank.
1. Press on the water tank.
2. Pull out the water tank.
3. Unscrew the lid on the water tank.
4. Empty the water tank, clean it with detergent and
then rinse it thoroughly with clean water.
5. Dry all parts with a soft cloth.
6. Rub the seal on the lid until dry.
7. Leave the water tank to dry with the lid off.
8. Place the lid on the water tank and screw it on.
9. Put the water tank in.
Drying the cooking compartment by hand
1. Allow the appliance to cool down.
2. Remove any food remnants from the walls of the
cooking compartment.
3. Dry the cooking compartment with a sponge.
4. Leave the appliance door open for 1 hour so that the
cooking compartment dries completely.
2
1
g

Time-setting options en
17
OTime-setting options
Ti me- s et t i ng opt i ons
Your appliance has different time-setting options.
An audible signal sounds once the cooking time or
timer duration has elapsed. You can cancel the audible
signal early by pressing the 0button.
Note: You can change how long the audible signal
sounds for in the basic settings. ~"Basic settings"
on page 18
Note: If you have set a time-setting option, the time
interval increases if you set a higher value. Example:
You can set a cooking time of up to one hour in one-
minute increments; for cooking times over one hour,
you can set a cooking time in five-minute increments.
Setting the timer
The timer can be set when the appliance is switched on
or off. It has its own audible signal so that you can tell
whether it is the timer duration or a cooking time that
has elapsed.
Tip: If the set timer duration is the duration for which
you want to cook your food, use the cooking time. The
appliance then switches off automatically.
1. Press the 0button repeatedly until the Qsymbol is
selected.
2. Use the (and)buttons to set the timer duration.
– Default value for the (button = 5 minutes
– Default value for the )button = 10 minutes
The setting is applied
automatically. The timer duration starts to count
down after a few seconds.
Note: When the set time has elapsed, a signal sounds.
To end the timer, press the 0button.
Setting the cooking time
Once the set cooking time has elapsed, the appliance
switches off automatically. The function can only be
used in combination with a type of heating.
1. Set the type of heating and temperature.
2. Press the 0button repeatedly until the xsymbol is
selected.
3. Use the (and )buttons to set the cooking time.
– Default value for the (button = 10 minutes
– Default value for the )button = 30 minutes
The setting is applied automatically. The appliance
starts heating after a few seconds. The duration
counts down in the display.
Once the cooking time has elapsed, an audible signal
sounds and the appliance brings the operating mode to
an end automatically.
To switch off, turn the function selector back to the "Off"
position.
Setting the end time
You can delay the time at which cooking is due to
finish. You can, for example, put your food in the
cooking compartment in the morning and set the
cooking time so that it is ready at lunch time.
Notes
■Ensure that food is not left in the cooking
compartment for too long as it may spoil.
■Do not adjust the end time once the appliance is
already in operation. Otherwise the cooking result
would no longer be satisfactory.
1. Place the food onto the appropriate accessory in the
cooking compartment and close the appliance door.
2. Set the type of heating and temperature.
3. Press the 0button repeatedly until the xsymbol is
selected.
4. Use the (and )buttons to set the cooking time.
5. Press the 0button repeatedly until the ysymbol is
selected.
6. Use the (and )buttons to set the end time.
The appliance applies the settings after a few
seconds. The end time is shown in the display. Once
the appliance starts, the time begins counting down.
As soon as the end time has been reached, an audible
signal sounds and the appliance ends the operation
automatically.
To switch off, turn the function selector back to the "Off"
position.
Time-setting option Use
QTimer The timer functions like an egg timer. It runs
independently of the appliance when it is
heating and of other time-setting options, and
does not affect the appliance.
xCooking time Once the set cooking time has elapsed, the
appliance automatically stops heating.
yEnd time Enter a cooking time and the required end
time. The appliance starts up automatically so
that it finishes cooking at the required time.
0Time Set the time, e.g. after a power cut, or change
it, e.g. from summer time to winter time.

en Childproof lock
18
Setting the time
You can only change the time when no other time-
setting option is active and the function selector is at
the "Off" position.
1. Press the 0button repeatedly until the 0symbol is
selected.
2. Use the (or )button to change the time.
The appliance applies the time after a few seconds.
Note: You can go to the basic settings to specify
whether or not the time should be shown in the display.
Checking, changing or deleting settings
1. Press the 0button repeatedly until the appropriate
symbol is selected.
2. If required, use the (or )button to change the
setting. To delete a time-setting option, set ‹‹:‹‹.
The setting is applied automatically.
AChildproof lock
Childproof lock
Your appliance is equipped with a childproof lock so
that children cannot switch it on accidentally or change
any settings.
Notes
■You can go to the basic settings to specify whether
you want the option to set the childproof lock.
~"Basic settings" on page 18
■If a hob is connected, it will not be affected by the
childproof lock on the oven.
Automatic childproof lock
The control panel is locked so that the appliance cannot
be switched on. To switch it on, the automatic
childproof lock must be interrupted. After the appliance
operation, the control panel is locked automatically.
To set or interrupt the automatic childproof lock, the
function selector must be in the "Off" position.
1. Press and hold the !button for approx.
four seconds.
™‹‹ ‹or ™‹‹ ‚appears in the display.
2. Use the temperature selector to change the setting
as required.
–‹= deactivate
–‚= activate
3. When you have finished, press and hold the !button
again for approx. four seconds to confirm the
settings.
The basic setting is applied.
Cancelling
1. Press and hold the vbutton until the 1symbol
goes out in the display.
2. Set the type of heating and temperature.
As soon as the appliance is switched off, the automatic
childproof lock is reactivated.
One-time childproof lock
The control panel is locked so that the appliance cannot
be switched on. To switch it on, the one-time childproof
lock must be deactivated. After the appliance is
switched off, the control panel is no longer locked.
To set, activate or deactivate the one-time childproof
lock, the function selector must be at the "Off" position.
Activating
Press and hold the vbutton until the 1symbol
appears in the display.
Deactivating
Press and hold the vbutton until the 1symbol goes
out in the display.
QBasic settings
Ba s i c set t i ngs
There are various settings available to you in order to
help use your appliance effectively and simply. You can
change these settings as required.
List of basic settings
Depending on the features of your appliance, not all
basic settings will be available.
Basic setting Options
™‹
‹
Automatic childproof lock ‹= no*
‚= yes
™‹
‚
Audible signal duration upon
completion of a cooking time
or timer duration
‚= approx. 10 seconds
ƒ= approx. 30 seconds*
„= approx. 2 minutes
™‹
ƒ
Amount of time until a setting
is applied
‚= approx. 3 seconds*
ƒ= approx. 6 seconds
„= approx. 10 seconds
™‹
„
Button tone that sounds when
a button is touched
‹= off
‚= on*
™‹
…
Brightness of the display illu-
mination
‚= dark
ƒ= medium*
„= bright
™‹
†
Display time of day ‹= hide the time
‚= display the time*
™‹
‡
Enable childproof lock activa-
tion?
‹= no
‚= yes*
ƒ= yes, with locked door**
™‹
ˆ
Interior lighting on when
appliance in operation?
‹= no
‚= yes*

Programmes en
19
--------
Note: If your appliance is equipped with the Home
Connect function, you will find the Home Connect
settings at the end of the basic settings for your
appliance.
The Home Connect settings begin with •’.
Changing the basic settings
The function selector must be set to the "Off" position.
1. Press and hold the !button for approx.
four seconds.
The first basic setting appears in the display,
e.g. ™‹‹ ‹.
2. Use the temperature selector to change the setting
as required.
3. Use the )or (button to continue going through all
the basic settings, and use the temperature selector
if you want to change any of these settings.
4. When you have finished, press and hold the !button
again for approx. four seconds to confirm the
settings.
This applies all of the basic settings.
You can change the basic settings again at any time.
PProgrammes
Pr ogr ammes
You can prepare food very easily using the various
programmes. Simply select a programme and the
appliance will apply the optimal settings for you.
To achieve good results, the cooking compartment
must not be too hot. Allow the cooking compartment to
cool before starting the programme.
Information on the settings
■The cooking result depends on the quality of the
food and the type of cookware. For an optimal
cooking result, only use food that is fresh and in
good condition and meat that is chilled to
refrigerator temperature. For frozen food, only use
food straight out of the freezer.
■For all food, you are asked to enter the weight. The
appliance then applies the time and temperature
settings for you.
It is not possible to set weights outside the
preprogrammed weight range.
■It is therefore important that you use heat-resistant
cookware.
■Information on the right kind of cookware to use and
tips and tricks for preparing your food can be found
at the end of the instruction manual.
Steam
For the steam programme, the appliance provides you
with programmes you can use to prepare your meals
easily and professionally.
Information about the steam functions can be found in
the relevant sections. ~"Steam" on page 15
:Warning – Risk of scalding!
When you open the appliance door, hot steam can
escape. Steam may not be visible, depending on its
temperature. When opening, do not stand too close to
the appliance. Open the appliance door carefully. Keep
children away.
Selecting a dish
The following table shows the corresponding setting
™‹
‰
Cooling fan run-on time ‚= short
ƒ= medium*
„= long
…= extra long
™‹
Š
Telescopic rails retrofitted?** ‹= no* (for rails and single
pull-out system)
‚= yes (for double and triple
pull-out systems)
™‚
‹
Sabbath mode available? ‹= no*
‚= yes
™‚
‚
Water hardness** ‹= softened
‚= soft (up to 1.3 mmol/l)
ƒ= medium (1.3 - 2.5 mmol/
l)
„= hard (2.5 - 3.8 mmol/l)
…= very hard* (above
3.8 mmol/l)
™‚
ƒ
Reset all values to factory set-
tings?
‹= no*
‚= yes
* Factory setting (factory settings may vary depending on the appli-
ance model)
** Not available for all appliance types.
Programme Food Cookware Weight range Shelf posi-
tion
Set weight Information
˜‚ Plaited loaf, savarin -Baking tray with
greaseproof
paper
0.6–1.5 kg 3 Dough
weight
The cooking compart-
ment must be cold to
begin with.
˜ƒ Proving dough Yeast dough Bowl on wire
rack
0.5–1.5 kg 2 Dough
weight
The cooking compart-
ment must be cold to
begin with.
˜„ Wheat bread, multi-
grain wheat bread on
a baking tray*
-Baking tray with
greaseproof
paper
0.5–2.0 kg 2 Dough
weight
The cooking compart-
ment must be cold to
begin with.

en Programmes
20
Setting a program
You will be guided through the entire setting process for
your chosen food.
1. Fill the water tank.
2. Use the function selector to set programs ©.
˜‚ will appear on the display.
3. Use the (or )button to select the program.
4. Use the temperature selector to set the weight.
The program will start after a few seconds.
Once the cooking time has elapsed, an audible signal
will sound and the appliance will bring the operating
mode to an end automatically. To silence the signal
tone, press the 0button.
If you are not satisfied with the cooking result, you can
cook your food for a little longer.
Adding extra cooking time
Use the )button to set the amount of extra cooking time
you want to add. The appliance will then start cooking
the food for the extra time you set.
Cancelling
Turn the function selector to the function you require or
back to "Programs" to select the program you require.
Switching off the appliance
Turn the function selector to the "Off" position.
˜… Wheat bread, multi-
grain wheat bread in a
loaf tin
- Cake tin,
greased and
floured
0.8–2.0 kg 2 Dough
weight
The cooking compart-
ment must be cold to
begin with.
˜† White bread on a bak-
ing tray
-Baking tray with
greaseproof
paper
0.5–2.0 kg 2 Dough
weight
If you are baking two
loaves at the same time,
enter the weight of the
heavier bread
˜‡ Multi-grain rye bread - Cake tin,
greased and
floured
0.8–2.0 kg 2 Dough
weight
The cooking compart-
ment must be cold to
begin with.
˜ˆ Flatbread -Baking tray with
greaseproof
paper
0.4–1.0 kg 2 Dough
weight
The cooking compart-
ment must be cold to
begin with.
˜‰ Chicken, not stuffed Ready to cook,
seasoned
Roasting dish
without lid or
universal pan
0.9–1.5 kg 2 Chicken
weight
Place in the cookware
with the breast at the top.
˜Š Chicken pieces Ready to cook,
seasoned
Roasting dish
without lid or
universal pan
0.1–0.8 kg 3 Weight of
the heavi-
est piece
-
˜‚‹ Duck, unstuffed Ready to cook,
seasoned
Roasting dish
without lid or
universal pan
1.3–2.5 kg 2 Duck
weight
Place in the cookware
with the breast at the top.
˜‚‚ Goose, unstuffed Ready to cook,
seasoned
Roasting dish
without lid or
universal pan
2.3–4.5 kg 2 Goose
weight
Place in the cookware
with the breast at the top.
˜‚ƒ Fillet of beef, medium Ready to cook,
seasoned
Roasting dish
without lid or
universal pan
0.8–2.0 kg 2 Meat
weight
The meat does not need
to be seared beforehand.
˜‚„ Fish, whole Ready to cook,
seasoned
Roasting dish
without lid or
universal pan
0.8–1.5 kg 2 Fish weight Place in the dish in a
swimming position.
˜‚… Shoulder of pork Boned, sea-
soned
Roasting dish
without lid or
universal pan
0.8–2.5 kg 2 Meat
weight
The meat does not need
to be seared beforehand.
˜‚† Joint of pork, with
crackling
E.g. shoulder,
seasoned, and
scored rind
Roasting dish
without lid or
universal pan
1.0–2.0 kg 2 Meat
weight
Place in the cookware
fatty side up; salt the rind
well
Programme Food Cookware Weight range Shelf posi-
tion
Set weight Information
Other manuals for B6AVH7A.1
1
Table of contents
Other NEFF Oven manuals

NEFF
NEFF C24MS31 0B Series User manual

NEFF
NEFF B58CT28 0B Series User manual

NEFF
NEFF C17DR02.1 User manual

NEFF
NEFF B45E62N0 User manual

NEFF
NEFF C88FT38 0B Series User manual

NEFF
NEFF B1691N2GB Reference manual

NEFF
NEFF B46E74N0 User manual

NEFF
NEFF C47D22N0 User manual

NEFF
NEFF B14P42.3GB User manual

NEFF
NEFF B45M42.5 User manual

NEFF
NEFF C15DR00N0 User manual

NEFF
NEFF B57CS22G1 User manual

NEFF
NEFF C47C42S0 User manual

NEFF
NEFF B45E54 0 Series User manual

NEFF
NEFF B1DCC1A 0B Series User manual

NEFF
NEFF U16E74.3AU User manual

NEFF
NEFF B69CS3A 0 Series User manual

NEFF
NEFF C16MT23 0 Series User manual

NEFF
NEFF B1432B2GB Safety guide

NEFF
NEFF B47CR33 0B Series User manual