Nemaxx VKM0325LED User manual

MOTORIZED CASSETTE AWNING
MOTORISIERTE KASSETTENMARKISE
STORE À COFFRE MOTORISÉ
TENDA DA SOLE MOTORIZZATA CON CASSONETTO
TOLDO MOTORIZADO CON COFRE
GEMOTORISEERDE CASSETTELUIFEL
VKM0325LED • VKM3503LED • VKM0403LED
VKM4503LED • VKM0503LED • VKM0603LED
ORIGINAL OPERATING INSTRUCTIONS / ORIGINAL-BETRIEBSANLEITUNG
MODE D´EMPLOI ORIGINAL / ISTRUZIONI PER L’USO ORIGINALI
INSTRUCCIONES DE USO ORIGINALES / ORIGINELE GEBRUIKSAANWIJZING
EN
page
2 - 21
DE
Seite
22 - 41
page
42 - 61
FR
pagina
62 - 81
IT
página
82 - 101
ES
page
102 - 121
NL
EN / DE / FR / IT / ES / NL

2
KEN002VKM
v1a • 17.04.2020
EN
INDEX
Brief Introduction ................................................................................................................................................. 3
Safety Instructions............................................................................................................................................... 4
Description and technical data of Nemaxx cassette awning ............................................................................... 8
Installation steps ................................................................................................................................................11
Operation instructions........................................................................................................................................ 16
Cleaning and maintenance................................................................................................................................ 20
Disposal............................................................................................................................................................. 21
SIMPLIFIED DECLARATION OF CONFORMITY............................................................................................. 21
3
KEN002VKM
v1a • 17.04.2020
EN
These instructions are applicable to the item: Nemaxx Motorized Cassette Awning
VKM0325LED, VKM3503LED, VKM0403LED, VKM4503LED, VKM0503LED, VKM0603LED.
Nemaxx Motorized Cassette Awning is a fashionable economic outdoor shading product.
The fabric of your awning is of superior quality with an all-weather UV treatment.
This treatment makes the awning waterproof and will protect the fabric for several years. When retracted, the
fabric and mechanism are protected from the weather by the cassette housing.
The screen can be stored completely inside the cassette thus effectively protects screen and components,
extending lifespan of the awning. Angle of spread screen can be adjusted expediently after the awning is fully
opened. Spreading length of screen can also be controlled by adjusting stop place of motor.
Please close your awning after each use to keep the fabric in good condition. This will prevent dust and dirt
from accumulating on it and will ensure the durability of your awning for many years.
Our awnings require little maintenance.
Keep the frame clean by wiping with damp cloth soaked in a warm mild detergent solution. Polish off with a
second damp cloth that has been soaked in clean warm water.
The cover may be rinsed with a cool mild detergent solution and rinsed with clean cold water.
Nemaxx Motorized Cassette Awning is of rational and cultured structure, stylish appearance.
It is the ideal and excellent shading product for modern stores, buildings as well as family houses.
Dear Customer,
We highly appreciate you for purchasing our Nemaxx Motorized Cassette Awning.
For your safety and better use of the awning, please read the users’ manual thoroughly before installation and
operation.
Thank you.
Before you start
Proper use of the product
The product is not designated for commercial use. Any other type of use is not permitted!
This product should be used for sun protection only.
Symbols used
Read the original operating instructions through before use. Comply with all safety instructions
DANGER! Type and source of danger! - Ignoring a danger sign may cause a danger to life and limb
CAUTION! - This danger sign warns of damage to the product, the environment or damage to property
Note: This symbol indicates information that will help you to better understand the processes.
Note: This symbol indicates that this forbidden ist.
BRIEF INTRODUCTION
4
KEN002VKM
v1a • 17.04.2020
EN
GENERAL.
CAUTION
●WARNING – IT IS IMPORTANT FOR SAFETY OF PERSONS TO FOLLOW THESE INSTRUCTIONS
●SAVE THESE INSTRUCTIONS
●Before installing the awning, you are expressly obliged to check the correctness of the
ordered colour and length, so that further costs can be avoided You will find details of the
size, length and colour on a sticker on the side of the awning. If you cannot find it or if the
size, length or colour is incorrect, please inform us urgently before assembly in your interest,
otherwise costs will be incurred which we cannot accept.
●Read this instruction manual carefully before using the appliance. It contains important information
for your safety as well operating and maintenance advice.
●Follow all safety instructions to avoid damage through improper use! Follow all warning notices on
the appliance.
●Always comply with the all applicable domestic and international safety, health, and working regula-
tions.
●Keep this instruction manual for future use. Should this appliance be passed on to a third party, this
instruction manual must be included.
●Use this appliance only for its intended use.
●No responsibility is accepted for damage resulting from improper use or non-compliance with these
instructions.
●Before opening the awning, make sure all the xing bolts and security devices are properly
installed and tightened.
●Always close the awning during heavy rain, storms, snowfall or the awning is not in use.
●Failed to observe the instrution may lead to material and constructional damage of the awning.
The folding arms of the awning are under tension and can cause damage and injury when they
are open up suddenly.
●The product may only be put into operation when it is in a perfect condition.
●Do not allow children and unauthorised persons to play with this awning.
●Do not allow the product to be operated by persons with limited physical, sensory or mental
capabilities or a lack or experience and know-ledge.
●All components of the product, in particular, the safety mechanisms, must be assembled correctly
in order to ensure trouble-free operation.
●The screen should not be used in a limp state or else it will affect the appearance and security.
●After use, always store the remote control in a dry and safe place.
●The most ideal state of the tubular motor is preset at the factory and should not require any major
adjustment in the process of using.
●It is better to install the receiver indoor, protecting it from the rain and sunshine.
●The customer must not disassemble the body of the awning, especially the arms. When having
problems, you may turn to the professionals. Otherwise, people could be injured.
●To keep your awning cover in perfect condition, always close your awning after use as this will
prevent dust and dirt collecting on the cover and will ensure your awning to last for many years.
●If you want to change the distance of expanding, please use the adjusting sticks to adjust the
motor, “-” for increasing distance, “+” for decreasing the distance.
●The mounting material is designed for assembly to concrete and reinforced walls. (e. g brick or
limestone). Another suitable bolt anchor must be used if the unit is mounted on walls consisting of
other materials.
IMPORTANT SAFETY INSTRUCTIONS
5
KEN002VKM
v1a • 17.04.2020
EN
IT IS FORBIDDEN
●Conversions, independent modifications and the use of non-approved parts are not permitted.
●Awnings should not be left open during windy conditions or heavy rain. When the wind force is
over 4 degrees, please close the awning.
●It is forbidden to open the awning if there is a heavy rain, snow or ice. There is a risk that the
awing may be damaged or fall
●The automatic control must be deactivated in the event of a risk of frost
●To avoid any risks, no additional objects may be attached to the awning.
●Never try to disassemble the awning or repair the awning by yourself. Consult a competent
technician for help.
ASSEMBLY
CAUTION
●Please have professionals install the Nemaxx Motorized Cassette Awning.
●Means for disconnection having a contact separation in all poles must be incorporated in the fixed
wiring in accordance with the wiring rules.
●When you are ready to unpack and assemble the awning, make sure that you have the appropri-
ate tools, sufficient operators (3 persons are suggested) and space, and a clean and dry area to
perform the installation.
●Switch the power off before cable installation.
●Before installing the product, remove the unnecessary cord and disable any equipment not
needed for power operation.
●This awning unit is heavy; do not attempt to lift this unit onto the wall brackets without assistance
from a second person.
IT IS FORBIDDEN
●Never install it in high and windy places, as the sunshade may drop and hurt people.
●Do not use it in places that have vibrations or impulsions.
●Do not use it in places of high temperature such as walls near furnaces.
●Do not hang anything on the frame or on the folding arms as the awning may fall down and
cause damage or personal injury.
CHOOSING THE SAFE LOCATION
CAUTION
●The installation can be made by non-professionals assuming the instruction is followed correctly.
Should you have any trouble during assembly, please consult a qualified person for help .
●Please use all the screws and nuts correctly during installation as it is very dangerous if you leave
it loose.
●Be careful with your fingers during installation.
CAUTION
●Please have professionals install the Nemaxx Motorized Cassette Awning.
●The awning may only be transported in a predetermined manner, as there are certain places
where it can be loaded and unloaded.
●It is necessary to keep the original packaging in case of a return shipment.
●Make sure that you never leave your awning unattended and switch off the automatic control
when you leave the house.
6
KEN002VKM
v1a • 17.04.2020
EN
IT IS FORBIDDEN
●Danger of electric shock! Do not attempt to repair the appliance yourself. In case of malfuncti-
on, repairs are to be conducted by qualified personnel only.
ELECTRIC SAFETY
CAUTION
●Before connecting the appliance to the power supply, check that the power supply voltage and
current rating corresponds with the power supply details shown on the appliance rating label.
●If the supply cord is damaged, it must be replaced by the manufacturer, its service agent or
similarly qualified persons in order to avoid a hazard.
●For an inspection or maintenance of the electrical parts, the external blind shall be disconnected
from the energy supply in a reliable way.
IT IS FORBIDDEN
●Do not modify the appliance in any way!
●Never use accessories which are not recommended by the manufacturer. They could pose a
safety risk to the user and might damage the appliance. Only use original parts and accessories.
●Do not use this appliance in adverse weather conditions. If wind speeds are stronger than 4 on
the Beaufort wind force scale, retract the awning.
●Never use the appliance on rainy days.
●The operation in frosty conditions may damage the awning.
●Do not barbecue under the awning or ignite a fire near to the awning.
●Check the awning every 3 months to ensure all fixing are tightened and no damage on the
products.
●Never use a damaged appliance! Disconnect the appliance from the power supply and contact
your supplier if it is damaged.
●Do not load over 800kPa on the non retractable parts of the awning
USE
CAUTION
●Save enough free space around the awning while rolling or unrolling.
●Frequently examine the installation for imbalance and signs of wear or damage to cables and
springs. Do not use if repair or adjustment is necessary.
●Take care when operating the manual release with the external blind retracted since it may fall
rapidly due to weak or broken springs.
●Disconnect the awning from the supply when maintenance, such as window cleaning, is being
carried out in the vicinity.
PROTECTION OF CHILDREN
CAUTION
●Do not allow children to play with fixed controls. Keep remote controls away from children.
●The awning is not intended for use by persons (including children) with reduced physical, sensory
or mental capabilities, or lack of experience and knowledge, unless they have been given super-
vision or instruction concerning use of the awning by a person responsible for their safety.
●Children should be supervised to ensure that they do not play with the appliance or the remote
control.

7
KEN002VKM
v1a • 17.04.2020
EN
IT IS FORBIDDEN
●Danger of explosion! The batteries may not be charged or re-activated by other means, disas-
sembled, thrown into fire, or short-circuited.
●Do not expose batteries to extreme temperatures. Do not place the remote control on heaters.
Leaked battery acid can cause damages.
●Attention! Danger of explosion! Never insert batteries inversely.
BATTERIES
CAUTION
●Replace all used batteries with the same type only.
●If batteries should leak, remove them with a cloth from the battery compartment.
●Dispose of batteries according to the regulations. If battery acid has leaked avoid contact to skin,
eyes and mucous membranes. Rinse affected areas immediately after contact with the acid and
wash with plenty of clean water. Visit a physician.
●Swallowed batteries are lethal. Keep batteries out of reach of children and pets.
●Immediately ask for medical assistance if a battery is swallowed.
●Remove exhausted batteries from the remote control. Remove the batteries from the remote
control, if you will not use it for an extended period of time.
USAGE WHEN THERE IS WIND
CAUTION
●The awning should be used only for wind speeds declared in the wind resistance class.
WIND RESISTANCE
●Class 0 - The wind resistance class 0 conforms (in accordance with DIN EN 13561) either to not
required or not measured performance or a product that does not satisfy the requirement of the
class 1. The awning should not be used (extended) when there is wind.
●Class 1 - The awning can be extended maximum up to of wind strength 4. Definition according
to Beaufort: Moderate breeze, moderate wind.Wind moves twigs and thinner branches, lifts dust
and loose paper.Speed 20-27 km/h = 5.5-7.4 m/s.
●Class 2 - The awning can be extended maximum up to of wind strength 5. Definition according to
Beaufort: Fresh breeze, fresh wind. Small broad-leafed trees begin to sway. White crests form on
the seas. Speed 28-37 km/h = 7.5-10.4 m/s
ATTENTION WARRANTY CLAIMS
●The awning loses its EC conformity and any warranty claims against the manufacturer if
the instructions are violated.
●We would like to point out that in the event of a defect only the provision of spare
parts is included in the warranty claim, and we cannot assume responsibility for the
replacement itself. The exchange of spare parts can be carried out very easily. However,
we would still recommend that you commission a specialist to do this. We ask for your
understanding. Thank you very much for your understanding.
GENERAL

8
KEN002VKM
v1a • 17.04.2020
EN
Motorized Cassette Awning, with modern and elegant stylish design of fully enclosed cassette, provides good
sun protection from blazing sunshine and ultraviolet radiation; it also helps to prevent your valuable furniture
from fading and helps stabilizing the internal temperature of your home.
DESCRIPTION AND TECHNICAL DATA OF NEMAXX CASETTE AWNING
Trade mark Nemaxx
Model VKM0325LED VKM3503LED VKM0403LED VKM4503LED VKM0503LED VKM0603LED
Size (Dimensions) 3.0m x 2.5m 3.5m x 3.0m 4.0m x 3.0m 4.5m x 3m 5.0m x 3.0m 6.0m x 3.0m
Hinged arm (quantity) 222223
Nominal voltage 230 V AC, 50 Hz
Rated current 0,89 A
Rated power 205 W
Tilt angle 90° - 60°
Protection class IPX4
Wind resistance class 2
Working temperature -10°C - 40°C
Noise emmision 65 db
Technical data of radio remote control
Nominal voltage of battery 3 V
Transmission frequency 433.92 MHz
Reception range up to 200 m outdoors
THE MAIN TECHNICAL PARAMETER:
9
KEN002VKM
v1a • 17.04.2020
EN
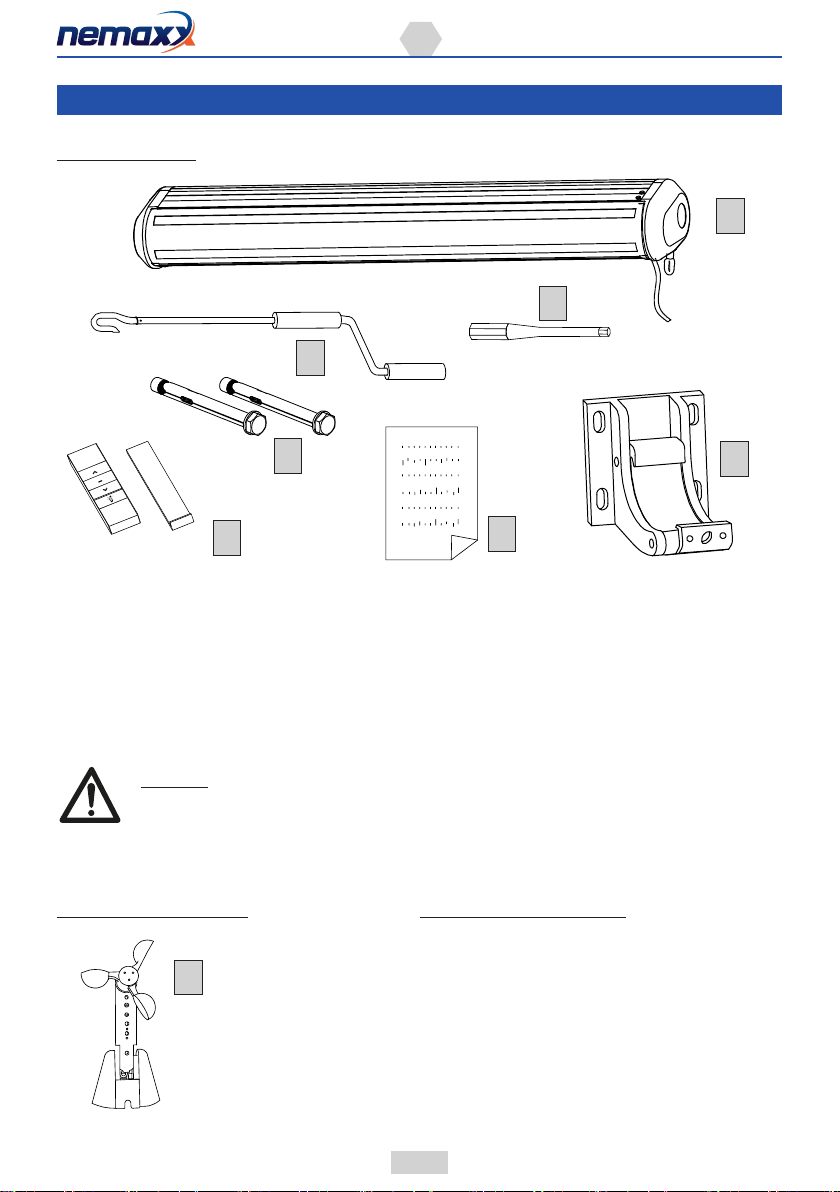
ACCESSORIES AND REQUIRED TOOLS
ITEMS IN PACKING
1
2
3
4
56
7
1. Awning unit (1x)
2. Motor adjustor (1x)
3. Crank handle (1x)
4. Wall bolts (3x2.5 m: 8pcs; 3.5x3 m: 8pcs; 4x3 m: 12pcs; 4.5x3 m: 12pcs; 5x3 m: 12pcs; 6x3 m: 16pcs)
5. Remote control with wall mount base (1x)
6. Manual (1x)
7. Wall brackets (3x2.5 m: 2pcs; 3.5x3 m: 2pcs; 4x3 m: 3pcs; 4.5x3 m: 3pcs; 5x3 m: 3pcs; 6x3 m: 4pcs)
OPTIONALLY ORDERABLE
1. Wind-Sensor
1
REQUIRED TOOLS AND AIDS
●Drill (hammer drill for bricklayer or cement)
●Masonry drill bit 12 mm
●Tape measure
●Pencil or chalk
●Mallet
●Spirit level
●2 ladders
●Adjustable spanner
CAUTION
●The expansion bolts provided in the product is for concrete or brick wall. If you are installing the
awning on support other than for concrete or brick wall, please make sure the wall is of sufficient
support and use the correct hardware to secure the awning on the support.
10
KEN002VKM
v1a • 17.04.2020
EN
NAMES OF THE PARTS
ANWING UNIT
REMOTE CONTROL
1. Extending
2. Stop button
3. Retracting
4. Indicator light
5. The switch of LED light (ON/OFF)
6. Wall mount base
7. Battery compartment ( for 3V battery)
8. P2 button
1
2
3
8
6
5
4
7
1. Cover
2. Cassette
3. Awning motor (built-in)
4. Hinged arm
5. Fabric
6. Front cover
7. Hinged arm bracket
8. Wall bracket
9. Connection cable
10. LED strip
1 2 3
4
5
6
7
8
9
10
11
KEN002VKM
v1a • 17.04.2020
EN
Before assembly
Check whether the delivery has any transport damage and whether the box contains all the
components listed on the enclosed parts list. Please contact your service representative if you
notice that any parts are missing or damaged.
Only install the awning if you have sufcient experience in occupational safety and in handling
the necessary tools.
Before tting, ensure that the building structure has sufcient load-bearing capacity. In case of
doubt, we advise you to consult a specialist.
Avoid the risk of electric shock by working carefully on the cables and disconnecting the
awning from the power supply beforehand.
Please ensure that the awning does not open unintentionally while you are working on it.
When you extend the awning for the rst time, avoid standing under the awning.
We do not accept any liability for the load-bearing capacity of your wall and the correct instal-
lation.
Of course we check the awning before shipping and adjust it correctly in advance, but it
must be adjusted again after installation. In this way the adjustment options can be precisely
matched to each other to ensure the best possible guidance of the awning. Since all adjust-
ment possibilities inuence each other, patient work is necessary.
WARNING
●Important safety instructions. Follow all instructions, since incorrect installation can lead to severe
injury. Before installing the drive, remove any unnecessary cords and disable any equipment not
needed for powered operation.
●Install the actuating member of a manual release at a height less than 1.8 m.
●A horizontal distance of at least 0.4 m is to be maintained between the fully unrolled driven part
and any permanent object.
●This awning is heavy.
●Three people are required to lift the awning into position once the brackets are fitted to the wall.
●DO NOT attempt to lift the awning unit into position without assistance as dropping the unit is
likely to cause serious damage to the product and could result in serious injury.
●DO NOT allow children or pets to play in the working area during assembly and fitting.
●Keep the transmitter out of children‘s reach at all times after the awning unit is fitted.
●Ensure your hands are kept clean during fitting; this will prevent the awning fabric and frame
becoming dirty.
●The awning frame is supplied with a clear plastic wrapping.
●This should be removed after fitting.
●Plastic bags used in the packing of this product can be dangerous to children and babies.
●Keep out of the reach of babies and children to avoid risks of suffocation.
INSTALLATION STEPS
12
KEN002VKM
v1a • 17.04.2020
EN
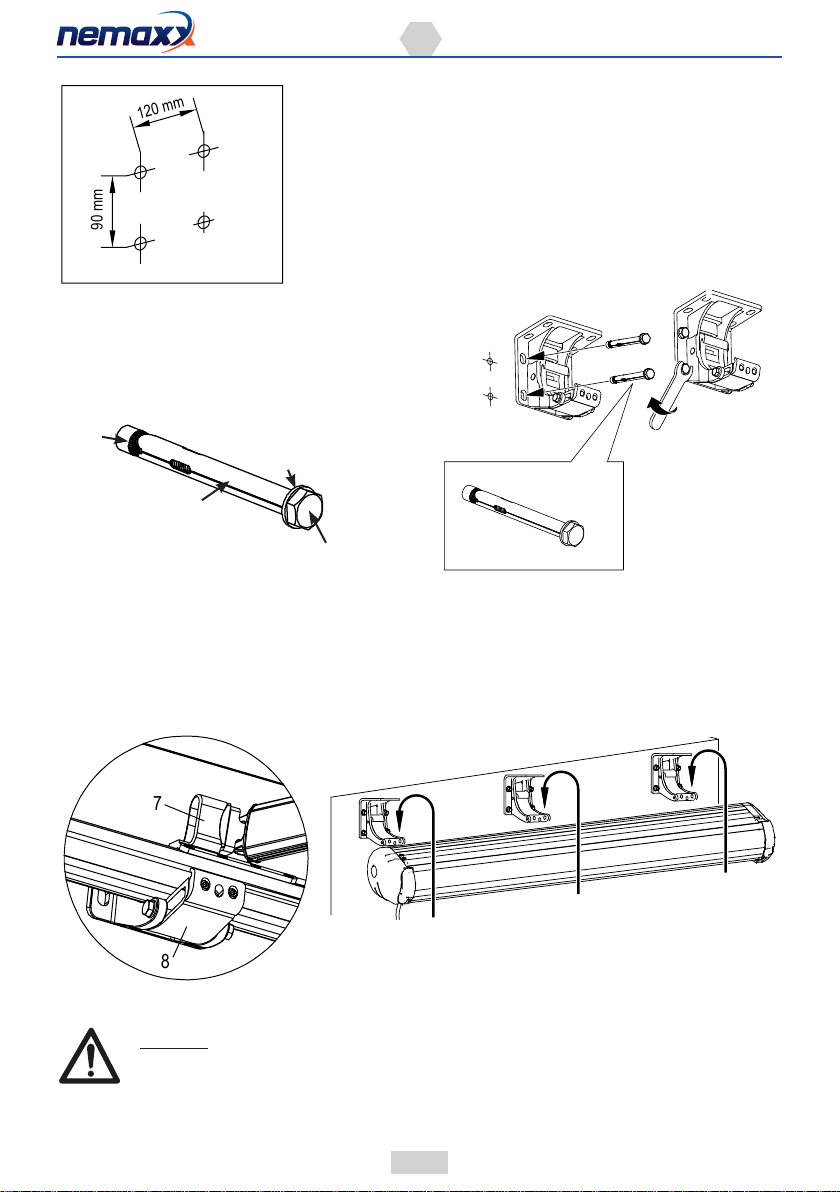
STEP 2
Remove the plate (2) and the retaining screws (1) of each wall bracket. Turning adjusting screw (3) with a
hex key 6 mm counter clockwise. Measure the distance in Figure. This distance must be greater than 40 mm,
(when the distance equal to 45 mm, the angle of inclination of awning is 80 °). Must be the same distance for
all wall brakcets (4).
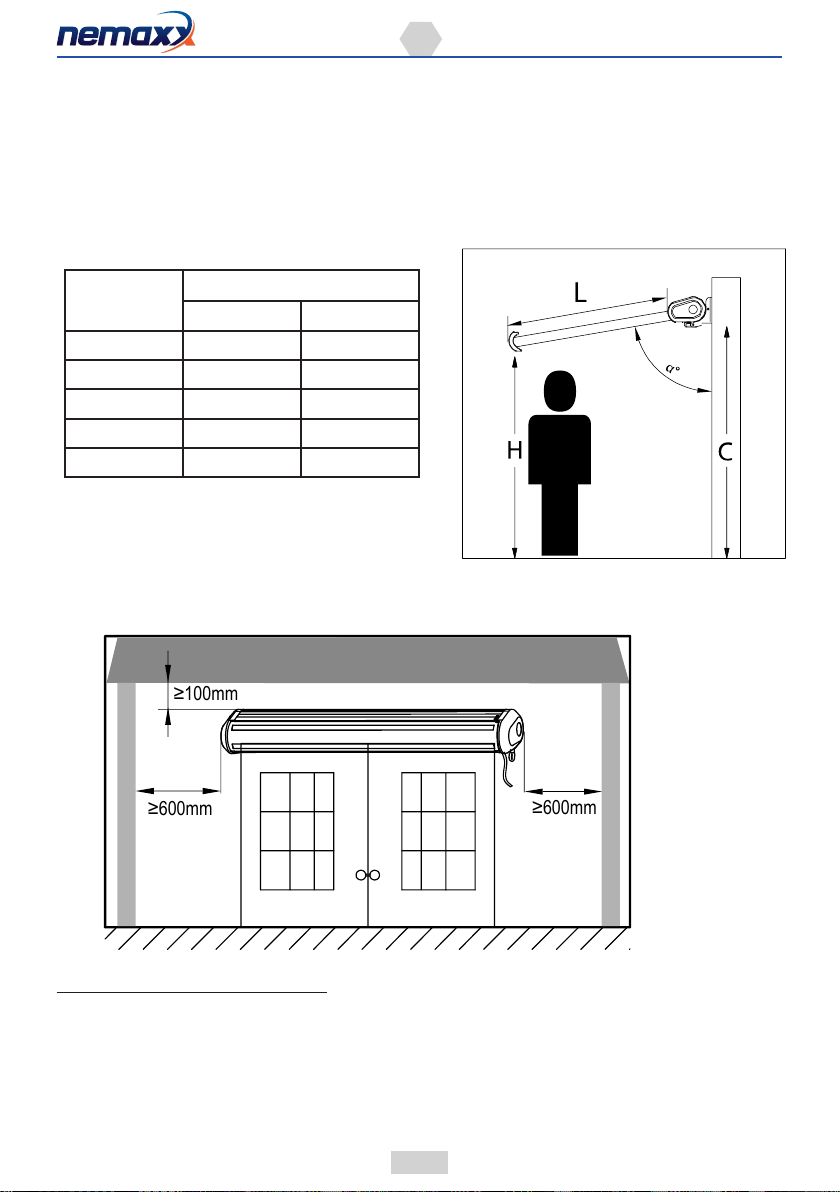
INSTALLATION DISTANCE FROM AWNING TO WALL OR CEILING
≥100mm
≥600mm ≥600mm
ceiling
wall
wall
MOUNTING OF THE WALL BRACKETS
STEP 1 CHOOSING THE RIGHT LOCATION
Suitable wall types: reinforced concrete walls, brick walls. The chosen wall must be suitable to hold and
maintain the awning. We will not be responsible for any damage to persons, to the property and to the awning
due to weak support of installation wall.
Before mounting your awning, select the required mounting height (C) in accordance with the required angle
of slope (α°) and the front line (H) of the awning. To avoid head injuries, the front line (H) should always be
greater than your own height
L
α° C
L=2.5m L=3m
80° H+450mm H+520mm
75° H+650mm H+780mm
70° H+850mm H+1030mm
65° H+1050mm H+1270mm
60° H+1250mm H+1500mm

13
KEN002VKM
v1a • 17.04.2020
EN
min. 40 mm
1
2
3
4
120 L120
90
3x2.5m :
3.5x3m:
120 LL120
120
90
4x3m :
4.5x3m:
5x3m:
120 1670 1670 120
90
6x3m: 120 120
1440
C
Size (m): L (mm)
3 x 2.5 2585
3.5 x 3 3120
4 x 3 1550
4.5 x 3 1530
5 x 3 1580
100
Ø12
STEP 3
Draw the drill holes on your mounting surface as schown. Drill the holes with a 12 mm drill bit suitable for your
surface
14
KEN002VKM
v1a • 17.04.2020
EN
STEP 4
Screw the wall brackets as shown using the bolt anchors.
(Installation sequence: wall bracket, washer, bolt anchor)
120 mm
90 mm
nut
expansion bolt
washer
bolt
STEP 5
Note: the wall brackets are used to hold the awning in place. Warning : The arm shoulder on both side (7)
must be installed on top of the wall bracket (8). Failure to do so can lead to the deformation of the awning and
reduce the service life of the products.
7
8
With three people, place the awning into the wall brackets (8)
CAUTION
●Pay attention to ensure that the rear fixture rail (12) is hooked into the wall brackets (8).
Align the awning by careful sliding laterally.

15
KEN002VKM
v1a • 17.04.2020
EN
STEP 6
Secure the holding plates (14) with the xing screws (13) to the wall bracket (8)
12
13
14
15
CAUTION
●Pay attention to ensure that the holding plates (14) are hooked into the front fixture rail (15).
STEP 7
Connect the awning motor (3) as shown.
3
hex key: 5 mm
N
L
PE
blue
brown
yellow/green
STEP 8
Mounting the wall bracket for the radio remote control. The mounting material for the wall bracket of the radio
remote control is not a component of this scope of delivery. Select suitable dowels and screws for the mounting
location you want. Locate a suitable place indoors and drill two holes for attaching the base (23). Use a cable
detector prior to drilling to prevent damaging electric cables or water pipes.
Insert the two small dowels into the drill holes. Insert the two screws into the dowels and mount the base to the
wall.

16
KEN002VKM
v1a • 17.04.2020
EN
CAUTION
●Operating the motor! By frequent use, motor overheat protection status will be automatically
started. In that case, pressing on the remote control cannot run the awning. Users need to wait
for about half an hour for any manipulation. Otherwise there is a risk of lasting damages for which
no guarantee can be made. This thermal protection function acts to ensure the long life of the
awning.
●Always store the remote control in a dry and safe place after use.
●The remote control receiver is better protected if it is installed in an interior space away from rain
and sunlight.
OPERATION INSTRUCTIONS
RADIO REMOTE CONTROL
NOTE:
●The battery is not included in the scope of delivery! Only use CR 2450 button cells!
●The risk of being interfered by remote communication or terminal unit during operating exists (e.g.
probably interfered by other remote devices using the same frequency).
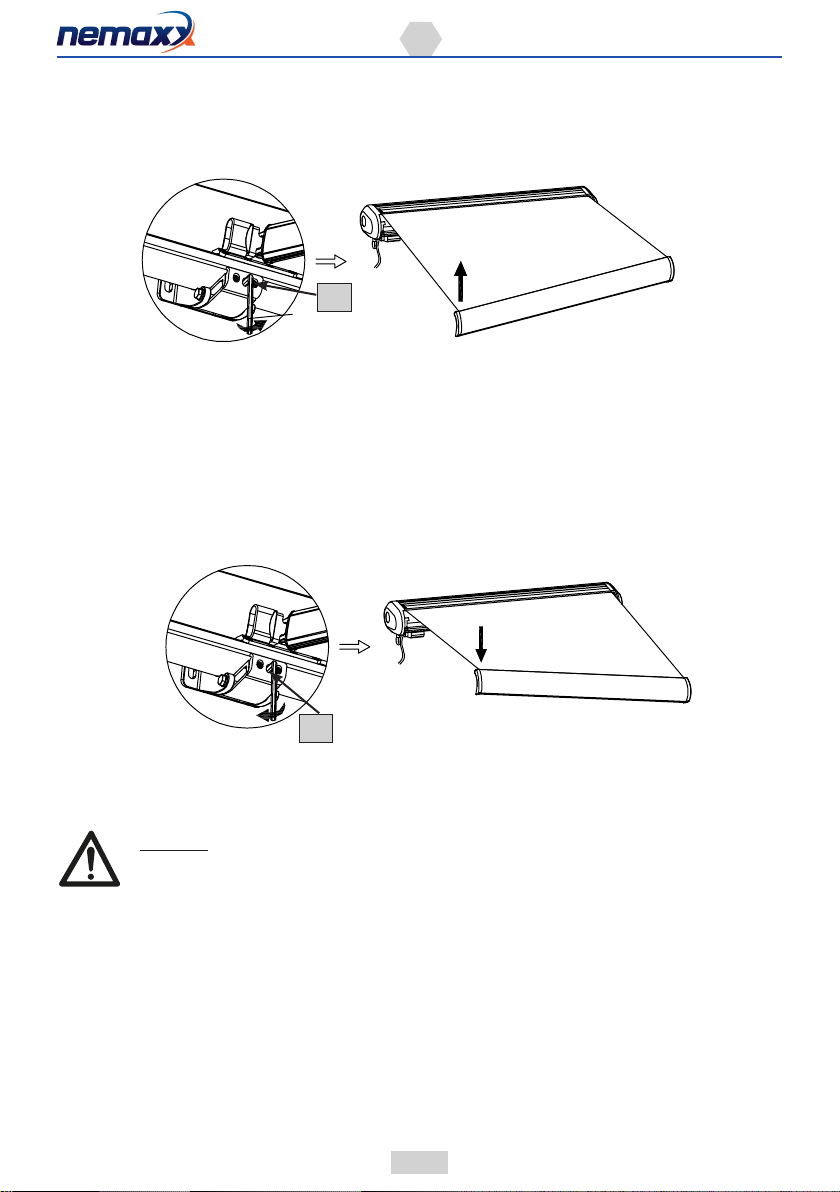
An indicator light is ashing when one of the buttons is pressed. When power off, you can use hand crank to
open or close the awning.
Press button Function
Up Retract / close the awning
▬ Stop Stop opening/closing process
Down Extract / open the awning
Switch Turn on or turn off the LED light
P2
P2 P2
UP
DOWN
STOP
LED
LIGHT

17
KEN002VKM
v1a • 17.04.2020
EN
CLOSE
OPEN
MANUAL OPERATION WITH HAND CRANK
The hand crank is used only to retract or extend
the awning in the event of a power failure or
when eit-her the switch or radio remote control
is defective. Be careful when extending the
awning as, in the event of weak or defective
springs, it may fall quickly.
ADJUSTING THE ANGLE OF SLOPE OF THE AWNING FABRIC
CAUTION
●Product damages! The angle of slope of the cloth must be set to the same angle at all three wall
brackets. If the front cover is not horizontal, the awning cloth will bed rolled unevenly which may
lead to damage.
The angle of slope of the extended awning may be set, as shown, to between 60° and 90°. Proceed as follows
to set the angle of slope:
30
18
19
18. Locking nuts
19. Jack bolt
Awning is extended fully. Undo the locking nuts (18) on both sides, on all wall wall brackets (8).
18
KEN002VKM
v1a • 17.04.2020
EN
●Rotate the adjustment screw (20) using the Allen key until the required slope has been set.
●Rotate the adjustment screw (20) anti-clockwise to make the set angle larger (the front line of the extended
awning becomes higher).
●Rotate the adjustment screw (20) clockwise to make the set angle smaller (the front line of the extended
awning becomes lower).
●Repeat the procedure for all wall brackets (8).
●Tighten the locking nuts (20) back up again on both sides, on all wall wall brackets (8).
●Check the front cover (6) of the awning with a spirit level to ensure that it is horizontal.
●If necessary, adjust until the front cover (6) is horizontal.
SETTING THE END POSITION SWITCH
CAUTION
●Product damages! If the end switches are not correctly set, there is a risk that the motor will run
hot. This may lead to motor damages and, potentially, cause a risk of fire.
●Attention: The awning is already adjusted at the factory, the end customer does not need to
adjust the motor again.
●The user can adjust the limit of one direction at one time, do not adjust two knobs at the same
time.
●Do not turn knobs fiercely, please check the limit with remote control per revolute about half
cycle, and check if the setting you satisfied.
20
20
hex key: 6 mm
hex key: 6 mm
●When setting the end switches, the awning may not be fully retracted or extended.
●Direction „+“ extends the run time, direction „-“ shortens the run time

19
KEN002VKM
v1a • 17.04.2020
EN
NOTE: THE MOTOR SHOULD BE RESET ONLY BELLOW SITUATION HAPPENED:
●The front bar can‘t fold completely
●The fabric isn‘t smooth after open the awning
1. The front bar can‘t fold completely
Up
White: sun shade
closing limit setting
WARNING
●Product damages! When the front bar tou-
ches the end cap shown in the image, do not
try to bring them closer. Otherwise, the product
may be damaged.
Front bar
2. The fabric isn‘t smooth after open the awning
Red: sun shade
projection limit setting
WARNING
●Product damages! The cloth must be tensioned
and may not sag.
20
KEN002VKM
v1a • 17.04.2020
EN
2
6
2
6
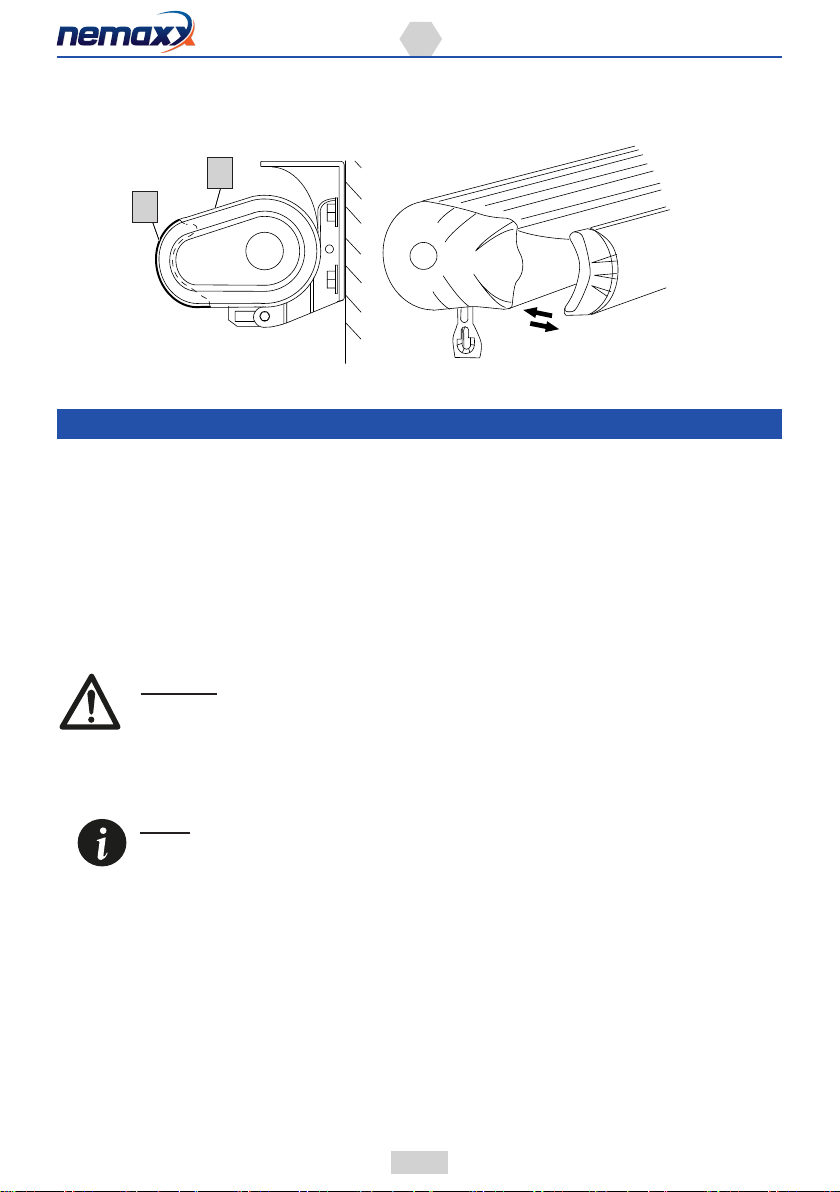
The correct setting is determined by extending and retracting the awning multiple times. Check to make sure
that the front cover (6) cleanly meets the cassette (2) of the awning.
CLEANING AND MAINTENANCE
●If the awning becomes wet, extend as soon as possible to allow it to dry. Unsightly spots may appear if wet
awning fabric is rolled up for longer periods of time.
●The awning fabric can be cleaned by dry brushing. Remove persistent dirt and stains with warm soapy
water and a brush. Allow fabric to dry before retracting.
●Clean metal surfaces with a soft, damp cloth.
●Clean the remote control with a soft, dry cloth.
Never clean the awning cloth with chemicals.
WARNING!
●Risk of injury! The awning‘s hinged arms are assembled under very high spring tension. The
awning should not be disassembled as this may cause serious injury. Please contact your service
partner if the hinged brackets do not function properly.
NOTE:
●Operating the motor! In the event of overheating caused by frequent use, the thermal protection
function may switch the motor of the awning off. In this case, you should wait approximately
30 minutes until you operate the awning again. Otherwise there is a risk of lasting damages for
which no guarantee can be made. This thermal protection function acts to ensure the long life of
the awning
●In the event of faults to the electrical drive, retract the awning using the hand crank.
●For perfect operation of the awning, we recommend you lubricate or oil the hinged elements
between the hinged arms at regular intervals.
●After multiple uses of the awning, one or both of the hinged arms may hang at the wrong angle or
unevenly. If this happens, the hinged arms must be readjusted.
Other manuals for VKM0325LED
1
This manual suits for next models
4
Table of contents
Languages:
Popular Accessories manuals by other brands

TriangleTube
TriangleTube CCRKIT36 Assembly Replacement

ATI Technologies
ATI Technologies Wireless F/T Software Installation and Setup Manual

ARIETE
ARIETE ghiro il tuo dolce sonno Series manual

Compressed Air Alliance
Compressed Air Alliance TEM1 Series user manual

AromaTech
AromaTech AroMini manual

Klarstein
Klarstein Bella Taverna manual


