NEOM Wellbeing Pod Luxe User manual

WELLBEING POD LUXE
ESSENTIAL OIL DIFFUSER

1. This appliance can be used by children aged from 8
years and above and persons with reduced physical,
and understand the hazards involved. Children shall not
play with the appliance. Cleaning and user maintenance
shall not be made by children without supervision.
2. Appliance is only to be used with the power supply
unit provided with the appliance.
3.
5. – Be aware that high humidity levels may encourage the
growth of biological organisms in the environment.
damp or wet. If dampness occurs, turn the output of the
turned down, use the
become damp.
– Never leave water in the reservoir when the appliance is
not in use.
6. Micro-organisms that may be present in the water
or in the environment where the appliance is used or stored,
can grow in the water reservoir and be blown in the air causing
Warning
72h
透明贴纸
4.
Escherichia coil and Staphylococcus aureus.

CONTENTS
A ABOUT THE NEOM WELLBEING POD LUXE
B TECHNICAL SPECIFICATIONS
C IMPORTANT NOTES FOR USE
D SET-UP INSTRUCTIONS
E TOUCH BUTTON CONTROL PANEL
F REMOTE CONTROL FUNCTIONS
G MAINTENANCE
H TROUBLESHOOTING
I WARRANTY
Congratulations on purchasing your NEOM Wellbeing Pod Luxe.
Please keep this manual to help you get the most out of your pod
and for maintenance.
A ABOUT THE NEOM WELLBEING POD LUXE
The NEOM Wellbeing Pod Luxe provides a revolutionary way to
fragrance your bigger spaces in minutes with even more features
DQGEHQHæWVWDLORUHGWR\RXUZHOOEHLQJ,WZRUNVE\FUHDWLQJ
high frequency vibrations that break down the water and
NEOM Essential Oil Blends into minute particles which are then
effectively diffused into your surroundings.
• Scent larger areas such as: open plan living spaces, kitchen
GLQHUVHQWUDQFHKDOOZD\VPH]]DQLQHVFRPPXQDORIæFHVDQG
event spaces.
• Remote control operated.
• Ceramic cover and sustainably sourced wooden base..
• Adjustable diffusion intensity.
• Alternating diffusion mode.
• Low energy LED lights.
• Use with or without ambient lighting and breathing light.
• Simple to use and easy to clean.
• Auto shut off when water runs out for additional safety.
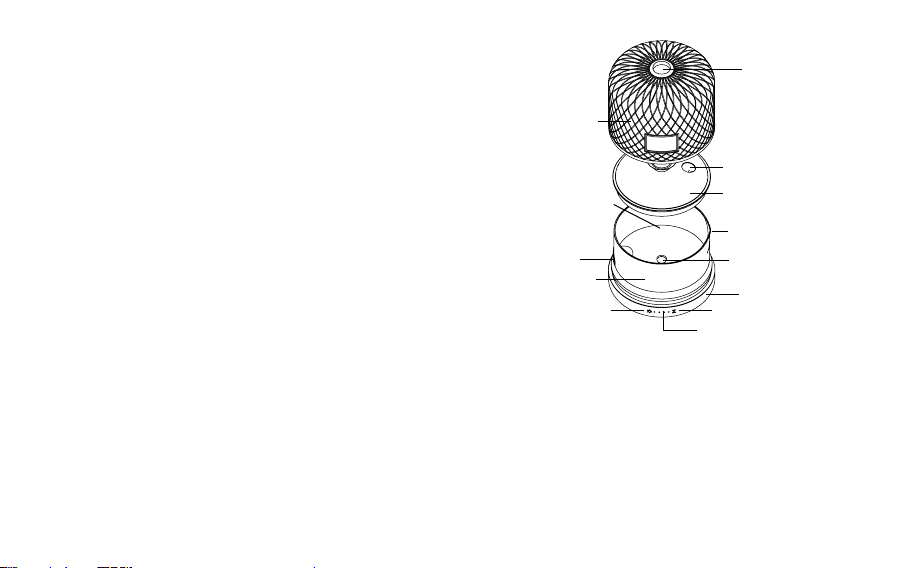
Mist Outlet
Air Vent
Water Tank Cover
Water Discharge Groove
Ultrasonic Ceramic Disc
Base
Mist & Timer Switch
Timer Indicator Lights
Ceramic Cover
Water Tank
Air Outlet
Power Supply Port
(back of Pod)
Light Switch
B TECHNICAL SPECIFICATIONS
Model Name: Wellbeing Pod Luxe
Model Number: 1104003
Product Size: 143mm x 138mm
Voltage: DC 24V
Power: 16W
Water Tank Capacity: 350ml

C IMPORTANT NOTES FOR USE
1. Keep the NEOM Wellbeing Pod Luxe in a clear space
to allow the mist to freely spread and away from appliances
especially those sensitive to water to avoid unnecessary
accidents.
3ODFHWKH1(20:HOOEHLQJ3RG/X[HRQDçDWVXUIDFH
DWOHDVWFPDZD\IURPWKHçRRUDQGDWOHDVWFPDZD\
from the wall. Do not place the NEOM Wellbeing Pod Luxe
on wooden or polished surfaces that may be damaged by
water moisture.
3. Always unplug the NEOM Wellbeing Pod Luxe from the
PDLQVHOHFWULFZKHQFOHDQLQJRUæOOLQJZLWKZDWHU$OZD\VXVH
the power adaptor supplied. Ensure the cable is secure
to avoid tripping. If the power adaptor is damaged,
it must be replaced with a suitable adaptor provided by the
manufacturer, its agent or retailer
8VHDVXLWDEOHPHDVXULQJFXSWRæOOWKHZDWHUWDQN'RQRWæOO
beyond the max water level line.
5. The NEOM Wellbeing Pod Luxe must be kept out of reach
of children and pets to avoid risk of injury. Children should
be supervised at all times.
6. Never attempt to disassemble the NEOM Wellbeing Pod
Luxe or repair the product, as this will void your warranty
and create a shock hazard. Contact your retailer if your pod
develops a fault or an internal inspection is required.
7. In case of abnormal observations such as smoke, peculiar
smells or noise, stop using the NEOM Wellbeing Pod
Luxe immediately and contact the retailer from where you
purchased it. Never wrap the pod with cloth or paper
DVEORFNLQJYHQWLODWLRQFRXOGLQFUHDVHWKHULVNRIæUH
8. Always handle the NEOM Wellbeing Pod Luxe with care,
particularly the ceramic cover - accidental damage is not
covered under the warranty.
9. Only use NEOM Essential Oil Blends. Other essential
oils have not been tested and if used with the NEOM
Wellbeing Pod Luxe, may invalidate your warranty.
10. Always plug the adaptor into the Power Supply Outlet
before plugging into the mains.
11. Do not immerse the unit in water or other liquids and
do not attempt to clean in a dishwasher.
12. When the water tank is empty, the mist function will
not work.
13. Always use water at room temperature and use only fresh,
clean water from a reliable source. Water and room
temperature and humidity can affect the amount of mist
diffused.
14. Scent throw results may vary depending on ventilation,
temperature, humidity, and space.
15. The NEOM Wellbeing Pod Luxe must be cleaned after
each use and should be kept clean and dry when not
in use. Never leave stagnant oil and water in the water tank
for prolonged periods.
16. Do not move the NEOM Wellbeing Pod Luxe whilst there
is water in the water tank.
17. Do not touch the unit if it has fallen into water. Turn off
power source immediately.
18. Do not remove the covers during operation.
19. NEVER touch the ultrasonic ceramic disc while the diffuser
is plugged in.
20. Before plugging in the device, check that the domestic
voltage is compatible. Never place the power cord under a
carpet or near heat sources such as a radiator, stove
or heater.
21. For use indoors only.
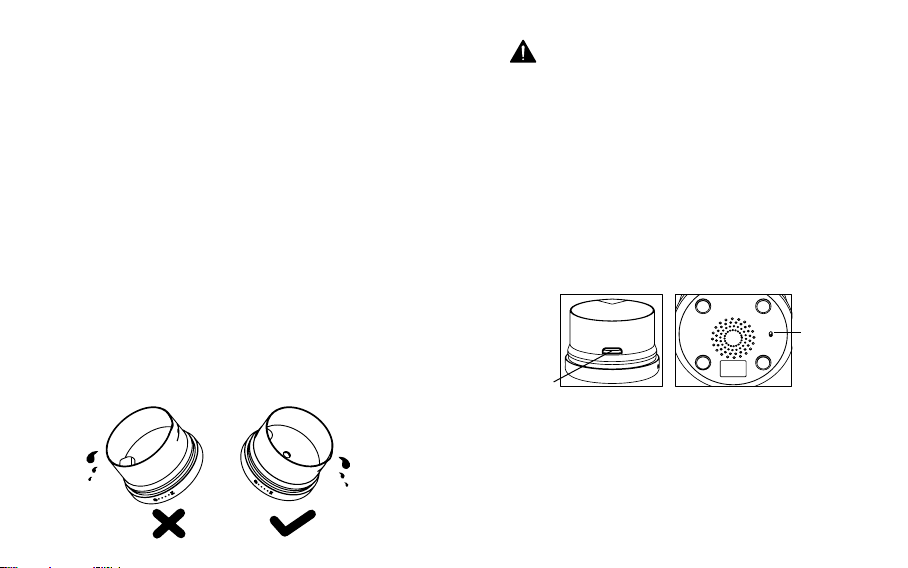
22. NEVER empty the water tank from the air vent side.
ACCIDENTAL LEAKAGE
In the event of the diffuser being knocked over or tipped during
use, some water may get into the air vent. A drain hole at the
base is designed to drain the water from the diffuser. If this
occurs, please follow the steps below:
1. Unplug the adaptor and power supply cable from the
diffuser.
2. Remove the rest of water from water tank (avoid air vent side).
3. Lean the product towards the direction of water drain hole.
4. Leave the product in a dry location for 24 hours.
Air Vent
Water
Drain
Hole
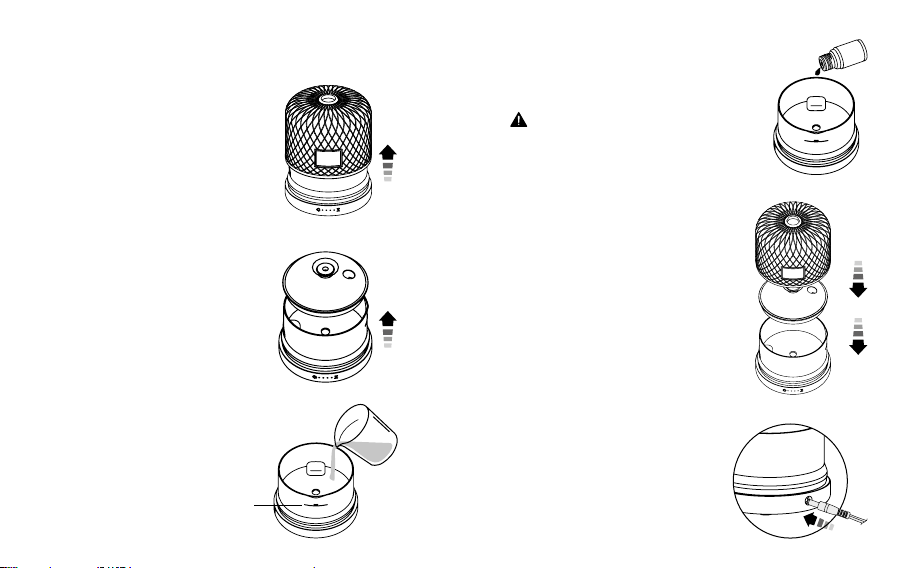
D SET-UP INSTRUCTIONS
1. Remove the ceramic cover.
2. Remove the water tank cover.
3. Fill the water tank to or below
MAX water mark level.
MAX water level
4. Add 20-40 drops of the NEOM essential
oil blend of your choice. Select the
number of drops based on the size
of your space and wellbeing need.
To avoid damage to this device,
NEVERXVHDUWLæFLDOO\SURGXFHG
synthetic perfume.
5. Replace the water tank cover and
ceramic cover.
6. Plug the adaptor into the power
supply port at the back of base
and plug the power adaptor
into the wall socket.

E TOUCH BUTTON CONTROL PANEL
LIGHT SETTINGS
Press once Brighter light
Press twice Dimmed light
Press 3 times Breathing light
Press 4 times Go back to start
Hold for 2 seconds Light off
BREATHING LIGHT
Use this for a guided NEOM breathing technique to help
de-stress. Breathe in through your nose for 7 seconds and
breathe out through your mouth for 11 seconds. Repeat until
you feel calm.
MIST TIMER SETTINGS
Press once Mist constant
Press twice 1 hour mist
Press 3 times 3 hour mist
Press 4 times 8 hour mist
Press 5 times Mist off
Press 6 times Go back to start
Hold for 2 seconds Mist off
Note: Timer is not interrupted whenever mist intensity is changed.

F R E M OT E C O NTR O L F U N C T I O N S
P O WER
•Power ON/OFF, both mist and light.
•If there is no water in the tankwhen switched
on, the indicators blink twice and lamp will
be power on only.
A LT E R N A T I N G M O D E
•Click to switch mist to alternag
mist mode (30 secs ).
•Click one more to switch back
to constant mist mode.
MIS T
•Press once for constant mist.
•Press again to switc the mist and cancel
segs.
1H Press once to acvate 1 hour e.
2H Press once to acvate 2 hou seg.
3H Press once to acvate 3 hou seg.
4H Press once to acvate 4 hou seg.
MIS T
• Press for low mist intensity.
H I G H M I S T
• Press for high mist intensity.
L I G H T
• Press once to switch the light on.
• Press again to switch the light o.
B R E A T HING L I G H T
• Press once for breathing light on.
• Press again to switch the breathing light mode o.
• Breathing light slowly brightens for 7 seconds and slowly
dims for 11 seconds in repeated cycles.
D E CRE A S E L I G H T B R I G H TNE S S
• Press to decrease light brightness.
I N CRE A S E L I G H T B R I G H TNE S S
• Press to increase light brightness.
Before using the remote control, pull internal plas protector to
acvate ba.
1. Push the upper part of back cover for remote control to unlock the
cover from remote control body.
2. Slide the cover downwards to remove the cover and replace the
3. Slide the cover upwards again to lock the cover.

G MAINTENANCE
•The diffuser has an ultrasonic ceramic disc found in the centre
of water tank. Please clean carefully using a cotton swab
or a soft clean damp cloth at least once every week.
•NEVER apply aggressive force or insert sharp objects during
cleaning.
•Please make sure to unplug the adaptor from the power source
when cleaning.
•Empty and clean the water tank when not in use.
PROBLEM POSSIBLE CAUSE SOLUTION
The mist
function
is not working
Power supplier is not
connected
,QVXIæFLHQWZDWHU
Plug the adaptor into
the power socket and
press the mist button
5HæOOWKHZDWHUWDQN
Mist function
is not working
effectively
Too much water
Ultrasonic ceramic
disc is clogged
Remove excess water
until water level is
below MAX line
Clean according to
the instructions in this
manual
The mist ON
indicator
is on, the fan
works, but
no mist is
coming out
Air inlet vent
underneath the base
is blocked
Condensation is
blocking the air vent
inside water tank
Remove the
obstruction
Remove the air vent
cover and wipe dry
H TROUBLESHOOTING

I WARRANTY
This product carries a 2 year warranty for proper use in accordance
with this manual against any manufacturing defects. Accidental
damage is not covered under the warranty.
The warranty period is 2 years from the date of purchase. In case
of any problems arising during the warranty period, please contact
the retailer you purchased the pod from.
Proof of purchase will be required, so it is vital that you keep
your receipt of purchase safely with this manual.
Corrosive oils such as citronella may cause damage to the unit if left
in the water reservoir. This type of damage is not covered under the
warranty. This pod must be cleaned after each use.
IMPORTANT!
In accordance to WEEE Directive (Waste from Electrical and
Electronic Equipment Directive) 2012/19/EU this equipment
should not be disposed of in the normal waste stream.
For disposal information contact local recycling or disposal
centre.
FCC Warning
This device complies with Part 15 of the FCC Rules. Operation is
subject to the following two conditions:
(1) This device may not cause harmful interference, and (2) this
device must accept any interference received, including interference
that may cause undesired operation.
NOTE 1: This equipment has been tested and found to comply with
the limits for a Class B digital device, pursuant to part 15 of the FCC
Rules. These limits are designed to provide reasonable protection
against harmful interference in a residential installation. This
equipment generates uses and can radiate radio frequency energy
and, if not installed and used in accordance with the instructions,
may cause harmful interference to radio communications. However,
there is no guarantee that interference will not occur in a particular
installation. If this equipment does cause harmful interference to
radio or television reception, which can be determined by turning the
equipment off and on, the user is encouraged to try to correct the
interference by one or more of the following measures:
- Reorient or relocate the receiving antenna.
- Increase the separation between the equipment and receiver.
-Connect the equipment into an outlet on a circuit different from that
to which the receiver is connected.
-Consult the dealer or an experienced radio/TV technician for help.
NOTE 2: Any changes or modifications to this unit not expressly
approved by the party responsible for compliance could void the
user's authority to operate the equipment.

Designed in the UK by NEOM Organics London
Harrogate
HG2 8NA
Tel: 01423 878810
www.neomorganics.com
AC: 34631
PC: 1104003
This manual suits for next models
1
Table of contents


