neomouv FACELIA User manual

CARLINA FACELIA
+ Hydraulic version
LINARIA ARTEMIS
USER MANUAL
THIS MANUAL CONTAINS IMPORTANT
SAFETY AND OPERATING INSTRUCTIONS
Model conforms to safety standards
Product may differ from photos


CARLINA (+ HY) – FACELIA – LINARIA – ARTEMIS Manual
2
CONTENTS
1. PRESENTATION..................................................................................................................................... 3
2. ADJUSTMENTS/ASSEMBLY:.............................................................................................................. 4
2.1 Adjusting the saddle:.............................................................................................................................. 4
2.1.1 Angle: ................................................................................................................................................. 4
2.1.2 Height:................................................................................................................................................ 4
2.2 Adjusting the handlebars and the stem:.................................................................................................. 5
2.2.1 Height:................................................................................................................................................ 5
2.3 Adjusting the brakes:.............................................................................................................................. 6
2.3.1 V-type front brake: ............................................................................................................................. 6
2.3.2 Rear v-type brake: .............................................................................................................................. 7
2.3.3 Hydraulic brakes:................................................................................................................................ 8
2.4 Rack:....................................................................................................................................................... 9
2.5 Mounting and dismounting the wheels (rear wheels to be handled by a specialist): ............................. 9
2.5.1 Front wheel:........................................................................................................................................ 9
2.5.2 Rear wheel:....................................................................................................................................... 10
2.6 Lights:................................................................................................................................................... 11
3. USING THE E-BIKE:............................................................................................................................ 12
3.1 Indexed gearshift:................................................................................................................................. 12
3.2 Electronic gear shifting: ....................................................................................................................... 12
3.3 Display.................................................................................................................................................. 13
3.4 Electric assistance:................................................................................................................................ 14
3.4.1 Operation:......................................................................................................................................... 14
3.4.2 Performance:..................................................................................................................................... 14
3.4.3 Technical specifications of the power-assistance system:................................................................ 15
3.5 The electric motor: ............................................................................................................................... 15
4. CHARGING THE BATTERY:............................................................................................................. 16
4.1 NEOMOUV Lithium Ion 36-volt charger............................................................................................ 16
4.1.1 Precautions (safety instructions): ..................................................................................................... 17
4.1.2 Protecting the charger:...................................................................................................................... 17
4.2 Battery .................................................................................................................................................. 18
4.2.1 Recommendations / precautions to take with your battery: ............................................................. 19
5. TIPS FOR INCREASING THE BATTERY LIFE PER CHARGE:................................................. 20
6. UPKEEP AND MAINTENANCE:........................................................................................................ 21
6.1 Upkeep:................................................................................................................................................. 21
6.2 Lubrication: .......................................................................................................................................... 21
6.3 Maintenance: ........................................................................................................................................ 21
7. SAFETY – RECOMMENDATIONS: .................................................................................................. 22
8. TECHNICAL DATA.............................................................................................................................. 23
9. DECLARATION OF CE CONFORMITY.......................................................................................... 23
10. CERTIFICATE OF CONFORMITY................................................................................................... 23
11. TERMS OF WARRANTY..................................................................................................................... 24


CARLINA (+ HY) – FACELIA – LINARIA – ARTEMIS Manual
3
1. PRESENTATION
Thank you for choosing a NEOMOUV Electric-Assisted Bicycle (E-Bike)
E-Bike Presentation:
Notes:
•The symbol indicates important advice or essential safety measures. Follow the various instructions.
•Some adjustment and assembly/disassembly operations require special tools and expertise; perform
these only if you have the skills to do so, otherwise consult your authorised dealer or a specialist.
•The symbol indicates the tools you will need to carry out adjustments.
• Your e-bike has a serial number engraved on the frame by the fork.
MAXIMUM LOAD:120 KG.FOR YOUR SAFETY,YOU SHOULD NOT EXCEED THE MAXIMUM LOAD WHEN
USING YOUR BICYCLE.
Rack (25kg
max)
Display
Battery
Electric
motor
Controller
Pedalling
sensor
Serial number

CARLINA (+ HY) – FACELIA – LINARIA – ARTEMIS Manual
4
2. ADJUSTMENTS/ASSEMBLY:
Adapt the bike to your height
2.1 Adjusting the saddle:
6mm mm Allen key
2.1.1 Angle:
Loosen the nut under the saddle (having first removed the battery).
Adjust the angle of the saddle in order to find your most comfortable position. Tighten the nut, with a
maximum tightening torque of 13 Nm.
2.1.2 Height:
The power-assisted bicycle enables you to opt for a lower saddle position than on a classic bike. With power
assistance, you expend less effort and can be seated in a lower position for improved safety. The required user
(cyclist) height for optimal utilisation of the bike ranges from 1.55m to 1.85 m. Adjust your saddle height to the
optimal sitting position as follows:
Loosen the quick-release seat clamp.
Wearing suitable cycling shoes, sit on the saddle, place one of the pedals in the lowest position, rest one heel
on the pedal, and your leg should rest normally on the pedal without being stretched. Raise or lower the
saddle to get the correct height. While pedalling backwards, you should not have to move your hips from side
to side.
Tighten the quick-release clamp.
THE SEAT POST SHOULD NOT BE EXTENDED BEYOND THE ENGRAVED SAFETY MARK (VERTICAL BARS).
Nut
Quick-release
clamp
CARLINA (+ HY) – FACELIA – LINARIA – ARTEMIS Manual
5
The minimum height between the highest point of the saddle and the ground is 80 cm.
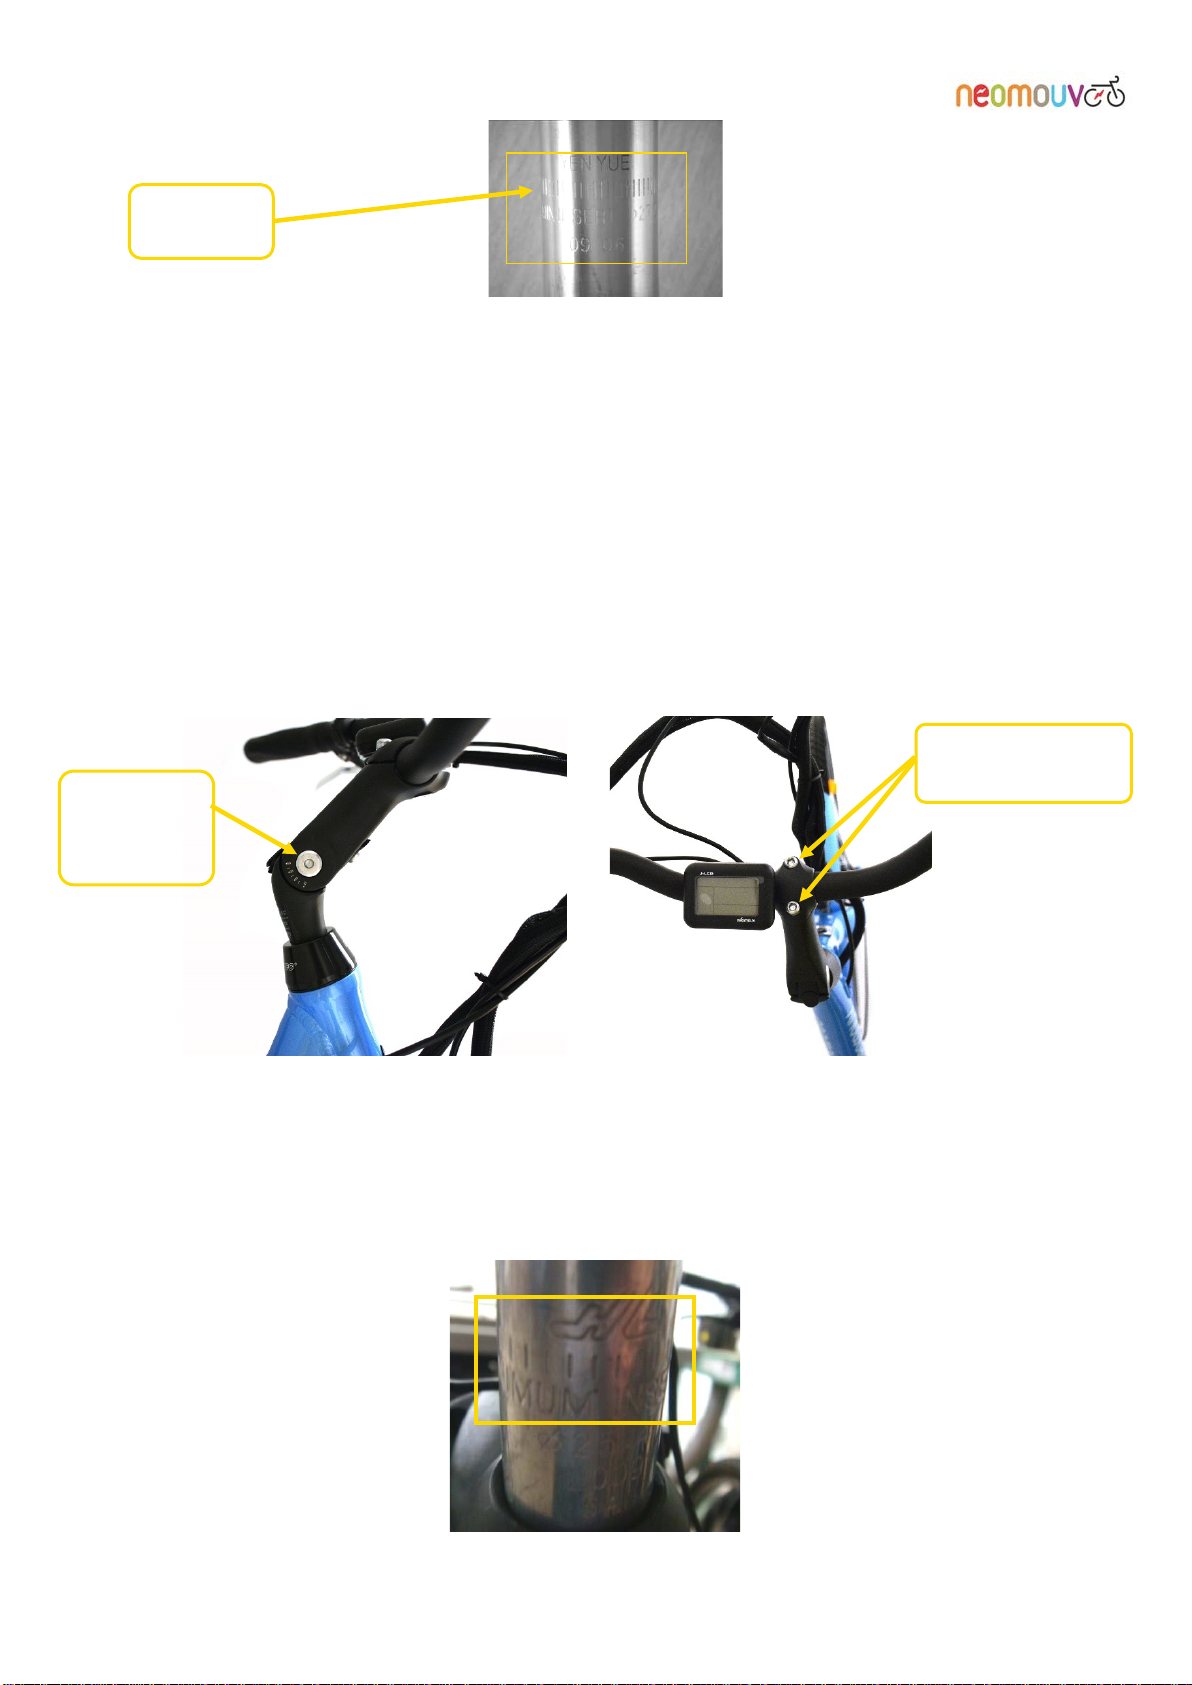
2.2 Adjusting the handlebars and the stem:
6 mm Allen Key
2.2.1 Height:
For your comfort, the position of your handlebars must be at the same level as the height of your saddle or a
bit higher according to your comfort. Unscrew the Allen screw and adjust your handlebars to the desired
height.
Do the same with the second screw to set the angle of tour handlebars, after making your adjustments,
tighten the screws vigorously, with a max. tightening torque of 6 Nm.
THE STEM MUST NOT COME OUT OF THE HEAD TUBE BEYOND THE ENGRAVED MARKINGS (VERTICAL BARS AND
THE INSCRIPTION MINIMUM INSERTION).
After making the adjustment, tighten the screw by turning it clockwise (max. tightening torque: 6 Nm).
Safety
mark
Handlebar angle
adjustment screw
Height
adjustment
screw
CARLINA (+ HY) – FACELIA – LINARIA – ARTEMIS Manual
6
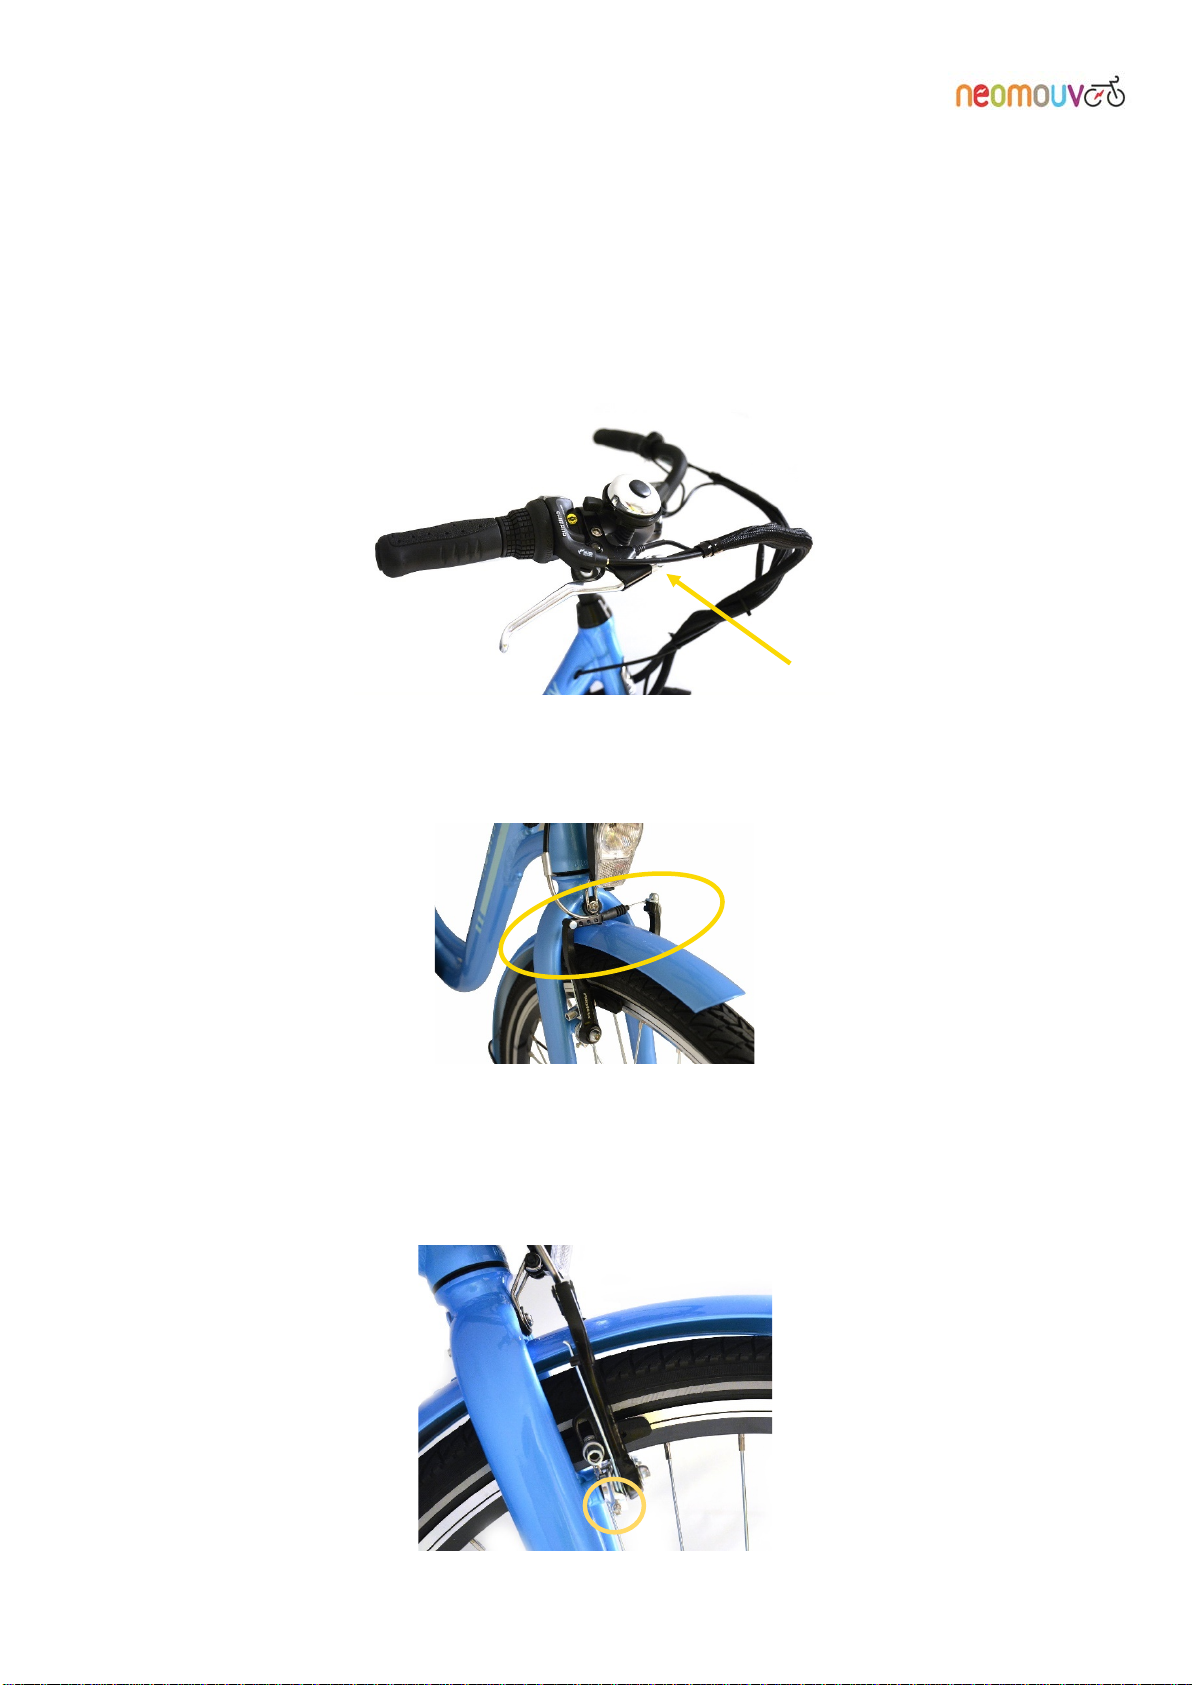
2.3 Adjusting the brakes:
5 mm Allen Key
Screwdriver
2.3.1 V-type front brake:
The front brake is operated by the left handle on the handlebar.
Tighten the nut on the brake handle fully. This adjustment will enable you to compensate later for the natural
slackening of the brake cable.
Loosen the cable clamp and pull the cable until the pads touch the wheel rim. Tighten the cable clamp (pay
particular attention to either end of the tubing which must fit easily into the rigid connectors on the brake
handle and V-Brake).
The pads are in the right position when they are an equal distance from the wheel rim. The final adjustment is
made by tightening the screws on the brake shoes with a screw driver (a distance of about 0.1 to 0.5 mm
from the wheel rim).

CARLINA (+ HY) – FACELIA – LINARIA – ARTEMIS Manual
7
The result of your adjustment is correct when the wheel turns freely and stops smoothly.
The pads are in the right position when they are an equal distance from the wheel rim. The final
adjustment is made by tightening the screws on the brake shoes with a screwdriver (a distance of
about 0.1 to 0.5 mm from the wheel rim).
2.3.2 Rear V-type brake:
The rear brake is operated by the right handle on the handlebar.
As with the front break (see section 2.3.1) tighten the nut on the brake handle fully. This adjustment will
enable you to compensate later for the natural slackening of the brake cable.
Loosen the cable clamp (see the photos for adjusting the front brake) and pull the cable until the pads are
touching the wheel rim.
Tighten the cable clamp (pay particular attention to each end of the tubing which must fit easily into the rigid
connectors on the brake handle and V-Brake).
The pads are in the right position when they are an equal distance from the wheel rim. The final adjustment is
made by tightening the screws on the brake shoes with a screw driver (a distance of about 0.1 to 0.5 mm
from the wheel rim).
WARNING!IN WET WEATHER OR ON DAMP GROUND,THE BRAKING DISTANCE INCREASES.

CARLINA (+ HY) – FACELIA – LINARIA – ARTEMIS Manual
8
2.3.3 Hydraulic brakes:
Your e-bike is equipped with front and rear hydraulic disc brakes. The maintenance of this system must be
carried out by a specialist. Nevertheless, here are a few recommendations:
-Periodically check the condition of the lining on the brake pads. It is important to avoid leaving this
until the last minute, because if the lining is damaged, the disc rubs against the metal of the pads
which damages them.
Here are 2 ways to monitor the wear and tear on your pads:
oBy sound: the braking sound will be more metallic when the lining is worn.
oBy sight: you can see the thickness of the lining when looking from the front of the calliper.
-Periodically check the cleanliness and wear of the discs. Use alcohol or water to clean the discs.
-Completely avoid any contact with greasy substances on the disc and the pads. The pads will
absolutely have to be changed. (They are porous and will absorb the greasy substance).
AS A GENERAL RULE,THE HYDRAULIC DISC BRAKING SYSTEM SHOULD NOT BE ADJUSTED BY NON-EXPERTS.
WE RECOMMEND THAT YOU CALL A SPECIALIST SHOULD YOU HAVE ANY DOUBTS ABOUT WHAT TO DO.
Disc
Pads

CARLINA (+ HY) – FACELIA – LINARIA – ARTEMIS Manual
9
2.4 Rack:
DO NOT LOAD RACK BEYOND THE STIPULATED WEIGHT:25 KG.
Any carrying device or other equipment installed by you on your rack (e.g., child seats, other equipment, etc.)
must be compatible with the robustness and build of the bike.
YOU SHOULD PERIODICALLY CHECK THE TIGHTNESS OF THE RACK’S FASTENINGS.THIS TYPE OF RACK
IS NOT DESIGNED TO TOW A TRAILER.
Any alterations made to the rack by the user will at their own risk.
When the rack is loaded, changes in the behaviour of the bicycle must be taken into account (wind stability,
braking distances, changes in direction, etc.). For their safety, the user must be aware of these changes in
operation.
When installing a child seat or panniers, the user must perform a safety check (e.g., hanging straps that are in
danger of catching in the spokes and raise the risk of a fall; check the secureness of the fastenings on the
child seat, the potential trapping of the child's fingers under the saddle, etc.)
The reflector and the rear light must not be covered by the equipment or seat that has been fitted to the rack.
The load on the rack must be evenly distributed on both sides to ensure the stability of the equipment while
riding on public roads.
2.5 Mounting and dismounting the wheels (rear wheels to be handled by a
specialist):
2.5.1 Front wheel:
14 mm open-ended spanner
Dismounting the front wheel:
First, loosen the V-Brake’s cable clamp to release the pads and enable the removal of the wheel. Undo the cap
nuts on each side and remove the washers.
Raise the bike and tap lightly on the top of the tyre to remove the wheel.
Mounting the front wheel:
Reposition the washers on the wheel axle. Raise the bike and insert the wheel axle into the base of the
opening of the fork ends.
Check the position of the washers as well as the centring of the wheel. Screw in the wheel nuts. Alternately
and progressively tighten the wheel nuts on each side (max. tightening torque 25 Nm).
If the wheel is not centred, loosen the nuts and perform the operation again.
DO NOT ADJUST THE LOCKNUTS,YOU MAY DAMAGE THE BEARINGS.
Adjust your brake again (see Chapter 2.3.1).

CARLINA (+ HY) – FACELIA – LINARIA – ARTEMIS Manual
10
2.5.2 Rear wheel:
THIS OPERATION SHOULD BE PERFORMED BY A PROFESSIONAL;HOWEVER,HERE IS THE PROCEDURE TO
FOLLOW.
Tool required: 19 mm open-ended spanner.
Dismounting the rear wheel:
Disconnect the motor (the connector is situated on the right side of the e-bike on the lower horizontal section
of the frame).
Cut the Colson cable tie attaching the motor cable to the frame. Remove the right and left wheel nut covers.
Loosen the nuts. Remove the nuts and the wheel axel washers. Loosen the V-Brake’s cable clamp to release
the pads and enable the removal of the wheel.
Remove the chain from the wheel sprocket, while paying attention to how the chain swings.
Move the wheel forward to remove it from the frame and remove the chain from the wheel axle.
Mounting the rear wheel:
Take the wheel and place the chain on the small sprocket on the right-hand side, then place the wheel
between the brake pads.
Insert the wheel axle backward into the housing on the left and right of the frame. Attach the washers and
the wheel nuts. Tighten the nuts by hand initially, until they make contact with the frame.
Centre the wheel in line with the frame and the mudguard. Check the centring and positioning in line with the
front wheel, as well as the positioning of the chain.
Screw on the wheel nuts on both sides without tightening them. Check the positioning, centring and position
of the chain again.
Alternately and progressively tighten the wheel nuts on each side (max. tightening torque 30 Nm)
Replace the nut covers.
Reconnect the motor connection and replace the Colson cable tie on the frame.
NB: the connector is equipped with a keyed connection. Place the two pins so that they are facing each other
(follow the arrows).
Adjust the brake pads (see Chapter 2.3.1).
Position the two
pins correctly to
reconnect the
motor plug
CARLINA (+ HY) – FACELIA – LINARIA – ARTEMIS Manual
11
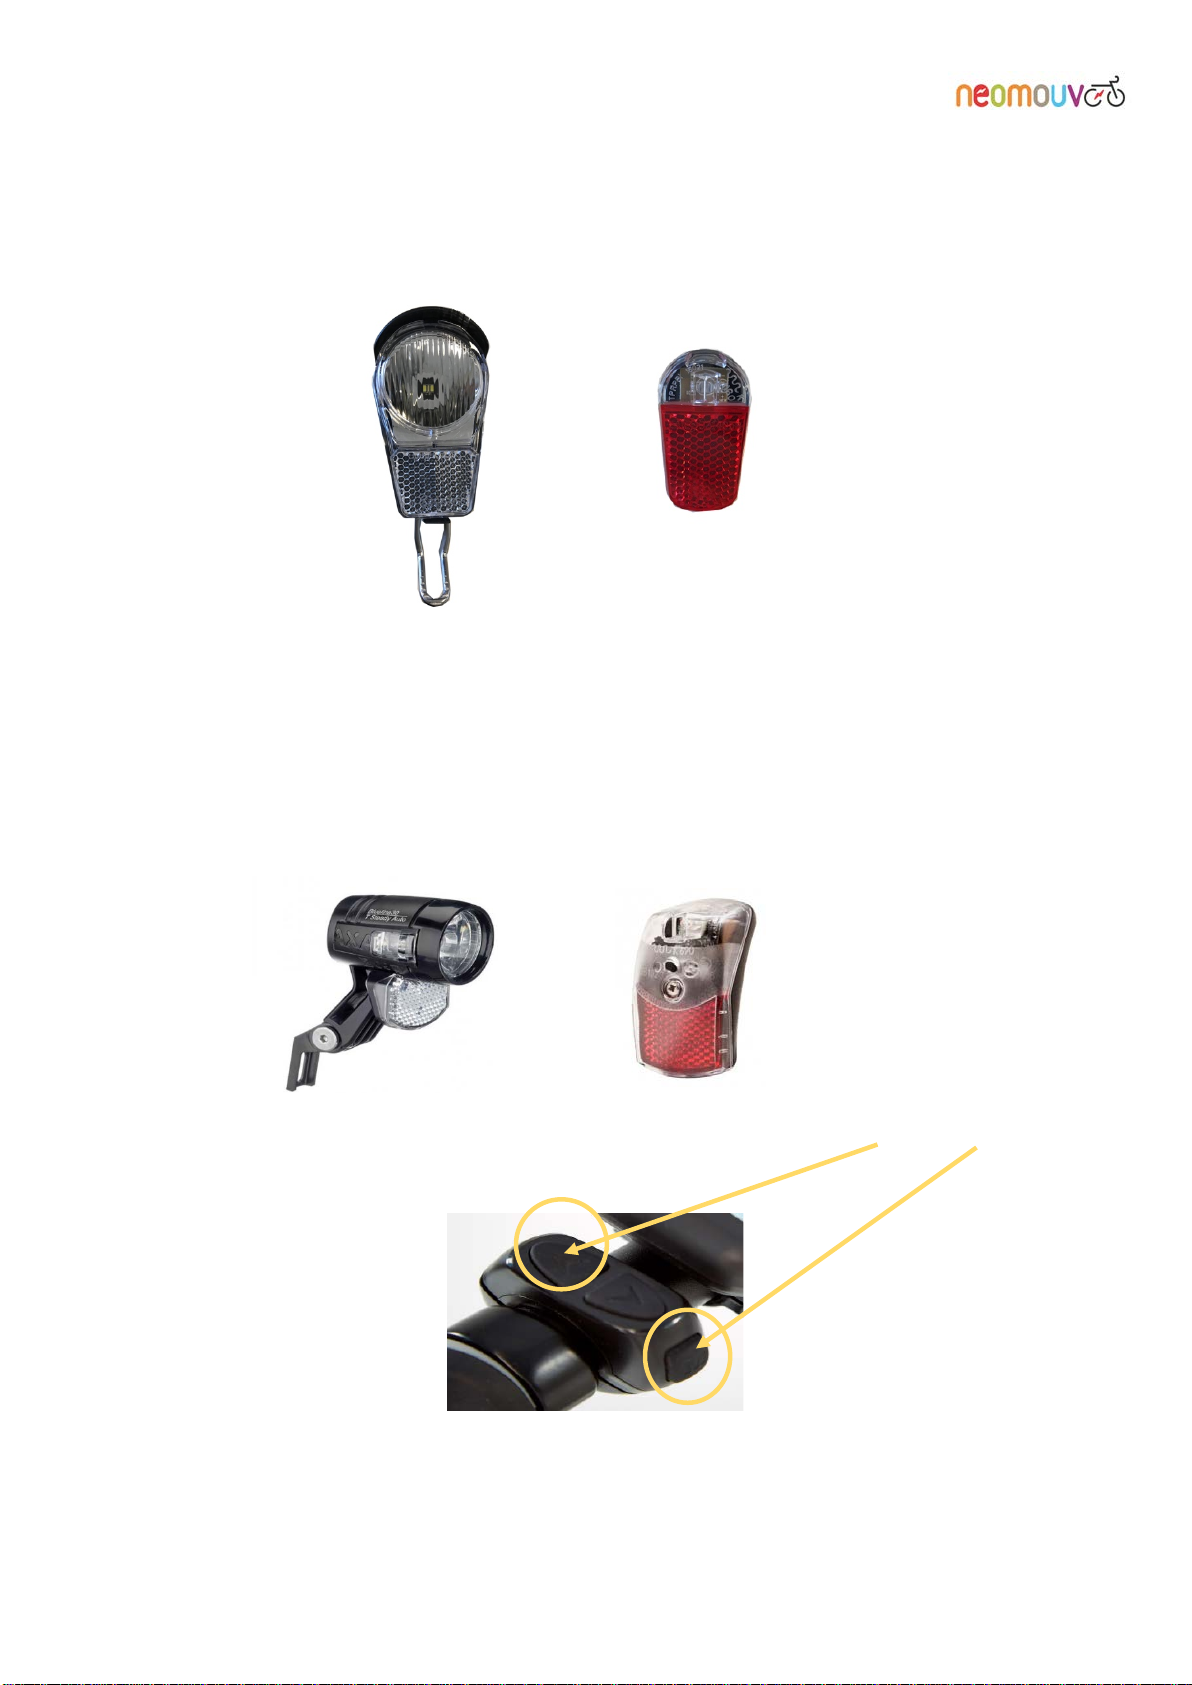
2.6 Lights:
=>Your bike is equipped with battery-operated front and rear lighting:
A fixed front light (2 x AA batteries), which is activated by a button on the light.
To change the batteries in the front light, slide the black tab underneath the light aside and open the
light unit.
A battery-operated rear red light (1 x 2032 batteries) which is activated by a switch on the bottom
of the casing. To change the rear light's batteries, open the light unit using a flat screwdriver.
=>Your bike is equipped with battery-operated front and rear lighting:
Fixed front and rear lighting. The lights are activated by pressing the UP and MODE buttons on
the control pad simultaneously.
ALWAYS KEEP YOUR LIGHTS CLEAN AND IN GOOD CONDITION.
LIGHTS ARE OBLIGATORY AT NIGHT.
CARLINA (+ HY) – FACELIA – LINARIA – ARTEMIS Manual
12
3. USING THE E-BIKE:
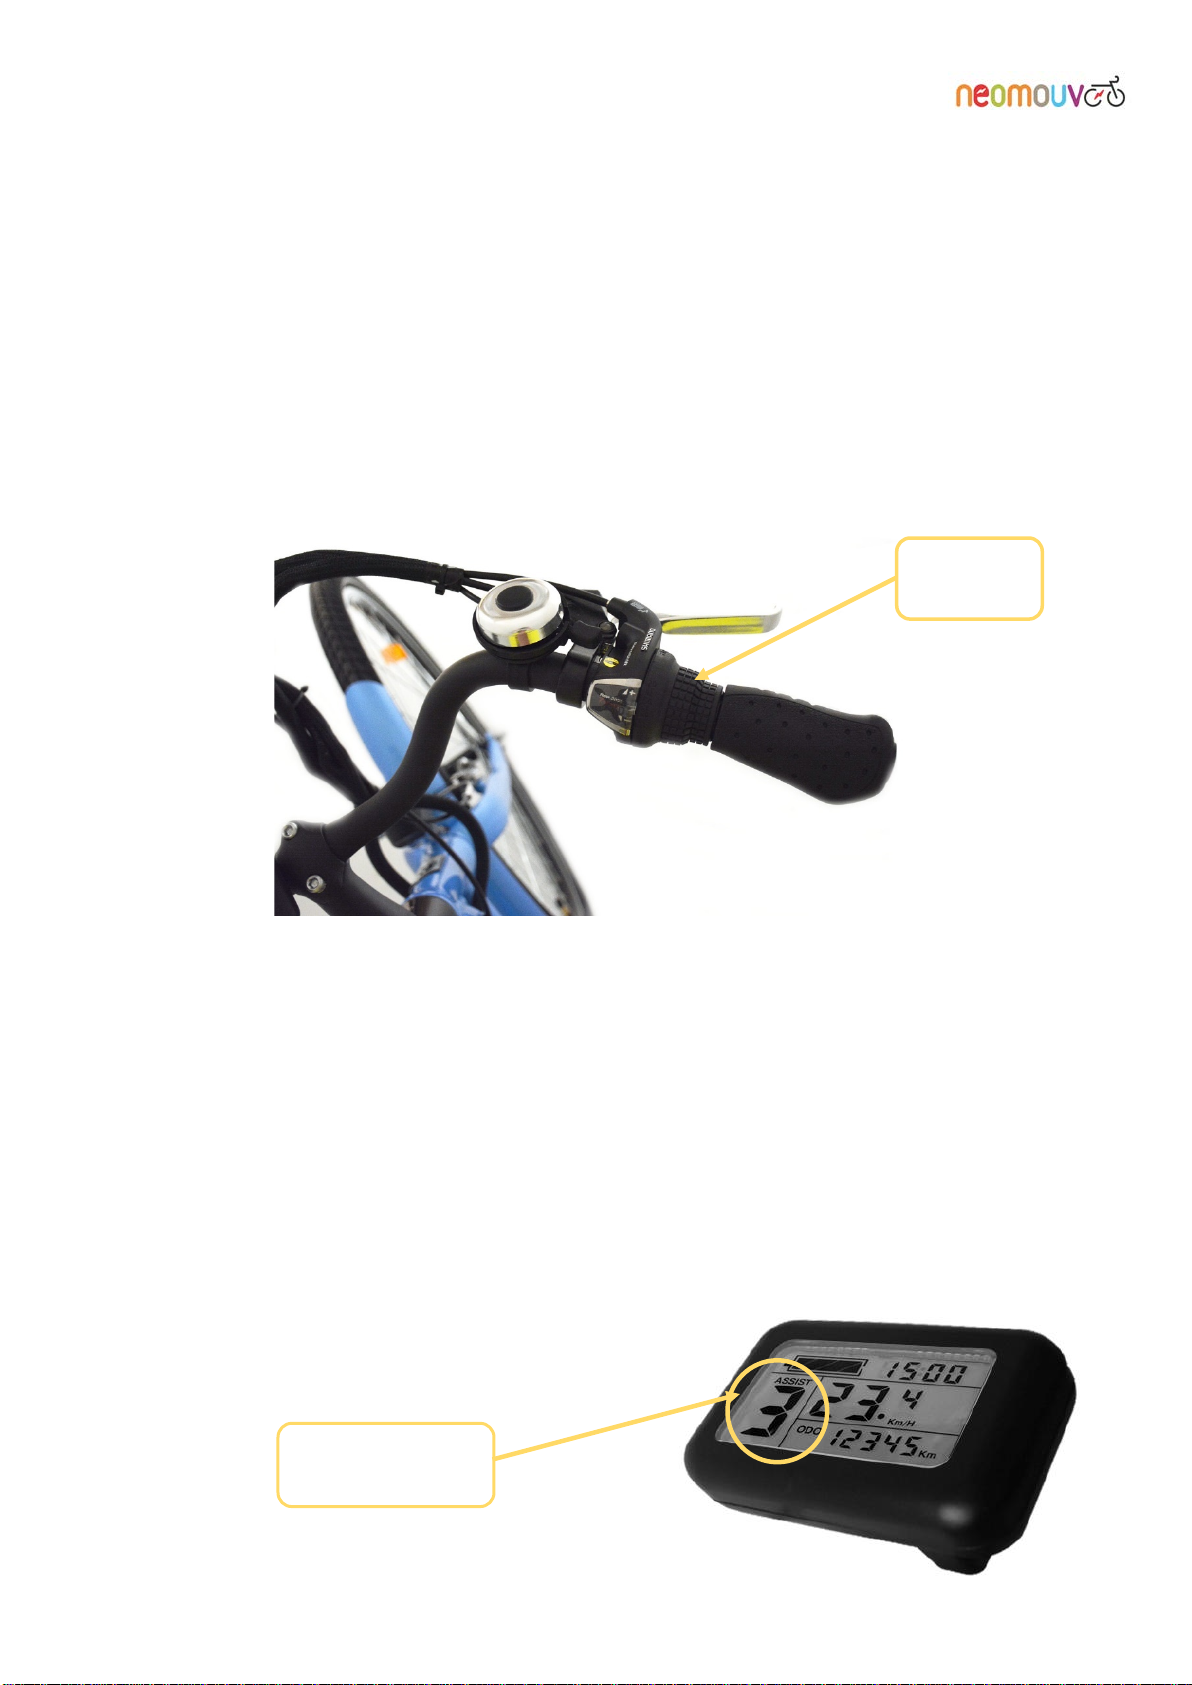
3.1 Indexed gearshift:
Your gearshift is composed of a derailleur and 7 sprockets (except for the FACELIA, which has 6 sprockets).
1 sprocket with 14 teeth (large development), which allows you, in easy conditions (light descent, flat),
to increase your speed;
3 intermediate sprockets with 16, 18, and 20 teeth to use under normal conditions;
(2 intermediate sprockets with 16, 18, and 21 teeth for the FACELIA)
3 sprockets (small development) with 22, 24, and 28 teeth for difficult hills and starts.
(2 sprockets (small development) with 24 and 28 teeth for the FACELIA).
The (indexed) gear selector is located next to the right handle on the handlebars. Activate it by choosing one
of the 7 preset positions. With the handle, you can choose one of 7 gears (or one of 6 gears for the FACELIA).
3.2 Electronic gear shifting:
Your bike is equipped with 6 levels of electronic assistance:
1Position 0 = No assistance.
2Positions 1 and 2 = economic. In these positions, your e-bike will consume less energy, but the
power may not be enough to tackle an incline.
3Positions 3 and 4 = medium assistance.
4Position 5 = maximum power. On this position, your e-bike provides you with the most assistance
but also consumes the most energy.
To scroll through the assistance levels, press the + and - buttons.
The power-assistance selector is on the display.
Twist-
shifter
Assistance
levels
CARLINA (+ HY) – FACELIA – LINARIA – ARTEMIS Manual
13
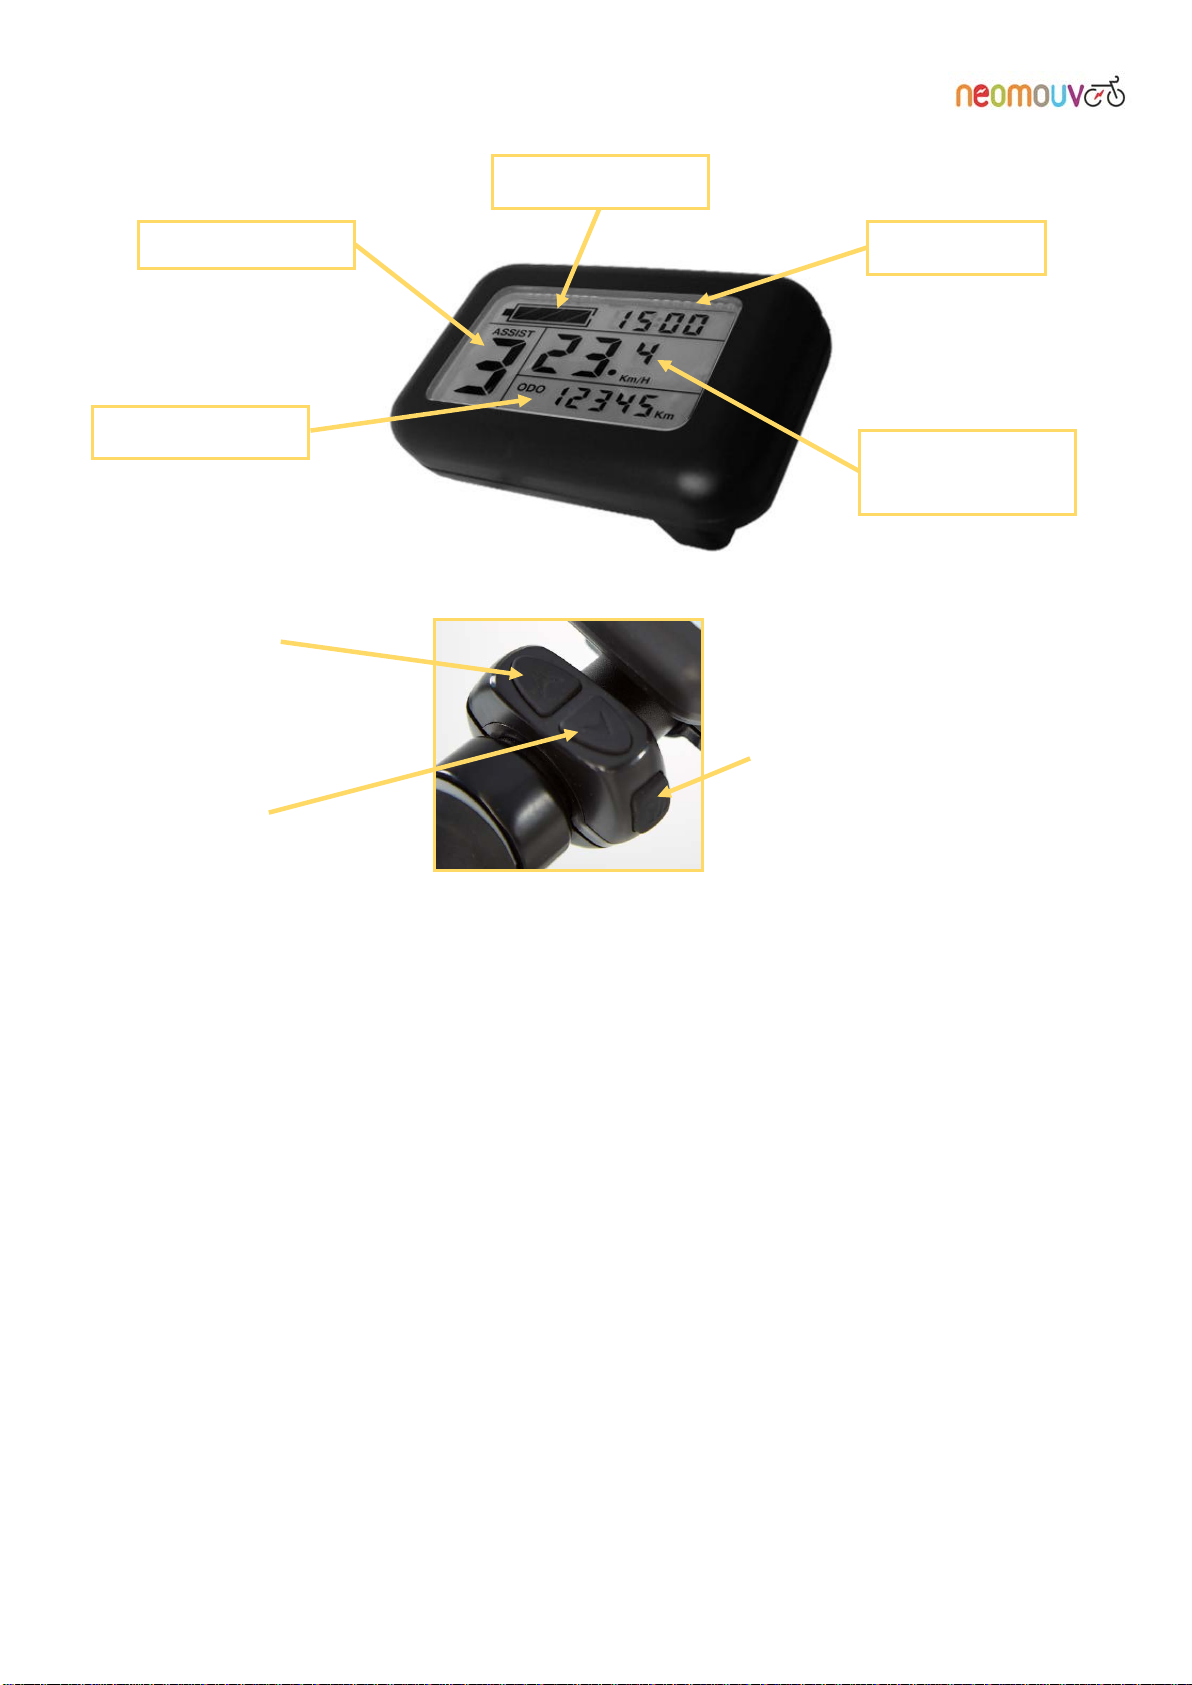
3.3 Display
Start-up aid 6 km/h: Pressing and holding the DOWN button (located under the control) will initiate a 6
km/h start-up, which enables the e-bike to start without pedalling up to the speed of 6 km/h.
Speed information: Pressing and holding the UP button allows you to select the desired speed
information: instantaneous, average (avg) or maximum (max).
Night mode: Pressing and holding the UP and MODE buttons simultaneously will switch the backlighting
on the display on and off as well as the front and rear lights.
Switching from ODO info to TRIP info: One quick press on the MODE button allows you to switch
between the two. ODO shows the total number of kilometres travelled since the bike was first used. TRIP
shows the number of kilometres travelled on your current journey.
Setting the clock: After selecting the ODO mode,press and hold Down and MODE simultaneously
until you are able to access the clock settings.
Set the hour using the UP and DOWN buttons.
Press briefly on the MODE button to move to the minutes setting.
Set the minutes using the UP and DOWN buttons.
Press and hold the MODE button to accept your changes and return to normal mode.
Reset trip information (km travelled, average speed, maximum speed): After selecting the TRIP mode,
press and hold Down and MODE simultaneously to reset the trip data to zero.
UP Arrow
Increases assistance
level
MODE Button
Turns system on and off (Press
for 3 secs)
DOWN Arrow
Decreases assistance
level
Charge level
Clock
Speed
information
Assistance level
TRIP or ODO

CARLINA (+ HY) – FACELIA – LINARIA – ARTEMIS Manual
14
3.4 Electric assistance:
3.4.1 Operation:
Your bicycle is an electrically-assisted bicycle: it is equipped with an electric motor, which is located on the
rear wheel. This motor starts automatically (if the ignition is on and the battery is charged) when and only
when you are pedalling.
Power assistance is initiated by an electromagnetic detector, which cuts off the motor's power supply as soon
as you stop pedalling.
The motor also stops:
•When you activate one of the two brakes;
•When you have reached the speed limit of 25 km/h.
This principle enables the motor to give you its full power when you need it and to save battery power when
you are descending or on flat ground.
This type of energy management gives you a longer battery life per charge. These functions and the energy
management are carried out by an electronic control unit or “controller”.
WE WOULD LIKE YOU TO NOTE THAT ACTIVATION OR DEACTIVATION OF POWER ASSISTANCE MAY LEAD TO
ABRUPT ACCELERATION OR DECELERATION.
3.4.2 Performance:
The power-assisted speed of your e-bike is limited to 25 km/h.
At this speed the motor's power supply is automatically cut off.
The battery life per charge of your bike depends on several factors:
Weight transported:
The expected performance of your bike is based on an average load of 75 kg.
External temperature:
The expected performance of your bike is based on an external temperature of roughly 20°C.
Performance decreases below this temperature, but is only really discernible below 5°C.
Battery wear:
Your battery is designed to deliver stable performance for 600 recharge cycles (or an average use of 3
years). The battery will still be operational after those 600 cycles but its performance and therefore
range per charge will decrease proportionally.
But the battery life per charge mainly depends on how you use the bike:
The theoretical battery life per charge is based on almost continuous use of the motor over
flat or slightly undulating ground (10 to 20% slopes). If your travel is on flat ground and
includes a number of descents (even if slight), your battery life is increased. If you are
ascending inclines of more than 5% (the motor “struggles" above a grade of 8%), your
battery life will diminish proportionally.

CARLINA (+ HY) – FACELIA – LINARIA – ARTEMIS Manual
15
3.4.3 Technical specifications of the power-assistance system:
Motor: Brushless type – 250 watts
Battery: 36 V lithium ion – 480 Wh/ 580 Wh/ 630 Wh/ 700 Wh
Life cycle: 750 complete charge/discharge cycles under normal load conditions.
Battery life per charge: 70 to 80 km for a 480 Wh battery
80 to 100 km for a 580 Wh battery
100 to 110 km for a 630 Wh battery
110 to 130 km for a 700 Wh battery
(for a user weighing 75 kg at a speed of 18 km/h on a journey in Eco mode).
3.5 The electric motor:
Located in the hub of the rear wheel, is a 250-watt BRUSHLESS electric motor.
It requires no maintenance on your part and has the benefit of a two-year manufacturer's warranty. After
3 years or 25,000 kilometres, we advise you to get it checked by an authorised dealer or specialist.
Although it is designed to resist water, we do not recommend cleaning it with a high-pressure jet.
Electric Motor
CARLINA (+ HY) – FACELIA – LINARIA – ARTEMIS Manual
16
4. CHARGING THE BATTERY:
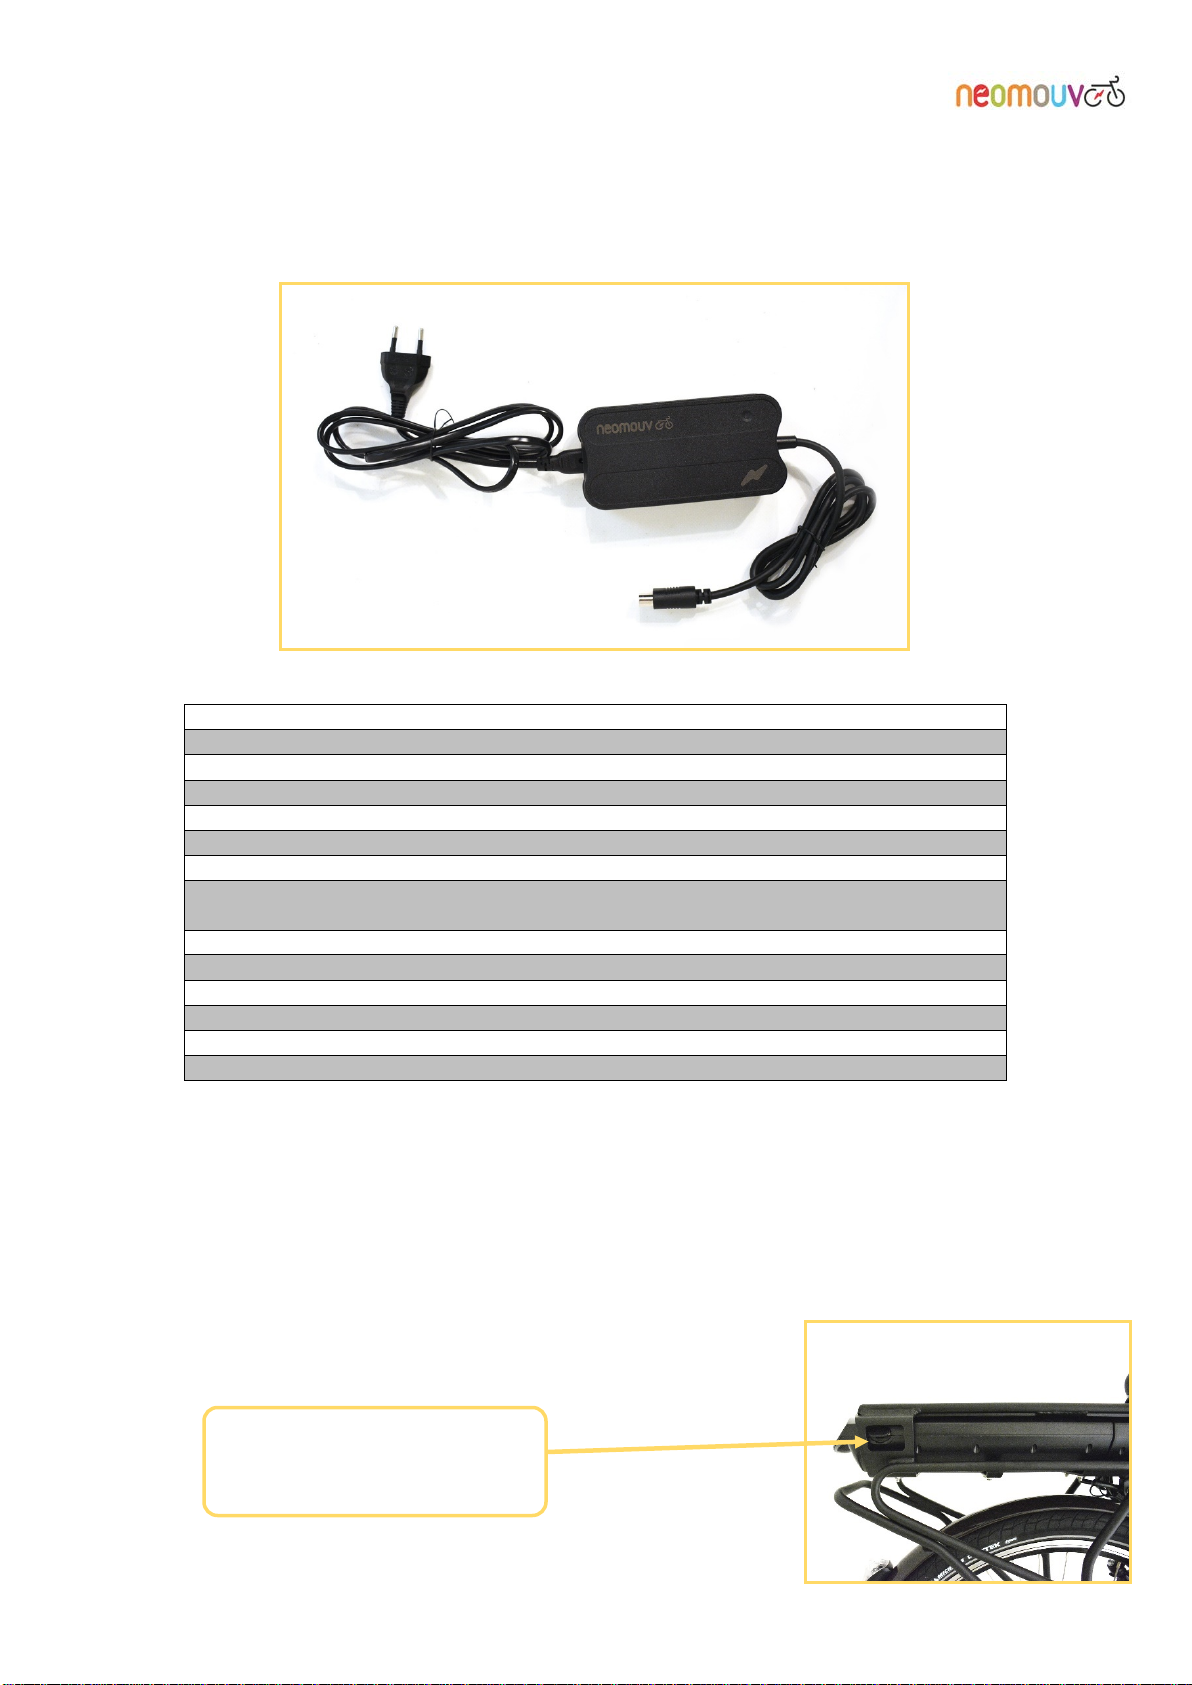
4.1 NEOMOUV Lithium Ion 36-volt charger
CHARGER FEATURES
36-volt model
STC-8127LC
Smart charger for a Lithium Ion battery
Voltage
AC220 -240 V
Frequency
50-60 Hz
Charging voltage (load)
42 V
Output current
2.0 A
LED power indicator: red
Charging
LED charge indicator: green
Charged or disconnected from
the battery
Efficiency (at full load)
100 %
Operating temperature range
Between 10° C and 35° C
Humidity
<+ 90 %
Safety standard
EN60335 –1: 2012 + A11 + A13
Weight
300 g
Dimensions
125x62x35 mm
The charger that comes with your bike is compliant with CE manufacturing standards, and with the IEC/EN
60335-1 environmental protection standards. It has been specially designed to recharge the battery of your
electric bike. It will fully recharge your battery in 4 to 6 hours dependent on the ambient temperature and
wear of the battery. This charging time, referred to as “slow”, is deliberate in order to preserve the life of your
battery.
It is easy to operate: plug the charger’s output jack into your battery’s socket, then plug it into the mains.
Connect the charger plug to the
battery first and then to the
mains.
CARLINA (+ HY) – FACELIA – LINARIA – ARTEMIS Manual
17
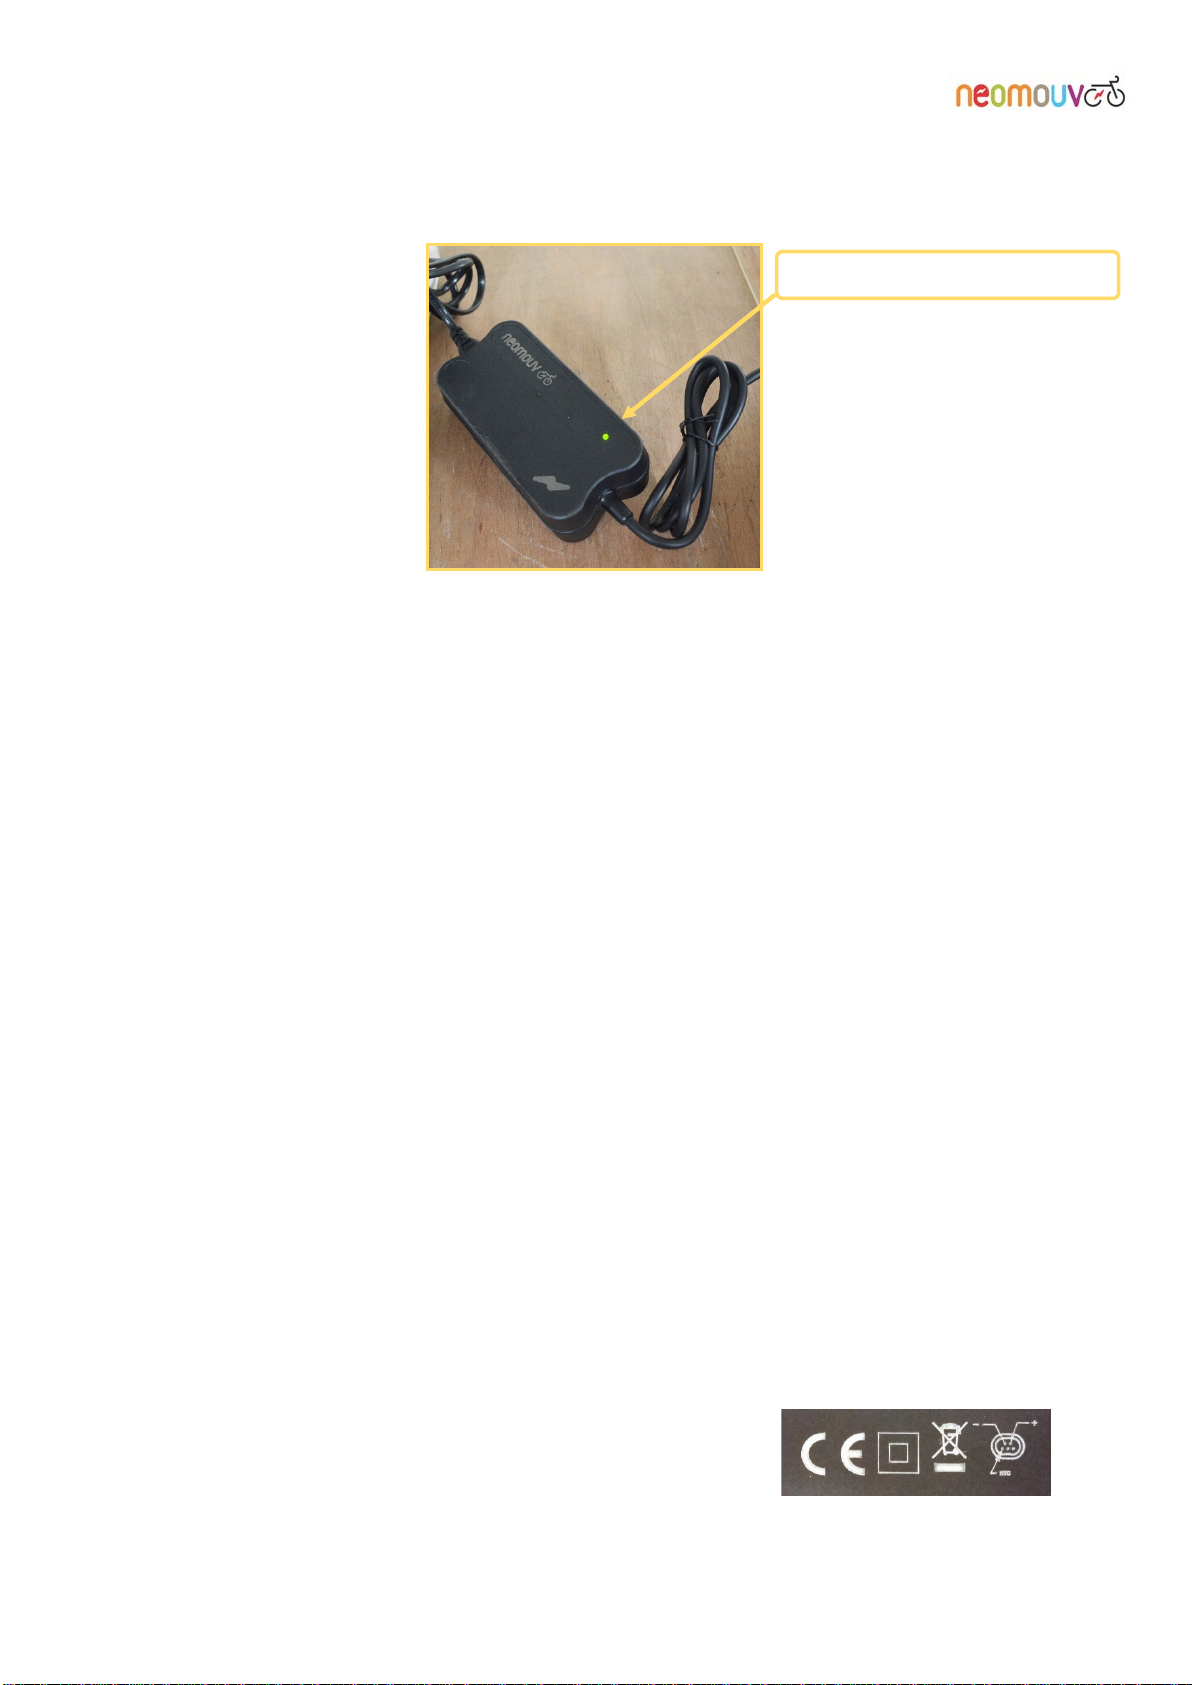
Your charger has a charging LED that shows the battery charge level. It is red when the battery is charging
and changes to green once the battery has been charged.
4.1.1 Precautions (safety instructions):
•Do not connect the charger plug to the mains with wet hands (risk of electrocution).
•All charging must be carried out in a ventilated area.
•Always check that the charger is compatible with the local power supply.
•Do not place the apparatus in a damp environment or near a flammable or explosive substance while it
is charging (any charge producing heat involves the risk of fire or explosion).
•Do not store the apparatus when hot.
•Do not charge a faulty or worn-out battery.
•Do not leave a plugged-in charger and its connections within the reach of children.
•Do not attempt to disassemble the charger.
•
4.1.2 Protecting the charger:
•Do not expose the charger to rain.
•Do not leave the charger disconnected from the power supply (220 volts) but plugged into the battery.
•Do not submerge it.
•Do not place any objects on the charger or cover it.
•Look after the charger’s input and output cables.
•To protect the charger after a long charging period (more than 24 hours), disconnect the electrical
connection and let the device rest in a dry and ventilated space.
•Avoid leaving the charger connected to the mains for more than 24 hours.
WARNING! FOR YOUR SAFETY,OPENING THE CHARGER IS PROHIBITED (RISK OF ELECTRIC SHOCK –
HIGH VOLTAGE). CONTACT YOUR DEALER SHOULD ANY FAULTS OCCUR WITH YOUR CHARGER.
FOR YOUR SAFETY,ALSO LOOK AT THE PICTOGRAMS ON THE BACK OF THE CHARGER.
Green LED: battery charge
1) Compliance with CR standards
2) Double insulation
3) Do not throw out with household waste
4) Comply with the polarity

CARLINA (+ HY) – FACELIA – LINARIA – ARTEMIS Manual
18
4.2 Battery
Your battery has a serial number. This can be found either under the battery or in the indent of the black
part.
Your battery is assembled in a special container. We strongly recommend that you do not attempt to open or
disassemble it. Any breaking of the warranty label will automatically render the warranty null and
void:
To remove the battery from its housing, you must open the lock using the key for this. Using the handle,
remove the battery from the back of the e-bike.
Be careful to place the battery in the correct position for it to slot back into the rack’s “rails”.
You can charge your battery while it is on the bike (switch the key to OFF beforehand) or remove it from its
holder and then charge it, always using the plug located at the back of it.
For safe charging, first connect the charger to the battery and then connect the charger's standard plug to the
mains (220V/50 Hz).
Check that the charger is working correctly (see section 4.1).
Battery lock
Warranty label
Battery registration label
This manual suits for next models
3
Table of contents
Other neomouv Scooter manuals


