Neon HFX-50 User manual

INSTRUCTION MANUAL
HFX-50
CD HIFI SYSTEM
机图后补

- 1 -
Table of Contents
Safety Warnings ...................................................................................................................................................3
Battery Safety Guidelines..................................................................................................................................5
Pack Contents......................................................................................................................................................6
Product Overview ..............................................................................................................................................7
Remote Control Overview ..............................................................................................................................8
Installation of Battery....................................................................................................................................................................9
Handling the Remote Control.....................................................................................................................................................9
Remote Control Operation Range..........................................................................................................................................10
Connections.......................................................................................................................................................10
Connect to the FM Antenna......................................................................................................................................................10
Connecting the Headphone.......................................................................................................................................................11
Connecting the AC/DC Adaptor ..............................................................................................................................................11
ECO Power/Standby Features .......................................................................................................................12
Switching ON / OFF....................................................................................................................................................................12
Switching the system to ECO Power/Standby mode...........................................................................................................12
Power-saving automatic standby ...............................................................................................................................................12
Setting the Clock .............................................................................................................................................12
Setting the Clock Manually.........................................................................................................................................................12
Display the Clock ........................................................................................................................................................................12
Sound Quality ....................................................................................................................................................13
Adjusting the Volume...................................................................................................................................................................13
Mute sound....................................................................................................................................................................................13
Adjusting the Super Bass ............................................................................................................................................................13
Controlling the Loudness...........................................................................................................................................................13
Presetting Equalizer ....................................................................................................................................................................13
Changing the Front Panel Darkness.........................................................................................................................................13
Listening to Radio Broadcasts........................................................................................................................14
Tuning in to a Station...................................................................................................................................................................14
Program radio stations................................................................................................................................................................14
To change the FM Reception Mode .........................................................................................................................................15
CD Operation ...................................................................................................................................................15
CD Playing......................................................................................................................................................................................15
To Skip Search and Play...............................................................................................................................................................15
To Search and Play........................................................................................................................................................................15
Programme Play ............................................................................................................................................................................15
Playing the Beginning (Intro) of each Track.............................................................................................................................16
Random Play ..................................................................................................................................................................................16

- 2 -
To Select Album (For MP3/WMA discs) .................................................................................................................................16
Playing Repeatedly........................................................................................................................................................................16
Text Display During Playback ...................................................................................................................................................16
Use the USB ......................................................................................................................................................17
Access a folder..............................................................................................................................................................................17
Charge your device......................................................................................................................................................................17
About NFC.........................................................................................................................................................18
Play from Bluetooth device.............................................................................................................................18
Setting the Daily on Timer..............................................................................................................................19
Setting the Sleep Timer....................................................................................................................................19
Activate the sleep timer .............................................................................................................................................................19
To deactivate sleep timer ...........................................................................................................................................................19
Listen to an external device ...........................................................................................................................20
Listen to a digital device..................................................................................................................................20
Specifications......................................................................................................................................................21
Maintenance .......................................................................................................................................................22
Cleaning the Unit .........................................................................................................................................................................22
Handling Discs...............................................................................................................................................................................22
Cleaning Discs...............................................................................................................................................................................22
Storing Discs..................................................................................................................................................................................22
Troubleshooting.................................................................................................................................................23

- 3 -
Safety Warnings
- Read all the instructions carefully before using the unit and keep them for future reference.
- Retain the manual. If you pass the unit onto a third party make sure to include this manual.
Dame
- Please inspect the unit for damage after unpacking.
- Do not continue to operate the unit if you are in any doubt about it working normally, or if it
is damaged in any way - switch off, withdraw the mains plug and consult your dealer.
Location of Unit
- The unit must be placed on a at stable surface and should not be subjected to vibrations.
- Do not place the unit on sloped or unstable surfaces as the unit may fall off or tip over.
- The mains socket must be located near the unit and should be easily accessible.
Temperature
- Avoid extreme degrees of temperature, either hot or cold. Place the unit well away from heat
sources such as radiators or gas/electric fires.
- Avoid exposure to direct sunlight and other sources of heat.
Naked Flames
- Never place any type of candle or naked flame on the top of or near the unit.
Moisture
- To reduce the risk of fire, electric shock or product damage, do not expose this unit to rain,
moisture, dripping or splashing. No objects filled with liquids, such as vases, should be placed
on the unit.
- If you spill any liquid into the unit, it can cause serious damages. Switch it off at the mains
immediately.Withdraw the mains plug and consult your dealer.
Ventilation
- To prevent the risk of electric shock or fire hazard due to overheating, ensure that curtains
and other materials do not obstruct the ventilation vents.
- Do not install or place this unit in a bookcase, built-in cabinet or in another confined space.
Ensure the unit is well ventilated.
Safety
- Always disconnect the unit from the mains supply before connecting/ disconnecting other
devices or moving the unit.
- Unplug the unit from the mains socket before a lightning storm.
Mains Cable
- Make sure the unit or the unit stand is not resting on top of the mains adaptor cable, as the
weight of the unit may damage the cable and create a safety hazard.
- The direct plug-in adaptor is used as disconnect device,the disconnect device shall remain
readily operable.
Interference
- Do not place the unit on or near appliances which may cause electromagnetic interference.
If you do, it may adversely affect the operating performance of the unit, and cause a distorted
picture or sound.

- 4 -
Batteries
- Batteries used in the remote control for this unit are easily swallowed by young children and
this is dangerous.
- Keep loose batteries away from young children and make sure that the battery holder tray is
secure in the remote control. Seek medical advice if you believe a cell has been swallowed.
- Please dispose of batteries correctly by following the guidance in this manual.
- Batteries (battery pack or batteries installed) shall not be exposed to excessive heat such as
sunshine, fire or the like.
Supervision
- Children should be supervised to ensure that they do not play with the unit and the remote
control.
- Never let anyone especially children push anything into the holes, slots or any other openings
in the case - this could result in a fatal electric shock.
Class 1 Laser Product
- This unit utilises a laser. Use of controls, adjustments or performance
of procedures other than those specified herein may result in
hazardous radiation exposure.
- Before moving the unit, ensure the disc tray is empty.
- Always remove the disc when the unit is not in use.
- Failure to do so will risk severely damaging the disc and the unit.
- Do not stack devices, heat from other devices may affect the performance of the unit.
Service
- To reduce the risk of electric shock, do not remove screws.The unit does not contain any
user-serviceable parts. Please leave all maintenance work to qualified personnel.
- Do not open any fixed covers as this may expose dangerous voltages.
Maintenance
- Ensure the unit is fully unplugged from the power supply before cleaning.
- Do not use any type of abrasive pad or abrasive cleaning solutions as these may damage the
unit’s surface.
- Do not use liquids to clean the unit.
- 5 -
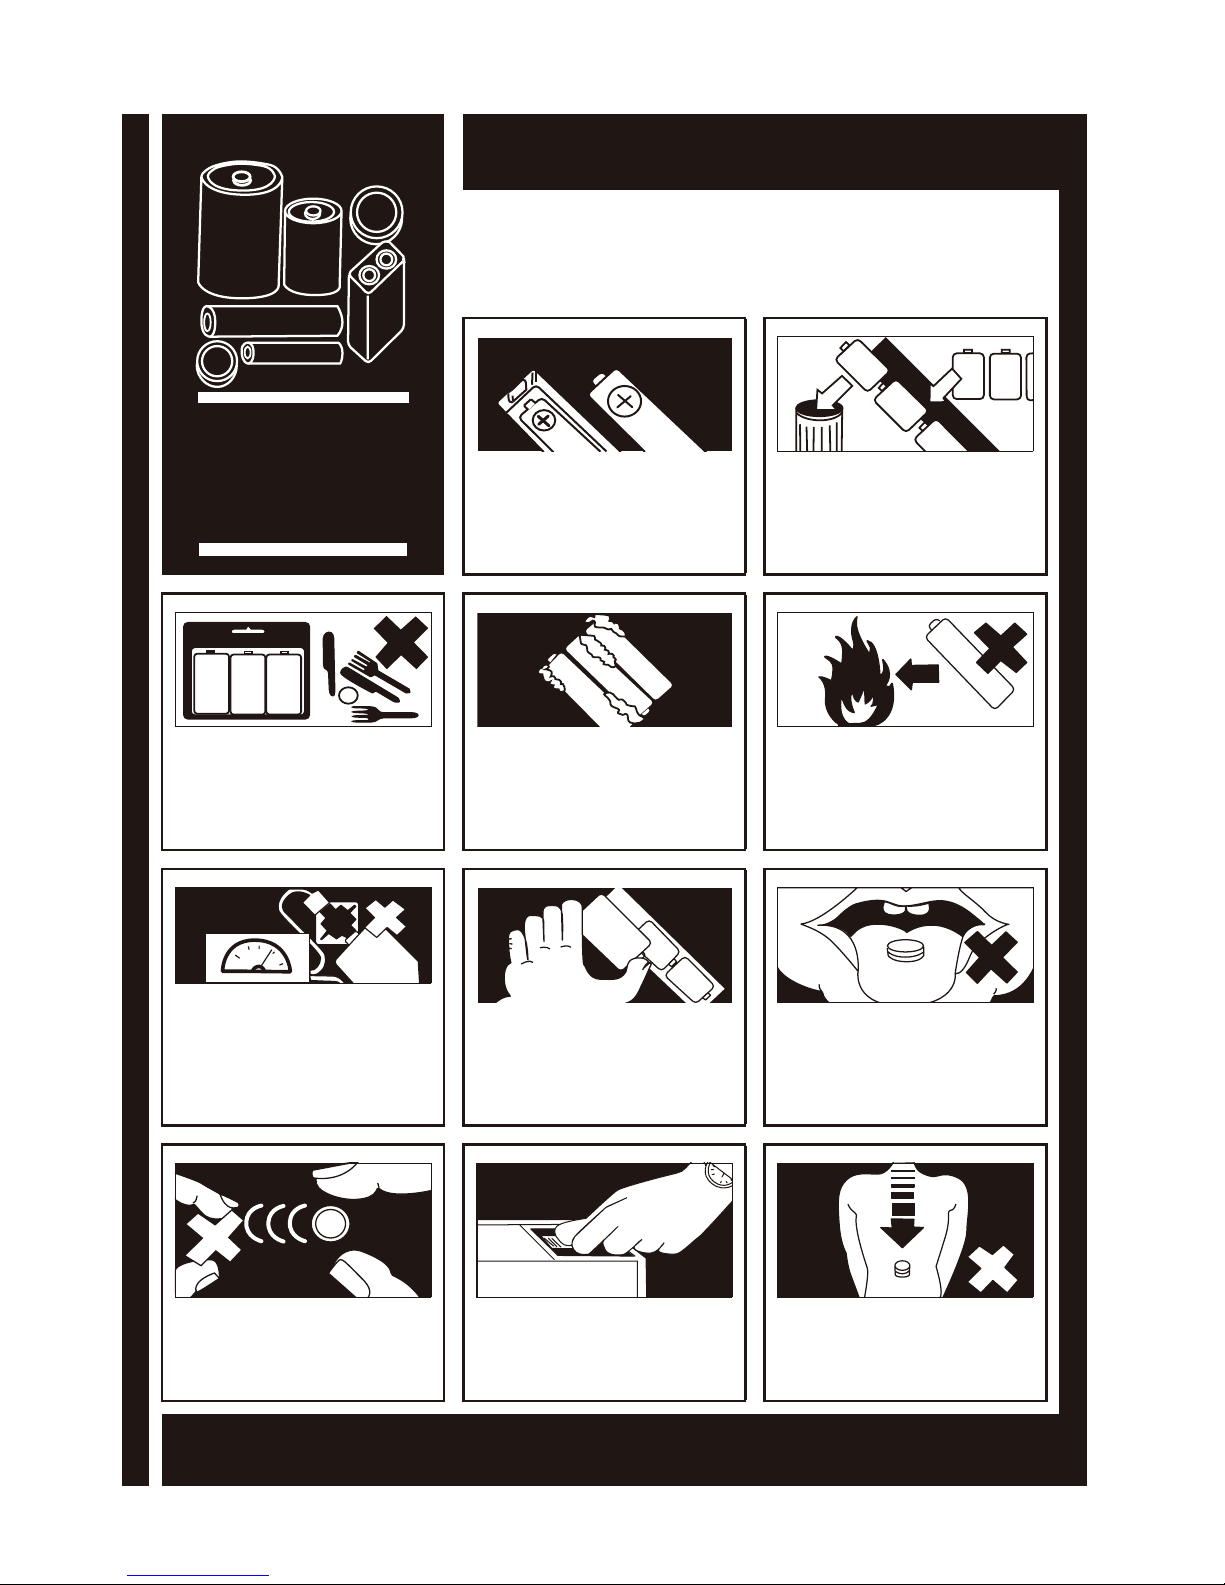
Used correctly, domestic batteries are a safe and dependable source of portable power.
Problems can occur if they are misused or abused — resulting in leakage or, in extreme
cases, fire or explosion.Here are some simple guidelines to safe battery use designed to
eliminate any such problems.
Take care to fit your batteries correctly,
observing the plus and minus marks
on the battery and appliance. Incorrect
fitting can cause leakage or, in extreme
cases, fire or even an explosion.
Replace the whole set of batteries
at one time, taking care not to mix
old and new batteries or batteries of
different types, since this can result in
leakage or, in extreme cases, fire or
even an explosion.
Store unused batteries in their
packaging and away from metal objects
which may cause a short-circuit
resulting in leakage or, in extreme cases,
fire or even an explosion.
Remove dead batteries from equipment
and all batteries from equipment you
know you are not going to use for a
long time. Otherwise the batteries may
leak and cause damage.
Never dispose of batteries in fire as
this can cause them to explode. Please
recycle dead batteries; do not put with
the normal household waste.
Never attempt to recharge ordinary
batteries, either in a charger or by
applying heat to them. They may leak,
cause fire or even explode. There are
special rechargeable batteries which
are clearly marked as such.
Supervise children if they are replacing
batteries themselves in order to ensure
these guidelines are followed.
Remember that small button cell
batteries such as used in some hearing
aids, toys, games and other appliances,
are easily swallowed by young children
and this can be dangerous.
Keep loose button cells away from
young children.
Make sure battery compartments are
secure.
Seek medical advice if you believe a cell
has been swallowed.
Battery
Safety
Guidelines

- 6 -
Pack Contents
Make sure all of the following contents are included.
Remote Control
(battery included)
The Unit
Instruction
Manual
Instruction Manual
FM Antenna
Audio Cable AC/DC Adaptor
OPTICAL
RANDOMREPEAT
INFO

- 7 -
1. Source Button
2. Standby Button
3. Disc Tray
4. Play/Pause Button (BF)
Tuning Forward Button (BF)
Paring Button (BF)
5. Open/Close Button(K)
6. Stop Button(L)
Tuning Backward Button (L)
Disconnect Bluetooth Connection Button (L)
7. Loudness Button (LOUDNESS)
8. USB Jack ( )
9. NFC Area ( )
10. Remote Sensor
11. LCD Display Lens
12. Volume Control Knob (VOLUME)
13. Headphone Jack ( )
14. Next Button (G)
Long press: Search Forward Button (G)
Preset Up Button (G)
15. Previous Button (H)
Long press: Search Backward Button (H)
Preset Down Button (H)
16. Repeat Button (REPEAT)
Stereo/mono Select Button (REPEAT)
17. DC Jack
18. Optical Input Terminal (OPTICAL)
19. AUX Input Terminals (L&R) (AUX IN)
Product Overview
20. FM Antenna Socket
21. Bluetooth Antenna

- 8 -
5. Intro Button (INTRO)
6. Loudness Button (LOUDNESS)
7. Preset Equalizer Button (P-EQ)
8. Clock Button (CLOCK)
9. Next Button ( )
Preset Up Button (PRESET +)
10. Long press: Search Backward Button (D)
Tuning Backward Button (D)
11. Previous Button ( )
Preset Down Button (PRESET -)
12. Play/Pause Button (BF)
Pairing Button(PAIRING)
13. Album Up Button (ALB +)
14. Album Down Button (ALB -)
15. Mute Button (MUTE)
16. Number Button (0-9, 10+)
17. Open/Close Button (K)
18. USB Function Button ( )
Optical Button (OPTICAL)
19. Bluetooth Function Button ( )
AUX Function Button (AUX)
20. Random Button
21. Dimmer Button (DIM)
22. Super Bass Button (S-BASS)
23. Sleep Button (SLEEP)
24. Timer Button (TIMER)
25. Information Button (INFO)
26. Long press: Search Forward Button (C)
Tuning Forward Button (C)
27. Stop Button (L)
Disconnect Bluetooth Connection Button (L)
Check TOC Button (L)
28. Volume Up Button (VOL +)
29. Volume Down Button (VOL -)
30. Program Button (PROG)
Long press:Auto Scan Button (PROG)
Memory Button (PROG)
Remote Control Overview
1. Standby Button ( )
2. CD Function Button ( )
3. Tuner Function Button ( )
4. Repeat Button (REPEAT)
Stereo/mono Select Button (REPEAT)

- 9 -
Installation of Battery
The first use of remote control, remote control to activate
the battery piece remove protection! It is located at the
bottom back side of the remote control.
Replace remote control battery
1. Loosen the screw on the battery compartment
cover with a screwdriver. Pull out the battery
compartment with your fingernails.
2. Replace a new battery (size 2025) correctly and fully
insert the battery compartment back to the original
position.Tighten the screw with a screwdriver.
Handling the Remote Control
• Remove the batteries if the remote control is not going to be used for an extended period of
time.
• To avoid possible failure, read the following instructions and handle the remote control
properly.
• Do not drop or cause impact to the remote control.
• Do not spill water or any liquid on the remote control.
• Do not place the remote control on a wet object.
• Do not place the remote control under the direct sunlight or near sources of excessive heat.
• Do not use caustic cleaners ( porcelain, stainless steel, toilet, or oven cleaner etc. ) on the
remote, as it may suffer damage.
Note:
Remove the battery from remote control handset when it is not to be used for a long period.
Otherwise it can be damaged due to leakage of battery.

- 10 -
Connections
Caution: Make all connections before plugging the unit into the AC Power outlet.
Connect to the FM Antenna
1. Connect the supplied FM Antenna to the FM Antenna socket on the rear of the unit.
Remote Control Operation Range
Point the remote control to the unit no more than 6 meters from the remote control sensor and
within 60° horizontally and 40° vertically of the front of the unit.The operating distance may vary
according to the brightness of the room.
Note:
• Makesurethatthereisnoobstaclebetweentheinfraredremotesensoroftheunitand
remote control. If you install the unit on rack, etc.., the remote controllable range may
decrease depending on the thickness or colour of glass door of rack.
• Donotexposetheinfraredremotesensortodirectsunlightorotherstronglight,suchasin
verter uorescent light.

- 11 -
2. If reception is poor, connect the outside antenna.
Note: Before attaching a 75 ohm coaxial lead (the kind with a round wire going to an outside
antenna), disconnect the supplied FM wire antenna.
Caution: To avoid noise, keep antennas away from the system, the connecting cord and the AC
power cord.
Connecting the Headphone
Connect a pair of headphones to the phone jack.
No sound comes out of the speakers.
Note: Be sure to turn down the volume before
connecting or putting on headphones.
Excessive sound pressure from earphones and
headphones can cause hearing loss.
Connecting the AC/DC Adaptor
Insert the AC/DC adaptor's DC plug into the unit, then insert one side of AC plug into a wall
outlet, and your system is at your command!.
Caution:
* Be sure to unplug the power plug from the outlet when going out or when the unit is not in
use for an extended period of time.
* The mains plug is used as the disconnect device and it shall remain readily operable.

- 12 -
ECO Power/Standby Features
Switching ON / OFF
When you rst connect the unit to the DC Jack, the unit will be in standby mode.
• Pressthe button to switch the unit on.The “HELLO” will show in the display.
• Pressthe button to switch the unit back to standby mode.The “BYE BYE” will scroll across
the display.
Switching the system to ECO Power/Standby mode
Long pressing the button for 2 seconds or more to switch to ECO Power Standby or normal
standby.
* ECO Power standby mode
The clock will not be displayed.Red led on.Press the CLOCK button to display the clcok on
the LCD.
* Normal standby mode
The clock display on the LCD. Red led off.
Power-saving automatic standby
As a power-saving feature, the unit will automatically switch to Standby mode if you do not press
any buttons within 15 minutes after playback is stopped.
Setting the Clock
Setting the Clock Manually
Caution: You can set the clock in standby mode only.
1. In standby mode, long pressing the CLOCK button on the remote control for 2 seconds or
more, the LCD will display CLOCK SET and CLOCK 24 begins to blink.
2. Use the VOLUME knob, H,Gbuttons on the unit or VOL+, VOL-, ,buttons on the
remote contorl to set the 12/24 hour format.
3. Press the CLOCK button to store the setting, hour indicator will blink.
4. Repeat
above
steps 2-3 to set the hour and minute.
Note:
• Toexitclocksettingmodewithoutstoring,presstheLbutton.
• Ifnobuttonispressedin90seconds,theunitexitsclocksettingmodeautomatically.
• Ifapowerfailureoccursortheunitisdisconnectedfromthemains,theclocksettingwillbe
lost.
Display the Clock
In any source mode, the built-in clock shows the time on the LCD by press the CLOCK button.

- 13 -
Sound Quality
Adjusting the Volume
To increase or decrease the volume, rotate the VOLUME knob on the unit or press the VOL +/-
buttons on the remote control.
Mute sound
You can mute the sound temporarily.
During play, press the MUTE button to mute or unmute sound.
Note: If you change the volume or source when the sound is muted, muting is cancelled.
Adjusting the Super Bass
You can reinforce the bass sound to maintain rich, full bass at low volume.
Press the S-BASS button on the remote control to get the effect, the “ ” will lit on the LCD.
Press the S-BASS button again to cancel the effect.
Controlling the Loudness
This unit has a loudness function, which can automatically increase the bass sound effect at low
volume. It can also increase the bass sound effect at high volume, but it will be relatively less when
it is at high volume. Press the LOUDNESS button to obtain the loudness function, the “ ” will
displayed on the LCD, press again will disappear.
Presetting Equalizer
You can adjust the sound reproduced simply by choosing from 5 preset equalizers.
During play, press the P-EQ button on the remote control repeatedly to select:
• FLAT
• POP
• JAZZ
• ROCK
• CLASSIC
Changing the Front Panel Darkness
This unit has three brightness levels for you to adjust the clock display. Press the DIM button on
the remote control repeatedly to choose the desired brightness.

- 14 -
Listening to Radio Broadcasts
Caution: Before listening to the radio, please check that the FM Antenna is correctly connected
and adjusted for length and direction.
Tuning in to a Station
1.
Repeatedly press the SOURCE button on the unit or directly press the button on the
remote control to select tuner source.
- The word “TUNER” will be displayed on the LCD.
2. Select a station using one of the following methods.
Auto Tuning
Long pressing the L/BF button on the unit or D/Cbutton on the remote control for
2 seconds or more, the frequency changes down or up automatically until a station is found.
Manual Tuning
Repeatedly press the L/BF button on the unit or D/Cbutton on the remote control
to change the frequency until you nd the station you want.
Preset Tuning (Available only after the stations are preset)
- Repeatedly press the G/Hbuttons on the unit or / buttons on the remote
control to select the desired preset number. Its band and frequency are displayed on the
LCD.
- Directly press the 0-9 buttons on the remote control to input a number directly and tune
to the band and frequency with this number.
Program radio stations
You can program a maximum of 20 preset radio stations (FM).
Automatically
Long pressing the PROG button on the remote control for 2 seconds or more to activate au-
tomatic program mode.
- [AUTO] is displayed.
- All available stations are programmed.
- The rst programmed radio station is broadcast automatically.
Manually
1. Tune to a radio station.
2. Press the PROG button on the remote control to activate program mode.
- The preset number will blink.
3. Press the G/Hbuttons on the unit or 0-9, / buttons on the remote control to
allocate a number to this radio station.
Note: If you select more than 20, the preset number will be changed to “1” automatically.
4. Press the PROG button on the remote control again to store the station.
5. Repeat above steps 1 to 4 for each station you want to store in memory with a preset number.
Note: If the system is unplugged or if a power failure occurs, the preset stations will not be
erased.

- 15 -
To change the FM Reception Mode
Press the REPEAT button to select the Stereo or Mono channel to receive the best FM reception
mode.
CD Operation
CD Playing
1.
Repeatedly press the SOURCE button
on the unit or
directly
press the
button on the
remote control to select the disc source.
- The “DISC” will be displayed on the LCD.
2. Press the Kbutton to open the disc door and place the disc on the disc tray (with the printed
side up).
3. Press the Kbutton to close the disc door, the unit will read the disc and play it automatically.
Note:If in stop mode, please press the BF button to start playing the disc.
4. Press the BF button to temporarily stop the playing, press the button again, it will continue
to play.
5. Press the Lbutton once to pre-stop the disc playing. Press the button twice to stop the disc
playing.
To Skip Search and Play
Press the Hbutton on the unit or button on the remote control once or more to skip
previous one or more tracks on the disc.
Press the Gbutton on the unit or button on the remote control once or more to skip
next one or more tracks on the disc.
To Search and Play
Long pressing the G/Hbuttons on the unit or D/Cbuttons on the remote control to
search for the position that you intend to start playing.
Programme Play
You can programme up to 20 tracks to play in any desired order.The player must be in stop mode
only with a CD inserted.
1. Insert a disc and press the Lbutton when it starts playing.
2. Press the PROG button on the remote control, the LCD will display "001 p--01" and
"PROG" .
3. Press the G/Hbuttons on the unit or 0-9, / buttons on the remote control to select
the desired track number.
4. Press the PROG button on the remote control to confirm the track number to be stored.
5. Repeat steps 3-4 to select and store all desired tracks.

- 16 -
6. Press the BF button to start programme play.
7. Press the Lbutton once to stop the programme play. Press the Lbutton twice to clear
programme.
Playing the Beginning (Intro) of each Track
Press the INTRO button on the remote control to play the beginning of each track consecutively.
The playing time of each track is 10 seconds, then the rst track is playing automatically.
When you hear the desired track, press the BF button.
Random Play
All tracks are played in a random sequence by pressing the RANDOM button on the remote
control,“SHUF” is blink on the LCD. Press this button again to return to normal play.
To Select Album (For MP3/WMA discs)
- Press the ALB+/- button on the remote control to select the next/previous album, and play the
first track of this album.
- If the playing has ended, press the ALB+/- button on the remote control to select the next/
previous album.
Playing Repeatedly
ONE,ALB and ALL repeat play can be set by pressing the REPEAT button.
For audio CD
- First press : To repeat the same track, the “TRK” and “REP” will blink.
- Second press : To repeat playing all tracks on a disc, the “REP ALL” will blink.
- Third Press : Return to the normal playback state.
For MP3/WMA Disc
- First press : To repeat the same track, the “TRK” and “REP” will blink.
- Second press : To repeat playing album, the “REP” and “ALB” will blink.
- Third press : To repeat playing all tracks on a disc, the “REP ALL” will blink.
- Fourth Press : Return to the normal playback state.
Text Display During Playback
For audio CD
Repeatedly press the INFO button on the reomote control to show the current track number
and sigle elapsed time,the current track number and single remain time,the current track num-
ber and total elapsed time or the current track number and total remain time.
For MP3/WMA Disc
Press the INFO button on the remote control, ID3 information (song title and artist) will be
displayed. Press this button again, album, track and playing time will be displayed.

- 17 -
Use the USB
1. Insert the USB device's USB plug into the socket on the unit.
2.
Repeatedly press the SOURCE button on the unit or
/
OPTICAL button on the remote
control
to select the USB source.
The word “USB” will be displayed on the LCD.
3. In stop mode, press the BF button to start playing.
During playing, press the BF button to temporarily stop the playing, press the button again, it
will continue to play.
4. Press the Lbutton once to pre-stop the disc playing. Press the button twice to stop the disc
playing.
Note: The player support the USB music file format of MP3/WMA only.
Access a folder
- During playing, press the ALB+/- buttons on the remote control to select a folder.
- In stop mode, press the ALB+/- buttons on the remote control to select a folder and press the
G/Hbuttons on the unit or / buttons on the remote controltoselectafile,and
then press the BF button to start play.
Charge your device
You can charge your device through the socket on the rear of the unit with a USB cable.
NOTE:
- The maximum current for USB charging is 5V 1A.
- Not all devices for USB charging are guaranteed.

- 18 -
About NFC
Pair your NFC(Near Field Communication)-enabled mobile device directly with this unit by just a
single tap.
1. Activate NFC on your mobile device.
2. Tap the mobile device on the NFC area of the unit.
3. Operate your mobile device directly for playback features.
4. Tap again on the NFC area of the unit to disconnect.
Note: This function only works with mobile devices that support NFC technology.
Play from Bluetooth device
1.
Repeatedly press the SOURCE button on the unit or
/
AUX button on the remote control to
select the bluetooth source.
The word “BT” will display on the LCD.
2. Long pressing the BF button on the unit or
PAIRING
button on the remote control for 2
seconds or more to searching pairing device.
3. Activate the Bluetooth function in your Bluetooth device (see the device user manual).
4. Select "HFX-50" on your device for pairing.
- For elder devices, you need to input “0000” as pairing password.
5. Start music play on your Bluetooth device, you can use this unit to control the function to
your Bluetooth device.
- To pause/resume play, press BF.
- To skip to a track, press G/Hbuttons on the unit or / buttons on the remote
control.
- To increase or decrease the volume, press VOL +/-.
6. Long pressing the Lbutton for 2 seconds or more to disconnect the Bluetooth connection
from your Bluetooth device and clear Bluetooth pairing history for this unit.
Note:
* The operational range is approximately 10 meters.
* Any obstacle can reduce the operational range.
* The device will also be disconnected when the device is moved beyond the operation range.
* If you want to reconnect the device to the unit, place it within the operational range.
* Compatibility with all Bluetooth devices is not guaranteed.

- 19 -
Setting the Daily on Timer
Caution: Make sure that you have set the clock correctly.
1. In standby mode, long pressing the TIMER button on the remote control,
until [TIMER SET]
scrolls on the LCD.
Then the source is displayed, e.g. DISC.
Note: If the clock is not set, the “SET CLOCK FIRST” will be displayed.
2. Use the VOLUME knob, H,Gbuttons on the unit or VOL+, VOL-, ,buttons on the
remote contorl to select a source.
3. Press the TIMER button to store the setting, the hour indicator will blink.
4. Repeat
above
steps 2-3 to set the hour, minute and adjust volume.
Note:
• Toexitclocksettingmodewithoutstoring,presstheLbutton.
• Ifnobuttonispressedin90seconds,theunitexitsclocksettingmodeautomatically.
• IfDISC/USBsourceisselectedandtheaudiocannotbeplayed,TUNERisactivated
automatically.
To deactivate or re-activate an alarm timer
Repeatedly press the TIMER button to activate or deactivate timer, if timer is activated, “ ” is
displayed.
Setting the Sleep Timer
Activate the sleep timer
When the unit is turned on, repeatedly press the SLEEP button on the remote control to select
a set period of time (in minutes: 120, 90, 60, 45, 30, 15), the “ ” is displayed.
To deactivate sleep timer
Repeatedly press the SLEEP button until [SLEEP OFF] is displayed, the “ ” is disappears.
Table of contents
Other Neon Stereo System manuals


