Neon MTB830 User manual
INSTRUCTION MANUAL
MTB830
VALVE HIFI SYSTEM

- 1 -
Table of Contents
Safety Warnings .................................................................................................................................................3
Battery Safety Guidelines................................................................................................................................5
Pack Contents....................................................................................................................................................6
Product Overview ............................................................................................................................................7
Remote Control Overview ............................................................................................................................8
Installation of Battery ................................................................................................................................................................. 9
Handling the Remote Control..................................................................................................................................................9
Remote Control Operation Range......................................................................................................................................... 10
Connecting the AC Power Cord................................................................................................................... 10
Switching ON / OFF.........................................................................................................................................11
Reset Feature.....................................................................................................................................................11
Setting the Clock .............................................................................................................................................11
Sound Quality .................................................................................................................................................... 12
Adjusting the Volume .................................................................................................................................................................. 12
Mute sound................................................................................................................................................................................... 12
Adjusting the Super Bass ........................................................................................................................................................... 12
Controlling the Loudness.......................................................................................................................................................... 12
Presetting Equalizer ................................................................................................................................................................... 12
Changing the Front Panel Darkness........................................................................................................................................ 12
Listen through headphone......................................................................................................................................................... 12
FM Radio Operation ........................................................................................................................................13
Tuning in to a Station.................................................................................................................................................................. 13
Program radio stations............................................................................................................................................................... 13
To change the FM Reception Mode ........................................................................................................................................ 13
Disc (audio CDs and MP3/WMA discs) Operation..................................................................................14
Disc Playing ................................................................................................................................................................................... 14
To Skip Search and Play.............................................................................................................................................................. 14
To Search and Play....................................................................................................................................................................... 14
Text Display During Playback .................................................................................................................................................. 14
Programme Play (For audio CDs and MP3/WMA discs) ................................................................................................... 14
Playing the Beginning (Intro) of each Track............................................................................................................................ 15
Random Play ................................................................................................................................................................................. 15
To Select Album (For MP3/WMA discs) ................................................................................................................................ 15
Playing Repeatedly....................................................................................................................................................................... 15

- 2 -
Use the USB ......................................................................................................................................................16
Play from USB............................................................................................................................................................................... 16
Charge your device..................................................................................................................................................................... 16
About NFC.........................................................................................................................................................16
Play from Bluetooth device............................................................................................................................. 16
Setting the Sleep Timer....................................................................................................................................17
Set the alarm timer...........................................................................................................................................17
Other features...................................................................................................................................................18
Optical ........................................................................................................................................................................................... 18
AUDIO IN .................................................................................................................................................................................... 18
Specifications......................................................................................................................................................19
Maintenance .......................................................................................................................................................20
Cleaning the Unit ........................................................................................................................................................................ 20
Handling Discs.............................................................................................................................................................................. 20
Cleaning Discs.............................................................................................................................................................................. 20
Storing Discs................................................................................................................................................................................. 20
Troubleshooting.................................................................................................................................................21

- 3 -
Safety Warnings
- Read all the instructions carefully before using the unit and keep them for future reference.
- Retain the manual. If you pass the unit onto a third party make sure to include this manual.
Dame
- Please inspect the unit for damage after unpacking.
- Do not continue to operate the unit if you are in any doubt about it working normally, or if it
is damaged in any way - switch off, withdraw the mains plug and consult your dealer.
Location of Unit
- The unit must be placed on a at stable surface and should not be subjected to vibrations.
- Do not place the unit on sloped or unstable surfaces as the unit may fall off or tip over.
- The mains socket must be located near the unit and should be easily accessible.
Temperature
- Avoid extreme degrees of temperature, either hot or cold. Place the unit well away from heat
sources such as radiators or gas/electric fires.
- Avoid exposure to direct sunlight and other sources of heat.
Naked Flames
- Never place any type of candle or naked flame on the top of or near the unit.
Moisture
- To reduce the risk of fire, electric shock or product damage, do not expose this unit to rain,
moisture, dripping or splashing. No objects filled with liquids, such as vases, should be placed
on the unit.
- If you spill any liquid into the unit, it can cause serious damages. Switch it off at the mains
immediately.Withdraw the mains plug and consult your dealer.
Ventilation
- To prevent the risk of electric shock or fire hazard due to overheating, ensure that curtains
and other materials do not obstruct the ventilation vents.
- Do not install or place this unit in a bookcase, built-in cabinet or in another confined space.
Ensure the unit is well ventilated.
Safety
- Always disconnect the unit from the mains supply before connecting/ disconnecting other
devices or moving the unit.
- Unplug the unit from the mains socket before a lightning storm.
Mains Cable
- Make sure the unit or the unit stand is not resting on top of the mains adapter cable, as the
weight of the unit may damage the cable and create a safety hazard.
- The direct plug-in adapter is used as disconnect device,the disconnect device shall remain
readily operable.
Interference
- Do not place the unit on or near appliances which may cause electromagnetic interference.
If you do, it may adversely affect the operating performance of the unit, and cause a distorted
picture or sound.

- 4 -
Batteries
- Batteries used in the remote control for this unit are easily swallowed by young children and
this is dangerous.
- Keep loose batteries away from young children and make sure that the battery holder tray is
secure in the remote control. Seek medical advice if you believe a cell has been swallowed.
- Please dispose of batteries correctly by following the guidance in this manual.
- Batteries (battery pack or batteries installed) shall not be exposed to excessive heat such as
sunshine, fire or the like.
Supervision
- Children should be supervised to ensure that they do not play with the unit and the remote
control.
- Never let anyone especially children push anything into the holes, slots or any other openings
in the case - this could result in a fatal electric shock.
Class 1 Laser Product
- This unit utilises a laser. Use of controls, adjustments or performance
of procedures other than those specified herein may result in
hazardous radiation exposure.
- Before moving the unit, ensure the disc tray is empty.
- Always remove the disc when the unit is not in use.
- Failure to do so will risk severely damaging the disc and the unit.
- Do not stack devices, heat from other devices may affect the performance of the unit.
Service
- To reduce the risk of electric shock, do not remove screws.The unit does not contain any
user-serviceable parts. Please leave all maintenance work to qualified personnel.
- Do not open any fixed covers as this may expose dangerous voltages.
Maintenance
- Ensure the unit is fully unplugged from the power supply before cleaning.
- Do not use any type of abrasive pad or abrasive cleaning solutions as these may damage the
unit’s surface.
- Do not use liquids to clean the unit.
CLASS 1
LASER PRODUCT
- 5 -
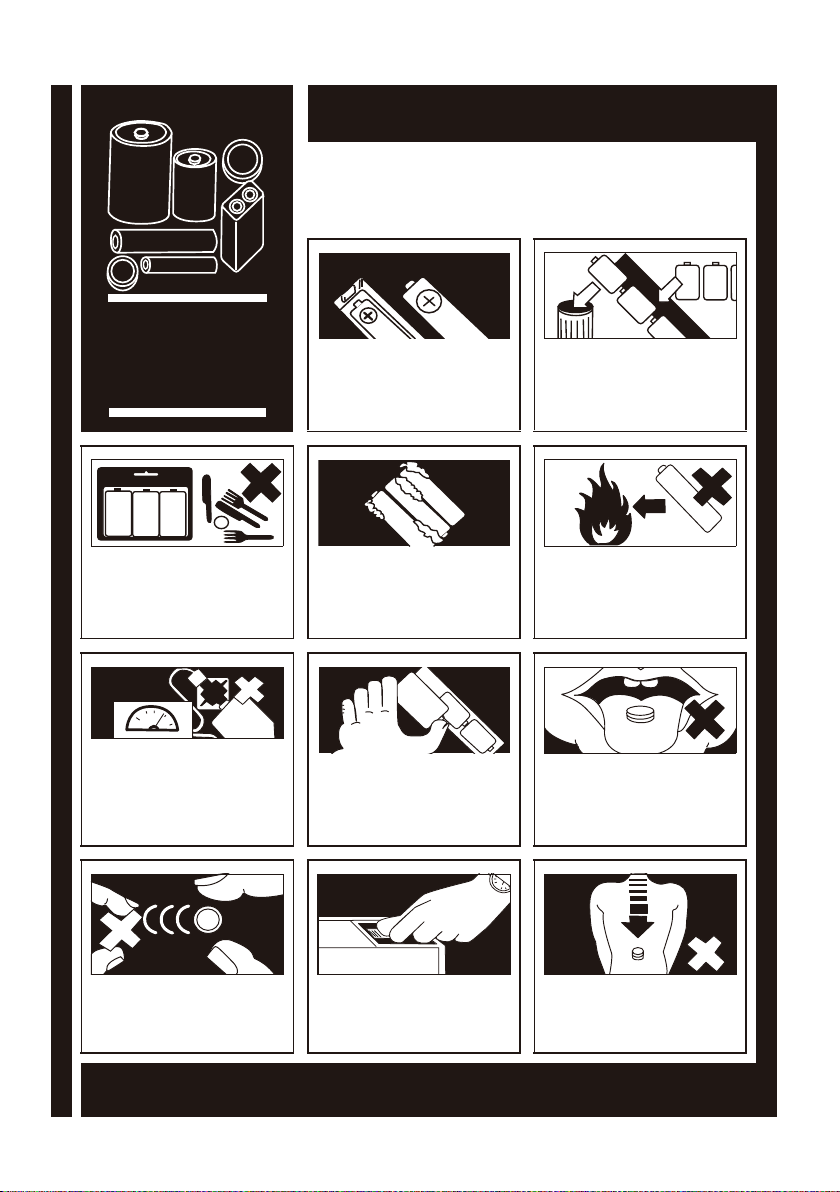
Used correctly, domestic batteries are a safe and dependable source of portable power.
Problems can occur if they are misused or abused — resulting in leakage or, in extreme
cases, fire or explosion.Here are some simple guidelines to safe battery use designed to
eliminate any such problems.
Take care to fit your batteries correctly,
observing the plus and minus marks
on the battery and appliance. Incorrect
fitting can cause leakage or, in extreme
cases, fire or even an explosion.
Replace the whole set of batteries
at one time, taking care not to mix
old and new batteries or batteries of
different types, since this can result in
leakage or, in extreme cases, fire or
even an explosion.
Store unused batteries in their
packaging and away from metal objects
which may cause a short-circuit
resulting in leakage or, in extreme cases,
fire or even an explosion.
Remove dead batteries from equipment
and all batteries from equipment you
know you are not going to use for a
long time. Otherwise the batteries may
leak and cause damage.
Never dispose of batteries in fire as
this can cause them to explode. Please
recycle dead batteries; do not put with
the normal household waste.
Never attempt to recharge ordinary
batteries, either in a charger or by
applying heat to them. They may leak,
cause fire or even explode. There are
special rechargeable batteries which
are clearly marked as such.
Supervise children if they are replacing
batteries themselves in order to ensure
these guidelines are followed.
Remember that small button cell
batteries such as used in some hearing
aids, toys, games and other appliances,
are easily swallowed by young children
and this can be dangerous.
Keep loose button cells away from
young children.
Make sure battery compartments are
secure.
Seek medical advice if you believe a cell
has been swallowed.
Battery
Safety
Guidelines

- 6 -
Pack Contents
Make sure all of the following contents are included.
Remote Control
(battery included)
The Unit MP3-LINK Cable
Quick Start Guide
Quick Start GuideOptical Cable AC Adaptor

- 7 -
Product Overview
1. Display Lens
2. Remote Sensor
3. Standby Button ( )
4. Source Knob (SOURCE)
5. Play/Pause Button (BF)
6. Disc Tray Window
7. Volume Control Buttons (VOL +/-)
8. Preset Equalizer Button (P-EQ)
9. Eject the disc Button (K)
10. DC in Socket
11. USB Socket
12. Headphone Socket
13. Optical Input Socket
14. Audio Input Socket
15. Telescopic antenna

- 8 -
Remote Control Overview
1. Standby Button ( )
2. Album Up Button ( )
Preset Up Button ( )
Adjust Time Button ( )
3. Previous Button ( )
Search Backward Button ( )
Tuning Backward Button ( )
4. Source Select Button (SOURCE)
5. Program Button (PROG)
Auto Scan Button (PROG)
Memory Button (PROG)
6. Mute Button (MUTE)
7. Play/Pause Button (BF)
Disable the Bluetooth Function Button
(PAIRING)
8. Random Button (RANDOM)
9. Repeat Button (REPEAT)
Stereo/mono Select Button (REPEAT)
10. Preset Equalizer Button (P-EQ)
11. Clock Button (CLOCK)
12. Super Bass Button (S-BASS)
13. Eject the disc Button
14. Next Button ( )
Search Forward Button ( )
Tuning Forward Button ( )
15. Album Down Button ( )
Preset Down Button ( )
Adjust Time Button ( )
16. Volume Up Button (VOL +)
Volume Down Button (VOL -)
17. Stop Button (L)
18. Intro Button (INTRO)
19. Display Information Button (INFO)
20. Loudness Button (LOUDNESS)
21. Timer Button (TIMER)
Sleep Button (SLEEP)
22. Dimmer Button (DIM)
- 9 -
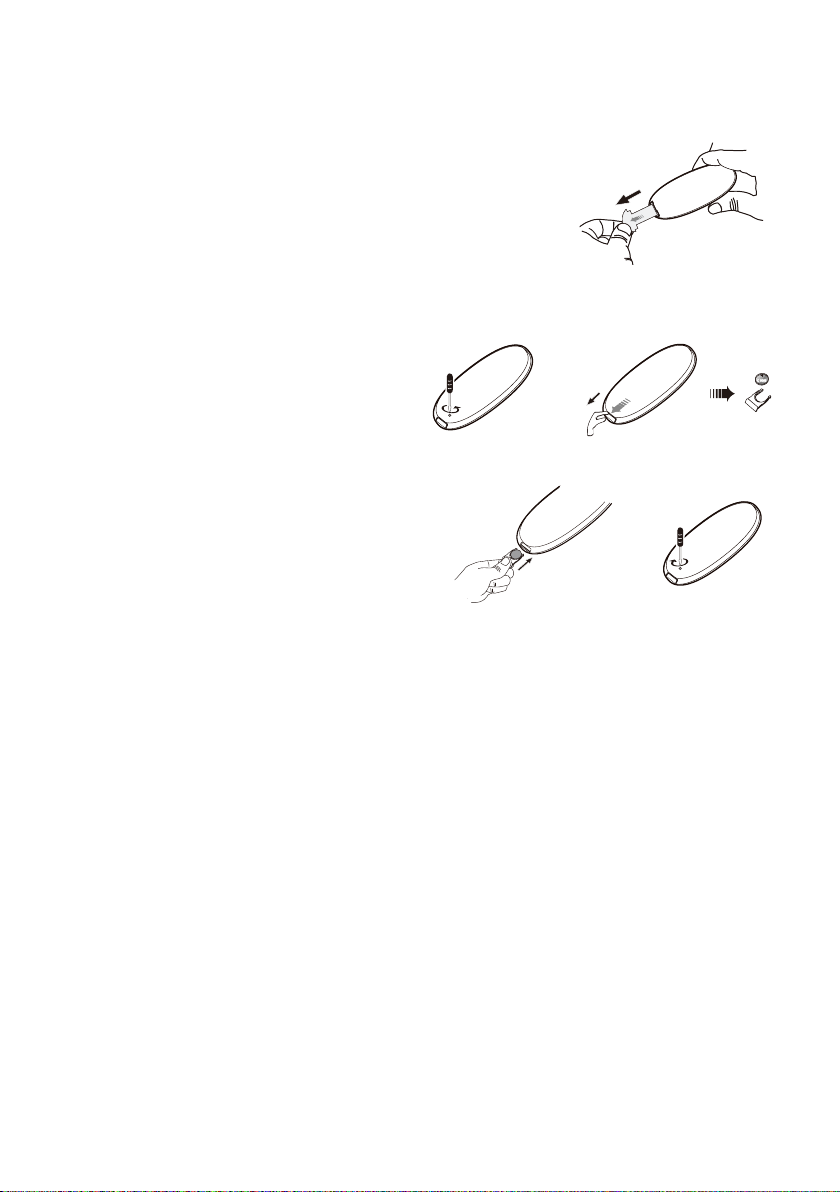
Installation of Battery
For first-time use:
Remove the protective tab to activate the remote control
battery. It is located at the bottom back side of the
remote control.
To replace the remote control batteries:
1. Loosen the screw on the battery compartment
cover with a screwdriver. Pull out the battery
compartment with your fingernails.
2. Replace a new battery (size 2025) correctly and fully
insert the battery compartment back to the original
position.Tighten the screw with a screwdriver.
Handling the Remote Control
- Remove the batteries if the remote control is not going to be used for an extended period of
time.
- To avoid possible failure, read the following instructions and handle the remote control
properly.
- Do not drop or cause impact to the remote control.
- Do not spill water or any liquid on the remote control.
- Do not place the remote control on a wet object.
- Do not place the remote control under the direct sunlight or near sources of excessive heat.
- Do not use caustic cleaners ( porcelain, stainless steel, toilet, or oven cleaner etc. ) on the
remote control, as it may suffer damage.
Note:
Remove the battery from remote control handset when it is not to be used for a long period.
Otherwise it can be damaged due to leakage of battery.
- 10 -
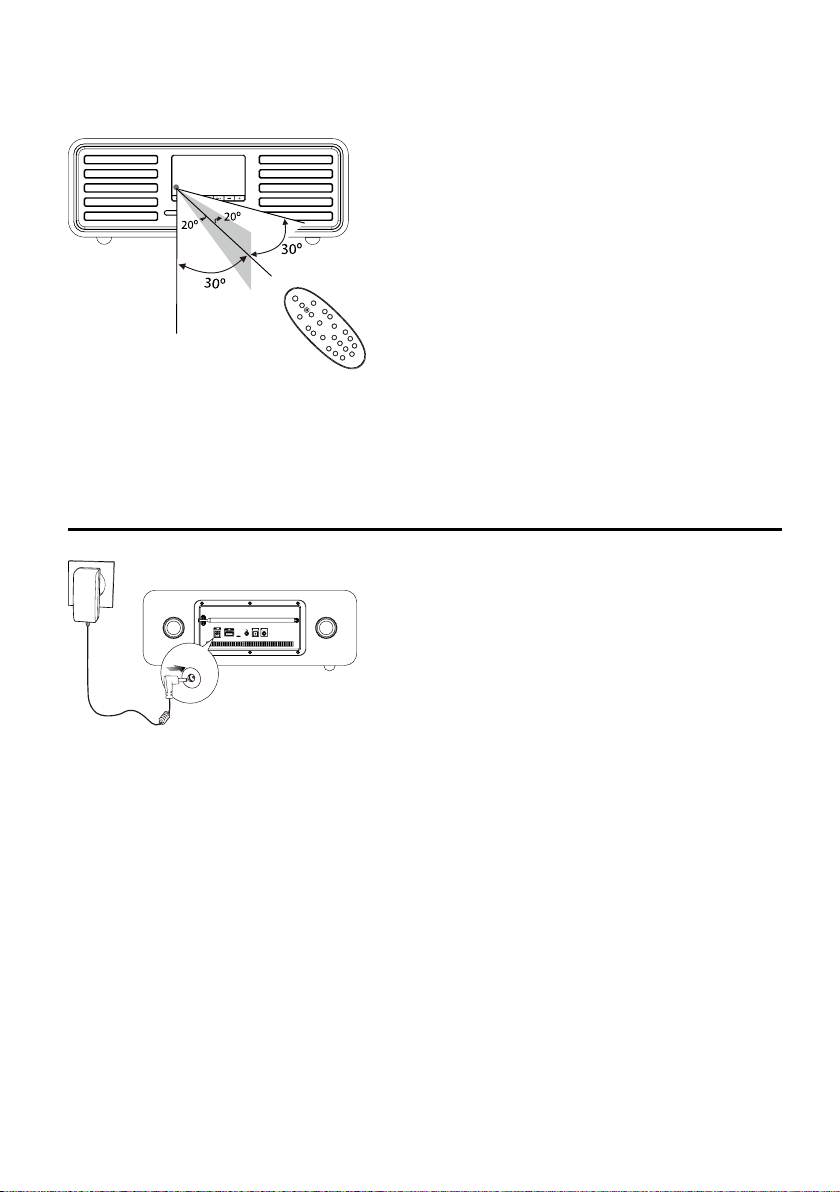
Remote Control Operation Range
Point the remote control to the unit no more than 6
meters from the remote control sensor and within
60° horizontally and 40° vertically of the front of the
unit.The operating distance may vary according to the
brightness of the room.
Note:
• Makesurethatthereisnoobstaclebetweenthe
infrared remote sensor of the unit and remote
control. If you install the unit on rack, etc.., the
remote controllable range may decrease depending
on the thickness or colour of glass door of rack.
• Donotexposetheinfraredremotesensorto
direct sunlight or other strong light, such as inverter
uorescent light.
Connecting the AC Power Cord
Insert the AC adapter’s DC plug into the unit and
other side into a wall outlet, and your system is at your
command!
Caution:
* Be sure to unplug the power plug from the outlet
when going out or when the unit is not in use for
an extended period of time.
6m directly
in front of the unit
DC IN

- 11 -
Switching ON / OFF
When you rst connect the unit to the AC power, the unit will be in clock mode.
- Press the button to switch the unit on.The word “HELLO” will display on the display lens.
A countdown of 10 seconds starts for preheating of the system. Then, the system will switch
to the last selected source.
- Press the button to switch the unit back to clock mode.The words “GOOD BYE” will
display on the display lens.
Reset Feature
Long pressing the BF button for 3 seconds or more to display the software version of the unit,
then press the P-EQ button to resets all the settings to factory default, “RESET” will display on
the display lens.
Note: This feature is only available for standby mode.
Setting the Clock
Caution: You can set the clock in clock mode only.
1. In clock mode, long pressing the CLOCK button on the remote control for more than 2
seconds to activate the clock setting mode, the time format [24--H] or [12--H] will blink.
2. Press the / buttons on the remote control to select a time format.
3. Press the CLOCK button to store the setting, the hour digits blink.
4. Repeat
above
steps 2-3 to set the hour and minute.
Note:
- To exit clock setting mode without storing, press the Lbutton.
- If no button is pressed in 10 seconds, the unit exits clock setting mode automatically.
- If a power failure occurs or the unit is disconnected from the mains, the clock setting will be
lost.

- 12 -
Sound Quality
Adjusting the Volume
To increase or decrease the volume, press the VOL +/- buttons.
Mute sound
You can mute the sound temporarily.
During play, press the MUTE button to mute or unmute sound.
Note: If you change the volume or source when the sound is muted, muting is cancelled.
Adjusting the Super Bass
You can reinforce the bass sound to maintain rich, full bass at low volume.
Press the S-BASS button on the remote control to get the effect, the “DBB ON”
will display on
the display lens
. Press again to cancel the effect, the “DBB OFF”
will display on the display lens
.
Controlling the Loudness
This unit has a loudness function, which can automatically increase the bass sound effect at low
volume. It can also increase the bass sound effect at high volume, but it will be relatively less when
it is at high volume.
Press the LOUDNESS button to obtain the loudness function, the “LOUD ON”
will display on
the display lens
. Press again to cancel the effect, the “LOUD OFF”
will display on the display lens
.
Presetting Equalizer
You can adjust the sound according to the genre of the music your taste.
During play, repeatedly press the P-EQ button to select your preferred sound mode.
- POP
- ROCK
- CLASSIC
- JAZZ
- FLAT
Changing the Front Panel Darkness
To dim or brighten the display, repeatedly press the DIM button on the remote control to the
desired brightness.
Listen through headphone
Plug a headphone into the socket on the rear of the unit.

- 13 -
FM Radio Operation
Caution: Before listening to the radio, please check that the telescopic antenna on the rear of
the unit is correctly adjusted for length and direction.
Tuning in to a Station
1.
Repeatedly press the SOURCE button to select TUNER source.The word “TUNER” will display
on the display lens.
2. Select a station using one of the following methods.
Auto Tuning
Long pressing the / buttons on the remote control for more than 2 seconds, the frequen-
cy changes down or up automatically until a station is found.
Manual Tuning
Repeatedly press the / buttons on the remote control to change the frequency until you
nd the station you want.
PresetTuning (Available only after the stations are preset)
Repeatedly press the / buttons on the remote control to select the desired preset num-
ber. Its band and frequency are
display on the display lens
.
Program radio stations
You can program a maximum of 20 preset radio stations (FM).
Automatically
Long pressing the PROG button on the remote control for more than 2 seconds to activate
automatic program mode.
- “AUTO” is
showed on the display lens
.
- All available stations are programmed.
- The rst programmed radio station is broadcast automatically.
Manually
1. Tune to a radio station.
2. Press the PROG button on the remote control to activate program mode.The preset number
and frequency will blink
on the display lens
.
3. Repeatedly press the / buttons on the remote control to select a number from 1–20 for
this radio station.
4. Press the PROG button on the remote control again to store the station.
5. Repeat above steps 1 to 4 for each station you want to store in memory with a preset number.
Note:If the system is unplugged or if a power failure occurs, the preset stations will not be losted.
To change the FM Reception Mode
Press the REPEAT button on the remote control to select the STEREO or MONO channel to
receive the best FM reception mode.

- 14 -
Disc (audio CDs and MP3/WMA discs) Operation
Caution:This unit can only use 12cm discs!
Disc Playing
1.
Repeatedly press the SOURCE button to select DISC source.The word “DISC” will display on
the display lens.
2. Insert the disc into the disc tray (with the printed side up) from the disc tray window then
gently push it up.
3. The unit will read the disc and play it automatically.
Note:If in stop mode, please press the BF button to start playing the disc.
4. Press the BF button to temporarily stop the playing, press the button again, it will continue
to play.
5. Press the Lbutton to stop the disc playing.
6. Press the Kbutton on the unit or eject the disc button on the remote control to eject the
disc.
To Skip Search and Play
Press the button on the remote control once or more to skip previous one or more tracks
on the disc.
Press the button on the remote control once or more to skip forward one or more tracks
on the disc.
To Search and Play
Long pressing the / buttons on the remote control to search for the position that you intend
to start playing.
Text Display During Playback
For audio CD
Repeatedly press the INFO button on the remote control to show the current track number
and single elapsed time or single remain time or total elapsed time or total remain time.
For MP3/WMA Disc
Repeatedly press the INFO button on the remote control, ID3 information (song title and art-
ist) scrolls on the display lens for a few minute or “NO ID3” if there is no ID3 information.
Programme Play (For audio CDs and MP3/WMA discs)
You can programme up to 20 tracks to play in any desired order.
1. Insert a disc and press the Lbutton when it starts playing.
2. Press the PROG button on the remote control, "001 P--01"
will display on the display lens
.
3. Press the / buttons on the remote control to select the desired track number.
- To select track number 8,“008 P--01”
will display on the display lens.

- 15 -
4. Press the PROG button on the remote control to confirm the track number to be stored.
- To select track number 8,“008 P--02”
will display on the display lens.
5. Repeat above steps 3-4 to select and store all desired tracks.
6. Press the BF button to start programme play.
7. Press the Lbutton once to stop the programme play. Press the Lbutton twice to clear
programme.
Playing the Beginning (Intro) of each Track
Press the INTRO button on the remote control to play the beginning of each track consecutively.
The playing time of each track is 10 seconds.
When you hear the desired track, press the BF button.
Random Play
All tracks are played in a random sequence by pressing the RANDOM button on the remote
control, the words “SHUF” will stay lit on the display lens. Press this button again to return to
normal play.
To Select Album (For MP3/WMA discs)
- In playing mode, press the / buttons on the remote control to select the next/previous
folder and the rst le is play automatically.
- In stop mode, press the / buttons on the remote control to select the next/previous
folder and press the BF button to start play from first file.
Playing Repeatedly
During play, repeatedly press the REPEAT button on the remote control to select:
- For audio CD
- First press : The current track is played repeatedly, the words “REP” will stay lit.
- Second press : All tracks are played repeatedly, the words “REP ALL” will stay lit.
- Third press : To cancel the repeat playing.
- For MP3/WMA Disc
- First press : The current track is played repeatedly, the words “REP” will stay lit.
- Second press : To repeat playing album, the words “REP ALB” will display a few second
and “REP” will stay lit.
- Third press : All tracks are played repeatedly, the words “REP ALL” will stay lit.
- Fourth press : To cancel the repeat playing.
- 16 -
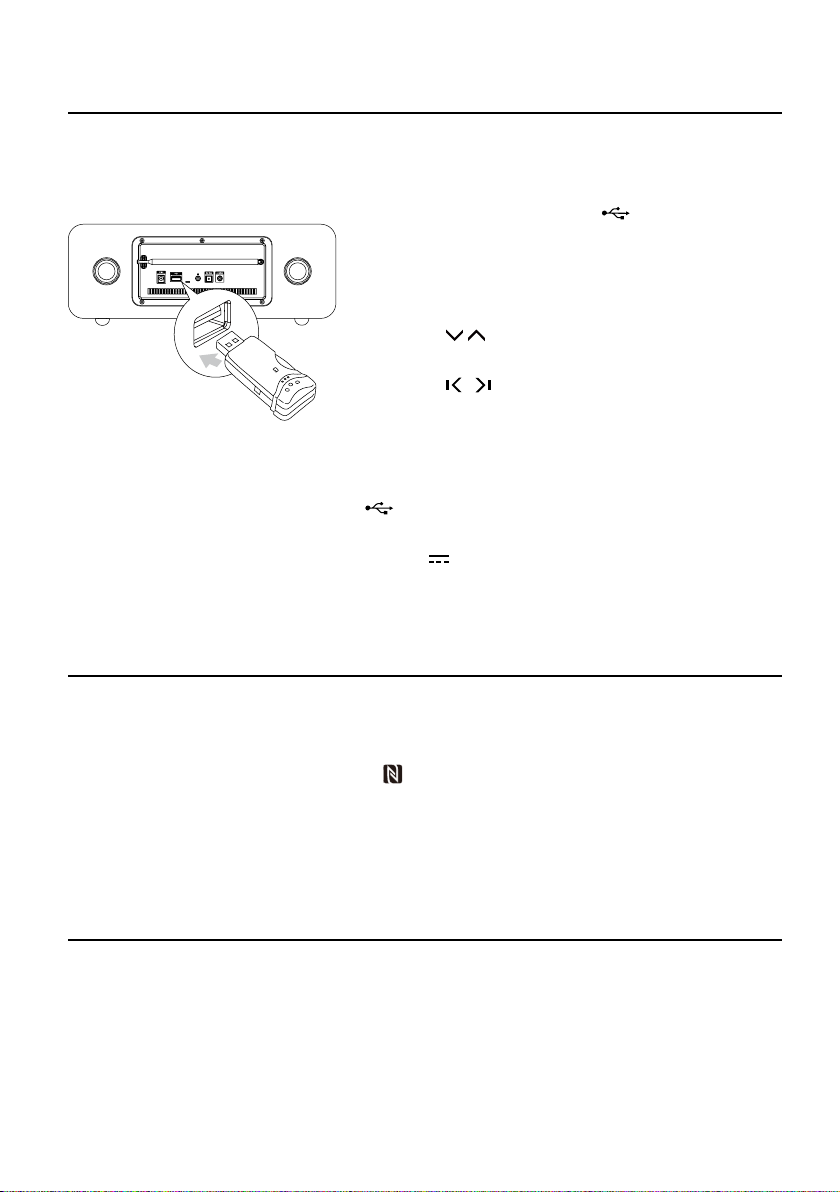
Use the USB
Play from USB
Note: Ensure that the USB device contains playable audio contents for supported formats.
1. Insert the USB device into the socket on the rear
of the unit.
2.
Repeatedly press the SOURCE button to select USB
source.The word “USB” will display on the display lens.
3. The device's stored music will be played automatically.
4. Press the / buttons on the remote control to
select the next/previous folder.
5. Press the / buttons on the remote control to
select a file.
6. Press the BF button to start play.
Charge your device
You can charge your device through the socket on this product with a USB cable.
Note:
* The maximum current for USB charging is 5V 1A.
* Not all devices for USB charging are guaranteed.
About NFC
Pair your NFC(Near Field Communication)-enabled mobile device directly with this unit by just a
single tap.
1. Activate NFC on your mobile device.
2. Tap the mobile device on the NFC area of the unit.
3. Operate your mobile device directly for playback features.
4. Tap again on the NFC area of the unit to disconnect.
Note: This function only works with mobile devices that support NFC technology.
Play from Bluetooth device
1.
Repeatedly press the SOURCE button to select Bluetooth source.The word “BT” will display on
the display lens.
2. Activate the Bluetooth function in your Bluetooth device (see the device user manual).
3. Select "MTB830" on your device for pairing.
- For elder devices, you need to input “0000” as pairing password.
4. Start music play on your Bluetooth device, you can use this unit to control the function to
your Bluetooth device.

- 17 -
- To pause/resume play, press BF.
- To skip to a track, press / .
- To increase or decrease the volume, press VOL +/-.
5. Long pressing the
PAIRING
button on the remote control for more than 2 seconds to disable
the Bluetooth function from your Bluetooth device.
Note:
* The operational range is approximately 10 meters.
* Any obstacle can reduce the operational range.
* The device will also be disconnected when the device is moved beyond the operation range.
* If you want to reconnect the device to the unit, place it within the operational range.
* This unit supports A2DP (Advanced Audio Distribution Profile).
* Compatibility with all Bluetooth devices is not guaranteed.
Setting the Sleep Timer
When the unit is turned on, repeatedly press the SLEEP button on the remote control to select
a set period of time (in minutes):
120, 90, 75, 60, 45, 30, 15
When sleep timer is activated, the “Zz” is displayed.
To deactivate sleep timer
Press the SLEEP button repeatedly until [SLEEP 00] is displayed.
When sleep timer is deactivated, the “Zz” is disappears.
Set the alarm timer
Caution: Make sure that you have set the clock correctly.
1. Long pressing the TIMER button on the remote control for more than 2 seconds, the “ ”
and
the source (e.g. DISC)
will blink on the display lens
.
2. Press the / buttons on the remote control to select a source (e.g. DISC,TUNER etc.).
3. Press the TIMER button to store the setting, the hour digits blink.
4. Repeat steps 2-3 to set the hour, minute and adjust volume.
Note:
* If DISC/USB source is selected and the audio cannot be played,TUNER is activated
automatically.
* If no button is pressed in 30 seconds, the unit exits timer setting mode automatically.

- 18 -
To deactivate or re-activate an alarm timer
Repeatedly press the TIMER button to activate or deactivate timer.
- If timer is activated,“ ” is displayed.
Other features
Optical
1. Connect the OPTICAL socket on the rear of the unit to OPTICAL socket on the amplifier
with digital signal input socket with the signal cable.
2. Repeate
dly press the SOURCE button to select the OPTICAL source.
3. Start to play on the device (see the user manual of the external device).
Note:
In receiving OPTICAL signals, the setting menu of TV or other connected devices, please change
Digital Audio Output into PCM.
AUDIO IN
1. Connect the AUDIO IN terminals on the rear of the unit to the headphone socket on the
external device with the MP3-LINK cable.
2.
Repeatedly press the SOURCE button to select
AUDIO IN
source.The word “
AUDIO IN
” will
display on the display lens.
3. Start to play on the device (see the user manual of the external device).

- 19 -
Specifications
Power requirements : 16V 1.8A
FM Tuning Range : 87.5 - 108 MHz
Output Power : 15W x 2
THD :
≤1%
Disc Diameter : 12cm
USB Port : 5V 1A
Speaker Impedance : 8Ωx 2 (tweeter speaker)
: 6Ωx 2 (woofer speaker)
Speaker Input Power : 25W
Dimensions : 392(W) x 148(H) x 204(D) mm
Bluetooth Specification
Communication system : Bluetooth Standard version 4.0
Output : Bluetooth Standard Power Class 2
Maximum communication Range : approx.8m
Frequency band : 2.4 GHz Band (2.4000 GHz - 2.4835 GHz)
Compatible Bluetooth profiles : Advanced Audio Distribution Profile (A2DP)
Supported Multi devices pairing : up to 8 devices
Supported codecs (Receive) : SBC(Sub Band Codec)
(Transmit) : SBC(Sub Band Codec)
Note: Design and specifications are subject to change without prior notice.
Table of contents
Other Neon Stereo System manuals


