NEONODE N1 User manual

Welcome to the N1 Guide
Welcome to the N1 Guide............................................................................................... 1
Elementary information ................................................................................................... 2
Insert the SIM card........................................................................................................... 3
Insert the SD card ............................................................................................................ 4
Charge the battery ........................................................................................................... 5
Turn on your Neonode .................................................................................................... 6
Enter PIN code ............................................................................................................. 6
Keylock........................................................................................................................... 7
Reboot your Neonode ................................................................................................. 7
Navigation Basics............................................................................................................. 8
The Keyboard ................................................................................................................. 11
General Settings............................................................................................................. 12
Connect your Neonode to a computer........................................................................ 13
Download new updates................................................................................................. 14
Make calls........................................................................................................................ 16
Address book.................................................................................................................. 17
The Image Viewer...................................................................................................... 19
The Messaging Application .......................................................................................... 21
SMS.............................................................................................................................. 21
MMS ............................................................................................................................. 23
The Media Player ........................................................................................................... 24
Internet Explorer............................................................................................................. 29
Transfer a favourite from your computer................................................................ 31
Watch DVD films on your Neonode............................................................................. 32
BetaPlayer................................................................................................................... 37
Podcast to your Neonode ............................................................................................. 38
Improve ring and alarm sound volume ....................................................................... 39
GPRS and MMS settings.............................................................................................. 41
Enter settings manually............................................................................................. 41
2
Elementary information
Important information before you start to use your Neonode:
Your Neonode must be turned off when you insert and remove the SD card. Removing the SD card while the power is on may cause
malfunction and loss of important settings and data.
Your Neonode must be turned off when you insert and release the SIM card. Releasing the SIM card while your Neonode is turned on may
cause malfunction and loss of important settings and data.
No subscription or SIM card is included in the package.
If you try to open or tamper with your Neonode's outer casing, the guarantee will not be valid.
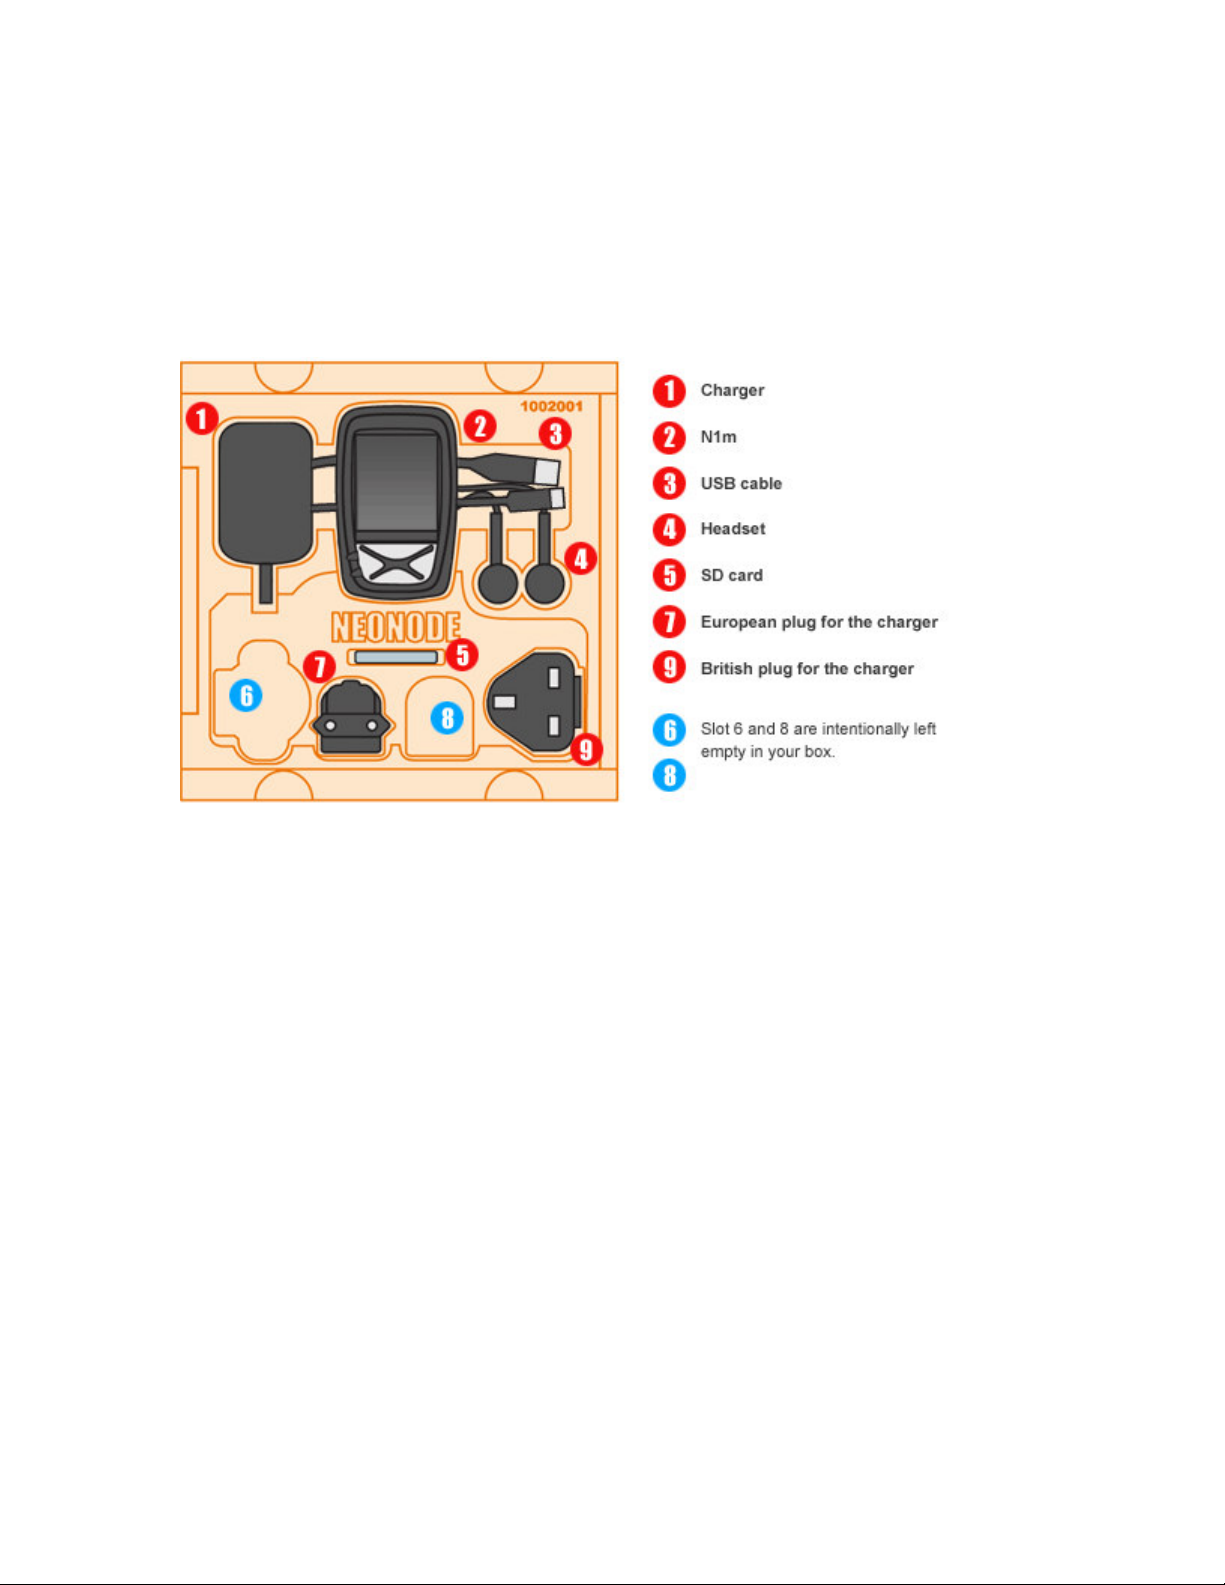
In the box
Before unpacking your Neonode, please make sure the box contains the following:
3
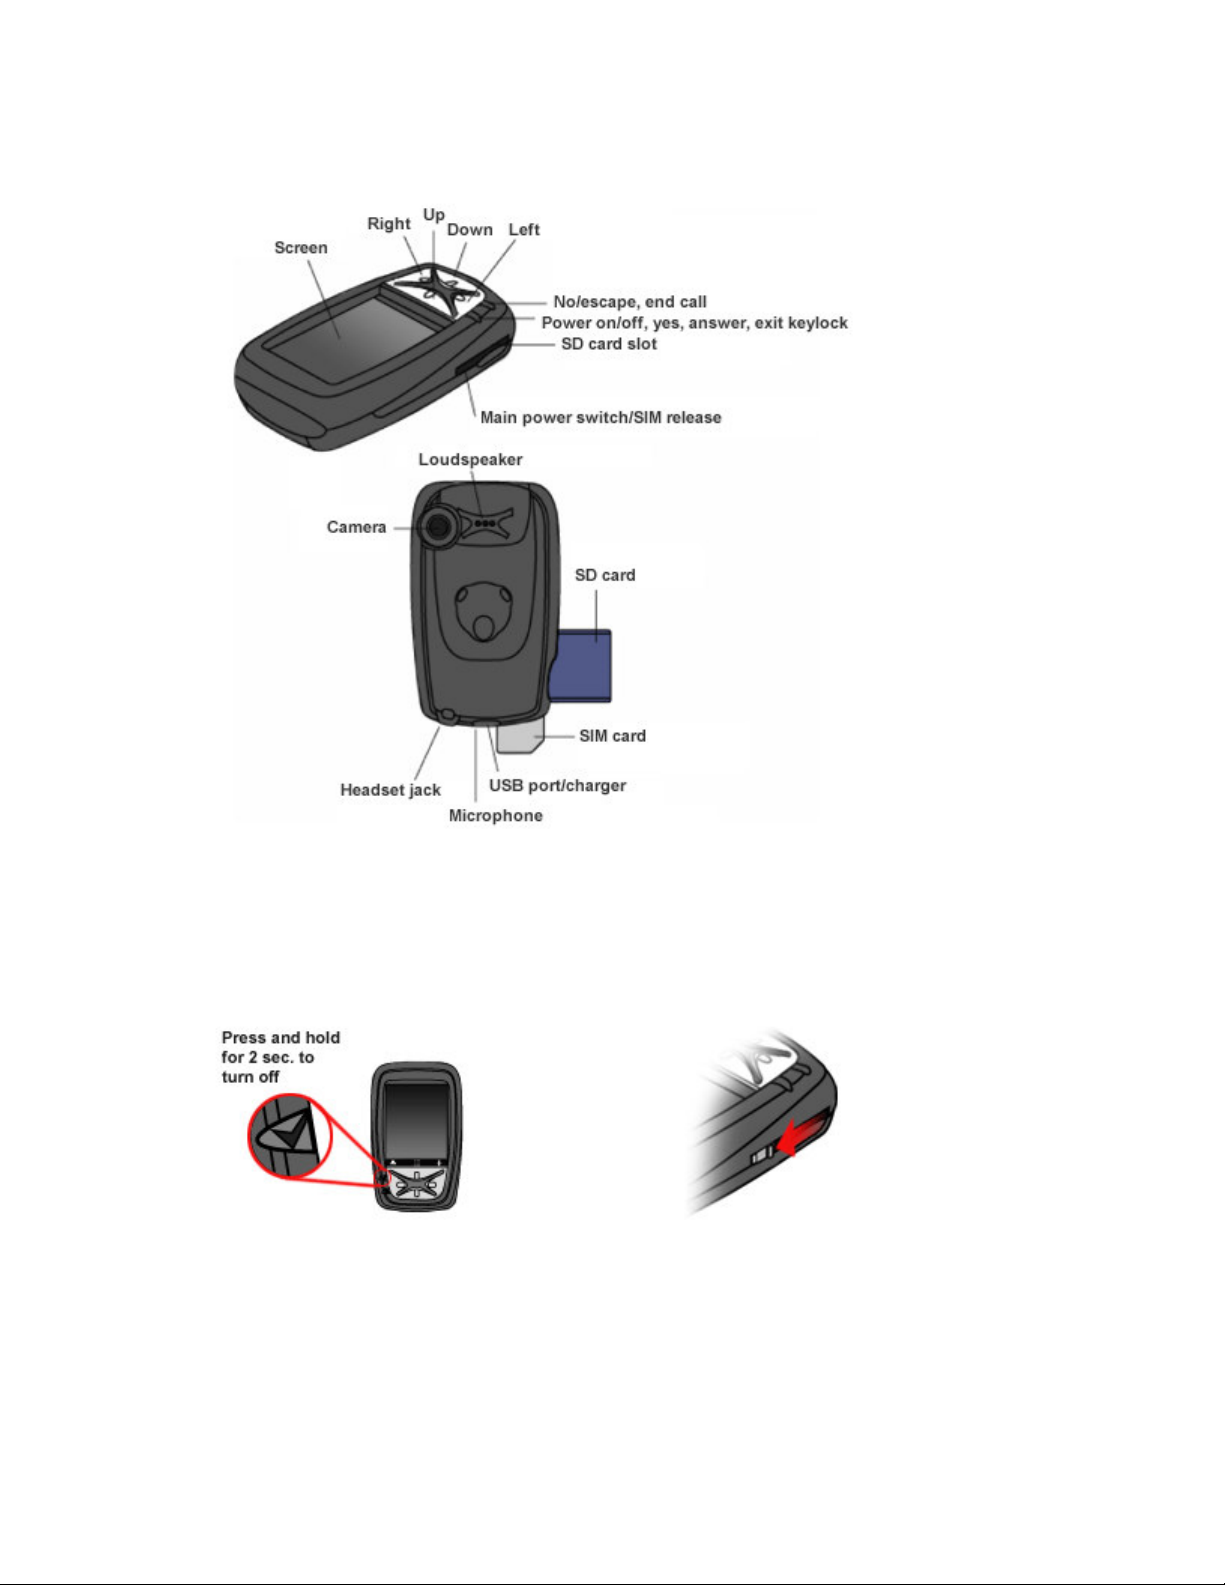
The mobile device
In the image below you can see the position of your Neonode's different buttons and parts.
Insert the SIM card
Please note that neither SIM card nor any subscription is included when you buy a Neonode.
Your Neonode should be turned off when you insert the SIM card. The main power switch must be in on-position.
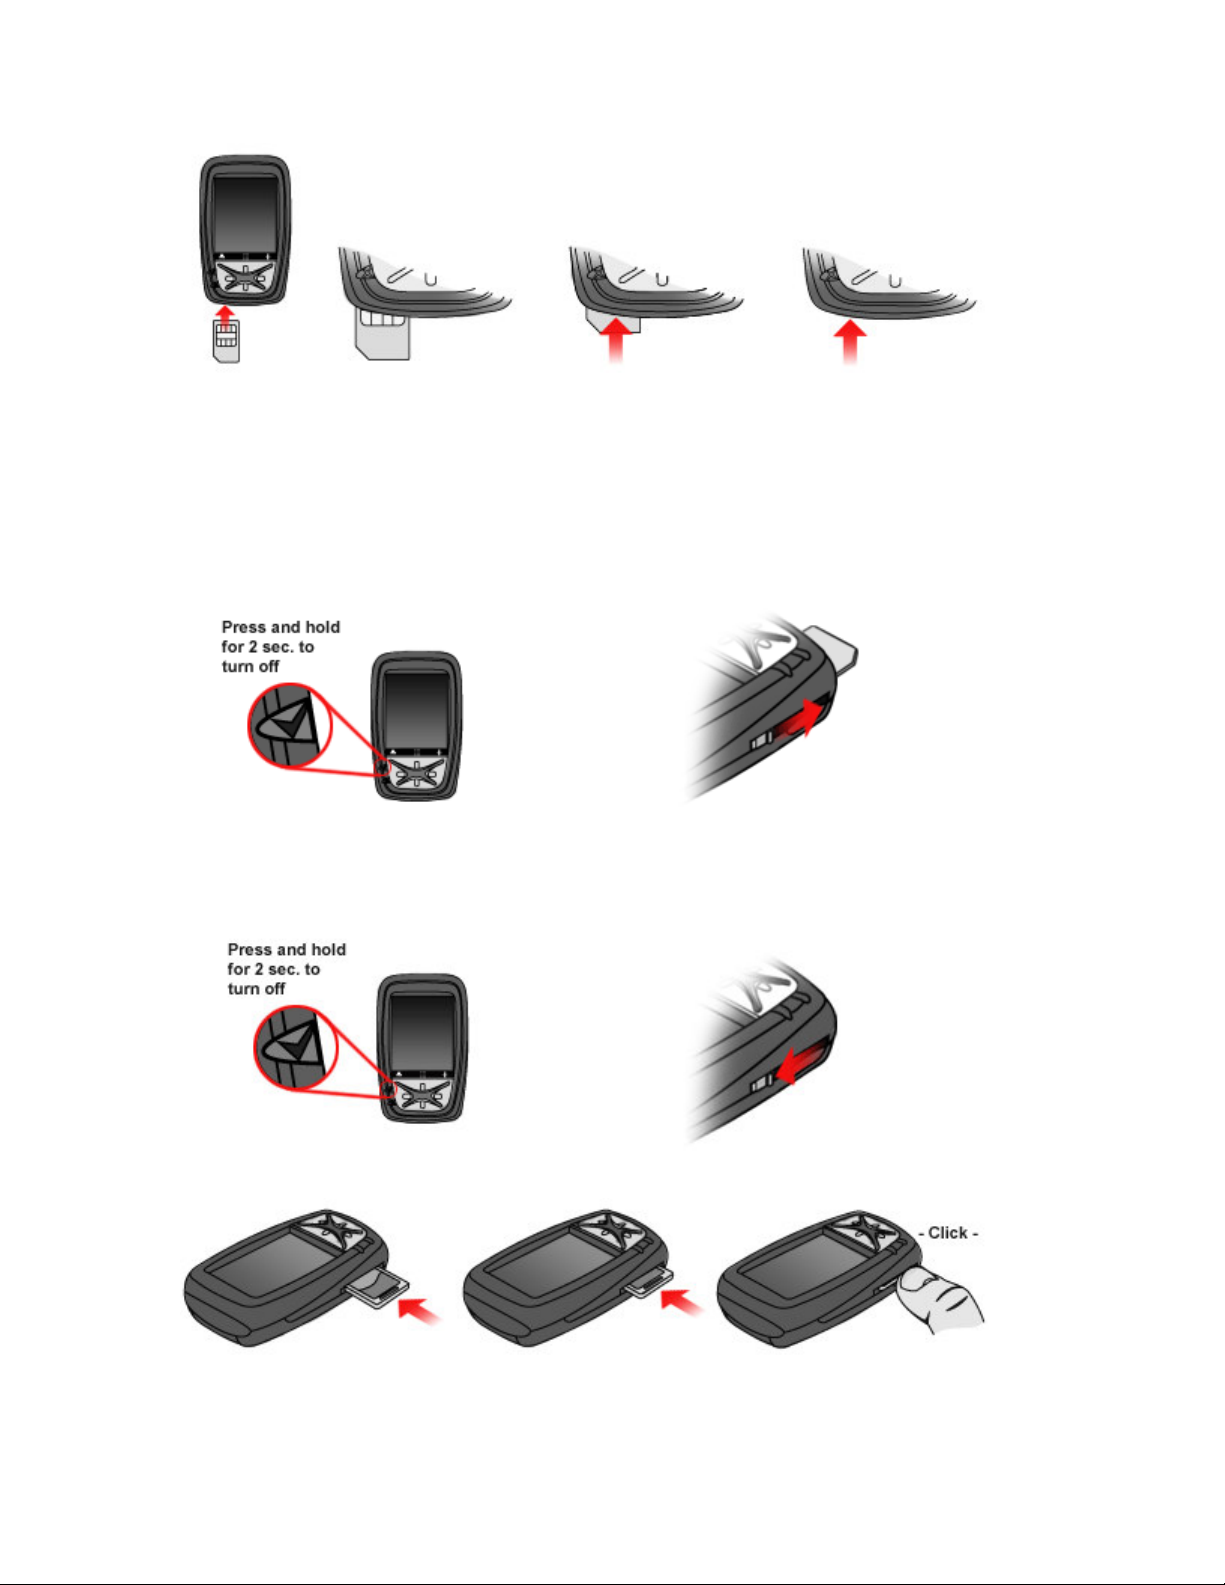
Insert the SIM card as shown in the picture below, with the chip facing upwards. Make sure the SIM card is fully inserted.
4
Release the SIM card
Important! Your Neonode must be turned off when you release the SIM card. Releasing the SIM card when the mobile device is turned on
may cause malfunction and loss of important settings and data.
Turn off the Neonode by pressing the on/off button (the top button on the left side, just below the screen) for about two seconds.
To release the SIM card you then pull the main power switch/ SIM release downwards. The SIM card will be released and you can
remove it.
Insert the SD card
Your Neonode should be turned off when you insert the SD card. The main power switch must be in on-position.
Insert the SD card as shown in the picture, with the text facing upwards. You will hear a clicking sound when the card is fully inserted.

5
Remove the SD card
Important! Your Neonode must be turned off when you remove the SD card. Removing the SD card when the mobile device is turned on
may cause malfunction and loss of important settings and data.
Turn off your Neonode by pressing the on/off button (the top button on the left side, just below the screen) for about two seconds.
When you have turned off your Neonode you remove the SD card by a light pressure on the lower part of the card. The SD card will be
released and you can remove it.
Charge the battery
Please note that the battery on your Neonode can’t be removed.
It takes up to 7 hours to fully charge the battery. The main power switch must be in on-position.
There are two different ways to charge the battery:
1. Use the enclosed charger. Two different plugs are enclosed, one European and one British. Choose the plug applicable in your country.
Make sure you insert the right plug correctly in the adapter before you start using the charger. To charge the battery you then insert the
charger in your Neonode's USB port and connect it to a wall socket.
2. Connect your Neonode to a computer with the enclosed USB cable. Your Neonode will charge while connected to the computer.
The text Charging will be visible on the screen when your Neonode is properly connected and charging. This text will show as long as the
device is connected to the charger/computer. Your Neonode can be charged either turned on or off. If it is turned off, you have to
disconnect your Neonode from the USB cable when finished charging before you can turn it back on.
6
Turn on your Neonode
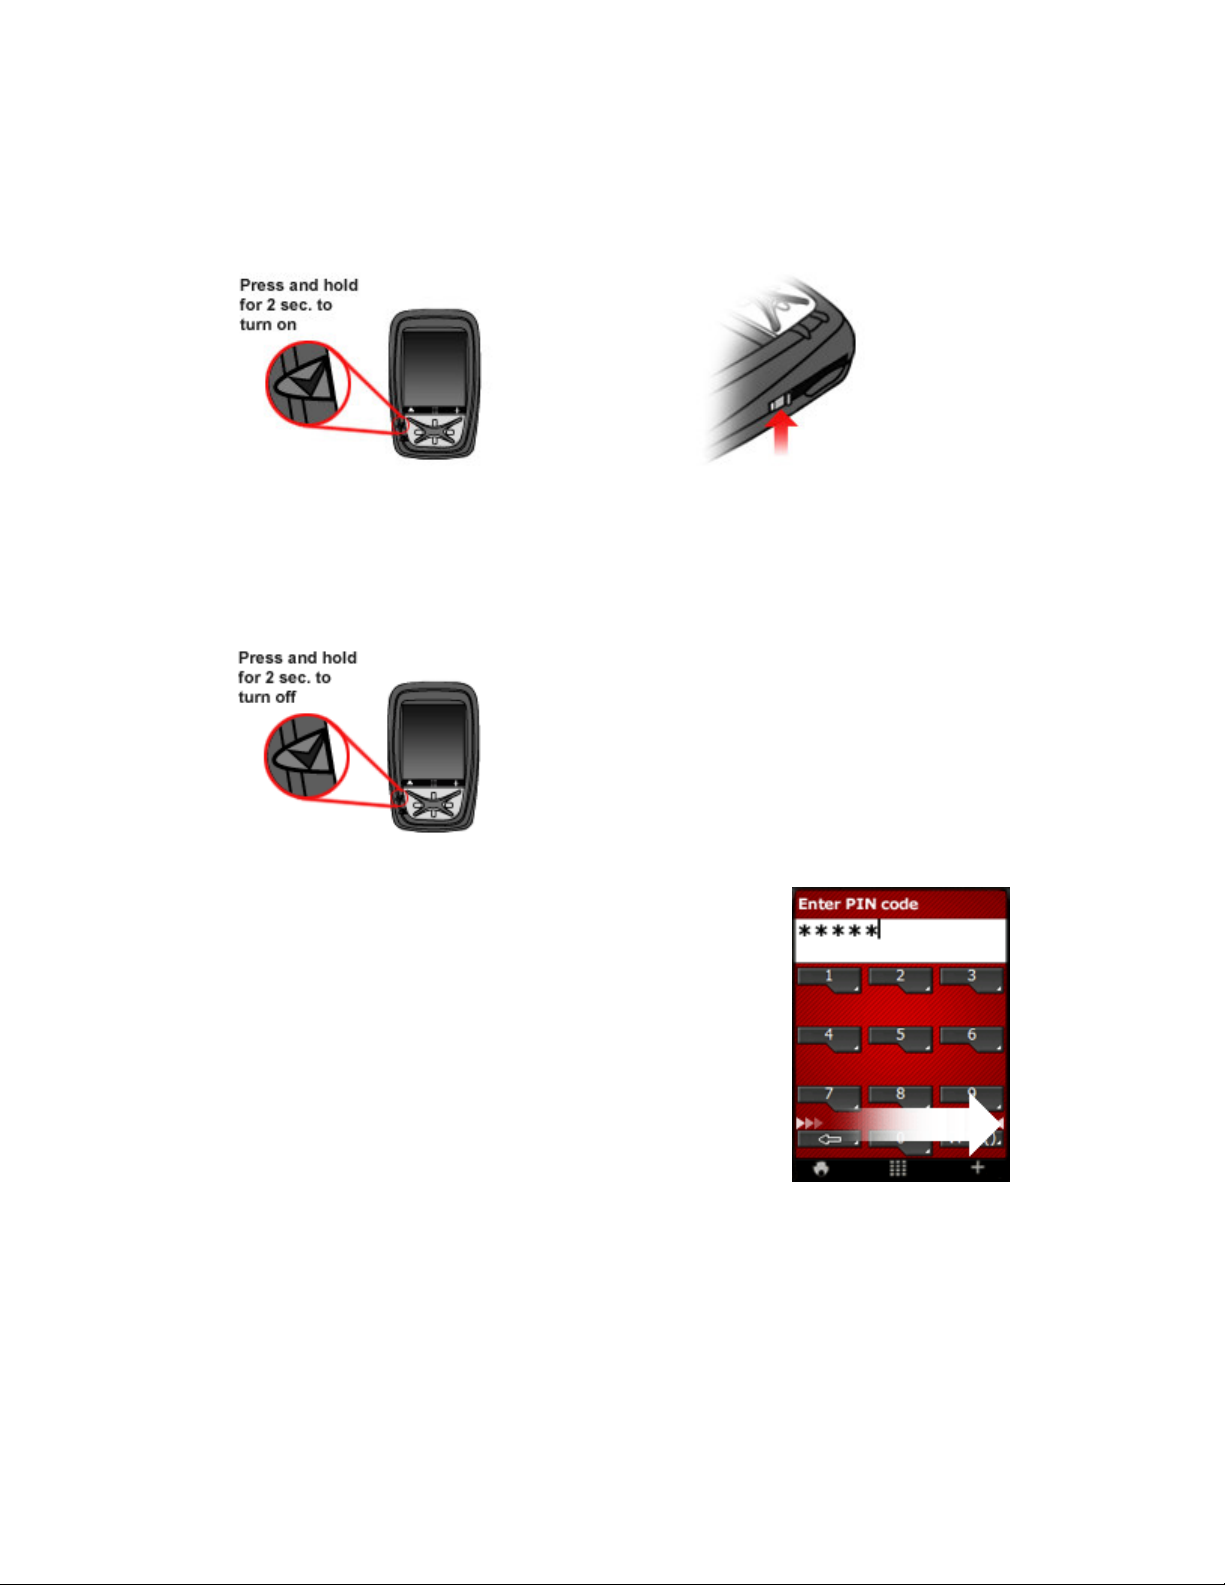
To turn on your Neonode you press the power on/off button. It is situated on the left side of the mobile device, just below the screen. Make
sure that the main power switch is in the on-position.
Press the on/off button for about two seconds. Release the button when the screen power up. If required, enter your PIN code.
Turn off your Neonode
To turn off your Neonode you press the power on/off button. It is situated on the left side of the mobile device, just below the screen.
Press the on/off button for about two seconds. Release the button when the Neonode symbol shows on the screen.
Enter PIN code
If your SIM card requires a PIN code, a keyboard will appear on-screen when you turn on your
Neonode. Enter your PIN code and make an Accept sweep.
When you see the status screen with clock, signal and battery symbol and the Neonode symbol,
your Neonode is ready to be used.
Please note: If you wait too long, the automatic keylock will be activated and the screen will turn
dark.

7
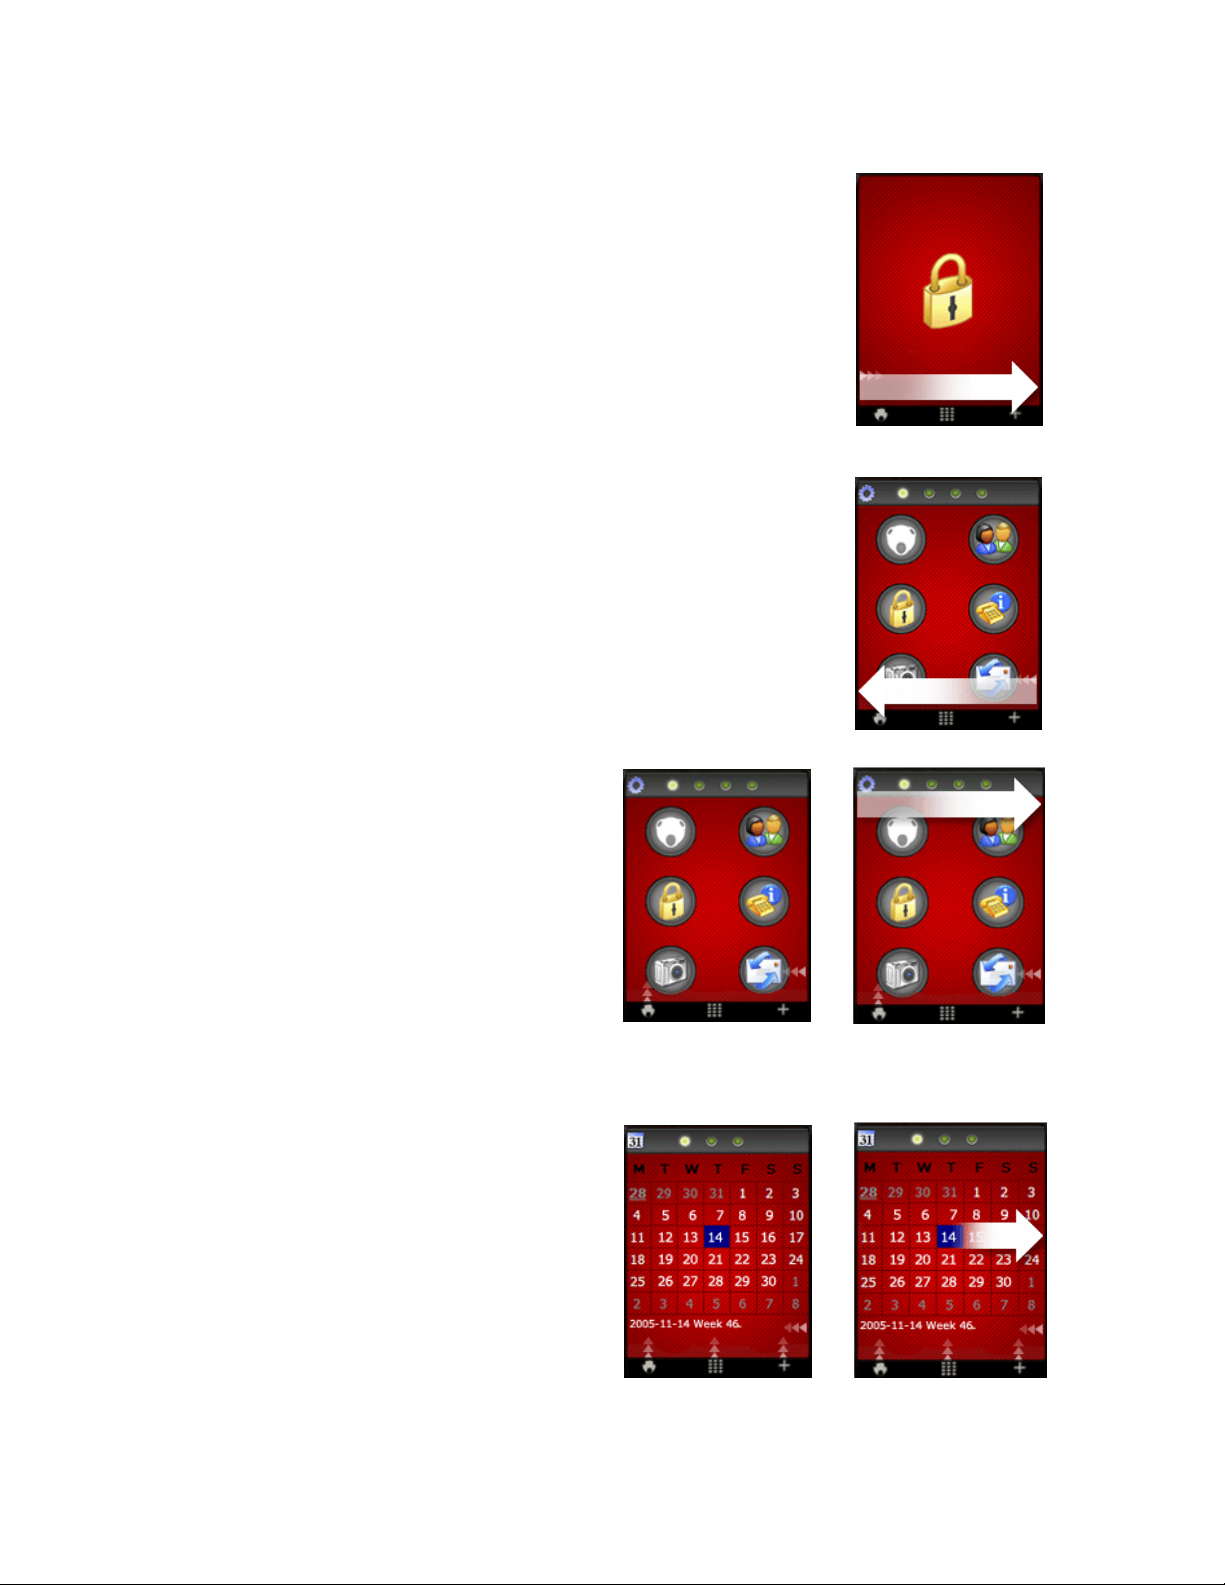
Keylock
The keylock turns on automatically, to save battery and to make sure no unintentional calls are made.
If you want to lock your Neonode manually, tap the padlock icon in the start menu.
Unlock the screen
Press the on/off button for a second. A picture of a padlock will appear.
To unlock, make an Accept sweep.
Reboot your Neonode
Important! This should only be done if you have no other alternative.
If you need to reset or reboot your Neonode you use the main power switch, situated on the left side.
First, turn off your Neonode by pressing the on/off button for about two seconds. Then pull the main power switch downwards to shut
down the battery. Wait for about five seconds.
Pull the main power switch back upwards, to on-position. Turn your Neonode back on by pressing the on/off button for about two
seconds. Release the button when the screen power up. If required, enter your PIN code.

8
Navigation Basics
To use a Neonode you have to learn a few basic navigation principles, which you use in the same way in every application.
To learn how to navigate, you can think of the screen as being divided into three horizontal areas and three vertical areas.
Horizontal areas:
The most upper area of the screen is called the Change view area.
The middle part of the screen is called the Navigation area.
The most bottom part of the screen is called the Accept/Close view area.
In the Change view area you sweep from left to right or from right to left to change views.
The Navigation area is used to navigate within a view. Put your finger in the very middle part of the
screen and sweep up/down/right/left in the Navigation area to navigate within a view.
In the Accept/Close view area you sweep from the left to the right to make an Accept sweep and from the
right to the left to make a Close view sweep.
Vertical areas:
The left part of the screen is called the Start menu sweep area.
The middle part of the screen is called the Keyboard sweep area.
The right part of the screen is called the Tools menu sweep area.
In the vertical areas you start the sweep at the very bottom of the screen. Sweep upwards. The sweep
should be about half the height of the screen.
A sweep in the left part of the screen opens the start menu. A sweep in the middle opens the keyboard and
a sweep in the right part of the screen opens the tools menu.

9
Navigation Specifics
Please have in mind that you never have to press the optical
screen; only a light touch is needed.
Open the Start Menu
To open the start menu, you sweep from the Neonode symbol in
the Start menu sweep area and upwards. The sweep should be
about half the height of the screen. When you lift your finger, the
start menu will appear.
The start menu is available from all applications.
Open the Tools Menu
To open the tools menu you sweep from the tools symbol in the
Tools menu sweep area and upwards. The sweep should be
about half the height of the screen. When you lift your finger, the
tools menu will appear.
NOTE! Each application has a tools menu specific to the
application in question. When you have opened an application, e.g.
the camera application, you open the tools menu specific to the
application by sweeping from the tools symbol in the lower right
corner of the screen and up.
Keyboard sweep
You open the keyboard with a Keyboard sweep. Sweep from the
keyboard symbol in the Keyboard sweep area and upwards. The
sweep should be about half the height of the screen. When you lift
your finger, the keyboard will appear.
The keyboard is used to enter text and numbers into your Neonode.
If the keyboard indicator at the bottom of the screen is visible, the
keyboard is available in the application currently open.
Tap
To open the applications you tap on icons visible at the
screen. You also tap the screen to select an item in a list, for
example in the address book.
A tap is a very quick light touch on the screen, no pressure is
needed. You put down your finger, lightly touch the screen and lift
the finger right back up.
10
Accept sweep
Sweep from the left to the right at the bottom of the screen.
An Accept sweep means accept, yes, forward, save, depending on the context. The Accept sweep is
also used to answer incoming calls.
Close view sweep
Sweep from the right to the left at the bottom of the screen.
A Close view sweep means close view, no, back, cancel, depending on the context
Change view sweeps
To make a Change view sweep you put your finger at the top of the
screen and sweep from the left to the right or from the right to the left
to change between the different views.
The start menu and several applications, for example the messaging
application, contain multiple views . If an application contains
multiple views, it will be indicated by dots at the top of the screen.
Navigate within a view
Put your finger in the very middle of the screen and then move the
finger Up/Down/Right/Left in the Navigation area. Please note that
you have to start the sweep in the middle part of the screen to not
collide with other sweeps in the uppermost or lowest part of the
screen (e.g Change view sweeps, Keyboard sweep, Accept sweep
and Close view sweep).
The sweeps in the Navigation area allows you to for example scroll
lists and navigate within the calendar and a webpage.
You can use the auto scroll function to for example scroll through
large quantities of text or quickly navigate within the calendar. To
auto scroll, sweep Up/Down but don't lift your finger, but let it stay at
the top or bottom part of the screen.
11
Close application sweep
A Close application sweep is a diagonal sweep over the screen, from the upper right corner to the lower
left corner.
To close third party applications that you’ve downloaded from other sources than neonode.com and
installed on your Neonode, you can use the Close application sweep.
Please note that you have to sweep to and from the very corners of the screen when you make a Close
application sweep.
The Keyboard
The keyboard is used to enter text and numbers into your Neonode. If the keyboard indicator at the bottom
of the screen is visible, the keyboard is available in the application currently open.
You open the keyboard with a Keyboard sweep.
To change between capital and lower-case letters in the keyboard, tap the bottom right key in the
keyboard (the shift mode/enter key). By tapping the enter key you can alter between capital first letter, all
letters capital and all letters lower-case. You’ll see the change in the keyboard when you tap the shift
mode/enter key.
To start a new row you hold your finger on the shift mode/enter key for about a second.
To move the caret back/forward in text, sweep Left/Right in the Navigation area. You can also move the
marker in text by pressing the Left/Right navigation key.
Alter between favourite keyboards
Make Change view sweeps to alter between your selected favourite keyboards. At the top of the screen you can see what keyboard that
currently is open.
Select T9 word
When using a T9 keyboard and a word is marked, the Keyboard sweep brings up a list of selectable words. Scroll the list and when the
right word is marked, tap the screen to select it. You can also change between selectable words by using the navigation keys. Press
Up/Down to change between selectable words.
To mark a T9 word (if not already marked) you place the caret right next to the word and press the Up or Down navigation key. You can
then select T9 word by either making a Keyboard sweep or press the Up/Down navigation keys.
Paste word and phrases
If you make a Keyboard sweep when no text is marked, you’ll get a list of your clipboard texts and favourite phrases. Mark the phrase you
want to paste and tap the screen.
The Keyboard Tools menu
Select keyboard
Open the tools menu and tap the Select keyboard icon. Mark the keyboard you want to select and tap the screen.
Delete favourite phrases
Open the keyboard and tap the Delete favourite phrases icon. You'll see a list of all your favourite phrases. Choose the one(s)
you want to delete and make an Accept sweep.
Copy
Enter a word or a phrase in the keyboard. Open the tools menu and tap the Copy icon. Choose whether to copy to clipboard or
favourite phrases and tap the screen.
Paste
Open the keyboard tools menu and tap the Paste icon. Mark the word or phrase you want to paste and tap the screen.
Keyboard Settings
Open the tools menu and tap the Keyboard Settings icon. You can now select Favourite Keyboards by marking the item and
tap the screen. A list of all available keyboards will appear. Scroll the list, mark the keyboards you want to select and tap the
screen. Make an Accept sweep to save the selection.

12
You can also set Keyboard Speed, which is the work speed when you use the keyboard, for example the caret’s speed when you browse
through letters or press the delete key. Mark Keyboard Speed and tap the screen. Set the speed (1 is slow, 5 is fast) and make an Accept
sweep.
Preview
Open the keyboard tools menu and tap the Preview icon to see a preview of the message.
General Settings
View and change settings
Open the tools menu from the status screen. In the tools menu you can view and change general settings for your Neonode.
Tap the icon that contains the kind of settings you want to view or change. Scroll the list and when the setting you want to change is
marked, tap the screen to make your changes.
Accept sweeps saves changes, Close view sweeps cancel and discard changes. Some settings change directly when you mark the
setting in the list and tap the screen.
Device Settings
Date and Time
Set and/or change date and time.
Regional Settings
Select User Interface Language, Time Zone and Regional Settings. You have to restart your Neonode for the settings to take effect.
Note: When you download a new Neno update you can already in the installation process set default regional settings, time zone and
language, thus you don’t have to enter the regional settings manually into your Neonode.
Button Vibration
Mark Button Vibration and tap the screen to set and/or change button vibration level. This will cause the keyboard to give vibration
indications when you press keys. Make an Accept sweep to save the value.
Background Image
Mark Background image and tap the screen to change status screen. You can now choose any picture stored on the SD card as
background image. Mark the picture and tap the screen to set the picture as status screen background image.
To restore the default status screen, open the tools menu from the status screen and tap the Settings icon. Mark Background Image.
Now open the tools menu again and tap the Delete icon. Your current background image will be deleted and the default status screen
restored.
System Information
Under System Information you find information about your Neonode, such as IMEI-number, free storage memory etc.
Telephony Settings
Mark an item and tap the screen to set the settings. Make an Accept sweep to save the new settings.
You can set settings for:
• Call waiting
• Use of PIN code
• Change PIN code
• Change Network
• Change SMS Central
• Clear voice message
• Call Forwarding
• Change GSM Band
GPRS Settings
You get the settings for GPRS and MMS from your operator. At your operator’s website you can get the settings sent to you by SMS.
Follow the operator’s instructions of how to send the settings to your Neonode using automated configuration SMS’s. Make an Accept
sweep to accept the settings when you receive the SMS.
Under GPRS Setting you can also enter the settings manually.
In the first tab view you’ll find GPRS Access Points. In the second tab view you’ll find Application Profiles. Alter between the tab views
with Change view sweeps.
13
Audio Settings
Mark the setting you want to change and tap the screen.
Turn on/off the speakers and the vibration by marking the item and tap the screen.
When you select Ringtone and SMS tone you can choose an audio file stored on the SD card. Mark the sound you want to use and tap
the screen.
When you change Ring/Alert tone volume and Call volume you make an Accept sweep to save the changes. Make a Close view
sweep to cancel.
You can also choose whether to play the Ring/alarm tone through the headset or the speakers, when the headset is inserted. Mark the
item and tap the screen to change.
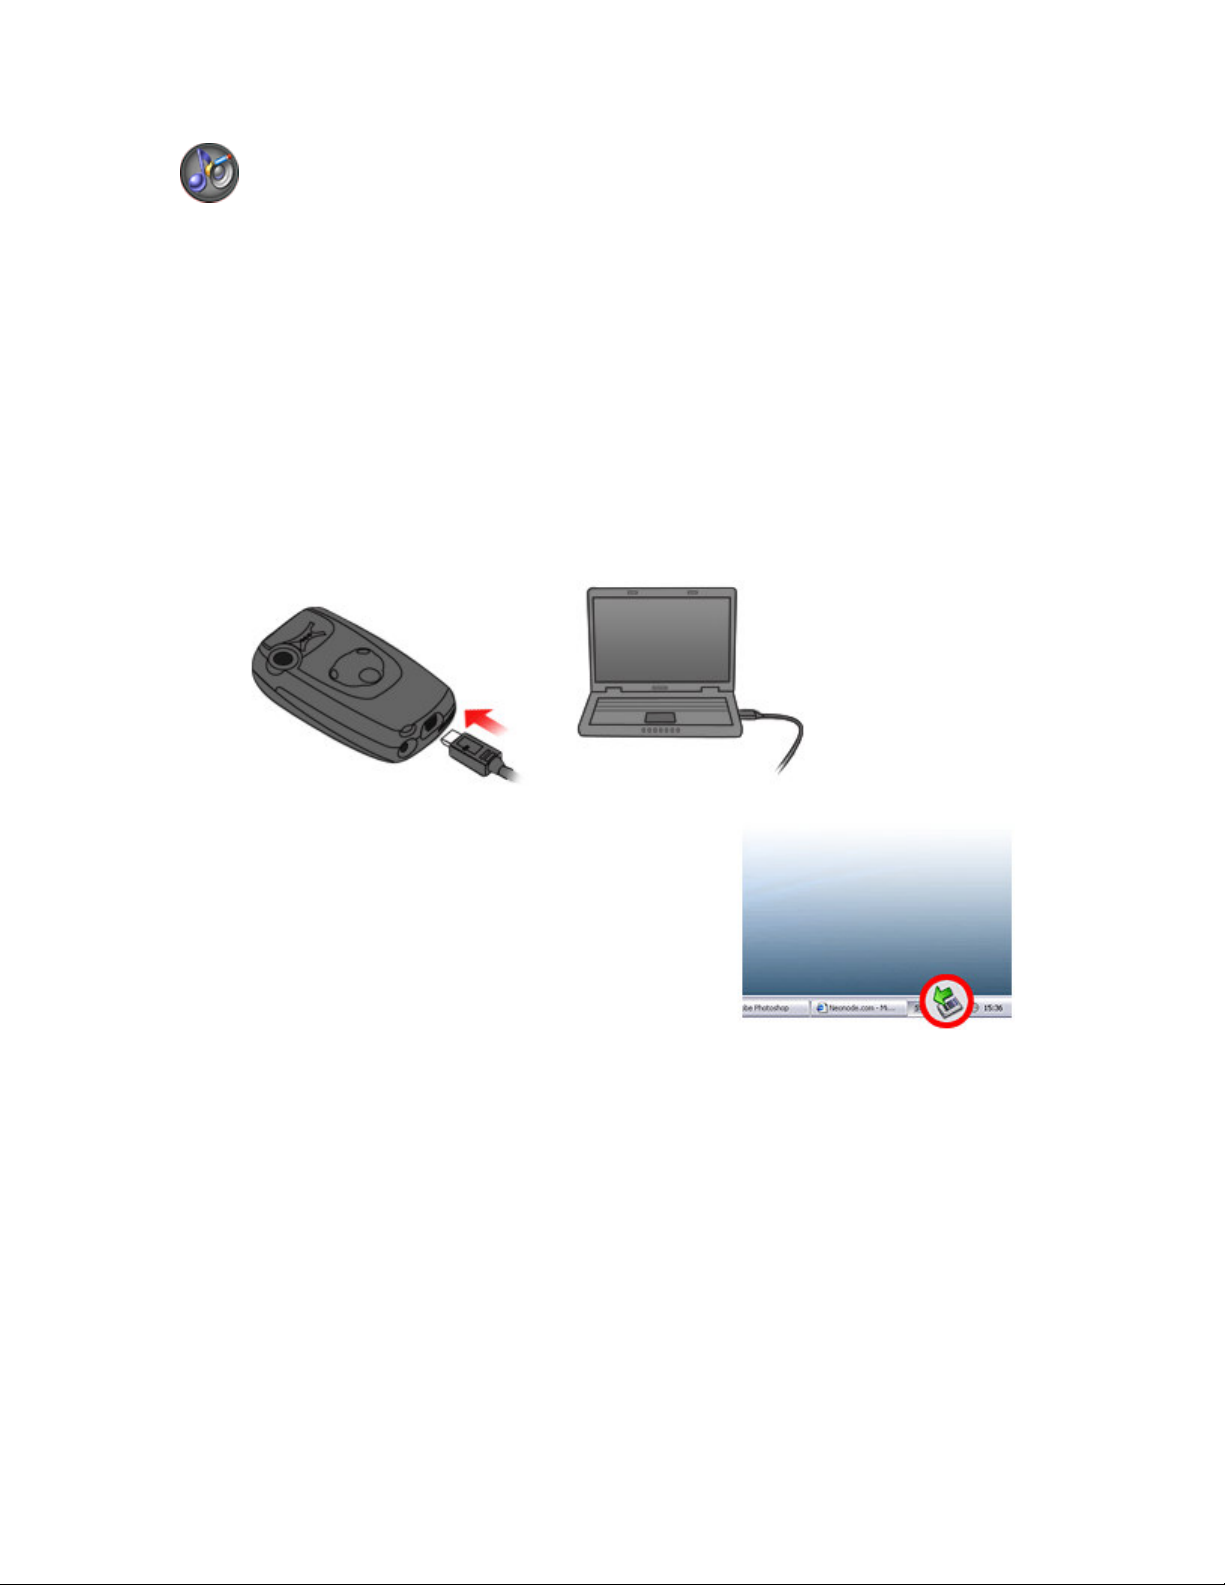
Connect your Neonode to a computer
Your Neonode can operate in two different modes while connected to a computer, either in phone mode or as a USB disk. When turned on,
it operates in phone mode. Turned off, it operates as a USB disk.
Connect as USB disk
Turn off your Neonode. Insert the enclosed USB cable into your Neonode USB port and connect it to a computer. Wait until the text
Connected shows up on the Neonode screen.
Your Neonode will automatically appear on your computer as a Removable disk. You
can now access the SD card and transfer files, such as music, videos and pictures. You
can also download and install new updates from www.neonode.com.
When disconnecting, safely remove your Neonode from the computer and turn it back
on.
14
Connect in phone mode
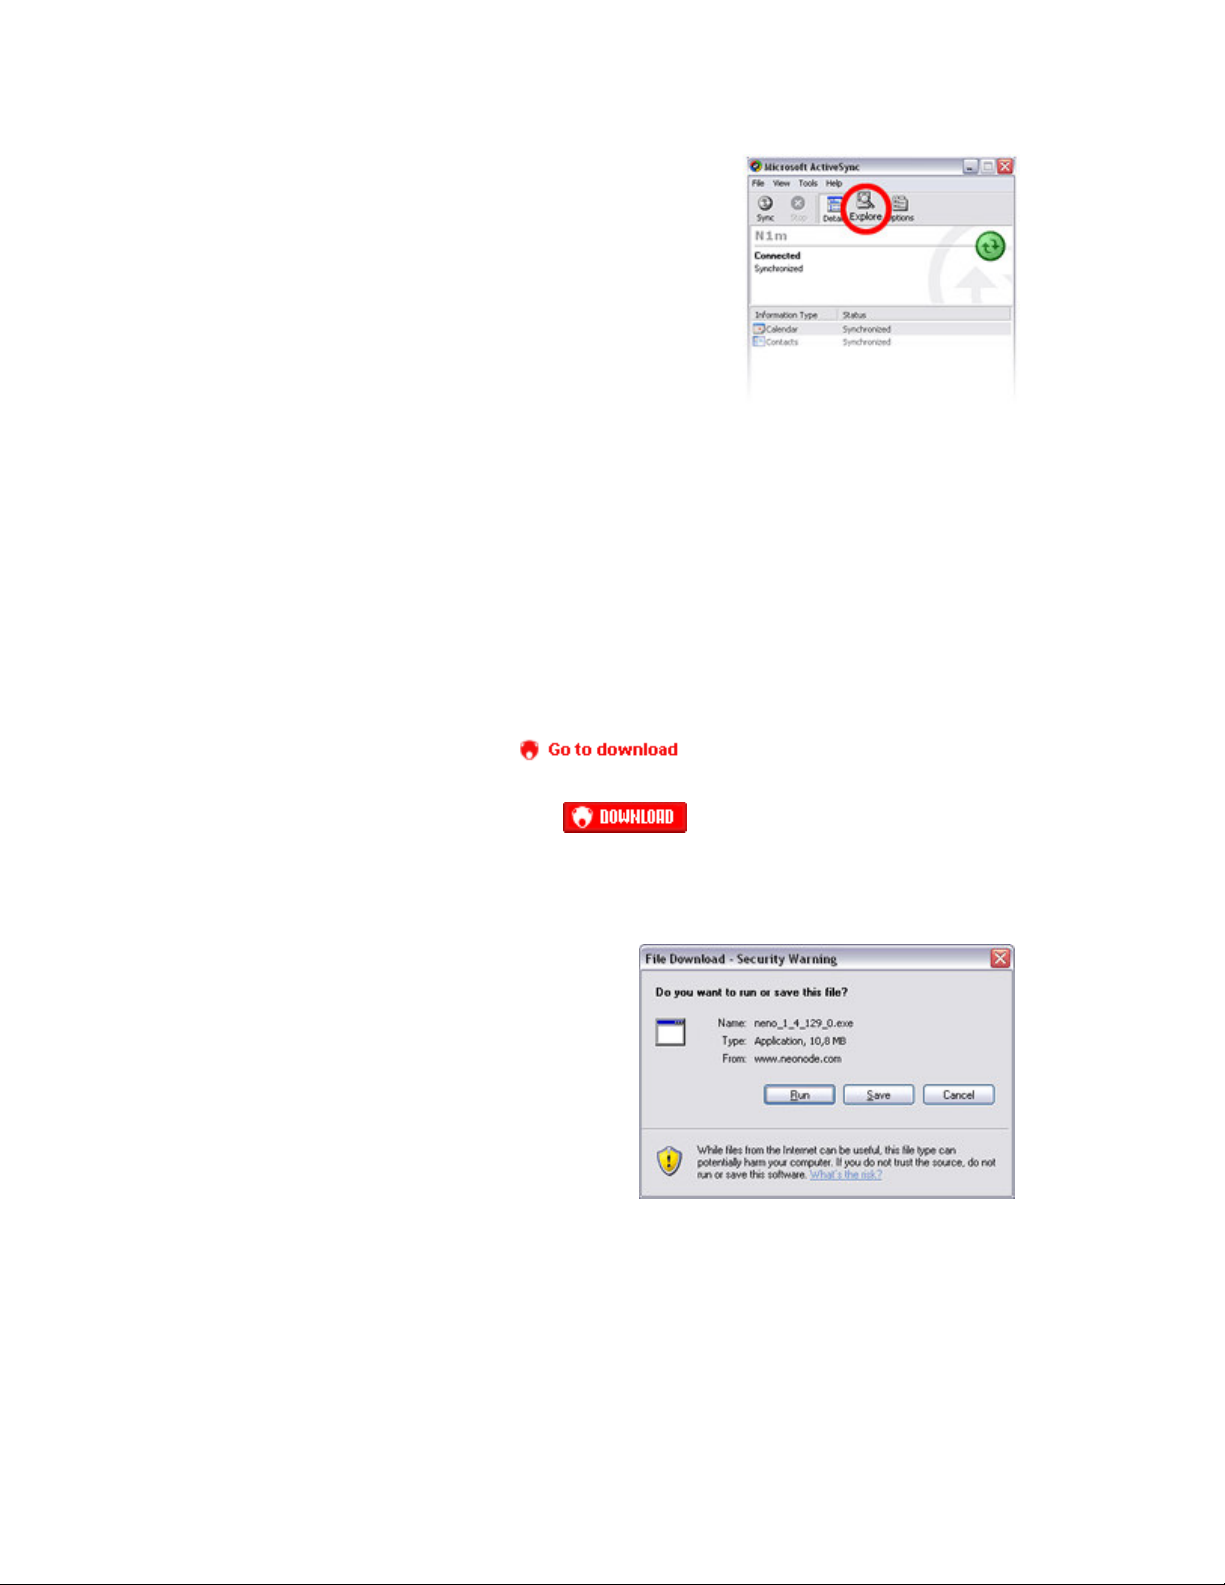
Download and install the free software ActiveSync from Microsoft on your computer.
Connect your turned on Neonode to the computer, using the USB cable. ActiveSync will
now automatically open. You will be asked if you want to set up a partnership between
your Neonode and the computer. Choose Yes and follow the instructions given on the
screen.
Using ActiveSync you can regularly synchronize your Neonode calendar and address
book with Outlook on your computer. Via ActiveSync you can also reach the file system
on your Neonode. Press Explore in ActiveSync to reach the Storage Card.
Tip: If you can’t see all your folders on the Storage Card, press Tools/Folder Options…
Under View, mark Show hidden files and folders.
Please note: When connected in phone mode, it is not possible to download and install
new updates from www.neonode.com. Transferring files is also slower than if
the Neonode is connected as a USB disk. We therefore recommend you to connect your Neonode as a USB disk when you want to transfer
several files or large amounts of data.
Download new updates
Login to www.neonode.com with your username and password. If you have bought your Neonode through our webshop an account is
automatically created and you receive username and password together with the mobile device.
If you have bought your Neonode in a store you have to manually create an account to be able to download new updates. When you have
filled in the form to create an account you will receive an automated e-mail with login instructions. Follow the instructions given in the e-mail.
When you have logged in to the website you will find the list of updates under Downloads – Neno.
Plug the device to the computer using the USB- cable. Please note that the device must be turned off to be able to download the update.
Choose the latest version and click Go to download.
This will take you to the information page for the chosen version, where you can read about what's new in this version.
When you are ready to download, click the download button.
Important! If you use Mac och Linux you can read further instructions of how to download new updates once you are logged in to
www.neonode.com.
A Security Warning window will appear and you will be asked to
choose whether to Run or Save. Choose Run.
The download now starts and will take a minute or two depending on
your Internet connection. While you’re waiting for the download, turn off
your Neonode and connect it to the computer via the USB-cable.

15
When the download is completed, another Security Warning
window will appear.
Click Run to start the installation.
An Install Neno window will open.
When the Installer has detected the mobile device
as connected to your computer, you can choose if
you want to Install Sample Web Links and Backup
current N1 settings to the computer. To select
any or both of them, check the box(es).
In the Install Neno window you will also see what
languages that will be installed, your active language,
your regional settings and time zone. Click Change
if you want to edit any of these settings.
First select languages to be installed. Mark the language(s) you
want to install on your Neonode and click Next.

16
Select Active language (User Interface Language),
Regional Settings and Time Zone. By selecting these
settings already in the installation process your Neonode will
have the correct settings when you turn it on, thus you don’t
have to edit the settings manually.
Click Finish.
You can now see the Install Neno window again, with your
current choices.
Choose Start Install.
The installation will take a few minutes to complete. When the Installer asks you to disconnect the mobile device, do so and turn it on.
Note:
Contact and Calendar information will not be deleted during an update of your Neno version.
After an update of the operating system, it is sometimes necessary to turn on your Neonode two times. If a blue progress bar appears when
you turn on your Neonode, please wait for a while until the progress bar completes and your Neonode shuts down automatically. At that
point, turn on your Neonode again.
Make calls
While talking on your Neonode, you hold it with the backside against your ear, with the screen facing away from you.
To change the volume during a call you use the navigation keys. Press Up to raise the volume, Down to lower the volume.
Make a call using the keyboard
Make a Keyboard sweep to open the keyboard.
Use the on-screen keyboard as an ordinary keyboard; tap the numbers
required to dial the number you want.
When you have entered all the numbers, make an Accept sweep to
make the call.

17
Make a Close view sweep to hang up.
Make a call using the Call History.
To call a number from the Call History, open the start menu and tap the Call History icon.
You can also get the Call History by quickly pressing the on/off button. A Call History list will appear. Scroll the
list to the number or contact you want to call. When the correct number or contact is marked, tap the screen to
make the call.
Make a Close view sweep to hang up.
Call a contact in the Address Book
Open the start menu and tap the Address Book icon. Scroll the list to get to the contact you want to call or use the Right/Left
navigation key to browse through the list page by page. You can also open the keyboard, enter a search text and make an
Accept sweep. If you e.g. enter “Daniela” you will get directly to that contact. When the contact you want to call is marked, tap
the screen to view the number(s) attached. Mark the number you want to call and tap the screen to make the call. Make a Close view
sweep to hang up.
In the address book, you can also make a Change view sweep to get to your favourites. Mark the favourite contact you want to call and
tap the screen to call. Make a Close view sweep to hang up.
Answer incoming calls
You answer an incoming call by with an Accept sweep. Make a Close view sweep to hang up. You can also
answer an incoming call by quickly pressing the mobile's on/off button and hang up by quickly pressing the
cancel button. When you receive a call, you can turn off the ring tone by making a Close view sweep. You
can then answer with an Accept sweep.
You can also give the caller a busy tone. Make a Close view sweep twice when the mobile is ringing if you want the caller to get a busy
tone.
Address book
Open the start menu and tap the Address Book icon to open the application.
Add a contact
Open the address book tools menu and tap the Add contact icon. A list of items to fill in will appear,
such as name, mobile number, home number, e-mail etc. Mark an item and tap the screen to enter
information. When you choose for example First name, a keyboard will appear on the screen
enabling you to enter text. Make an Accept sweep to save the text.
When you choose Mobile, a keyboard that allows you to enter numbers will appear. Make an Accept
sweep to save the number.
To add a picture to the contact, choose Picture. This takes you to the Camera application. You can
take a picture with the camera and make an Accept sweep to add this picture to the contact.
To add a picture from the Image viewer, make a Change view sweep to the right in the Camera
application. Mark the picture you want to add, tap the screen to select it and make an Accept sweep.
To attach a personal ringtone to the contact, choose Ringtone. This takes you to the folder My
Ringtones, a subfolder to My Documents on the Storage Card. Scroll the list and choose a ringtone by
tapping the screen when the ringtone of your choice is marked.
18
Note: If you have stored the picture or ringtone you want to add in some other folder, you can easily browse through your folders by
marking Up and then tap the screen. Browse through your folders and choose the one that contains the picture or ringtone you want to
attach to your contact. Mark the picture or ringtone and tap the screen to add it.
Make an Accept sweep to save the new contact. If you don’t want to save the new contact, make a Close view sweep to cancel and
discard the changes you made.
Make a contact a favourite
Mark the contact you want listed as a favourite. Then open the tools menu and tap the Favourite icon.
Mark Empty favourite and tap the screen. The chosen contact will be listed as a favourite. To replace one favourite with another, mark the
contact you want to replace instead of an empty item, and the new favourite will be listed instead.
If you have a picture attached to your contact, the picture will appear in the favourite list instead of the name of your contact.
Copy contacts from the SIM card
Open the address book tools menu and make one Change view sweep to the right.
To copy contacts from the SIM card, tap the icon Import contact list. All your contacts on the SIM card will now be copied to your
Neonode.
Copy contacts to the SIM card
Open the address book tools menu and make one Change view sweep to the right. To copy contacts from your Neonode to the SIM card,
tap the icon Export contacts to SIM card. Choose which contacts you want to export to your SIM card and make an Accept sweep to
export them.
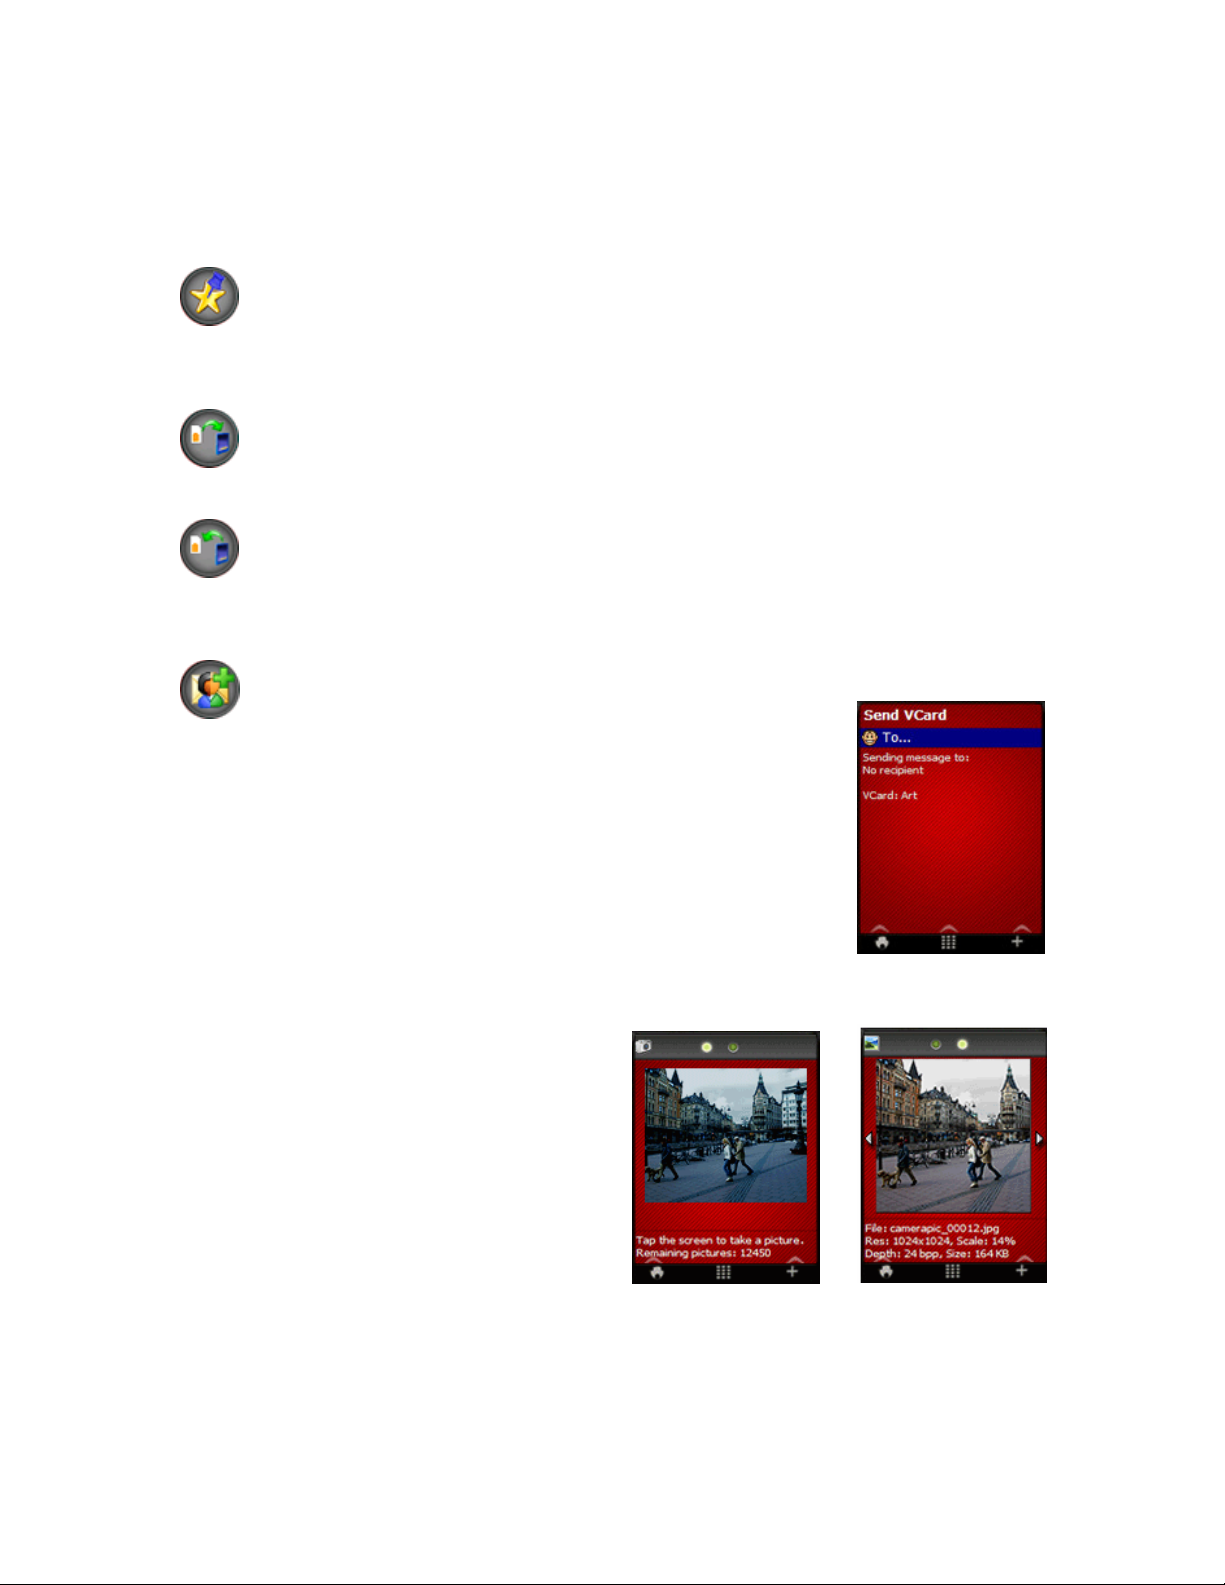
Send and receive vCard
You can send contact information you have attached to a contact in your address book with
SMS as a vCard.
Mark the contact in the address book whose contact information you want to send as a vCard. Then open
the tools menu and tap the vCard icon.
Mark To and tap the screen to choose the recipient of the vCard from your address book. Mark the
recipient and tap the screen. You can also open the keyboard with a Keyboard sweep and enter a phone
number manually.
Make an Accept sweep to send the vCard.
When receiving a vCard by SMS, make an Accept sweep to save the contact information in the address
book. Make a Close view sweep to close the view without saving the received information.
The Camera application
Take and view a picture
Open the start menu and tap the Camera icon to open the camera
application. When in camera mode, the screen is a viewfinder and to
take a photo you tap the screen.
To view the recently taken picture, make a Change view sweep to the
right. This takes you to the Image Viewer and you can see the picture.
A Change view sweep to the left will get you back into camera mode.

19
Change settings
Open the camera tools menu and tap the Settings icon. You can
change resolution, scene type, contrast and brightness. Mark the
setting you want to change and tap the screen. When you choose
Resolution or Scene type a list of alternatives will appear. Mark
the alternative you want and tap the screen to choose it.
Choose Advanced to change contrast and brightness. Use
Right/Left navigation key to alter between contrast and brightness,
use Up/Down navigation key to change value. Make an Accept
sweep to save the new settings. You’ll get to the Settings view.
Make a Close view sweep to get back to the camera.
Send MMS
Take a picture with the camera. To send it as an MMS you open the tools menu, tap the Messaging icon and compose an MMS.
The Image Viewer
You find the Image Viewer in the second tab view of the camera application. Open the camera application
and make a Change view sweep.
You can now view all your pictures stored on the SD card one by one.
To change to the next/previous picture in the Image Viewer you press the navigation keys. The Right key
lets you view the next picture, the Left key the previous picture.
Your pictures are automatically stored in the folder My Pictures, a subfolder to My Documents on the
Storage Card. You can scroll the list upwards or downwards.
To view a specific picture, tap the screen when the picture is marked.
The Image Viewer tools menu
While looking at a picture you can open the Image Viewer tools menu. The tools menu contains three tab views. In the first tab view, you
can do the following:
Go to the folder My Pictures where all your pictures are stored
Delete the picture
Rename the picture NOTE! Make sure you don’t delete the “.jpg” ending

20
The second tab view allows you to view the picture in different modes. Please note that this gives you the possibility to view your picture in
different modes, not to save/update the picture in these modes.
View the picture as shown in Image Viewer
View the picture in full-screen. In this view the edges of the picture will be cut of
Rotate the picture to the right and view the whole picture in full-screen
Rotate the picture to the left and view the whole picture in full-screen
View in actual size. Use the navigation keys to navigate around in the picture
In the third tab view you can choose to send the picture in an MMS and set a status screen.
Send picture as MMS
Go to the address book and add a recipient
Set status screen Use the selected picture to set a status screen
Other manuals for N1
1
Table of contents
Other NEONODE Cell Phone manuals


