NEONODE N2 User manual

1
Neonode N2 user guide
www.neonode.com
N070802-1 Rev. 1.7

2
1. 0 Basics....................................................................................................................................................................................................4
1.1 Insert the SIM card....................................................................................................................................................................4
1.2 Release the SIM card................................................................................................................................................................4
1.3 Insert the Mini-SD card .............................................................................................................................................................4
1.4 Charge the battery.....................................................................................................................................................................5
1.5 Turn the device on.....................................................................................................................................................................5
1.6 Enter PIN code...........................................................................................................................................................................6
1.7 Turn the device off ....................................................................................................................................................................6
1.8 Backlight timeout ......................................................................................................................................................................6
1.9 Key lock ......................................................................................................................................................................................6
1.10 Exit Key lock ............................................................................................................................................................................6
1.11 Navigation basics....................................................................................................................................................................6
1.12 Horizontal areas: .....................................................................................................................................................................6
1.13 Vertical areas: .........................................................................................................................................................................7
2.0 Navigation Specifics..............................................................................................................................................................................7
2.1 Open the Start Menu.................................................................................................................................................................7
2.2 Tap ..............................................................................................................................................................................................7
2.3 Open the Tools Menu ................................................................................................................................................................7
2.4 Keyboard sweep ........................................................................................................................................................................8
2.5 Accept sweep.............................................................................................................................................................................8
2.6 Close view sweep ......................................................................................................................................................................8
2.7 Change view sweeps .................................................................................................................................................................8
2.8 Navigate within a view ..............................................................................................................................................................9
2.9 Close application sweep ...........................................................................................................................................................9
3.0 The Keyboard.........................................................................................................................................................................................9
3.1 Select T9 word ........................................................................................................................................................................ 10
3.2 Paste word and phrases ........................................................................................................................................................ 10
3.3 The Keyboard Tools menu..................................................................................................................................................... 10
3.4 Select keyboard ...................................................................................................................................................................... 10
3.5 Delete favorite Text ................................................................................................................................................................ 11
3.7 Paste........................................................................................................................................................................................ 11
3.8 Keyboard Settings .................................................................................................................................................................. 11
3.9 Keyboard Speed ..................................................................................................................................................................... 12
3.10 Button Vibration ................................................................................................................................................................... 12
3.11 Preview.................................................................................................................................................................................. 12
4.0 Make calls........................................................................................................................................................................................... 12
4.1 Make a call using the keyboard ............................................................................................................................................ 12
4.2 Make a call using the Call History......................................................................................................................................... 13
4.3 Call a contact in the Address Book....................................................................................................................................... 13
4.4 Answer incoming calls............................................................................................................................................................ 14
5.0 Address book ...................................................................................................................................................................................... 14
5.1 Add a contact.......................................................................................................................................................................... 14
5.2 Make a contact a favorite...................................................................................................................................................... 15
5.3 Send and receive vCard......................................................................................................................................................... 15
5.4 Copy contacts from the SIM card.......................................................................................................................................... 16
5.5 Copy contacts to the SIM card .............................................................................................................................................. 16
5.6 Contact settings...................................................................................................................................................................... 16
6.0 The Messaging Application................................................................................................................................................................ 17
6.1 Open the messaging application .......................................................................................................................................... 17
6.2 Add number to address book................................................................................................................................................ 17
6.3 Call number received in message....................................................................................................................................... 18
6.4 Messaging settings ................................................................................................................................................................ 18
7.0 SMS ..................................................................................................................................................................................................... 18
7.1 Send an SMS .......................................................................................................................................................................... 18
7.2 Add a recipient........................................................................................................................................................................ 19
7.3 Add several recipients............................................................................................................................................................ 19
7.4 Compose a message.............................................................................................................................................................. 19
7.5 Receive SMS ........................................................................................................................................................................... 19
7.6 Send areply ............................................................................................................................................................................ 20
7.7 Forward a message................................................................................................................................................................ 20
8.0 MMS .................................................................................................................................................................................................... 20
8.1 New message ......................................................................................................................................................................... 20
8.2 Add a recipient........................................................................................................................................................................ 21
8.3 Add several recipients............................................................................................................................................................ 21
8.4 Compose a MMS .................................................................................................................................................................... 21
8.5 Receive MMS .......................................................................................................................................................................... 22
9.0 The Camera application..................................................................................................................................................................... 23
9.1 Take and view a picture ......................................................................................................................................................... 23
9.2 Change settings...................................................................................................................................................................... 23
9.3 Send MMS............................................................................................................................................................................... 23
10.0 The Image Viewer............................................................................................................................................................................. 24
10.1 The Image Viewer tools menu............................................................................................................................................. 24

3
11.0 The Media Player ............................................................................................................................................................................. 25
11.1 Open the Media Player ........................................................................................................................................................ 25
11.2 The Media Player tools menu ............................................................................................................................................. 25
11.3 Tools menu second tab view:.............................................................................................................................................. 25
11.4 Close the Media Player ........................................................................................................................................................ 27
12.0 The Calendar .................................................................................................................................................................................... 28
12.1 Open the calendar ............................................................................................................................................................... 28
12.2 Navigate within a Calendar view......................................................................................................................................... 28
12.3 Go to date ............................................................................................................................................................................. 28
12.4 Add a new appointment ...................................................................................................................................................... 28
12.5 Delete appointments ........................................................................................................................................................... 29
12.6 Settings ................................................................................................................................................................................. 29
13.0 The Alarm application...................................................................................................................................................................... 29
13.1 Open the alarm .................................................................................................................................................................... 29
13.2 Add a new alarm .................................................................................................................................................................. 30
13.3 The Alarm History ................................................................................................................................................................. 31
14.0 Internet Explorer .............................................................................................................................................................................. 31
14.1 Install and configure the Internet browser ........................................................................................................................ 31
14.2 Open the Internet browser .................................................................................................................................................. 31
14.3 The tools menu..................................................................................................................................................................... 32
14.4 The first tab view:................................................................................................................................................................. 32
14.5 The second tab view: ........................................................................................................................................................... 32
14.6 Enter a new website address.............................................................................................................................................. 32
14.7 Surf the web ......................................................................................................................................................................... 33
14.8 Close the Internet browser.................................................................................................................................................. 33
15.0 General Settings............................................................................................................................................................................... 33
15.1 View and change settings ................................................................................................................................................... 33
15.2 Display .................................................................................................................................................................................. 33
15.3 System .................................................................................................................................................................................. 34
15.4 Communication .................................................................................................................................................................... 34
15.5 Bluetooth .............................................................................................................................................................................. 35
15.6 Audio Settings ...................................................................................................................................................................... 36
16.0 Connect your Neonode to a computer ........................................................................................................................................... 37
16.1 Connect as USB disk............................................................................................................................................................ 37
17.0 Download and install new updates ................................................................................................................................................ 37
18.0 GPRS and MMS settings ................................................................................................................................................................. 39
18.1 Enter settings manually....................................................................................................................................................... 39
18.2 Settings for GPRS................................................................................................................................................................. 39
18.3 Settings for MMS ................................................................................................................................................................. 40
19.0 Tips and trix ...................................................................................................................................................................................... 40
19.1 Customize the start menu................................................................................................................................................... 40
19.2 Multi part call function......................................................................................................................................................... 41
20.0 Safeguards ....................................................................................................................................................................................... 42
21.0 FCC Notice to users ......................................................................................................................................................................... 43
22.0 SAR.................................................................................................................................................................................................... 44
Declaration of Conformity......................................................................................................................................................................... 45

4
1. 0 Basics
Important information before you start using your Neonode device.
•The device must be turned off ( See 1.7) before removing the battery.
•No subscription or SIM card is included in the package.
•If you try to open or tamper with the device’s front casing, the guarantee will not be valid.
•Please check www.neonode.com for the latest updates, support and other information.
1.1 Insert the SIM card
Neonode N2 can be turned on and used to a certain extent without SIM card. However, you can’t make or receive calls,
send SMS or MMS or use Internet Explorer. To do this, you need a SIM card. To insert the SIM card, first remove the rear
cover which includes the battery, and then insert the SIM-card with the chip facing downwards. Make sure it is fully
inserted.
1.2 Release the SIM card
To release the SIM card you turn the device off, remove the rear cover, and then remove the SIM-card.
1.3 Insert the Mini-SD card
NEONODE N2’s primary storage area is the SD card. The operating system is also stored on the SD card. Please note
that the device will not function without an SD card inserted.
An SD card is included in the package when you buy the Neonode device.

5
To insert the SD-card, first remove the rear cover as shown above, and then insert the SD-card with the text facing
upwards. Make sure it is correctly inserted.
To remove the SD-card you do the opposite of inserting it. Turn the device off, remove the rear cover then remove the sd-
card.
1.4 Charge the battery
Before you charge the battery for the first time, you must remove the protective tape over the battery connectors.
There are two different ways to charge the battery:
1. Use the enclosed charger. To charge the battery, you insert the charger in the device’s USB -port and connect it to a
wall socket.
2. Connect the mobile to a computer with the enclosed USB cable. The mobile will charge while connected to the
computer.
1.5 Turn the device on
To turn the device on you press the on/off button . It is situated on the left side of the device, just below the + and -
button.
Press the on/off button for about two seconds. Release the button when the device starts to boot up.

6
1.6 Enter PIN code
If your SIM card requires a PIN code, a keyboard will appear on the screen when the device is
started. Enter your PIN code and make an accept sweep, (a sweep from the left to the right at
the bottom of the screen). When you see the status screen with clock, signal and battery
symbol and the Neonode symbol, the mobile is ready to be used.
Please note: If you wait too long, the automatic key lock and/or the backlight timeout will be
activated and the screen will turn dark. See 1.8.
1.7 Turn the device off
To turn the device off, you press the on/off button . It is situated on the left side of the device, just below the + and -
button.
Press the on/off button for about two seconds. Release the button when the Neonode shut down symbol shows on
the screen.
1.8 Backlight timeout
The backlight timeout application turns on automatically to save battery. Tap the screen to deactivate it. If you wait a
little after the LCD has turn dark, the key lock will be activated. See 1.9 for more details about the key lock.
1.9 Key lock
The key lock turns on automatically; to save battery and to make sure no unintentional calls
are made. If you want to lock your device manually, tap on the padlock symbol in the first tab
view of the start menu.
1.10 Exit Key lock
Press the on/off button.
A picture of a padlock with an arrow beneath will appear. Make an Accept sweep (See 2.5 to
unlock the screen)
1.11 Navigation basics
To use Neonode N2 you will have to learn a few basic navigation principles, which you can use in every application. You
never have to press the optical screen; only a light touch or sweep, is needed.
To learn how to navigate, you can think of the screen as being divided into three horizontal areas and three vertical
areas.
1.12 Horizontal areas:

7
1. The upper area of the screen is called the Change view area.
2. The centre of the screen is called the Navigation area.
3. The bottom area of the screen is called the Accept/Close view area.
In the Change view area you sweep from left to right or from right to left to change
views. The Navigation area is used to navigate within a view. Put your finger in the very
middle part of the screen and sweep up/down/right/left in the Navigation area to
navigate within a view.
Right under Navigation area is the Notification area. In the Notification area, icons for
active programs will show if they need some kind of input from the user. For example
if you have an active alarm that you have not dismissed, the alarm icon will show in
this area.
In the Accept/Close view area you sweep from the left to the right to make an Accept
sweep and from the right to the left to make a Close view sweep.
1.13 Vertical areas:
1. The left part of the screen is called the Start menu sweep area.
2. The middle part of the screen is called the Keyboard sweep area.
3. The right part of the screen is called the Tools menu sweep area.
In the vertical areas you start the sweep at the very bottom of the screen. Sweep upwards.
The sweep should be about half the height of the screen.
A sweep in the left part of the screen opens the start menu. A sweep in the middle opens
the keyboard and a sweep in the right part of the screen opens the tools menu.
2.0 Navigation Specifics
Please have in mind that you never have to press the optical screen; only a light touch or sweep, is needed.
2.1 Open the Start Menu
To open the start menu, you sweep from the Start menu sweep area
which is from the bottom left side of the screen and upwards. The
sweep should be about half the height of the screen. When you lift
your finger, the start menu will appear.
The start menu is available from all applications.
2.2 Tap
To open the applications you tap on icons visible at the screen. You
also tap the screen to select an item in a list, for example in the
address book.
A tap is a very quick light touch on the screen, no pressure is needed.
You put down your finger, lightly touch the screen and lift the finger
right back up
2.3 Open the Tools Menu
To open the tools menu you sweep from the Tools menu sweep area

8
which is from the bottom right side of the screen and upwards. The sweep should be about half the height of the screen.
When you lift your finger, the tools menu will appear.
NOTE! Each application has a tools menu specific to the application in question. When you have opened an application,
e.g. the camera application, you open the tools menu by sweeping from the Tools menu sweep area in the lower right
corner of the screen and up.
2.4 Keyboard sweep
You open the keyboard with a Keyboard sweep. Sweep from the
Keyboard sweep area which is from the bottom middle part of the
screen and upwards. The sweep should be about half the height of the
screen. When you lift your finger, the keyboard will appear.
The keyboard is used to enter text and numbers into your Neonode. If
the keyboard indicator at the bottom of the screen is visible, the
keyboard is available in the application currently open.
2.5 Accept sweep
Sweep from the left to the right at the bottom of the screen.
An Accept sweep means accept, yes, forward, save, depending on the context. The Accept sweep
is also used to answer incoming calls.
2.6 Close view sweep
Sweep from the right to the left at the bottom of the screen.
A Close view sweep means close view, no, back, cancel, depending on the context
2.7 Change view sweeps
The start menu and several applications, for example the messaging
application, contain multiple views. If an application contains multiple
views, it will be indicated by dots at the top of the screen and a
Change view sweep can be made.
To make a Change view sweep you put your finger at the top of the
screen and sweep from the left to the right or from the right to the left
to change between the different views.
The Start menus last view is called shortcuts. A shortcut can be any file you want fast access to.
To create a shortcut you open the start menu and make three Change
view sweeps, from left to the right.

9
Open the tools menu and tap the Add icon, choose the file you want as a shortcut and tap the screen.
2.8 Navigate within a view
Put your finger in the very middle of the screen and then move the finger Up/Down/Right/Left in
the Navigation area. (see 1.12) Please note that you have to start the sweep in the middle part of
the screen to not collide with other sweeps in the uppermost or lowest part of the screen (e.g.
Change view sweeps, Keyboard sweep, Accept sweep and Close view sweep).
The sweeps in the Navigation area allows you to for example scroll lists and navigate within the
calendar and a webpage.
You can use the auto scroll function to for example scroll through large quantities of text or
quickly navigate within the calendar. To auto scroll, sweep Up/Down but don't lift your finger, let
it stay at the top or bottom part of the screen.
2.9 Close application sweep
A Close application sweep is a diagonal sweep over the screen, from the upper right corner to the
lower left corner.
To close third party applications that you’ve downloaded from other sources than neonode.com
and installed on your Neonode, you can use the Close application sweep.
Please note that you have to sweep to and from the very corners of the screen when you make a
Close application sweep.
3.0 The Keyboard
The keyboard is used to enter text and numbers into your Neonode. If the keyboard indicator at
the bottom of the screen is visible, the keyboard is available in the application currently open.
You open the keyboard with a Keyboard sweep.
To change between capital and lower-case
letters in the keyboard, tap the bottom
right key in the keyboard (the shift
mode/enter key). By tapping the enter key
you can alter between capital first letter,
all letters capital and all letters lower-case.
You’ll see the change in the keyboard
when you tap the shift mode/enter key.
To start a new row you hold your finger on the shift mode/enter key for about a second.

10
To move the caret back/forward in text, press the Left/Right on the cursor key.
Alter between favorite keyboards
Make Change view sweeps to alter
between your selected favorite keyboards.
At the top of the screen you can see what
keyboard that currently is open.
3.1 Select T9 word
When using a T9 keyboard and a word is marked, the Keyboard sweep
brings up a list of selectable words. Scroll the list and when the right
word is marked, tap the screen to select it. You can also change
between selectable words by using the navigation keys. Press Up/Do
wn on the cursor key to change between selectable words.
To mark a T9 word (if not already marked) you place the caret right
next to the word and press Up or Down on the cursor key. You can
then select T9 word by either making a Keyboard sweep or press
Up/Down on the cursor key.
3.2 Paste word and phrases
If you make a Keyboard sweep when no text is marked, you’ll get a list
of your clipboard texts and favorite phrases. Mark the phrase you want
to paste and tap the screen.
3.3 The Keyboard Tools menu
3.4 Select keyboard
Open the keyboard tools menu and tap the Select keyboard icon. Mark
the keyboard you want to select and tap the screen.

11
3.5 Delete favorite Text
Open the keyboard Tools menu and tap the paste icon. You'll see a list
of all your favorite phrases.
Make a tools menu sweep and tap the icon
Delete favorite Text. Choose the one(s) you
want to delete and make an Accept sweep.
3.6 Copy
Enter a word or a phrase in the keyboard.
Open the tools menu and tap the Copy icon.
Choose whether to copy to clipboard or
favorite phrases and tap the screen.
3.7 Paste
Open the keyboard tools menu and tap the Paste icon.
Mark the word or phrase you want to paste and tap the screen.
3.8 Keyboard Settings
Open the keyboard tools menu and tap the
Settings icon. You can now select Favorite
Keyboards by marking the item and tap the
screen. A list of all available keyboards will
appear. Scroll the list, mark the keyboards
you want to select and tap the screen.
Make a Close view sweep to save the
selection and exit.

12
3.9 Keyboard Speed
You can also set Keyboard Speed, which is the work speed when you
use the keyboard, for example the caret’s speed when you browse
through letters or press the delete key. Mark Keyboard Speed and tap
the screen. Set the speed (1 is slow, 5 is fast) and make a close view
sweep to save and exit.
3.10 Button Vibration
Mark Button Vibration and tap the screen to set and/or change
button vibration level (0 to 10). This will cause the keyboard to give
vibration indications when you press the keys. Make a Close view
sweep to save the selection and exit.
3.11 Preview
Open the keyboard tools menu and tap the Preview icon to see a preview of the message.
4.0 Make calls
While talking on your Neonode, you hold it with the backside against your ear, with the screen facing away from you.
To change the volume during a call you use the volume control on the side of Neonode N2. Press + (plus) to raise the
volume, - (Minus) to lower the volume.
4.1 Make a call using the keyboard
Make a Keyboard sweep to open the keyboard.
Use the on-screen keyboard as an ordinary keyboard; tap the
numbers required to dial the number you want.

13
When you have entered all the numbers make an Accept sweep to
make the call.
Make a Close view sweep to hang up.
4.2 Make a call using the Call History.
To call a number from the Call History, open the start menu and tap
the Call History icon.
A Call History list will appear. Scroll the list to the number or contact
you want to call. When the correct number or contact is marked, tap
the screen to make the call.
Make a Close view sweep to hang up.
4.3 Call a contact in the Address Book
Open the start menu and tap the Contacts
icon. Scroll the list to get to the contact you
want to call or use the Right/Left cursor key
to browse through the list page by page.
You can also open the keyboard, enter a
search text and make an Accept sweep. If
you e.g. enter “John Doe” you will get
directly to that contact. When the contact
you want to call is marked, tap the screen to
view the number(s) attached.
Mark the number you want to call and tap the screen to make the call. Make a Close view sweep to hang up.
14
In the address book, you can also make a Change view sweep to get to your favorites. Mark the
favorite contact you want to call and tap the screen to make the call. Make a Close view sweep
to hang up.
4.4 Answer incoming calls
You answer an incoming call with an Accept sweep. Make a Close view sweep to hang up. When you receive a call, you
can turn off the ring tone by making a Close view sweep. You can then answer with an Accept
sweep.
You can also give the caller a busy tone. Make a Close view sweep twice when the mobile is
ringing if you want the caller to get a busy tone.
5.0 Address book
Open the start menu and tap the Contacts icon to open the application.
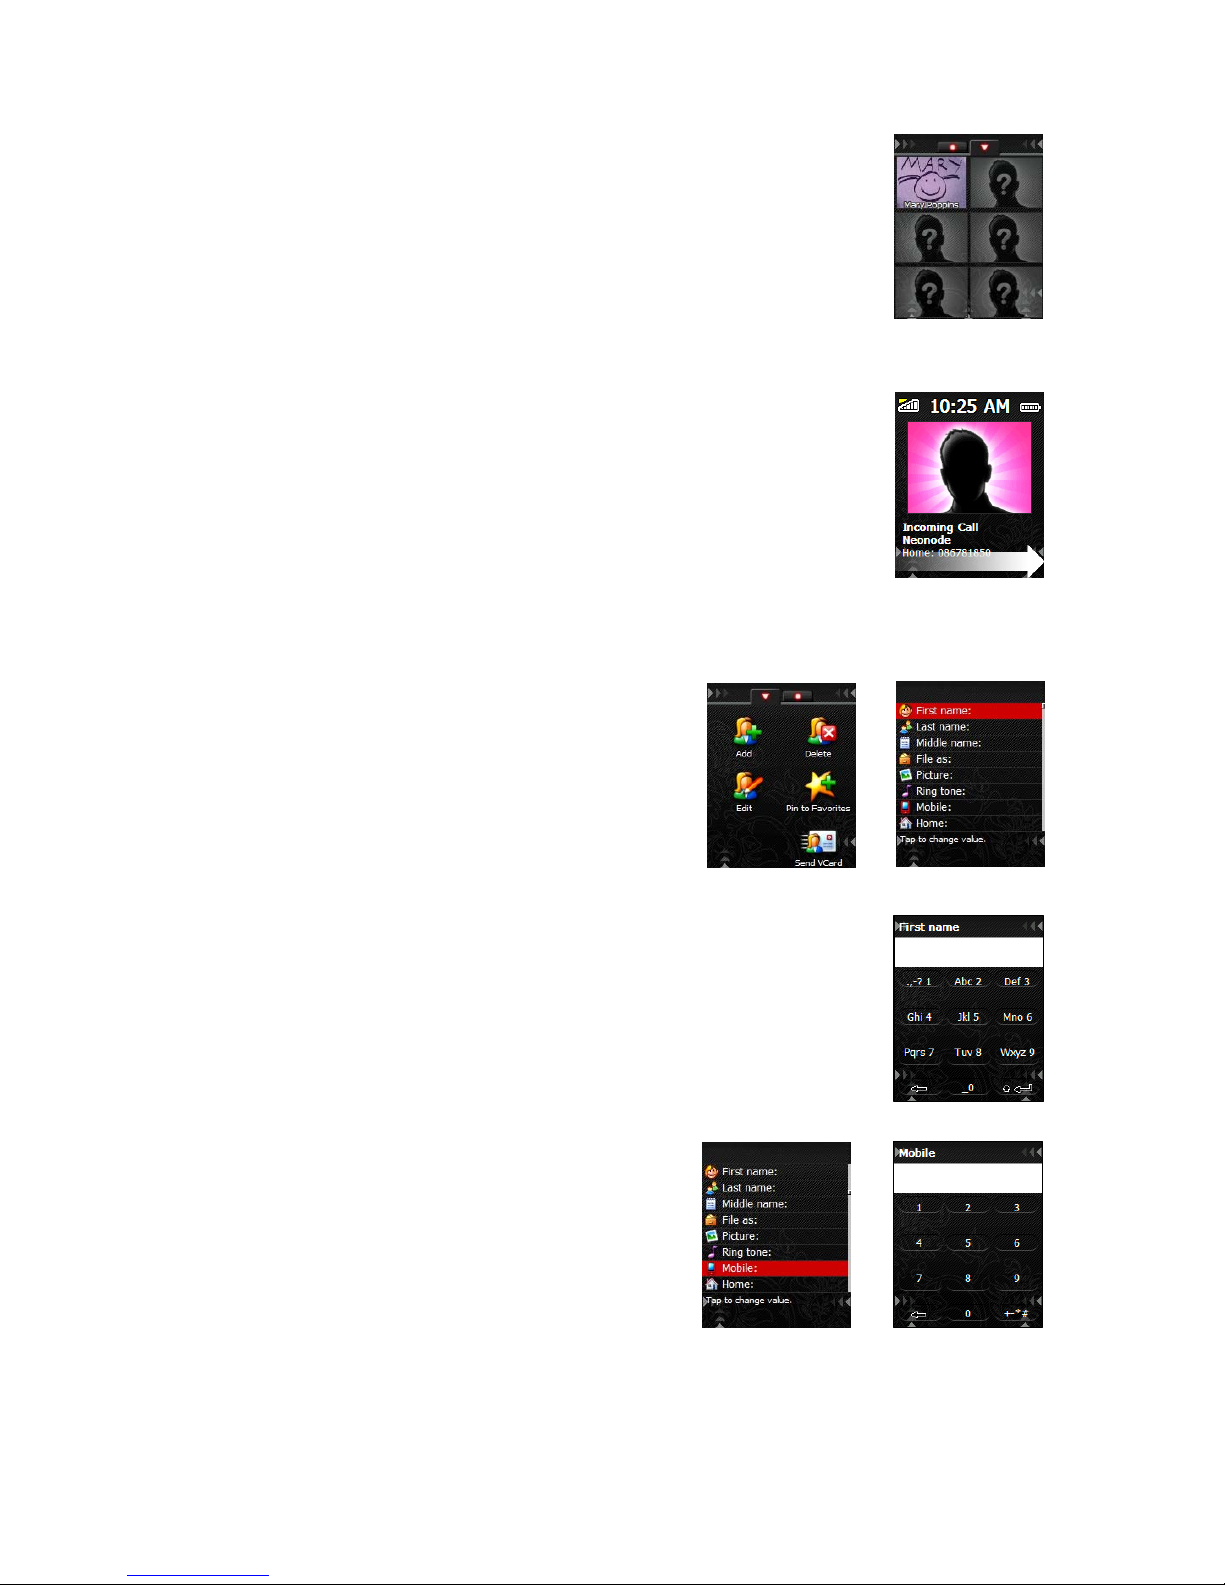
5.1 Add a contact
Open the address book tools menu and tap the Add icon. A list of
items to fill in will appear, such as name, mobile number, home
number, e-mail etc. Mark an item and tap the screen to enter
information.
When you choose for example First name, a keyboard will appear on the screen enabling you to
enter text. Make an Accept sweep to save the text.
When you choose Mobile, a keyboard that allows you to enter
numbers will appear. Make an Accept sweep to save the number.
To add a picture to the contact, choose Picture. This takes you to the Camera application. You can take a picture with
the camera by tapping the screen, and make an Accept sweep to add this picture to the contact.

15
To add a picture from the Image viewer, make a Change view sweep to the right when you are in the Camera application.
Mark the picture you want to add, tap the screen to select it and make an Accept sweep.
To attach a personal ring tone to the contact, choose Ring tone. This takes you to the folder My Ring tones, a subfolder
to My Documents on the Storage Card. Scroll the list and choose a ring tone by tapping the screen when the ring tone of
your choice is marked.
Note: If you have stored the picture or ring tone you want to add in some other folder, you can easily browse through
your folders by marking Up and then tap the screen. Browse through your folders and choose the one that contains the
picture or ring tone you want to attach to your contact. Mark the picture or ring tone and tap the screen to add it.
Make an Accept sweep to save the new contact. If you don’t want to save the new contact, make a Close view sweep to
cancel and discard the changes you made.
5.2 Make a contact a favorite
Mark the contact you want listed as a favorite.
Then open the tools menu and tap the
Favorite icon. Mark No favorite selected and
tap the screen. The chosen contact will be
listed as a favorite. To replace one favorite
with another, mark the contact you want to
replace instead of an empty item, and the
new favorite will be listed instead. If you have
a picture attached to your contact, the picture
and the name of your contact will appear in
the favorites tab.
5.3 Send and receive vCard
You can send contact information you have attached to a contact in your address book with SMS
or Bluetooth as a vCard.
Mark the contact in the address book whose contact information you want to send as a vCard.
Then open the tools menu and tap the vCard icon. Two options will be shown, with Bluetooth and
with SMS.
To send a vCard by SMS you do like this:
Mark To and tap the screen to choose the recipient of the vCard from your address book. Mark
the recipient and tap the screen. You can also open the keyboard with a Keyboard sweep and
enter a phone number manually. Make an Accept sweep to send the vCard.
When receiving a vCard by SMS, make an Accept sweep to save the contact information in the
address book. Make a Close view sweep to close the view without saving the received
information.

16
To send a vCard by Bluetooth you do like this:
Mark the contact in the address book whose contact information you
want to send as a vCard. Open the tools menu and tap the vCard icon.
Choose “with Bluetooth” and tap on the screen.
The device should show a list of paired Bluetooth devices and also
start scanning for other available Bluetooth devices. Select a device by
marking the row and Tap on the screen. The vCard should now be sent
if the peer device accepts it.
5.4 Copy contacts from the SIM card
Open the address book tools menu and make one Change view sweep
to the right.
To copy contacts from the SIM card, tap the icon Import from SIM. All
your contacts on the SIM card will now be copied to your Neonode.
5.5 Copy contacts to the SIM card
Open the address book tools menu and make one Change view sweep to the right. To copy
contacts from your Neonode to the SIM card, tap the icon Export to SIM. Choose which contacts
you want to export to your SIM card and make an Accept sweep to export them.
5.6 Contact settings
Set name format.
Chose if you want the first name or the last name to show first. Prefer.
When you have entered the name of a contact, you can set an alias for that person. If you chose
“file as” in the prefer setting you display the alias name. Example; If you have several people with
the same name you can create aliases for them so you know which one of them is calling.
Set Birthday reminders.
Chose if you want a birthday reminder for the contact.

17
6.0 The Messaging Application
The messaging application allows you to read, view, compose and send SMS and MMS.
6.1 Open the messaging application
Open the start menu and tap the Messages icon.
The Messaging Application contains multiple views. You can view your
drafts, received and sent SMS and MMS by making Change view
sweeps to the right or left.
To send an SMS or MMS you open the
messaging application tools menu and tap the
icon for New. In the Compose view, set type to
either SMS or MMS and start composing.
NOTE! To be able to send MMS your
subscription must include GPRS and MMS
services. Contact your operator or visit their
website for help on how to configure your
Neonode for MMS.
6.2 Add number to address book
If you have received a message containing a
phone number you want to add to the address
book, you open the tools menu when viewing
the message.
Make a Change view sweep to the right and tap
the Add to contact icon.
Mark the number you want to add and tap the
screen. You can choose if you want to add the
number to an already existing contact or create
a new contact.
When you have entered all information, you
save the contact by making an accept sweep.

18
6.3 Call number received in
message
If you have received a message containing a
phone number you want to call, open the tools
menu when viewing the message. Make a
Change view sweep to the right and tap the icon
Parse. Mark the number you want to call and
tap the screen.
Make an accept sweep to call the number.
6.4 Messaging settings
To change settings for the messaging application, open the messaging
tools menu and make a Change view sweep to the right.
Tap the settings icon.
- Choose max folder items
- Choose whether to show original message when replying
- Set default message type – last used, SMS or MMS.
- Show Receipt – indicate whether receipts should be shown or not.
- Message audio – tap to change incoming message audio settings.
Mark the item you want to edit and tap the screen.
7.0 SMS
7.1 Send an SMS
Open the start menu and tap the Messaging icon.
Open the tools menu.
In the tools menu’s first tab view, tap the icon for New message.
In the Compose view, mark Type, tap the screen and choose SMS.

19
7.2 Add a recipient
In the Compose view you add a recipient to your message by marking To
and tap the screen. This will take you to the Address Book. Scroll the list
and when the wanted contact is marked, tap the screen to add him or
her as the recipient of your SMS.
If you want to enter a phone number instead, make sure the To row is marked and make a
Keyboard sweep. Enter the number and make an Accept sweep.
7.3 Add several recipients
You can add several recipients to your SMS. When you have added a recipient and want to add
one more, mark To and tap the screen. Mark Add and tap the screen. Mark the contact and tap
the screen.
To enter a phone number, make sure the To row is marked and make a Keyboard sweep. Enter
the number and make an Accept sweep.
In this way you can add several recipients to your SMS. When all recipients are added, make an
Accept sweep.
7.4 Compose a message
Mark text and tap the screen. A keyboard will appear on-screen that allows you to enter text.
Make an Accept sweep to save when you have entered all message text.
When all the required fields are completed, make an Accept sweep to send the SMS.
You can also save the SMS as a draft and send it later. If you make a Close view sweep the
message will be saved among your drafts in the messaging application.
7.5 Receive SMS
When you receive an SMS you will get a notification that you have
received a new SMS. Make an Accept sweep if you want to read the
message immediately.
If you make a Close view sweep, the message will be saved among
your received messages and you can read it later.

20
7.6 Send a reply
Reply a received SMS by open the tools menu and tap the Reply icon. You will get directly to the
Message view. Enter the message text and make an Accept sweep.
In the Reply view, make an Accept sweep to send the message.
The message you're replying to will be shown as a reference. This
function can be disabled in the messaging application's Settings.
7.7 Forward a message
Open the tools menu and tap the Forward icon. Mark To and tap the screen. Choose a recipient
from the address book by tapping the screen when the contact is marked. To enter a phone
number, make sure the To row is marked and make a Keyboard sweep. Enter the number and
make an Accept sweep.
Forward the message with an Accept sweep.
8.0 MMS
• Make sure that your subscription include GPRS and MMS services. Contact your operator for help regarding this.
• Follow the instructions on your operator’s website on how to configure your Neonode for MMS by using automatic
configuration SMS messages. When you receive a configuration SMS, make an Accept sweep to accept the settings. The
Messaging Application, the same application used for SMS, is used to send and receive MMS messages.
IMPORTANT! The first MMS you send should be to your own number. Some operators require this to activate the MMS
service.
8.1 New message
Open the start menu and tap the Messaging icon.
Table of contents
Other NEONODE Cell Phone manuals


