nest Cam IQ User manual

Nest Cam IQ outdoor security camera | Installation Guide
Nest Cam IQ utendørs sikkerhetskamera | Installasjonsveiledning
Nest Cam IQ udendørs sikkerhedskamera | Installationsvejledning
Nest Cam IQ säkerhetskamera för utomhusbruk | Installationsguide
Nest Cam IQ ‑ulkovalvontakamera | Asennusopas


English � � � � � � � � � � � � � � � � � � � � � � � � � � � � � � � � � � � � � � � � � � � � � � � � � � � � � � � � � � � � � � � � � � � � � � � � � � � � � � � � � � � � � � � � � � � � � � � � � � � � � � � � � � � � � � � � � � � � � � � � � � � � � � � � � � � � � � � � � � � � � � � � 5
Norsk � � � � � � � � � � � � � � � � � � � � � � � � � � � � � � � � � � � � � � � � � � � � � � � � � � � � � � � � � � � � � � � � � � � � � � � � � � � � � � � � � � � � � � � � � � � � � � � � � � � � � � � � � � � � � � � � � � � � � � � � � � � � � � � � � � � � � � � � � � � � � � � � 17
Dansk� � � � � � � � � � � � � � � � � � � � � � � � � � � � � � � � � � � � � � � � � � � � � � � � � � � � � � � � � � � � � � � � � � � � � � � � � � � � � � � � � � � � � � � � � � � � � � � � � � � � � � � � � � � � � � � � � � � � � � � � � � � � � � � � � � � � � � � � � � � � � � � � 29
Svenska� � � � � � � � � � � � � � � � � � � � � � � � � � � � � � � � � � � � � � � � � � � � � � � � � � � � � � � � � � � � � � � � � � � � � � � � � � � � � � � � � � � � � � � � � � � � � � � � � � � � � � � � � � � � � � � � � � � � � � � � � � � � � � � � � � � � � � � � � � � � � 41
Suomi� � � � � � � � � � � � � � � � � � � � � � � � � � � � � � � � � � � � � � � � � � � � � � � � � � � � � � � � � � � � � � � � � � � � � � � � � � � � � � � � � � � � � � � � � � � � � � � � � � � � � � � � � � � � � � � � � � � � � � � � � � � � � � � � � � � � � � � � � � � � � � � � 53


GBEN
5
Contents
In the box � � � � � � � � � � � � � � � � � � � � � � � � � � � � � � � � � � � � � � � � � � � � � � � � � � � � � � � � � � � � � � � � � � � � � � � � � � � � � � � � � � � � � � � � � � � � � � � � � � � � � � � � � � � � � � � � � � � � � � � � � � � � � � � � � � � � � � � � � � � � � 6
What you’ll need� � � � � � � � � � � � � � � � � � � � � � � � � � � � � � � � � � � � � � � � � � � � � � � � � � � � � � � � � � � � � � � � � � � � � � � � � � � � � � � � � � � � � � � � � � � � � � � � � � � � � � � � � � � � � � � � � � � � � � � � � � � � � � � � � � � � 7
Do this first � � � � � � � � � � � � � � � � � � � � � � � � � � � � � � � � � � � � � � � � � � � � � � � � � � � � � � � � � � � � � � � � � � � � � � � � � � � � � � � � � � � � � � � � � � � � � � � � � � � � � � � � � � � � � � � � � � � � � � � � � � � � � � � � � � � � � � � � � �8
Choose a good spot � � � � � � � � � � � � � � � � � � � � � � � � � � � � � � � � � � � � � � � � � � � � � � � � � � � � � � � � � � � � � � � � � � � � � � � � � � � � � � � � � � � � � � � � � � � � � � � � � � � � � � � � � � � � � � � � � � � � � � � � � � � � � 10
Mount your camera� � � � � � � � � � � � � � � � � � � � � � � � � � � � � � � � � � � � � � � � � � � � � � � � � � � � � � � � � � � � � � � � � � � � � � � � � � � � � � � � � � � � � � � � � � � � � � � � � � � � � � � � � � � � � � � � � � � � � � � � � � � � � � 12
Limited warranty� � � � � � � � � � � � � � � � � � � � � � � � � � � � � � � � � � � � � � � � � � � � � � � � � � � � � � � � � � � � � � � � � � � � � � � � � � � � � � � � � � � � � � � � � � � � � � � � � � � � � � � � � � � � � � � � � � � � � � � � � � � � � � � � � 14
Safety � � � � � � � � � � � � � � � � � � � � � � � � � � � � � � � � � � � � � � � � � � � � � � � � � � � � � � � � � � � � � � � � � � � � � � � � � � � � � � � � � � � � � � � � � � � � � � � � � � � � � � � � � � � � � � � � � � � � � � � � � � � � � � � � � � � � � � � � � � � � � � � 16
Want to see how it’s done?
Go to nest�com/eu/installnestcam for installation videos and additional tips�

6
In the box�
8 cable clips
Power cable strap
Camera Wall plate
Hex keyIndoor power adapter
Outdoor power cable (7�5 m) 12 wall anchors
12 Nest screws
IMPORTANT: Nest Cam IQ’s power adapter is not
weatherproof and should only be plugged into
an indoor power socket�

GBEN
7
• Wi-Fi and a working broadband
Internet connection with at least
2 Mbps upload speed�
• A compatible phone or tablet
with Bluetooth 4�0
• A Nest account
• An indoor power socket
• A power drill with Phillips driver bit
What you’ll need�
Other items you may need
• Drill bits (2 mm for pilot holes, 6 mm for wall
anchors, 13 mm or larger for cable hole)
• Caulk to seal the wall plate
Want a Pro to do it for you?
We can connect you with an independent installer who’s been trained
to install Nest products� Find a local Nest Pro at nest�com/eu/install

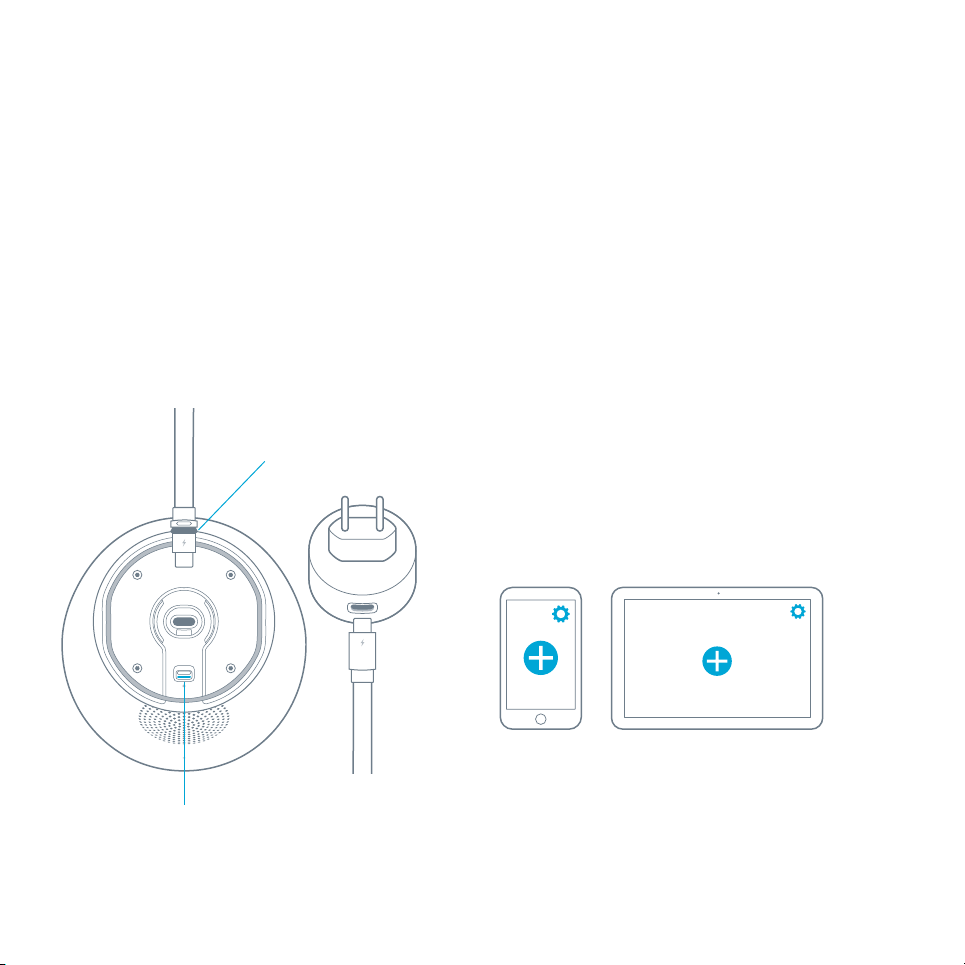
IMPORTANT: Push the latch
to unlock the cable
before trying to remove it�
Connect the end
with the grey ring�
8
2. Connect it to the app
If you’re new to Nest:
• Get the Nest app from the App Store
or Google Play�
• Open the app and tap “Sign up” to create
an account�
• Then tap Add�
If you already have a Nest account:
• Tap the Settings icon in the top right-hand
corner of the app home screen�
• Then tap “Add product”�
The app will guide you through a few steps�
You’ll scan the camera’s QR code, name your
camera and connect it to your Wi-Fi network�
If you need help, go to nest�com/eu/pair
Do this first�
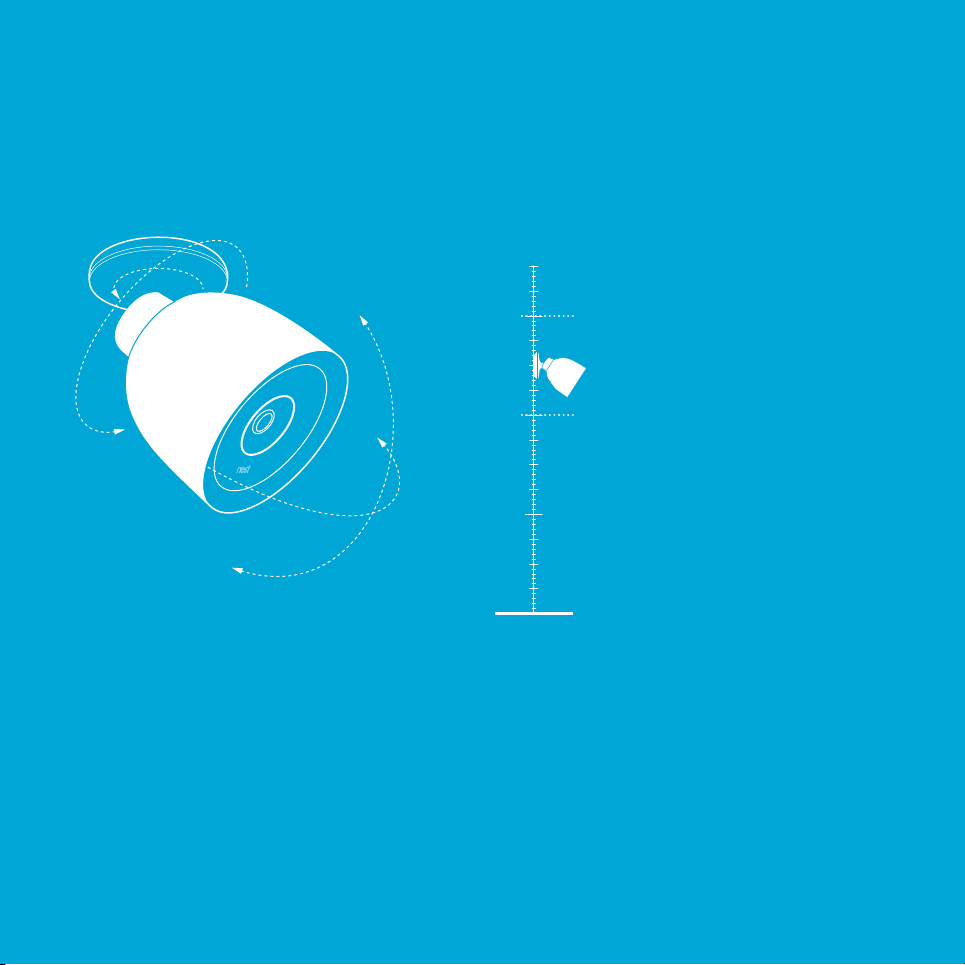
1. Turn on Nest Cam IQ indoors
Start by turning on your camera inside your home
to get it set up before you take it outside�
Plug the end of the power cable with the grey
ring into the base of your camera� It will click
into place�
Plug the other end into the power adapter�
Then plug the adapter into an indoor power
socket close to your Wi-Fi router� Your Nest
Cam IQ will turn on and its light ring will turn blue�

GBEN
9
3. Test your camera’s video
streaming outside
Keep your camera plugged into a power socket
and take it outside� Hold it where you’d like
to mount it and check to make sure that it’s
streaming video to the Nest app�
If you can’t see video, the Wi-Fi may not be strong
enough there – you’ll need to find a different spot
or move your Wi-Fi router�
→ See location tips on the next page�
4. Plan the cable path
Before you mount your camera, measure the
cable along the route where you’ll be installing
it� You can disconnect your camera from the
cable to make it easier to measure�
If there’s an existing opening, you may
be able to run the cable through it to the
outside� If not, you can use a 13 mm bit to
drill a hole for the cable� Make sure you know
where all the in-wall pipes and electrical
wires are before drilling�

360°
360°
360°
65°
1 m
2 m
3 m
Choose a good spot�
Consider the view
Nest Cam IQ has a wide 130-degree field of
view and a fully articulating hinge, so you
can mount it almost anywhere you want and
point it in any direction� Generally, you should
install it where it can look over a large area of
your property: over the garage or patio, or
your back, side or front doors� You can also
use the Nest app to zoom and enhance the
view to get it exactly as you want�
Install it just above head height
2 to 3 metres above the ground, tilted downwards,
is best – this is high enough to let you see people’s
faces and talk to them with the camera’s speaker
and microphone�

Keep it in range of your router
Make sure that you pick a place within range
of your network� Thick or insulated walls can
greatly reduce Wi-Fi signal strength, even if
your router is close by� So you should check
that you can stream video with the app before
you mount your camera�
Learn more at nest.com/eu/wifihelp
Look for an indoor power socket nearby
Nest Cam IQ has a 7�5 metre outdoor-rated
power cable that is designed to be easily
routed through or along a wall to an indoor
power socket� Look for a power socket
that’s close to where you want to install
your camera�

12
5. Install the wall plate
Use a 2 mm drill bit to drill pilot holes for
the screws�
If the wall is made of a hard material, such as
brick or polished plaster, you may need to use
the wall anchors included to hold the screws�
Use a 6 mm bit for the anchors�
Spread caulk around the edge of the wall plate
before installing to seal it� Leave a small open
space at the bottom for water to drain out�
• If you’re installing the camera directly over
the cable hole (see illustration), mount the
wall plate over the hole and route the cable
through the centre hole�
• If you’re running the cable along the wall
before it goes inside, mount the wall plate
wherever you want it and route the cable
through the notch in the wall plate�
6. Attach the camera
• Plug the end of the power cable that has the
grey rubber ring into the base of your camera�
It will click into place�
• Then push the camera base into the wall
plate until it clicks into place�
• Your Nest Cam will turn on and reconnect
to Wi-Fi�
• Check your camera’s video feed with the
Nest app and adjust the camera angle
if required�
Mount your camera�

GBEN
13
7. Install the cable
Secure the cable using as many of the cable
clips included as you need�
For a clean-looking installation, try to route
the cable along a ledge or corner� You can
also paint the cable and the clips to match
your home� Do not paint the camera�
Using your Nest Cam
For help with getting started, learning about
Nest Cam IQ features, tips and more, go
to nest�com/eu/camerabasics
IMPORTANT: If you ever need to unmount your
camera, you can use the hex key included
to disconnect it from the wall plate�

14
Nest Labs (Europe) Ltd�
Limited warranty
Nest Cam IQ
THIS LIMITED WARRANTY CONTAINS IMPORTANT INFORMATION ABOUT
YOUR RIGHTS AND OBLIGATIONS, AS WELL AS LIMITATIONS AND
EXCLUSIONS THAT MAY APPLY TO YOU UNDER THIS LIMITED WARRANTY.
YOUR RIGHTS AND THIS LIMITED WARRANTY
This Limited Warranty gives you specific legal rights� You may also have other
legal rights that vary by state, province or jurisdiction� The disclaimers,
exclusions and limitations of liability under this Limited Warranty will not
apply to the extent prohibited by applicable law� For a full description of
your legal rights, you should refer to the consumer protection laws applicable
in your jurisdiction, and you may wish to contact a relevant consumer advisory
service� This Limited Warranty is in addition to your legal rights in relation
to the Products and does not affect your statutory rights� In particular, this
Limited Warranty does not limit the legal warranty obligations imposed on
the seller and you may claim your rights under the legal warranty against the
seller� This Limited Warranty only applies to Products purchased and used
in the European Union, Norway and Switzerland�
1. WHAT THIS LIMITED WARRANTY COVERS: PERIOD OF COVERAGE
Nest Labs (Europe) Ltd� (“Nest Labs”) warrants to the owner of the enclosed
product that the product contained in this box (“Product”) will be free from
defects in materials and workmanship for a period of two (2) years from the
date of delivery following the original retail purchase (the “Warranty Period”)�
If the Product fails to conform to this Limited Warranty during the Warranty
Period, Nest Labs will, at its sole discretion, either (a) repair or replace any
defective Product or component; or (b) accept the return of the Product and
refund the money actually paid by the original purchaser for the Product�
Repair or replacement may be made with a new or refurbished product or
components, at Nest Labs’ sole discretion, to the extent that this is permitted
by local laws in your jurisdiction� If the Product or a component incorporated
within it is no longer available, Nest Labs may, at Nest Labs’ sole discretion,
replace the Product with a similar product of similar function� Any Product
that has either been repaired or replaced under this Limited Warranty will be
covered by the terms of this Limited Warranty for the longer of (a) ninety (90)
days from the date of delivery of the repaired Product or Replacement Product,
or (b) the remaining Warranty Period� This Limited Warranty is transferable
from the original purchaser to subsequent owners, but the Warranty Period
will not be extended in duration or expanded in coverage for any such transfer�
2. TOTAL SATISFACTION RETURNS POLICY
If you are the original purchaser of the Product and you are not satisfied with
this Product for any reason, you may return it, at your cost, in its original condition,
within thirty (30) days of the original purchase and receive a full refund�
3. WARRANTY CONDITIONS; HOW TO GET SERVICE IF YOU WANT
TO CLAIM UNDER THIS LIMITED WARRANTY
Before making a claim under this Limited Warranty, the owner of the Product must
(a) notify Nest Labs of the intention to claim by visiting nest�com/eu/support
during the Warranty Period and providing a description of the alleged failure,
and (b) comply with Nest Labs’ returns delivery instructions� Nest Labs will
have no warranty obligations with respect to a returned Product if it determines,
at its reasonable discretion after examination of the returned Product, that
the Product is an Ineligible Product (defined below)� Nest Labs will bear all
costs of return delivery to the owner and will reimburse standard delivery
costs incurred by the owner, except with respect to any Ineligible Product, for
which the owner will bear all delivery costs�
4. WHAT THIS LIMITED WARRANTY DOES NOT COVER
This Limited Warranty does not cover the following (collectively “Ineligible
Products”): Products marked as “sample” or “Not for Sale”, or sold “AS IS”; or
Products that have been subject to: (a) modifications, alterations, tampering,
or improper maintenance or repairs; (b) handling, storage, installation, testing
or use not in accordance with the user’s guide, placement guidelines, or other
instructions provided by Nest Labs; (c) abuse or misuse of the Product;
(d) breakdowns, fluctuations or interruptions in the electricity supply or the
telecommunications network; or (e) Acts of God, including, but not limited
to lightning, flood, tornado, earthquake or hurricane� This Limited Warranty
does not cover consumable parts, including batteries, unless damage is due
to defects in materials or workmanship of the Product or software (even if
such consumable parts or software are packaged or sold with the product)�
Nest Labs recommends using only authorised service providers for
maintenance or repair� Unauthorised use of the Product or software can
impair the Product’s performance and may invalidate this Limited Warranty�
5. DISCLAIMER OF WARRANTIES
EXCEPT AS STATED ABOVE IN THIS LIMITED WARRANTY, AND TO THE MAXIMUM
EXTENT PERMITTED BY APPLICABLE LAW, NEST LABS DISCLAIMS ALL
EXPRESS, IMPLIED AND STATUTORY WARRANTIES AND CONDITIONS WITH
RESPECT TO THE PRODUCT, INCLUDING THE IMPLIED WARRANTIES OF
MERCHANTABILITY AND FITNESS FOR A PARTICULAR PURPOSE� TO THE
MAXIMUM EXTENT PERMITTED BY APPLICABLE LAW, NEST LABS ALSO
LIMITS THE DURATION OF ANY APPLICABLE IMPLIED WARRANTIES OR
CONDITIONS TO THE DURATION OF THIS LIMITED WARRANTY�
6. LIMITATION OF DAMAGES
IN ADDITION TO THE WARRANTY DISCLAIMERS ABOVE, IN NO EVENT WILL
NEST LABS BE LIABLE FOR ANY INDIRECT, CONSEQUENTIAL, INCIDENTAL,
EXEMPLARY OR SPECIAL DAMAGES, INCLUDING ANY DAMAGES FOR LOST
DATA OR LOST PROFITS, ARISING FROM, OR RELATING TO THIS LIMITED
WARRANTY OR THE PRODUCT, AND NEST LABS’ TOTAL CUMULATIVE LIABILITY
ARISING FROM, OR RELATED TO THIS LIMITED WARRANTY OR THE PRODUCT
WILL NOT EXCEED THE AMOUNT ACTUALLY PAID FOR THE PRODUCT BY THE
ORIGINAL PURCHASER�
7. LIMITATION OF LIABILITY
IF YOU CHOOSE TO USE THEM, ONLINE SERVICES OFFERED BY NEST LABS, INC�,
A US AFFILIATE OF NEST LABS, (“SERVICES”) PROVIDE YOU WITH INFORMATION

GBEN
15
(“PRODUCT INFORMATION”) REGARDING YOUR NEST PRODUCTS OR OTHER
PERIPHERALS CONNECTED TO YOUR PRODUCTS (“PRODUCT PERIPHERALS”)�
THE TYPE OF PRODUCT PERIPHERALS THAT MAY BE CONNECTED TO YOUR
PRODUCT MAY CHANGE FROM TIME TO TIME� WITHOUT LIMITING THE
GENERALITY OF THE DISCLAIMERS ABOVE, ALL PRODUCT INFORMATION IS
PROVIDED FOR YOUR CONVENIENCE, “AS IS” AND “AS AVAILABLE”� NEST
LABS OR ITS AFFILIATE DOES NOT REPRESENT, WARRANT OR GUARANTEE
THAT PRODUCT INFORMATION WILL BE AVAILABLE, ACCURATE OR RELIABLE,
OR THAT PRODUCT INFORMATION OR USE OF THE SERVICES OR PRODUCT WILL
PROVIDE SAFETY IN YOUR HOME� YOU USE ALL PRODUCT INFORMATION, THE
SERVICES AND THE PRODUCT AT YOUR OWN DISCRETION AND RISK� YOU WILL
BE SOLELY RESPONSIBLE FOR (AND NEST LABS AND ITS AFFILIATE DISCLAIM)
ANY AND ALL LOSS, LIABILITY OR DAMAGES, INCLUDING TO YOUR WIRING,
FIXTURES, ELECTRICITY, HOME, PRODUCT, PRODUCT PERIPHERALS, COMPUTER,
MOBILE DEVICE, AND ALL OTHER ITEMS AND PETS IN YOUR HOME, RESULTING
FROM YOUR USE OF THE PRODUCT INFORMATION, SERVICES OR PRODUCT�
PRODUCT INFORMATION PROVIDED BY THE SERVICES IS NOT INTENDED AS
A SUBSTITUTE FOR DIRECT MEANS OF OBTAINING THE INFORMATION�
8. VARIATIONS THAT MIGHT APPLY TO THIS LIMITED WARRANTY
Some jurisdictions do not allow limitations on how long an implied warranty
lasts or specific exclusions, so some of the limitations set out above may
not apply to you� If any court or relevant authority decides that any of these
limitations is unenforceable, it should be deemed modified to the minimum
extent necessary to make it enforceable� If this modification is not possible,
the relevant provision should be deemed deleted� Any modification or deletion
will not affect the validity of the rest of this Limited Warranty�
9. CONTACT INFORMATION
Please direct any questions about this Limited Warranty to Nest Labs
(Europe) Ltd� at Gordon House, Barrow Street, Dublin 4, Ireland or through
nest�com/eu/contact
064-00004-GB

16
PLACEMENT GUIDELINES
To avoid risk of overheating and burns:
Use only in temperatures between -40° and 45°C�
Do not block airflow to Nest Cam IQ�
To avoid risk of fire and electric shock:
Only use the USB cable and power adapter provided�
Install in accordance with local building and installation
regulations�
To avoid risk of other serious injury:
Keep the camera and all components out of the reach
of children and pets�
For more information on safety go to nest.com/eu/camsafety
Patent & TM: nest.com/eu/ip‑and‑other‑notices
Open source: nest.com/eu/compliance
Safety
For online or phone support, visit nest�com/eu/support
For more information on safety, go to nest�com/eu/camsafety
Recycling and disposal: visit nest�com/eu/recycle
Dispose in accordance with applicable legislation�
The WEEE symbol means that your Nest Cam IQ outdoor must
be disposed of separately from general household waste� When
Nest Cam IQ outdoor reaches its end of life, take it to a designated
waste collection point in your area for safe disposal or recycling�
By doing this, you’ll conserve natural resources, protect human
health and help the environment�
EU Declaration of Conformity
Hereby, Nest Labs (Europe) Limited declares that the Nest Cam
IQ outdoor is in compliance with RED 2014/53/EU� The full text
of the EU DoC is available at the following Internet address:
nest�com/eu/legal/compliance/red
Nest Labs (Europe) Limited: Gordon House, Barrow Street�
Dublin 4, Ireland
Product Wireless Information
2400–2483�5 MHz: Wi-Fi (max 20 dBm), BLE (max 9�5 dBm),
802�15�4 (max 13�5 dBm)
RF Exposure Information (MPE)
This device meets the EU requirements and the International
Commission on Non-Ionizing Radiation Protection (ICNIRP) on the
limitation of exposure of the general public to electromagnetic
fields by way of health protection� To comply with the RF exposure
requirements, this equipment must be operated at a minimum
of 20 cm separation distance from the user�

NO
17
Innhold
Innholdet i esken� � � � � � � � � � � � � � � � � � � � � � � � � � � � � � � � � � � � � � � � � � � � � � � � � � � � � � � � � � � � � � � � � � � � � � � � � � � � � � � � � � � � � � � � � � � � � � � � � � � � � � � � � � � � � � � � � � � � � � � � � � � � � � � � � 18
Dette trenger du� � � � � � � � � � � � � � � � � � � � � � � � � � � � � � � � � � � � � � � � � � � � � � � � � � � � � � � � � � � � � � � � � � � � � � � � � � � � � � � � � � � � � � � � � � � � � � � � � � � � � � � � � � � � � � � � � � � � � � � � � � � � � � � � � � 19
Gjør dette først � � � � � � � � � � � � � � � � � � � � � � � � � � � � � � � � � � � � � � � � � � � � � � � � � � � � � � � � � � � � � � � � � � � � � � � � � � � � � � � � � � � � � � � � � � � � � � � � � � � � � � � � � � � � � � � � � � � � � � � � � � � � � � � � � � � 20
Velg et godt sted � � � � � � � � � � � � � � � � � � � � � � � � � � � � � � � � � � � � � � � � � � � � � � � � � � � � � � � � � � � � � � � � � � � � � � � � � � � � � � � � � � � � � � � � � � � � � � � � � � � � � � � � � � � � � � � � � � � � � � � � � � � � � � � � � 22
Monter kameraet � � � � � � � � � � � � � � � � � � � � � � � � � � � � � � � � � � � � � � � � � � � � � � � � � � � � � � � � � � � � � � � � � � � � � � � � � � � � � � � � � � � � � � � � � � � � � � � � � � � � � � � � � � � � � � � � � � � � � � � � � � � � � � � � 24
Begrenset garanti� � � � � � � � � � � � � � � � � � � � � � � � � � � � � � � � � � � � � � � � � � � � � � � � � � � � � � � � � � � � � � � � � � � � � � � � � � � � � � � � � � � � � � � � � � � � � � � � � � � � � � � � � � � � � � � � � � � � � � � � � � � � � � � � 26
Sikkerhet � � � � � � � � � � � � � � � � � � � � � � � � � � � � � � � � � � � � � � � � � � � � � � � � � � � � � � � � � � � � � � � � � � � � � � � � � � � � � � � � � � � � � � � � � � � � � � � � � � � � � � � � � � � � � � � � � � � � � � � � � � � � � � � � � � � � � � � � � � � 28
Vil du se hvordan det gjøres?
Gå til nest�com/eu/installnestcam for monteringsvideoer og flere tips�

18
Innholdet i esken�
Åtte kabelklemmer
Strømkabelstropp
Kamera Veggmonteringsplate
SekskantnøkkelInnendørs strømadapter
Utendørs strømkabel (7,5 meter) 12 veggankere
12 Nest-skruer
VIKTIG: Strømadapteren til Nest Cam IQ
er ikke værbestandig og bør bare kobles
til strømnettet innendørs�

NO
19
• Wi-Fi og en fungerende bredbåndstilkobling
med opplastingshastighet på minst 2 Mbps�
• en kompatibel telefon eller et kompatibelt
nettbrett med Bluetooth 4�0
• en Nest-konto
• en innendørs stikkontakt
• en boremaskin med Phillips-skruebit
Dette trenger du�
Andre ting du kanskje trenger
• Bor (2 mm for styrehull, 6 mm for veggankere,
minst 13 mm for kabelhull)
• Fugemasse for å tette rundt
veggmonteringsplaten
Vil du ha hjelp av en fagperson?
Vi kan sette deg i kontakt med en uavhengig montør som er blitt lært opp til å montere
Nest-produkter� Finn en profesjonell Nest-montør der du bor, på nest�com/eu/install

VIKTIG: Skyv låsen for
å frigjøre kabelen før
du prøver å fjerne den�
Koble til enden
med grå ring�
20
2. Koble den til appen
Hvis Nest er nytt for deg, må du gjøre som følger:
• Last ned Nest-appen fra App Store eller
Google Play�
• Åpne appen og trykk på «Sign up» for å opprette
en konto�
• Trykk deretter på «Add»�
Hvis du allerede har en Nest-konto, må du gjøre
som følger:
• Trykk på Innstillinger-ikonet øverst til høyre
på appens startskjerm�
• Trykk deretter på «Add product»�
Appen veileder deg gjennom noen trinn�
Du får beskjed om å skanne kameraets QR-kode,
gi videokameraet et navn, og koble det til
Wi-Fi-nettverket�
Hvis du trenger hjelp, kan du gå til nest�com/eu/pair
Gjør dette først�
1. Slå på Nest Cam IQ inne
Slå først på kameraet når du er innendørs,
og konfigurer det før du tar det ut�
Koble enden av strømkabelen med den grå
ringen til undersiden av kameraet� Den klikker
på plass�
Koble den andre enden til strømadapteren�
Koble deretter adapteren til en innendørs
stikkontakt i nærheten av Wi-Fi-ruteren�
Nest Cam IQ slår seg på, og lysringen lyser blått�
Other manuals for Cam IQ
5
Table of contents
Languages:
Other nest Security Camera manuals