Netafim NETAFLEX 3G User manual
V 003.02 - DECEMBER 2020
NETAFLEX
™3G
INSTALLATION MANUAL

© COPYRIGHT 2020, NETAFIM
NO PARTS OF THIS PUBLICATION MAY BE REPRODUCED, STORED IN AN AUTOMATED DATA FILE OR MADE PUBLIC IN
ANY FORM OR BY ANY MEANS, WHETHER ELECTRONIC, MECHANICAL, BY PHOTOCOPYING, RECORDING OR IN ANY
OTHER MANNER WITHOUT PRIOR WRITTEN PERMISSION OF THE PUBLISHER.
ALTHOUGH NETAFIM TAKES THE GREATEST POSSIBLE CARE IN DESIGNING AND PRODUCING BOTH ITS PRODUCTS
AND THE ASSOCIATED DOCUMENTATION, THEY MAY STILL INCLUDE FAULTS.
NETAFIM WILL NOT ACCEPT RESPONSIBILITY FOR DAMAGE RESULTING FROM THE USE OF NETAFIM'S PRODUCTS OR
THE USE OF THIS MANUAL.
NETAFIM RESERVES THE RIGHT TO MAKE CHANGES AND IMPROVEMENTS TO ITS PRODUCTS AND/OR THE ASSOCIATED
DOCUMENTATION WITHOUT PRIOR NOTICE.
FOREIGN LANGUAGES
In the event that you are reading this manual in a language other than the English language, you
acknowledge and agree that the English language version shall prevail in case of inconsistency or
contradiction in interpretation or translation.

NETAFLEX™ 3G INSTALLATION MANUAL 3
CONTENTS
Use of symbols
Introduction
General instructions
Safety instructions
Safety instructions when using acid/chemicals
Description
Introduction
Highlights
Advantages
Specifications
Basic functions
Operating principle
Service
Maintenance
Add-ons
Schematic diagram
Typical installation overview
Dimensions
Weights
On-site preparations
Hydraulic infrastructure preparation
Electrical preparation
Installation
Unpacking and placement
Hydraulic installation
Electrical installation
System operation
Preparations for running the NetaFlex™ 3G
Running the NetaFlex™ 3G
Calibration
Calculation of dosing channels opening percentage
Simulation with a 10 liter (2 US gal) bucket of water
Calibration of the NetaFlex™ 3G while irrigating
Commissioning
Warranty
Appendix - System pump electrical data
4
5
5
6
7
7
7
8
8
8
8
8
9
9
10
11
11
12
15
16
16
18
19
20
22
22
24
26
27
28
4 NETAFLEX™ 3G INSTALLATION MANUAL
ELECTRICAL HAZARD
Contains instructions aimed at preventing bodily injury or direct damage to the NetaFlex™ 3G
and/or the infrastructure in the presence of electricity.
The symbols used in this manual refer to the following:
USE OF SYMBOLS
WARNING
Contains instructions aimed at preventing bodily injury or direct damage to the crops, the
NetaFlex™ 3G and/or the infrastructure.
CAUTION
Contains instructions aimed at preventing unwanted system operation, installation or conditions
that, if not followed, might void the warranty.
ATTENTION
Contains instructions aimed at enhancing the efficiency of usage of the instructions in the
manual.
NOTE
Contains instructions aimed at emphasizing certain aspect of the operation of the system or
installation.
SAFETY FOOTWEAR
Contains instructions aimed at preventing foot injury.
TIP
Provides clarification, tips or useful information.
ACID HAZARD
Contains instructions aimed at preventing bodily injury or direct damage to the crops, the
product and/or the infrastructure in the presence of acid.
PROTECTIVE EQUIPMENT
Contains instructions aimed at preventing damage to health or bodily injury in the
presence of fertilizers, acid or other chemicals.
EXAMPLE
Provides an example to clarify the operation of the settings, method of operation or installation.
The values used in the examples are hypothetical. Do not apply these values to your own
situation.

NETAFLEX™ 3G INSTALLATION MANUAL 5
INTRODUCTION
General instructions
• Installation must be performed by authorized technicians only.
• Refer to your supervisor if problems occur during installation procedure.
• Installation should be performed on a hard, leveled floor or on a flat, hard, leveled plate.
• Do not apply force or pressure on components during the installation procedure.
• Verify that field components work properly.
• Make sure fertilizers and acid are on site at time of installation.
Electricity
• Ensure that suitable electrical power supply is available in the vicinity of the installation for the
NetaFlex™ 3G electrical connection (see - Electrical Installation, page 18).
•
Ensure an electrical socket available in the NetaFlex™ 3G vicinity, for installation and for service purposes.
Safety instructions
•All safety regulations must be applied.
•Ensure that the installation is carried out in a manner that prevents leaks from the NetaFlex™ 3G,
the fertilizer/acid tanks and lines, the peripherals and the accessories, contaminating the
environment, soil or ambient area.
•Electrical installation must be performed by an authorized electrician only.
•The electrical installation must comply with the local safety standards and regulations.
•Protection provided by the equipment can be impaired if the equipment is used in a manner other than
that specified by the manufacturer.
WARNING
In agricultural environment - always wear protective footwear.
WARNING
Measures must be taken to prevent fertilizer infiltration of the water source, to avoid water pollution.
NOTE
The maximum sound level produced by the equipment does not exceed 70dB.
CAUTION
When opening or closing any manual valve, always do it gradually, to prevent damage to the
system by water hammer.
CAUTION
Read the Safety instructions chapter before beginning installation of the NetaFlex™ 3G dosing unit.
6 NETAFLEX™ 3G INSTALLATION MANUAL
INTRODUCTION
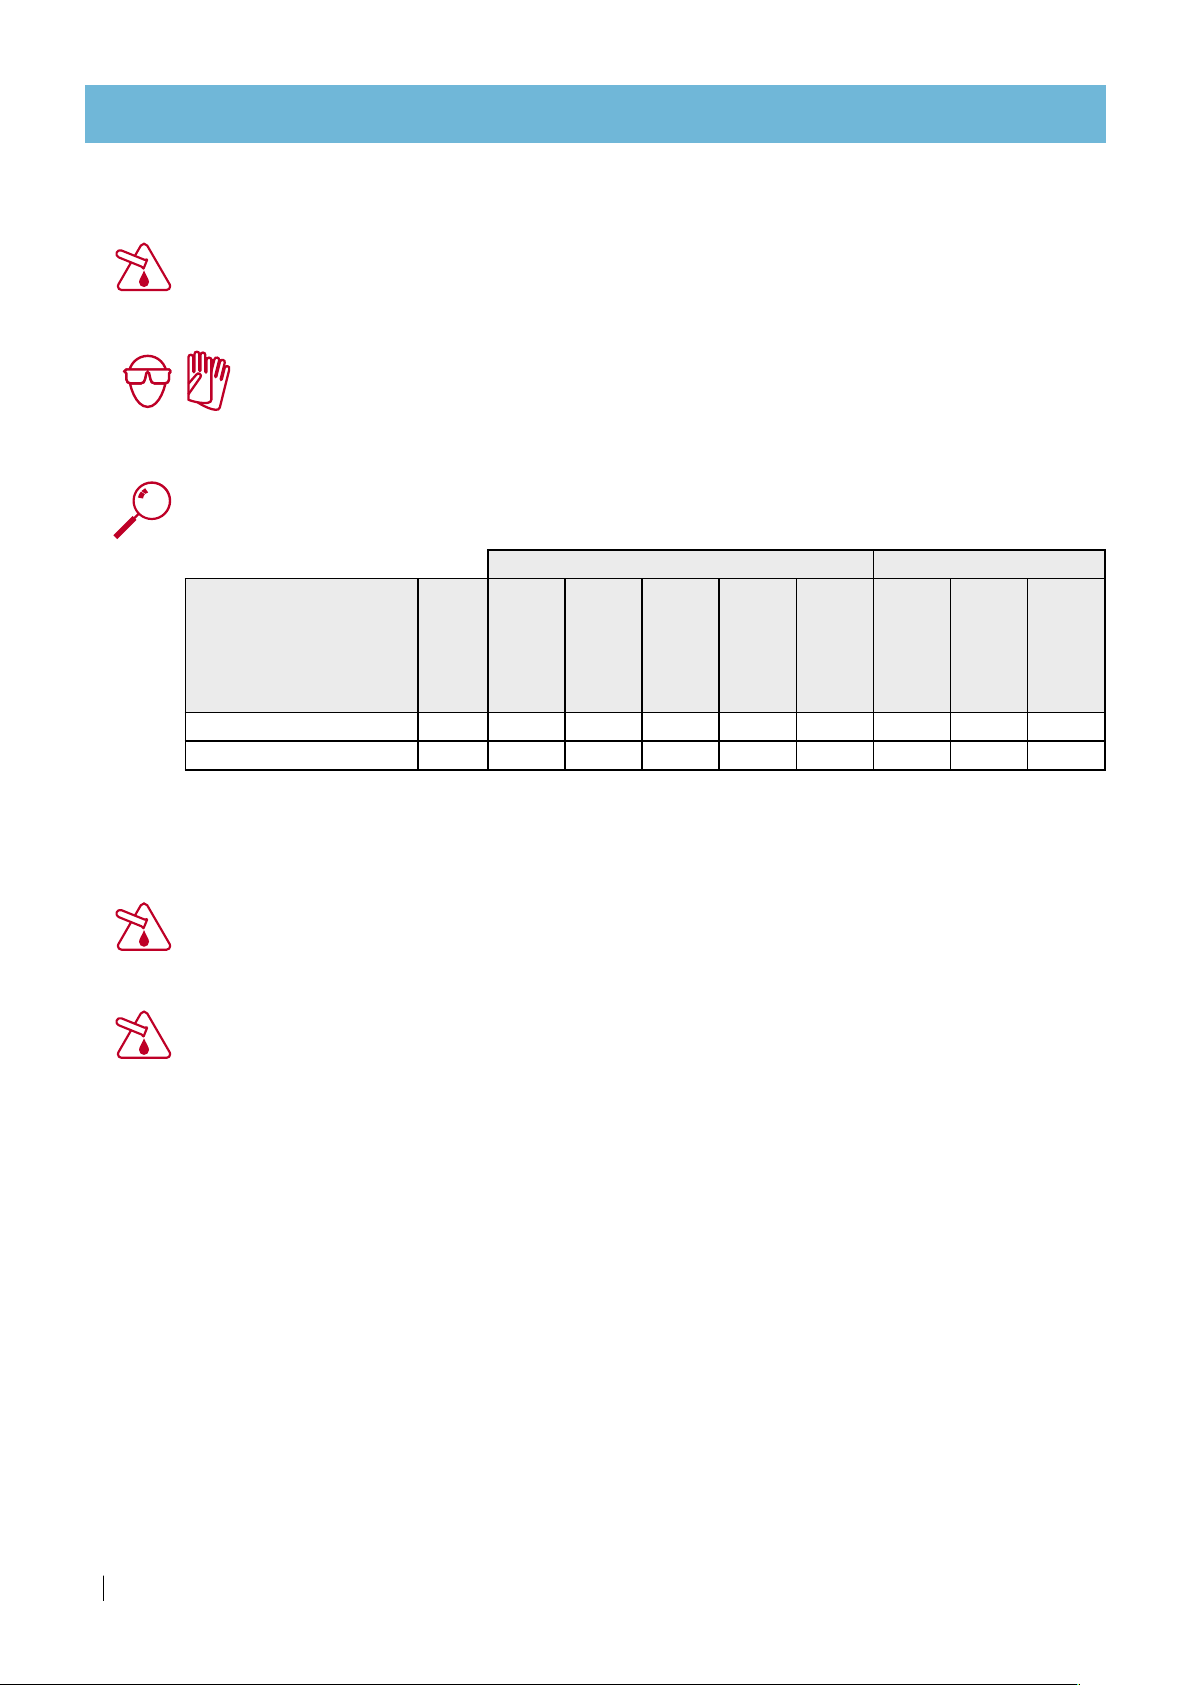
Safety instructions when using acid/chemicals
ACID HAZARD
When using acid - always observe the acid manufacturer's safety instructions.
WARNING
Always use protective equipment, gloves and goggles when handling fertilizers, acid and
other chemicals!
WARNING
Exceeding the recommended acid concentrations will damage the dosing channels.
WARNING
Substances
such as chemicals for pest/disease control might be corrosive and damage the
NetaFlex™ 3G. When using any substance
other than
fertilizers or acids not exceeding the
concentrations in the table above, always observe the manufacturer's instructions for corrosivity.
In case of any doubt, consult your local Netafim™ representative.
ATTENTION
When dosing acid, use a dosing channel fitted with the appropriate components according to
the type
and concentration of acid used*:
For pH correction
For maintenance of drippers
Type of dosing channel
Diaphragm
and O-rings
Nitric acid
(HNO3)
Phosphoric
acid
(H3PO4)
Sulfuric acid
(H2SO4)
Potassium
hydroxide
(KOH)
Acetic acid
(CH3COOH)
Hydrochloric
(HCl)
Hydrogen
peroxide
(H2O2)
Chlorine (as
(hypochloride
For diluted acid EPDM <3% <85% <30% <35% <30% <10% <30% <1%
For concentrated acid
Viton <40% <85% <90% <10% <5% <33% <50% <10%
% is by weight at 21oC (70oF)
*The table indicates the resistance of the dosing channel components to acid,
and is not a recommendation to use the acids mentioned.

NETAFLEX™ 3G INSTALLATION MANUAL 7
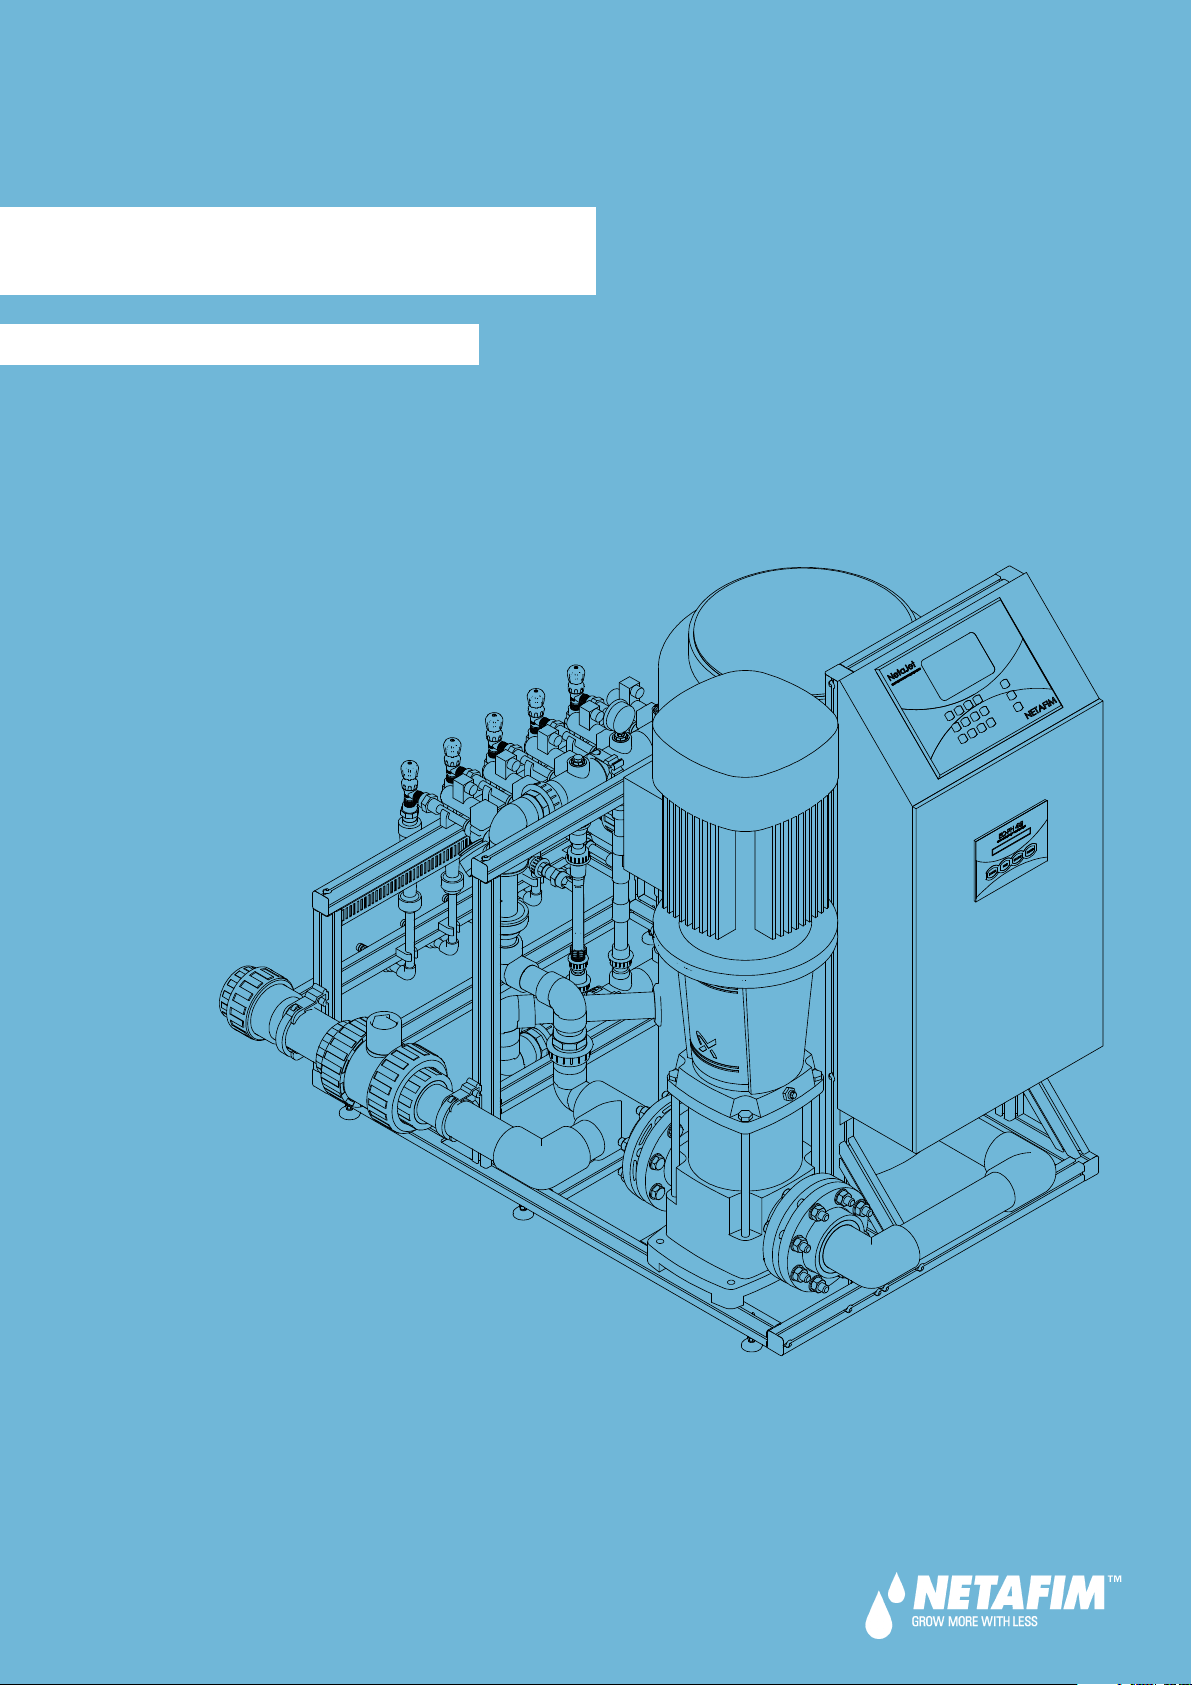
DESCRIPTION
Introduction
The NetaFlex™ 3G is a reliable open-tank dosing system.
The NetaFlex™ 3G ensures very precise and homogeneous nutrient dosing for greenhouse crops.
The NetaFlex™ 3G is a modular CE-compliant dosing system that easily integrates with multiple Netafim™
and third-party control and monitoring systems.
The NetaFlex™ 3G always injects a uniform quantity of nutrients while performing perfect EC and pH
control.
The NetaFlex™ 3G features a 200 liter open mixing tank fitted with a movable float valve enabling the
preparation of 100 or 200 liter solutions.
The NetaFlex™ 3G can accommodate a wide variety of dosing channels for fertilizer and concentrated/
diluted acid. Up to 6 dosing channels of various types, from 50 l/hr (13 GPH) each, up to 600 l/hr (158
GPH) each, in many mixed configurations.
The NetaFlex™ 3G accommodates a wide variety of system pumps, peripherals and accessories to meet a
vast range of applications and infrastructure constraints.
Highlights
•Wide range of soil/substrate applications
•Built around a standard platform
•Minimal investment requirement
•Efficient water, fertilizer and energy consumption
•Very large range of irrigation water capacities
•Quantitative or proportional Nutrigation capabilities
•Precise single or dual EC/pH monitoring and control - selectable by customer.
•Almost completely maintenance-free Venturi operations - no moving parts
•Highly accurate dosing channels equipped with quick action dosing valves
•Fast and efficient Nutrigation recipe adjustments
•Easy integration into existing irrigation systems, Netafim's NMC, and third-party controllers
•Multilingual system
•Wide range of integrated accessories and peripherals
•High-quality components and PVC
•Aluminum, corrosion-resistant frame with adjustable legs
•Made by Netafim™
Advantages
•Easy to install and maintain system
•Highly profitable price/performance ratio
•Requires minimal investment with rapid ROI
•Productive: Employing precise EC and pH control assists in delivering a high quality product with
outstanding yields (single or dual EC and pH control sets are available).
•Uniform: Delivers a consistent quantity or ratio of nutrients in a homogenous solution thanks to an open
mixing tank design.
•Flexible: Works with a wide range of dosing channel flow rates up to 6 units of 50-600 l/hr (13-158 GPH).
Each dosing channel is fitted with a multipurpose dosing valve for the dosing of fertilizer or acid,
at any dosing rate up to 600 l/hr (158 GPH). Compatible with 50/60 Hz electricity frequency.
•Scalable: System flow rates from 3 m3/h (13 GPM) to 64 m3/h (282 GPM).
Open mixing tank allows the preparation of 100 or 200 liter solutions.
•Focused: Made for soil/soilless greenhouse applications.

8 NETAFLEX™ 3G INSTALLATION MANUAL
DESCRIPTION
Specifications
Output flow rate and pressure
The NetaFlex™ 3G ensures a satisfactory mixture in a vast range of system performances.
Flow rate from 3 m3/h (13 GPM) to 64 m3/h (282 GPM) at a wide range of output pressure according to
the selected system pump.
A single NetaFlex™ 3G will accommodate from a 0.1 Ha (0.25 Acres) to a 10 Ha (25 Acres) nursery.
For output pressure lower than 3.0 bar (44 PSI) consult your local Netafim™ representative.
Fertilizer dosing capacity
The NetaFlex™ 3G accommodates up to 6 dosing channels of various types in many mixed configuration:
•50 l/hr (13 GPH)
•150 l/hr (40 GPH)
•400 l/hr (105 GPH)
•600 l/hr (158 GPH)
* For applications requiring more than 6 dosing channels - consult your local Netafim™ representative.
Basic functions
The NetaFlex™ 3G supports the following Nutrigation™ functions:
•Fully controlled dosing and mixing of fertilizers/acid with source water into a homogenous nutrient
solution.
•EC and pH correction of the nutrient solution (single or dual EC and pH control available).
Operating principle
Fertilizers and acid are injected into a tank, opened to the atmosphere; a homogeneous solution is
prepared in the tank before it is delivered to the field.
The open mixing tank method permits accelerated assimilation of fertilizers into the water. The result is a
perfectly mixed solution.
Service
The NetaFlex™ 3G utilises a modular construction making servicing a simple and prompt process.
The dealer keeps a small quantity of interchangeable components on hand, for replacement on site within
a few minutes.
Maintenance
To prevent failures and extend the life cycle of the NetaFlex™ 3G, regular maintenance must be carried out
by the user, such as periodic rinsing of filters and calibration of the EC and pH sensors.
Regular maintenance of the NetaFlex™ 3G is a prompt, low cost process requiring no special tools or skils.

NETAFLEX™ 3G INSTALLATION MANUAL 9
DESCRIPTION
Add-ons
You can extend the functionality of your NetaFlex™ 3G by means of the many add-ons offering a wide
variety of useful functions. All the add-ons are easy to connect to the NetaFlex™ 3G - here are a few
examples:
Fertilizer meter with electric output
Enables continuous reading of fertilizer dosing. Useful in applications where the costumer wants a broader
indication on fertilizer flow on top of the EC and pH readings.
Stock selection
Enables the dosing of multiple fertilizers through a single dosing channel (in cases where simultaneous
dosing is not required).
Available in a wide variety of configurations, from a single channel with 2 fertilizers to as many channels
and fertilizers as required.
For further information on the NetaFlex™ 3G add-ons, consult your local Netafim™ representative.
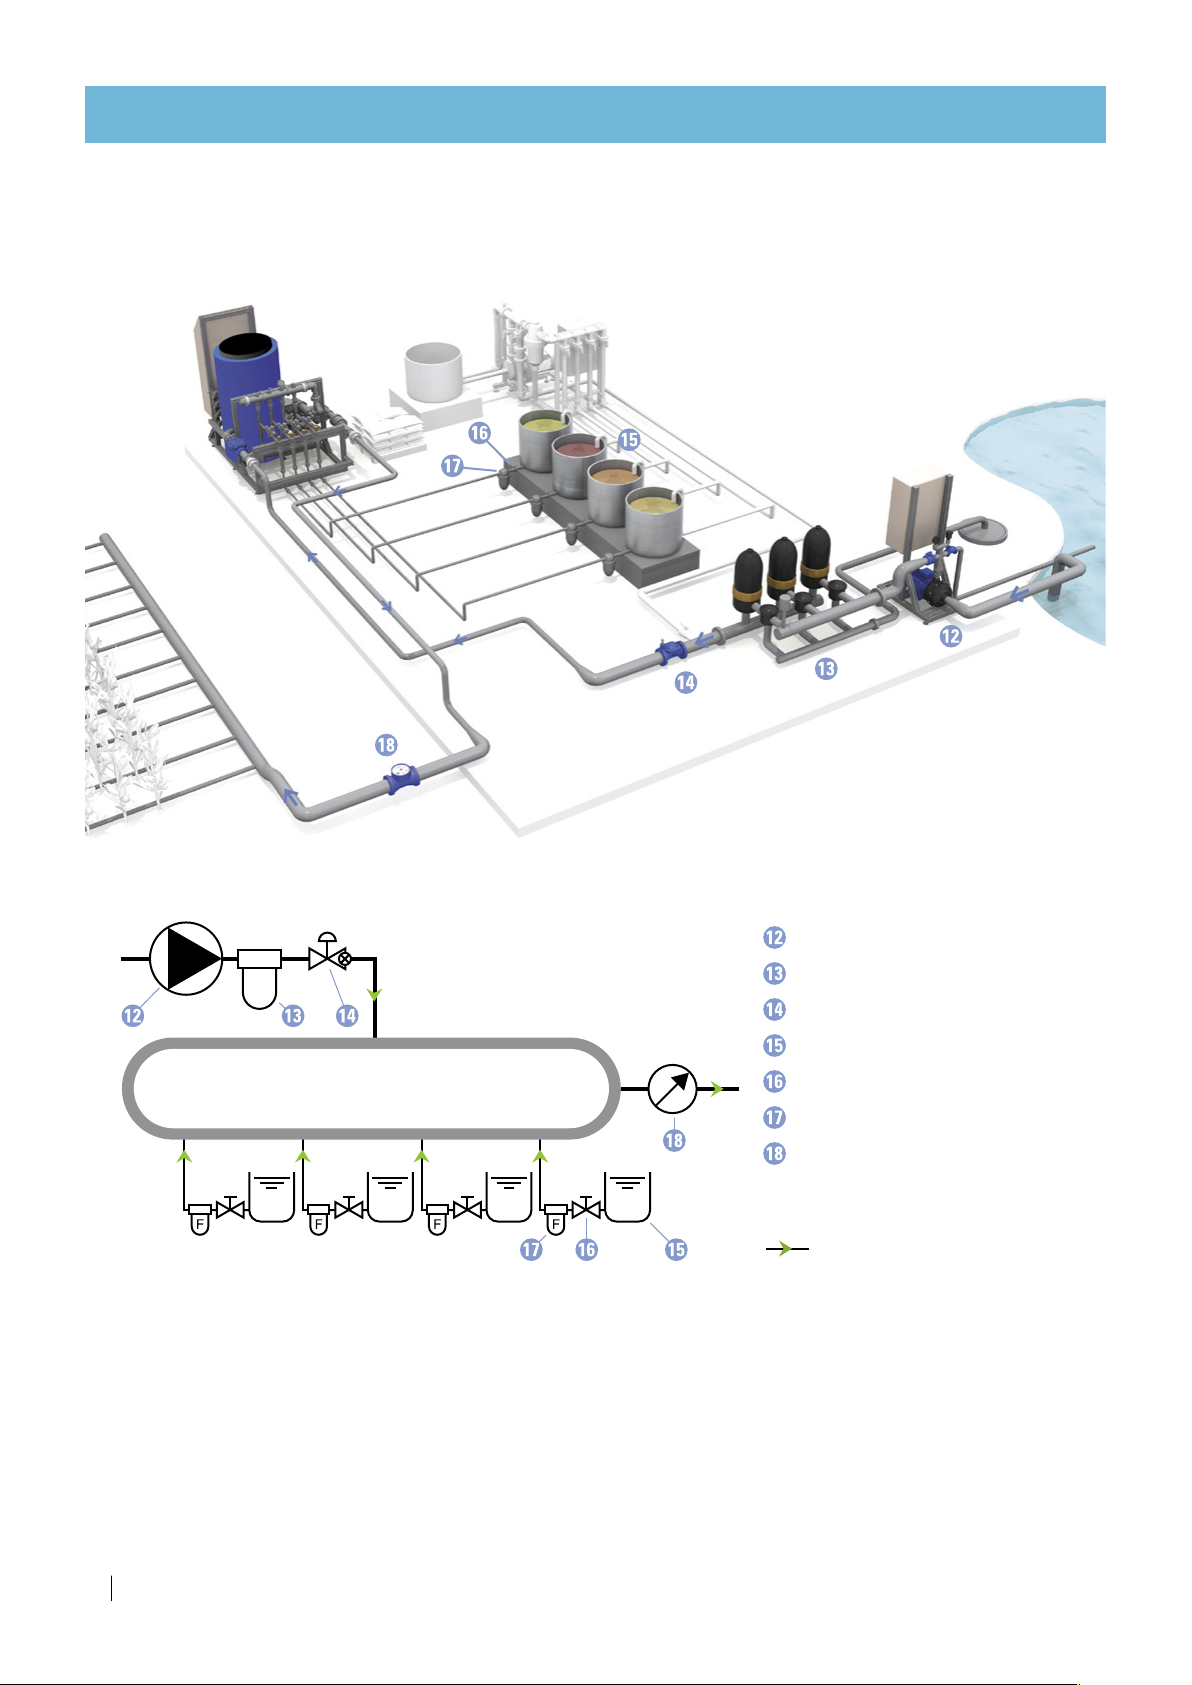
Schematic diagram
scope of delivery
direction of flow
LEGEND
System pump
Tank
Dosing channel + Venturi
Control panel, including:
Controller, EC/pH tranceducer,
electric switchboard.
EC sensors (2)
pH sensors (2)
Float valve
Pressure gauge
Upper manifold filter
Low level switch
Non-return valve
Filling pump
Filling line filter
Pressure reducing valve
Fertilizer/acid stock tank
Manual valve (fertilizer)
Fertilizer/acid filter
Water meter
10 NETAFLEX™ 3G INSTALLATION MANUAL
DESCRIPTION
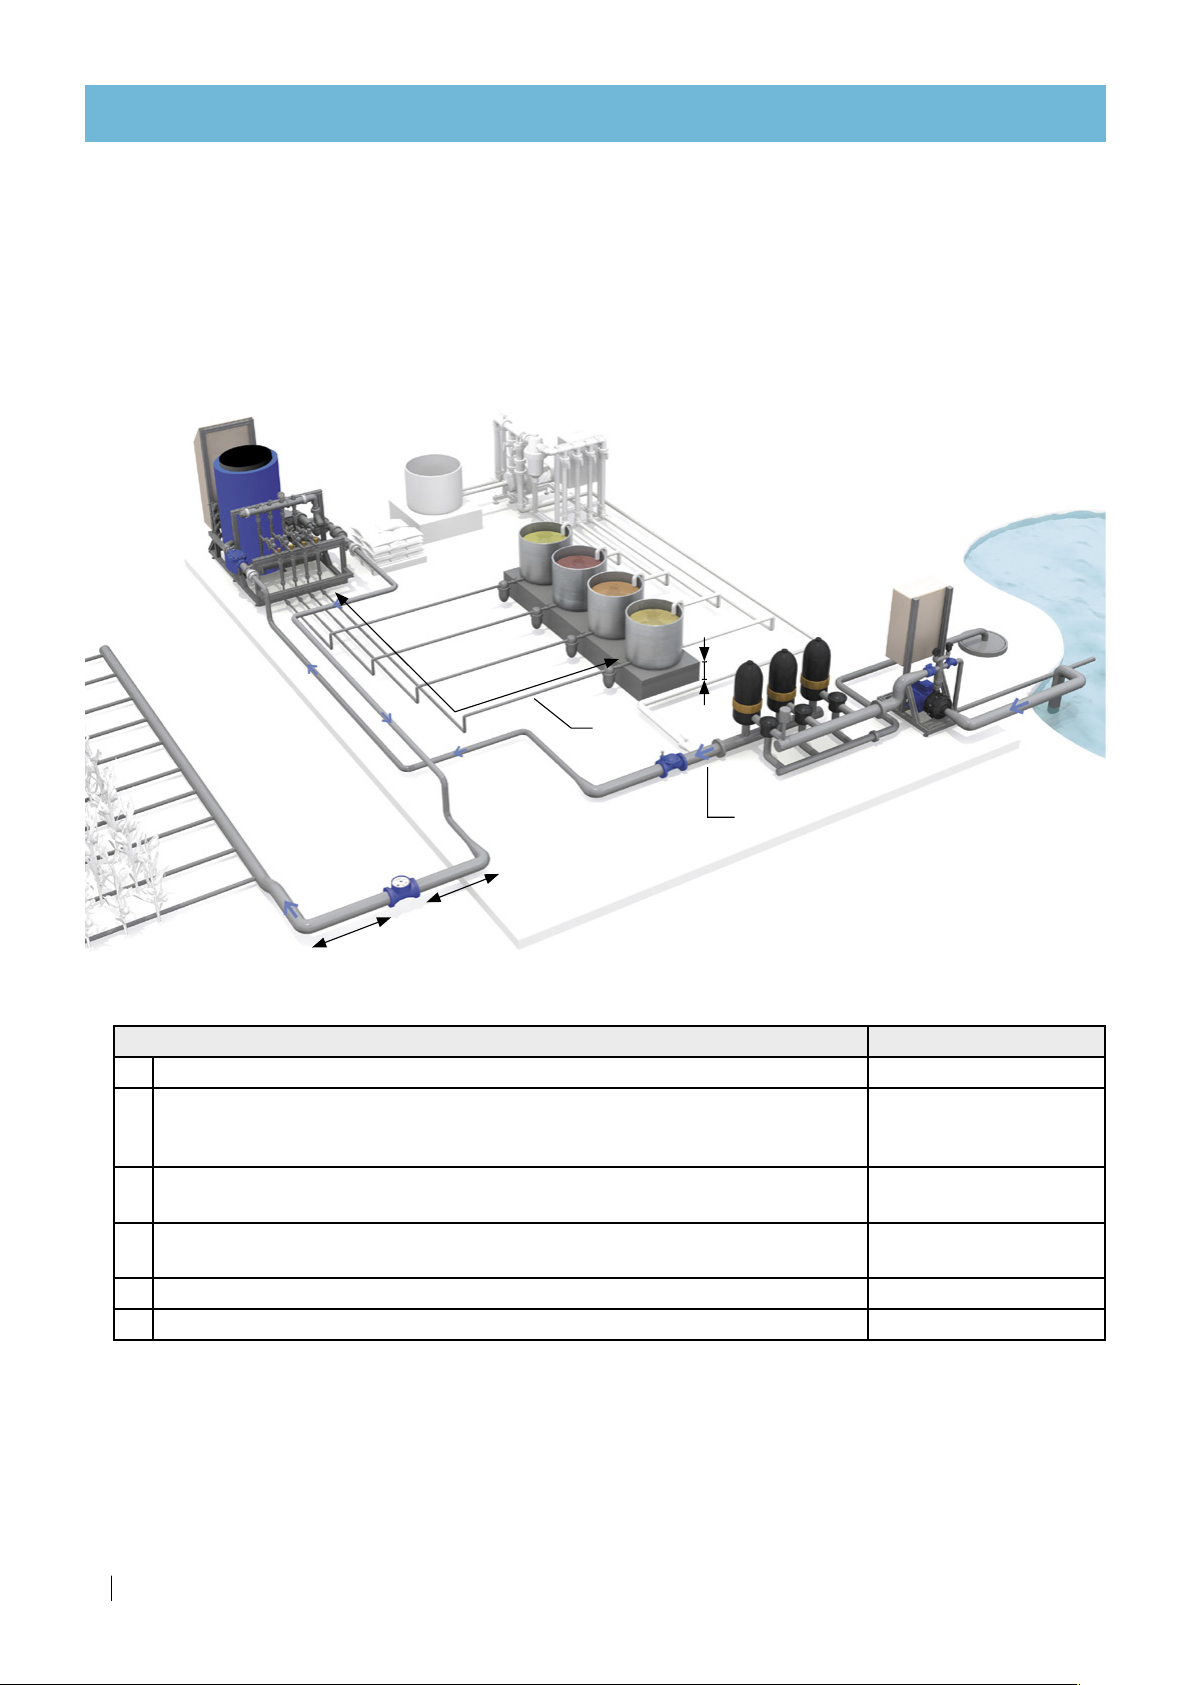
Typical installation overview
The drawing below represents a typical NetaFlex™ 3G infrastructure.
NetaFlex™ 3G
Infrastructure schematic diagram
Filling pump
Filling line filter
Pressure reducing valve
Fertilizer/acid stock tank
Manual valve (fertilizer)
Fertilizer/acid filter
Water meter
direction of flow
LEGEND
NETAFLEX
™
3G

NETAFLEX™ 3G INSTALLATION MANUAL 11
DESCRIPTION
Dimensions
H
D
W
NetaFlex™ 3G
external dimensions (W/D/H*)
Package dimensions (W/D/H**)
109/148/133.5 cm (43/58.3/52.5") 131/166/159 cm (51.5/65.5/62.5")
*The height varies by ±1 cm (±0.5") according to the adjustment of the legs.
**The package height includes the pallet height of 15 cm (6").
NOTE
Allow 20 cm (8") arround the
NetaFlex™ 3G for inlet, outlet and fertilizer pipes connections.
Weights°
The weight of the NetaFlex™ 3G varies according to the selected system pump.
50Hz
System pump Net weight° Packed weight°
CM10 -3 156 kg. (344 lbs.) 286 kg. (631 lbs.)
CM10 - 4 159 kg. (351 lbs.) 289 kg. (637 lbs.)
CM25-2 153 kg. (337 lbs.) 283 kg. (624 lbs.)
CM25-3 176 kg. (388 lbs.) 306 kg. (675 lbs.)
CR32-3-2 217 kg. (478 lbs.) 347 kg. (765 lbs.)
CR32-3 217 kg. (478 lbs.) 347 kg. (765 lbs.)
CR45-2 237 kg. (522 lbs.) 367 kg. (809 lbs.)
CR45-3-2 284 kg. (626 lbs.) 414 kg. (913 lbs.)
CR64-2-1 283 kg. (624 lbs.) 413 kg. (911 lbs.)
CR64-2 240 kg. (529 lbs.) 370 kg. (816 lbs.)
60Hz
System pump Net weight° Packed weight°
CM10 -2 158 kg. (348 lbs.) 288 kg. (635 lbs.)
CM10 -3 161 kg. (355 lbs.) 291 kg. (642 lbs.)
CM15-2 160 kg. (353 lbs.) 290 kg. (639 lbs.)
CM25-2 172 kg. (379 lbs.) 302 kg. (665 lbs.)
CR32-2-2 214 kg. (472 lbs.) 344 kg. (758 lbs.)
CR32-2 226 kg. (498 lbs.) 356 kg. (785 lbs.)
CR45-2-2 280 kg. (617 lbs.) 410 kg. (904 lbs.)
CR45-1 233 kg. (514 lbs.) 363 kg. (800 lbs.)
CR64-1 279 kg. (615 lbs.) 409 kg. (902 lbs.)
CR64-2-2 296 kg. (653 lbs.) 426 kg. (939 lbs.)
°Order of magnitude only - final weights are issued with the product order.
Extrenal
dimensions
12 NETAFLEX™ 3G INSTALLATION MANUAL
ON-SITE PREPARATIONS
D
d
X1
X2
X3
H
Description Required
proportions
D Filling line - pipe diameter
d Fertilizer/acid lines - pipe diameter:
•32 mm (1¼") for dosing channels of up to 400 l/hr (106 GPH)
•40 mm (1½") for dosing channels of over 400 l/hr (106 GPH)
X1Length of the pipe upstream from the water meter to the adjacent corner
•Pipe must be straight
10 x D
X2
Length of the pipe downstream from the water meter to the adjacent corner
•Pipe must be straight
5 x D
X3Length of fertilizers or acid lines
Max. 10 meter (33 feet)
HElevation of the fertilizer/acid tanks Min. 30 cm (12")
Infrastructure required proportions
Hydraulic infrastructure preparation
Before performing the infrastructure installation, consult Typical installation overview, page 12.
Required proportions
To enable optimal operation of the
NetaFlex™ 3G
, piping must be installed while maintaining the following
proportions.
NetaFlex™ 3G
Filling line flow rate and pressure requirements
In order to enable the NetaFlex™ 3G operation, the following requirements must be met.
•Source water should enter the NetaFlex™ 3G at a flow rate equal to the maximum flow rate required
for the field.
If the flow rate at the inlet of the NetaFlex™ 3G is insufficient, the low level switch will be activated
and the NetaFlex™ 3G operation will be stopped.

NETAFLEX™ 3G INSTALLATION MANUAL 13
ON-SITE PREPARATIONS
•The water entering the NetaFlex™ 3G should be within a pressure range of 2 to 4.5 bar
(29 PSI to 65 PSI).
NOTE
To ensure flow rate stability, the consumption of the individual irrigation shifts should be as
equal as possible. Each changeover between shifts with different consumption will result in
consumption fluctuation that will affect the EC and pH stability. The consumption of the smallest
shift should not be less than 75% of the consumption of the largest shift.
Pump house (Filter house / Fertilizer house) requirements
CAUTION
The NetaFlex™ 3G should:
•be placed in a roofed building
•not be exposed to direct sunlight
•kept at an ambient temperature between 10°C and 40°C (50°F and 104°F)
•kept at a maximum relative air humidity of 85%
•be properly ventilated
•be protected from dust
•be protected from splashes or direct spraying with water or chemicals
NOTE
In order to prevent penetration of fertilizer or acid to the soil, it is recomended that the floor of the
pump house have a slope of minimum 1% towards a gutter at its lower edge and an underground
tank at the lower end of the gutter, enabling drainage of any spill or excess.
Location of inlet, outlet and fertilizer/acid line connectors
The location of the inlet and the outlet connectors vary according to the selected system pump.
C
DDD
Inlet Outlet
fertilizer/acid lines connectors
A
B
Distance - cm (inch)
System pump A* B* C D
CM10
12.5 cm (4.9")
36.6 cm (14.4") 95.7 cm (37.7")
11.4 cm (4.5")
CM15
CM25
CR 32
15.8 cm (6.2")
97.5 cm (38.4")
CR 45
18.3 cm (7.2")
CR 64
*The height varies by ±1 cm (±0.5") according to the adjustment of the legs.
14 NETAFLEX™ 3G INSTALLATION MANUAL
ON-SITE PREPARATIONS
The water distribution system
For the setup of the water distribution system the following components should be installed:
Components of the water distribution system
Component Specifications
Filling pump Suitable for flow rate satisfying the maximum field requirement
(Ensure stable pressure).
Filling line filter ≤ 130 µm (≥ 120 mesh).
Pressure reducing valve
(PRV)
Should be installed on the filling line, downstream from the filling line filter
and be able to supply suitable pressure as specified for the NetaFlex™ 3G.
Fertilizer/acid stock tank Between 1 and 6 fertilizer/acid solution stock tanks
Manual valve (fertilizer) A manual ball valve on each fertilizer/acid line at the stock tank outlet
Fertilizer/acid filter ≤ 130 µm (≥ 120 mesh)
Water meter With electrical pulses. The pulse should be as short as possible according
to the output line diameter and the controller's limitations.
(See the Recommended flow meter pulse rate table below.)
CAUTION
EC and pH sensors must never be exposed to pressure greater than 6 bars (87 PSI).
Recommended flow meter pulse rate
Flow rate
m3/hr
Flow meter output
l/pulse
Up to 6 1
6 - 60 10
Flow rate
GPM
Flow meter output
US gal/pulse
Up to 88 1
88 - 1000 10
The fertilizer/acid tanks and lines
For the setup of the fertilizer/acid tanks and lines, the following components should be installed:
Components of the fertilizer/acid tanks and lines
Component Specifications
Fertilizer/acid stock tank Between 1 and 6 fertilizer/acid solution stock tanks
Manual valve (fertilizer) A manual ball valve on each fertilizer/acid line at the stock tank outlet
Fertilizer/acid filter ≤ 130 µm (≥ 120 mesh)
The following aspects should be taken into account:
•Ensure the stock tanks are of sufficient size for storage of at least one day's consumption .
•Sufficient space should be available between the fertilizer/acid tanks and the NetaFlex™ 3G,
to enable inspection and maintenance operations.
•Fertilizer/acid pipe diameter: 32 mm (1¼") for dosing channels of up to 400 l/hr (106 GPH)
40 mm (1½") for dosing channels of over 400 l/hr (106 GPH)
•For the connection of fertilizer supply lines to the NetaFlex™ 3G, use a transparent, chemical-resistant,
reinforced PVC water hose with an internal diameter of 16 mm that will not contract when there is
a vacuum in the system.
•Use properly sealing stainless steel band clamps for the fertilizer/acid hose connection, type SS 316.
NETAFLEX™ 3G INSTALLATION MANUAL 15
ON-SITE PREPARATIONS
CAUTION
After completion of the hydraulic infrastructure, before the installation of the NetaFlex™ 3G, rinse
the hydraulic infrastructure and fertilizer/acid lines and tanks by running water through them in
order to wash away any residues (chips, shavings, sawdust) due to the setup work.
Electrical preparation
Mains connection
CAUTION
Only qualified electricians are permitted to perform electrical installations!
ATTENTION
Make sure the electrical supply capacity is in accordance with the electrical characteristics of
the NetaFlex™ 3G.
Make sure the short-timed higher current consumption when starting up the system pump was
taken in consideration (for further details see the enclosed Pump Documentation).
The following components have to be provided in the installation:
• A readily accessible circuit breaker, rated according to the NetaFlex™ 3G's total rated power for peak
demand, certified as a branch circuit over current protector (see System Pump List, page 28),
compliant with the national code and requirements.
• Grounding connection: ≤ 10 Ω.
For the selection of the supply wire size - consider (see System Pump List, page 28):
• The NetaFlex™ 3G's total rated power.
• Whether the electricity supply is single-phase or three-phase.
Mains wire size for three-phase system*
5 wires: GND, N, L1, L2, L3
Power source required (kWatt) 3 X 200-250 VAC 3 X 400-480 VAC
Up to 1.5
≥ 2.5 mm2(≤ 13 awg)
≥ 2.5 mm2(≤ 13 awg)
1.5-2
2-3
3-4 ≥ 4 mm2(≤ 11 awg)
4-6 ≥ 6 mm2(≤ 9 awg)
6-8 ≥ 10 mm2(≤ 7 awg) ≥ 4 mm2(≤ 11 awg)
8-10 ≥ 6 mm2(≤ 9 awg)
10 -12 ≥ 16 mm2(≤ 5 awg) ≥ 10 mm2(≤ 7 awg)
12-16 ≥ 25 mm2(≤ 3 awg)
*Using a cable not longer than 25 meter (82 feet) between the power supply
and the switchboard of the NetaFlex™ 3G.
16 NETAFLEX™ 3G INSTALLATION MANUAL
INSTALLATION
Unpacking and placement
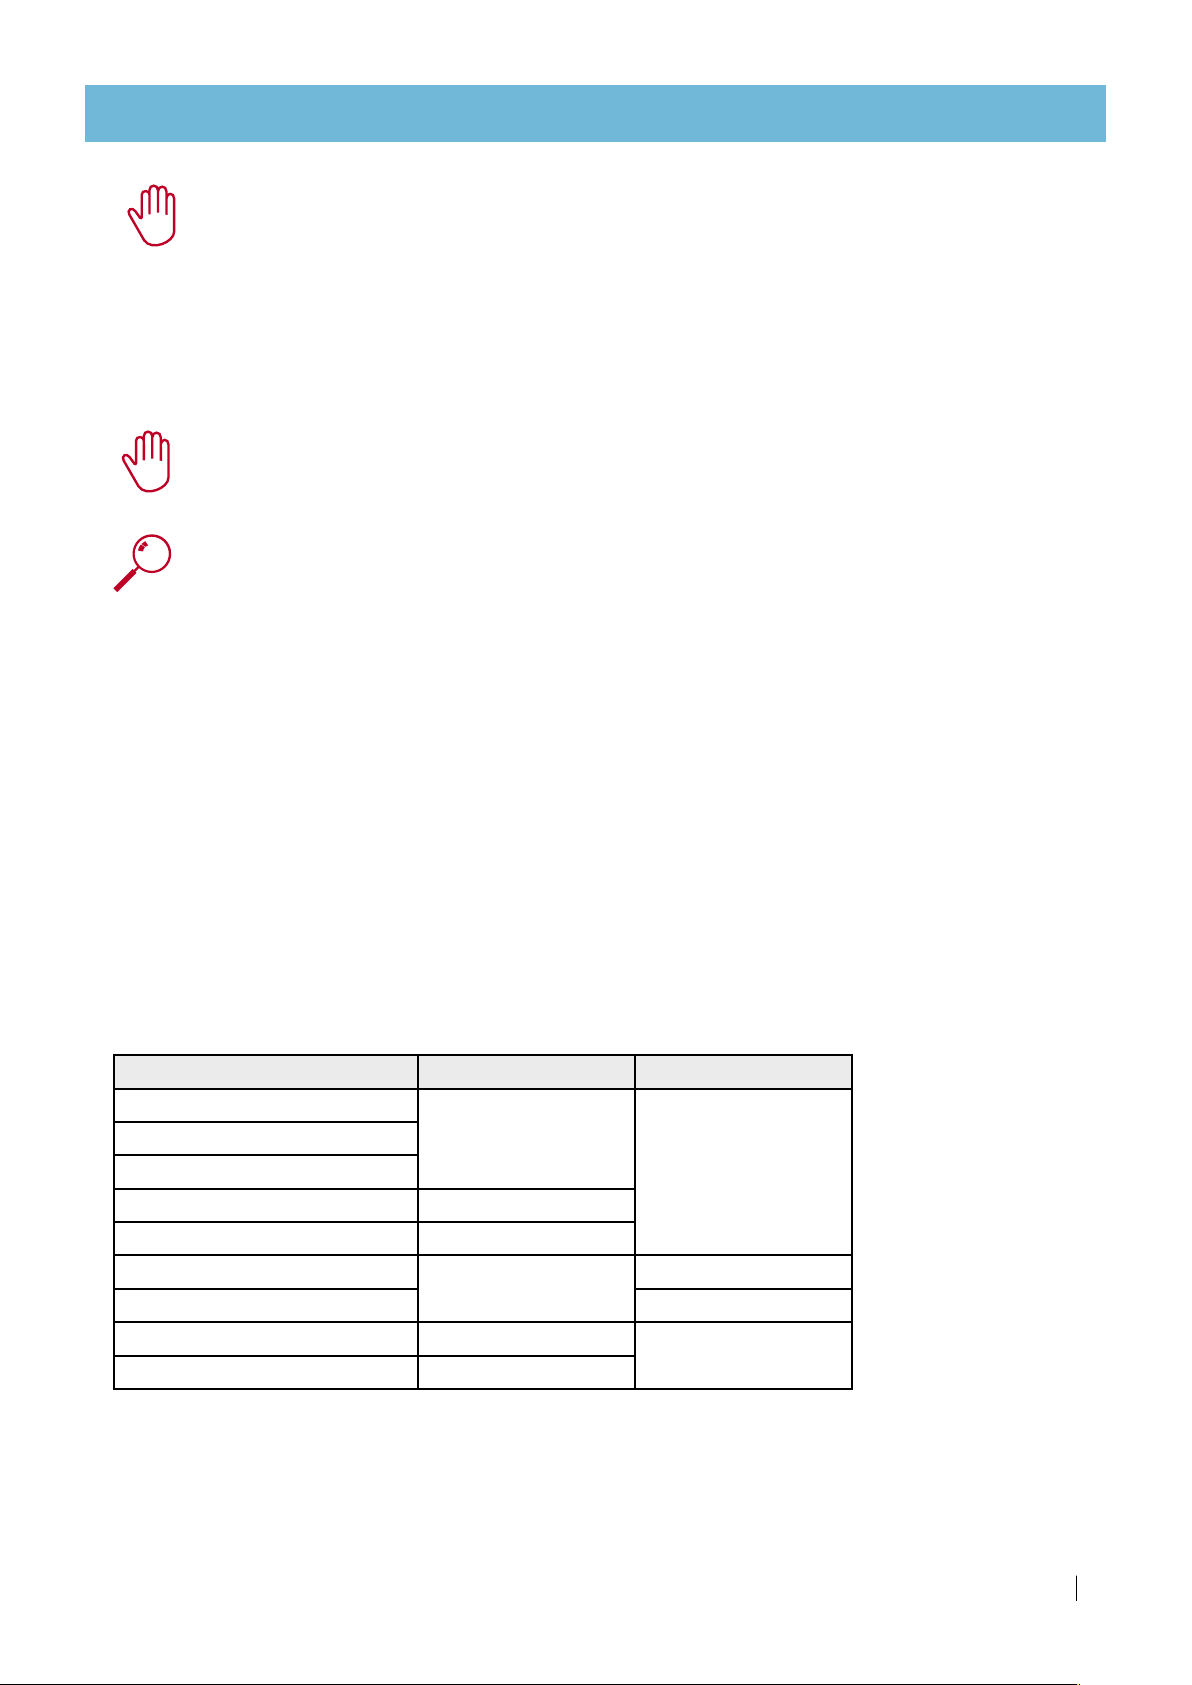
Check the ShockWatch label attached to the
packaging and ensure the indicator is white.
If the indicator is red - act according to the instruction
on the ShockWatch label.
Place the NetaFlex™ 3G package close to the irrigation
system using forklift.
Gently open the packaging.
Remove the 4 screws and bolts connecting the
NetaFlex™ 3G to the wooden pallet.
Remove plastic cover from controller (if existing).
Place the NetaFlex™ 3G in its position.
Adjust the legs so that the NetaFlex™ 3G is steady.
Hydraulic installation
WARNING
When handling fertilizers, acid and other chemicals, always use protective equipment,
gloves and goggles.
NetaFlex™ inlet/outlet connection
Connect the appropriate pipes to the inlet and the outlet of the NetaFlex™ 3G
(see Location of inlet, outlet and fertilizer/acid line connectors, page 13).
Two types of connectors are supplied
System pump CM10 CM15 CM25 CR32 CR45 CR64
PVC, adaptor union - glue connector (installed)
63 mm 75 mm 90 mm
BSP or NPT nipple - male thread connector (supplied)
2" 2.5" 3"
Float valve location
The float valve can be installed at two locations:
•Top location for 200 liter solution (as supplied)
•Bottom location for 100 liter solution
(supplied sealed with a rubber plug)
To shift the float valve location
•Remove the
rubber plug [A] from the other location.
•Disconnect the
controll tube [B] from the float valve.
•Disconnect the float valve
[C]
.
•Insert the rubber plug in its stead.
•Install the float valve at the other location.
•Connect the controll tube.
•After activation, check for leaks and fix if required.
A
B
C

NETAFLEX™ 3G INSTALLATION MANUAL 17
INSTALLATION
Stock tank connection
Connect the fertilizer lines to the NetaFlex™ 3G
(see Location of inlet, outlet and fertilizer/acid line connectors, page 13).
Three types of connection are available
Fittings (interchangeable) Diameter
PVC, hose nozzle insert connector (installed) 16 mm
PVC, nipple - male thread connector (supplied) 1/2"
PVC, half union - female thread connector (supplied) 3/4"
Prior to flexi-tube connection, thread a stainless steel
band clamp Aon each flexi-tube hose.
Heat the tip of each Flexi tube hose in boiling water
to make it flexible for insertion.
Connect flexi-tube hose from fertilizer lines to the hose-
nozzle-insert connectors of dosing channels B,
ensuring 1⁄2 meter (1.7 feet) of transparent, chemical-
resistant, reinforced PVC water hose with an internal
diameter of 16 mm that will not contract when there is
a vacuum in the system.
Attach the stainless steel band clamp on each flexi-tube
connection Cand secure tightly.
Flexi-tube specification:
•16 mm (½") reinforced EVA tubing.
•Material: EVA (ethylene vinyl acetate) tube compound
specially formulated to meet USDA requirements.
•Polyester cord reinforcement with color tracer.
•Pressure: 18 to 20 Bar (250 to 300 PSI).
•Recommended temperature range:
-23oC to +65oC (-10oF to +150oF).
TIP
You can rotate the hose connectors of the dosing
channels to face the desired direction according to
the location of the stock tanks.
Loosen the Rotameter's lower connector A, rotate
the hose connector to the desired direction Band
fasten the Rotameter's lower connector A.
B
C
A
A
B
18 NETAFLEX™ 3G INSTALLATION MANUAL
INSTALLATION
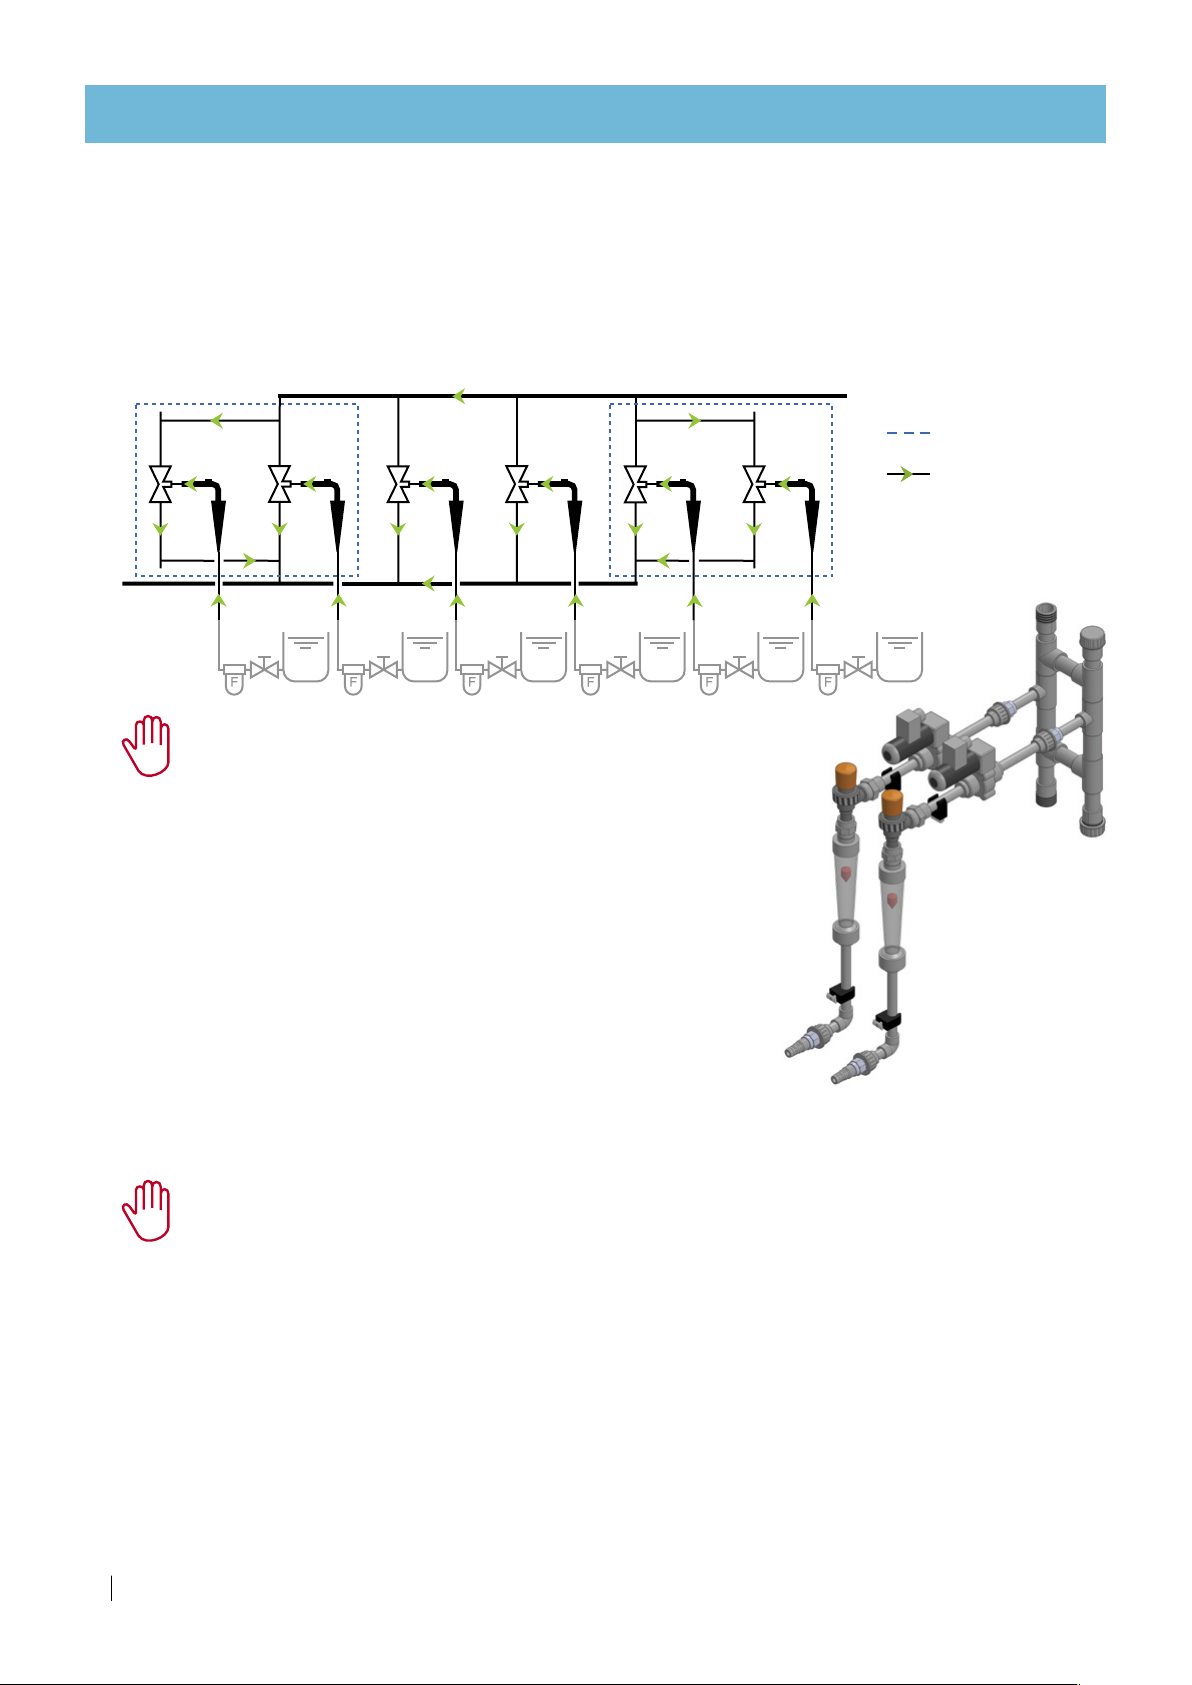
Dual dosing channel
If the NetaFlex™ has more than 4 dosing channels (up to 6), the dual dosing channel option is utilized.
•
Up to 2 dual dosing channels are installed on the
NetaFlex™ 3G
, at the farthest manifold positions
(1 and 4).
•The dual dosing channel option is applicable with 600 l/hr (158 GPH) or 50 l/hr (13 GPH)Venturis.
Dual dosing channels schematic diagram
CAUTION
There are fertilizer combinations that should never be used in
the dual dosing channel as they will induce crystalization and
cause clogging of the pipes.
•
Calcium Nitrate + Ammonium Sulfate => Calcium Sulfate
•
Calcium Nitrate + Potassium Sulfate => Calcium Sulfate
•
MKP + Calcium Nitrate => Calcium Phosphate
•
MAP + Calcium Nitrate => Calcium Phosphate
•
Phosphoric acid + Calcium Nitrate => Calcium Phosphate
In case of doubt regarding the use of any
combination of
fertilizers in the
dual dosing channel
, consult your local
Netafim™ representative.
scope of the
dual dosing channel
direction of flow
LEGEND
Electrical installation
CAUTION
Only qualified electricians are permitted to perform electrical installations!
Have a qualified electrician connect the NetaFlex™ 3G to the mains.
Follow the instructions in the enclosed Swichboard Documentation.

NETAFLEX™ 3G INSTALLATION MANUAL 19
SYSTEM OPERATION
NOTE
The following procedure describes the operations that should be performed, regardless of the type
of controller in use. For the operation of the specific controller interface, see the Controller Manual.
Preparations for running the NetaFlex™ 3G
For NetaFlex™ 3Gs with an onboard or external controller:
Run the controller and enter preliminary general settings (see the Controller Manual).
Ensure that the INPUT for protection against low level in the mixing tank is connected to the controller and
defined (see the Controller Manual).
Connect all the elements (valves, pumps, filters, sensors, etc.) to the controller (see the Controller Manual).
Manual test of controller outputs
Perform the test to make sure that all the elements (valves, pumps, filters, sensors, etc.) function properly
upon command from the controller.
Run the test using the controller's TEST menu (see the Controller Manual).
Set the relay status of the dosing channels to MANUAL
and make sure that the irrigation program is not defined
(see the Controller Manual)
.
NOTE
Make sure the dosing valve selector is in the CLOSED position.
To check that the dosing channels are working:
When the OPEN command from the controller is given -
the LED on the dosing valve is lit.
Calibration of sensors
Calibrate the EC and pH sensors (see the EC/pH Transmitter Manual).
ATTENTION
Unions tend to get loose during transit.
Before operating the NetaFlex™ 3G, tighten all the unions of the NetaFlex™ 3G by hand.
Filling the NetaFlex™ 3G with water for the first time
CAUTION
When opening or closing any manual valve, always do it gradually, to prevent damage to the
system by water hammer.
Gradualy fill the NetaFlex™ 3G with water until the float valve closes.
If the float valve does not close the tank may overflow - immediatety stop filling the tank and check the
float valve for fault)
Keep the system under static pressure for 10 minutes and visually check for leaks in the filling line.
Verify that the arm of the float remains horizontal (The water level in the tank is kept).
Perform a simulation test with a 10 liter (2 gallons) bucket of water. (see Calibration, page 22).
OPEN
CLOSE

20 NETAFLEX™ 3G INSTALLATION MANUAL
Check the system pump operation
CAUTION
Only qualified electricians are permitted to perform electrical installations and repairs!
Switch the system pump ON for a few seconds and check that it is rotating in the correct direction.
If the pump does not rotate in the correct direction - a qualified electrician should swap between
phases L1 and L3 (see the system pump Manual).
HIGH VOLTAGE ELECTRICAL HAZARD
Before unplugging the system from the main power source,
switch the unit and the main power source OFF!
Running the NetaFlex™ 3G
Define a program in the controller for one valve or multiple valves (shift) as defined by the irrigation plan
(see the Controller Manual).
In the first stage it is recommended that you define a program with quantitative or proportional fertigation
only, without EC/pH control (see the Controller Manual).
Temporarily deactivate all alarms in the system - EC/pH, flow control, etc. (see the controller manual).
Start the program and wait for the lines to be filled (this takes a few minutes, depending on the size of the
installation).
Check that the flow rate displayed on the controller's screen and the pressure at the system outlet
displayed on the pressure gauge are stabilized (see the Controller Manual).
Make sure flow rate and pressure are in range according to the performance curve of the relevant system
pump (see Sales Documentation, page 10).
If the system cannot reach the required flow rate and pressure, it is possible that there is
an air pocket in the system pump's impeller chamber:
Loosen the system pump's bleeding screw and wait until a stable flow, free of air bubbles,
is obtained, then retighten the bleeding screw (see the System Pump Manual).
Check the suction of the dosing channels from the stock tanks, and tune the desired flow
rate for each dosing channel by adjusting the needle valve (see Calibration of the dosing
unit while irrigating, page 24).
Let the system run for about ten minutes and see that it works properly.
check for leaks in the NetaFlex™ 3G and the infrastructure.
After tuning the flow rate for each dosing channel, adjust the cursors on each Rotameter.
NOTE
The Rotameter's scale is calibrated by the manufacturer for measurement of the
flow rate of water (H2O). Certain inacuracies may be observed when the flow rate
of liquids with different densities, such as fertilizers and acids, is measured.
SYSTEM OPERATION
Other manuals for NETAFLEX 3G
1
Table of contents
Other Netafim Industrial Equipment manuals


Popular Industrial Equipment manuals by other brands


Thermopatch
Thermopatch NL-15 R/SQR MAMMOTH user manual

schmersal
schmersal AZM300Z-ST-1P2P-N-DU instructions

Crane
Crane Depa 401800-45 Assembly instructions

MARBURG INDUSTRIES
MARBURG INDUSTRIES M500 owner's manual

Ingersoll-Rand
Ingersoll-Rand ARO SHOCK BLOCKER SB10 Series Operator's manual

Tsubaki
Tsubaki PB Series manual


