Network Devices ND-70M-HDBT-HVD User manual

Multi format HDBT switcher
User Manual

Introduction
The ND-70M-HDBT-HVD is multi-format switcher with HDMI, VGA and Display Port inputs to
HDBT output. The audio port is independent and could be embedded into any of the video signal
and send it to the far end. The product support web server and it could be controlled by the
button, lan, Rs232, contact closure, IR and Rs232 can pass through.
Package Contents
1×ND-70M-HDBT-HVD
1×24V 1A DC power adapter
1×User manual
2×Wall mounting bracket
Features:
◆ Transmit Audio/Video/Control up to 70m over one Cat 6/Cat 6A/Cat 7 cable;
◆ Support VGA with WUXGA resolution;
◆ Support HDMI 4K x 2K and 3D;
◆ Support DP1.2 with 4K@30Hz;
◆ Support Auto/Manual switching;
◆ Support EDID management;
◆ Support field FW upgrade;
◆ Support Web Server for management, monitor and configuration;
◆ HDCP 1.4 Compliant;
◆ IR and RS-232 pass through;
◆ LAN for local control and Web Server access;
◆ Control switching through Button/RS232/ Contact Closure or Web Server;
◆ Independent audio input;
◆ Remotely or Locally Powered;
◆ Status LED for all connections on front.

Panel Description
Front Panel
1. PWR: Solid red when power on;
2. HDMI: Led solid when with HDCP, flashing when without HDCP;
3. Link: flashing when HDBT connected without video signal, solid when video presented;
4. D:LED solid when DP selected, flashing when signal presented, off mean no input signal;
5. H:LEDsolid when HDMI selected, flashing when signal presented, off mean no input signal;
6. V:LED solidwhen VGA selected, flashing when signal presented, off mean no input signal;
7. IR Tx:IR emitter port;
8. IR Rx: IR sensor port;
9. SELECT: Button for switching input signal. If hold for 3-5 second, it will execute the preset
rs232 command listed in the “Button”. If hold for 20second or more, it will reset the product
to the factory default setting.
Rear Panel
1. Power:24V DC Power;
2. HDBT Out:HDBT output
3. DP: Display Port input;
4. HDMI:HDMI input;
5. VGA:VGA input;
6. AUD:Independent audio input;
7. LAN:Lan for local control or web serve access;
8. Phoenix Port: RS232 and Contact Closure with LED indicator.
1
2
5
4
3
6
8
7

Connection and Installation
Specification
Video
HDMI Compliance HDMI 1.4, 3D, 4K
VGA Compliance VESA
DP Compliance DP 1.2
HDCP Compliant HDCP 1.4
Distance Up to 70m
Max Resolution Up to 4K x 2K@30Hz
Control
Control RS232,IP,IR, Contact Closure
Mechanical
Dimensions 190 x103 x 29 mm (L/W/H)
Gross Weight 880g
Power
Power Supply 24V 1A DC
Power Consumption 12W
Environmental
Operation Temperature 14~131°F [-10~55°C]
Relative Humidity 5~95% RH [no condensation]
Web Server
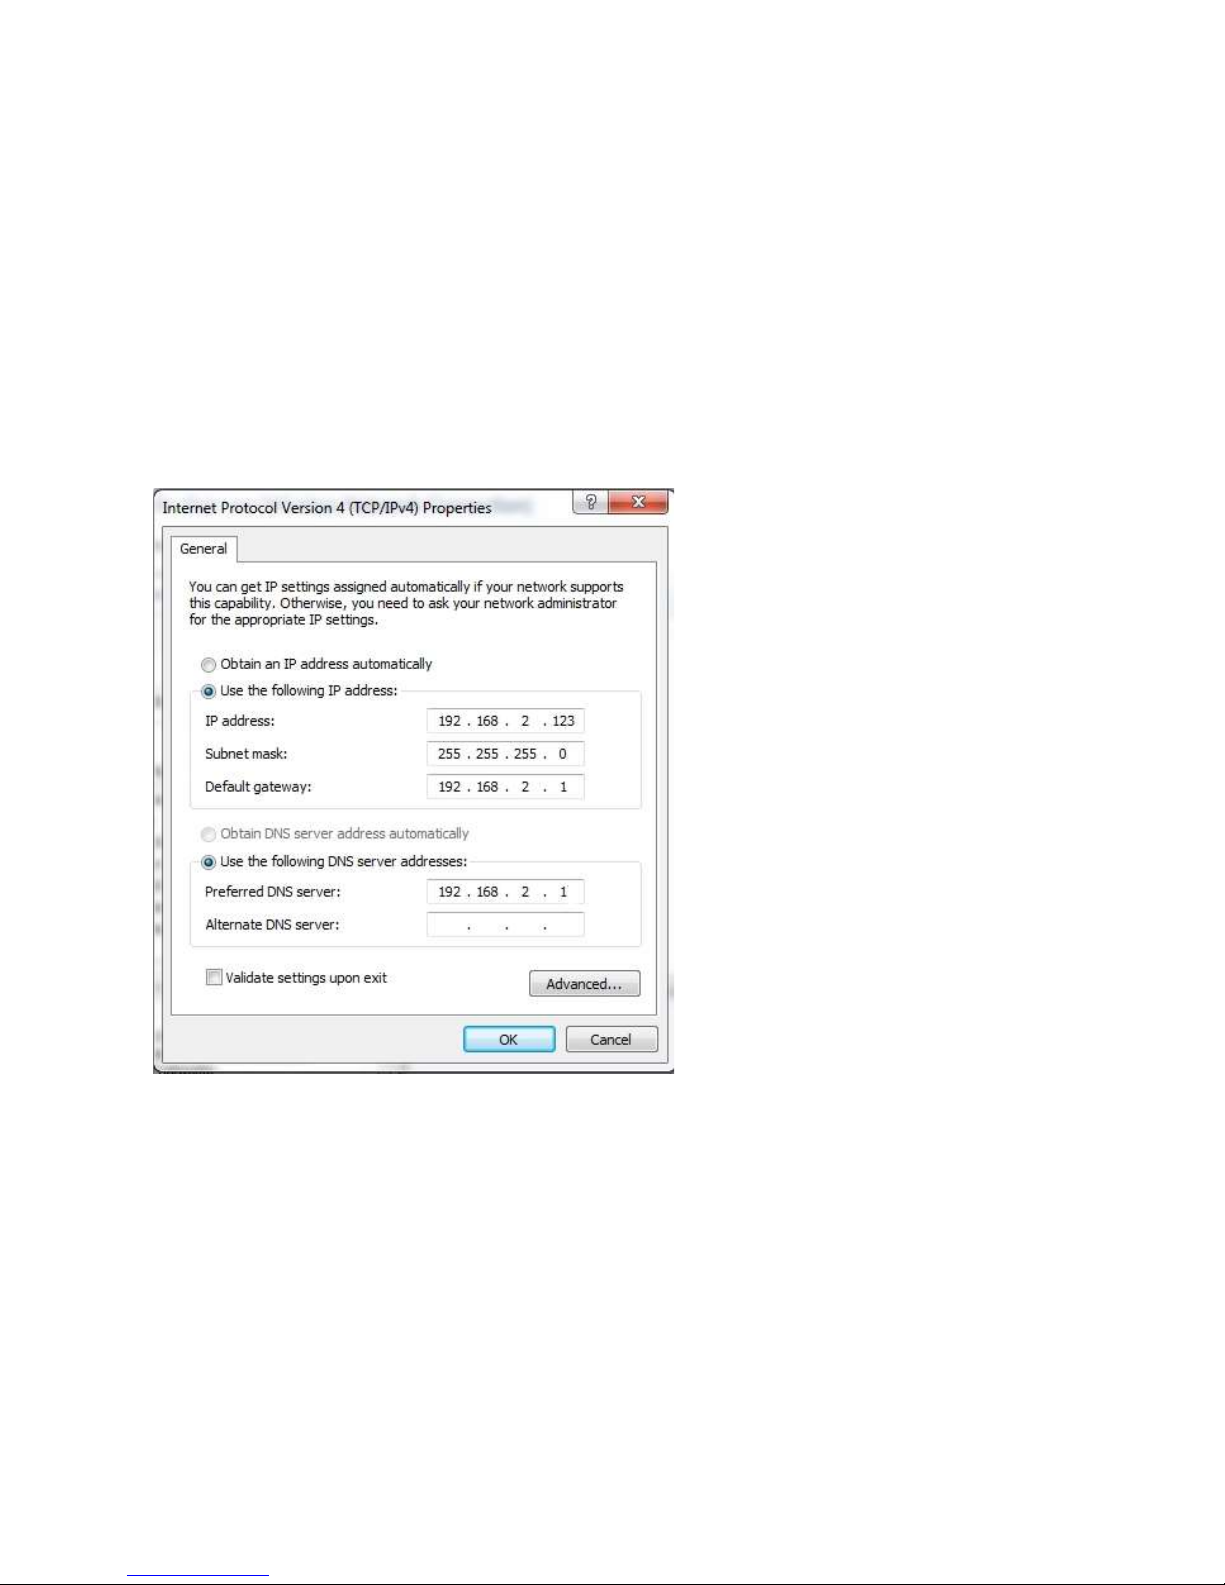
The factory default IP : 192.168.2.175
To access to the product web server, user could direct connect the PC LAN port to the MVE-HPVlan
port with a straight RJ45 cable. After making the connection, go to network connection of the PC and
revised the IP property to static IP as below. Once done, open a web brower and enter the
192.168.2.175 to access to the web server.
For the ND-70M-HDBT-HVD connected to the local area network, please update the ND-70M-HDBT-
HVD product IP to match the lan network setting from the web server.
For example if the lan IP is set as 192.168.88.xxx, then please revise the product to 192.168.88.1xx.
Once the IP is set, then you could access to the device from any PC in the same network.
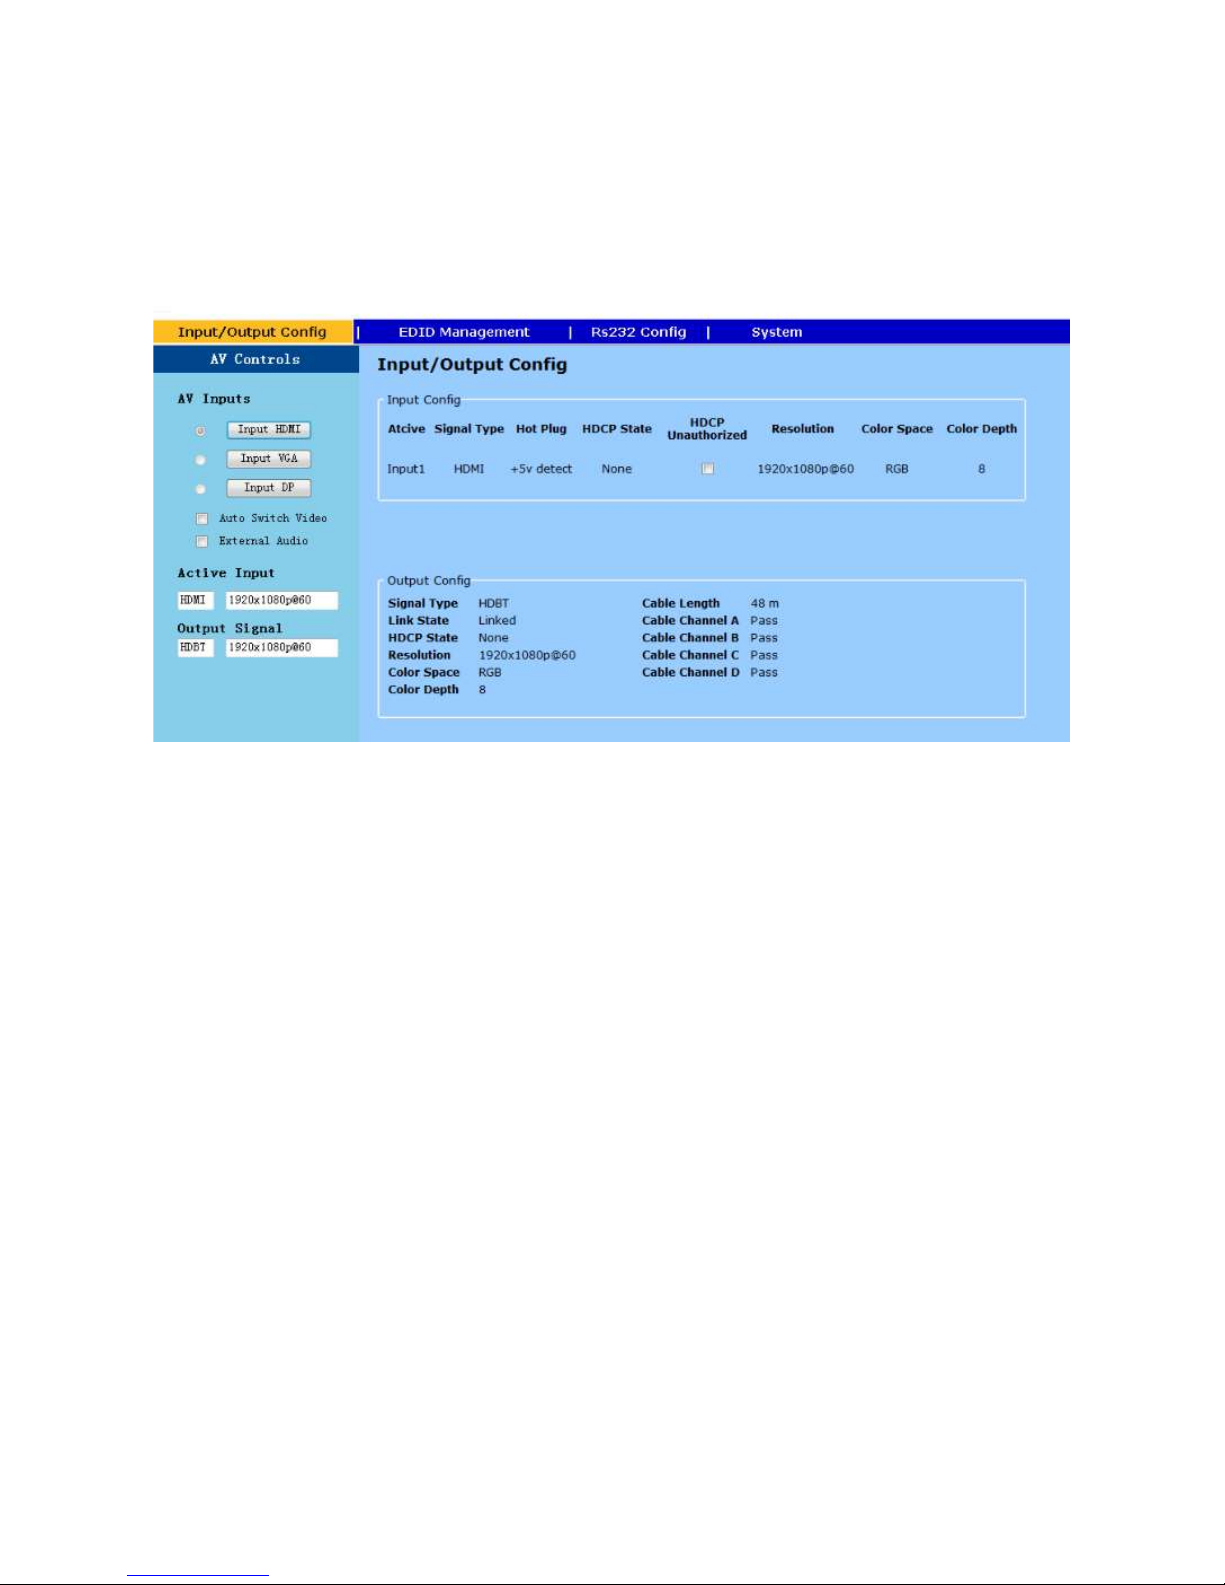
Input/Output Config
The page provided the switching and also the connection input signal information and hdbt output
connection status.
AV Inputs – Select to switch the input
Auto Switch Video – If check, the device is set in auto switching mode else in manual mode
External Audio – If check, the 3.5mm audio input is embedded to the input video.
Input config – Input port information
Output Config – HDBT connection status
Active Input – Showing the Input signal format and resolution
Active Output – Showing output signal format and resolution
HDCP Unauthorized- When check, MVP-HPV will request none HDCP compliant source.

EDID Management
The page provided switching and EDID management. this page.
Follow Output – EDID from Display
Network Devices – Internal Preload EDID

Rs232 Config
Rs232 –Local Rs232 setting to control the MVE-HPV
HDBT Rs232 – Set the far end Rs232 baud rate.
Rs232 Preset
Command1 – When detect active signal, send the Rs232 command in the preset timing
Command2 – When no active signal present, send the command in the preset timing
Button – Press and hold the button for 3-5 second, send the preset command
To set the preset RS232, please click the program button to program the code to the unit.

System
System and fw info. User could modify the IP setting on the page. Please remember to click on Apply
for the changes.

RS232 Command Table
Rs232 Setting Protocol Command Example Query Command
Ex Note:
Baud Rate >MBaud:115200<0D 0A> #MBaud<0D 0A> Support 9600, 19200, 38400, 115200
(default)
Data Bits >MDBits:8<0D 0A> #MDBits<0D 0A> Support 8 & 9
Stop Bits >MSBits:1<0D 0A> #MSBits<0D 0A> Support 1 & 2
Parity Bits >Mparity:None<0D 0A> #MParity<0D 0A> Support 0DD, Even, None
Network Setting
DHCP >DHCP:ON<0D 0A> #DHCP<0D 0A>
IP >IP:192.168.2.175<0D 0A> #IP<0D 0A>
Net Mask >Mask:255.255.255.0<0D
0A> #Mask<0D 0A>
Gateway >Gate:192.168.2.175<0D
0A> #Gate<OD OA>
TCP Protocol >Tcp Protocol : Server<0D
0A>
#Tcp Protocol<0D
0A>
TCP Port >Tcp Port:1001<0D 0A> #Tcp Port<0D 0A>
TCP Host IP >HsIP:192.168.2.200<0D 0A> #HsIP<0D 0A>
Video Switching
Siwtching >C2to1<0D 0A> #C 1:DP 2:HDMI 3:VGA
Output Port >V0<0D 0A> 1:Output On 0:Output Mute
Query
Resolution #R
Switching Mode >M0 1:Auto 0:Manual
Audio Setting 0: Mute 1: Vol Up 2:Vol Down
Audio >A1 0:Internal Audio 1:External Audio
Pass through
command
(Rs232 to Lan or
vice versa)
>RS1TX05Hello<0D 0A> Command pass through (control port) :
1:Rs232 2:Lan
Ex : passing command
through Rs232 port for 5
character "Hello"
Note: The default baud rate 115200.
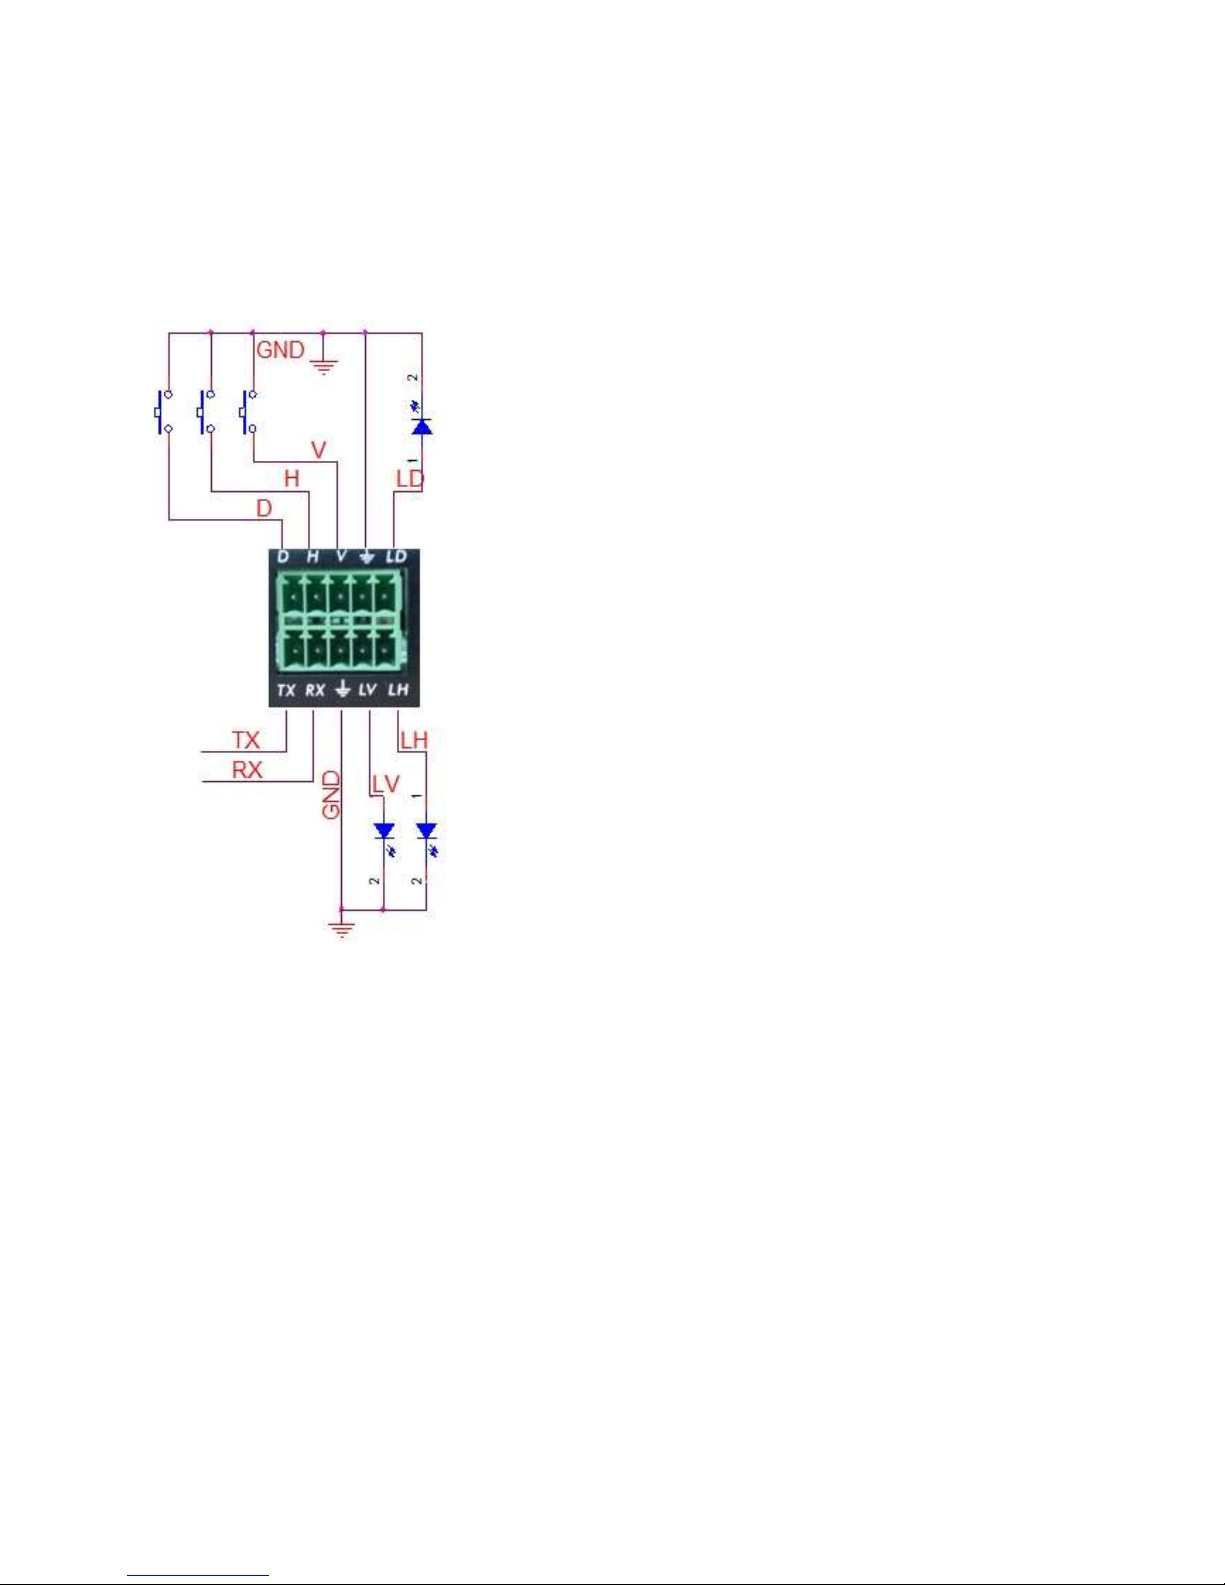
Phoenix contact connection diagram
Note:
V : VGA Input LV: LED indicator for VGA
D: DP Input LD: LED indicator for DP
H: HDMI Input LH: LED indicator for HDMI
TX: Rs232 Tx
RX: Rs232 Rx
GND: Ground

Safety Information
To reduce the risk of electric shock, do not expose this product to rain or moisture
Do not modify the wall plug. Doing so will void the warranty and safety features
If the wall plug does not fit into your local power socket, hire and electrician to replace
your obsolete socket.
This equipment should be install near the socket outlet and the device should be easily
accessible in the case it requires disconnection
Warranty
Warranty time is two year and from the date of original shipment.
This warranty shall be void if a serial number has been removed from the product.
Upon determination of a legitimate defect covered by this warranty and at Network Devices sole
discretion, user should bear the transport cost during the warranty.
If product is out of warranty then repair charge is required. Minimum repair charge: 10% of the
retail price plus the cost of failed components. We will repair the failed product after repair cost
has been approved by customers and proper financial arrangements are made. Customer must
cover round trip shipment expenses.
Return and RMA Policies
Shipments will not be receiver and processed for warranty repair/replacement without an
Network Devices RMA(Return Materials Authorization).
Table of contents
Popular Switch manuals by other brands


Belkin
Belkin OmniView Secure KVM Switch Specifications

3Com
3Com 2924-PWR user guide

Moxa Technologies
Moxa Technologies PowerTrans PT-7728-PTP Hardware installation guide

Datacom Systems
Datacom Systems DURAstream DS-1010 user guide

Huawei
Huawei S1700 Series Web user manual

ZyXEL Communications
ZyXEL Communications Dimension ES-3024 Specifications