Neunaber Illumine User manual

ILLUMINE REVERB
USER GUIDE
v. 1.0.1

Key Features 1
Quick Start 1
Connectors 2
User Interface 6
Knobs 6
Footswitches 9
Presets & Editing 11
Changed Preset Flag 11
Save Menu 12
Edit the Preset Name 13
Factory Presets 14
Eect 16
Parameters 23
Footswitch Recalls/Skips Preset 26
Setup Menus 26
Expression Control Engine 27
Expression Controller Inputs 27
Expression Controller Setup 30
A/B | Exp Setup 30
Adding Parameters to Expression Control 31
Selecting the Midpoint 32
AB and AB Time 32
MIDI 33
Global Setup 36
Exp Source 36
Cal Pedal Screens 36
MIDI Setup 38
Bypass Type & Trails 38
Eect Loop Type 40
Right Footswitch 41
Preset Switching 42
Mix Sum Type 43
Gain Structure 44
FX Sidechain In 45
Noise Reduction 46
User Interface Options 46
Preset Manager Software 48
Troubleshooting Guide 51
Specifications 53
Legal 54

1
KEY FEATURES
• 17 stereo reverb eects
• 50 user presets
• MIDI input and thru/out with simple controller
• Powerful and flexible expression control engine
• Analog dry signal path
• Pedalboard-friendly design with rear connectors and low
power usage
QUICK START
MENU /
SELECT
CHANGE
PARAMETER /
SAVE PRESET
ENGAGE EFFECT
PRESET RECALL /
HOLD FOR A/B

2
OR
MONO MONOTRS STEREO 9-12V
IN OUT/THRU
TRS ST/
OUTPUT
L LR R
EXP
MIDI
INPUT
OR
CONNECTORS
POWER
Power is supplied with a standard pedal power supply:
• 9 V to 12 V regulated DC
• 100 mA or greater
• center-negative (tip-negative) barrel connector,
5.5 mm OD x 2.1 mm ID
Grounding
The screw next to the power connector connects to chassis ground. In
cases where the entire rig “floats” (does not connect to earth ground
through an amp, audio interface or mixer), this screw may be used to
connect a ground wire. Make sure this screw is securely fastened, and do
not use ILLUMINE with this screw removed or loose.
GROUND
SCREW
POWER
Do not use a power supply greater than 12 V DC.
Use only a linear regulated power supply.

3
OR
MONO MONOTRS STEREO 9-12V
IN OUT/THRU
TRS ST/
OUTPUT
L LR R
EXP
MIDI
INPUT
OR
SIGNAL INPUT / OUTPUT
When used as a headphone output,
volume must be controlled externally
(preamp output level, instrument
volume control, etc.).
MONO
STEREO TS
STEREO TRS
A mono input can be connected with a stereo output, or a stereo input can
be connected with a mono output, in which case the two channels will
be summed.
EXPRESSION INPUT / OUTPUT
A 3.5 mm (⅛”) TRS Expression input may be used to connect an
expression pedal or volume pedal with the appropriate cable. Only TRS
connections (not TS) are supported.

4
A 3.5 mm-to-¼” adapter is required to connect a standard
expression pedal.
To connect a volume pedal, use a 3.5 mm to dual ¼” TS (stereo breakout)
cable, such as a Hosa CMP-153. Connect as follows:
The volume pedal must be passive (unpowered).
The EXP input may be driven with a 0 V - 3.3 V control voltage (CV). Use
only a TRS connector, and leave the ring contact unconnected.
CV: 0 V 3.3 VX
IN OUT
RIGHT/RING
LEFT/TIP
EXP
EXP

5
MIDI
MIDI connects using two 2.5 mm TRS jacks. Adapter cables are required
for connecting 5-pin circular DIN plugs. These connectors are wired
according to MIDI’s recommendation (Type A) as follows:
The MIDI INPUT is isolated and may be used in a daisy-chain connection.
The MIDI OUTPUT may be configured as either a hardware THRU or
an OUTPUT:
• When configured as THRU, the MIDI INPUT is echoed to THRU with
no latency.
• When configured as OUTPUT, the MIDI INPUT is not echoed. In this
case, ILLUMINE functions as a simple controller and sends program
change and control change messages.
For detailed information, see the MIDI section of this User Guide.
TIP
RING
SLEEVE
X
TIP RING
SLEEVE
X
3
54
1
2
2.5 mm TRS 5-PIN DIN

6
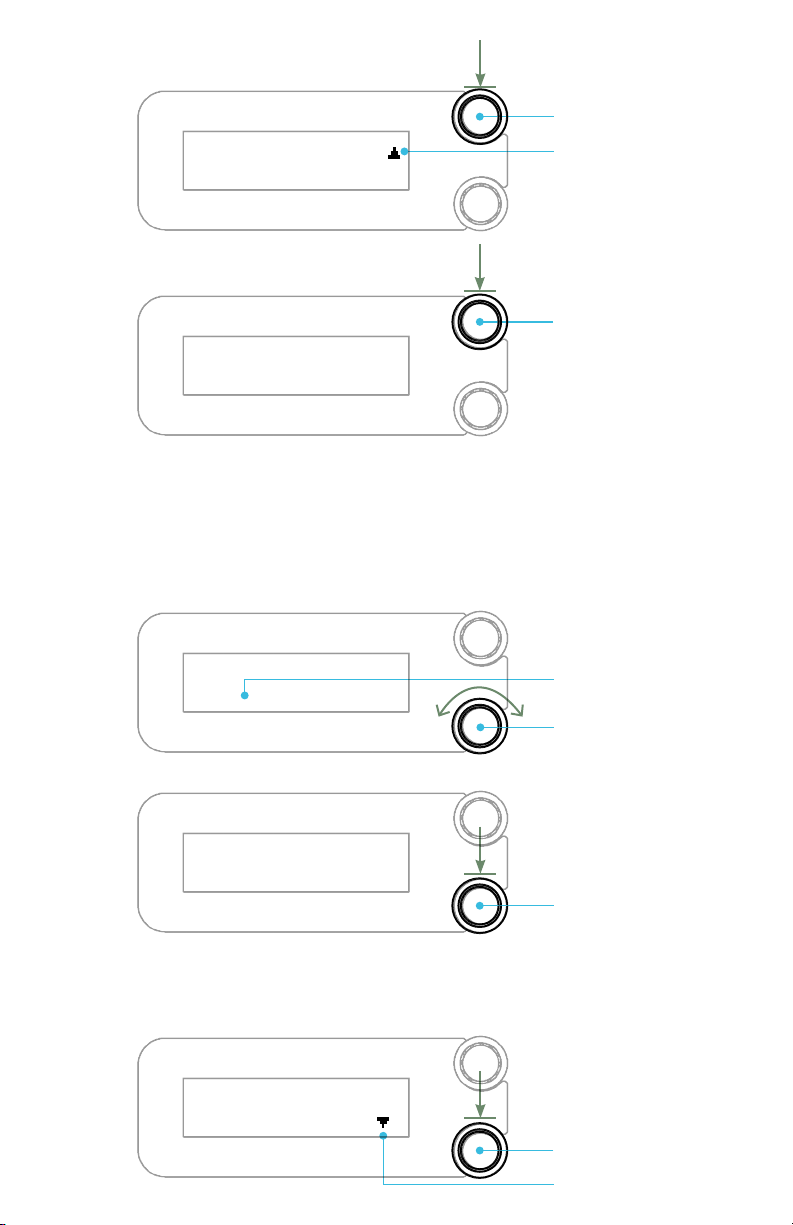
USER INTERFACE
KNOBS
In general terms, the top knob navigates through the menu, and the
bottom knob changes the currently displayed item.
Top Knob
Turning the top knob moves through the current menu. If a sub-menu is
available, ▼ is displayed on the right of the top line. Pressing the knob
enters this sub-menu.
If ▲ is displayed, pressing the top knob returns to the top-level menu.
When the arrow is not displayed, pressing the top knob will jump to the
PRESET screen.
Key:
SCREEN NAME
Selection NameSelection Name
ENTER
SUBMENU
MOVES
THROUGH
MENU
EffectEffect
WetWet PlPluginugin
EffectEffect
WetWet PlPluginugin
7
Bottom Knob
Turning the bottom knob changes the displayed parameter or item. In the
top-level menu, pressing the bottom knob enters the Save Preset menu.
When ▼ is displayed on the right of the bottom line, pressing the bottom
knob will invoke the currently displayed selection.
CHANGE
PARAMETER /
ITEM
RETURN TO
TOP LEVEL
MENU
JUMP TO
PRESET
SCREEN
CHOOSE
SELECTION
ENTER SAVE
PRESET MENU
EndEnd OptionsOptions
MMixix
50 %50 %
MMixix
50 %50 %
MMixix
50 %50 %
Save Preset?Save Preset?
YYeses
8
S
S
E
E
L
L
E
E
C
C
T
T
P
P
R
R
E
E
S
S
E
E
T
T
S
S
E
E
L
L
E
E
C
C
T
T
E
E
F
F
F
F
E
E
C
C
T
T
F
F
O
O
O
O
T
T
S
S
W
W
I
I
T
T
C
C
H
H
R
R
E
E
C
C
A
A
L
L
L
L
/
/
S
S
K
K
I
I
P
P
E
E
X
X
P
P
o
o
r
r
A
A
/
/
B
B
S
S
E
E
T
T
U
U
P
P
G
G
L
L
O
O
B
B
A
A
L
L
S
S
E
E
T
T
U
U
P
P
E
E
D
D
I
I
T
T
N
N
A
A
M
M
E
E
E
E
F
F
F
F
E
E
C
C
T
T
O
O
P
P
T
T
I
I
O
O
N
N
S
S
S
S
E
E
T
T
U
U
P
P
O
O
P
P
T
T
I
I
O
O
N
N
S
S
F
F
O
O
R
R
E
E
A
A
C
C
H
H
P
P
A
A
R
R
A
A
M
M
E
E
T
T
E
E
R
R
A
A
/
/
B
B
T
T
I
I
M
M
E
E
S
S
A
A
D
D
J
J
U
U
S
S
T
T
P
P
A
A
R
R
A
A
M
M
E
E
T
T
E
E
R
R
S
S
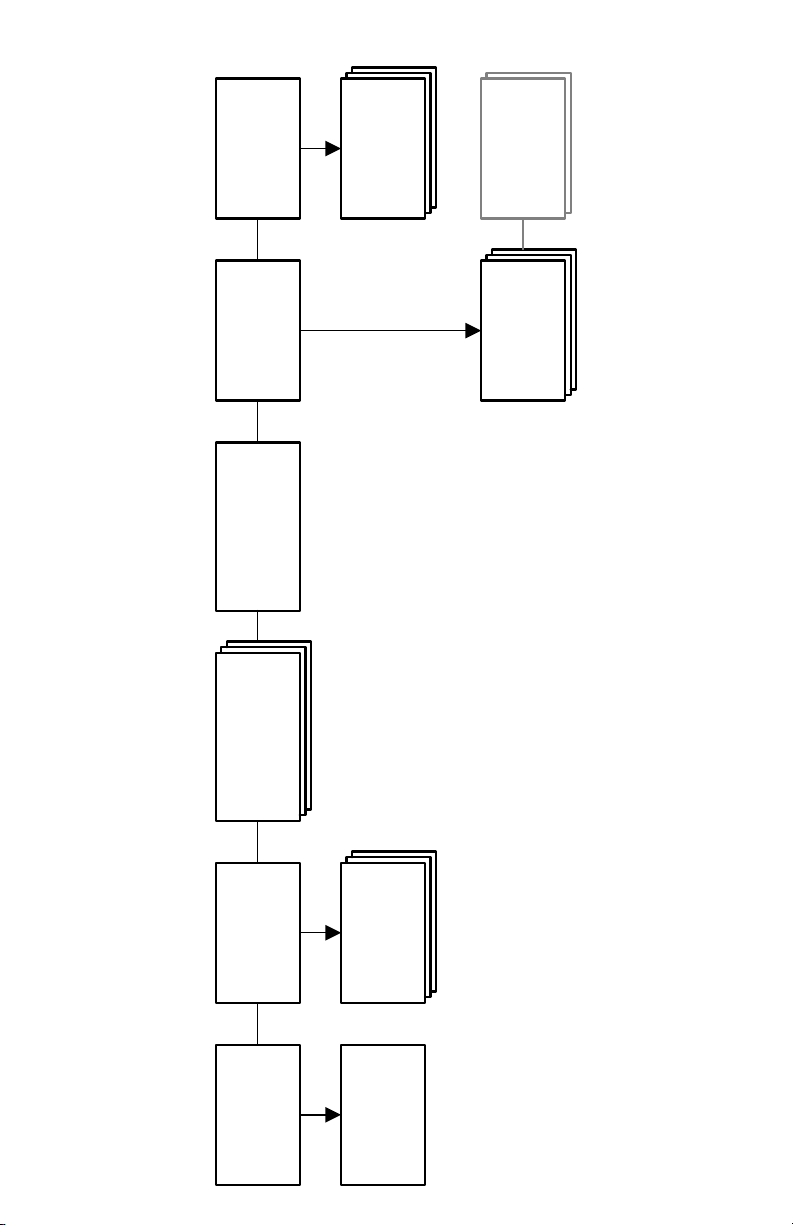
Menu Map

9
FOOTSWITCHES
The left-side footswitch cycles up to the next preset in the Footswitch
Recall list. Presets are added/removed from this list from the
“FOOTSWITCH” screen in the top menu.
Recalling a preset from the left footswitch displays the preset name in
double-high characters for easier viewing at a distance.
A long-press (>650 ms) of the left footswitch toggles between A and B
parameter sets, if the A/B switch is selected as the Expression Input (see
Expression Control Engine).
The function of the right-side footswitch depends on the
RIGHT FOOTSWITCH configuration in the GLOBAL SETUP menu
(see Right Footswitch):
• Engage-only mode — the right footswitch toggles Engage with no
long-press function.
• Preset Down mode — the right footswitch cycles down to the
previous preset in the Footswitch Recall list. A long-press of the
right footswitch toggles Engage.
PRESET
RECALL
LONG
PRESS
FOR A/B
IlluIllumiminatenate MeMe

10
The LED illuminates to indicate when the pedal is engaged.
Actuation
Since each footswitch has an optional long-press secondary function,
whether the primary function is actuated upon press or release depends
on whether the secondary function is enabled.
• If the secondary function is disabled, the primary function occurs
when the footswitch is depressed.
• If the secondary function is enabled, ILLUMINE waits to see if you
release the footswitch within 650 ms (the long-press threshold).
If so, the primary function is performed; otherwise the secondary
function is performed at 650 ms.
Left Footswitch Right Footswitch
Primary Function
(secondary function disabled) Preset Up Engage
Primary/Secondary Functions
(secondary function enabled)
Preset Up /
A/B Switch
Preset Down /
Engage
If PRESET SWITCHING is set to DelayedDelayed, preset changes occur 1
second after the last press of the footswitch (see Preset Switching).
See Right Footswitch under Global Setup for more information.
ENGAGE
ONLY
MODE ENGAGE
PRESET
DOWN
MODE LONG
PRESS FOR
ENGAGE
11
PRESETS & EDITING
ILLUMINE contains 50 user presets (0-49) and 50 factory presets (50-99).
After a factory reset, the user presets will be a copy of the factory presets.
Any of the 50 user presets may be edited and saved into any user preset
number. The 50 factory presets may be edited, but must be saved into a
user preset (0-49). In other words, the factory presets are always available,
should you choose to use one as a starting point for a user preset.
A preset consists of the selections in the top-level menu, including
the following:
• Preset name
• Eect
• 5 parameters — Mix, 3 eect-dependent parameters, and Level
• If the preset will be recalled by the footswitch
If an Expression controller is active, two parameters — one for each end
of the expression controller's range — are displayed and included in the
preset. See Expression Control Engine for more information.
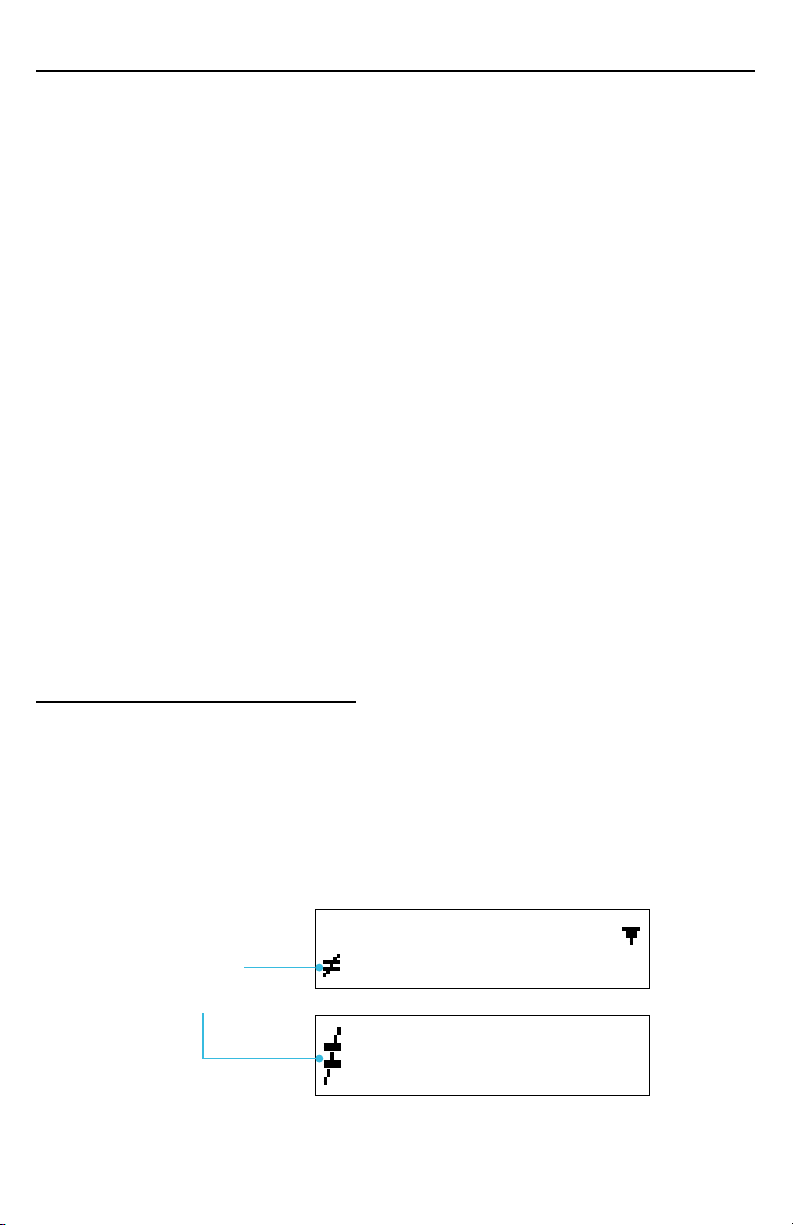
CHANGED PRESET FLAG
If a preset is changed and not saved, a “≠” (not equal) character will appear
before the preset name as a reminder to save the preset, if desired. You
may navigate away from this preset without losing these changes. Only
upon powering the unit o will these changes be lost, unless you save
the preset.
CHANGED
PRESET
FLAG
IlIllluumiminanatete MeMe
UserUser PrePresetset 00
IlIllulummiinnaatete MeMe

12
SAVE MENU
From most screens in the top menu, pressing the bottom knob enters the
SAVE PRESET menu.
If the preset has changed, “Yes” will be the default option; otherwise, “No”
is the default option.
The SAVE PRESET menu options are as follows:
• YesYes — save the preset now
• NoNo — do nothing and exit
• Compare/RevertCompare/Revert — the previously-saved preset may be heard
when this option is showing, select to revert to these settings
•
Save to (User Preset number)Save to (User Preset number) — do nothing to the
current preset and save this preset to the Preset number indicated
ENTER SAVE
PRESET MENU
SaveSave Preset?Preset?
YesYes
EffectEffect
WetWet PlPluginugin

13
EDIT THE PRESET NAME
On the PRESET screen, pressing the top knob enters the EDIT
NAME menu:
• Turning the top knob selects the character to be changed
• Turning the bottom knob changes the character
• Pressing the top knob returns to the PRESET screen
• Pressing the bottom knob enters the SAVE PRESET menu
Preset names are limited to 14 characters in length.
Character Set
ENTER EDIT
NAME MENU
UserUser Preset 0Preset 0
IlIllluumiminatenate MeMe

14
FACTORY PRESETS
# Name Description
50 Illuminate Me big dark reverb*
51 Wet Plugin Wet Reverberator plugin example*
52 Immerse W3T W3T in Immerse Mk II pedal
53 Wet Stereo v1 Wet Stereo Reverb pedal
54 Studio Room very small damped room*
55 Small Darkroom small, dark boomy room*
56 Basement medium, dark reflective room*
57 Empty Club medium lively room*
58 Medium Hall medium hall
59 On the Stage large lively room*
60 Parking Garage huge lively space*
61 Lovely Hall large damped hall*
62 Big Brite Hall large lively hall*
63 Small Plate small bright plate reverb*
64 Predelay Plate medium plate with predelay*
65 Big Hair Plate large plate reverb*
66 Gated Plate short gated plate reverb*
67 Small Digiverb very small digital reverb*
68 Cybernetic medium digital reverb
69 Electric Cloud large modulated digital reverb
70 Spring Is Here medium spring reverb*
71 Twerpitude large bright spring reverb
72 Dwell-O-Spring high-dwell spring reverb*
73 Slap Happy slapback echo with a hint of reverb*
74 EchoVerb120bpm 120 bpm echo with a hint of reverb*
75 Into the AByss A:large reverb | B:echoverb
76 500ms Ekoplux 500 ms dark modulated echo*

15
# Name Description
77 Big Echo Verb big echo with a hint of reverb*
78 Derecho huge, dark swirly echoverb
79 Long Tapeloop high-regen long echo*
80 Chorus Air small-room chorus*
81 ShABby Chic A:large reverb | B:+detune
82 Vibro Room small-room vibrato*
83 Hi Short Shimr short, resonant shimmer*
84 ABsynth Pad A:large reverb | B:shimmer
85 Iridescence ambient reverb with a hint of shimmer
86 I'm Shimmering large shimmer reverb*
87 WannABe Chime A:large reverb | B:+octaves
88 Slo Ghost Wind octave-up reverb*
89 Octal Void octave-up/down reverb*
90 Avalanche Fall deep rumble reverb*
91 King Gong gong-like reverb
92 LAByrinthine A:large reverb | B:+low overtones
93 FreezABle A:large reverb B:freeze+reverb
94 SustainABle A:almost infinite | B:sustain
95 SwellABle A:medium reverb | B:large swell reverb
96 OK Bloomer medium bloom reverb*
97 Bloom In Time large bloom reverb*
98 Ambient Plug ethereal ambient reverb*
99 Torn Texture big drone reverb*
*Factory Presets with an asterisk were created by Drew Schlesinger, a
professional synthesist, sound designer and composer. Drew's legacy
of unique sound development started in the 1980's. He has worked with
many leading eect and synthesizer manufacturers and created some
extremely well known sounds. We are most grateful for Drew's contribution
to ILLUMINE's presets. https://www.instagram.com/drewschlesinger/

16
EFFECT
Turning the bottom knob changes the algorithm used to create the
reverberation eect.
Pressing the top knob enters the Options sub-menu, which allows for
further tweaking of the algorithm.
Changing between presets that use the same Eect and Options will result
in a seamless transition. However, when the Eect or Options are dierent
between presets, changing between them will briefly mute the sound in
the wet signal path only.
The Reverb Eects
Wet Plugin
This algorithm matches the Neunaber Wet Reverberator software
plugin as closely as possible given hardware constraints. The only
significant dierence from the plugin is that this version has fewer
adjustable parameters.
The Wet Plugin reverb was designed to work well with a variety of
instruments, but it really shines with voiced (non-percussive) instruments.
Like all of the Wet Reverb algorithms, it is known for its open, natural
sound, which complements the source signal without masking it.
Wet v3
The Wet v3 reverb was designed to work well with voiced instruments, in
particular guitar and other stringed instruments. Like all of the Wet Reverb
algorithms, it is known for its open, natural sound, which complements the
source signal without masking it.
CHANGE
ALGORITHM
ENTER
OPTIONS
SUBMENU
EffectEffect
WetWet PlPluginugin

17
This is the same as the W3T reverb in the Immerse Mk II. It is the same
core algorithm as the Wet Plugin, with dierent tone shaping and lower
initial reflection density.
Wet v1
This is the original reverb from the Wet Stereo Reverb pedal. The Wet v1
reverb was designed to work well with stringed instruments and guitar, in
particular. Like all of the Wet Reverb algorithms, it is known for its open,
natural sound, which complements the source signal without masking it.
Plate
A studio plate reverb is a large, suspended metal plate connected with
transducers at the input and output. It is known for its highly diuse,
metallic sound. This reverb has high input diusion, giving it the dense,
metallic quality of a studio plate. Plate reverbs work well on a variety of
audio sources, especially percussive sounds.
Hall
Emulating the sound of a well-designed concert hall, this reverb is large
and expansive. This is version 2 of our hall reverb algorithm. Hall reverbs
sound great on a variety of audio sources, especially voiced instruments.
Vintage Digital
Designed in the style of a vintage rack unit, this reverb sounds diuse and
synthetic, but not metallic like a plate. It sounds super spacey on synths.
Spring
A spring reverb consists of springs suspended between transducers, and
its sound has a distinctive “twerp.” Try increasing the modulation rate for a
classic vibrato-spring reverb sound. This is version 3 of our spring reverb
algorithm.
Shimmer
Shimmer is a reverb eect reminiscent of a synth pad that follows what
your instrument plays. This is version 2 of our shimmer reverb algorithm.
Rumble
Rumble creates a low-frequency drone for a deep, cavernous reverb
sound. It sounds neat on synths.

18
Octaves
This eect combines the Wet v3 Reverb with a dual octave generator, one
up and one down. Each octave is mixed with the original signal prior to the
reverb in any proportion you desire.
Wet+Echo
This eect adds the Wet v3 Reverb and stereo echo. The Depth parameter
controls both reverb decay and echo repeats.
Wet+Detune
This eect adds the Wet v3 Reverb and a detune eect. Detune is an
eect that pitch-transposes a signal slightly downward, which creates a
thick, chorus-like eect without the warble of a traditional chorus.
Bloom
This reverb is based on our Vintage Digital algorithm. It builds more slowly
than a typical reverb. Increasing the Pre-Delay will delay the “bloom” even
further.
Swell
This eect is typically used with the Mix set to 100%. If the Mix Sum Type
is configured as Unity Dry, the Swell reverb eect may not operate
as expected.
Swell reverb places a slow-attack, fast-release gate before a Wet v3
Reverb. This emulates placing a volume pedal before a reverb to swell in
reverb pads. Playing a note or chord triggers the swell. Muting resets the
swell, so it is ready for the next note or chord.
TIP:
Increase the Sensitivity (see Options) if the swell does not
trigger; decrease it if the swell does not reset between
notes. Remember that you need to suciently mute the
note to reset.
Table of contents
Other Neunaber Music Equipment manuals


