New World NW801FZ Guide

142570
1
Installation and User Instructions
NW801FZ
Integrated Freezer
Built In
Retention of the Instruction Book
This Instruction Book must be kept handy for reference as it contains important details on
the safe and proper use of the appliance.
If you sell or pass the appliance to someone else, or move house and leave it behind,
make sure this Book is also provided so the new owner can become familiar with the
appliance and safety warnings.

142570
2
Your New Integrated Appliance
Using your new integrated appliance is very simple. Nevertheless, to get the best results it
is important that you read right through this handbook before using your integrated
appliance for the first time.
Electrical Requirements
WARNING: This appliance must be earthed.
Fuses
Your appliance comes fitted with a plug and a 13A fuse. If you need to replace the fuse,
only those rated at 13A and ASTA approved to BS1362 should be used. If you lose the
fuse cover, a replacement may be obtained from your local authorised Service Centre or
Electricity company. Correct replacement is identified by colour coding or the marking on
base of plug.
WARNING: Do not use plug unless fuse cover is fitted.
Changing the Plug
Cut off and dispose of the supplied plug if it
does not fit your socket.
WARNING: To avoid a shock hazard do
not insert the discarded plug into a
socket anywhere else.
IMPORTANT: WIRES IN THE MAINS
LEAD ARE COLOURED IN
ACCORDANCE WITH THE FOLLOWING
CODE:
Green/Yellow - Earth
Blue - Neutral
Brown - Live
If you change the plug, the colour of wires
in the mains lead may not correspond with
the colour of the markings identifying
terminals in the plug. You should therefore
wire it as shown.
Green and
yellow (Earth)
wire to terminal
marked ‘E’,
symbol , or
coloured green
and yellow.
Blue (Neutral)
wire to terminal
marked ‘N’ or
coloured black.
13A ASTA
approved
fuse to
BS1362.
Brown
(Live)
wire to
terminal
marked ‘L’
or
coloured
red.
Cord clamp
Changing the Mains Lead
If you have damaged the existing lead or require a longer one a charge will be made. It is
strongly advised that this work is carried out by a qualified electrician.
CE marking certifies that this appliance conforms to the following EEC directives:-
Low Voltage Equipment - 72/23/EEC & 93/68 EEC
Electromagnetic Compatibility - 89/336/EEC, 92/31/EEC & 93/68/EEC
WARNING: AVOID ACCIDENTS TO CHILDREN.WHEN DISCARDING AN OLD FRIDGE
OR FREEZER BE CERTAIN TO MAKE THE LOCK UNUSABLE. IF
POSSIBLE,REMOVE THE DOOR AND DISCARD SEPERATELY.
DO NOT ATTEMPT TO SIT ON TOP OF YOUR APPLIANCE. IT IS NOT DESIGNED
FOR SUCH USE AND YOU COULD INJURE YOURSELF OR DAMAGE THE
APPLIANCE BY SUCH ABUSE.

142570
3
Contents Page
Electrical Requirements 2
Disposal Notes/Technical Safety 3
Installation 4-7
Model NW801FZ Get to know your Integrated Freezer 8
Getting your Integrated Freezer ready for use 9
Controlling the Temperature 9
Storing Food 10
Caring for your Integrated Freezer 11-12
If your Integrated Freezer Won’t Work 13
After Sales 14
Guarantee 15
Key Contacts Back Cover
Disposal Notes:
The packaging is designed to protect the appliance and individual components during
transport and is made of recyclable materials.
Corrugated board/board
Moulded polystyrene foamed, CFC-free polystyrene.
Polythene bags and sheets
Polyproplene straps
Keep packaging materials away from children - polythene sheets and bags can
suffocate!.
Please return packaging material to your nearest official collection point so that the various
materials can be reused or recycled as far as possible.
Ensure that the refrigerant circuit is not damaged, before the appliance that is no longer
needed is taken away for disposal. In this way the refrigerant will not escape into the
environment.
Exact details of the refrigerant used can be found on the type plate. The heat insulator is
PU with Pentane.
Information on collection dates or collection points can be obtained from the waste disposal
authorities or local council.
Technical Safety
The refrigerant R600a is environmentally friendly but flammable, take care not to damage
the refrigerant circuit pipes. If refrigerant does escape, immediately ensure that the area is
well ventilated.
Do not use electrical appliances; i.e ice makers, inside the appliance.
In the event that the appliance is damaged, contact the supplier immediately before
connecting to the mains.
To guarantee safe operation, ensure that the appliance is set up and connected as
described in these operating instructions, and that any repairs and work on the appliance
are only carried out by an authorised service office.

142570
4
INTRODUCTION
Your New World Freezer
Thank you for purchasing a New World Freezer. Its stylish and practical design will
enhance your kitchen
Getting Help
If you have any problems with installation, or operating with your freezer please check
through these instructions thoroughly to make sure that you have not missed anything. If
you still need help, then please contact (including a daytime telephone number if possible):
Customer Care Centre
New World,
Stoney Lane,
Prescot
Merseyside.
L35 2XW.
NEW WORLD HELP LINE Tel: 0870 444 9936
Please quote the cooker model and serial number with your enquiries. This can be found
on the rating label, positioned on the rear panel
WARNING! For your own safety, make sure that these instructions on installation,
use and maintenance are followed.
We advise you to keep these instructions in a safe place for future reference.
If you sell or transfer ownership of this product, please pass on these instructions to the
new owner.
Note: the pictures shown in the figures in this handbook are purely indicative.

142570
5
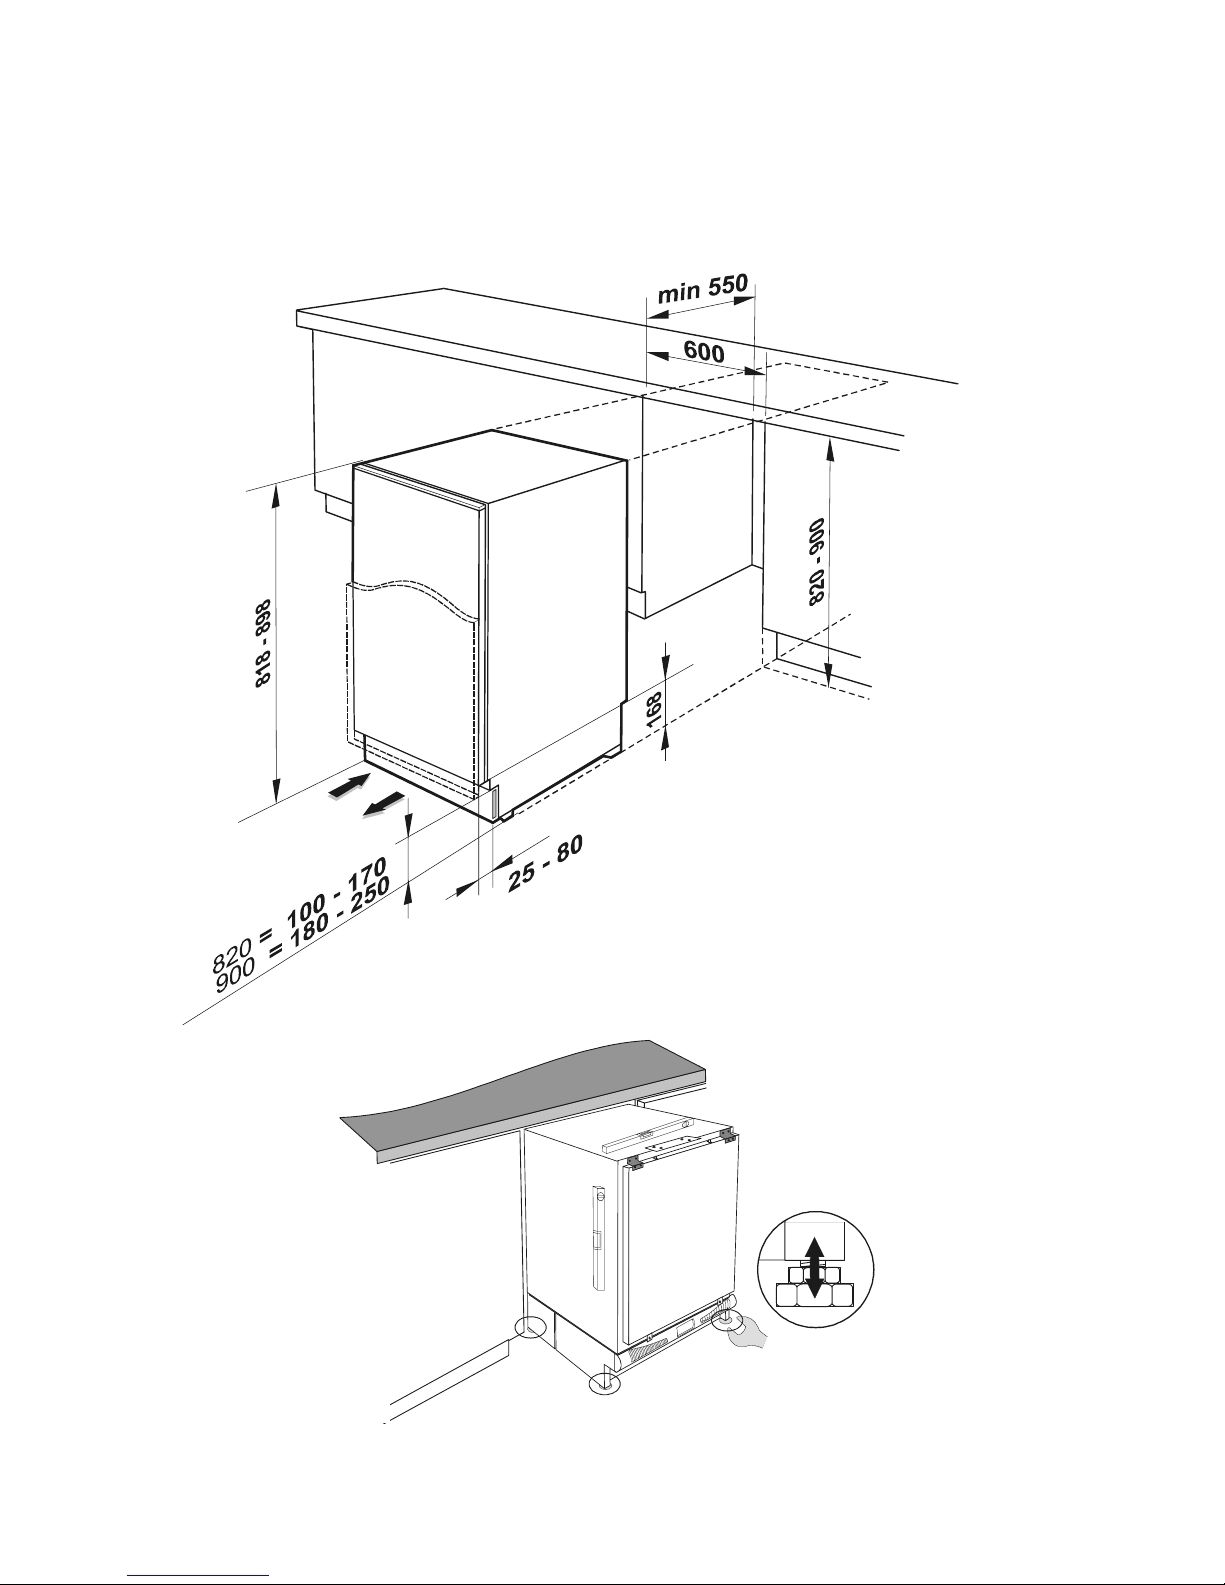
Installing Your Integrated Appliance
Please read through this section before
starting any work.
The installation location should be in a dry,
well ventilated room. The appliance should
not be exposed to direct sunlight and
should not be near a heat source (e.g. a
radiator, cooker). If required, use an
insulating plate.
Warning!
The appliance contains the environmentally
friendly but flammable refrigerant R600a.
Ensure that the refrigerant circuit is NOT
damaged during transportation and
installation.
Leaking refrigerant may ignite or cause eye
injuries.
The more refrigerant in an appliance, the
larger the room must be in which the
appliance is situated. If a leak occurs in a
room which is to small, a flammable gas-air
mixture may form.
The room must be at least 1 m3 per 8g of
refrigerant.The amount of refrigerant in
your appliance is indicated on the rating
plate located inside the appliance, on
the bottom left hand side.
If refrigerant is leaking out:
•Avoid naked flames and ignition sources
near the installation location.
•Unplug the appliance and thoroughly
ventilate the room for several minutes.
Installation of the appliance under the
worktop
Although you will need to provide all tools
required for the installation, all fittings are
supplied with the appliance.
142570
6
Installing Your Integrated Appliance
Before fitting
The electrical socket should be easily accessible.
Do not connect the appliance to the electricity supply until installation is completed.
Make sure that the appliance is sitting level on the floor by adjusting all four feet.
142570
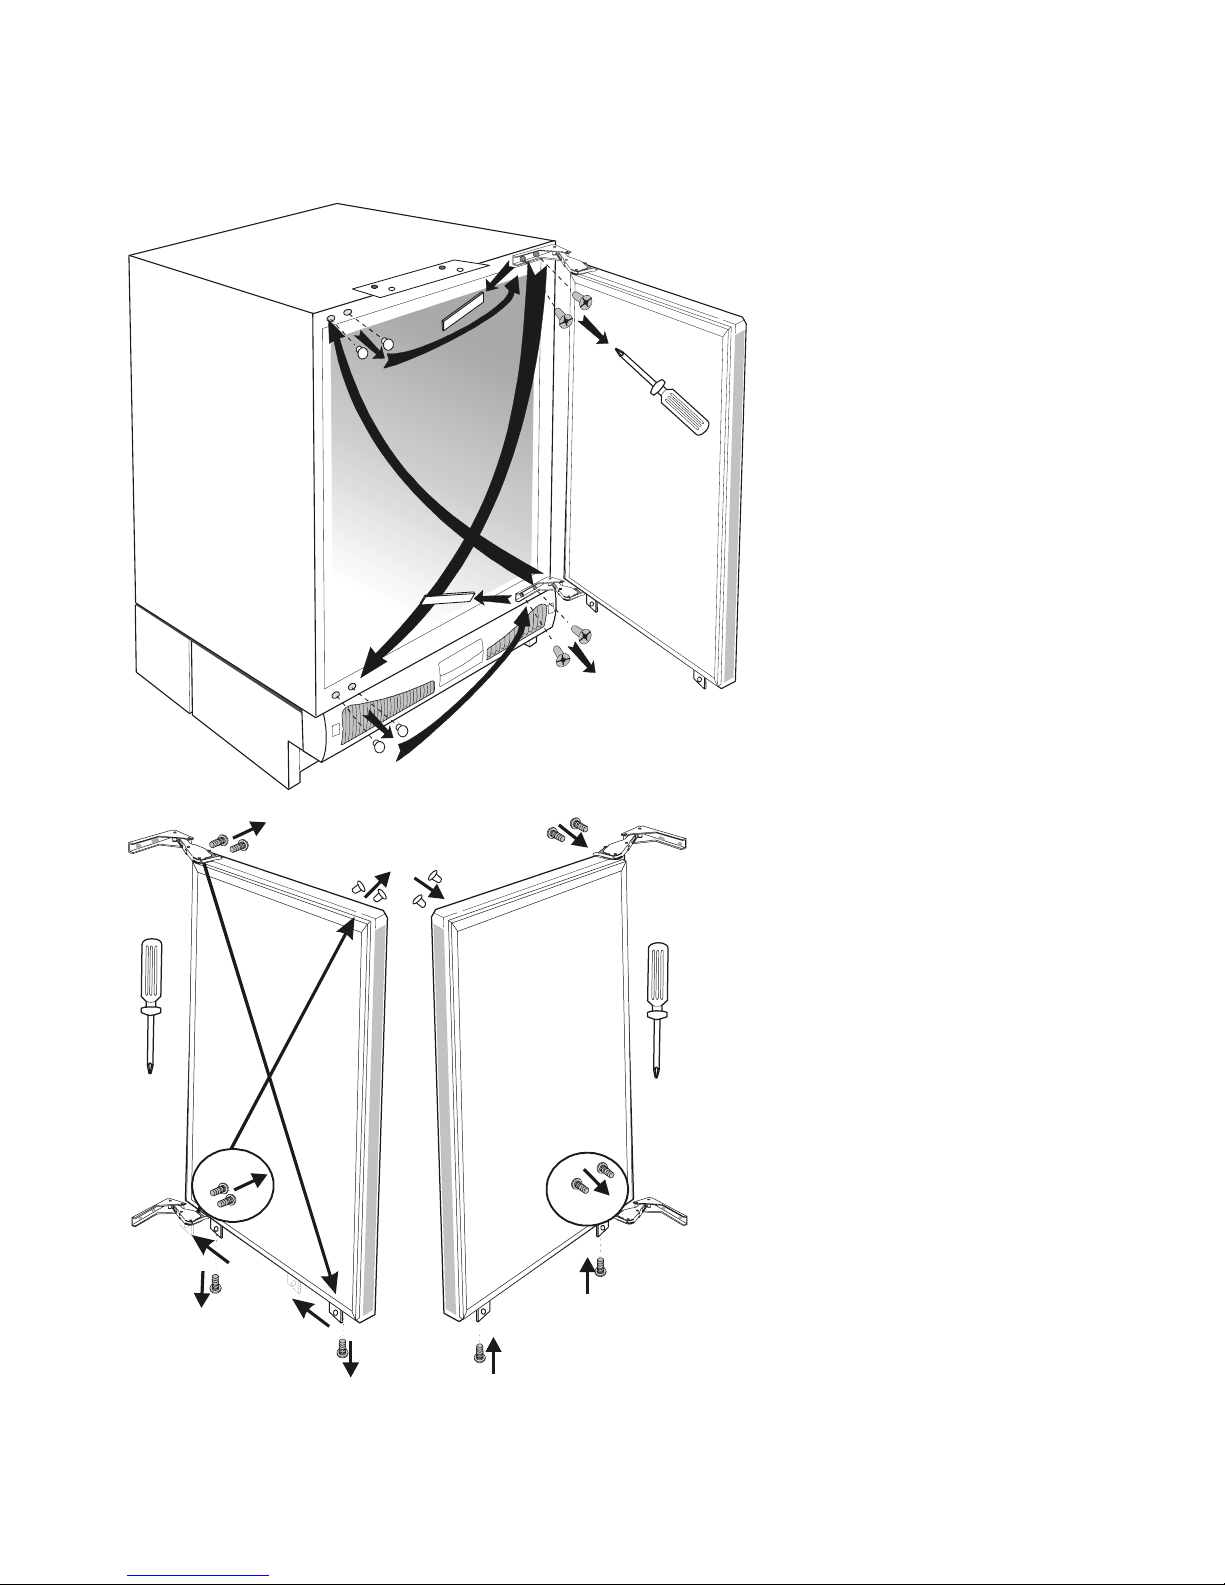
7
Changing over the door hinges
Before fitting, if needed, change over the way the door opens as show below.

142570
8
Fastening the appliance under the
worktop.
Secure the appliance bracket under the
worktop by two fixing screws.
Mounting the kitchen cabinet door.
Remove the top bracket from the appliance
and secure to the door panel.
Minimum door width - 595mm
Minimum door height - 650mm
Fitting the door panel to the appliance.
Adjusting the base.
Cut out the plinth of the cabinet to match
the aplliance bottom ventilation grille.
142570
9
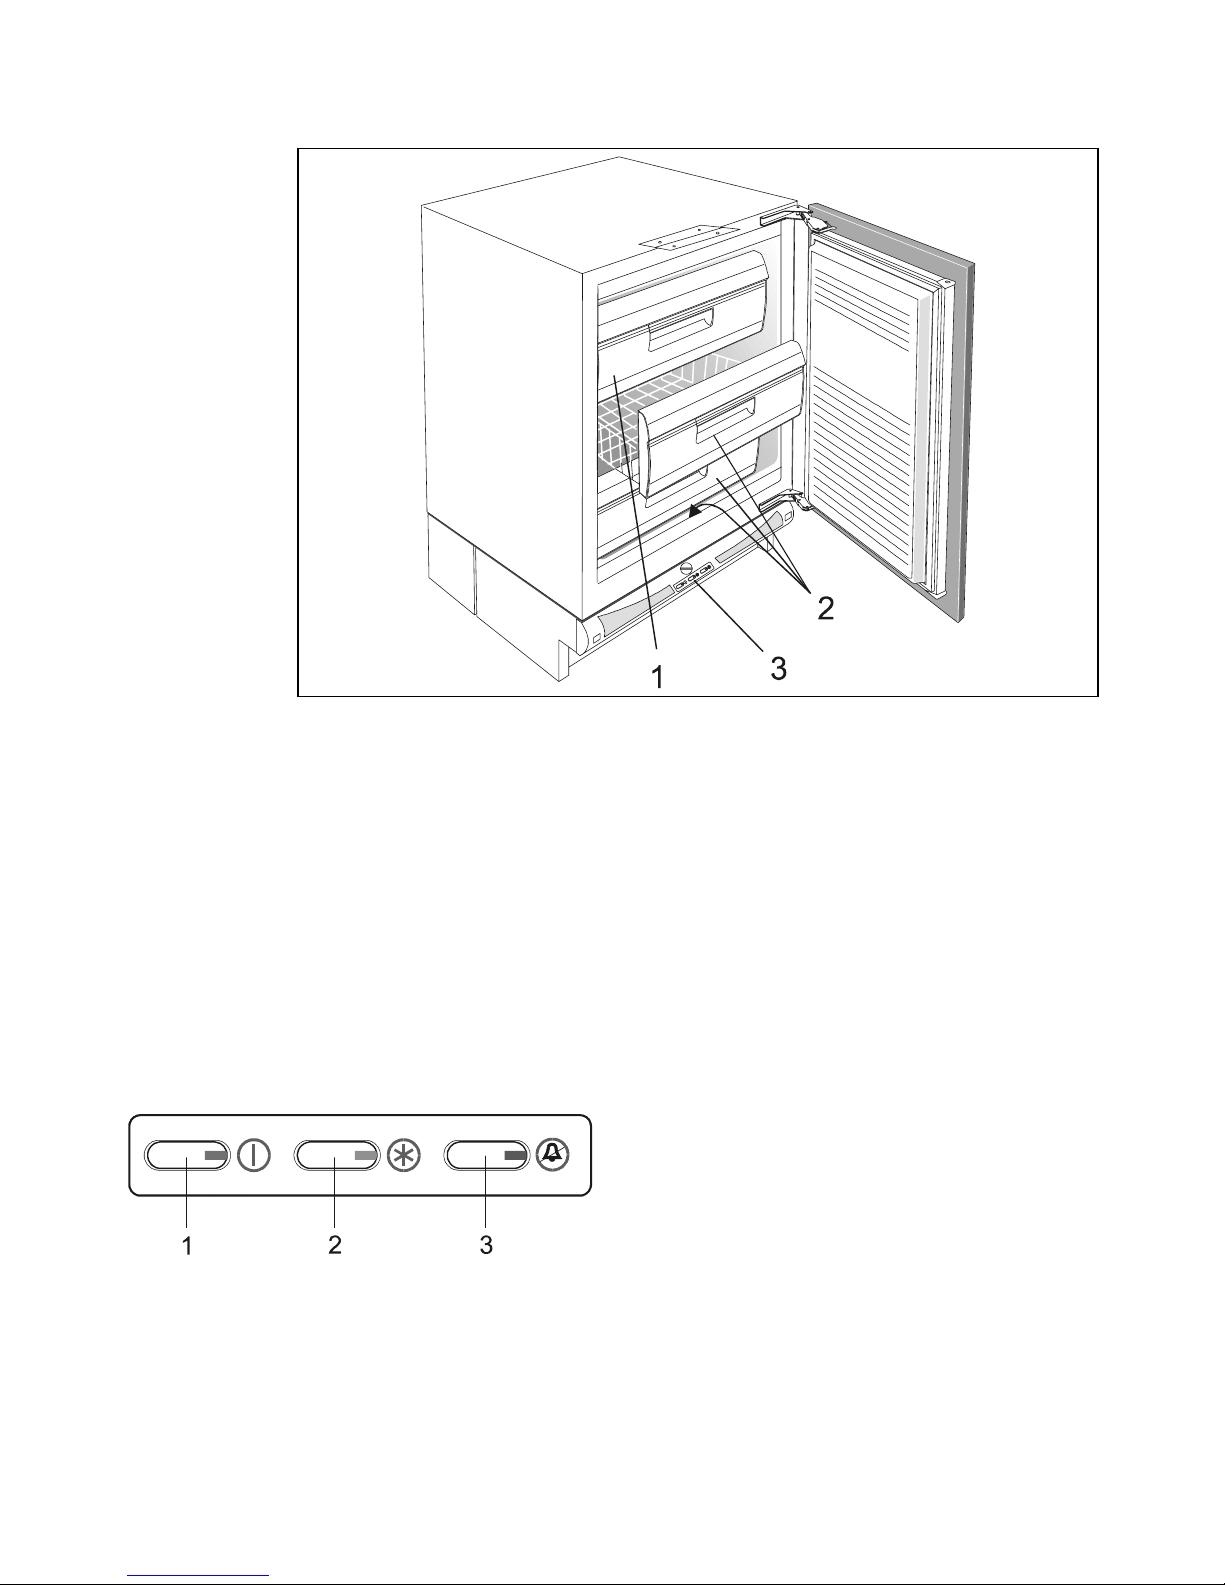
Get to know your Integrated Larder Fridge
Model
NW801FZ
NW801FZ FEATURES:
1Freezing compartment. Is used for
freezing fresh foods
2Storing basket. Is used for storing
packages of frozen foods.
3Control panel. See operation of the
controls.
Controls
Do not let children tamper with the
controls.
The freezer is controlled with switches and
a thermostat button which are located at
the bottom of the freezer.
1ON/OFF switch (green light)
2Fast freeze button (yellow light)
3Alarm off button (red light).
ON/OFF switch
The freezer is on when the switch is in the
ON position and the green light is on.
Fast Freeze button
This is used to select one of the two
operation modes; continuous or automatic.
Continuous; yellow light is ON.
Choose this one when you want to freeze
large amounts of fresh food.
Automatic; yellow light is OFF.
The freezer is controlled by the thermostat
and will turn the cooling system on and off.
The alarm off button
The alarm will sound and the red light will
come on if the temperature inside the
freezer gets to high. To turn the alarm off;
press the alarm off button and see the
troubleshooting section of the book.
142570
10
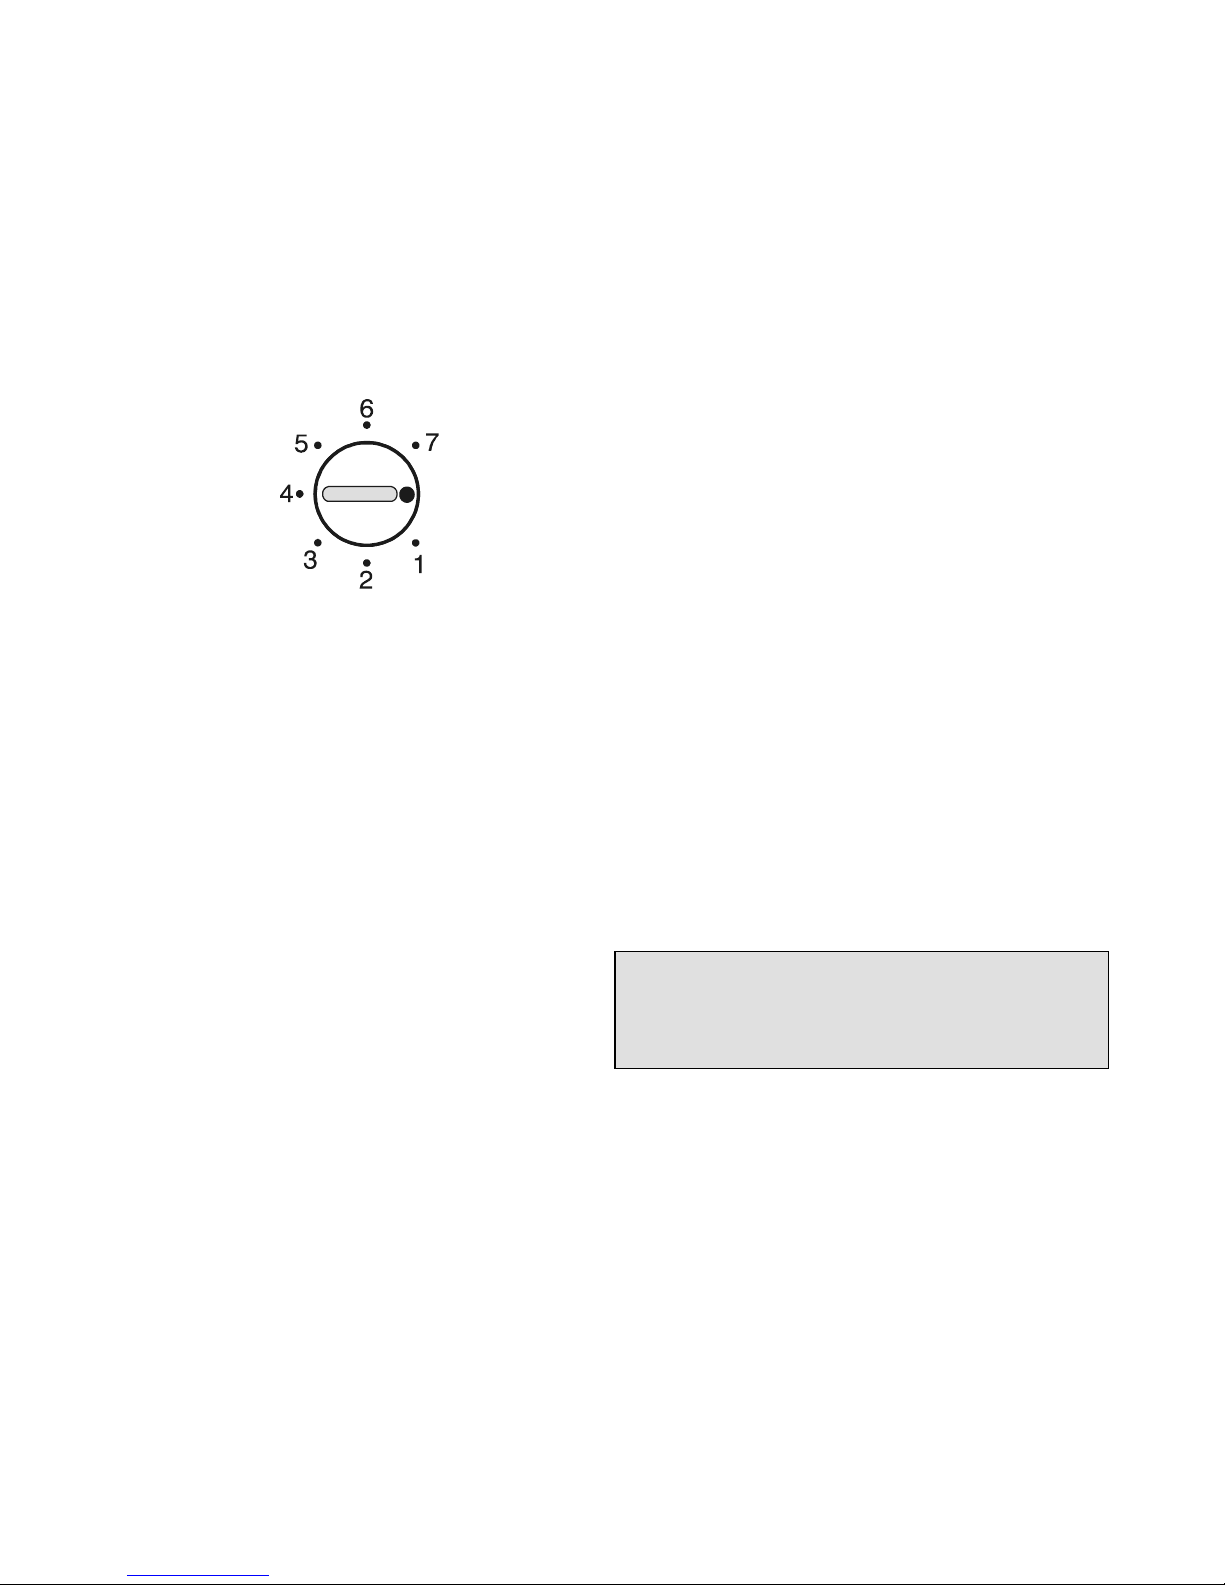
Controls
Temperature selection
The thermostat control goes from 1 to 7.
The coldest setting is 7.
We recommend setting 4 for normal use.
We also recommend setting the control
towards the 7 setting when loading small
amounts of fresh food to accelerate
freezing.
Getting your Appliance ready for use.
Before connecting to the mains electricity
supply leave the appliance to stand for 2
hours to allow the cooling system to settle.
Clean the appliance, and be thorough,
especially in the interior. (see ‘Caring for
your Appliance’ - Cleaning, page 11).
Final Check:
Before you start using your appliance
check that:
- It is thoroughly dry inside.
- There is adequate air circulation.
- Accessories are correctly placed in their
positions.
Starting:
Turn the appliance on and set the
thermostat knob to the continuous
setting.The red and yellow control lights are
on and the alarm is sounding.Turn off the
alam by pressing the alarm off button.When
the red light goes off, wait for a couple of
hours and load the freezer with packages
of fresh foods.
After 24 hours set the freezer to the
required temperature setting.
Running in the Compressor:
Your appliance is operated by a
compressor which switches on and off in
order to maintain the internal temperature.
The compressor requires a running in
period of up to 2 months.During this time it
has to work a little harder and may result in
more noise than usual.
Whether the compressor is running or
not, it is normal to hear sounds created
by the liquid and gases sealed within
the system.
142570
11
Storing Food.
FREEZING FRESH FOODS -
•Carefully select food you intend to freeze: it
should be of high quality and thoroughly cleaned
before freezing it.
•Use correct packaging suitable for the freezer.
- The packaging should be air tight and should
not leak since this could cause substantial
vitamin loss and dehydration of foods.
- Foils and bags should be soft enough to wrap
tightly around foods.
•Mark packages with the following data:
- The kind and quantity of foods.
- The date of loading.
•Prepare fresh foods for freezing in small
quantities to ensure that the food freezes quicker
and its quality does not deteriorate during
thawing and preparation.
•Dry packs of food to be frozen so that they do not
freeze together.
•The quantity of fresh foods that can be loaded in
the freezer within 24 hours is indicated on the
rating plate (freezing capacity). If the loaded
amount is too large, the quality of freezing is
reduced, which affects the quality of frozen foods.
•Don’t put liquid filled bottles or sealed cans
containing fizzy drinks into the freezer as they
may burst.
•Don’t try to keep food which has thawed, it
should be eaten within 24 hours, or cooked and
refrozen.
•Don’t give children lollipops and water ices
directly from the freezer, the low temperature
may cause ‘freezer burns’ on their lips.
•Never store poisonous, dangerous substances,
products that contain flammable gasses (eg.
aerosols) or explosive substances in the
appliance.
Explosion hazard! Your appliance has been
designed for the storage of edible foodstuffs only.
FREEZING PROCEDURE -
The freezing compartment is used for freezing
foodstuffs (see “Description of the appliance”).
* If you want to freeze a larger amount of fresh
food, set the thermostat knob to the ‘Super’
position for continuous operation (yellow light is
on). After 24 hours you can load the freezing
compartment with fresh food.
* 24 hours after the food was loaded, the frozen
packages can be stored into baskets and the
freezer can be loaded with new packages of
fresh food. Don’t let the fresh packages touch the
frozen ones.
* Some 24 hours after the last load, set the
thermostat knob to the position for automatic
operation (yellow light is off ).
* There is no need to set the thermostat knob to
the position for continuous operation if you intend
to freeze smaller amounts of fresh food.
STORING FROZEN FOODS -
Store commercially frozen foods according to the
manufacturer’s recommended storage instructions
as indicated on the packaging.
When shopping select frozen foods last and be
careful in choosing adequately packed foods. Wrap
frozen food when you buy it and put it in the freezer
as soon as possible. Don’t buy packages of food
with a frost layer, this indicates that the package
has been at least partially thawed before.
DEFROSTING FROZEN FOOD -
Partially thawed or defrosted food should be used
as soon as possible.
Cold air preserves the food but it does not destroy
micro-organisms which rapidly activate after
defrosting and make foods perishable.
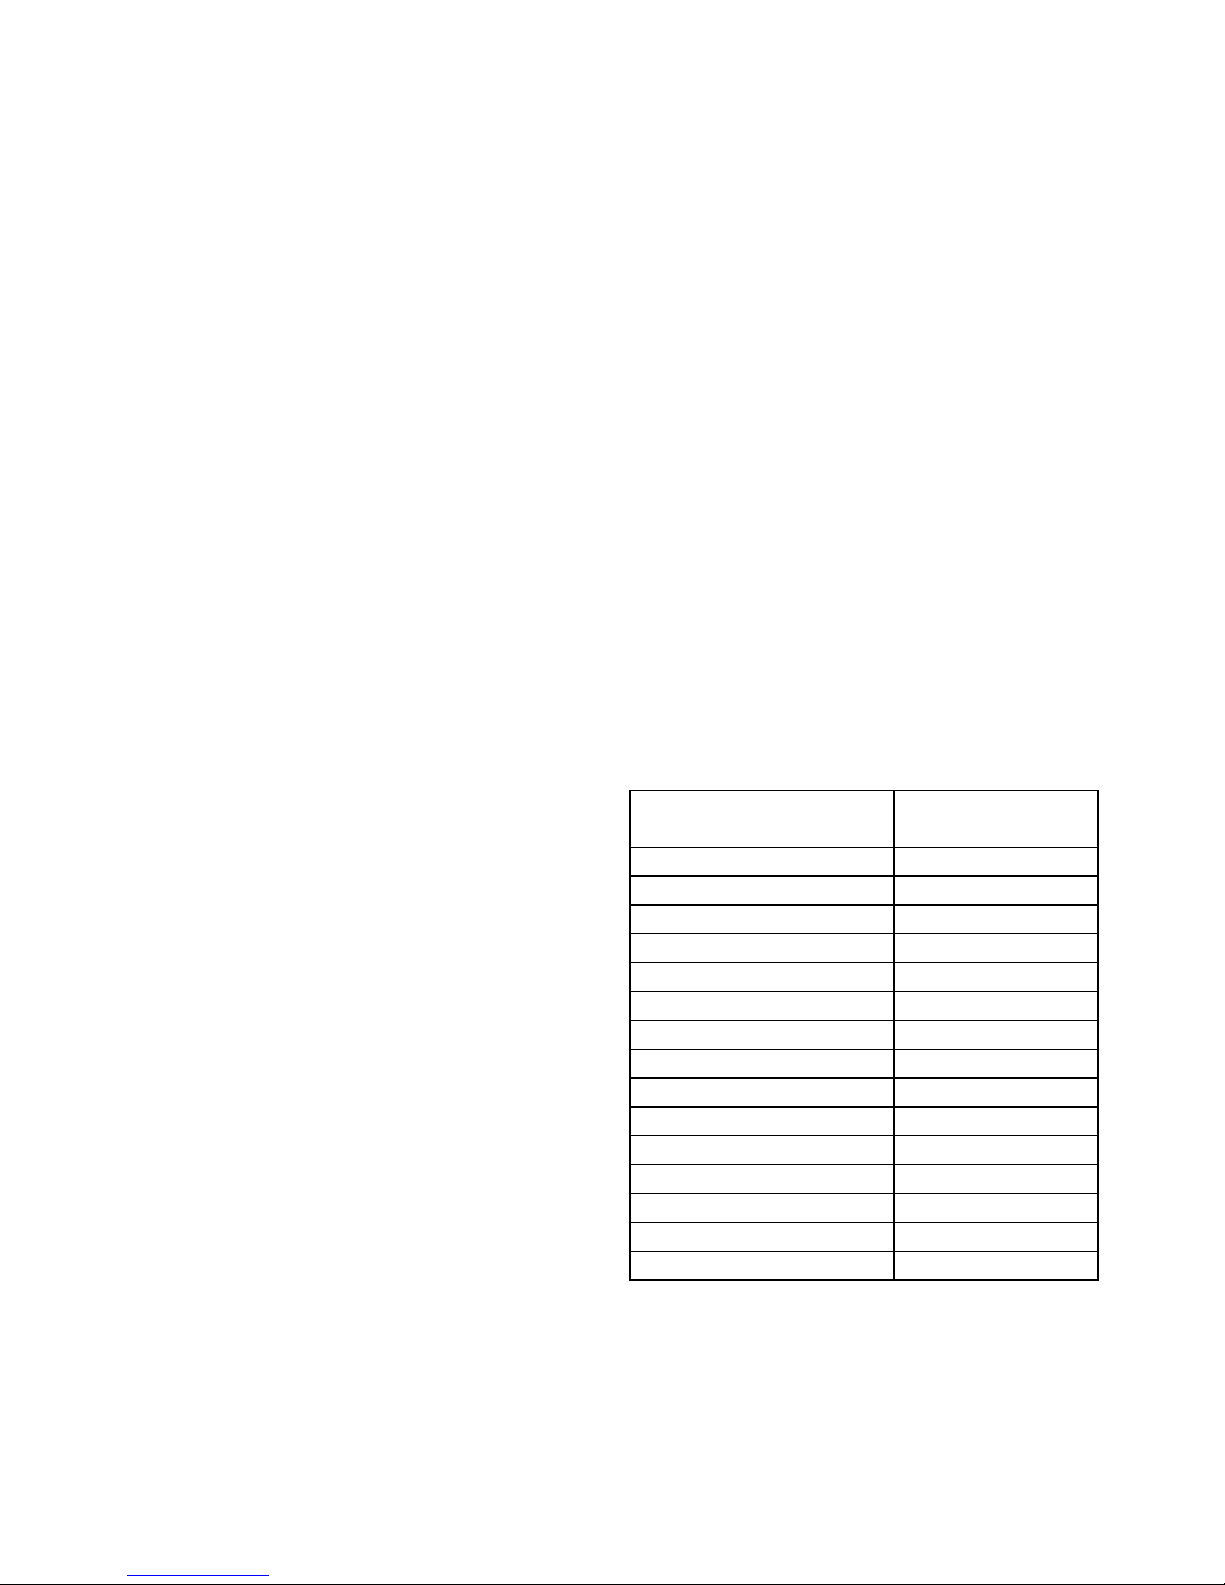
APPROXIMATE STORAGE TIME FOR FROZEN
FOODS:
FOOD Storage Time
(in months)
Vegetables 8-10
Fruit 10-12
Bread, Pastries 3
Milk 3
Ready-made Meals 3
Meat Beef 10-12
Veal 8-10
Pork 4-6
Poultry 8-10
Game 6-8
Minced Meat 4
Smoked Sausages 1
Fish lean 3
fat 1
Offal 2

142570
12
Caring for your Integrated Freezer
Defrosting
WARNING:
NEVER USE SHARP OBJECTS TO
REMOVE THE FROST AS THIS MAY
DAMAGE YOUR APPLIANCE AND
CAUSE REFRIGERANT TO LEAK.
After the appliance has been in operation
for some time, a layer of ice will form on the
aluminium panels and the fronts of the
drawers if the door is opened and fresh
food placed inside the freezer regularly.
This is completely normal. However, a
thick layer of ice will increase the
appliance’s energy consumption.
You should therefore defrost the appliance
regularly.
Do this by switching the fast freeze button
on and leave it on for 24 hours to deep
freeze the food stored. After this period
take out the food and keep it in a cool
place.
Switch off the freezer and disconnect from
the mains.
Mop up the water which will collect in the
bottom basket of the freezer.
It is a good idea to clean the inside of your
Freezer after defrosting. Always switch off
at the socket outlet and pull out the
mains plug first. Wipe out the inside of the
Freezer using a clean cloth wrung out in
either a solution of one teaspoonful of
bicarbonate of soda to one pint of water or
domestic sterilising solution diluted
according to the manufacturer’s
instructions. The complete interior including
the door and removable parts, should be
washed.
Every year remove the plinth grille and
vacuum clean the underside of the housing
unit and the grille to keep the air flow
passage clear of dust. This will mean that
the freezer operates at its peak efficiency.
Never use any household cleaner or
detergent, abrasive powders or wax polish.
These not only damage the surfaces, but
also leave a smell in the Freezer.
Before you refill the Freezer ensure it is
thoroughly dry.
The rubber door seal must be cleaned
with soap and water only as detergent
will damage it.
Remember to re-connect the mains plug
and switch on after cleaning your Freezer.
142570
13
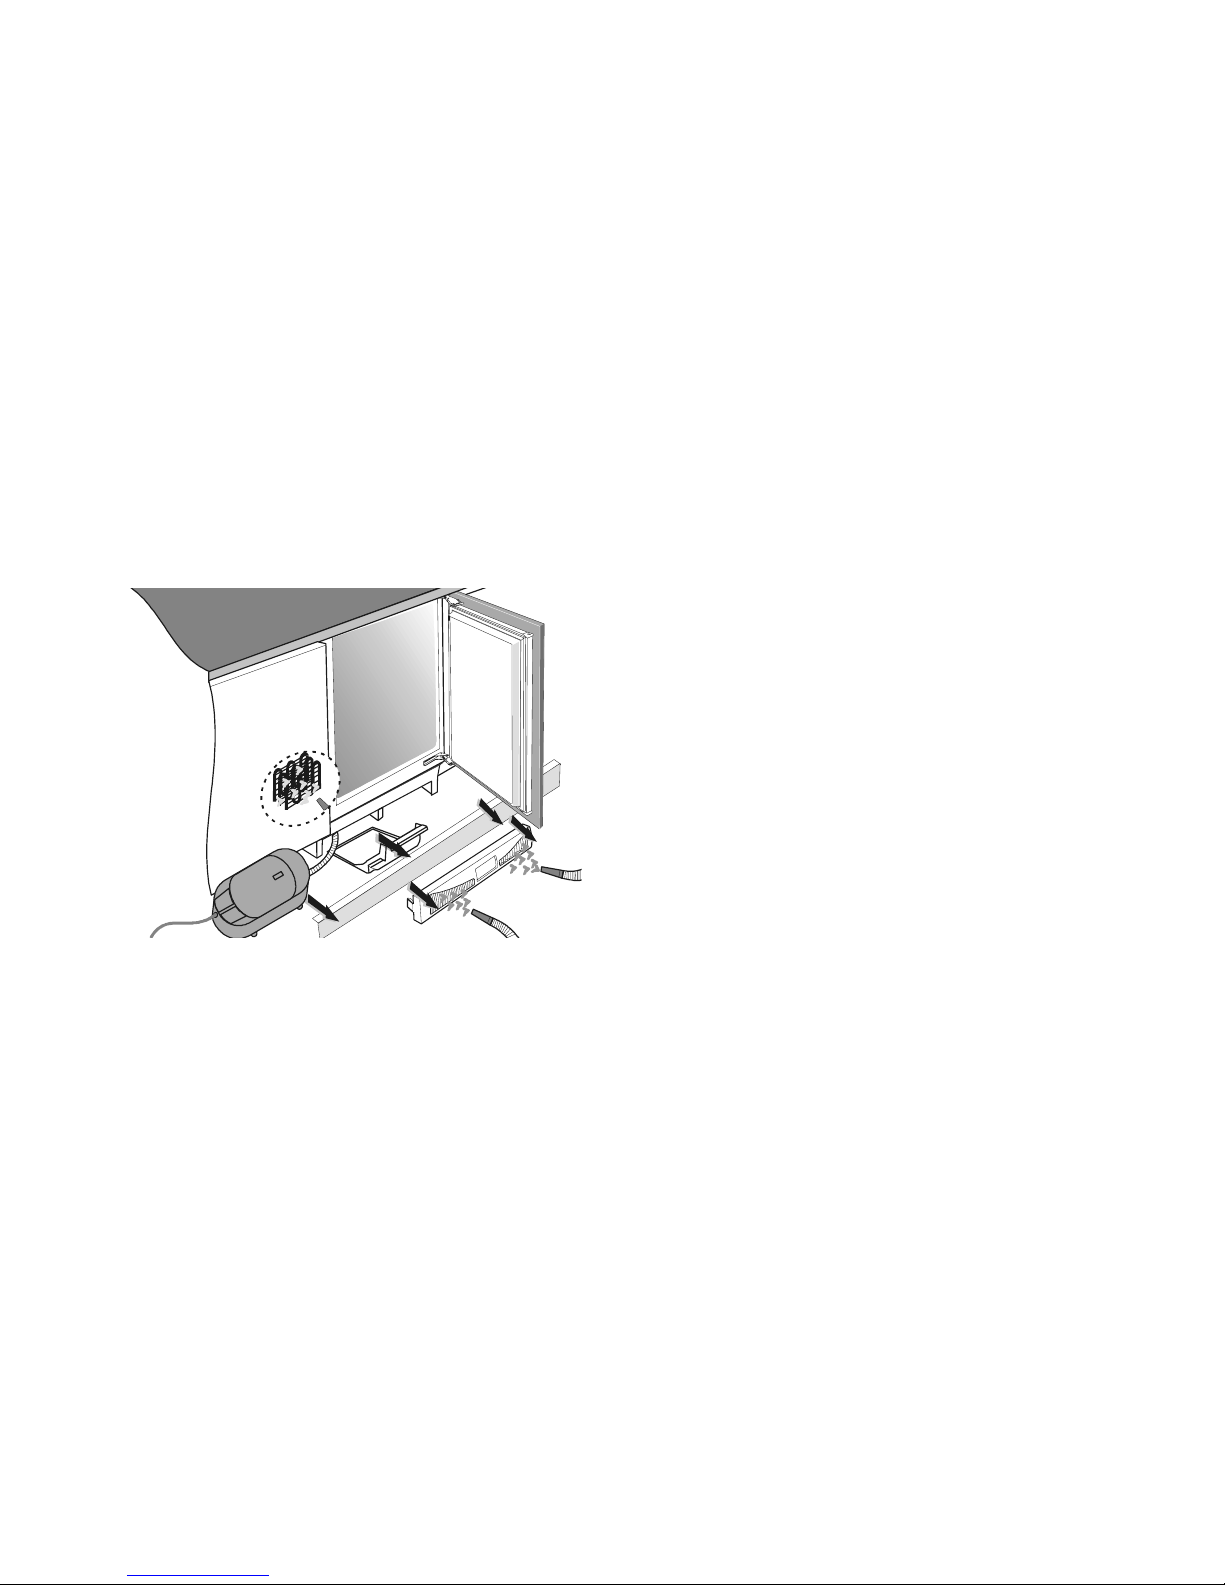
Caring for your Integrated Freezer
Cleaning the condenser
Make sure the appliance is
disconnected from the power supply.
Dust from the condenser should be
vacuumed as follows;
* Through the plinth grille, release the
fastener.
* Pull the grille towards you and remove it.
* Remove the bottom board of the kitchen
cabinet.
* Pull the condenser dish out.
* Use the vacuum cleaner to clean the dust
from the condenser.
* Replace the condenser dish and the grille
in the opposite order.
After cleaning, connect the appliance to the
power supply and reload it.
Periodical cleaning of the condenser.
Make sure the appliance is
disconnected from the power supply.
In order to optimize the operation of the
appliance and save energy, it is
recommended to periodically clean the
dust from the condenser at the back of
the appliance.
* Empty the contents of the appliance.
* Remove the supporting panel from the
bottom of the kitchen cabinet.
* Remove the screws fixing the appliance
to the kitchen worktop.
* Pull the appliance out and expose the
condenser at the back of the appliance.
* Unscrew the screws from the condenser
cover and remove the cover.
* Clean the dust and dirt from the
condenser.
After cleaning,refit the appliance back in
position, turn the power supply back on and
reload.

142570
14
Energy Saving
* Ensure that the ventilation grille is free
from dust
* Avoid keeping the door open for too long.
* Store food logically.Do not exceed the
storage period specified.
* Keep all food properly packed and
covered so as to avoid its frosting up on
the outside.
* Always allow hot food to cool to room
temperature before placing in the
appliance.
* Defrost frozen food in the refrigerator.
If an ice layer forms in the freezer defrost
it. This will improve the cold transfer and
reduce energy consumption.
* Keep the appliance door shut in the
event of a breakdown.This will delay the
cold loss and will help to maintain the
quality of the frozen food for longer.
If your Integrated
Freezer Won’t Work
Appliance is not working, all lights are
OFF:
* Is the appliance switched ON?
* Is the plug correctly fitted in the socket?
* Is the socket fuse intact?
* Has there been a power failure? (Plug in
another appliance to check).
Freezer is too cold:
* Is the temperature set too low?
* Has fast freeze been left ON, if so switch
it OFF.
Burbling noises are normal.
These are caused by the refrigerant flowing
round the refrigerant circuit.
A short clicking sound: This will be
heard whenever the refrigeration unit
(the motor) switches on or off
automatically.
Motor noise:
This will be slightly
louder for a brief period when the
refrigeration unit switches on.
The red light is on:
* The freezer compartment is too warm,
maybe because the door was opened
frequently or large quantities of fresh
food have been loaded.
Are the ventilation slots covered?
Is the temperature set properly? If
necessary set at a lower temperature.
When adjusted the red warning light
will go out. If the light does not go out
contact your nearest Belling Service
Agent.

142570
15
SERVICE
Please check your guarantee card for who to contact for service. Remember that service
agents may charge for visits (even during the guarantee period) if nothing is found to be
wrong with the appliance, so always check the instructions to make sure you have not
missed anything.
New World Customer Care Centre
Tel: 0870 444 9939
Before contacting a service agent, please note the following details about your cooker:
Model Number............................................
Serial Number ............................................
Date of Purchase .......................................
In order to provide a complete service history for your New World product, please ask the
service engineer to record the appropriate details in the chart below.
Date Nature of fault Parts Replaced or Repaired Authorised Stamp or Signature

142570
16
New World, Stoney Lane, Prescot, Merseyside, L35 2XW
NW801FZ June 2004
ZOPI 1066 142570/en (11-05)
Table of contents
Other New World Freezer manuals


