NEWHOUSE HARDWARE PGCM120 User manual
Inside Push Button: Place tune jumper on location A.
• Ding-Dong (two note tune)
Wireless Plug-In
Chime
This package includes (Style of push button and
chime may vary from illustration):
• Wireless plug-in chime
•
Wireless push button with battery (Specic
models include 2)
• Hardware pack
WARNING: To prevent possible
SERIOUS INJURY or FEATH:
NEVER allow small children near
batteries.
If battery is swallowed, immediately
notify doctor.
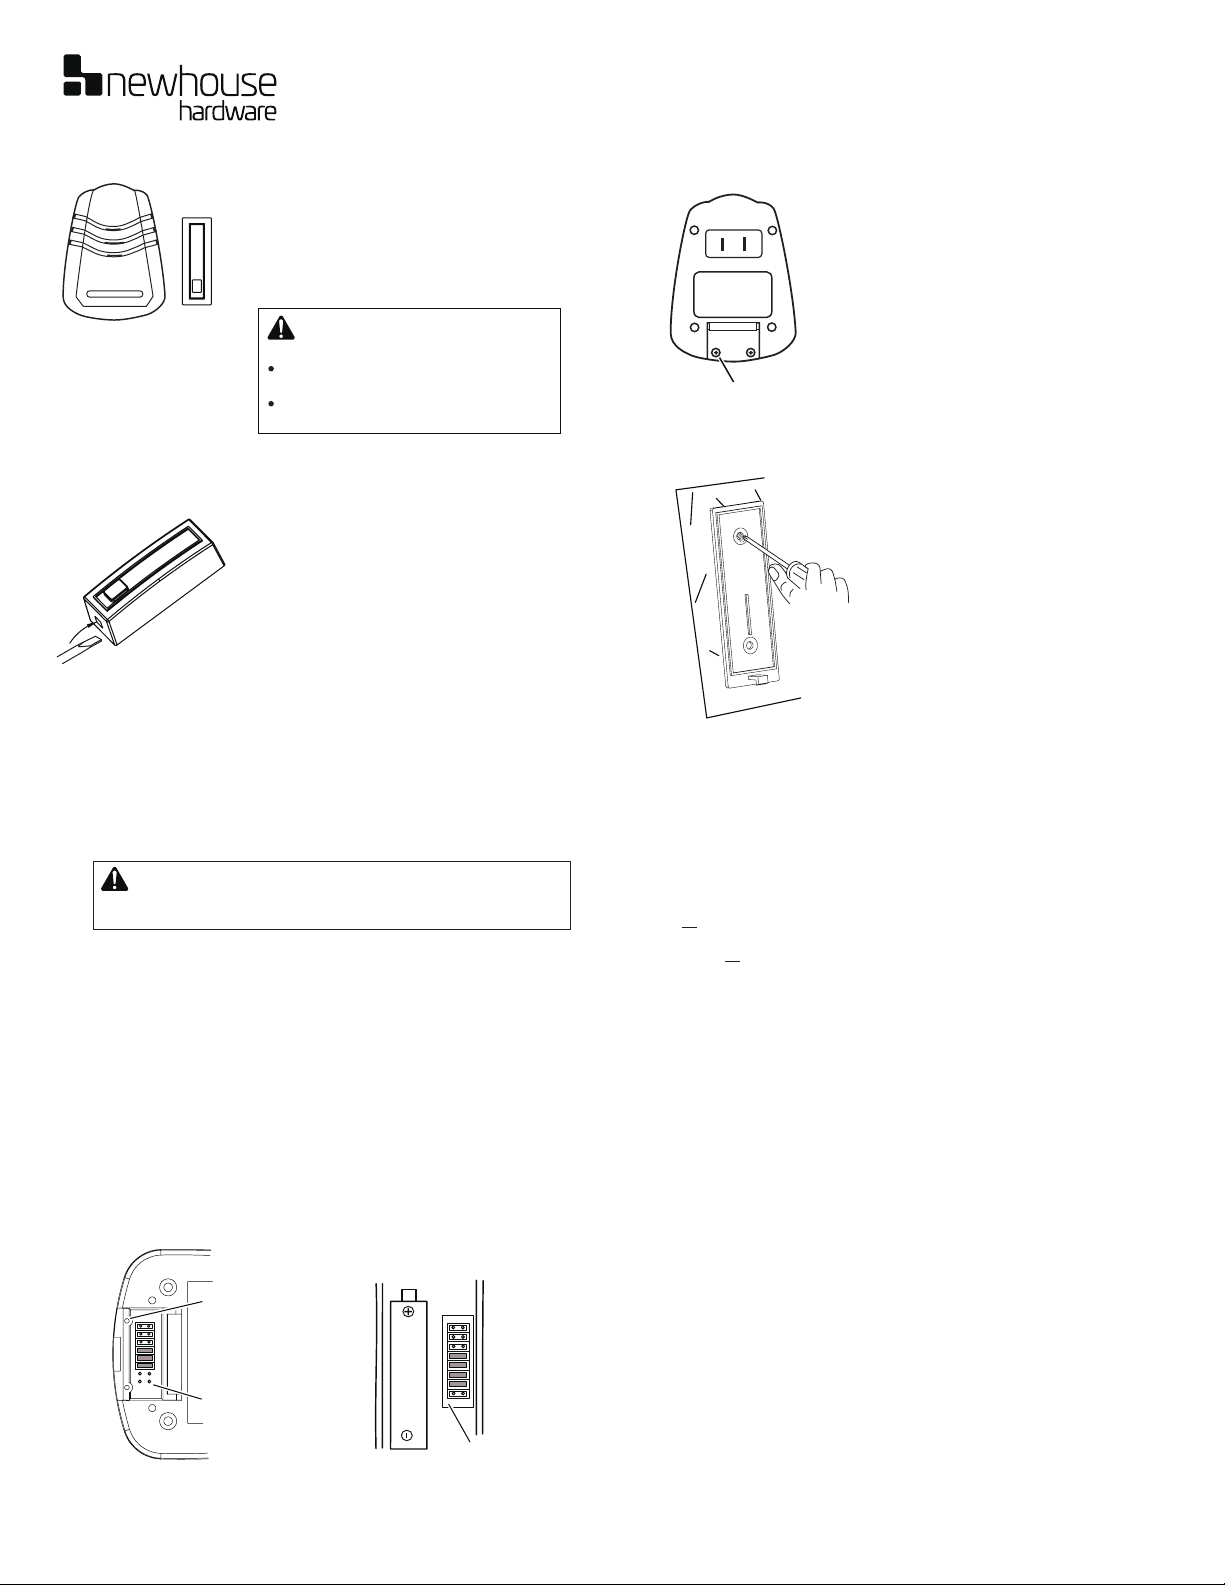
1. Install alkaline type A23 12 volt push button
battery (included). Remove back of case by
pushing in tab on bottom with a small screw-
driver (see Figure 1). See diagram inside push
button for correct battery orientation.Note: If
batteries are preinstalled, remove orange
battery tab.
2. Plug in wireless chime. To reduce the risk of
electrical shock, this equipment has a polarized
plug (one blade is wider than the other).
This plug will t in a polarized outlet only one
way. If the plug does not t fully in the outlet,
reverse the plug. If it still does not t, contact a
qualied electrician to install the proper outlet.
Do not attempt to bypass this safety feature.
3. Test range. Temporarily position push button
where you want it mounted. Press push button
to verify chime and push button work properly. If
chime does not sound, see Troubleshooting.
Tune Settings
WARNING: Disconnect chime unit from power source before
opening code access door. Close door and replace screw before
reconnecting to power.
Your wireless chime has dierent selectable tunes: Ding (one note), Ding-Dong
(two note), or Westminster (eight note) (Available on selected chimes). The
factory setting is for the Ding-Dong tune (or Westminster, when available). This
tune can be changed by following the instructions below.
• Ding (one note tune)
Inside Push Button: Place tune jumper on location B.
• Westminster (Eight note tune) (Available on selected chimes)
Inside Push Button: Remove jumper from location 8.
Chime: Add a jumper to location 8.
Note: AII models have both front and back door tune capabilities. We recommend
the back door use the Ding tune and the front door use the Ding-Dong tune
(or Westminster tune, available on selected chimes). Models that include two
push buttons will come factory set for front and back doors. Decals on the rear
of the push button will indicate its setting.
4. Mount push button. Use either screws or
double sided tape to mount push button.
• Screw Mounting: To mount with screws,
remove back of case by pushing in tab on
bottom with a small screwdriver (see Figure
1). Note: Remove material in screw holes
(if needed) beforie mounting with screws.
Attach back of case to door jamb or wall (see
Figure 3). Snap front of push button on.
• Tape Mounting: When attaching push button
using double sided tape, make sure the
surface of the door jamb or wall is clean.
To change the code, either (For models with 2 push buttons, change code
setting in both push buttons to match chime.):
• Add a jumper to the same location on both the push button and the chime
or...
• Remove a jumper from the same location on both the push button and the
chime or...
• Move a jumper on the push button from one location to another. Move the
corresponding jumper on the chime to match the new location in the push
button.
Example: Move jumper at location "5" to location "4" on both the push
button and the chime.
Note: Code positions 1 through 6 must be exactly the same for both the
push button and chime for this system to function. Positions 7/8 and A/B
are NOT used to change the code setting. See Tune Setting.
Code Settings
Inside Push Btton
1 2 3 4 5 6 7 8
++
Remove screw to
open access door
7/8 Tune Setting
(Not used on all
models)
1 2 3 4 5 6 A B
12V A23
Tune Setting
Back of Chime
Figure 4
Note: Some models might require the use of
tweezers to remove and replace the jumpers.
Figure 2
Jumper Access Door (see
Tune or Code Section)
Figure 3
3
2
1
4
Model: PGCM120
A. Chime does not sound:
• Make sure push button and chime codes are the same (see Figure 4).
• Check orientation of push button battery (See diagram inside push button
for correct battery orientation.)
• Check charge of push button battery, replace it necessary.
• Make sure the plug-in chime has power going to it.
B. Chime sounds when not intended (false triggers): Chime is receiving
interference from another wireless device; change the code setting (see
Code Setting below).
C. Batteries seem OK, but the chime does not work when installed:
• Do not mount chime or push button on metal or near metal studs. This
reduces the transmitter range. Use 1/4" to 1/2" (6 to 13 mm) wood shims
to move chime or push button o metal surface.
• Concrete oors may reduce range. Move chime away from oor.
• Try locating chime closer to push button.
D. Code Setting:
Troubleshooting
WARNING: Disconnect chime unit from power source before
opening code access door. Close door and replace screw before
reconnecting to power.
It is recommended to only change one code position at a time and then
check to see if system is functioning properly.
1. Unplug chime from power source.
2. Open the cases and locate the jumpers on both the push button and
chime (see Figure 4).
3. The push button and chime both have eight dierent jumper locations.
Jumper positions 1 through are used for setting the code.
5
CAUTION:
• Minimum distance around the apparatus for sucient
ventilation, no less than 5 cm.
• No naked ame sources, such as lighted candles, should
be placed on the apparatus.
• Attention should be drawn to the environmental aspects
of battery disposal.
• Use of apparatus in moderate climates.
AVERTISSEMENT:
• Distance minimum autour de l'appareil pour une ventilation
susante, pas moins de 5 cm.
• Aucune source de amme nue, telle que des bougies
allumées, ne doit être placée sur l'appareil.
• Il convient d'attirer l'attention sur les aspects
environnementaux de l'élimination des batteries.
• Utilisation d'appareils dans des climats modérés.
En
Fr
6
Questions? Please contact us at


