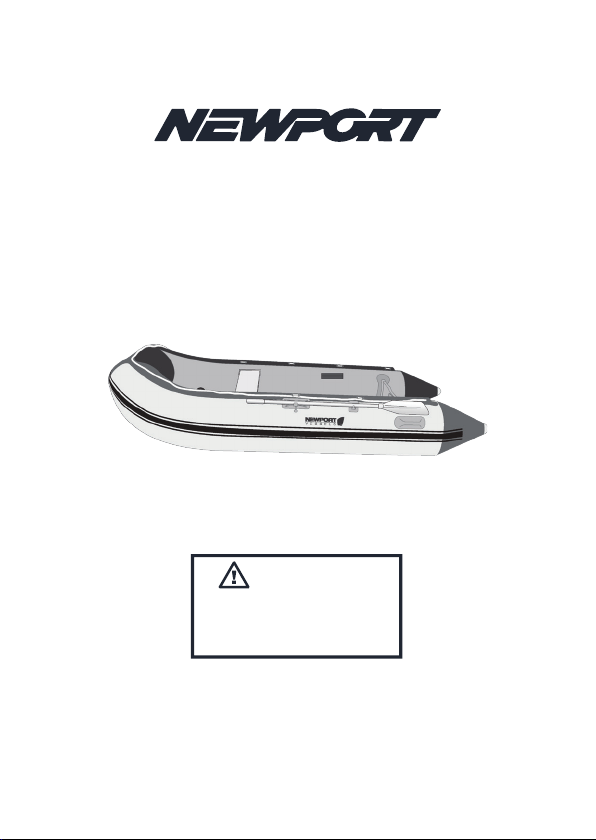
Newport CARMEL Original instruction manual
Owner’s Manual and
Safety Instructions
WWW.NEWPORTVESSELS.COM
Toll-free: (8660 721-0002
WARNING
WARNING: This product contains
chemicals known to the State of
California to cause cancer and birth
defects or other reproductive harm.


Dear Valued Customer,
Congratulations! You are now the proud owner of a Newport inflatable boat.
This full owner’s manual can be downloaded from the Newport website (www.
newportvessels.com/downloads). In addition, we invite you to visit the Newport
“Video Library” or “FAQ’s”. We have put together an extensive collection of
short video tutorials as well as answers to FAQ’s. We’ve found that videos can
be more detailed, viewed faster, and a lot of fun to watch, so we invite you to
browse the Video Library at the link listed below.
1. Visit: www.newportvessels.com
2. Hover over the top heading: “ABOUT NV”
3. Click “Video Library” or “FAQs”
If you have any questions or concerns, send us a chat message or give us a call!
Enjoy your Newport inflatable boat and happy boating!
Sincerely,
The Newport Team


CONTENTS
6
6
6
7
7
8
9
9
9
10
10
10
10
11
12
12
12
12
13
13
13
13
13
14
14
14
14
14
14
15
1.
2.
3.
4.
5.
6.
7.
8.
9.
Boat Models & Specs ..................................................................................
Conformity Declarations ...........................................................................
Parts ..................................................................................................................
Assembly .........................................................................................................
Operation Information ..............................................................................
Safety Guidelines: .......................................................................................
Repair Procedure ........................................................................................
Warranty ........................................................................................................
Glossary of Terms .......................................................................................
Assembly Preparation ........................................................................
Seat Installation ....................................................................................
Finish Inflation .......................................................................................
Oar Assembly ........................................................................................
Disassembly ...........................................................................................
Air Pressure Guidelines ....................................................................
Air Chamber Failure ..........................................................................
Operation Safety .................................................................................
Aspects of Environmental Protection .........................................
Loading ...................................................................................................
Operation: Rowing ..............................................................................
Operation: Outboard Motor ............................................................
Towing - Anchoring - Mooring .......................................................
Water Hazards ......................................................................................
Beaching .................................................................................................
Storage ....................................................................................................
Use in High Altitudes .........................................................................
Small Tears, Cuts, and Punctures ..................................................
Large Repairs of Skin, Seams, Bulkheads, and Transom .....
EC Declaration of Conformity ........................................................
Warranty Claim ....................................................................................

1. BOAT MODELS & SPECS
2. CONFORMITY DECLARATIONS
3. PARTS
EN ISO 6185 for boats below 2.5m length EC Approvals for boats larger than
2.5m according to EC directive 94/25/EC.
AIR FLOOR
MODELS
INFLATED
LENGTH CHAMBERS
INFLATED
WIDTH WEIGHT MAX
POWER
MAX
LOAD
MAX
PERSONS
CARMEL
SEASCAPE
SANTA CRUZ
7'7"
9'
10'
4.5'
5'
5'
3 + 1
3 + 1
3 + 1
80 lbs
98 lbs
108 lbs
4 HP
10 HP
10 HP
805 lbs
1067 lbs
1124 lbs
2
3
4
ATTENTION! Do not us a compressed air source (such as a compressor)
to inflate boats. Over-inflation through the use of compressed air may
result in ruptured seams and/or bulkheads
Before starting, layout all of the box contents to ensure that you have all of
the parts.
Seat(s)
Side Joiners
Rope
Repair
Kit*
Foot Pump Oars
Boat and Air Flooring Storage Bag
- 6 -
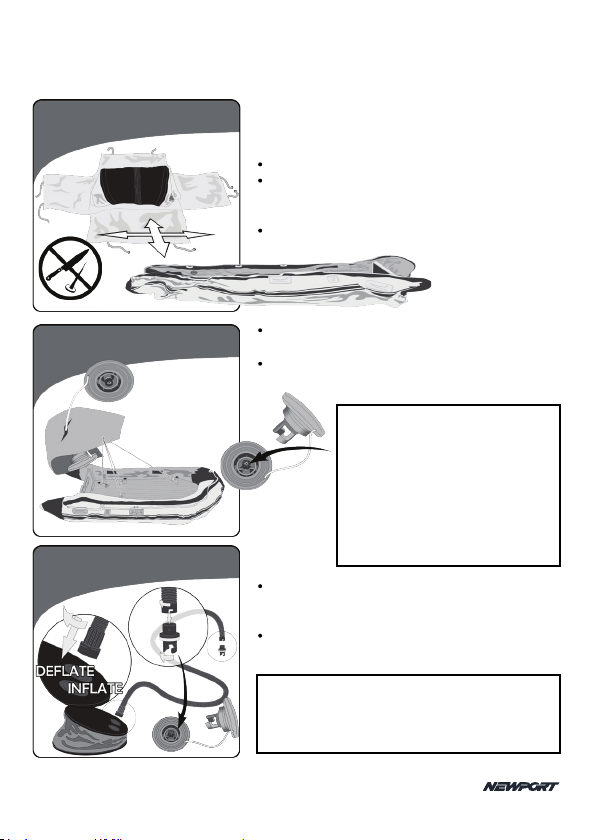
4. Assembly
Assembly Preparation
Find a smooth flat surface.
Remove any sharp objects from the flat
surface where the boat will be assambled
and inflated.
Unfold and spread out the boat flat.
Locate the inflation valves which are
tagged with a bright orange flag.
The valve retainer cap is inside of the
orange flag.
Attach the nozzle which is fixed to the
hose to the pump by screwing it clockwise
into the port marked “INFLATE”.
Attach the nozzle with the twist lock (as
shown) to the other end of the hose.
NOTE:
The one-way valve makes
inflation easy. The inner valve
design allows air to flow into the
hull but not out. Make sure the
plastic stem is in the lock position
for inflation, by pushing it in and
turning clockwise. To unlock the
valve and release air, push in and
turn counter-clockwise.
NOTE:
When you want to prepare the boat for
storage, attach the fixed end to the port
marked “DEFLATE” to pump to remove all air
from the boat.
LAYOUT ON FLAT
SMOOTH SURFACE
LOCATE INFLATION
VALVES
PREPARE FOOT PUMP
- 7 -
Tuck air floor under the hull with
the inflation valve facing up.
Make sure that the keel bladder
valve is aligned with the hole in
the air floor.
Tuck under
the lip of the
transom.
Fully inflate
the air floor
to 8 psi.
NOTE: When using the boat for the first time, fully inflate it by attaching the foot
pump to each of the hull chamber valves, one at a time, and when pumping, ensure
that a balance of pressure between the chambers is maintained until the boat has
been fully inflated.
When the boat is fully inflated, unscrew the valves and allow approximately 70%\
of the air to escape. Close valves again, and continue assembling the boat.
ATTENTION! For the rest of the assembly process - the boat should be filled to
approximately 30% air capacity.
Learn more
in the “Air
Pressure
Guidelines”
on page
10.
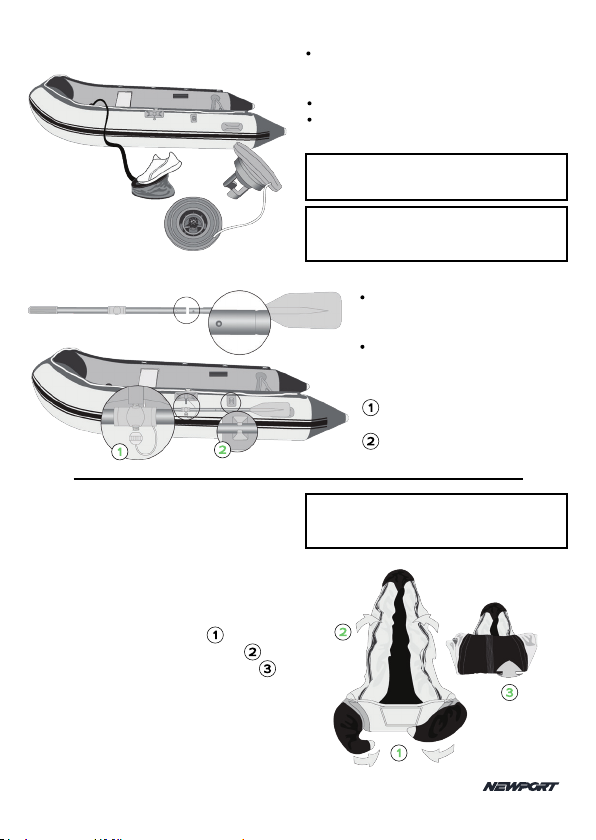
Seat Installation
Install the seat (or seats) by sliding the seat on
to the seat mounts on either side of the boat.
Slide both sides simultaneously until centered
on the mounts.
The seat will be held securely in place once the
boat is fully inflated.
INSTALL SEAT
- 8 -
Unscrew all air valves to deflate
the boat.
Remove the seat.
Remove air floor and deflate.
Using the foot pump as a suction device,
remove excess air from each chamber,
including air floor.
With the boat now flat, fold the back
end cones over the transom. Fold the
hull sides in toward the center. Roll
the transom over itself toward the bow.
Finish inflating thr air chambers one
after the other in order to maintain
equal amount of air.
Install valve caps.
Inflate the keel and screw on valve
cap.
Push two halves of the
oar together with button
aligned with hole.
Push button in and continue
sliding halves together until
the button pops up.
1.
2.
3.
4.
5.
Secure oar to the oar
attachment fixture.
Snap oar into the oar kep
when not in use.
NOTE: DO NOT inflate any chamber to
full capacity at one time.
NOTE: Make sure the plastic stem is in
the lock position. Screw cap on each
valve.
NOTE: The boat should be clean and dry
before rolling up for storage. Remove
any sand and debris.
Finish Inflation
Oar Assembly
Disassembly
- 9 -

5. OPERATION INFORMATION
Operation Safety
Cleaning Procedures
Air Pressure Guidelines
Rinse your boat, after each use. At
the end of a season, wash it
completely with soapy water or with
a mild detergent. Rinse, let dry then
apply talcum powder before folding
up the boat. Store in a dry place
Inflate the boat with the foot
pump supplied. It is the responsibility of the boat’s
operator to know all laws applicable
to boats and to comply with those
laws when equipping and operating
the boat.
Rules and regulations may vary
depending on the following
conditions:
The location of the boat’s operation
and the requirements of local
authorities; the use of boat, the
particular time of the day during
which the boat is being used, the
conditions under which the boat is
being operated, and the size, speed,
course, kind of boat (power, oars,
etc.) and mode of operation.
In addition to knowing and following
the applicable laws, please note the
following:
1. Each passenger should wear the
appropriate clothing and wear an
approved life jacket.
2. Ensure that all basic equipment is
on board the boat, including paddles
or oars and an inflation pump. Be
aware of the possible necessity of
additional safety equipment.
The maximum inflation pressure
is 3.6 PSI for the boat and 4.5 PSI
for the keel and 8 PSI for the
inflatable floor. Depending on
climate and operating conditions,
the pressure may require
monitoring during boat use to
maintain a correct inflation level.
A boat inflated for 2 to 3 days
may lose pressure and require
topping off to the correct
operating pressure.
When inflating, maintain a balance
of air between air chambers to
prevent damage to air chamber
bulkheads.
1.
Air Chamber Failure
Should an air chamber get
punctured, shift the weight to the
opposite side. Prevent, as much as
possible, further air leakage (by
hand or with webbing) and
immediately proceed to the
nearest shore.
Check that on-board loads are not
chafing or puncturing the boat skin.
1.
2.
2.
3.
4.
IMPORTANT: DO NOT use a vinyl-
preserving agent on fabric surfaces.
Chemicals in such agents will dry out
the fabric.
NOTE: When using a foot pump, the
boat can never be over-inflated. If
using an electric inflater, finish the
inflation procedure with the pump
supplied to obtain the correct
inflation pressure.
Beware of oshore winds and currents!
WARNING: DO NOT use a compressed
air source (i.e. compressor) to inflate
the boat. Over-inflation may result in
ruptured seams and/or bulkheads.
- 10 -

6. SAFETY GUIDELINES
3. A boat should not be operated by
an individual under the influence of
drugs or alcohol.
4. Weight must be distributed evenly.
If your motor-equipped boat is lightly
loaded, do not accelerate suddenly.
Stability and handling problems can
occur if the operator mishandles the
craft.
5. The carrying capacity, engine
power, and maximum weight must
not be exceeded.
6. Outboard motors are dangerous
and can cause injury and death when
improperly operated. Never equip or
operate your boat with a motor that
is not approved for use with the boat.
Never approach a swimmer in the
water or allow a swimmer to
approach the stern of the boat while
the engine is running.
7. Attention should be given to
winds, currents, and tides, which can
affect fuel consumption.
8. When boating in unkown waters,
it is always a wise precaution to
obtain local knowledge before
setting out.
9. Always tell someone your time
and place of departure, your
proposed route and the time you
expect to return.
10. The display of navigation lights
may be required. The user should
ensure that the boat should not be
operated during darkness or other
hazardous weather conditions unless
correct navigational lighting has been
fitted and is operating properly.
11. Safety courses on boat handling
are available in most countries from
national or local organizations.
Operators should acquaint themselves
with the general rules of the waterways
and the local water conditions before
taking a boat out.
12. On extended voyages due
consideration must be given to safety
equipment such as flares, first aid kit,
anchors, etc.
When boating: learn and respect local
regulations and practices. Do not
neglect the safety rules, this could
jeopardize your life and the lives of
others.
CAUTION! DO NOT EXCEED
AUTHORIZED NUMBER OF
PERSONS OR WEIGHT.
NO ALCOHOL/DRUGS: Do not
drink alcohol or take drugs
before or while operating your
boat. Ensure that all passengers
remain sober.
If using outboard motor, Always
use the stop switch lanyard:
Your outboard comes equipped
with a stop switch safety lanyard
to prevent a runaway boat in
Use persoonal flotation device
(PFDs): PFDs are comopulsory
equipment. Wear them.
Make sure your passengers
remain seated: sitting on the
buoyancy tubes may be
comfortable at rest or at low
speeds provided your passengers
case the operator falls overboard. Attach it
to the operator, it could save a life. THE
PROPELLER IS DANGEROUS. KEEP HANDS
AWAY FROM THE PROPELLER.
use the grab line. At planing speeds, in rough
water or during sharp turns, all passengers
should position themselves in seats or on the
- 11 -

Aspects of Enviromental
Protection
Operation: Rowing
Operation: Outboard Motor
NOTE: DO NOT use oars as levers: they
could break!
floor. We will take no responsibility if this
warning is disregarded.
injured if they are outside the boat.
operating near beaches and launch sites.
Shut off the motor when operating near
someone in the water.
To protect waterways from the
spread of invasive species, always
clean your boat after each use to
remove unwanted hitchhikers such as
Zebra Mussels and other aquiatic
pests.
In case of oil and fuel leakage, or in
polluted or dirty waters, clean or
recuperate the waste in a manner
appropriate to the local environment.
Excessive noise and exhaust emission
should be avoided. Particular care
should be used in the disposal of
residues, e.g. of paint, paint removing
substances or other cleansing agents.
Loading
DO NOT EXCEED THE WEIGHT
CARRYING CAPACITY INDICATED
ON THE BOAT IDENTIFICATION
PLATE.
1.
Each person in the boat should wear a
life jacket (personal flotation device).
Oars or paddles. and a repair kit should
be carried on board for emergencies.
All loads placed in the boat should be
distributed evenly for proper boat trim.
2.
Inflatable boats are equipped with oars
and thole-pins; certain models also come
with a rowing-seat as standart. Ensure
seat is properly installed.
Install oars in thole-pins, attach thole-pin
cap screws.
1.
WARNING!
Local water conditions must be taken
into account before operating the boat
with oars or a small outboard motor.
Boat power may not be strong enough
to overcome currents in tidal inlets,
small channels or shallows of shoal
water regions.
DO NOT OVERPOWER AND
EXCEED THE MAXIMUM WEIGHT
OF THE MOTOR!
Overpowering can result in severe
handling and/or stability problems
with serious consequences or loss
of motor.
Loose motor mounting screws will
cause erratic boat operation and
possibly the loss of your outboard
motor!
Read the manual carefully before
assembling or operating the boat.
3.
1.
2.
2.
3.
4.
OBSERVE THE RULES OF THE SEA.
LEARN TO CONTROL YOUR BOAT
CORRECTLY AND TO RESPECT THE
NAVIGATION RULES. TAKE A BOATING
SAFETY COURSE TO IMPROVE YOUR
KNOWLEDGE. ALWAYS OPERATE WITH
COURTSEY AND RESPECT.
No bow riding: Bow riding is
illegal in most areas and is
extremely dangerous. Be
especially careful when
docking: arms and legs may be
Keep clear of swimmers and
divers: Always avoid areas
where divers/swimmers are in
the water. Keep a sharp
lookout especially when
- 12 -

Towing - Anchoring -
Mooring
Water Hazards
Beaching
The inflatable boat MUST BE EMPTY
when it is towed by another boat.
The towing line should be secured
to the “D”- rings on each side of the
inflatable boat. The boat must be
under constant supervision when it
is being towed.
Anchoring and mooring lines should
be secured to the bow “D-ring”.
WARNING: For towing use only the
Towing Bridle. Never tow your
tender by the bow ring. The bow
ring should only used to attach a
mooring line.
1.
Storage
Use in High Altitudes
After use, the boat and all
components should be washed with
a mild soap and rinsed with fresh
water. Dry all parts before storing in
the carrying bag. This will help
prevent mold or mildew.
Wooden parts should be inspected
for damage or deterioration. Surface
scratches or abrasions should be
covered with a marine grade varnish.
To keep the boat looking new, store
the boat in a cool and dry place and
avoid excessive exposure to direct
sunlight. UV exposure will degrade
PVC and can result in adhesive failure.
IMPORTANT: Waxes or cleaners
containing alcohol SHOULD NOT be
used on the boat fabric. Alcohol will
prematurely dry out the boat fabric.
PVC has a low resistance to
chemicals. Use MEK and other harsh
cleaners lightly.
1.
To avoid damaging boat during
storage, do not place heavy objects
on it.
Store off the ground. Rodents may
find their way into your boat, creating
nests and chewing through the PVC
materials.
High humidity may affect the adhesive
on the boat. It is best to stoore your
boat in a climate controlled area.
4.
Normal full inflation pressure is 3.6 PSI
for the tubes and 4.5 PSI for the keel
& 8 PSI for the drop stitch inflatable
floor. If the boat is inflated when at
sea level (low altitude) and is brought
to a high altitude (i.e. for use in a
mountain lake), the air pressure must
be reduced at the higher altitude to
prevent over inflation.
1.
5.
6.
2.
3.
Wrecks, reefs, rocky shores,
sandbanks, and shallows should be
avoided or approached with caution.
When boating in unfamiliar waters,
obtain information on local water
hazards before setting out.
1.
2.
It is recommended not to use an
engine when beaching. Do not drag
the boat across rocks, sand, gravel
or on a pavement as damage to the
boat skin may result.
If the boat is to be temporarily left
on a beach, part of the boat should
be left in water so that the internal
heat caused by exposure to sunlight
can escape and so that air pressure
in the tubes can decrease.
Cover the boat to block direct
exposure to sunlight if the boat is to
be removed from the water for an
extended period of time.
1.
2.
3.
2.
- 13 -

7. REPAIR PROCEDURE
SMALL TEARS, CUTS, AND
PUNCTURES
8. WARRANTY
The repair of a small leak or puncture
less than 1/2 inch (12.7mm) can be
done with a round patch, 3 inches
(76.2mm) diameter, minimum.
Both patches and surface on the
boat must be dry and free of dirt
and grease.
Apply 3 thin, even coats of adhesive
to the surface of the boat and the
patch. Wait 5 minutes between each
coat. After the 3rd coat, wait 10-15
minutes before placing the patch on
the boat skin.
Wait for at least 24 hours before re-
inflating the boat.
Designation of the boat: Inflatable
Boat.
Boat Type: The Seascape and The
Santa Cruz.
Main Dimensions: (9’x5’) and (10’x5’)
Design Category: C (designed for
voyages in coastal waters, large bays,
estuaries, lake and rivers where
conditions up to, and including, wind
force and significant wave heights up
to, and including 2m may be
experienced.)
Certification Module: AA
Application Directive: EC-Dir
(94/25/EC) Recreational Craft
The product described above meets
the essential requirements of Directive
94/25/EC Annex 1, points 3.2 and 3.3
Certificate of Conformity No.:
88.01.0618, 88.01.0626, 88.01.0629,
88.01.0630, 88.01.0632, 88.01.0633,
88.01.0635, 88.01.0636, 88.01.0638,
88.01.0639, 88.01.0640, 88.01.0641,
88.01.0645, 88.01.0646.
View www.newportvessels.com/
warranty-info/ for all warranty info.
Steps to Complete Warranty Claim:
1. Visit: www.newportvessels.com
2. Click “Warranty Claim” at the bottom
footer.
3. Fill in all information and click
“Submit”:
When boating: learn and respect local
regulations and practices. Do not
neglect the safety rules, this could
jeopardize your life and the lives of
others.
1.
3.
4.
2.
Warranty Claim
For all repairs it is recommended to
visit the video library at
www.newportvessels.com/video-
library/ for instruction.
EC Declaration of Conformity
Large Repairs of Skins, Seams,
Bulkheads, and Transom
According to EC Directive
“Recreational Craft” 94/25/EC, Boat
XV
We hereby declare that the boat
describe below, at the time it is
placed on the market, meets, in its
design, type and construction, the
basic safety requirements of the; EC
Directive for Recreational Craft
In the event of alterations,
modifications made to the boat which
have not been agreed by us and
which affect the “basic safety
requirements”, this declaration no
longer applies to that boat and is
therefore null and void.
- 14 -
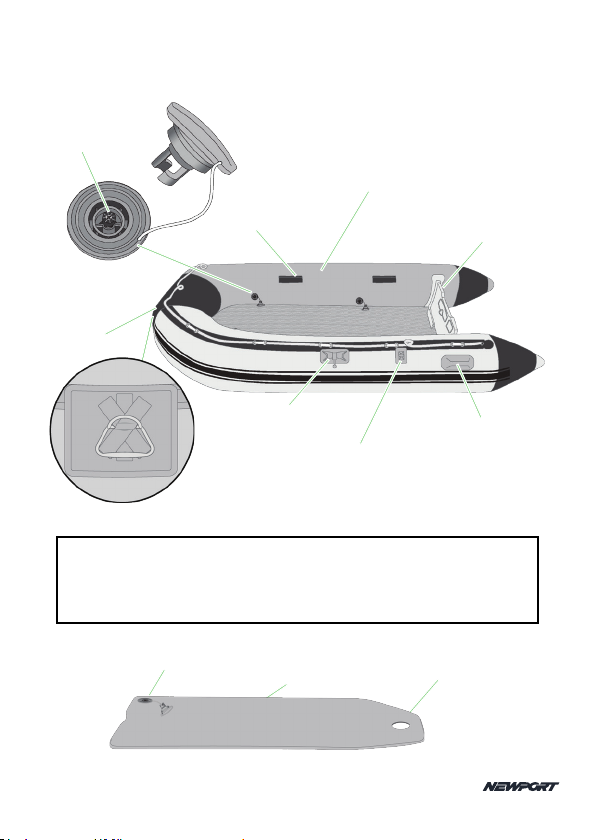
9. GLOSSARY OF TERMS
NOTE:
The one-way valve makes inflation easy. The inner valve design
allows air to flow into the hull but not out. Make sure the plastic valve stem
is in the lock position for inflation, by pushing it in and turning clockwise.
To unlock the valve and release air, push in and turn counter-clockwise.
VALVE
RETAINER
CAP
VALVE
STEM
SEAT
MOUNT
HULL
TRANSOM
INFLATION
VALVE
BOW
OAR
ATTACHMENT
FIXTURE
OAR KEEP
BOW
D-RING
AIR FLOOR
INFLATION
VALVE AIR FLOOR HOLE FOR
KEEL VALVE
ACCESS
GRAB BAR
- 15 -

This manual suits for next models
2
Table of contents
Popular Boat manuals by other brands


Jeanneau
Jeanneau SUN ODYSSEY 41 DS owner's manual

Meridian
Meridian 490 Pilothouse owner's manual

Advanced Elements
Advanced Elements AdvancedFrame Expedition AE1009 owner's manual

Robo Marine Indonesia
Robo Marine Indonesia GEOMAR user manual

Swallow Boats
Swallow Boats BayRaider owner's manual

X SHORE
X SHORE EELEX 8000 owner's manual


