Nexian NexiCam User manual

NexiCam™
The NEXbest thing™
Digital Camera for the Compaq iPAQ™Pocket P
C
Digital Camera

TABLE OF CONTENTS
Introduction
Getting Started
What’s in the package
What you need
Installing NexiCam software
Connecting the NexiCam and the iPAQ Pocket PC
Using the NexiCam
Icons and Buttons
The Controls on the Camera
Capturing Images
Photo Resolutions
Preview Mode
Capturing Mini-Movies (Video)
Settings
Setting the Capture Timer
Viewing Images
Storing Images
Beaming Images to other Handhelds
Bringing Images to Your Computer
Viewing Images and Mini-Movies on Your Computer
Specifications
Warranty
3
4
4
4
6
7
8
8
8
10
10
11
12
12
13
13
13
14
15
16
17
18
Your NexiCam Guide

3
Introduction
It’s the NEXbest thing™ when
the Compaq iPAQ™ Pocket PC
becomes a digital camera with
the NexiCam™, the first,
revolutionary digital camera
designed specifically for the iPAQ.
Welcome to the next frontier of
digital photography, combining
sharp, full color or black and white
photos, video clips and even video
teleconferencing with the power
of your iPAQ to create, store, send
and manage images more precisely
than ever before.
In this guide, you will learn just
how simple it is to set up and use
your NexiCam, as well as how to
work, manipulate and send images
from your iPAQ and on your PC.
We hope you will enjoy this
revolutionary new product, and
use it as your handheld window
to the world around you.
www.nexian.com

4www.nexian.com
Getting Started
What’s in this package:
Inside the NexiCam package you should find:
(a) the NexiCam
(b) CD-ROM containing NexiCam software
(c) NexiCam At-A-Glance Card
(d) warranty registration card/information
If ANY of these items are missing, contact
your retailer directly and/or Nexian by e-mail
(858) 623-1544 or via the Internet at
www.nexian.com. Should you contact
Nexian, we will investigate your situation
and try to help resolve it.
What you need:
On your desktop computer:
You will need a personal computer equipped with
at least the following:
• Microsoft Windows® 95, Windows 98,
Windows ME, Windows 2000 or Windows
NT Workstation 4.0 with a 486/33DX or
higher processor (Pentium 90 MHz
recommended). This product also supports
Microsoft Windows XP (Home or Professional)
on systems meeting minimum requirements
for XP usage.
•12MB of memory for Windows® NT or 8MB of
memory for Windows® 95 and 98
•Hard disk drive with 10 to 50 MB of available
hard disk space (actual requirements will vary
based on selection of features and user's system
configuration)
• Available 9 or 25 pin communications port
(adapter required for 25 pin communication
port), or USB connector (for iPAQ Pocket PC)
• CD-ROM drive
• VGA or higher resolution graphics display
•Microsoft ActiveSync installed on PC and a
partnership established with your iPAQ Pocket
PC (see iPAQ Pocket PC manual for directions).

On your Compaq iPAQ Pocket PC:
You will also need a Compaq iPAQ Pocket PC
equipped with at least the following:
• 16 MB of RAM for Program Storage
•16 MB of RAM for Data (image) Storage
•Pocket PC or Pocket PC 2002 software
• SVGA screen display – color is preferred
•Synchronization Cradle or cable to connect
to PC
• ActiveSync installed and running on the iPAQ
(ActiveSync is pre-loaded by Compaq – make
sure the program has not been deleted
or damaged)
5www.nexian.com
Getting Startedcontinued

6www.nexian.com
Getting Startedcontinued
Installing the NexiCam software:
You must install the NexiCam software on the
iPAQ Pocket PC before using the camera. If you
do not, the iPAQ will not recognize the NexiCam
and will not take pictures.
Installing the NexiCam software on your iPAQ,
however, is a simple process. Here’s what to do:
(1) Insert the NexiCam installation CD in the
CD-ROM or DVD-ROM drive of your computer
(2) If you’ve selected “AutoPlay” for CD-ROMs,
the disc will open up and you can select
“Setup” from the file/program menu
(3) Otherwise, use the Windows file explorer to
open the file menu on the CD and select
“Setup” to launch installation
(4) The program will ask you where to save the
installation files. Select a location by clicking
“Browse…,” or leave the default location
and click “Next”
(5) The computer will then schedule the NexiCam
software for installation on your handheld
during your next synchronization.
(6) Place your iPAQ Pocket PC in the docking
station or connect the synchronization cable
to the iPAQ Pocket PC. If ActiveSync doesn’t
automatically start, click on the desktop
ActiveSync icon or the ActiveSync icon on
your iPAQ Pocket PC.
(7) The NexiCam software will be installed during
this synchronization – do not disconnect the
iPAQ Pocket PC during this time. Wait until
the synchronization is finished.
(8) The program will ask if the “Nexian
NexiCam” should be installed in the default
installation directory… Click “Yes”
(9) It will ask you to check your mobile device
screen to see if there are additional steps
necessary to complete the installation
(10) On your iPAQ Pocket PC, click “Yes” to
restart
(11) When the ActiveSync is finished, your
NexiCam software is installed on the iPAQ
Pocket PC. End the session, disconnect the
iPAQ and you’re ready to go!

Getting Startedcontinued
Connecting the NexiCam and the iPAQ:
Insert the iPAQ Pocket PC into the NexiCam
sleeve and gently press the iPAQ down until it
meets with the connector on the sleeve. Your
camera is now ready to use.
7www.nexian.com

8www.nexian.com
Using the NexiCam
(1) Turn on the iPAQ Pocket PC. While
starting, the NexiCam will be recognized
and you can start the camera application
from the iPAQ “Programs” menu.
(2) Make sure the lens cap is moved away
from the lens (slide the lens cap) so the
lens can focus.
(3) The camera will start in “Camera”
mode, and will seek to focus on an image.
Icons and Buttons
The Controls on the Camera
In Camera Mode, there are five indicators on
the top of the screen: the zoom level (1X or 2X),
the image size (e.g. 800-by-600), the Camera
Mode icon (which changes to a picture of an
album in Album Mode), the iPAQ Pocket PC
battery power remaining percentage, and the
storage space remaining (number of pictures
remaining and megabytes of memory remaining).
These indicators can give you a quick “read” on
how the NexiCam is functioning.

There are four onscreen buttons:
Preview:initiates Preview Mode
2X: toggles normal zoom and double zoom
Motion Capture:initiates motion
capture mode
Nexian logo: clicks shutter
Zoom
Resolution
Camera/Album Mode
iPAQ Battery Level
Number of Pictures Remaining
9www.nexian.com
Using the NexiCamcontinued
10 www.nexian.com
Using the NexiCamcontinued
The buttons to the left (if the iPAQ Pocket PC is
sideways) have the following functions during
Camera Mode:
•The “Calendar” button will toggle between
normal zoom and 2X zoom
•The “Contacts” button inverts the image
display in the viewfinder
•The “QMenu” button toggles between camera
mode and album mode
•The iPAQ “QStart” button (rightmost)
exits the NexiCam application
The buttons to the left (if the iPAQ Pocket PC is
sideways) have the following functions during
Album Mode:
•The “QMenu” button toggles between camera
mode and album mode
•The iPAQ “QStart” button (rightmost)
exits the NexiCam application
Capturing Images
Images are captured using either the “Voice
record” button or the on-screen shutter button.
Press either to capture an image.
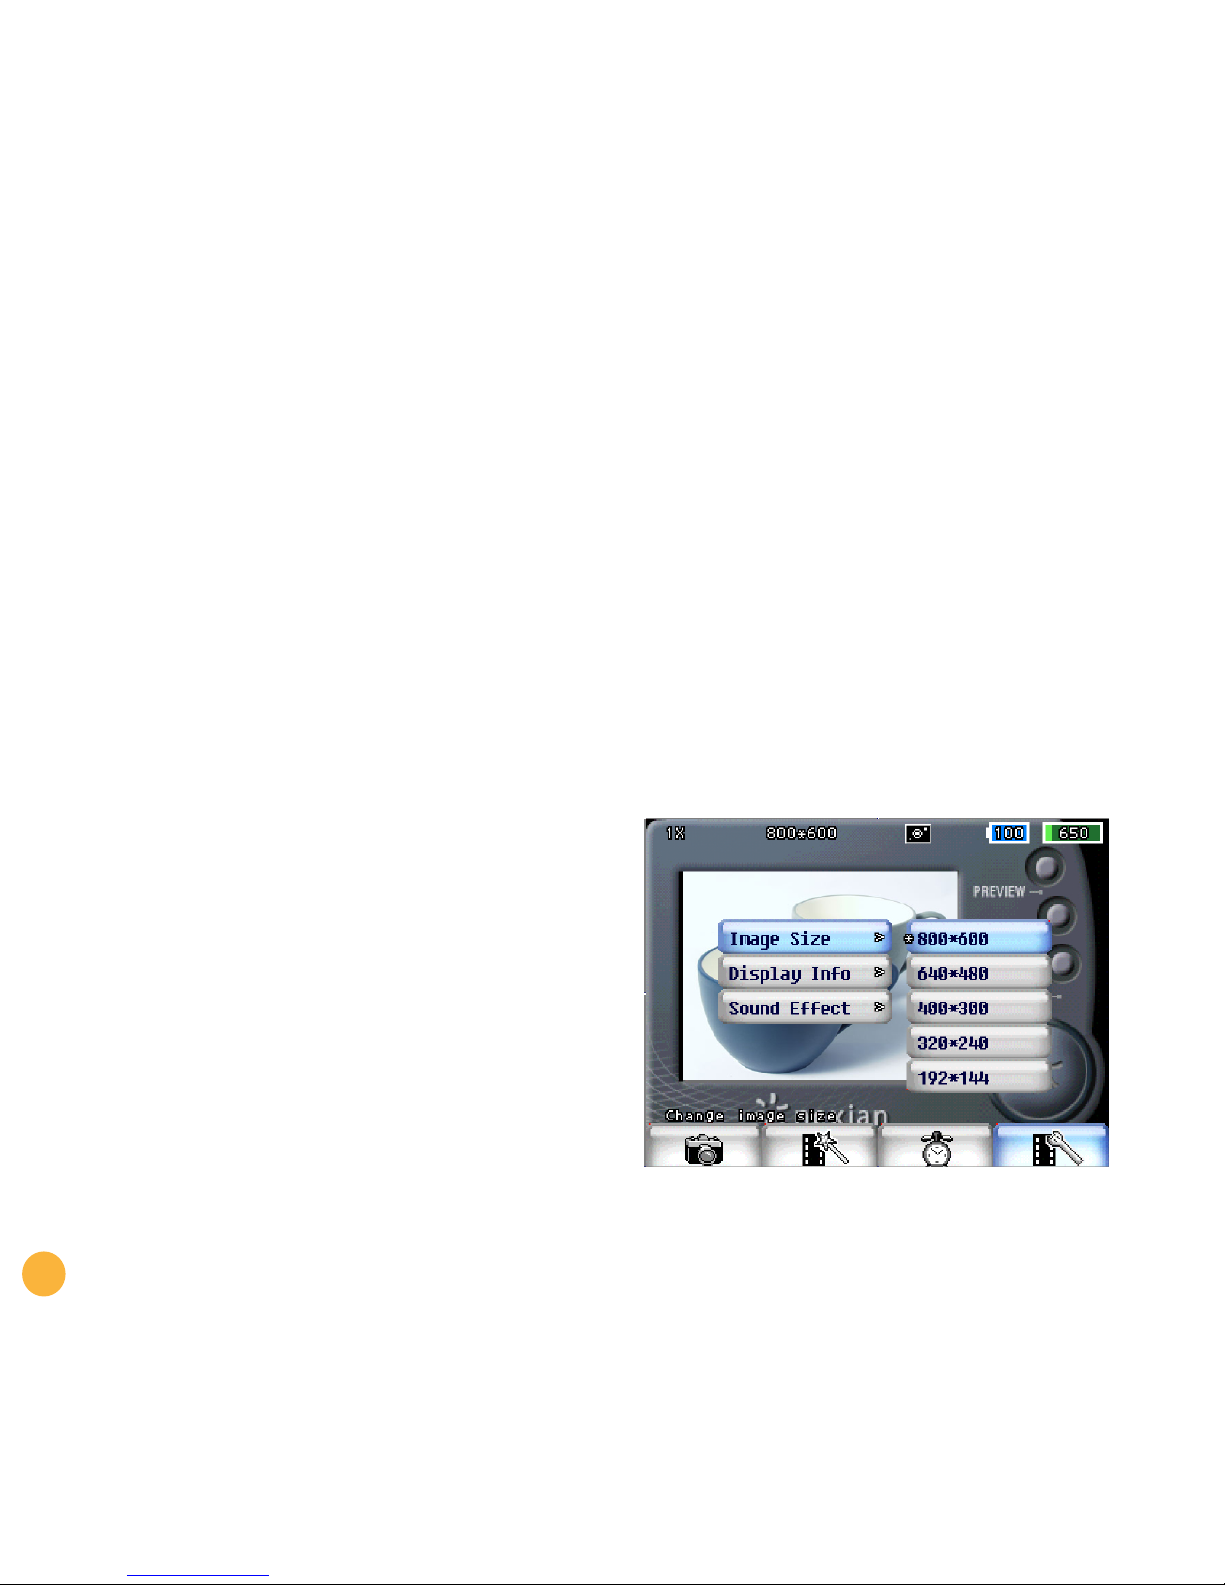
Photo resolutions
The default resolution for the NexiCam is 800 by
600 pixels, known as SVGA resolution. While in
camera mode, tap the lower edge of the screen.
A row of on-screen icons appears:

Using the NexiCamcontinued
Select the right-most button (film strip and
wrench) and then, on-screen, tap the “Image size”
button. A menu will appear at right with five
image size options:
• 800 x 600
• 640 x 480
• 400 x 300
• 320 x 240
• 192 x 144
Tap the button you desire and the image will be
changed accordingly.
NOTE: If you decrease the image resolution,
the quantity of remaining pictures will
increase.
Preview mode
After snapping a still picture, it will automatically
enter “Preview mode.” Preview mode can also be
accessed by pressing the “Preview mode” button
in Camera Mode. If you wish to delete it, press the
joystick button to the left (if the iPAQ is sideways)
and the picture will be erased. Pressing the joystick
button in will save the picture.
11 www.nexian.com
this by switching the exposure setting to 'Manual'.
view finder screen may fluctuate. You can change
control can be too sensitive and the brightness of
in some very bright conditions, the automatic
This setting will work in most cases but
Default setting for exposure is 'Auto'.
Exposure Setting

12 www.nexian.com
Using the NexiCamcontinued
Capturing Mini-Movies (Video)
Capturing video involves pressing the
“Motion capture” button onscreen. The
pre-determined capture length will then be
activated: the default length is 15 seconds.
There is no audio recording along with the video
capture. To stop recording, press the “motion
capture” button again.
Settings
To alter the length of a video capture, press the
“Camera” icon button on the lower part of the
display screen. Selection “Motion capture” and
then select 15, 30 or 45 seconds. No other
settings can be adjusted.

Using the NexiCamcontinued
Setting the Capture Timer
To put yourself in the picture – or to take a photo
at a specific time – use the “Capture timer”
feature. This is activated by selecting the “Clock”
icon from the lower portion of the screen. You can
select the amount of time you wish the shutter to
be delayed, from 5, 15 or 20 seconds. Once
selected, the camera will beep every second and
the shutter will “Wait” the specified time before
snapping a picture. This feature must be activated
by pressing “On” each time you wish to utilize it.
Viewing Images
You can view your photos on the iPAQ Pocket PC
whether or not it is seated in the NexiCam sleeve.
To do this, start the NexiCam application and select
the “Camera” icon in the lower left corner. Tap
once to select Album mode, and then you can
view pictures in “Thumbnail,” “Frame” or
“Slideshow” mode.
To select a display mode, tap the Album icon and
then select the desired mode from the pop up
menu. If “Slide show” is selected, you will have
the option of determining how many frames-per-
second are shown.
Storing Images
Your iPAQ Pocket PC’s memory can be used
for image storage, as can any available memory card
(e.g. SD, CF) on the iPAQ Pocket PC. Your NexiCam
sleeve is equipped with a Type II Compact Flash card
slot for additional memory storage or a wireless
modem.
To store pictures on a Compact Flash card:
(1) Remove the protective holder from the CF
slot on the NexiCam
(2) Insert the CF memory card
(3) Select Album Mode
(4) Click on the Album Menu (the second button)
(5) Click “Edit Album”
(6) Click the “Add” button
(7) Press “+” and then press the “+” sign next
to Storage Card
(8) Click “OK” or make a new folder by clicking
the “New Folder” button and then click “OK”
(9) Select the desired folder and click “OK”
(10) Click on the Album Menu again
(11) Click “Select Album” and select the desired
folder (default “My Pictures”)
13 www.nexian.com

14 www.nexian.com
Beaming Images to other
Handhelds
Your photos are stored in the “My Pictures”
sub-folder of the “My Documents” on your iPAQ
Pocket PC. Using the “File Explorer” program, you
can select and beam an image to other Pocket PCs
using the built-in Infrared port on the device.

Bringing Images to Your
Computer
When you synchronize your iPAQ Pocket PC
with your desktop PC, your pictures are
automatically stored in a “My Pictures” sub-folder
of the desktop “Compaq iPAQ Files” folder created
by ActiveSync on your desktop. From that folder,
images can be moved to other locations on the
PC, opened, edited and printed on paper with
photo editing software or sent as e-mail
attachments.
15 www.nexian.com

16 www.nexian.com
Viewing Images and
Mini-Movies on Your Computer
Your “Motion capture” files are stored on the
Pocket PC and your PC as “VID” files. Use the
supplied NexiCam Tool to convert the VID files into
AVI files that can be viewed using the free Apple
QuickTime® viewer (www.apple.com).
To convert the files, do the following:
(1) Select folder. If the folder with the VID files
has not already been selected, click the folder
button (blue “…” on the top right) on your
PC and explore to the directory which contains
your VID (stored motion capture file for
NexiCam) files. Then, the location will appear
in the selected folder box.
(2) Convert the VID file to AVI. Double-clicking
the VID file will convert it to an AVI file. This
AVI file can now be viewed on your PC with
applications like QuickTime (www.apple.com). movie files to another folder on the desktop.
AVI files are placed in the same folder where
VID files are. If the folder is where the ActiveSync
synchronizes files, next ActiveSync process will
attempt to copy those AVI files to the Pocket PC.
To avoid this, it's desirable to move your pictures and
And this will cause a memory issue on the Pocket PC,
because AVI files are substantially larger than VID files.
Notice:

Specifications
• Size: 3.4x5.2x2.0 inches
• 180° Articulating Lens
• Lens Aperture: f/2.8
• SGVA (800x600) Resolution
• Focus: 2" to Infinity
• Zoom: 2X Digital
• Automatic Shutter Speed
• View Finder in iPAQ Pocket PC LCD Display
• Auto Exposure
•45-Second Video Recording with 12 Frames
per Second
• Automatic White Balance
• Self-Timer, 10-Second or User Configurable
• Output File Format to JPEG, BMP, AVI
• File Transfer: AutoSync, IrDA
• Storage: iPAQ Main Memory and CF Memory
Card
•User Interface in Landscape Mode
•Preview 1.5x1 inches
•Displays Zoom, Resolution, Number of Pictures
Taken, Battery Level, Memory Available
• View/Edit/Save/Delete/File/Organize Functions
• Power Source: iPAQ Main Battery
17 www.nexian.com

Warranty
Any information contained in this manual is subject to
change without notice. Nexian, Inc. (hereinafter could
mean Nexian, Inc., as well as affiliated companies
including Navicom Co. Ltd. and Nexigate Co. Ltd. as
needed) reserves the right to make changes to its
products and to make changes in the content without
obligation to notify any organization or person of
such changes.
Limited Warranty
Nexian, Inc. warrants this product to be free from defects
in materials and workmanship for a period of one year
from the date of original purchase. Nexian, Inc. will, at its
sole judgment, repair or replace any defective components
that fail in normal use with no charge to the purchaser for
parts or labor, except any transportation cost including
insurance. This warranty does not cover failures caused by
abuse, misuse, accident, negligence or tampering, service
or modification performed in all or part by anyone other
than authorized by Nexian, Inc. installation, defects
from installation and wear and tear from
normal usage.
NEXIAN, INC. SHALL NOT BE LIABLE FOR ANY INCIDENTAL,
SPECIAL, CONSEQUENTIAL OR INDIRECT DAMAGES,
WHETHER RESULTING FROM THE USE, MISUSE OR
INABILITY TO USE THIS PRODUCT OR FROM THE
PRODUCT’S DEFECTS UNLESS PROHIBITED BY SPECIFIC
LAW. TO THE EXTENT PERMITTED BY APPLICABLE LAW,
ALL OTHER WARRANTIES, EXPRESS OR IMPLIED,
INCLUDING BUT NOT LIMITED TO THE IMPLIED
WARRANTIES OF MERCHANTABILITY, FITNESS FOR ANY
PARTICULAR PURPOSE, NONINFRINGEMENT, AND THE
COMPLETENESS OR ACCURACY OF THE INFORMATION
DERIVED FROM USING THIS PRODUCT, ARE DISCLAIMED
BY NEXIAN, INC.
To obtain warranty service, the original purchaser must call
Nexian, Inc. Customer Service at (858) 623-1544 for further
instructions. Product should be in its original packaging
with all supplied parts and documents, original receipt with
the date of original purchase clearly marked, postpaid,
and insured.
Registration
Register the NexiCam to receive more information and
support.At the Nexian website (www.nexian.com), click
“Register” on the main page. Follow the registration
process step-by-step. Enter the serial number (S/N) that can
be found on the device, or on the packaging.
The serial number is case-sensitive.
4225 Executive Square, Suite 260 La Jolla, CA 92037
Telephone: (858) 623-1544
E-Mail: [email protected]
www.nexian.com
Table of contents


