SkyBean ChaseCam User manual

½SkyBean ChaseCam
user guide
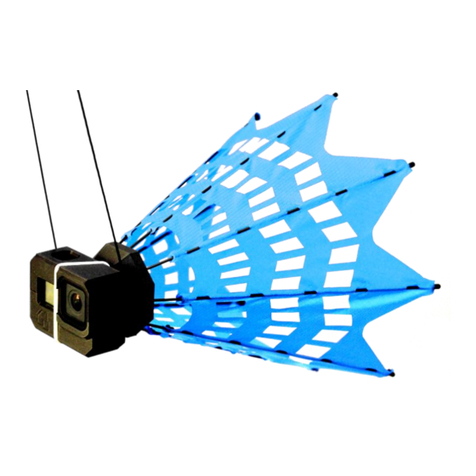
SkyBean ChaseCam is unique product dedicated to record awesome videos and
photos from position behind the paragliding pilot. Its shape is tuned to achieve as
stable picture as possible without electronic stabilization.
security of action camera
We upgraded design for maximum security of your action camera. GoPro Hero 3,4, 5
and 6 must be fixed with silicon band. It is not necessary for GoPro Hero Session.
White silicon band can be found in the package. Silicon band needs to be applied
before putting plastic lames. IMPORTANT: never leave the silicone band wrap
around the head without camera. It will deform it.
camera holder
ChaseCam heads are produced with the newest available technology of 3D printing.
IMPORTANT: prints are sensitive to heat and long-term pressure. Do not leave
ChaseCam in hot/sunny places for long time. After flight do not leave camera inside
and never leave the silicone band wrap around the head. Product cannot be
exposed to long-term pressure therefore bungee rope cannot be wrapped around
ChseCame too tightly.
assembly
After opening the package, you will need to assembly chasecam. If you have Hero
3/4 or 5 version, place white rubber ring around chasecam head, into groove on
heads back (this ring is used to secure camera in its position inside the head).
Always put silicon band first. Put 8 wings inside apertures in direction marked by little
arrows on chasecam head. In the next step you will need to bind the wings, as
shown on the following pictures.
wings position in apertures main line connection

outside bindind inside binding
mount and adjustment
We strongly recommend to hang chasecam on middle eye of last lines row
(usually C/D lines for 3/4 lines glider). Do not use the brake lines! Rubber line
length should be adjusted to achieve best possible records. We equipped
SkyBean ChaseCam by 5.8m long rubber line, which should be suitable for
most glider types. There is a loop, which is used for rubber line length
adjustment. We recommend to make several short training flights during
length tuning. You should start with shorted line (e.g. 5m) and if picture on
video is stable, just make it longer in 20cm steps. When video will start to
shake, make line shorter to previous last stable position. The point is to tune
the length of rubber line as long as possible - to fit pilot inside the picture, but
you should avoid to let it fly inside the turbulences behind the pilot and
harness. It seems that about 50cm above the carbines is good position to start
tuning.
launch
There are several options how to take off with chasecam.
assisted takeoff - If there is somebody helpful available, this is the best
option to get awesome shot during takeoff. The assistant should stay couple
meters next to you. Some distance is needed to ensure security and also to fit
you and glider into scene. Wide angle setting on your camera will help.
Assistant should hold chasecam lightly and it will after you rise the glider and
move forward, chasecam will automatically fly away from assistant hand.

rocket launch - If there are perfect conditions to take off, without strong
impulse wind and takeoff place is without sharp stones, you can use “rocket
launch”. It means you put the chasecam facing up next of glider trailing edge
middle, about one meter from the place where rubber line is hanged to glider.
It is recommended to make a coil or snake from rubber line between
chasecam and trailing edge. If camera top edge will face to glider, you will get
very nice shot, when wing will rise up above the camera and right after it will
record the whole launch.
harness launch - If you are not sure about smooth launch, it would be clever
to exclude any extra staff during takeoff. This means it is recommended to put
chasecam on velcro mount on arm strap of your harness and put it in the air
right after successful launch, when you are safely sitting in the harness.
Flexibility of rubber line allows to achieve stable picture from position slightly
above pilot head and mount possibility on pilot arm. This type of launch won’t
make a video during takeoff, but always remember - safety first.
landing
Landing with SkyBean ChaseCam is very easy and secure. If there is some
wind on landing area and therefore is possible to hold glider above, you can
catch the chasecam into hand, which is very impressive in video. If you will
land standardly, there is almost no risk of damage, because materials used for
head and wings are very durable and definitely protects your camera.
security note
We have spent hundreds of hours by heavy development to reach the most
stable chasecam behavior in the air. We have been using it for several months
during normal paragliding flight conditions without any dangerous situation;
however, any official security tests are missing, yet. Therefore we have to
advertise, that we cannot guarantee your inviolable security and every pilot
uses SkyBean ChaseCam at her/his own risk. Any member of SkyBean team
is not responsible for non-standard situations or injuries. Responsibility for any
damages or injuries to third parts is completely covered by pilot of paragliding
glider while using SkyBean ChaseCam. Please, let us know your experiences
and we are looking forward to your feedback after flights!
important information
If you have any doubts how to assembly or use SkyBean ChaseCam, please
visit our YouTube channel at www.youtube.com/c/SkyBeanVarios
If there is still something wrong with the device or if you need more detailed
explanation, please write us by email or contact us on Facebook.
Other manuals for ChaseCam
2
Table of contents
Other SkyBean Digital Camera manuals
Popular Digital Camera manuals by other brands
HIK VISION
HIK VISION DS-MCW405 user manual
Data Video
Data Video BC 80 instruction manual
HIK VISION
HIK VISION HIKMICRO CHEETAH Series quick start guide

i-joy
i-joy Camara de Aventuras Explorer de Tadeo Jones user manual
BZB Gear
BZB Gear BG-VPTZN-HSU3 user manual
Clear One
Clear One UNITE 260 Pro quick start guide

