Nexigo PJ01 User manual

NexiGo Mini DLP Projector
User Manual-PJ01
Scan the QR code or visit our link to download the latest manual here: www.nexigo.com

Thank you for choosing the NexiGo PJ01 Mini DLP Projector. You are now part of an
exclusive club: the NexiGo family! It's our job to make sure you enjoy your membership. If
you have any problems please contact us at cs@nexigo.com
assistance. This product is covered by our industry leading 1-year manufacturers warranty.
Make sure to register your purchase at nexigo.com/warranty within 14 days of the
delivery date to extend your warranty coverage to TWO Years!
From all of us here at NexiGo, we want to welcome you again to the family. We thank you
deeply for your trust and for your business. We know you'll love it here. We look forward
to serving you again in the near future.
Yours Sincerely,
The NexiGo Team
Welcome to the NexiGo Family!
Website: www.nexigo.com
Manufacturer: Nexight INC
Address: 11075 SW 11th St, Beaverton, OR, 97005, US
Tel: +1(458) 215-6088
E-mail: cs@nexigo.com
01010101
1 x Projector
1 x 12V DC Adapter
NOT included)
1 x HDMI Cable
1 x User Manual
What’s in the Box?
Tripod Mount (1/4" Thread)
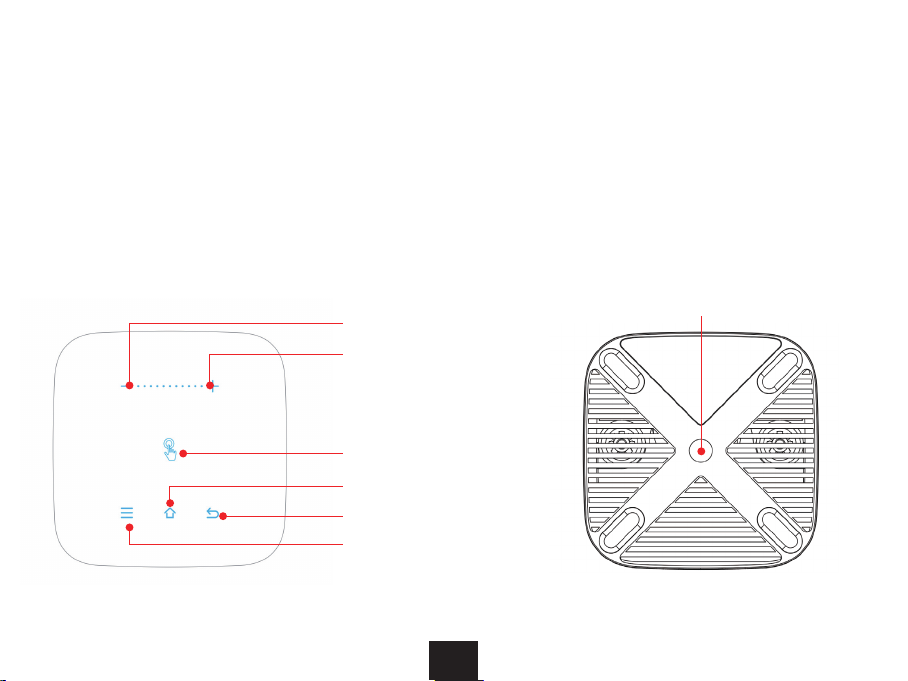
Volume -
Volume +
Touch Control Area
Home
Return
Menu
01010102

Lens
USB Input Port LED Indicator
IR Receiver
Power Input Port
HDMI Input Port
Power Switch
3.5mm Audio Port
Air Vents
Focus Adjustment
Wheel
0103

Mute
Vol -
Return
ON/OFF
EShare
Airplay
Mouse Control
OK
Menu
Home
Vol +
ON/OFF
Mute
EShare
Airplay
Mouse Control: Toggles to use the
mouse
: Moves the cursor
in the on screen display
OK
currently on
Return: Returns to the last screen
Menu: Displays the menu
Home: Returns to the homepage
Vol +: Increases the volume level
Vol -: Decreases the volume level
0104

RGB LED
5G Wi-Fi
Bluetooth 4.2
5200 mAh
16:9/4:3
1.2:1
DC 12V/2A
18W
HDMI x 1, USB x 1, 3.5 mm
audio port x 1
3W x 1
Light Source
Memory
Wi-Fi
Bluetooth
Focusing mode
Keystone
Power Input
Integrated
Interface
Speaker
Distance/Size
0105

1. Ceiling Mount
(Standard Ceiling View)
3. Desktop Mount
(Standard View)
The room layout and the desired room design will be the most important factors in
The projector is designed to be installed in one of four layouts. You can either hang the
correctly. Under the tab select , then select
Note
0106
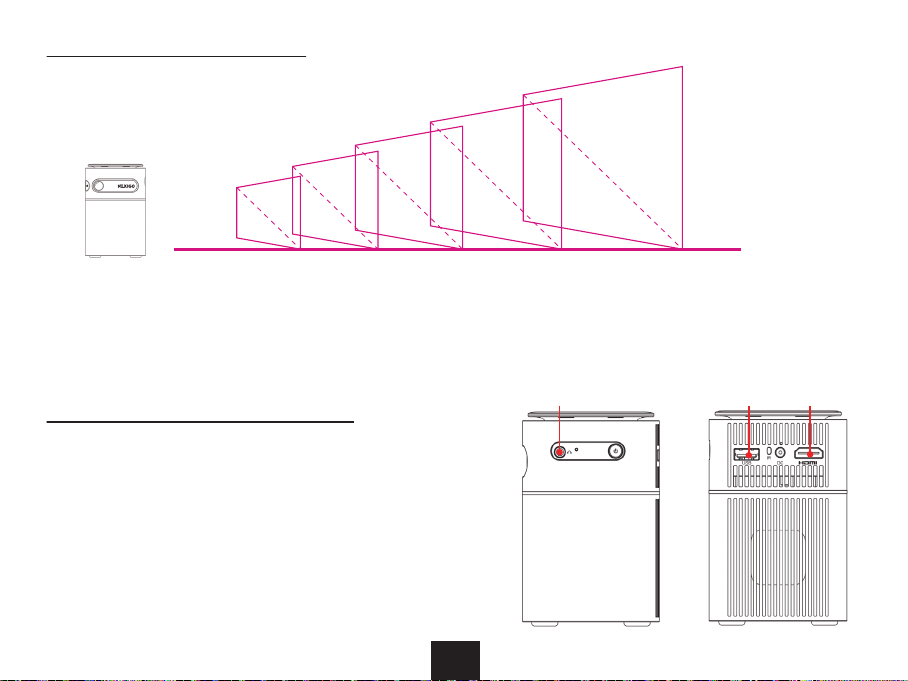
Note: Due to manufacturing tolerances there will be variance of about 3% from unit to
unit. The above data is for reference only. Please use actual measurements when installing
the device.
Drives, Mouses and Keyboards
0.86
2.59
4.32
6.04
8.64
(ft)
0107
0108

:
fully charged the charging indicator light will turn yellow.
:
1. Press and hold the Power Switch to turn on the projector.
When it is ready, the projector will illuminate and display an image on the projector
screen.
:
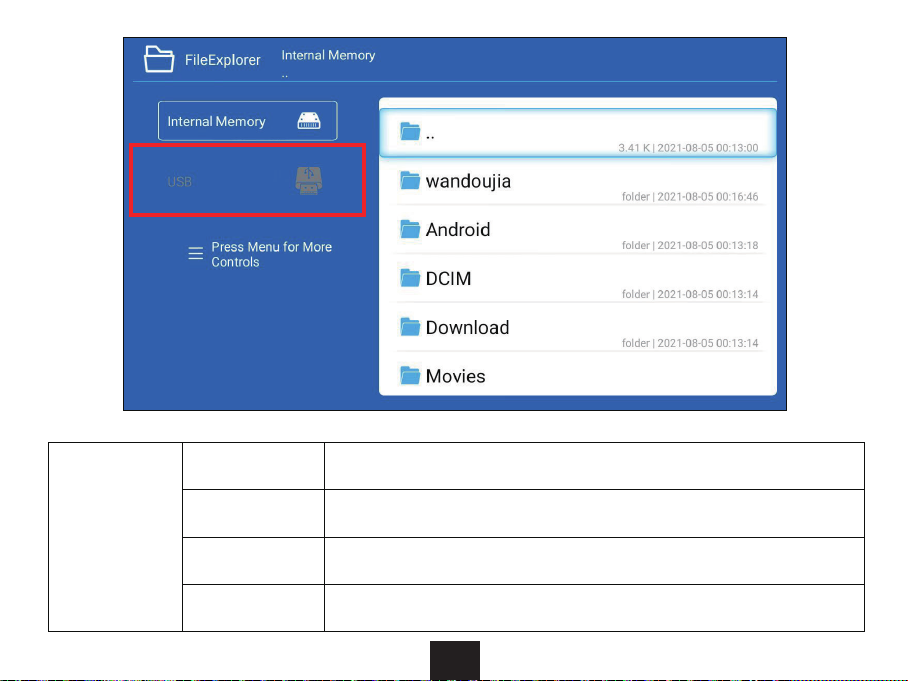
Insert a USB External Hard Drive or Thumb Drive into the USB port of the projector. On the
homepage, select Files and then select
videos, audios, documents, and/or images from the drop-down menu that appears on
the right.
0109
Video Support
Audio Support
Image Support
Text Support
JPG/PNG/BMP
HEVC/MVC/H2.63/H.264/H.265/MPEG-1/MPEG-2/MPEG-4/VP8/VP9
MPEG 1/MPEG 2/MPEG 2.5/Audio Layer 1, 2, 3/AAC/HEAAC/WMA/
PCM/IMA-ADPCM/MS-ADPCM
TXT
0110

Supported
854 x 480 1280 x 720 1366 x 768 1600 x 1200 2560 × 1440
800 x 600 1280 x 800 1440 x 900 1680 x 1050 3200 × 1800
1024 x 768 1280 x 1024 1440 x 960 1920 x 1080 3840 × 2160
Connect the projector to your device using the included HDMI cable. On the homepage,
select Source > HDMI and the projector will display the screen of the connected device.
0111

Connect the projector to your device using a 3.5mm audio cable. This will allow you to
output audio from the projector.
:
control between devices and displays.
To connect your mobile device with the projector, make sure your device and the projector
are connected to the same network. On the homepage, select EShare, then follow the
your device, click “NexiGo PJ01 -XXXX” on the device list, and your device is now
connected to the projector.
0112
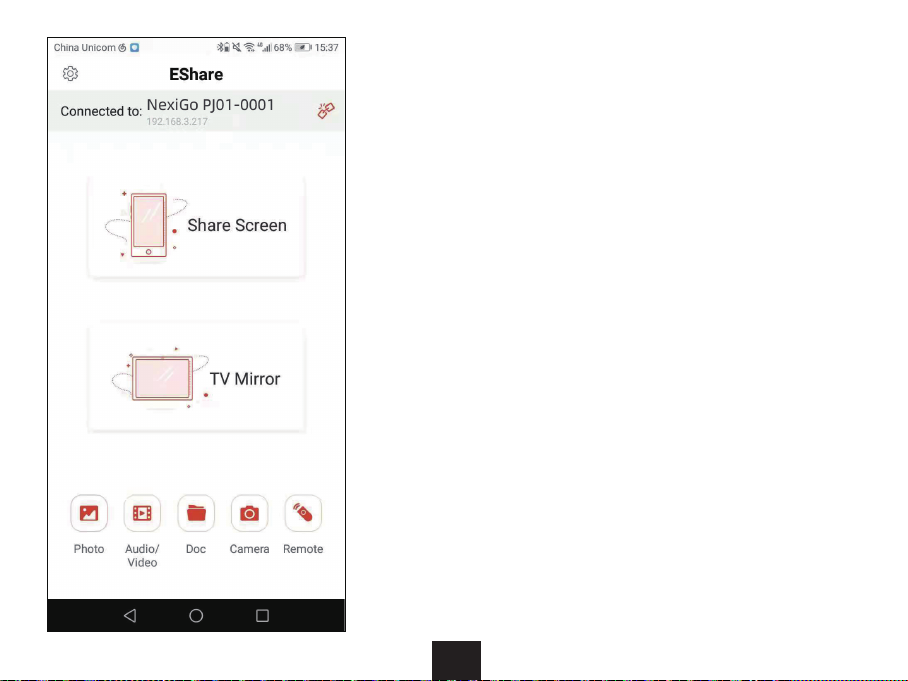
Once connected, you can select between the
icons on the EShare interface on your
device to use the
1. Share Screen: Displays the screen of your
Android device on the projector
2. TV Mirror: Displays the screen of the projector
on your smartphone or tablet
3. Photo: Choose photos on your device, and
display them on the projector
4. Audio/Video: Allows you to choose audio or
the projector
5. Doc: Allows you to choose documents on your
phone and display them on the projector
6. Camera: Turns on the camera of your device and
displays the image on the projector
7. Remote: Allows you to use your device as a
remote control for the projector
0113

:
devices, as well as with specialized third party pieces of hardware. To set up this
this message: “Search for the above device name (NexiGo PJ01) via AirPlay mirroring on
.” Open your iDevice and go into the AirPlay
program and select the correct device name shown above. Your device is now connected.
:
replace them with apps of your choice. If you run out of storage space you can use the USB
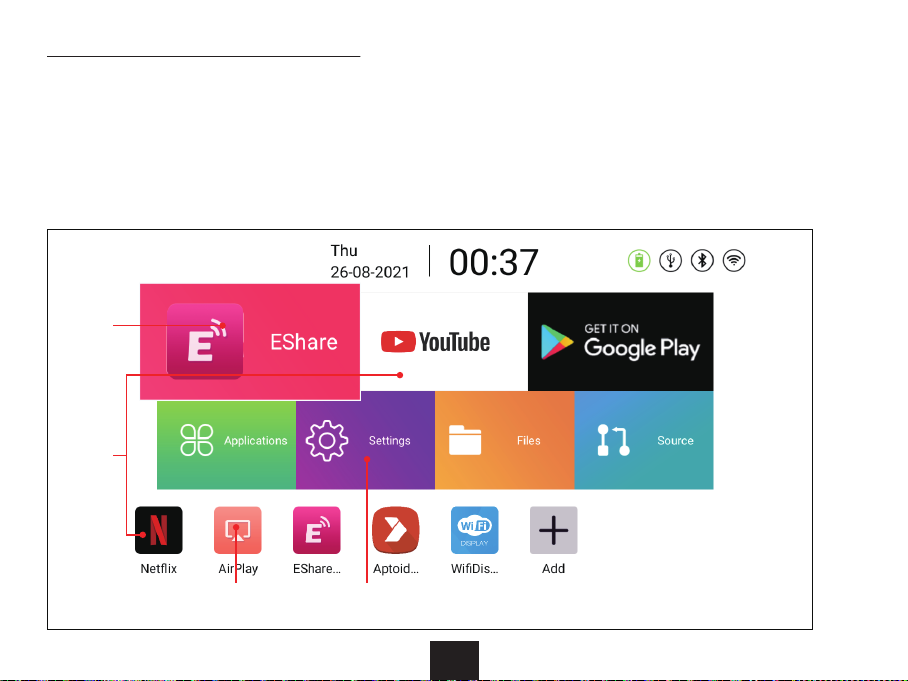
On the homepage, YouTube and Google Play are set on the top for easy access.
0114

Add
of the homepage. Move your cursor to the apps you would like to add and hit OK on the
the screen.
0115
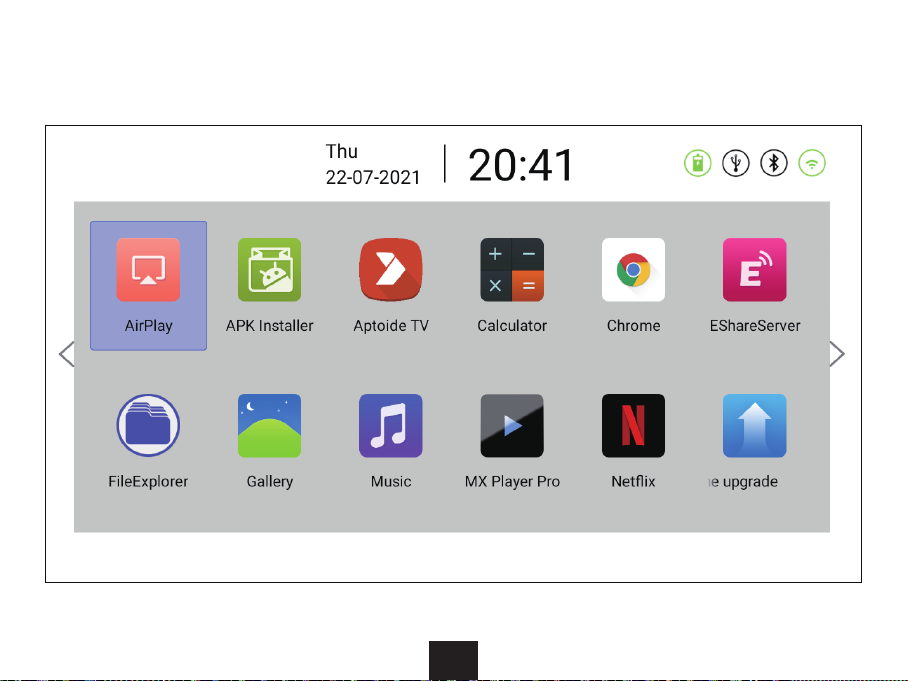
on the
homescreen menu to see the full list.
0116
:
Select
want to uninstall. Press and hold the OK
appear asking “Do you want to uninstall this app?”. Click OK
Return if you do not want to
delete the app.
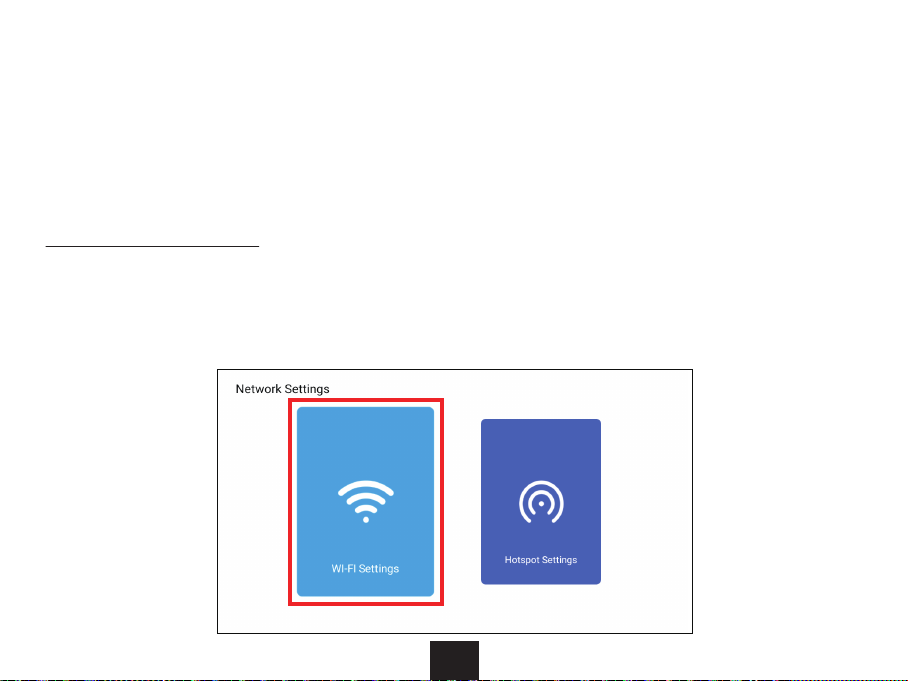
:
. Choose the Wi-Fi network you want to connect to, enter your
Wi-Fi password, and then select Link to connect your projector to the network.
0117

:
To make your projector show up as a Wi-Fi hotspot, from the homepage, select
. Make sure the toggle at the top of the page is
set to On, select OK, and then choose the projector as your Wi-Fi source on your device.
0118

:
To connect your projector to Bluetooth audio, on the homepage, select
. Make sure the toggle at the top of the page is set to ON, then choose the
Bluetooth device you want to connect on the right side of the screen. Wait for 5-10 seconds
Note
made under .
0119
Table of contents
Other Nexigo Projector manuals


