Nexigo Aurora Pro User manual

4K Tri-Color UST Laser Projector
Aurora Pro
Scan the QR code or visit our link to download
the latest manual or watch the installation video.
nexigo.com/aurorapro-support
User Manual
User Manual


Important Safety Instructions
3D Safety Information
Welcome to the NexiGo Family!
Contact Information
Product Features
What’s in the Box?
Projector Diagram
Connectors and Ports
Remote Introduction
Remote Control Pairing
Specifications
Installation
Image Adjustment
Projector Distance & Size
Quick Start Guide
File Manager
System Settings
Multiscreen Connections
Amazon Alexa Voice Control Setup
Troubleshooting
Dolby Audio
FCC Requirement
05
CONTENTS
01
06
06
07
09
09
11
12
13
14
15
17
21
22
26
28
36
40
45
47
48

IMPORTANT SAFETY INSTRUCTIONS
PLEASE READ THE FOLLOWING SAFETY INSTRUCTIONS BEFORE YOU
START USING THE PROJECTOR.
EN 01
- Children should not play with this appliance. Cleaning and user
maintenance should not be made without direct supervision by an
adult.
- Children less than 3 years of age should be kept away from this device
unless continuously supervised.
- Children from 3 to 8 years of age should not plug in, regulate, clean, or
perform any type of maintenance on this device.
- Children from 3 to 8 years of age shall only switch the appliance on /
off after all the following safety precautions have been met:
1. The product has been placed or installed in its intended operating
position.
2. The child has direct supervision or has been given full instructions on
how to use the device safely.
3. The child is capable of understanding the hazards involved.
CHILD SAFETY MEASURES
Read the user manual in full before operating your projector and make
sure to save it for future reference. Follow all instructions provided,
failure to do so may result in the loss of the device or injury.
This appliance can be used by children aged from 8 years and above
and persons with reduced physical, sensory or mental capabilities or
lack of experience and knowledge if they have been given supervision
or instruction concerning use of the appliance in a safe way and
understand the hazards involved. Children shall not play with the
appliance. Cleaning and user maintenance shall not be made by
children without supervision.

EN 02
For appliances having a specially prepared cord, if the supply cord is
damaged, it must be replaced by a special cord or assembly available
from the manufacturer or its service agent.
To ensure the projector is operating smoothly and is protected from
any potential overheating issues, make sure to install the projector in a
location that does not block ventilation.
To reduce the risk of fire and / or electric shock, do not expose the
projector to moisture or liquids.
Do not install the projector near heat sources or any other appliance
that emits heat.
Do not allow small objects to enter the projector. They may cause the
projector to short circuit, which could start a fire or create an electric
shock.
Do not use the projector under the following conditions:
- In extremely hot, cold, or humid environments.
(i) Ensure that the ambient room temperature is within 32°F-104°F
(0°C-40°C)
(ii) Ensure that the relative humidity is ~30% - ~90%
- In areas susceptible to excessive dust and dirt.
- Near any appliance generating a strong magnetic field.
- In direct sunlight.
Do not use the projector if it has been physically damaged or abused.
Physical damage / abuse could include (but is not limited to) the
following circumstances:
- The projector has been dropped.
- The power supply cord or plug has been damaged.
- Liquid has been spilled onto/into the projector.
- The projector has been exposed to rain or moisture.
- Something has fallen into the projector, or something is loose inside.
Do not place the projector on an unstable surface. The projector may
fall over, resulting in injury or damage to the unit.
Do not block the light coming out of the projector lens when in
operation. Objects in the light’s path may melt, cause burns, or start
a fire.
OPERATIONAL SAFETY MEASURES

EN 03
Please do not open or disassemble the projector, as this may result in
an electrical shock.
Do not attempt to service the unit yourself. Opening the unit may
expose you to dangerous voltages and/or other hazards. The unit should
only be repaired by the manufacturer or its service agent.
Only use attachments / accessories directly specified by the
manufacturer.
Do not look straight into the projector lens during operation.
Excessively bright lighting has been shown to harm vision under some
circumstances.
When switching the projector off, please ensure the cooling cycle has
been completed before disconnecting the power. Allow at least 90
seconds for the projector to cool down.
Do not use a power source with a voltage other than what is specified
in this manual.
Disconnect the power plug from the AC outlet if the product is not
being used for a long period of time.
Do not set up the projector in areas where it might be subjected to
vibration or shock.
Do not touch the lens with your bare hands.
Remove the battery / batteries from the remote control before storage.
If the battery / batteries are left in the remote for a long period of time,
they may leak.
Do not use or store the projector in places where smoke may be
present, as it can negatively affect the quality of the projector’s
performance.
Please refer to the manual for how to properly install your projector, as
nonstandard installation may affect the projector’s performance.
Use a power strip and / or surge protector with this device. Power
outages and / or brownouts can damage your device.
When installing or adjusting a ceiling or wall mount, do not use
adhesives, oils, and / or lubricants. These may cause the projector case

EN 04
to crack and allow it to fall from its ceiling mount causing damage to
the device and / or serious injury.
Do not stand the projector vertically. Doing so may cause the projector
to fall over, causing damage and / or injury.
While the projector is operating, you may notice hot air and a strong
odor emanating from its ventilation grill. This is normal and not a
malfunction.
Turn off the projector and unplug the power plug from the AC outlet
before cleaning the unit.
Use a soft, dry cloth with mild detergent to clean the product housing.
Do not use harsh cleaners, waxes, or solvents to clean the unit.
CLEANING THE PROJECTOR
Some viewers may experience a medical issue such as epileptic
seizure or stroke when exposed to flashing images and / or lights
displayed by this device. If you suffer from or have a family history of
epilepsy or stroke, please consult with a medical specialist before using
the projector.
PHOTOSENSITIVE SEIZURE WARNING
Warning: Avoid eye exposure at a distance
of less than 1m / 3.28ft.
Avertissement: Évitez l'exposition oculaire à
une distance inférieure à 1m / 3.28ft.
Complies with 21 CFR 1040.10 and 1040.11 except for
conformance as a Risk Group 2 LIP as defined in IEC
62471-5:Ed. 1.0. For more information, see Laser Notice
No. 57, dated May 8, 2019.
1m/3.28ft.
1m/3.28ft.

EN 05
D SAFETY INFORMATION
Children and teenagers may be more susceptible to health issues when
viewing 3D projections and should be closely supervised to ensure they
are not being affected.
Pregnant women, the elderly, people who are sleep-deprived, people
under the influence of alcohol, and those more prone to serious
medical conditions are recommended to avoid using the projector’s 3D
functionality.
Watching 3D projections while wearing 3D glasses for an extended
period of time may cause headaches or fatigue. If you experience a
headache, noticeable signs of fatigue, or dizziness, stop viewing the 3D
projection and rest.
If you experience any of the following symptoms, stop viewing the 3D
projection immediately and consult a medical specialist: (1) altered
vision; (2) light-headedness; (3) dizziness; (4) involuntary movements
such as eye or muscle twitching; (5) confusion; (6) nausea; (7) loss of
awareness; (8) convulsions; (9) cramps; and / or (10) disorientation.
Children and teenagers may be more likely than adults to experience
these symptoms. Parents should monitor their children and ask whether
they are experiencing these symptoms.
Watching 3D projections may also cause motion sickness, perceptual
after-effects, disorientation, eye strain, and decreased postural stability. It
is recommended that users take frequent breaks to reduce the
possibility of these effects. If your eyes show signs of fatigue or dryness,
or if you show any of the above symptoms, immediately stop using this
device and do not resume using it until at least 30 minutes after the
symptoms have subsided.
Do not place your 3D projector near open stairwells, cables, balconies, or
other objects that can be tripped over, run into, knocked down,
broken, or in areas with fall hazards.
Watching 3D projections while sitting too close to the screen for an
extended period of time may damage your eyesight. The ideal viewing
distance is at least three times the screen height. It is recommended
that the viewer's eyes are level with the center of the screen.
Do not use the 3D glasses for any other purpose than for watching 3D
projections.

EN 06
WELCOME TO THE NEXIGO FAMILY!
Thank you for choosing the NexiGo 4K Tri-Color UST Laser Projector! You
are now part of an exclusive club: the NexiGo family! It's our job to make
sure you enjoy your membership. If you have any problems, please
From all of us here at NexiGo, we want to thank you for your trust in us.
We look forward to serving you again in the near future.
Sincerely,
The NexiGo Team
CONTACT INFORMATION
Website: www.nexigo.com Manufacturer: Nexight INC
E-mail: cs@nexigo.com Tel: +1(458) 215-6088
Address: 11075 SW 11th St, Beaverton, OR, 97005, US
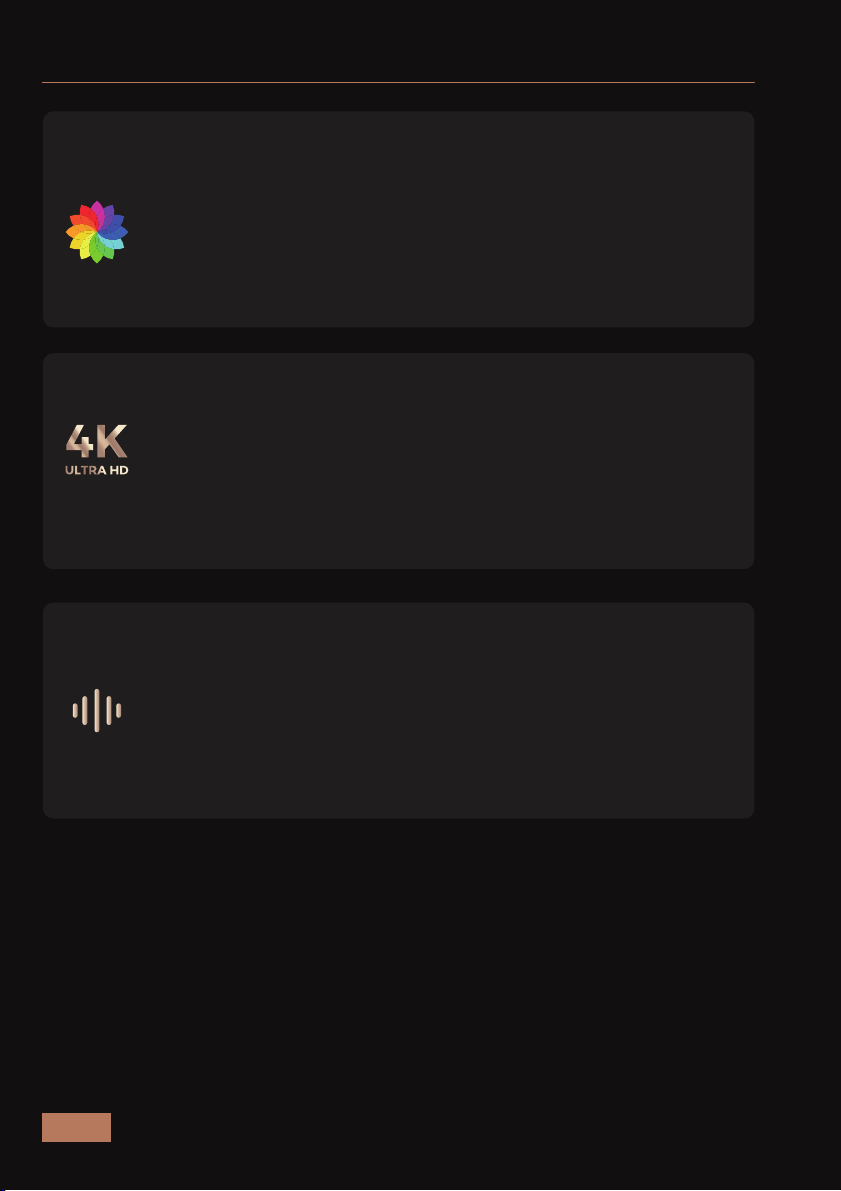
PRODUCT FEATURES
Impressive & Lifelike Detail
The Aurora Pro features 4K resolution to deliver sharper,
lifelike images across a supersized screen.
A Whole New Realm of Audio & Visual
Enjoy an immersive cinematic experience with built-in 60W
stereo speakers (two 15W woofers and two 15W tweeters)
and 3D movie support. The Aurora Pro also features Dolby
Atmos support for state-of-the-art surround sound.
EN 07
This tri-color laser projector offers superior color range
and uniformity thanks to its RGB lasers. This color range is
supplemented by Dolby Vision, an HDR imaging
technology that significantly boosts color, contrast,
and brightness.
Experience Color Like Never Before

EN 08
For Rooms of Any Size
A huge screen is possible of any size with the ultra-short
throw lens on the Aurora Pro, which casts a projection of
up to 150 inches when placed just over a foot away from
the projection surface.
Fluid & Accurate Motion
Enjoy ultra-smooth motion and reduced ghosting with
responsive MEMC technology. This high refresh rate
makes it easier to keep track of the action while
watching sports or playing video games.
Experience Color Like Never Before

EN 09
WHAT’S IN THE BOX?
AAA Batteries x 2
Cleaning Cloth
x 1
Projector x 1
Remote x 1
Power Cable x 1
User Manual
x 1
Quick Start
Guide x 1
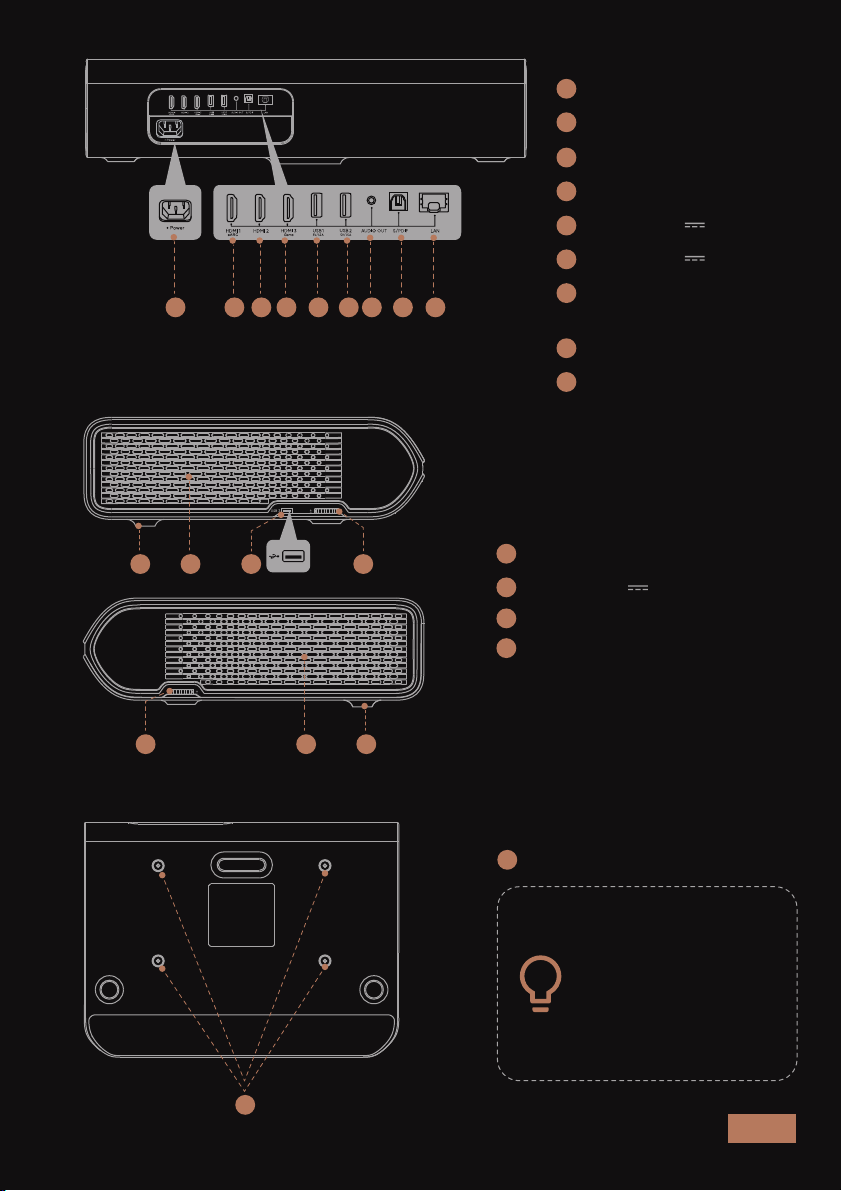
PROJECTOR DIAGRAM
TOP VIEW
Power Switch
Lens
Eye Protection Sensors
23 3 1
1
2
3
Please note that the power cable included in the package
may vary depending on your country.
EN 10
SIDE VIEW
Cooling Vents
USB 3 (5V 1.5A)
Height Adjustment Wheels
Feet
5 6 7 8 9 10 11 12
1316
1615
1514
13
BACK VIEW
Power Input
HDMI 1(Support eARC)
HDMI 2
HDMI 3
USB 1 (5V 1.5A)
USB 2 (5V 1.5A)
Audio Out
(3.5 mm Jack)
S/PDIF
LAN
4
16
12
11
10
9
8
7
6
5
4
15
14
13
BOTTOM VIEW
M4 x 4 Screw Holes
17
Please use 4 x M4
screws with a
length of 16mm
when mounting the
projector on the
ceiling.
17
EN 11
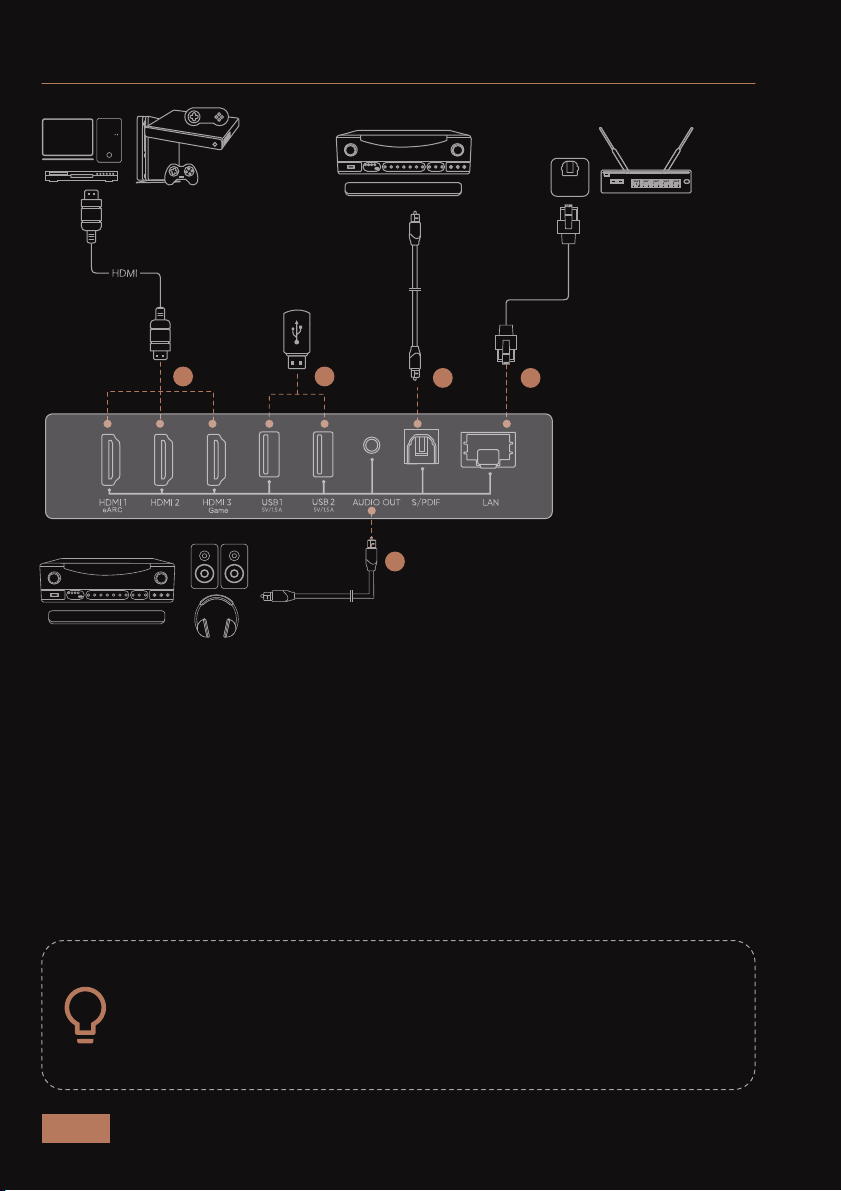
CONNECTORS AND PORTS
When connecting a device to the projector, please be sure to:
1. Turn off all devices before making any connections.
2. Make sure the cable is inserted securely.
3. Use the appropriate cable for the device.
1: HDMI 1 (Support eARC) / HDMI 2 / HDMI 3
To connect items like: cable boxes, DVD players, digital media
players (Roku, Fire TV, etc.), and computers.
2: USB 1 / USB 2 / USB 3
To connect items like mobile hard drives and USB flash drives.
3: Audio Out / S/PDIF
To connect audio devices like sound bar or speakers.
4: LAN
To connect an Ethernet cable.
133 4
3
2

EN 12
REMOTE INTRODUCTION
1. Power: Toggles power on and off.
2. Source: Adjusts the input source.
3. Air Mouse: Toggles motion control.
4. Settings: Opens the settings menu.
5. Left / Right / Up / Down: Moves the cursor within the on-screen display.
6. OK: Selects the highlighted option.
7. Return: Returns to the previous screen.
8. Menu (Press and hold): Opens the shortcut menu.
9. Home: Returns to the home page.
10. Volume + / -: Increases or decreases the volume.
11. Mute: Toggles audio on and off.
12. Play / Pause: Starts or stops a video.
13. Rewind / Fast Forward: Moves forward or backward within a video.
5
6
5
8
9
12
13
2
4
1
3
5
5
7
10
11

EN 13
REMOTE CONTROL PAIRING
METHOD 1
There are infrared (IR) sensors at the front center of the projector and on
the remote. If you choose to use this method to control the projector, it
has a maximum range of 26 feet.
METHOD 2
Ensure that the remote is within a few feet of the front of the projector
before pairing. Press and hold the Return and Menu buttons
simultaneously for at least 10s to put the remote control into pairing
mode with the projector. If the pairing is successful, the screen will
show "Remote connected".
If the connection is disabled, you will need to re-pair the
remote in order to continue using it via method 2.
Do not place objects in front of the projector's IR sensor. This
may prevent the sensor from operating properly.
The IR sensor on the remote, like all IR sensors, can be
interfered with by extremely bright light sources. If the
remote is not working properly, make sure that there are no
bright lights shining on them.
When holding the
remote control, it must
be within 15 degrees of
the infrared sensor to
work properly.
±15°

Basic
Information
Display
Hardware
Model PJ92
Device Name Aurora Pro
Product Weight 9.98 KG / 22lbs
Resolution 3840 x 2160
Refresh Rate 60Hz
Throw Rate (TR) 0.233:1
Projection Size Up to 150"
RAM 3GB
ROM 128GB
Wi-Fi 802.11ax 2.4G / 5G 2T2R WiFi 6
Bluetooth 5.2
Keystone Correction Yes (Support 4 / 8-Point
Keystone Correction)
Device Dimensions 547.1 x 122.2 x 407.5mm /
21.54 x 4.81 x 16.04 inches
SPECIFICATIONS
ITEM TYPE PARAMETERS
Audio
Power
Yes
Power Consumption 300W (Normal)
Input 100 - 240V~ @50 / 60Hz
Dolby Atmos
YesDTS HD
Speakers 2 x 15W Woofers,
2 x 15W Tweeters
EN 14
Standby Power
Consumption ≤0.5W

EN 15
ITEM TYPE PARAMETERS
Interfaces
About
HDMI 3 x HDMI 2.1
USB 3 x USB-A 2.0
Audio Out 1 x Audio Out
S/PDIF 1 x S/PDIF
LAN 1 x LAN
Storage Temperature -4°F-131°F (-20°C-55°C)
Working Temperature 32°F-104°F (0°C-40°C)
Operating Humidity 30%~85%
INSTALLATION
CHOOSING A LOCATION
The room layout and the design of the room will be the most important
factors in choosing where to place the projector. Consider the following
when selecting a location:
While most projectors feature long-throw technology, the NexiGo Aurora
Lite is an ultra short throw projector. Therefore, rather than placing it in
the center of a room, you should position your device so it is directly in
front of the screen. For a 120-inch projection, it should be approximately
1.12 feet away from the screen. Meanwhile, for an 80-inch projection, it
should be approximately 0.46 feet away from the screen. Additional
distance information is listed below in the Projector Distance & Size
section of the manual (See page 21 for details).
The size, shape, and position of your screen.
Location of a suitable power outlet.
Ensure the projector has sucient space around it for airflow.

EN 16
The projector is designed to be installed in one of four layouts. You can
either hang the projector from the ceiling via a special mounting
bracket (NOT INCLUDED), or simply place it on a stable surface. You may
need to change the projection mode so the images project correctly.
Select Projection Mode under Display Setting tab, then choose the
corresponding projection mode for your needs.
Screen
Projector
Screen
Projector
Screen
Projector
Ceiling mounted (front projection) Ceiling mounted (rear projection)
Desktop (rear projection)Desktop (front projection)
Screen
Projector
A rear projection screen is required to use the rear
projection function.
Please use 4 x M4 screws with a length of 16mm when
mounting the projector on the ceiling.

EN 17
Turn the adjustment wheel forward to raise it.
Turn the adjustment wheel backward to lower it.
ADJUST THE HEIGHT OF THE PROJECTOR’S FEET
Turn the adjustment wheel backward to the lowest height.
IMAGE ADJUSTMENT
Projector’s feet
If the projector is resting on a table, you may need to adjust
the height of the projector’s feet. There are two feet for
vertical height adjustment at the front of the unit and on
the side. As shown in the figure below, turn the height
adjustment wheel to adjust the feet.
Other manuals for Aurora Pro
1
Table of contents
Other Nexigo Projector manuals


