Nexnovo XT Series User manual

Transparent LED Poster- XT Series
Installation and User Manual
Protection From
Electric Shock
Safety Information
Read below safety information before
powering or servicing this product.
Warning!
The following symbols are used to identify important safety information on the
product and in this manual:
Safety information Protection from
electric shock
Protection from fire Protection from injury Power system
Safety Information
Important Warnings
Hot surface
NS Poster should be installed under the guidance of professional technician.
This product presents risks of severe injury or death due to fire hazards, electric shock.
Safety Information: Read this manual closely before installing, powering or servicing this product,
follow the safety precautions listed below and observe all warnings in this manual and printed on the
product.
Amateur serviceman are not allowed to open cabinet and dismantle accessories inside.
If you have questions about how to operate the panel safely, please contact your supplier.
Connect the product to AC mains power within the range 90- 264 V nominal at 50 or 60 Hz only.
Always ground (earth) the product electrically.
Before using the product, check that all power distribution equipment and cables are in perfect
condition and rated for the current requirements of all connected devices.
Do not use the product if the power cable or a power plug is in any way damaged, defective or showing
signs of overheating.
Do not attempt to open any cover.
Refer any service operation not described in this manual to a qualified technician.
Protection From Injury
Important Warnings
Power System
Protection From
Injury
Power System
Protection From Fire
Protection From Fire
Do not stick filters, masks or other materials directly onto LED modules.
Do not retool the product in any way not described in this manual.
Install only genuine NEXNOVO parts in or on the product unless an alternative is described in this
manual.
This product is only suitable for indoor installations behind the retail window instead of overheating
outdoor environment.
When setting up the XT poster,please ensure it is fixed very securely so that children can hardly move
the poster.
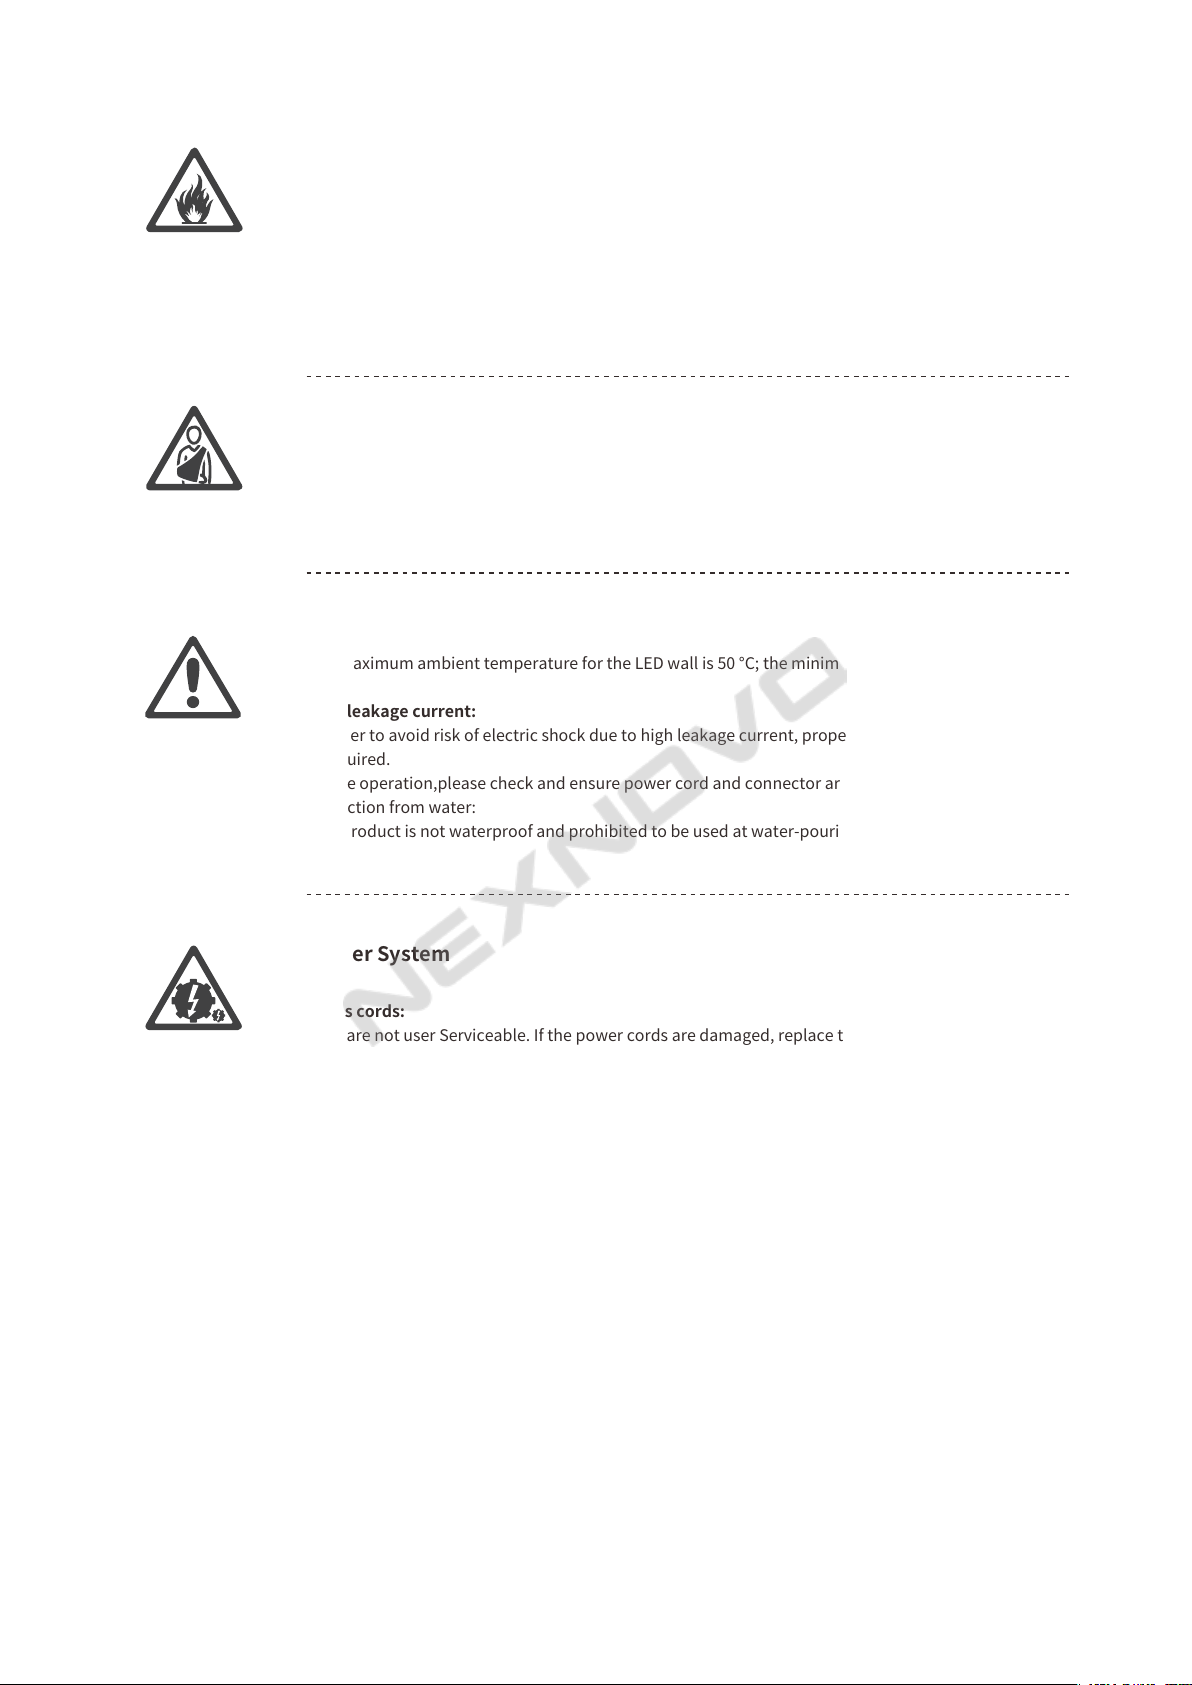
Maximum and Minimum Ambient Temperature:
The maximum ambient temperature for the LED wall is 50 °C; the minimum temperature is -20 °C.
High leakage current:
In order to avoid risk of electric shock due to high leakage current, proper grounding of the installation
is required.
Before operation,please check and ensure power cord and connector are intact.
Protection from water:
This product is not waterproof and prohibited to be used at water-pouring places.
Mains cords:
They are not user Serviceable. If the power cords are damaged, replace them
only with new ones. New power cord is required to bear at least 1600W load.
Data cables:
The data cables provided with this system have special properties for safety.
They are not user serviceable. If the data cables are damaged, replace them
only with new ones. Never try to repair a data cable.The length of a data cable must not
exceed 100 m (332 feet). Avoid exposure of data cables to accidental contact
with lightning or power conductors.
Introduction:
XT transparent digital poster targets at retail showcase to replace traditional printed poster.
Its technical edges lies in high brightness,unparalleled transparency and easy updates of contents etc.Besides,XT poster
has remote cloud management which solves the collective control of advertising in scattered chain stores,banks etc.
Size Diagram
1
XT 3S
Safety Information
Introduction
Specifi cation for Accessories
Installation
Confi guration of System Control
Service and Maintenance
Package and Transportation
00
01
03
05
11
13
14
CONTENTS

2
XT 3M
XT 2L / XT 5L
NEX-XT-001
A1
A2
A3
A4
B
C1
XT3S
NEX-XT-002
XT3M
NEX-XT-003
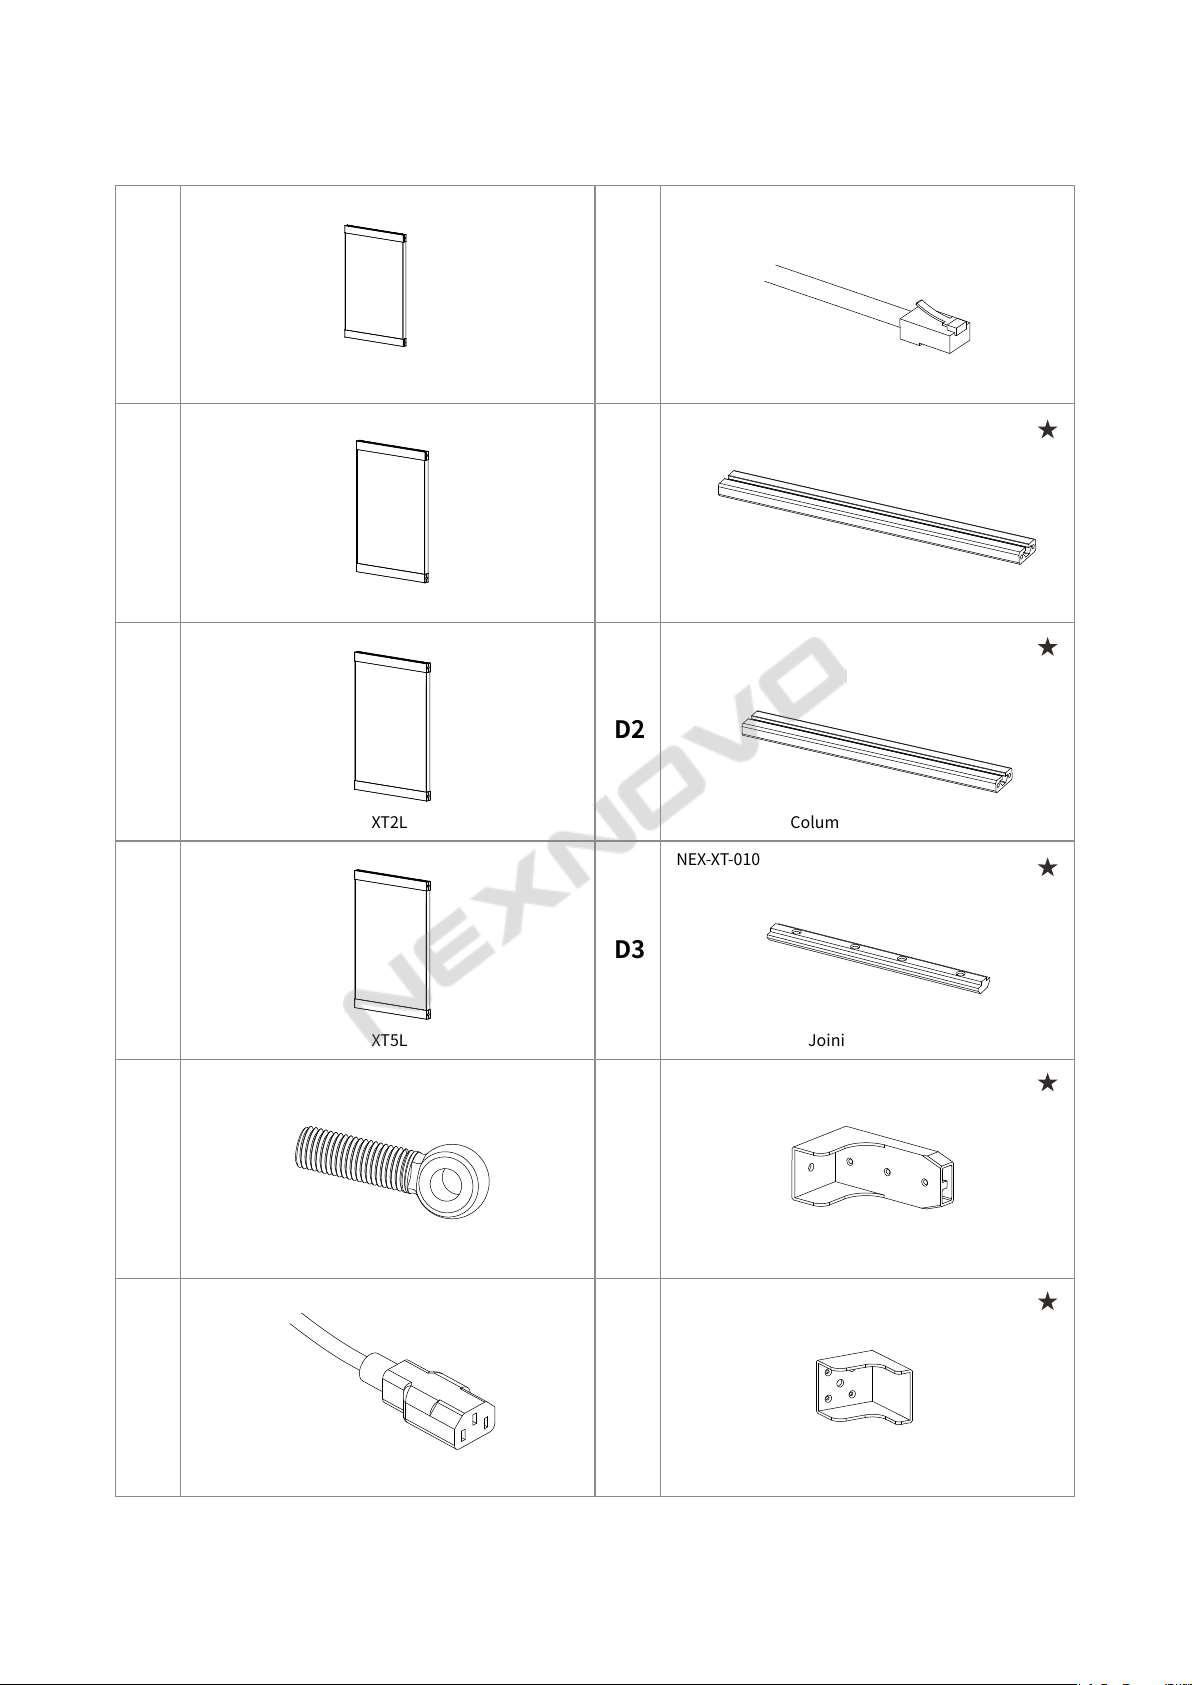
XT2L
NEX-XT-004
XT5L
NEX-XT-005
M8 x 25 Hanging Ring
NEX-XT-006
NEX-XT-007
C2
D1
D2
D3
E1
E2
NEX-XT-008
NEX-XT-009
NEX-XT-010
NEX-XT-011
NEX-XT-012
Input Power Cord
Cat6 Lan Cable With RJ45 Connector
Column Frame(1.3m)
Column Frame(1m)
Joining Frames
Angled Bracket to fix Column Frame
Angled Bracket from supporting frame
Detailed list of accessories (★ stands for optional)
3
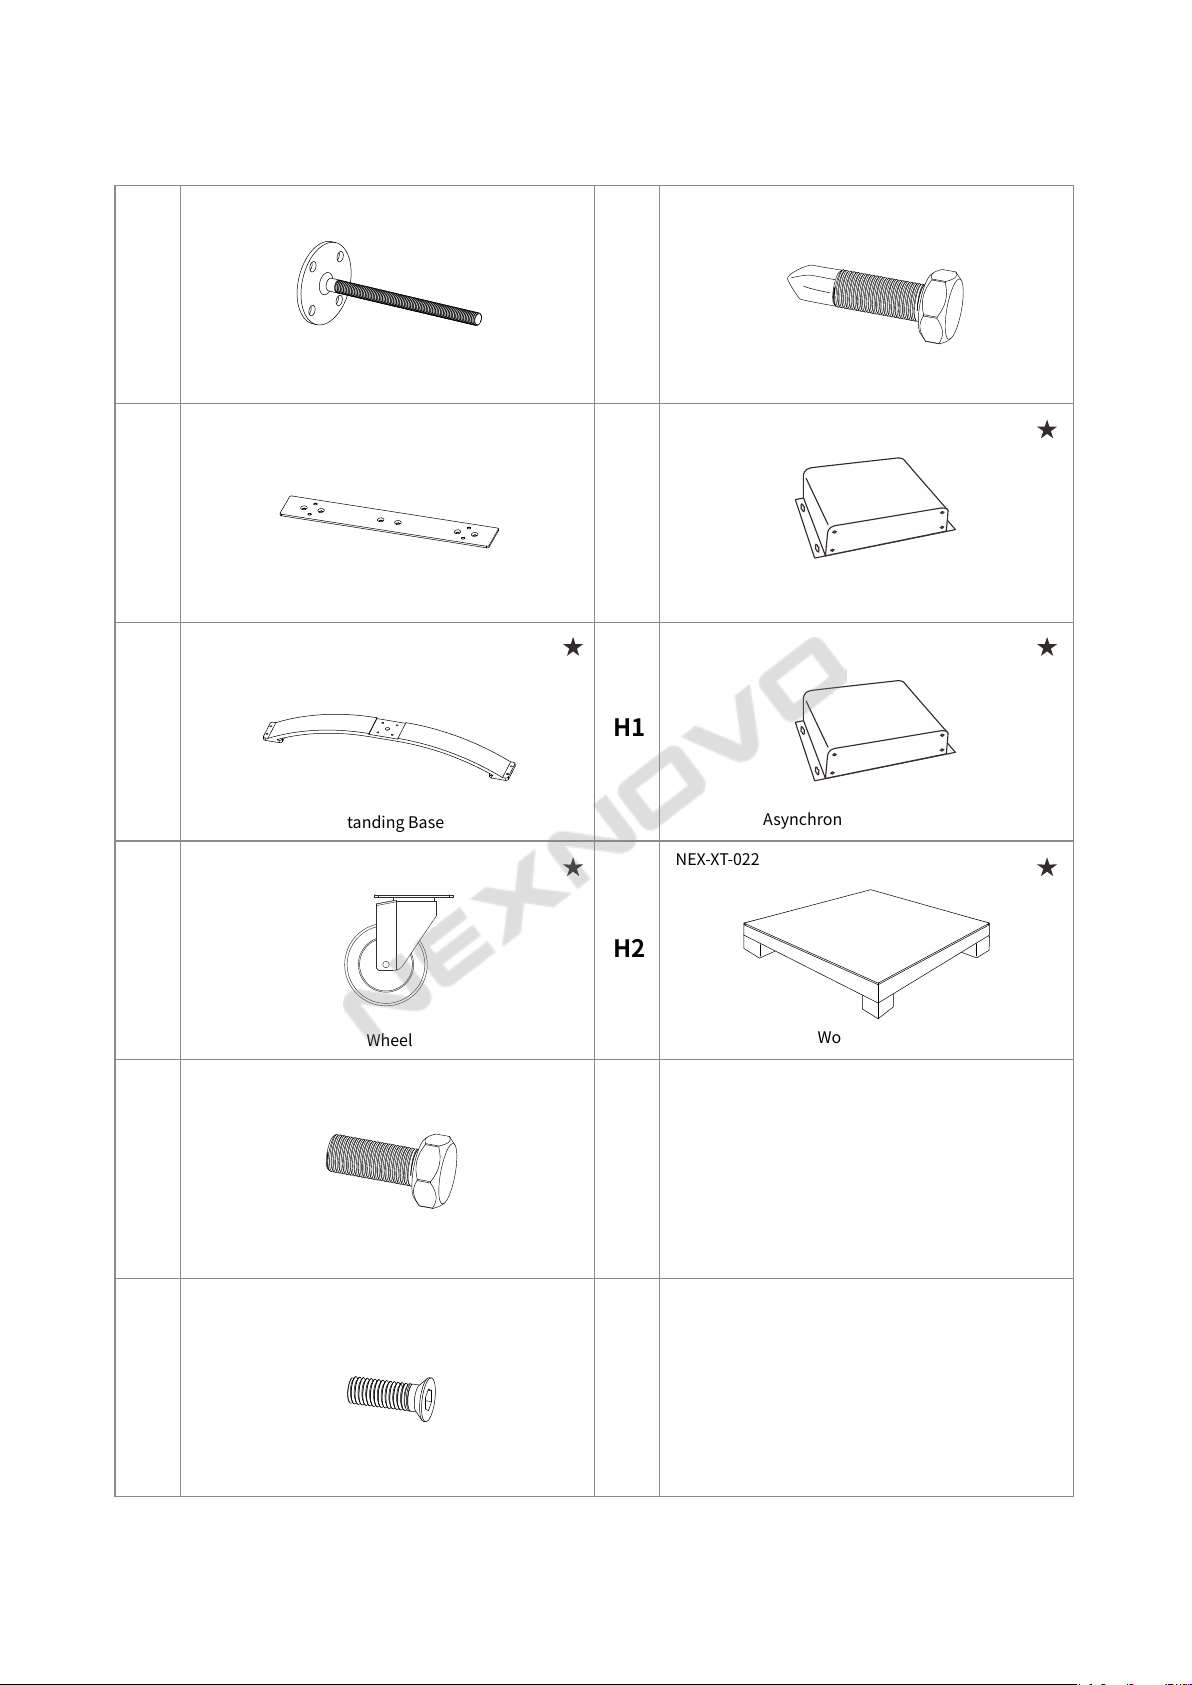
NEX-XT-013
F
F1
F2
F3
G2
G3
Top Fixing Accessories
NEX-XT-014
Surpporting Base
NEX-XT-015
Standing Base
NEX-XT-016
Screw (Hm8x20)
NEX-XT-017
Screw(Km6x12)
NEX-XT-018
G3
NEX-XT-019
H
H1
H2
NEX-XT-020
NEX-XT-021
NEX-XT-022
Tapping Screws(48x40)
Wheel
Synchronous Sending Box
Asynchronous Sending Box
Wooden Box
Detailed list of accessories (★ stands for optional)
4
4 5
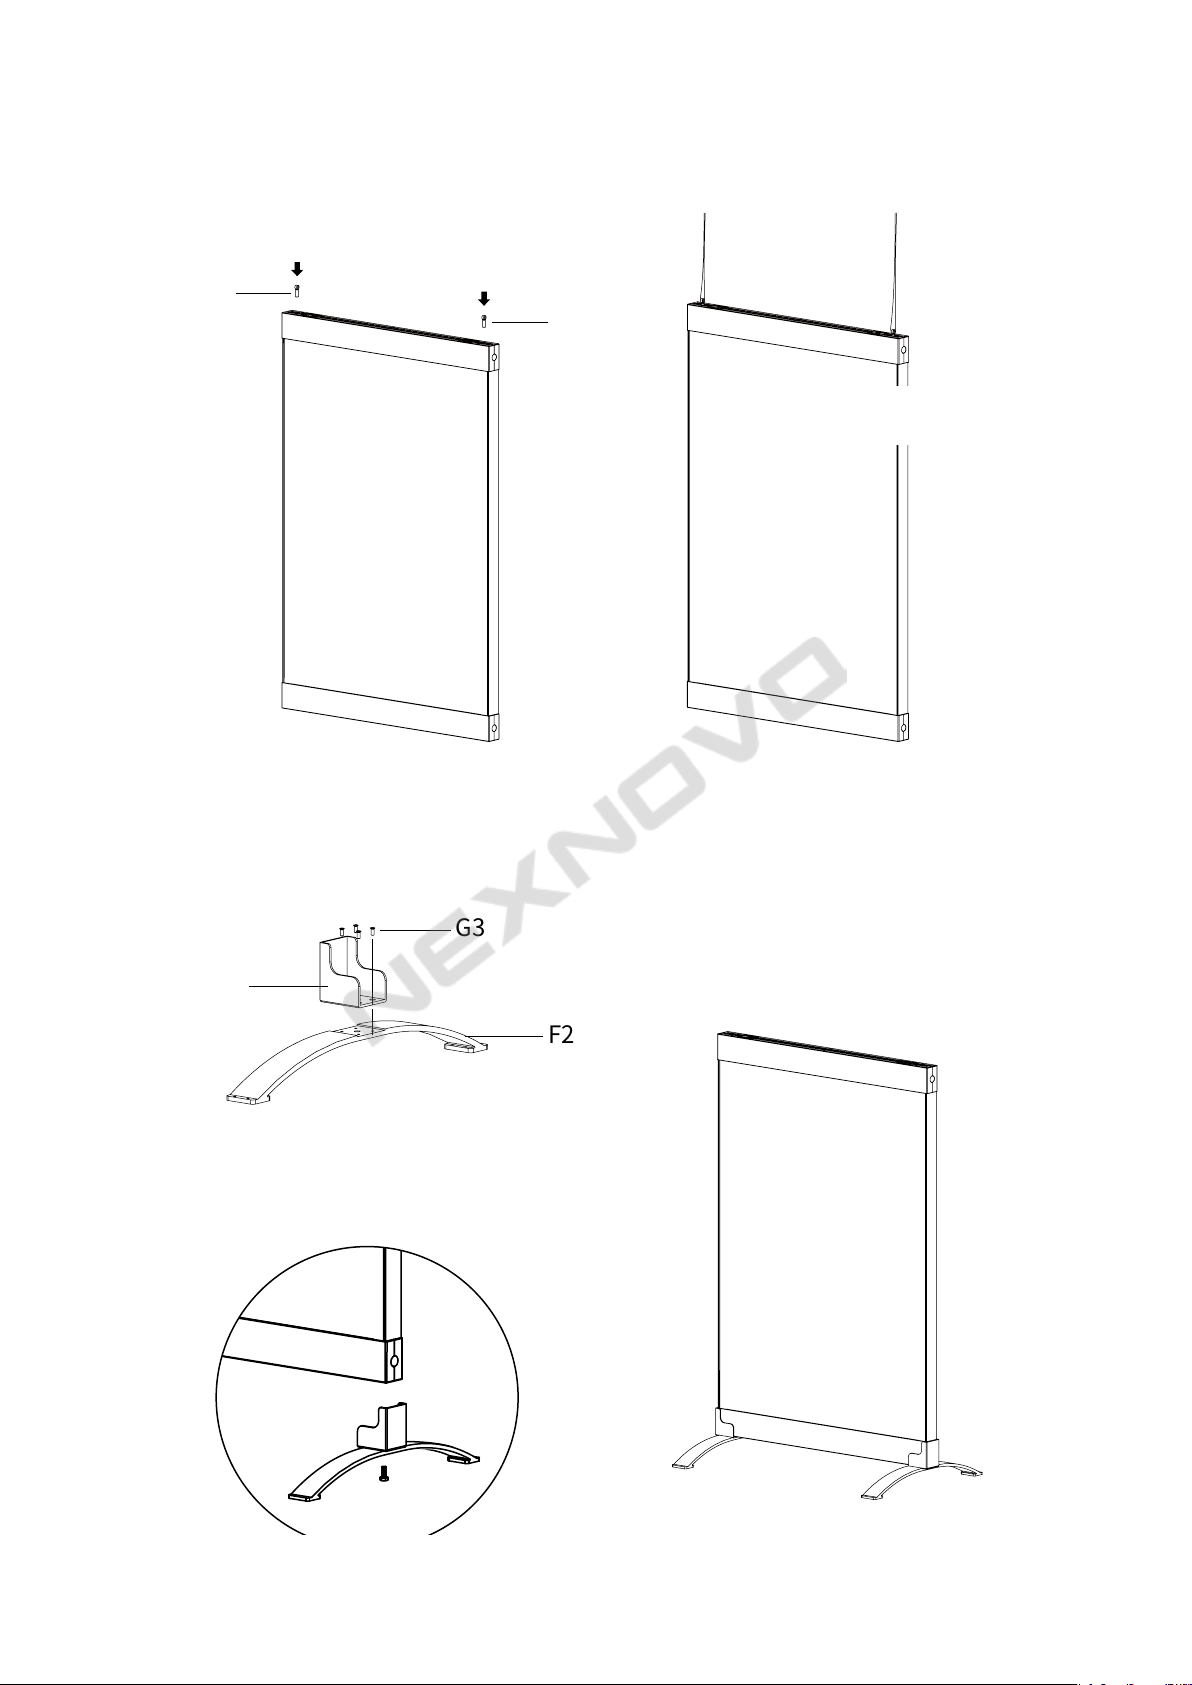
Installation
Hanging System
Standing System
1. Hanging rings
2. Put on steel wires
provided by customer.
1. Assemble the supporting base.
2. Tuck XT cabinet into the supporting base.
B
B
G2
E2
G3
F2
NEX-XT-013
F
F1
F2
F3
G2
G3
Top Fixing Accessories
NEX-XT-014
Surpporting Base
NEX-XT-015
Standing Base
NEX-XT-016
Screw (Hm8x20)
NEX-XT-017
Screw(Km6x12)
NEX-XT-018
G3
NEX-XT-019
H
H1
H2
NEX-XT-020
NEX-XT-021
NEX-XT-022
Tapping Screws(48x40)
Wheel
Synchronous Sending Box
Asynchronous Sending Box
Wooden Box
Detailed list of accessories (★ stands for optional)
4
4
5
Installation
Hanging System
Standing System
1. Hanging rings
2. Put on steel wires
provided by customer.
1. Assemble the supporting base.
2. Tuck XT cabinet into the supporting base.
B
B
G2
E2
G3
F2

6
Installation Against French Window
1. The suitable length
of column frame is
provided basing on on-
site condition(Standard
Length is 2.3m).
2. The two cutted column
profi les are joined fi rmly
with “ 一 ” shaped
connectors and tighten
screws.
D1D1
E1
G3
F
G2
G2
G3
G3 F1
D2
D2 D3
D3
5. Tighten screws to
fasten poster tightly
into angled bracket.
6. Mount the supporting
frames firmly with
screws.
3. Tuck the column
profile into angled
bracket and fix
screws.
4. Adjust angled
bracket to fit
different heights
of XT series and fix
screws.
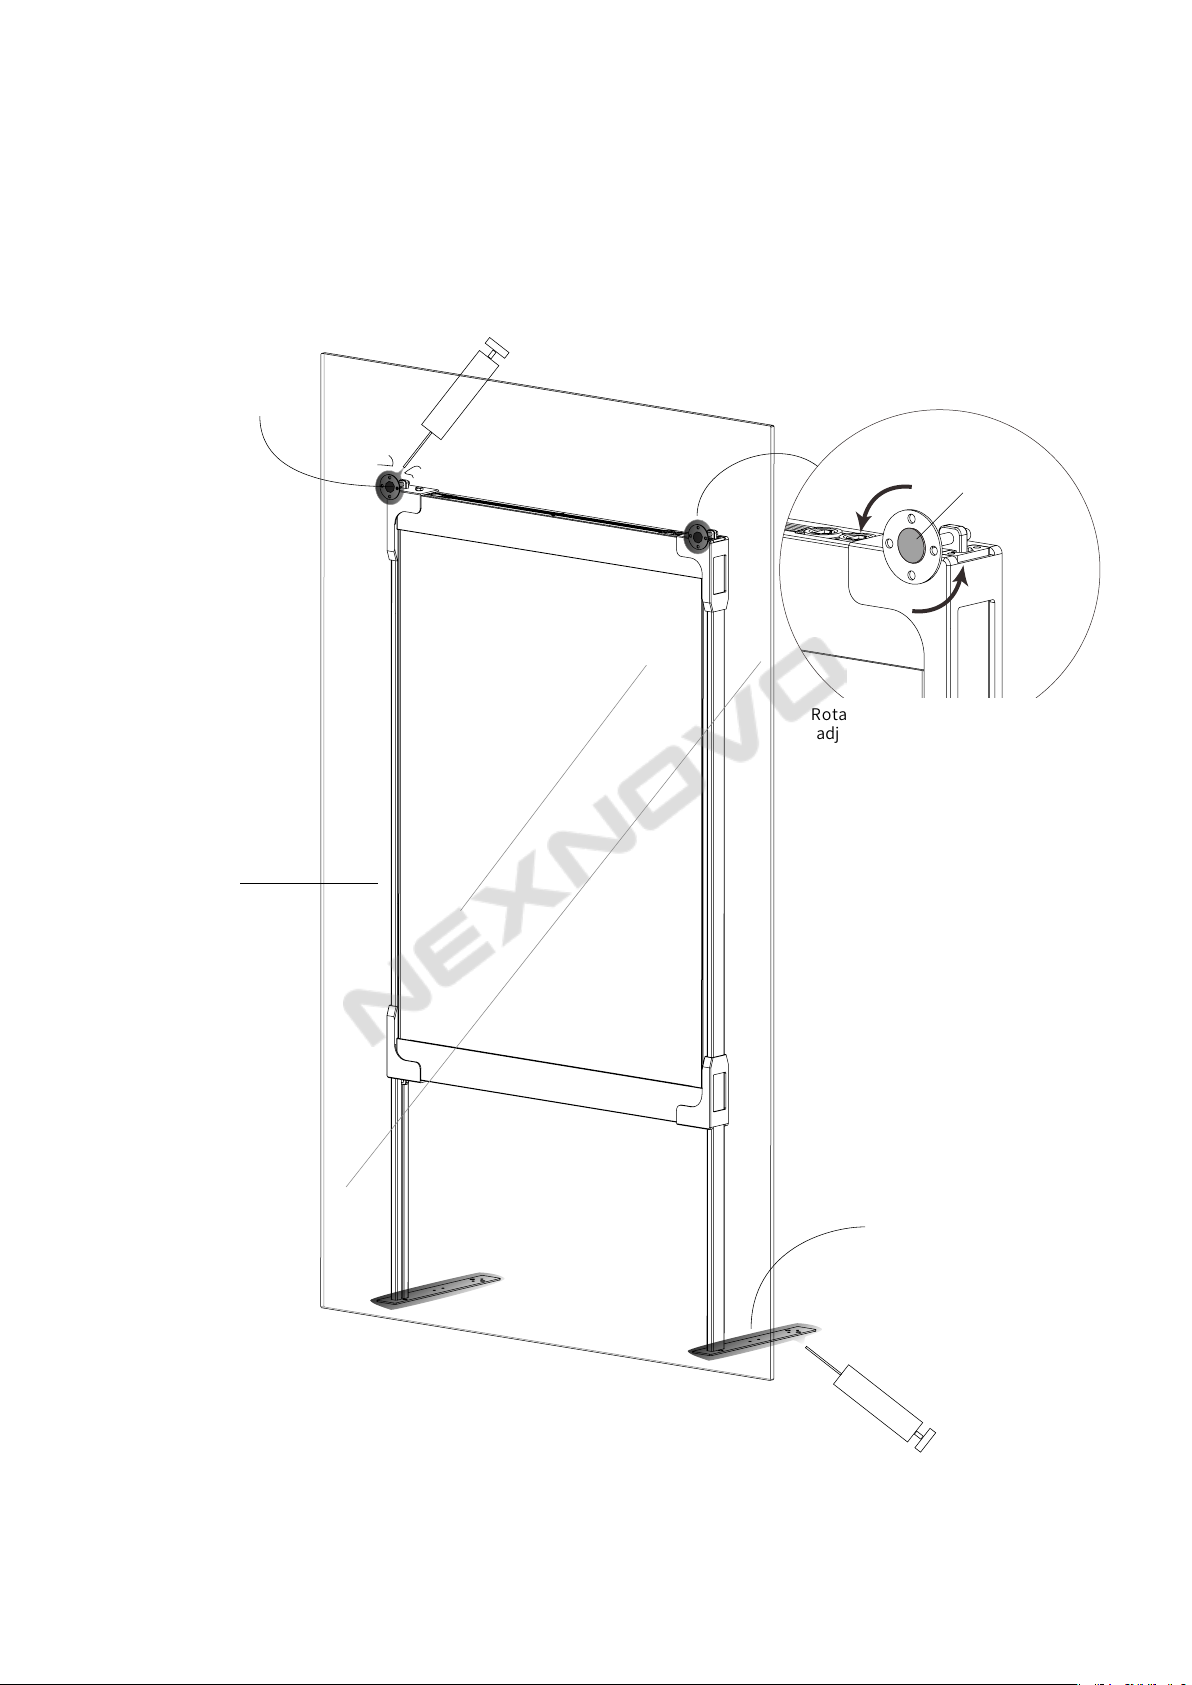
7
7. Adjust the relative
position betweenXT
poster and French
window glass and then
fasten poster against
glass.(Stick temporarily
the poster against glass
with 3M glue deliveried
with product and then
fix with screws or glass
cement)
Glass Cement(Recommended model:Baide FT101)
3M Glue
8.Use screws or glass
cement to fi x the base.
Rotate the round fixing plate to
adjust the gap with glass(3M Glue)
Tempered Glass
6
Installation Against French Window
1. The suitable length
of column frame is
provided basing on on-
site condition(Standard
Length is 2.3m).
2. The two cutted column
profi les are joined fi rmly
with “ 一 ” shaped
connectors and tighten
screws.
D1D1
E1
G3
F
G2
G2
G3
G3 F1
D2
D2 D3
D3
5. Tighten screws to
fasten poster tightly
into angled bracket.
6. Mount the supporting
frames firmly with
screws.
3. Tuck the column
profile into angled
bracket and fix
screws.
4. Adjust angled
bracket to fit
different heights
of XT series and fix
screws.
7
7. Adjust the relative
position betweenXT
poster and French
window glass and then
fasten poster against
glass.(Stick temporarily
the poster against glass
with 3M glue deliveried
with product and then
fix with screws or glass
cement)
Glass Cement(Recommended model:Baide FT101)
3M Glue
8.Use screws or glass
cement to fi x the base.
Rotate the round fixing plate to
adjust the gap with glass(3M Glue)
Tempered Glass

8
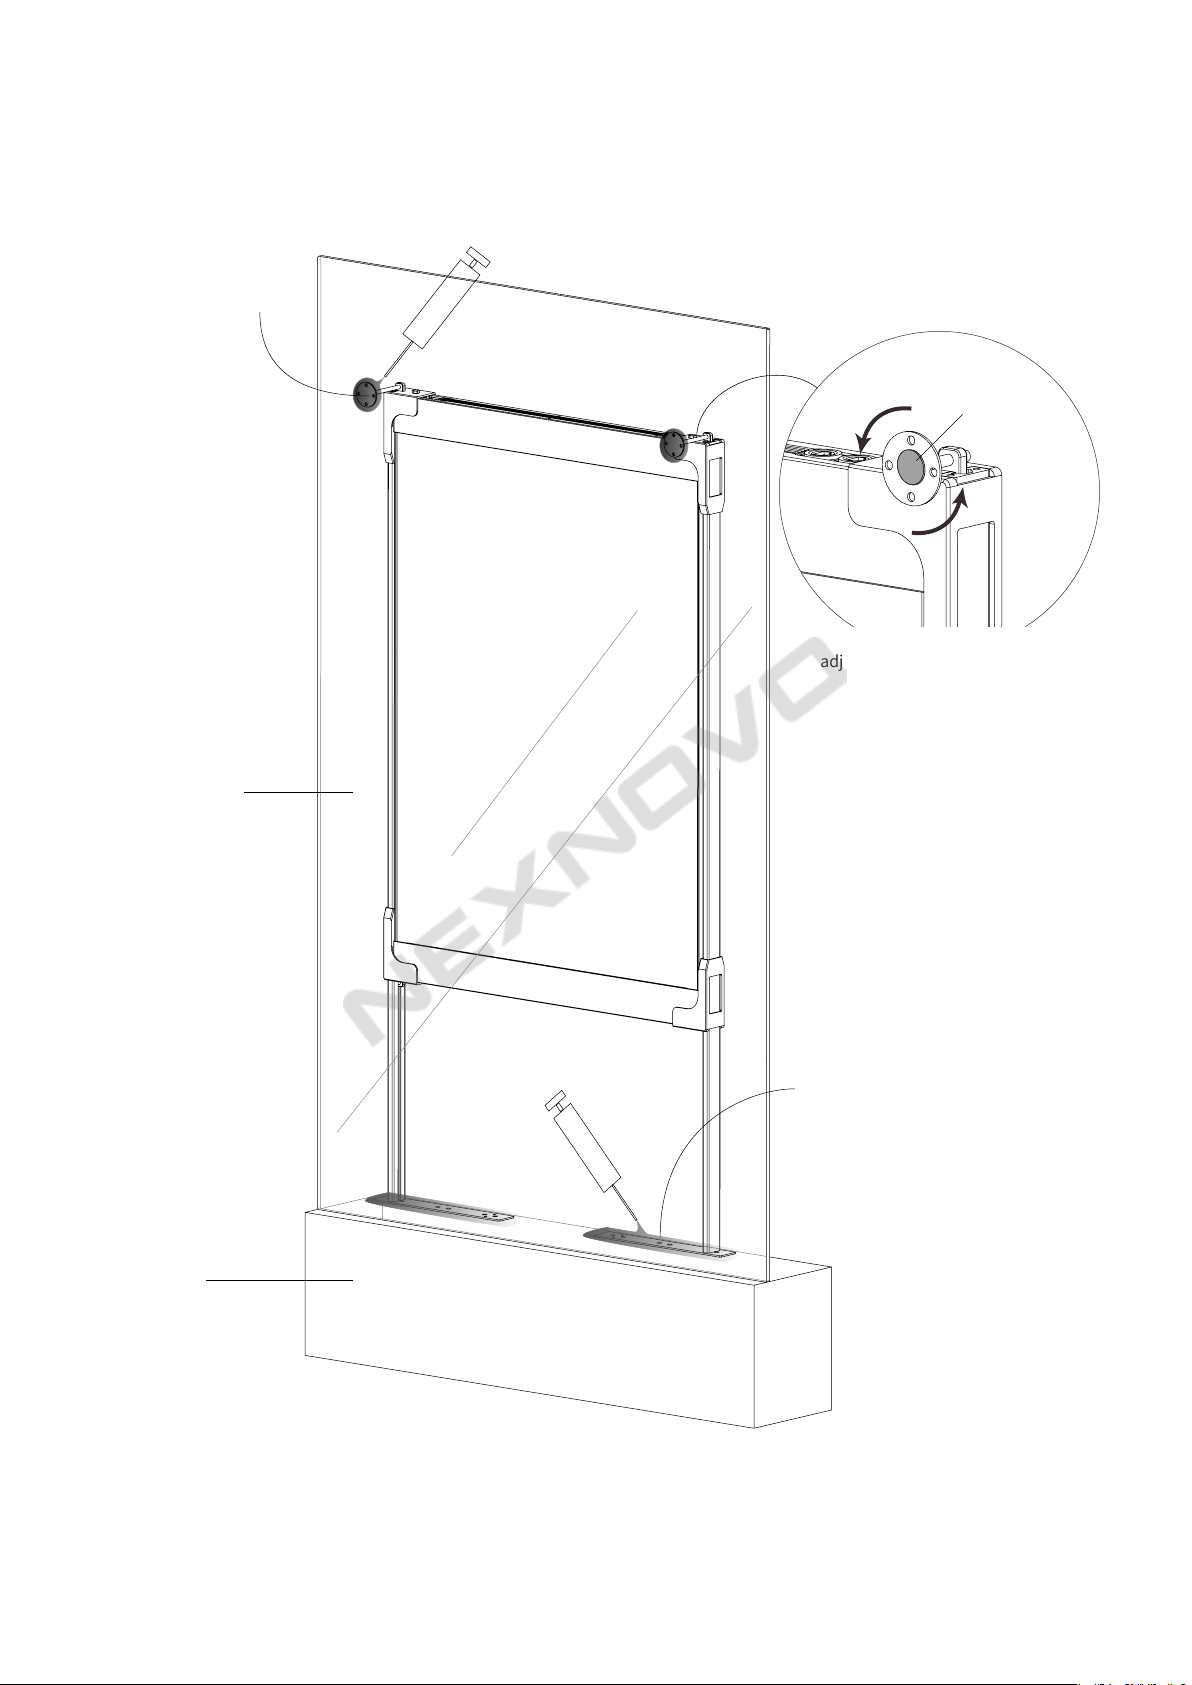
Installation on Window Sill
1.The suitable length
of column frame is
provided basing on on-
site condition(Standard
Length is 2.3m).
5.Tighten screws to
fasten poster tightly with
angled bracket.
6. Mount the supporting
frames firmly with
screws.
3. Tuck the
aluminum profile
into angled bracket
and tighten screws.
4. Adjust angled
bracket to fit
diff erent heights of
XT series and fasten
screws.
2.The two cutted column
profi les are joined fi rmly
with “ 一 ” shaped
connectors and tighten
screws.
D1
D1
E1
G3
F
G2
G2
G3
G3 F1
D2
D2 D3
D3
8
Installation on Window Sill
1.The suitable length
of column frame is
provided basing on on-
site condition(Standard
Length is 2.3m).
5.Tighten screws to
fasten poster tightly with
angled bracket.
6. Mount the supporting
frames firmly with
screws.
3. Tuck the
aluminum profile
into angled bracket
and tighten screws.
4. Adjust angled
bracket to fit
diff erent heights of
XT series and fasten
screws.
2.The two cutted column
profi les are joined fi rmly
with “ 一 ” shaped
connectors and tighten
screws.
D1
D1
E1
G3
F
G2
G2
G3
G3 F1
D2
D2 D3
D3
9
7. Adjust the relative
position betweenXT
poster and French
window glass and then
fasten poster against
glass.(Stick temporarily
the poster against glass
with 3M glue deliveried
with product and then
fix with screws or glass
cement)
Window Sill
tempered glass
8.Use screws or glass cement to fi x
the base.
Glass Cement(Recommended model:Baide FT101)
3M Glue
Rotate the round fixing plate to
adjust the gap with glass(3M Glue)
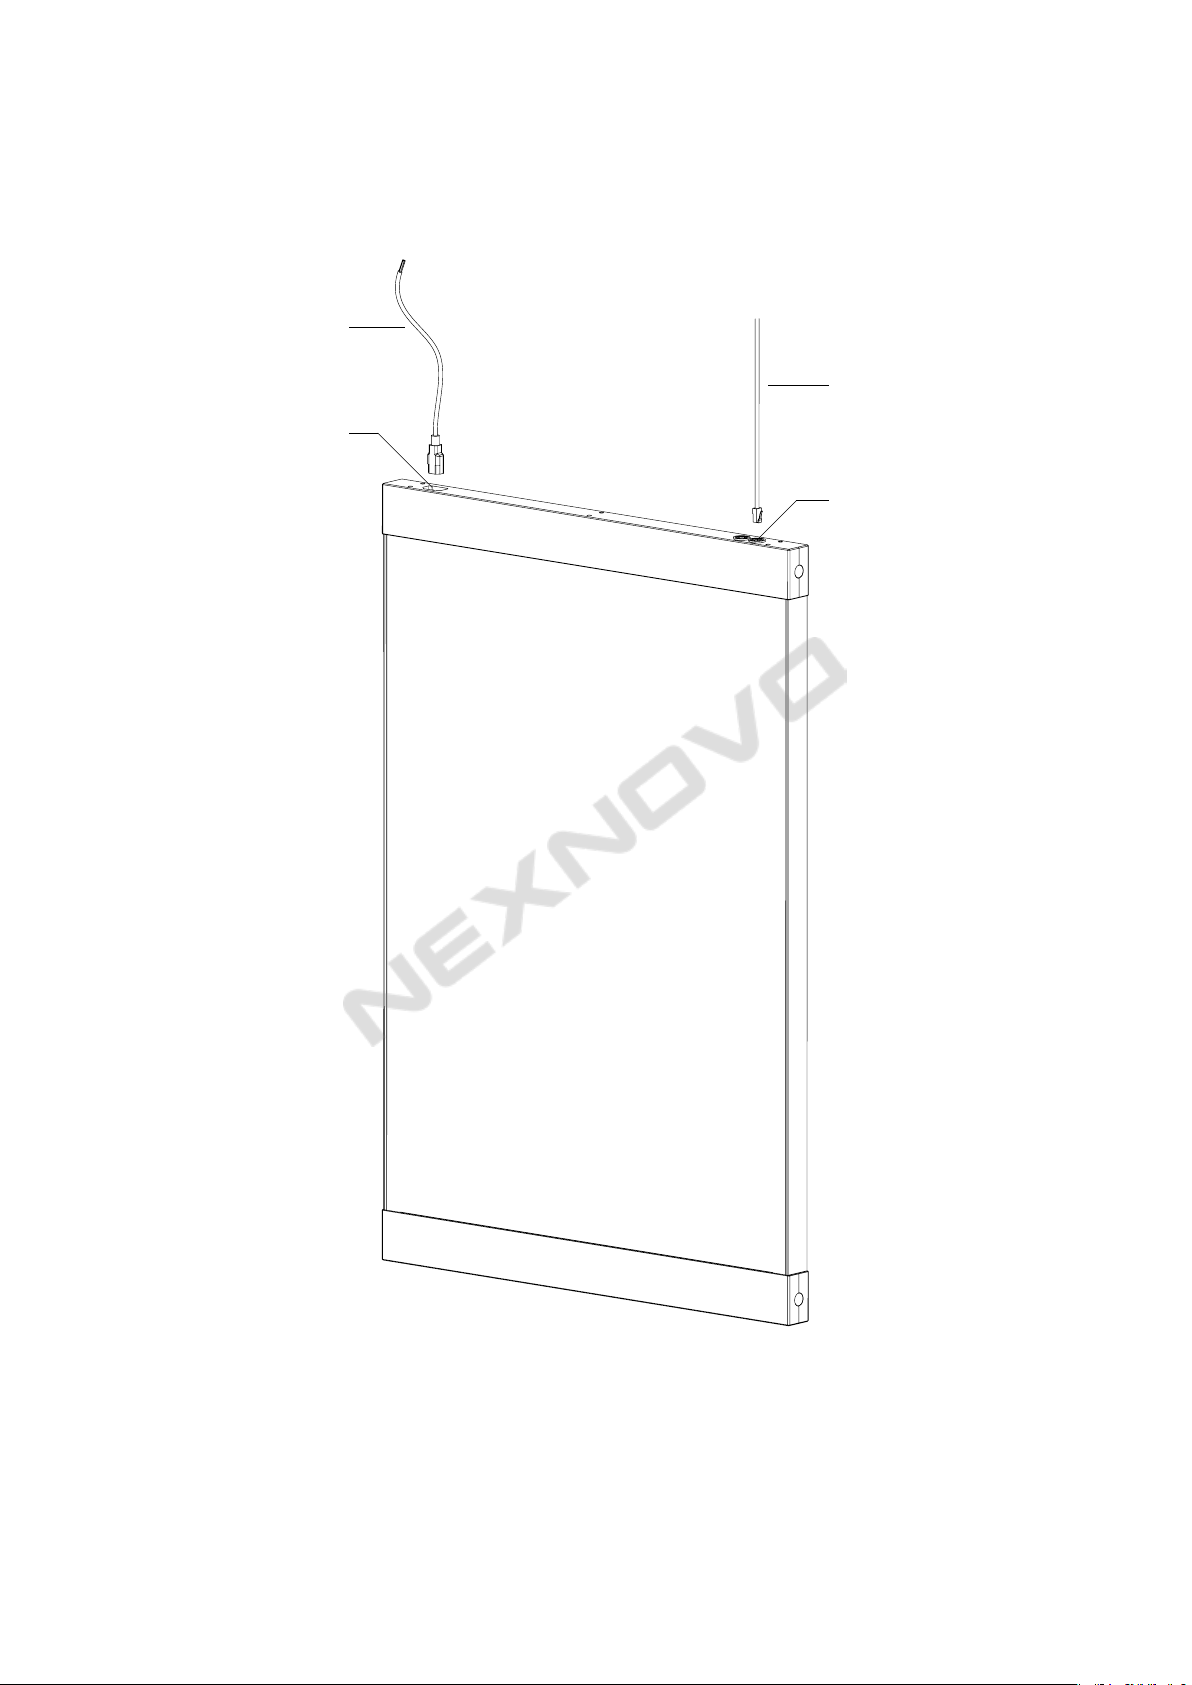
Data input
Power input
10
Wiring Diagram
C2
C1
Data input
Power input
10
Wiring Diagram
C2
C1
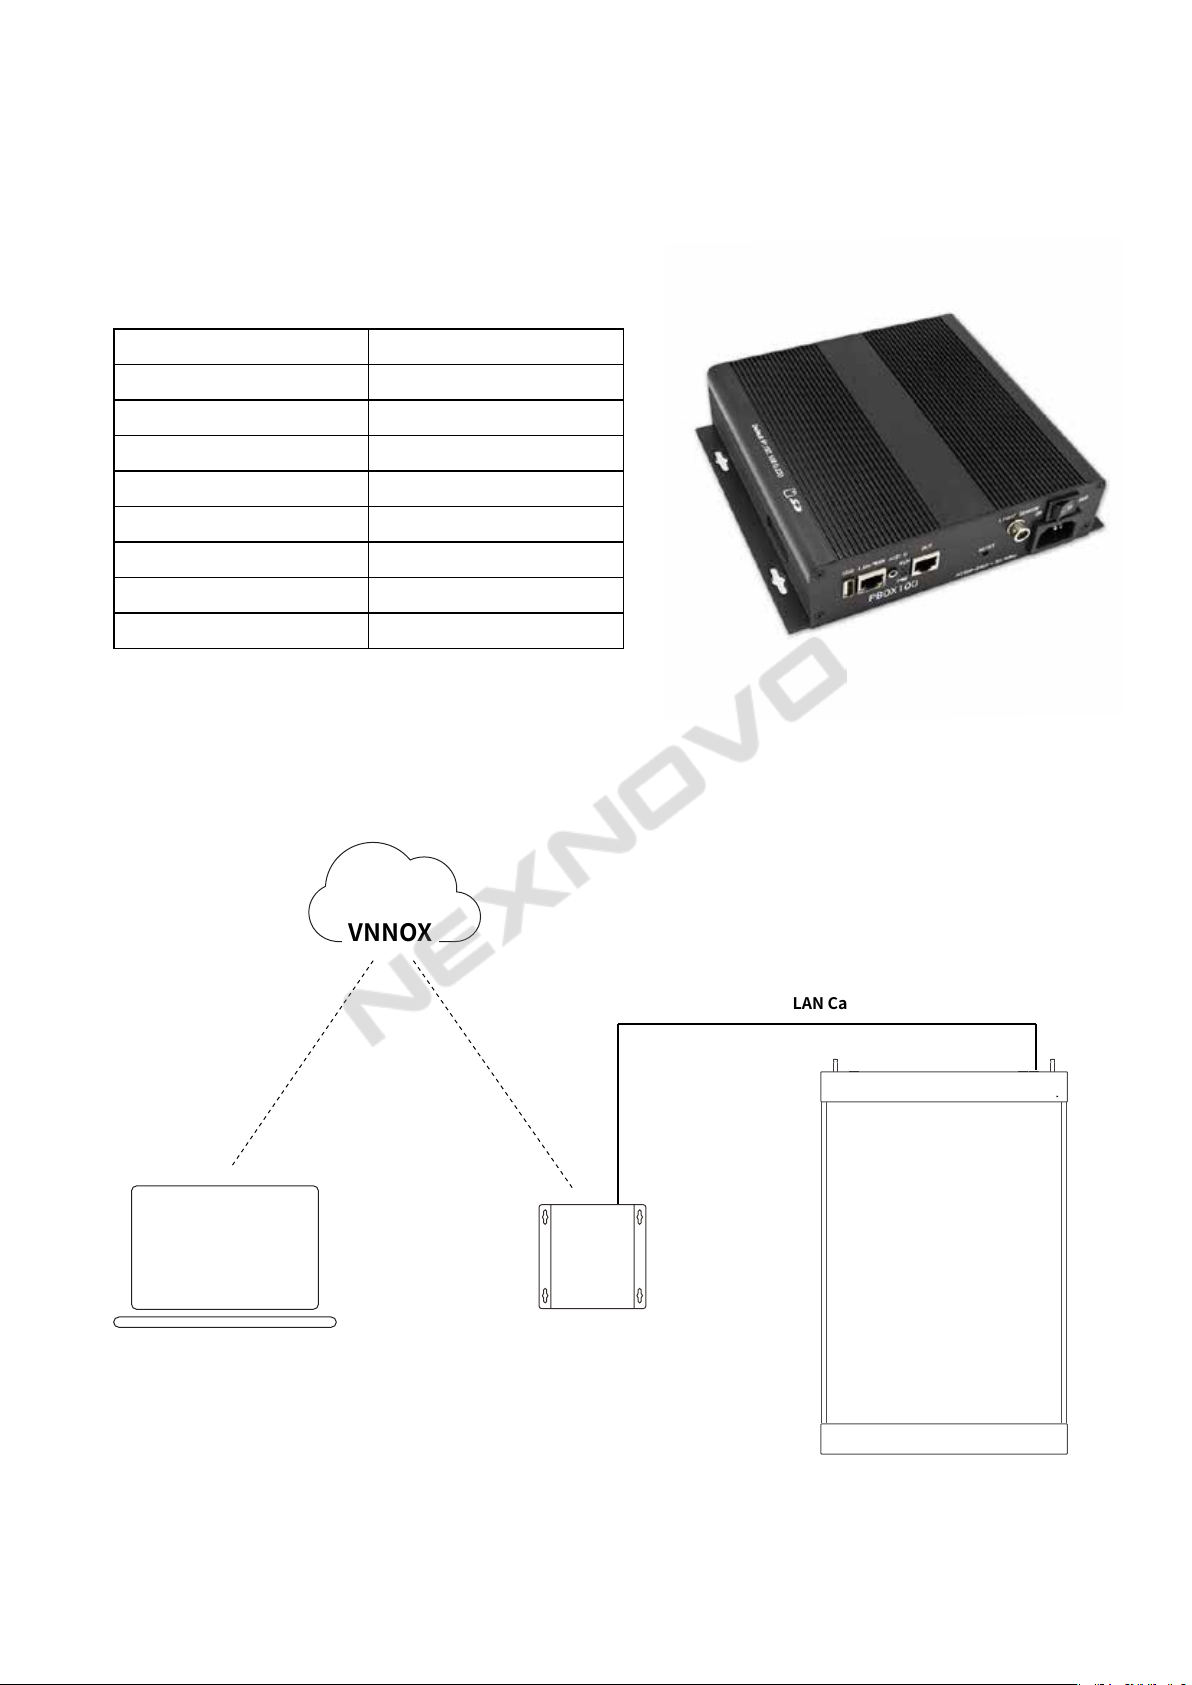
11
Confi guration of System Control
The system control of NS poster is composed of main controller and receiving card provided by NOVASTAR.
Please refer the specifi c confi guration and control to NOVA user manual.
Main Controller
Control Diagram 1
TB3/PBOX100
10W
100-240VAC
0℃ ~50℃
0%RH ~80%RH
-40℃ ~80℃
0%RH ~80%RH
1.33KG
L278.5 x W148.5x H15 MM
Recommended Model
Power consumption
Input Voltage
Storage temperature
Storage humidity
Working ambient temperature
Working ambient humidity
Net weight
Outer Size
VNNOX
PBOX100
LAN Cable
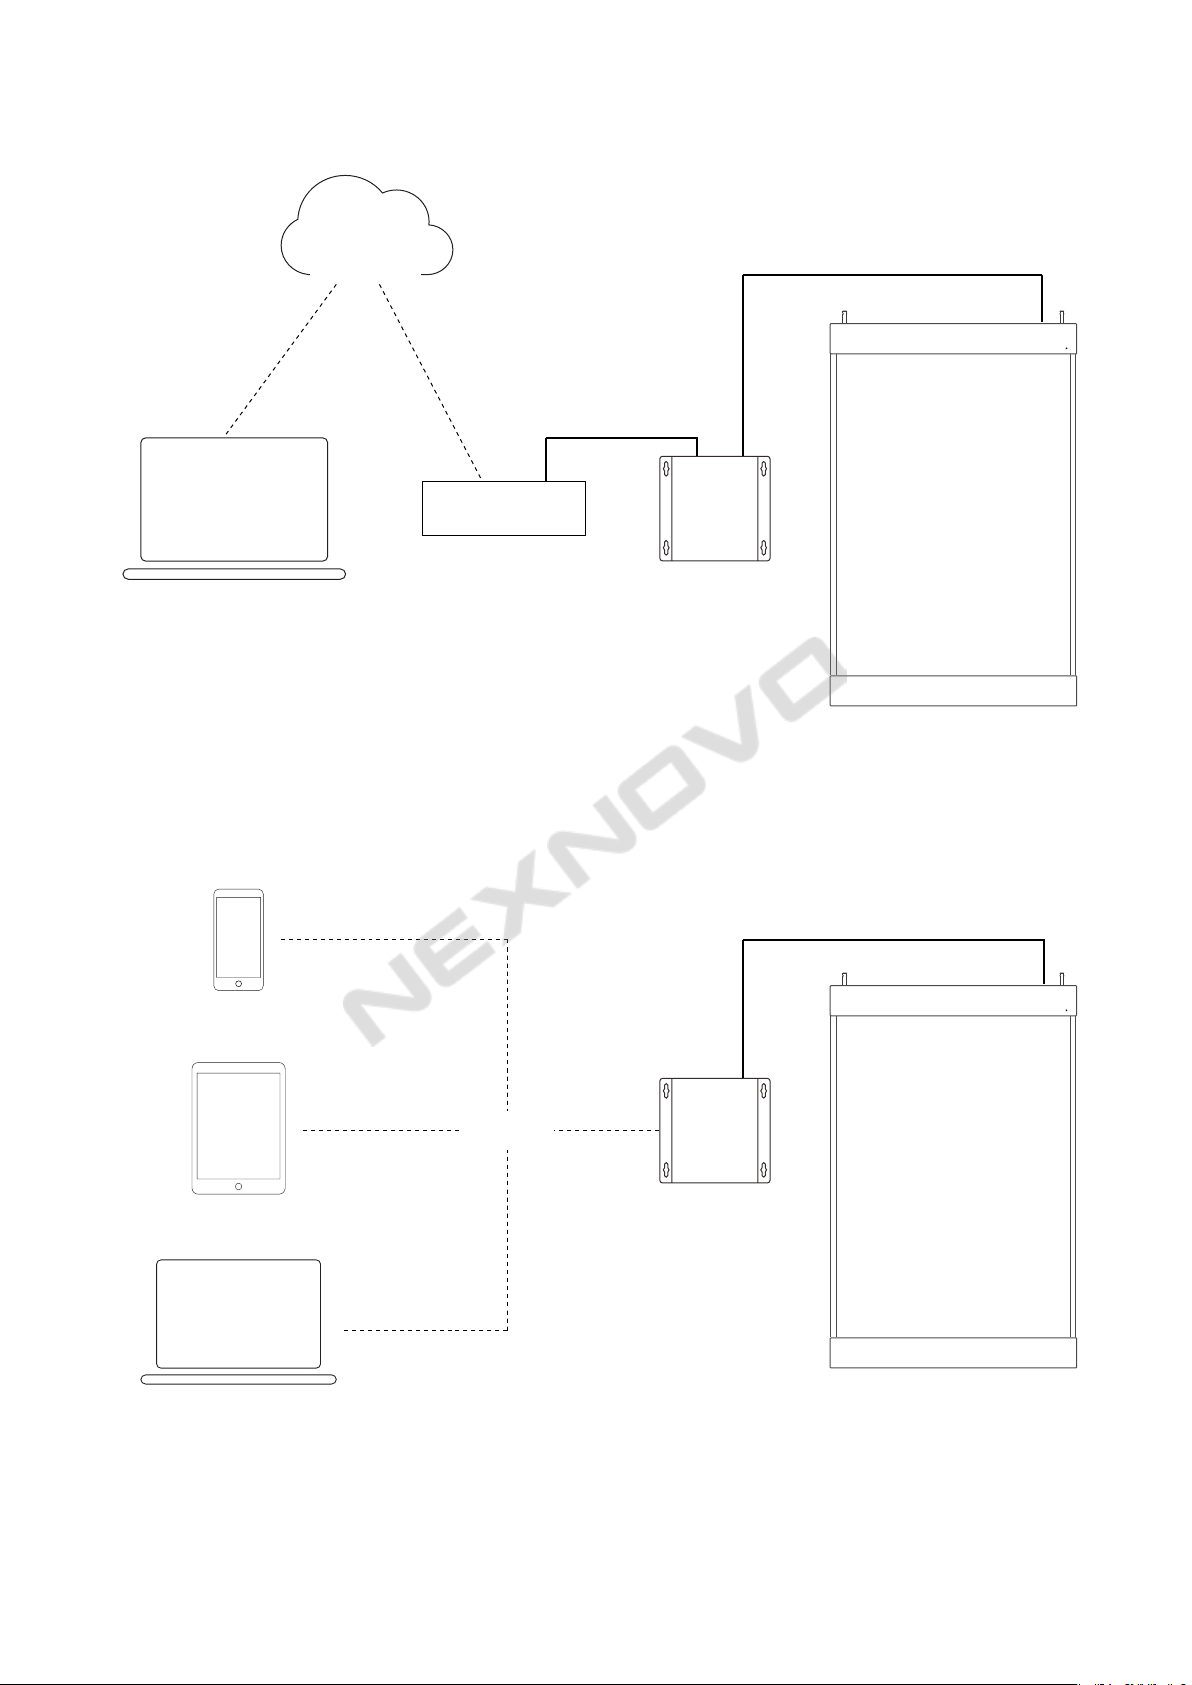
The 3rd cloud
The 3rd player
PBOX100
HDMI
TB3
WiFi
Control Diagram 2
Control Diagram 3
LAN cable
LAN cable
The 3rd cloud
The 3rd player
PBOX100
HDMI
TB3
WiFi
Control Diagram 2
Control Diagram 3
LAN cable
LAN cable
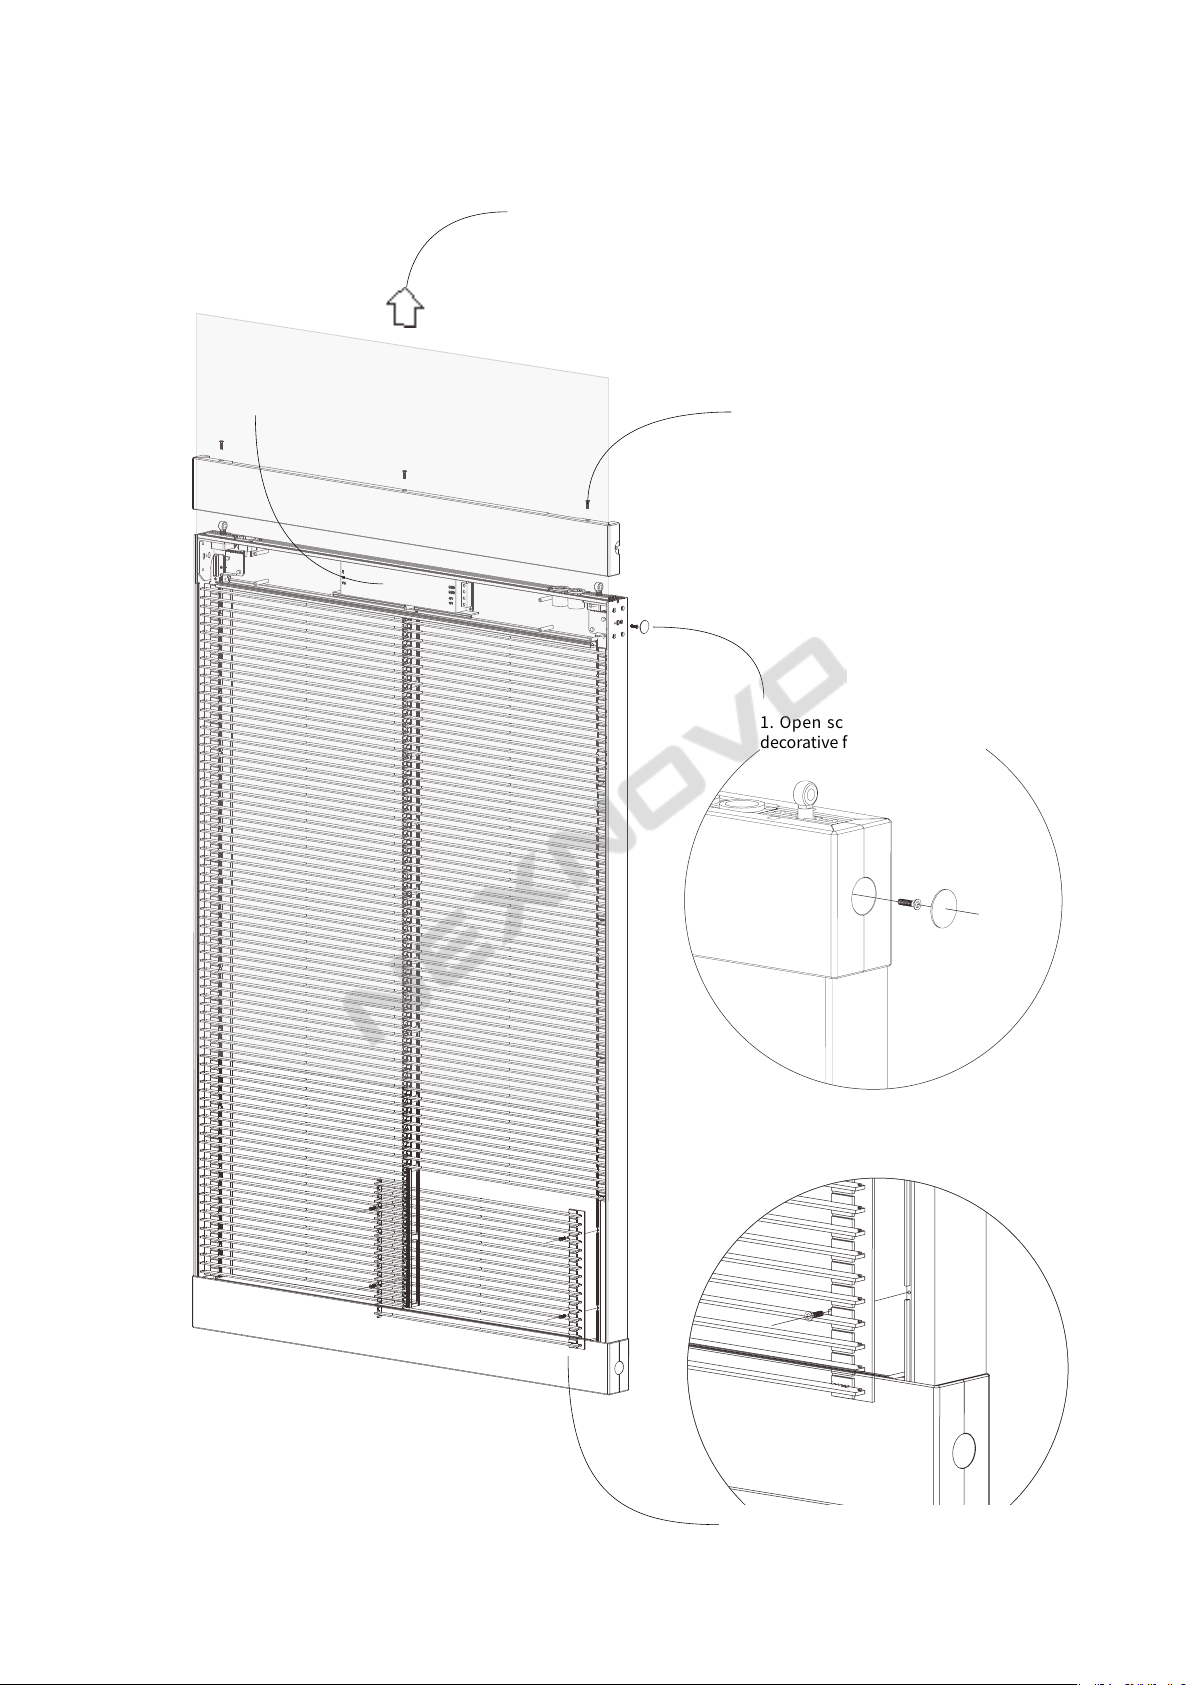
Maintenance
13
2. Open 3 screws at top to take off cover.
3. Then pull tempered glass off in the
direction of top cover.
4. Repair receiving card and
switch-off power supply
5. Open screws and take off led modules
1. Open screws to dismantle
decorative frames

14
Transportation And Package
Package method
Package method
Package method
Package
Package
Package
Package Size
Package Size
Package Size
Package weight
Package weight
Package weight
115x82x22 cm
143x98x23 cm
158x114x23 cm
46kg
67kg
79kg
94kg
150kg
193kg
122kg
189kg
245kg
109x34x92 cm
133x36x110 cm
154x36x126 cm
109x45x92 cm
133x47x110 cm
154x47x126 cm
Flight Case
Flight Case
Flight Case
XT 3S
XT 3M
XT 2L / XT 5L
XT 3S
XT 3M
XT 2L / XT 5L
XT 3S
XT 3M
XT 2L / XT 5L
Wooden Case
Wooden Case
Wooden Case
Wooden Case
Wooden Case
Wooden Case
1
1
1
3
3
3
4
4
4
Model
Model
Model
© 2017 NEXNOVO TECHNOLOGY CO,LTD
www.nexnovo.com
This manual suits for next models
4
Popular Lighting Equipment manuals by other brands


Lightolier
Lightolier Calculite IS-PS Assembly and installation

Avlite
Avlite Airfield lighting system Installation & service manual

NaviLite
NaviLite N3 Series installation instructions

Techni-Lux
Techni-Lux mzSCULPT TH-SCLPMZ100WW/B manual

Castaldi Lighting
Castaldi Lighting D22 Installation and maintenance sheet

Milwaukee
Milwaukee M18 Original instructions