Nextphase ProtecTV User manual

Thank you for your purchase of ProtecTV. ProtecTV is going to change how you
watch TV from the moment you plug it in. As much as you will like the protection that
ProtecTV provides, there will be a period of adjustment for you and your family.
Once you and your family adjust to your new way of watching TV you will wonder
how you ever watched TV without this protection.
During your adjustment period you should consider the following:
• ProtecTV will mute the audio during phrases containing offensive language.
• If you choose to use closed captioning, ProtecTV will display a series of X’s in
place of the chosen phrase, and when the spoken phrase is completed the sound
is restored.
Examples:
The phrase “Shut the hell up”, is muted and “Shut the XXXX up”is
displayed on the closed captioning.
The phrase “I don’t give a rat’s a—!”, is muted and “I don’t give a rat’s
xxx”is displayed on the closed captioning.
•ProtecTV can only be as accurate as the closed captioning. If the closed caption-
ing on a particular TV show or movie is inaccurate it will cause the ProtecTV sys-
tem to be inaccurate. If a word is not captioned correctly the ProtecTV system will
not be able to filter it.
OTHER IMPORTANT THINGS YOU SHOULD KNOW:
•How it works-ProtecTV uses CC+ patented technology. This technology was
developed for the hearing impaired to be able to read what was being said on the
bottom of the TV screen. Each word in a particular show is checked against a
database of over 400 words. When an offensive word is detected, the CC+ tech-
nology automatically mutes the sound, and turns the sound back on when the
word is completed.
•Virtually all scripted programs (videos, dvds, TV series, TV movies) are filtered.
NOTE: Although Universal Studios videos are filtered by ProtecTV, Universal
DVDs are not filtered. Universal Studios does not follow the established
standard for closed-captioning on their DVDs.)
•Live programming (news, sporting events, talk shows, soap operas) are not
filtered.
User’s Manual
WARNING: TO REDUCE THE RISK OF ELECTRIC
SHOCK, DO NOT REMOVE COVER. REFER SERVICING
TO QUALIFIED SERVICE PERSONNEL.
CONNECTIONS:
This manual will provide you with many ways to connect your unit up based on what
you are using. There may not be one exactly like the system that you have at home,
but one or more of the diagrams will most likely be close to what you have and can
be used as a guide.
Connection Types
ProtecTV can be connected to your TV using either AUDIO/VIDEO (RCA type cable)
jacks or RF jacks (coaxial cable).
Using a simple RF coaxial cable connection gives you a good picture with mono
sound quality. This connection (diagram A) must be used if AUDIO/VIDEO connec-
tions are not available for your TV. When using the coaxial cable connection your TV
should be turned to either channel.
If your TV has AUDIO/VIDEO connections, it is highly recommended that you use
them to achieve better picture quality and HI-FI stereo sound. When using the
AUDIO/VIDEO connections your TV must be set to the proper input, not channel 3
or 4. Normally, the proper input can be selected using your TV’s remote by pressing
the INPUT button. However, you may need to select it on your TV’s front panel but-
tons, or through your TV’s menu system. It might also be selected by tuning to chan-
nel 00, 90, 91, 92, 93, VID1, or VID2. The proper input’s name and selection method
varies from TV to TV.
Surround Sound Systems
ProtecTV does work with ProLogic surround-sound. Simply follow the instructions for
stereo connections in this manual.
DVD Players
ProtecTV does work with DVD players. Connect your DVD player in the same meth-
ods described in this manual for VCRs. ProtecTV does not support Dolby Digital 5.1.
We recommend using the stereo connections illustrated in this manual for both audio
and video.
ProtecTV also does not support connections for S-Video or Component Video. We
may recommend using RCA-type video connections illustrated. Although not recom-
mended, you may still use the S-Video or Component Video connections, if support-
ed by your DVD player and TV. Simply make the connections as diagrammed for
RCA-type connections, plus connect the S-Video or Component Video cables direct-
ly from your DVD player to your TV, bypassing ProtecTV. TVG will still mute the
audio at the appropriate moments, however, it will not display the modified profanity-
free text.
ProtecTV
does work with most DVD players. A few DVD players, however, have been
discovered to strip out the closed captioning text required by
ProtecTV
to detect the foul
language.
Connection Requirements
ProtecTV must be connected between your VCR/cable box/satellite receiver/DVD
player, and your TV and stereo/home theater system (if applicable).
To have both TV programs and videos filtered, ProtecTV must be connected to your
VCR as illustrated in the following diagrams. Your VCR will need to stay on when
your watching TV.
Your TV must be turned to either channel 3, 4 or aux/video input depending on
whether you’re using a coaxial connection from the ProtecTV to your TV.
CHANGING CHANNELS –you will not change the channel on your TV. You will use
your VCR to change the channels, unless you have a satellite receiver or cable box.
If you do have a satellite receiver or cable box it will be used to change channels,
and your VCR should be turned to channels 3, 4 or the proper input station, if appli-
cable.
CONNECTION DIAGRAMS:
Depending on the particular type of equipment you have in your home, you may
have to refer to more than one of the diagrams in this manual. Please use them as a
guide. You may also want to refer to the manuals for your VCR, DVD player, satellite
receiver and TV. If you’ve tried your best, but did not succeed please call us for
installation assistance between 9:00 AM and 5:00PM ET at 866-ProtecTV.
STANDARD (MONO) CONNECTIONS (DIAGRAM A)
RECOMMENDED FOR TVs WITH ONLY A RF COAXIAL JACK. THIS CONNECTION
IS NOT RECOMMENDED IF YOUR TV HAS AUDIO/VIDEO CONNECTIONS.
If your VCR has separate left and right audio connections then connect the red
cable to the right and the white cable to the left on both your VCR and ProtecTV.
Connect this to cable
outlet on the wall, cable
box or satellite receiver.

HIGHER QUALITY
Use this connection scheme if you are using a
cable box or satellite reciever with an A/V out
and a VCR with an A/V in. Connect them with
another A/V type cable instead of the ANT. This
will give you better audio and video quality.
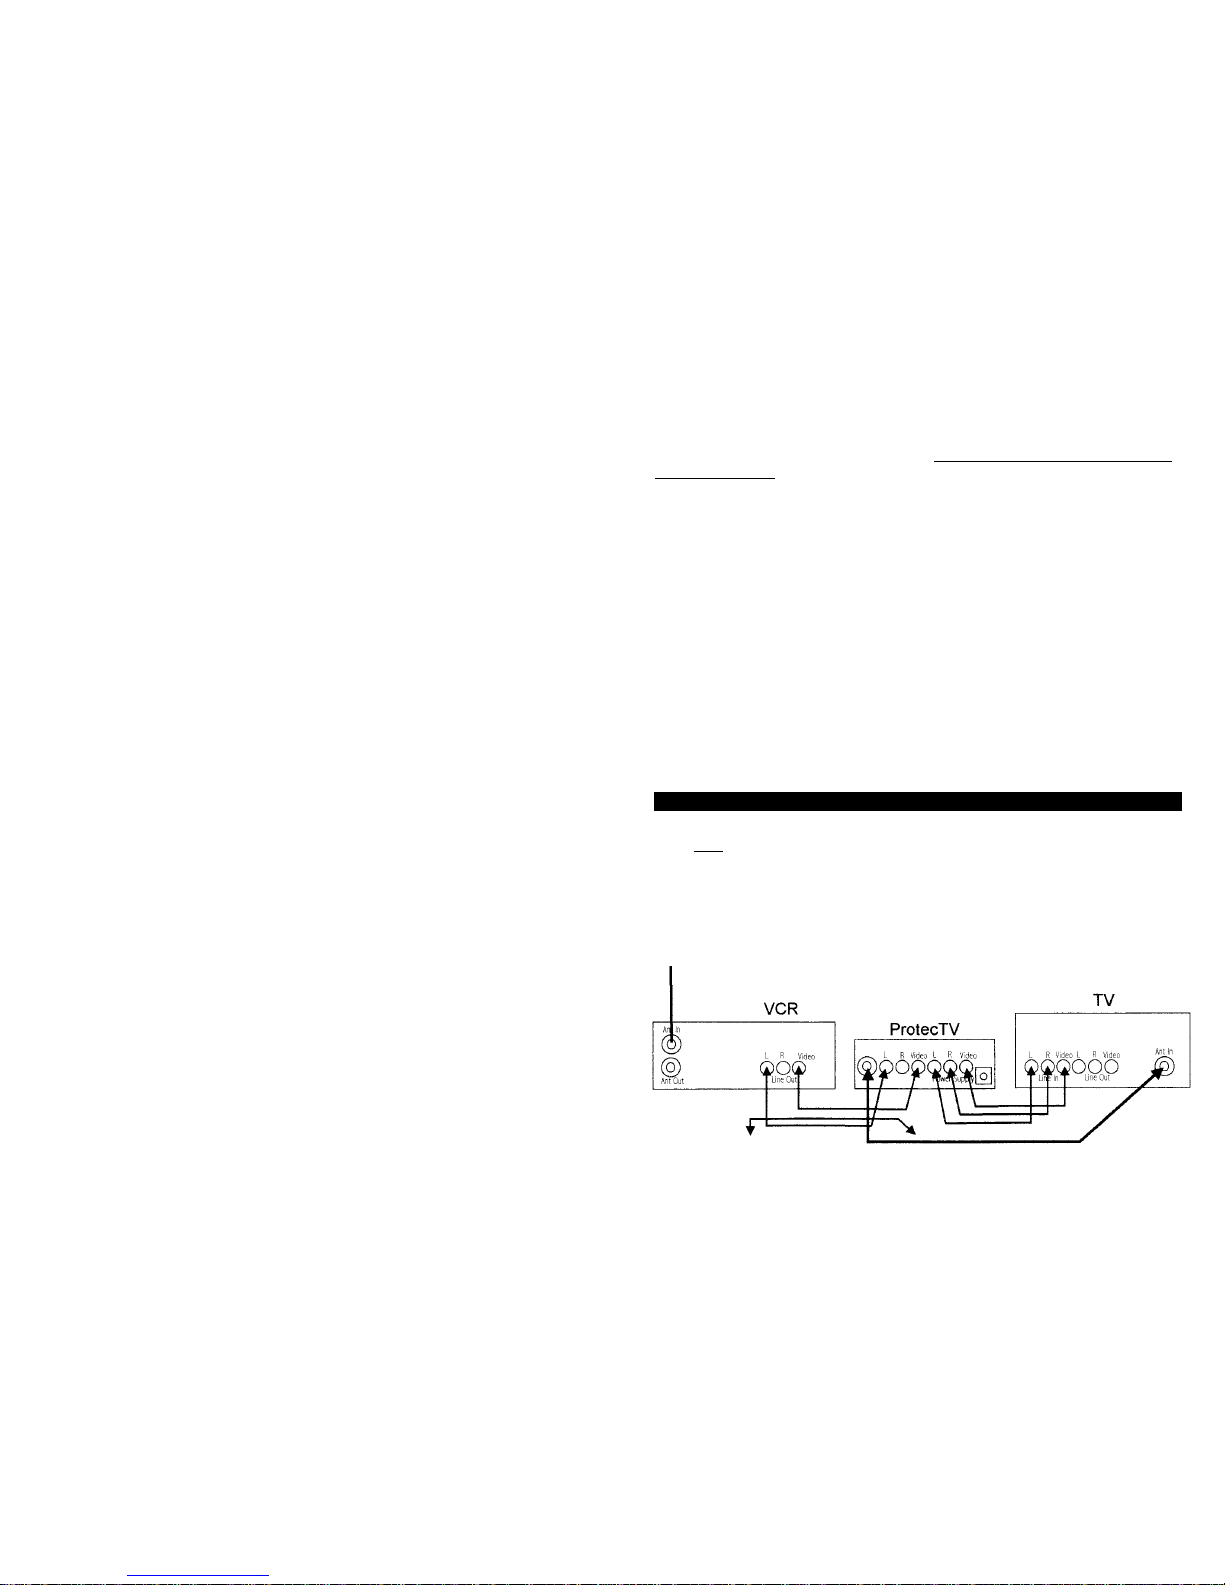
CONNECTIONS FOR HI-FI STEREO /IMPROVED VIDEO (DIAGRAM B)
SAMPLE HOME THEATER CONNECTIONS (DIAGRAM C)
SAMPLE HOME THEATER CONNECTIONS (DIAGRAM D)
CONNECTIONS FOR BOTH DVD PLAYER AND A VCR (DIAGRAM E)
RECOMMENDED FOR TVS WITH AUDIO/VIDEO JACKS. THIS CONNECTION IS
NOT RECOMMENDED IF YOU ARE CONNECTING A STEREO OR SURROUND
SOUND RECEIVER.
You will need a second AUDIO/VIDEO (RCA-type) cable with this connection.
Connect to cable
outlet on the
wall, cable box or
satellite receiver.
2nd cable not included.
RECOMMENDED FOR STEREO OR SURROUND SOUND CONNECTIONS
UNLESS YOUR TV HAS AUDIO/VIDEO OUT CONNECTIONS. IF IT DOES,
REFER TO DIAGRAM D.
Cable from the
wall, cable box, or
satellite receiver.
RECOMMENDED FOR STEREO OR SURROUND SOUND CONNECTIONS
IF YOUR TV HAS AUDIO/VIDEO OUT CONNECTIONS. IF IT DOES NOT,
REFER TO DIAGRAM C.
You will need 2 additional audio/video (RCA type) cables with this connection.
If you have both a DVD player and a VCR it is recommended that you purchase
an audio/video switch box. This will allow you to switch between the VCR and
DVD player by pressing a button on the A/V switch box.
You will need 2 additional audio/video (RCA type) cables with this connection.
Connect this to the
cable outlet on the wall,
cable box or satellite
receiver. Connect ProtecTV A/V input
to A/V switchbox output.
Connect to your television
or stereo receive.
HIGHER QUALITY
Use this connection scheme if you are using a
cable box or satellite reciever with an A/V out
and a VCR with an A/V in. Connect them with
another A/V type cable instead of the ANT. This
will give you better audio and video quality.
Cable from the
wall, cable box, or
satellite receiver.

If you are not completely satisfied, simply return the ProtecTV unit in its entirety and
in its original packaging to: Global Cable, Inc., 2969 Worley Chapel Drive, Trenton,
Georgia, USA 30752 within 30 days of purchase for a full refund. GCI also warrants
that the product will function according to written specifics for a period of one full
year from the date of purchase.
TROUBLESHOOTING:
No picture and sound:
•Check that the wall power supply is plugged in to the electrical outlet.
•Check that the power supply connection is securely plugged into ProtecTV.
•Check that the A/V connections in diagram A are secure.
•Check that the mono Coaxial connections in diagram A are secure and that your
TV is tuned to channel 3 or 4 (selected by the channel setting switch in diagram C
(3).
•Check that the optional A/V connections in diagram B are secure and TV is tuned
to VIDEO IN.
A foul word was not filtered:
•The program that you are watching is either not close-captioned, or the captioning
is not synchronized with the audio (live TV, news, sports, talk shows). Either turn
the channel and then turn it back to the original program, or turn off your VCR and
turn it back on again. If ProtecTV is not displayed then the program will not be fil-
tered.
•The program is being filtered, but there are captioning errors (words left out, mis-
spelled or not synchronized with the audio).
•The word is not in the ProtecTV dictionary.
Connections for Recording one Program while watching another, and Picture
in picture Connections.
1.Connect a coaxial cable directly form your VCR ANT OUT to your TV ANT IN.
Watching TV using this connection on your TV will not be filtered.
2.Connect two A/V cables as illustrated in diagram B-E.
3.Only the A/V connection will be filtered by ProtecTV. Watch TV using the proper
Video Input Selection on your TV for ProtecTV filtered viewing. INFORMATION TO THE USER
This equipment has been tested and found to comply with the limits for a Class B
digital device, pursuant to part 15 of the FCC Rules. These limits are designed to
provide reasonable protection against harmful interference in a residential installa-
tion. This equipment generates, uses and can radiate radio frequency energy and, if
not installed and used in accordance with the instructions, may cause harmful inter-
ference to radio communications. However, there is no guarantee that interference
will not occur in a particular installation. If this equipment does cause harmful inter-
ference to radio or television reception, which can be determined by turning the
equipment off and on, the user is encouraged to try to correct the interference by
one more of the following measures:
•Reorient or relocate the receiving antenna.
•Increase the separation between the equipment and receiver.
•Connect the equipment into an outlet on a circuit different from that to which the
receiver is connected.
•Consult the dealer or an experienced radio/TV technician for help.
WARNING
Changes or modifications not expressly approved by the manufacturer could void
the user’s authority to operate the equipment.
This device complies with Part 15 of the FCC Rules. Operation is subject to the fol-
lowing two conditions: (1) this device may not cause harmful interference, and (2)
this device must accept any interference received, including interference that may
cause undesired operations.

Table of contents


