NextVPU AngleEye Desktop Reader User manual

Desktop Reader
NextVPU (Shanghai) Co., Ltd.
User Guide

Contents
Product Overview 3
Use Instructions 6
Specifications 10
Precautions 10
Disclaimer 11
2

Product Overview
A4
A3
* The maximum recognition range can reach the
standard paper size of A3.
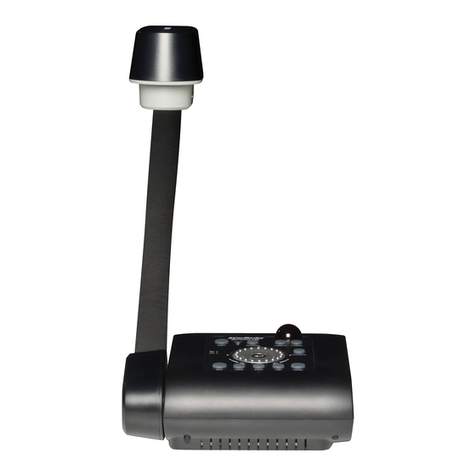
Based on the advanced computer vision and artificial intelligence (AI)
technology, the AngelEye Desktop Reader converts text materials (such as
newspaper, magazines, books, packages, and business cards) into voice
through OCR recognition, which can assist people with visual fatigue, weak
vision, or visual impairment in reading without difficulties.
3

Key Description
Status light
Headset light
Charging indicator
USB-C
TF
USB-A
Headset jack
Power key
Camera
Fill-in LED light
4

Right
Camera
Back
Play/Pause
Menu
Left
Volume down
Volume up
VIF
DC
Speaker
Handle
5
Key Description

Use Instructions
Powering On or Off
1. Powering on the device: Press and hold the power key for 2s. When you
hear the sound of "beep", it indicates that the device is successfully
powered on and the status indicator turns on.
2. Powering off the device: Press and hold the power key for 2s. When you
hear the power-off music, it indicates that the device is successfully
powered off.
Text Recognition (OCR)
Text recognition can be divided into three modes: Manual, Auto and Finger.
1. Mode Switchover
a. After being powered on, the reader enters Manual mode by default.
b. You can press the Left or Right key to switch among the three modes.
2. Manual Mode
a. Place the book or material to be recognized directly in front of the
reader and align it with the dots at the lower part of the reader. Keep
the material still.
b. Press the Camera key. When you hear a countdown photo-taking
sound, it indicates that the photo is taken successfully. Then, the
reader starts to read the text automatically.
3. Auto Mode
a. In Auto mode, place a book or material to be recognized directly in
front of the reader and align it with the dots at the lower part the
reader. Keep the material still.
b. When you hear a countdown photo-taking sound, it indicates that
the photo is taken successfully. Then, the reader starts to read the
text automatically.
4. Finger Mode
a. Press the Left or Right key to switch to Finger mode.
b. Place the book or material to be recognized directly in front of the
reader and align it with the dots at the lower part of the reader. Keep
the material still.
c. Place your index finger under the text to be recognized. When you
hear the sound of "beep, beep" and "click", it indicates that the
photo is taken successfully. Then, the reader starts to read the
word above the finger.
6

5. Precautions
a. Ensure that the text to be recognized and the background have a
certain contrast. It is recommended that black characters and
white background be used.
b. The material to be recognized must not reflect light.
c. It is recommended that the reader be used under normal indoor
lighting conditions.
d. When taking pictures, keep the reader and the book still.
e. When taking pictures, ensure that the center of the camera is
aligned with the center of the material to be recognized.
Reading Text
1. In the process of reading text, you can press the Play/Pause key to
stop or continue reading text.
2. In the process of reading text, press and hold the Menu key to save
the current text.
3. In the process of reading text, press the Left to fast backward or
Right key to fast forward.
4. In the process of reading text, press the Back key to return to the text
recognition mode.
5. After finishing reading text, the reader plays the end sound and
automatically returns to the text recognition mode.
Settings
1. In any mode, you can press the Menu key to enter the Settings menu.
a. In the Settings menu, you can press the Left or Right key to
browse different configuration items.
b. In the Settings menu, you can press the Camera key to go to the
next level. After the settings are changed, press the Camera key
to save the current settings.
c. At the first level of the Settings menu, press the Back key to exit
the Settings menu. At the second level of the Settings menu, press
the Back key to return to the upper level.
2. Perform document management.
a. Press the Menu key to enter the main menu.
b. Press the Left or Right key switch to document management.
c. Press the Camera key to enter the submenu of document
management.
d. Press the Left or Right key to select a document to read, and
press the Camera key to start reading the document.
7

e. Delete the document.
On the document list page, press the Left or Right key to select
a document to delete, and press and hold the Menu key to
delete it.
3. Set the reading speed.
a. Press the Menu key to enter the main menu.
b. Press the Left or Right key switch to the speed settings.
c. Press the Camera key to enter the submenu of the speed settings.
d. Press the Right key to speed up reading and the Left key to slow
down reading, and press the Camera key to save the settings.
e. Press the Back key to cancel the settings.
4. Set a reading voice (male/female).
a. Press the Menu key to enter the main menu.
b. Press the Left or Right key to switch to the voice settings.
c. Press the Camera key to enter the submenu of the voice settings.
d. Press the Left or Right key to select a reading voice (male or
female), and press the Camera key to save the settings.
e. Press the Back key to cancel the settings.
5. Network connection
a. Enter Network setting
b. Use mobile phone to scan the QR code on the manual, download and
install the app, enter the WiFi account and password in the app, and
generate a QR code.
c. Put the QR code under the camera, press capture button, wait for QR
recognition, and automatically connect to WiFi.
d. After the WiFi connection is successful, you will be prompted that the
connection is successful and return to the main menu.
e. If the connection fails,you will be prompted that fail to connect to the
network,press camera button to reconnect,press back button to return
to the previous menu.
6. Connect to the Bluetooth headset.
a. Press the Menu key to enter the main menu.
b. Press the Left or Right key to switch to the headset settings.
c. Press the Camera key to enter the submenu of the headset
settings.
d. Press the Left or Right key to switch between the detected
Bluetooth headsets, and press the Camera key to start pairing
with the headset.
e. When you hear the prompt "Bluetooth headset connected", it
indicates that the connection is successful.
8

7. Disconnect the Bluetooth headset.
a. Press the Menu key to enter the main menu.
b.Press the left or right button to switch to the headset settings and
see that the Bluetooth headset is connected
c.Press theBluetooth disconnected
8. Factory reset
a. Press the Menu key to enter the main menu.
b. Press the Left or Right key switch to About, and press the Camera
key to enter the About menu.
c. Press the Left or Right key switch to Factory Reset.
d. Press the Camera key. A message pops up, prompting you to
confirm whether to restore factory settings. You can press the
Back key to cancel the restoration of factory settings. You can also
press the Camera key to confirm the restoration of factory
settings, and the reader will automatically restore factory settings.
9. Upgrade
a.Connect to wifi first.
b. Enter main menu - about - upgrade
c. If there is a new soft version, the voice prompts whether to
upgrade. Press the capture key to start the upgrade. If the upgrade
is successful, voice prompts upgrade successful.
d. If there is no updated version, voice prompts that the current
version is the latest version.
Adjusting System Volume
Pressing the Volume up/down key in any mode can adjust the system
volume.
Sleep
1. The reader enters Sleep mode if no operations are performed within
5 minutes.
2. Press the Power key to manually enable Sleep mode.
3. Pressing the Power key in Sleep mode can wake up the reader. After
being woken up, the reader returns to the working state before
sleeping.
Battery Level Reminder
1. When the charger is plugged in or disconnected, the reader will
broadcast the current battery level.
2. When the battery level is lower than 10%, the reader will
automatically broadcast a low battery reminder.
9

Specifications
Product
Model
SR-D1
Fill-in LED
Light Available
280mm*155mm*150mm Material ABS
395mm*155mm*150mm Battery Capacity 6700mAh
Working
Hours
> 6 hours
RAM + ROM
2 GB + 16 GB
Camera
Resolution
13MP
Operating
Temperature
0℃to 40℃
Power DC 5 V/2 A
Input and
Output
Extension
Interfaces USB-A x 1, USB-C x 1, SD card slot x 1
Dimensions
3.5 mm headset jack x 1, video interface x 1
To ensure that you use this product safely and correctly, read this user
guide carefully and observe the following safety rules before using this
product:
1. This product must be handled gently and prevented from any serious
impact or vibration.
2. It is recommended that this product be not placed in a seriously
polluted environment.
3. When using this product, avoid contact with chemicals such as benzene
and diluents. Keep this product away from strong magnetic or electric
field, avoid direct sunlight, and stay away from fire sources.
4. Do not place this product in environments with high temperature and
high humidity. Do not flush or wash this product. Otherwise, this
product may be damaged or cause electric shock during use.
5.Do not disassemble, repair, revamp, or replace any parts of this
product by yourself.
6.Discarded packages, batteries, and electronic components must be
properly classified and disposed of.
10
LED Light Effects
1. Running: The blue LED light is steady on.
2. Sleep: The blue LED light blinks.
3. Power-on: The blue LED light turns on.
4. Power-off: The LED light turns off.
5. Bluetooth connection established: The white LED light turns on.
6. Charging: The red LED light turns on during charging. The green LED
light turns on when the reader is fully charged.
Precautions

7. Use only the charger that comes with this product. Using an unautho
rized charger may invalidate your warranty and may even cause serious
injury.
8. Place this product out of reach of children.
11
Please take attention that changes or modification not expressly
approved by the party responsible for compliance could void the
user’s authority to operate the equipment.
This device complies with Part 15 of the FCC Rules. Operation is subject
to the following two conditions:
(1) This device may not cause harmful interference, and
(2) This device must accept any interference received, including
interference that may cause undesired operation.
This device contains licence-exempt transmitter(s)/receiver(s) that
comply with Innovation, Science and Economic Development
Canada’s licence-exempt RSS(s). Operation is subject to the following
two conditions:
(1)This device may not cause interference.
(2)This device must accept any interference, including interference that
may cause undesired operation of the device.
l'appareil contient des émetteurs/récepteurs exempts de licence qui
sont conformes aux CNR exempts de licence d’Innovation, Sciences et
Développement économique Canada. L’exploitation est soumise aux
deux conditions suivantes:
(1) l'appareil ne doit pas produire de brouillage,
(2) l'utilisateur de l'appareil doit accepter tout brouillage radioélec-
trique subi, même si le brouillage est susceptible d'en compromettre le
fonctionnement.
This equipment complies with FCC/IC RSS-102 radiation exposure limits
set forth for an uncontrolled environment. This equipment should be
installed and operated with minimum distance 20cm between the
radiator & your body.
ce matériel est conforme aux limites de dose d'exposition aux
rayonnements, FCC / CNR-102 énoncée dans un autre environne-
ment.cette eqipment devrait être installé et exploité avec distance
minimale de 20 entre le radiateur et votre corps.
9.
10.
11.

12
12.
The user manual for local area network devices shall contain instructions
related to the restrictions mentioned in the above sections, namely that:
(i) the device for operation in the band 5150-5250 MHz is only for indoor
use to reduce the potential for harmful interference to co-channel mobile
satellite systems;
(ii) the maximum antenna gain permitted for devices in the band
5725-5825 MHz shall comply with the e.i.r.p. limits specified for
point-to-point and non point-to-point operation as appropriate.
(i)Les dispositifs fonctionnant dans la bande 5150-5250 MHz sont
réservés uniquement pour une utilisation à l'intérieur afin de réduire les
risques de brouillage préjudiciable aux systèmes de satellites mobiles
utilisant les mêmes canaux.
(ii) le gain d'antenne maximal autorisé pour les appareils dans la bande
5725-5825 MHz doivent respecter le pire limites spécifiées pour le
point-à-point et l'exploitation non point à point, le cas échéant.

Disclaimer
In order to protect the legitimate rights and interests of users, you must
carefully read the user guide, disclaimer, and safety precautions provided
related to this product before using it. NextVPU (Shanghai) Co., Ltd.
reserves the right to update the preceding documents. This product must
be operated in compliance with the user guide and safety precautions.
Once you start using this product, you will be deemed to have read,
understood, approved, and accepted all the terms and contents of this
user guide, disclaimer, and safety precautions. Users promise to be liable
for their actions and all the consequences arising therefrom. Users
promise to use this product only for legitimate purposes and agrees to
these terms and any relevant policies or guidelines formulated by NextVPU
(Shanghai) Co., Ltd.
Requirements including but not limited to this user guide and safety
precautions must be strictly observed and implemented during the use of
this product. For all personal injuries, accidents, property losses, legal
disputes, and other adverse events causing conflicts of interest owing to
improper behaviors in violation of safety precautions or force majeure,
users shall be liable for relevant responsibilities and losses, and NextVPU
(Shanghai) Co., Ltd. shall not bear any liability.
NextVPU (Shanghai) Co., Ltd. shall not bear any liability for any violation of
laws and regulations directly or indirectly caused by users' use of this
product. NextVPU (Shanghai) Co., Ltd. shall not bear any liability for any
indirect losses (including but not limited to losses in profits, expected
benefits, business reputation, and time) caused by defects, flaws, and
repair of this product. The company's liability for compensation for this
product and repair shall not exceed the actual amount paid by users for
purchasing this product.
13. Use only the charger that comes with this product. Using an unautho
rized charger may invalidate your warranty and may even cause serious
injury.
14. Place this product out of reach of children.
13

NextVPU (Shanghai) Co., Ltd.
Address: Room 501, Building 7, No. 3000 Longdong
Avenue, Shanghai Pilot Free Trade Zone, Shanghai,
201203, China
Hotline: (Japan) + 81 (0) 70 1441 1117
(US-Euro/Japan) + 86 134 2636 6931
Email: [email protected]
Scan the Android QR code via the browser to
download the APP of the Reader
Scan the iOS QR code via the browser to
download the APP of the Reader
V1.0.1
This manual suits for next models
1
Table of contents
