NextWave Digital PVR-3790 User manual
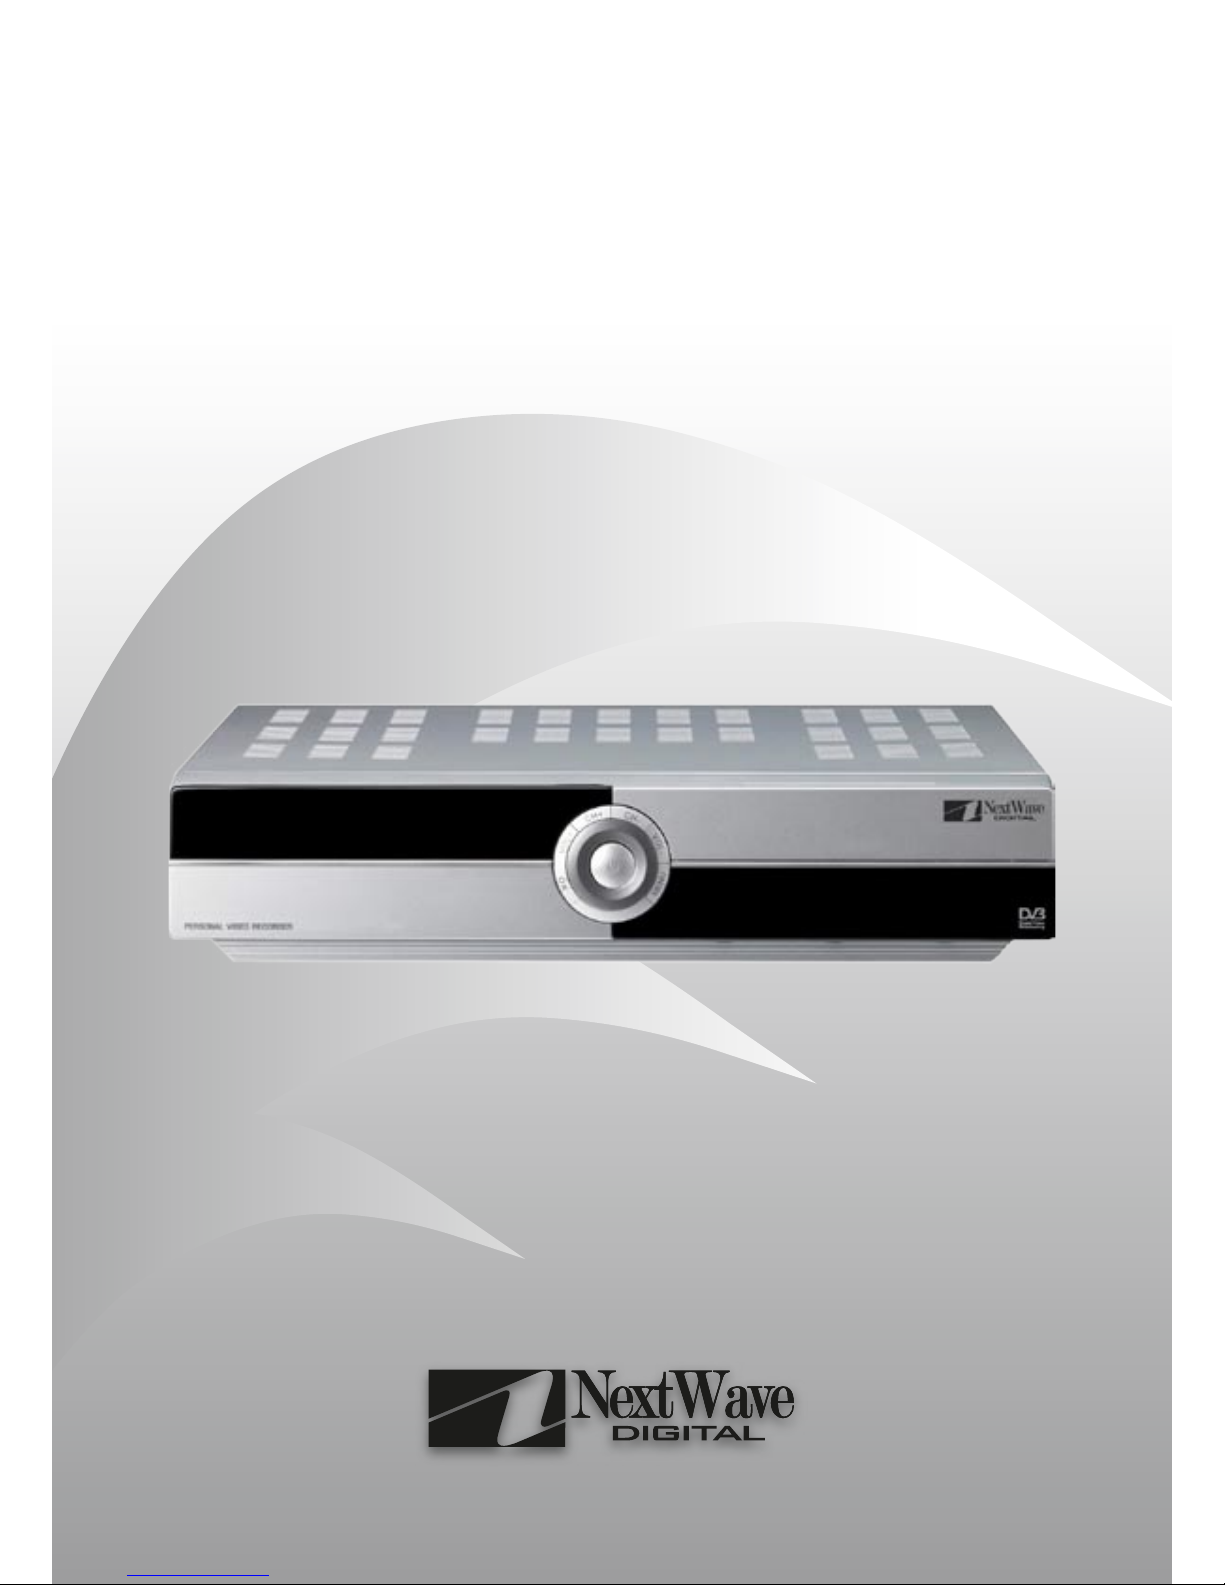
Twin Tuner SDTV
Personal Video Recorder
PVR-3790
Please read these operating instructions before using the product
Operating Instructions
2
Safety Instructions
Safety Tips.
Do not overload wall outlets, extension cords or integral convenience receptacles as this can result in a risk of
fire or electrical shock.
Never allow liquids, spray or other materials to come into contact with the inside of the STB.
Unplug the STB from the wall outlet before cleaning.
Use a soft cloth to clean the exterior of the STB.
Allow clear space around the STB for sufficient ventilation.
Do not use the STB where it is exposed to direct sunlight or near a heater.
Never stack other electronic equipment on top of the STB.
Do not place the STB outdoors. Keep out of direct sunlight.
Do not connect or modify cables when the STB is plugged in.
Do not cover the STB or place it on a unit that emits heat.
»
»
»
»
»
»
»
»
»
»
WARNING
RISK OF ELECTRIC SHOCK
DO NOT OPEN
TO REDUCE THE RISK OF ELECTRIC SHOCK, DO NOT REMOVE
COVER (OR BACK). NO USER SERVICEABLE PARTS INSIDE.
REFER SERVICING TO QUALIFIED SERVICE PERSONNEL.
This symbol indicates “dangerous
voltage” inside the product that presents a
risk of electric shock or personal injury.
This symbol indicates important
instructions accompanying product.
Never stack other electronic equipment on top of the STB. The STB requires sufficient
ventilation space to prevent overheating. Failure to provide adequate ventilation could
result in poor performance of the STB, may damage the hard drive or void your warranty.
!
Please read the following
safety instructions carefully.

33
Table of Contents
Welcome... 4
Included within package ...................................................................4
Optional or Recommended Accessories (Not Included) ................ 4
Important Points 5
Quick Start Guide 6
Rear Panel 8
Connection Options 9
Connecting the Antenna ..................................................................9
Basic Set Up - Standard TV ............................................................. 9
Standard TV VCR/DVD-R & HiFi .................................................... 10
Plasma / LCD / Component video capable display ........................ 10
Component video capable display & HiFi Amplifier ........................ 11
Component video display & AV Processor or HiFi ......................... 11
Loop through function using VCR SCART ......................................12
Front Panel 13
Front Panel ....................................................................................... 13
Remote Control 14
Navigating Menus 16
Using Remote Control to Navigate .................................................. 16
Using Front Panel to Navigate ......................................................... 16
Main Menu 17
Menu Structure ................................................................................. 17
Installation Sub-menu ......................................................................18
Auto Search ...................................................................................... 18
Fast Search ................................................................................ 18
Manual Search ................................................................................. 19
Scan Complete Menu ......................................................................19
Antenna Power ................................................................................. 20
Initialise STB .....................................................................................20
Edit Channels ................................................................................... 21
Favourite Group ...............................................................................22
PVR Manager Sub-menu ................................................................ 23
Timer List ..........................................................................................23
Recording ......................................................................................... 24
Timeshift ........................................................................................... 24
Skip Time .......................................................................................... 25
Bookmark Image ..............................................................................25
HDD Format ..................................................................................... 25
System Settings ...............................................................................26
Video Settings .................................................................................. 26
Clock Settings ................................................................................... 27
Language Settings ........................................................................... 28
Lock Settings .................................................................................... 29
System Information .......................................................................... 30
Program Guide .................................................................................30
Utility Sub-menu ...............................................................................31
Calendar ........................................................................................... 31
Tetris .................................................................................................. 31
Captured image ................................................................................ 31
USB Manager ................................................................................... 32
On Screen Display (OSD) 33
iplate ..................................................................................................33
Function Guide 34
Changing Channels ......................................................................... 34
Volume Control ................................................................................. 34
Aspect Ratio ..................................................................................... 34
Sleep .................................................................................................34
TV / Radio .........................................................................................34
Audio Settings .................................................................................. 35
Recording TV .................................................................................... 35
Timeshifting .......................................................................................36
F.LIST (Playback) .............................................................................37
Playback Controls ............................................................................ 38
Playback iplate ................................................................................. 39
Bookmarks ........................................................................................ 40
Repeat .............................................................................................. 40
Teletext .............................................................................................. 41
Closed Captions (subtitles) .............................................................. 41
Screen Zoom .................................................................................... 41
Appendix 42
Troubleshooting ................................................................................42
Specifications ...................................................................................43
PVR Manager ................................................................................... 44
Glossary ............................................................................................ 46
Warranty certificate .......................................................................... 47
4
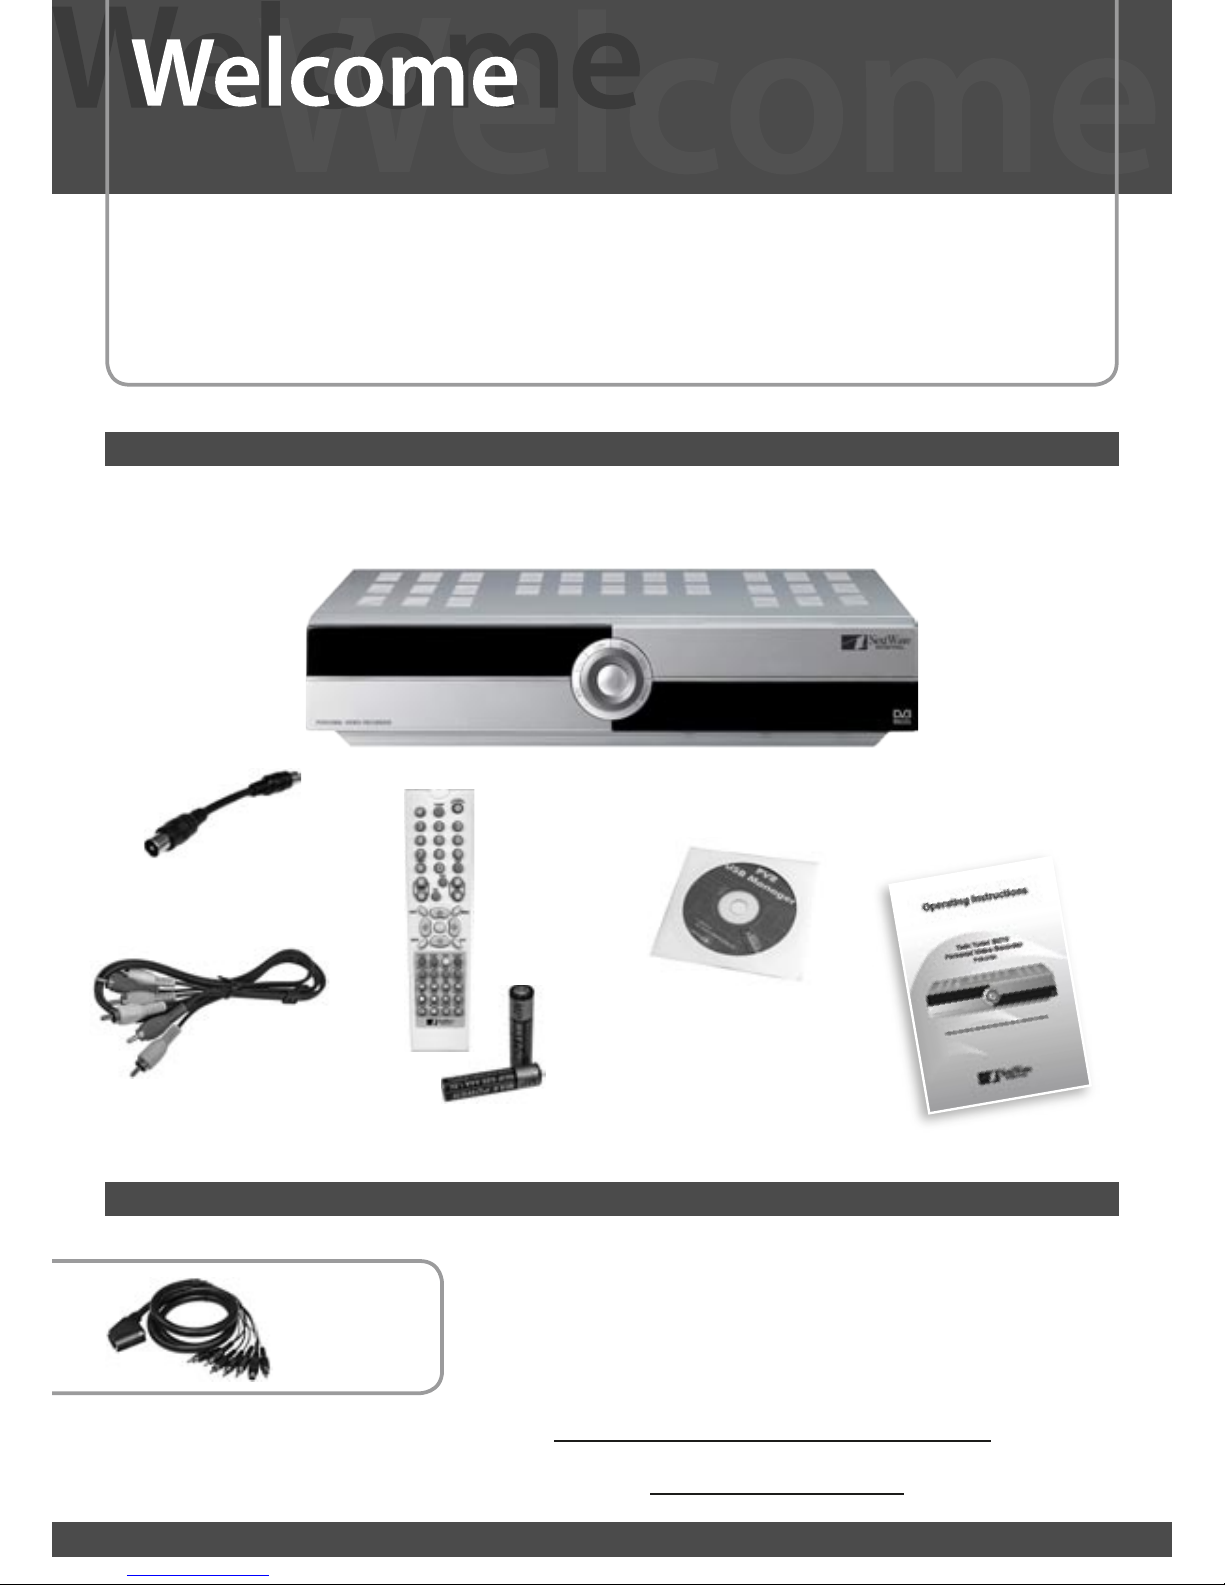
Congratulations, and thank you for purchasing a NextWave Digital PVR-3790 Standard Definition Personal Video Recorder (PVR).
The distinctive feature of this receiver is its ability to decode multiple MPEG streams simultaneously, allowing you to record
programs to a hard drive while watching other channels. This manual will guide you through a variety of representative installation
setups and describe the various features and functions required to make full use of the capabilities of this unit
Your NextWave Digital PVR should include the following items. If you are missing any of the following included items, contact your retailer.
Electronic copies of the operating instructions and quick start guide are also available for download from the support section of
www.nextwave-digital.com.
Included within package
Depending on your particular audio/visual setup, certain third party products may
need to be purchased such as:
SCART ~ Component lead, Optical Digital interconnects, USB cable, RF Flyleads.
Optional or Recommended Accessories (Not Included)
NextWave Digital recommends SignalMAX Home Theatre Interconnects
www.signalmax.com.au
to the NextWave of Technology...
Optional
SCART ~ Composite +
Audio + S-video lead.
Loop Through
Cable
Video+Audio lead
3x RCA ~ 3x RCA
RCU + 2x AAA
batteries
Operating
Instructions
PVR USB Manager
For Microsoft™ Windows®
Instructions avialable from
www.nextwave-digital.com

55
Typographic conventions
Several symbols are used throughout these
operating instructions to assist the user
in identifying actions, tasks and important
information.
Begin a task
This symbol indicates the beginning of a
specific task, and it is usually followed by a
step by step listing of the actions needed to
complete that task.
Information
This symbol indicates that a statement
contains explanatory or additional information
relevent to the particular task.
Caution
This symbol indicates that a statement
contains important information that has a
significant impact on the operation of the
product.
Ignoring this type of symbol could result in
damage to the product or external equipment,
loss of recorded programs or information.
Step by Step
These symbols indicate a step by step
process required to complete a particular task
or use a specific function of the product. All
the steps of a single task are joined by a grey
bar, and other symbols such as and !
may appear within that bar.
Losing power to the PVR
Switch the PVR to standby mode prior to switching off at the mains. Doing
so minimises any chance of damaging the hard drive inside the PVR or
losing recorded programs.
Manual User Time Settings
The user time settings will need to be re-entered after a loss of mains
power, or a power cycle. The time should not need to be re-entered if the
time mode is automatic and the broadcaster supports time broadcasts.
Using Component Video (YPbPr)
Use a SCART to Component video (YPbPr) cable to connect the PVR to
your display device. Press the TV OUT button on the remote control to
activate YPbPr output.
First Time Boot Procedure
When turned on for the first time, the PVR will boot up to standby mode.
Press the Power Button on the remote control to go from standby to run
mode. The PVR will scan for broadcasts.
Total Available Recording Time
The total recording time available to the PVR will vary as broadcasters
vary the bandwidth - and therefore space - used to transmit certain
programs. Sports and feature films often use a greater amount of
bandwidth (and storage space). As a result the available capacity of the
PVR falls within a range depending on what has been recorded onto
it. Generally speaking the 80GB PVR3790 can record up to 35 hours
of programs, while the 120GB PVR3790 can record up to 60 hours of
programs.
Buffer length for Manual vs Continuous
Timeshifting
Activating Timeshifting by pressing the PAUSE button will store up to
a maximum of 60 minutes of programming. Continuous timeshifting,
activated via the Timeshift sub-menu; will automatically continuously
timeshift a maximum of 25 minutes of programming.
Important Points
1. Standby – Power On
2. LED Display:
2.1 run
2.2 p000
2.3 boot
2.4 succ
3. Display Device:
3.1 HDD Check
3.2 NextWave Logo
1. Channel Scan Begins
1. Power on at mains
2. LED Display:
2.1 Boot
2.2 Run
2.3 P000
2.4 - - - -
3. Standby Mode
1
2
3
!
Disclaimer:
While every care has been taken to
ensure the accuracy of these operating
instructions, neither NextWave Digital nor
any of its employees make any warranty,
expressed or implied, or assume any legal
liability or responsibility for the accuracy or
completeness of any information contained
within these operating instructions.
Please check
http://nextwave-digital.com/products.php
for the latest version of these operating
instructions.
!
6
Personal Video Recorder
PVR3690 80GB / 120GB
Quick Start Guide
Copyright 2005 nationwide Antenna Systems.
Please read this quick start guide before using your NextWave PVR3690.
VCR/DVD-R (SCART)
TV (SCART)
ON / OFF
AC / DC Power
Component Video (YPbPr)
RGB
S-Video
Composite (CVBS)
Connects to:
TV, Plasma/LCD Panel,
Monitor.
Mains power supply
USB (USB 2.0)
VID File data transfer
Connects to:
Media Center or Home PC
for archiving of recorded
programs
Power Switch
AUDIO L/R (RCA)
Stereo Audio
Connect To:
Audio input V Input on
VCR, DVD-R and TV
TV OUT (RF)
RF Signal
Connect To:
Old TV with RF inputs.
Composite (CVBS) Input*
and output
Connect To:
VCR or DVD-R
*Not for recording on HDD. Signal
can be looped through to RCA or TV
SCART Output.
S/PDIF (TOSLINK)
TOSLINK Optical Digital
Audio Interface.
Connect to:
AV Processor
RS232 (15-pin)
Software Upgrade Port
VIDEO (RCA)
Composite (CVBS)
Connect to:
TV, VCR, DVD-R
Please Note
Connect supplied loop
cable from RF LOOP OUT
1 to ANT 2
Connect to VCR with SCART to RCA
composite video & audio L/R cable.
(not supplied)
Connect to standard TV with supplied
RCA composite video & audio L/R cable.
This setup allows you to record a second channel onto the
VCR/DVD-R, so that you can record one channel to the HDD,
watch another channel and record it as well to the VCR.
Connect to VCR or DVD-R
with supplied composite video
& audio L/R cable.
Connect to AV Processor with
TOSLINK optical digital audio
interface cable.
(not supplied)
Connect to Plasma/LCD Display with
SCART to Component cable.
(not supplied)
BASIC SETUP
ADVANCED SETUP
Quick Start Guide
Personal Video Recorder
PVR3690 80GB / 120GB
Quick Start Guide
Microsoft and Windows are trademarks of Microsoft Corporation in Australia and other countries.
NextWave Digital and Catch the Next wave are registered trademarks of Nationwide Antenna Systems.
Copyright 2005 Nationwide Antenna Systems.
Introduction
The twin tuners and advanced chipset within the PVR-3690, provide it with the
ability to process several MPEG streams simultaneously.
This ability allows a user to:
- Watch one channel while recording another channel,
- Play back a previously recorded program while recording another program,
- Timeshift or pause live TV while recording another channel.
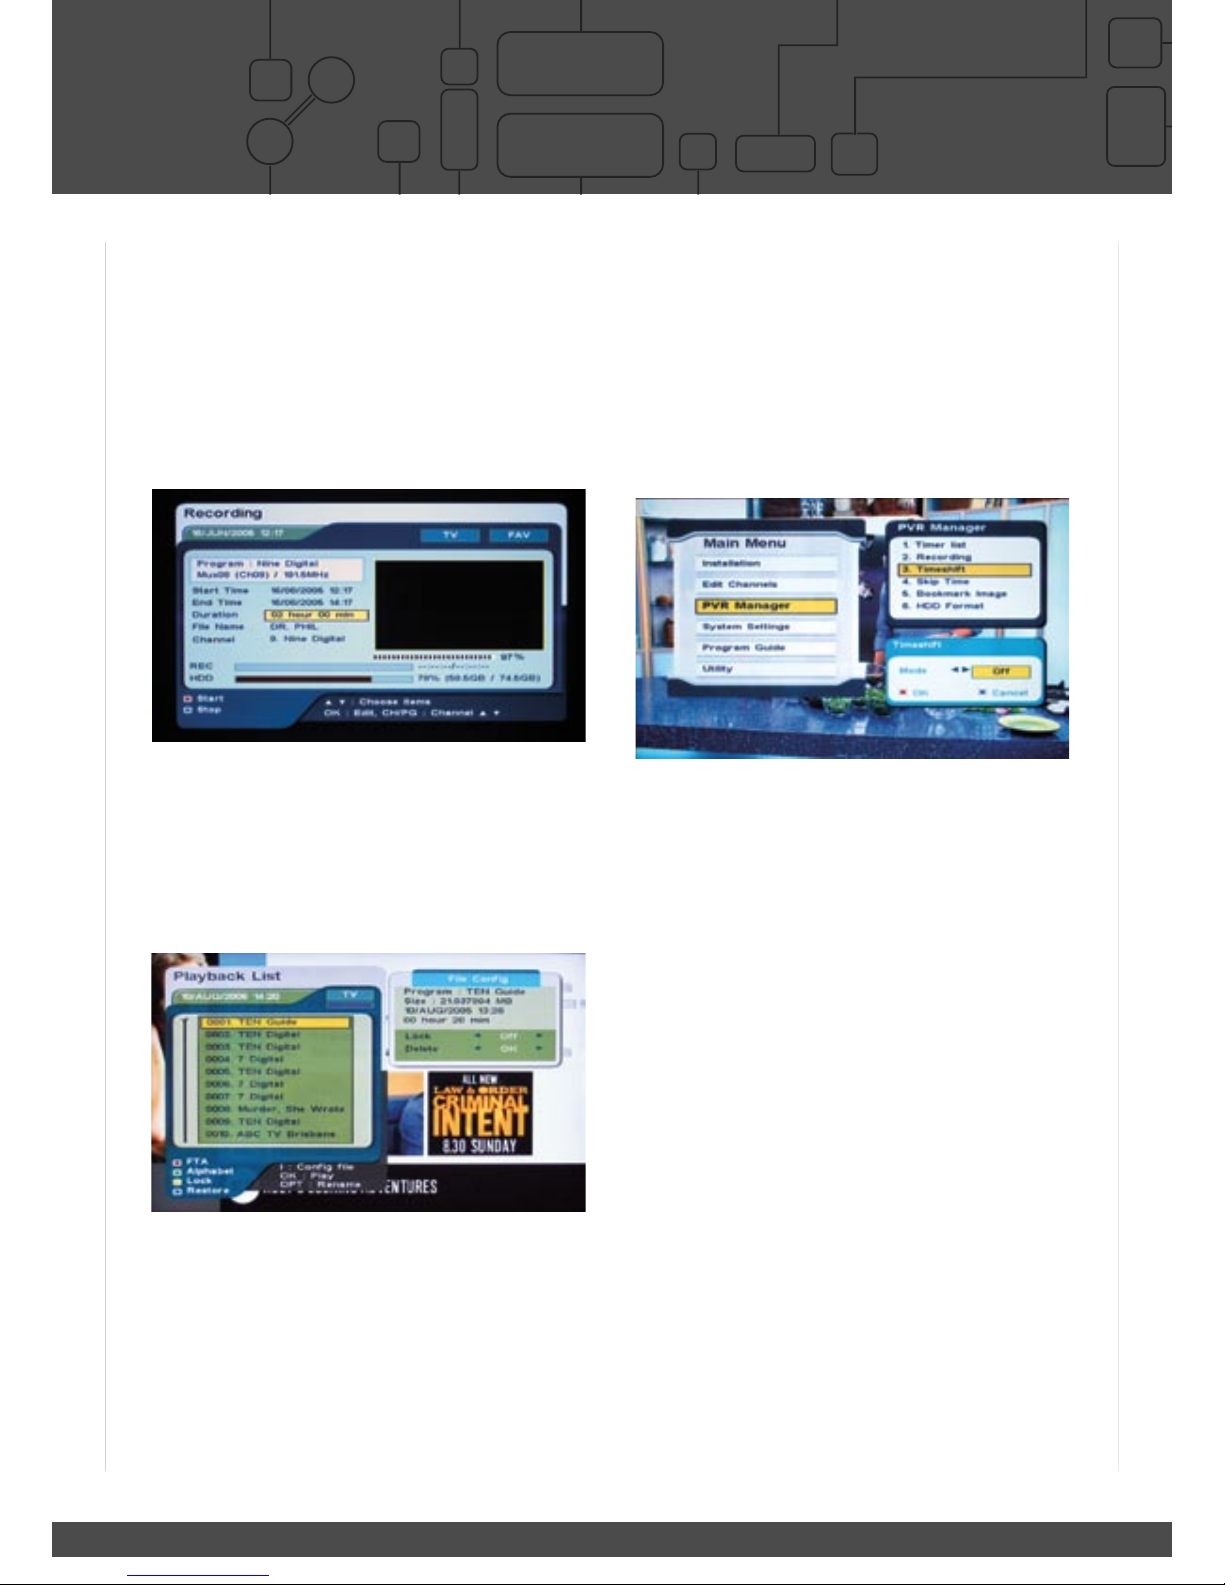
1. Record one channel, watch another.
a. Press the record button to begin recording current channel.
b. To view the status of recording, press record button again.
c. The screen above provides recording status, HDD space and duration of
recording.
d. Press exit to remove this screen.
e. Change channels to view another channel.
Your recording does not get interrupted
2. Record a channel, and play back a recorded program
a. Press the record button to begin recording current channel.
b. Press ‘F.LIST’ (Playback list) button to list recorded programs.
c. Select desired program from playback list.
d. Press ‘OK’ to play
Your recording does not get interrupted
3. Pause live TV (Timeshifting).
While watching live TV pressing pause will temporarily store up to 60min of live TV.
a. Press ‘PAUSE’ button to pause (timeshift)* live TV.
b. Pressing ‘PAUSE’ button again restarts the program.
c. Top right hand corner of TV screen will show duration of timeshift.
d. Pressing ‘F.FWD’ enables you to catch up to live TV.
*Timeshifting will stop if the channel is changed.
4. Record a channel, time shift another.
a. Press the record button to begin recording current channel.
b. Change channels.
c. Press ‘PAUSE’ button to pause (timeshift)* live TV.
d. Pressing ‘PAUSE’ button again restarts the program.
e. Top right hand corner of TV screen will show duration of timeshift.
f. Pressing ‘F.FWD’ enables you to catch up to live TV.
*Timeshifting will stop if the channel is changed.
5. Continuous Timeshift function (menu activated).
This function needs to be activated via the main menu (see below).
If continuous timeshift is in the ‘ON’ mode, the unit will continuously cache 30min
of whatever is being watched. The unit automatically starts storing programs
temporarily as soon as you change channel.
You will be able to rewind the program and fast forward to catch up to the live
broadcast, without having to manually use the pause button timeshift method
described in point number 3.
6. Delete Files.
a. Press ‘F.LIST’ (Playback list) button to list recorded programs.
b. Select desired program from playback list.
C. Press ‘i’ (info button)
d. Highlight ‘delete’ in ‘File Config’ sub menu.
e. Press ‘OK’ to delete.
7. Skip Function.
The skip function settings are available in the ‘PVR Manager’ sub menu. Skip time
is available in 10/20/30 sec increments and 1/2/3/5/10/15 min increments.
a. Play a recorded program.
b. Press ‘F.SKIP’ button to skip forward at configured increment.
C. Press & Hold the ‘F.SKIP’ button to skip forward at 10min increment.
8. USB 2.0 Connection to PC.
The included PVR manager software allows recorded programs to be transferred
from the PVR to a Microsoft™ Windows™ PC for archiving. Additionally, the
PVR manager software can play back recorded programs stored on a PC.
Install the software on the CD to your Windows™ PC to begin using this
functionality. Please refer to the www.nextwave-digital.com for a more detailed
tutorial about the included software.
Timeshifting

77
Personal Video Recorder
PVR3690 80GB / 120GB
Quick Start Guide
Copyright 2005 nationwide Antenna Systems.
Please read this quick start guide before using your NextWave PVR3690.
VCR/DVD-R (SCART)
TV (SCART)
ON / OFF
AC / DC Power
Component Video (YPbPr)
RGB
S-Video
Composite (CVBS)
Connects to:
TV, Plasma/LCD Panel,
Monitor.
Mains power supply
USB (USB 2.0)
VID File data transfer
Connects to:
Media Center or Home PC
for archiving of recorded
programs
Power Switch
AUDIO L/R (RCA)
Stereo Audio
Connect To:
Audio input V Input on
VCR, DVD-R and TV
TV OUT (RF)
RF Signal
Connect To:
Old TV with RF inputs.
Composite (CVBS) Input*
and output
Connect To:
VCR or DVD-R
*Not for recording on HDD. Signal
can be looped through to RCA or TV
SCART Output.
S/PDIF (TOSLINK)
TOSLINK Optical Digital
Audio Interface.
Connect to:
AV Processor
RS232 (15-pin)
Software Upgrade Port
VIDEO (RCA)
Composite (CVBS)
Connect to:
TV, VCR, DVD-R
Please Note
Connect supplied loop
cable from RF LOOP OUT
1 to ANT 2
Connect to VCR with SCART to RCA
composite video & audio L/R cable.
(not supplied)
Connect to standard TV with supplied
RCA composite video & audio L/R cable.
This setup allows you to record a second channel onto the
VCR/DVD-R, so that you can record one channel to the HDD,
watch another channel and record it as well to the VCR.
Connect to VCR or DVD-R
with supplied composite video
& audio L/R cable.
Connect to AV Processor with
TOSLINK optical digital audio
interface cable.
(not supplied)
Connect to Plasma/LCD Display with
SCART to Component cable.
(not supplied)
BASIC SETUP
ADVANCED SETUP
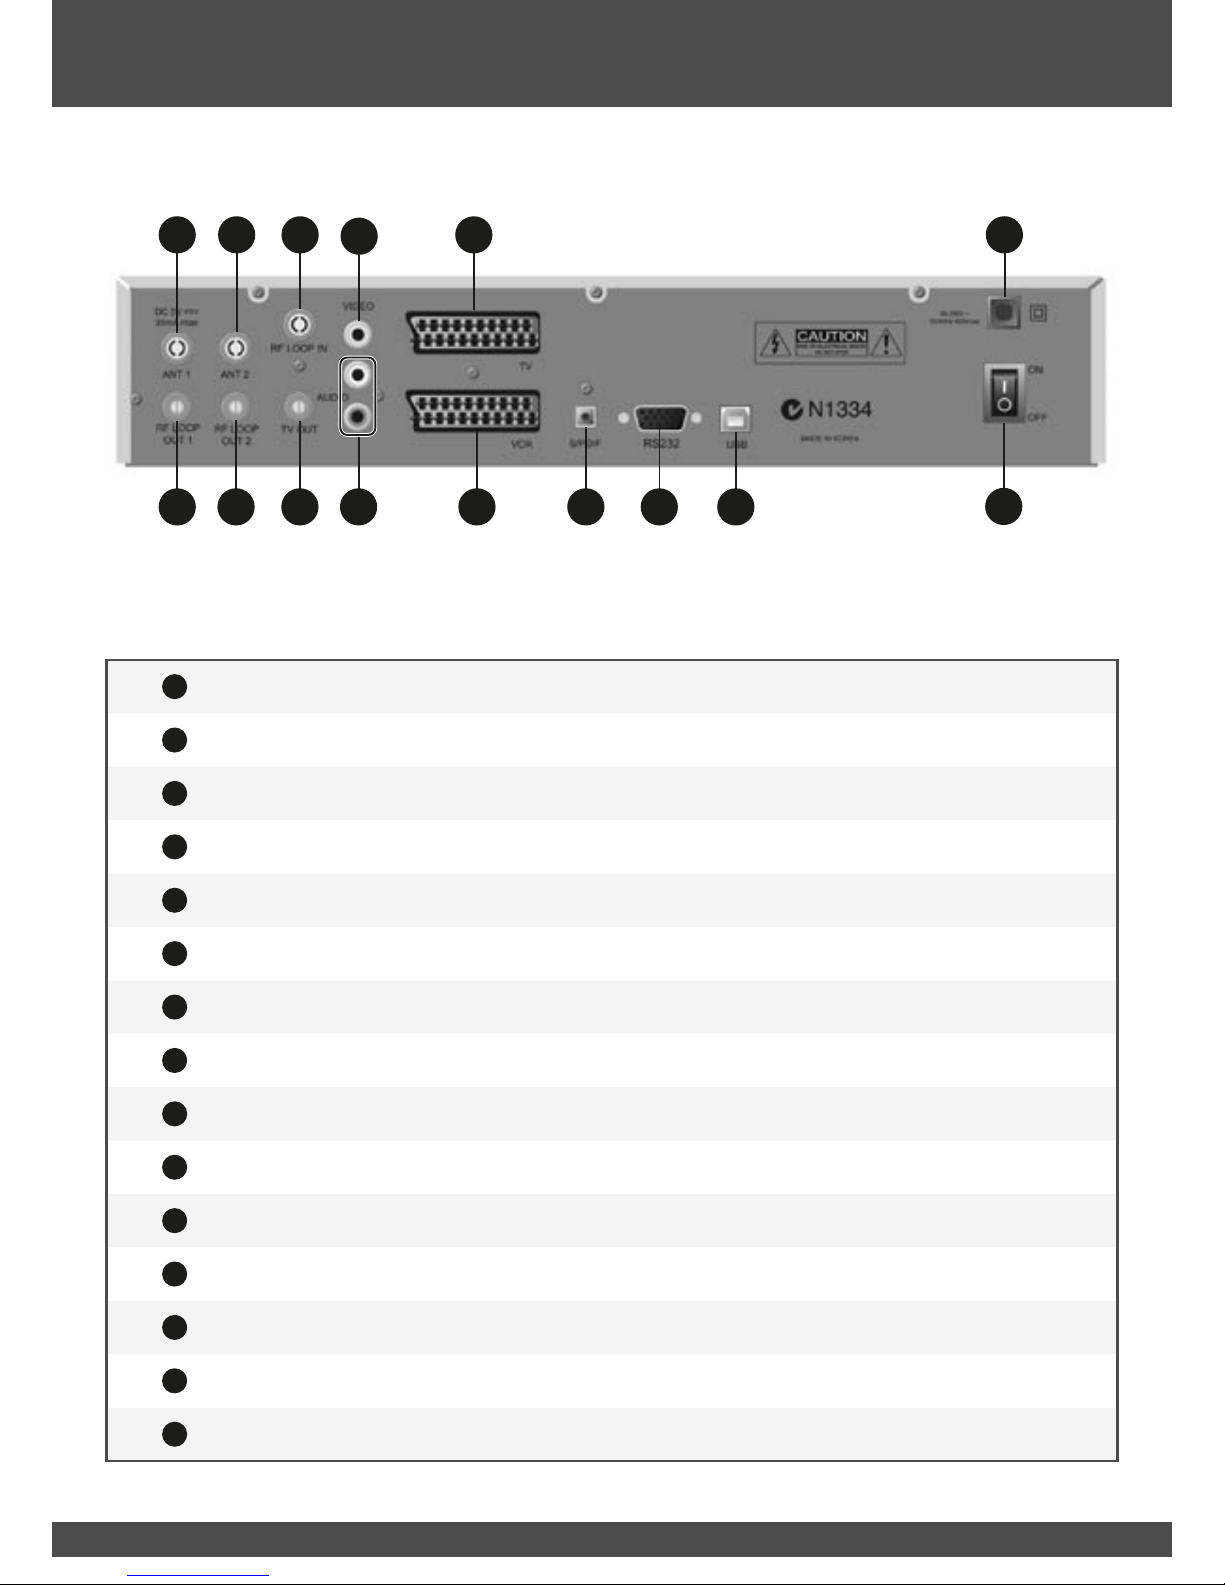
8
1
1ANT IN RF - Terrestrial (conventional) TV aerial input.
1
2RF LOOP OUT 1 RF - LOOP OUT to second tuner.
1
3ANT 2 RF - LOOP IN for second tuner.
1
4RF LOOP OUT 2 RF - TV Aerial output for feeding to other devices (eg: TV/VCR).
1
5RF LOOP IN RF - Input for signal to be looped via TV OUT.
1
6TV OUT RF - Connect modulated output to TV.
1
7VIDEO OUT RCA - CVBS (Composite) video output. Connect to TV/VCR.
1
8Audio Left/Right RCA - Stereo Output for connection to a Hi-Fi system or TV set.
1
9TV SCART - Component (YPbPr), RGB, CVBS video output for connection to
Plasma/LCD/TV.
1
10 VCR SCART - CVBS (Composite) video output. Connect to DVD-R/VCR.
1
11 S/PDIF Optical
(TOSLINK) TOSLINK - Optical Audio Output. Connect to AV Processor or Audio Amplifier.
1
12 RS232 Data Port For Software Upgrades.
1
13 USB 2.0 Connector For connection to media centre or home PC .
(requires installation of transfer software to function)
1
14 Power Lead Connect to 240VAC mains supply.
1
15 Mains Power Switch
Rear Panel
1
41
61
81
10 1
11 1
12 1
13
1
21
15
1
14
1
11
31
51
71
9

99
The following section details some common connection options that may assist. Please note that some of these connection options may
require third party interconnects or cables beyond what is supplied in the box. Talk to your retailer about the best options for connecting
your PVR.
Connecting the Antenna
Connection Options
N1334
!
CAUTION
RISK OF ELECTRICAL SHOCK
DO NOT OPEN
RS232
90-250V ~
50/60Hz 40Wmax
ON
OFF
TV
VCR S/PDIF USB
VIDEO
TV OUT
TV OUT
ANT 1
RF LOOP IN
ANT 2ANT 1
RF LOOP
OUT 1
RF LOOP
OUT 2
AUDIO
MADE IN KOREA
DC 5V
35mA max
L R
RCA Audio Left/Right
POWER
POWER
L R
V
VCR DVD Recorder
POWER
12 : 00
POWER
12 : 00
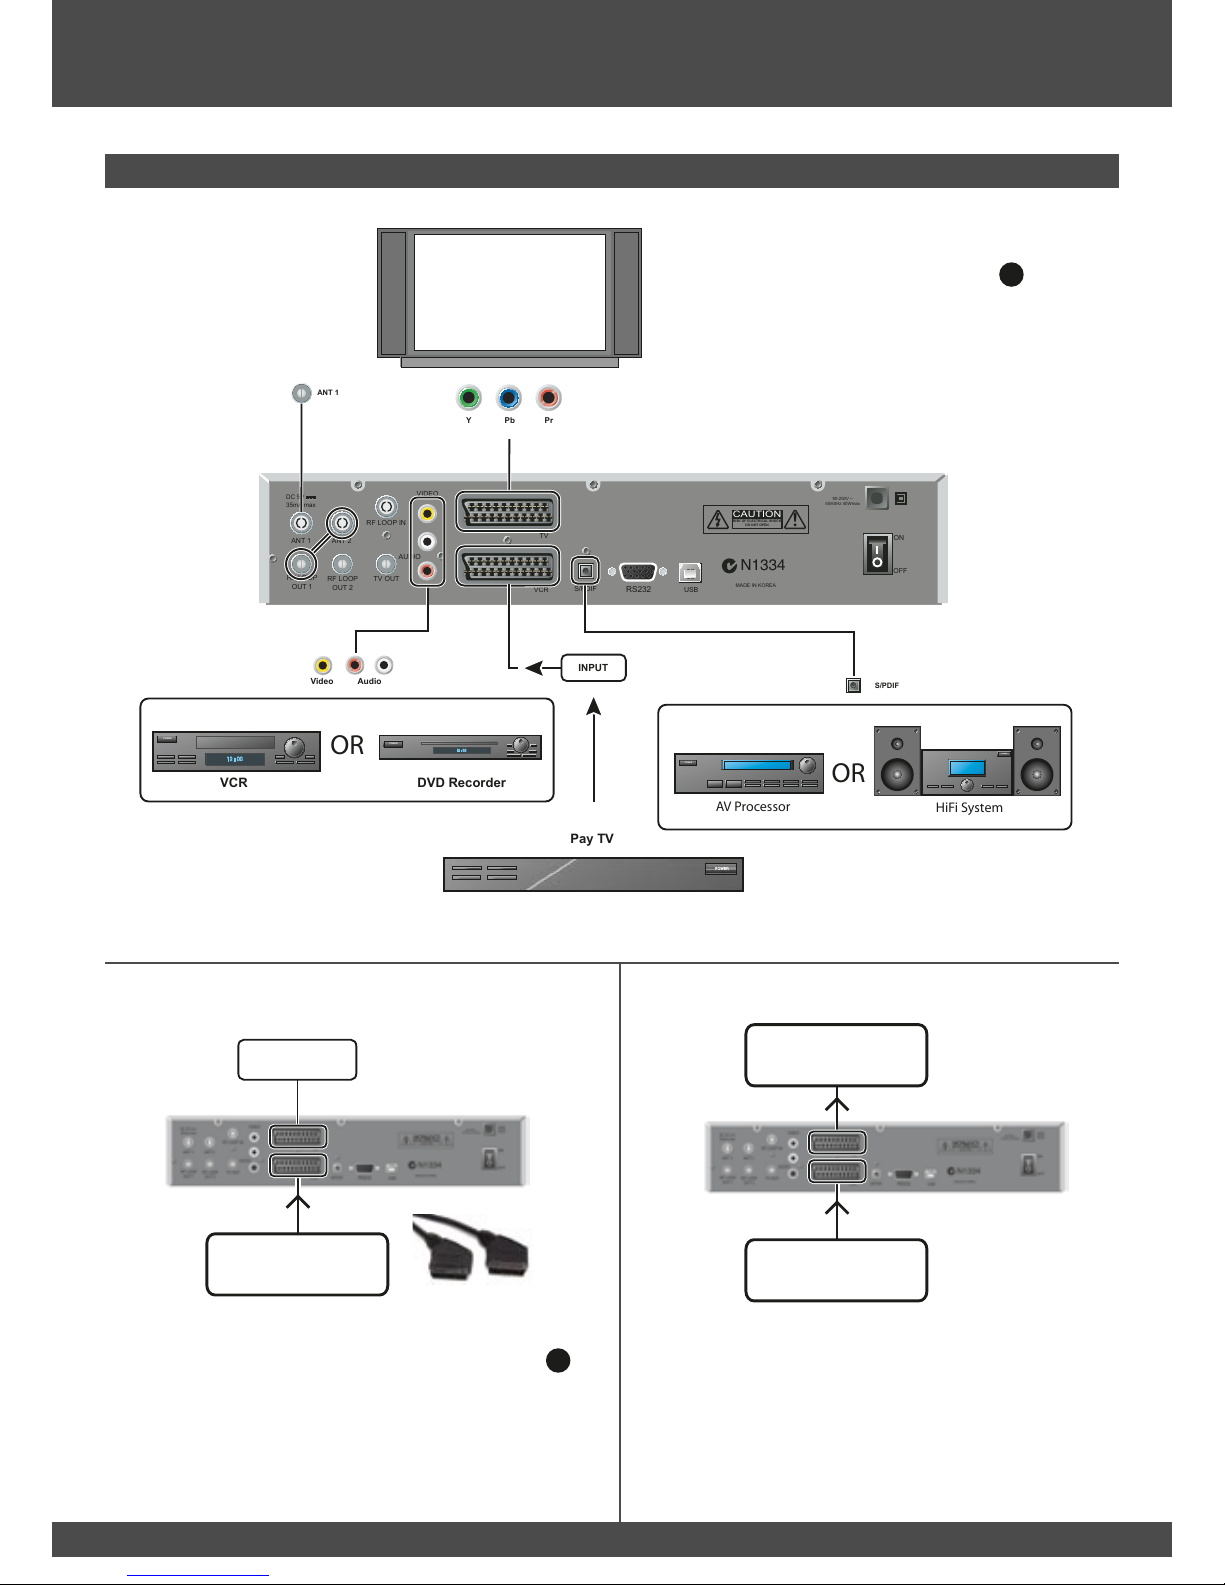
Please Note: If you would like to receive either community television channels
or original analogue programming, you may use the RF LOOP OUT 2 output
signal to connect your VCR or TV receiver to it. (This signal carries the same
signal that is received by the antenna and is not processed by the STB).
Basic Set Up - Standard TV
N1334
!
CAUTION
RISK OF ELECTRICAL SHOCK
DO NOT OPEN
RS232
90-250V ~
50/60Hz 40Wmax
ON
OFF
TV
VCR S/PDIF USB
VIDEO
TV OUT
RF LOOP IN
ANT 2ANT 1
RF LOOP
OUT 1
RF LOOP
OUT 2
AUDIO
MADE IN KOREA
DC 5V
35mA max
L R
RCA Audio Left/Right
POWER
POWER
Audio
Video
VCR DVD Recorder
POWER
12 : 00
POWER
12 : 00
Y Pb Pr
Audio
Video
ANT 1
The PVR-3790 can power a 5VDC active antenna. By default this functionality is disabled
to prevent damaging standard passive antennas. To enable this feature, please refer to the
‘Antenna Power’ sub-menu on page 17.
!
Connect the supplied LOOP OUT cable to the ANT LOOP OUT ( 1
2) and ANT 2 ( 1
3) sockets.
The loop through connection must be in place in order to record programs to the hard drive.
1

10
Connection Options
Standard TV VCR/DVD-R & HiFi
Connecting the Antenna
Connect the coaxial cable from the VHF/UHF Antenna to the RF IN ( 1
7)
socket on the rear panel of the STB.
N1334
!
CAUTION
RISK OF ELECTRICAL SHOCK
DO NOT OPEN
RS232
90-250V ~
50/60Hz 40Wmax
ON
OFF
TV
VCR S/PDIF USB
VIDEO
TV OUT
RF LOOP IN
ANT 2ANT 1
RF LOOP
OUT 1
RF LOOP
OUT 2
AUDIO
MADE IN KOREA
DC 5V
35mA max
Audio
POWER
Audio
Video
VCR DVD Recorder
POWER
12 : 00
POWER
12 : 00
Y Pb Pr
Audio
Video
ANT 1
Plasma / LCD / Component video capable display
Connecting the Antenna
Connect the coaxial cable from the VHF/UHF Antenna to the RF IN ( 1
7)
socket on the rear panel of the STB.
N1334
!
CAUTION
RISK OF ELECTRICAL SHOCK
DO NOT OPEN
RS232
90-250V ~
50/60Hz 40Wmax
ON
OFF
TV
VCR S/PDIF USB
VIDEO
TV OUT
RF LOOP IN
ANT 2ANT 1
RF LOOP
OUT 1
RF LOOP
OUT 2
AUDIO
MADE IN KOREA
DC 5V
35mA max
L R
RCA Audio Left/Right
POWER
POWER
Audio
Video
VCR DVD Recorder
POWER
12 : 00
POWER
12 : 00
Y Pb Pr Audio
Video
ANT 1
Please Note: Audio connection options for component capable displays are
varied. Several options for connecting to audio devices are provided in the next
few diagrams.

11 11
Connection Options
Component video capable display & HiFi Amplifier
Connecting the Antenna
Connect the coaxial cable from the VHF/UHF Antenna to the RF IN ( 1
7)
socket on the rear panel of the STB.
N1334
!
CAUTION
RISK OF ELECTRICAL SHOCK
DO NOT OPEN
RS232
90-250V ~
50/60Hz 40Wmax
ON
OFF
TV
VCR S/PDIF USB
VIDEO
TV OUT
RF LOOP IN
ANT 2ANT 1
RF LOOP
OUT 1
RF LOOP
OUT 2
AUDIO
MADE IN KOREA
DC 5V
35mA max
Audio
POWER
Y Pb Pr
Audio
Video
ANT 1
Component video capable display & AV Processor or Digital Capable HiFi
Connecting the Antenna
Connect the coaxial cable from the VHF/UHF Antenna to the RF IN ( 1
7)
socket on the rear panel of the STB.
N1334
!
CAUTION
RISK OF ELECTRICAL SHOCK
DO NOT OPEN
RS232
90-250V ~
50/60Hz 40Wmax
ON
OFF
TV
VCR S/PDIF
S/PDIF
USB
VIDEO
TV OUT
RF LOOP IN
ANT 2ANT 1
RF LOOP
OUT 1
RF LOOP
OUT 2
AUDIO
MADE IN KOREA
DC 5V
35mA max
L R
RCA Audio Left/Right
POWER
POWER
Audio
Video
VCR DVD Recorder
POWER
12 : 00
POWER
12 : 00
Y Pb Pr
Audio
Video
POWER
ANT 1
Used for surround sound processing
12
N1334
!
CAUTION
RISK OF ELECTRICAL SHOCK
DO NOT OPEN
RS232
90-250V ~
50/60Hz 40Wmax
ON
OFF
TV
VCR S/PDIF
S/PDIF
USB
VIDEO
TV OUT
RF LOOP IN
ANT 2ANT 1
RF LOOP
OUT 1
RF LOOP
OUT 2
AUDIO
MADE IN KOREA
DC 5V
35mA max
L R
RCA Audio Left/Right
POWER
POWER
Audio
Video
VCR DVD Recorder
Pay TV
POWER
12 : 00
POWER
12 : 00
Y Pb Pr
Audio
Video
POWER
POWER
INPUT
ANT 1
Connection Options
Loop through function using VCR SCART
If you have limited inputs on your TV, this function
is ideal as it allows video and audio signals to be
looped through via the VCR SCART (1
10 ) connector.
1. If you are using SCART to SCART cable use the TV/SAT ( 1
19 )
button to activate loop through function.
2. For composite/S-video/Component the unit has to be
switched to stanby mode.
13 13
1
16 Standby LED It shows Red LED when the power is off.
1
17 Navigation Menu, Channel up/down, Volume up/down, OK
1
18 Standby.
Front Panel
Front Panel
1
18
1
16 1
17

14
You can operate every function of the NextWave digital decoder using the buttons on the remote control handset. Please read this section
to help your understanding of each function.
Remote Control
1
42
1
38
1
39
1
35
1
43
1
47
1
40
1
36
1
41
1
37
1
34
1
32
1
30
1
28
1
27
1
24
1
21
1
19 1
20
1
22 1
23
1
26
1
29
1
33
1
25
1
31
1
44
1
51
1
48
1
55
1
52
1
46
1
45
1
50
1
49
1
54
1
53

15 15
Remote Control
1
19 Standby. Put the STB in or out of standby mode.
1
20 Mute.
1
21 0 ~ 9 Select channels by channel numbers or OK programming parameters.
1
22 F.LIST Display Playback list of recorded programs.
1
23 RES Display the Timer List to reserve recordings. Reserve a program on the Timer List.
1
24 REPEAT Set and delete loop points ( A & B) looping playback.
1
25 CAPTURE Capture still image of current program.
1
26 BOOK.M Set and delete bookmarks.
1
27 BOOK.J Jump between bookmarks.
1
28 R.SKIP Skip a program backward (Default interval : 10 seconds).
1
29 REW Rewind a program.
1
30 FWD Fast Forward a program.
1
31 F.SKIP Skip a program forward (Default interval : 10 seconds).
1
32 REC Record a program.
1
33 STOP Stop a program.
1
34 PLAY Play a program.
1
35 PAUSE Pause a program or live TV.
1
36 MENU Display the Main Menu.
1
37 EXIT Cancel the user selection.
1
38 INFO Display information plate (iplate).
1
39 BACK Return to the previous menu, status or channel.
1
40
PR+
PR- 1. Change channels up and down. 2. Navigate up and down the main menu, Channel list and EPG.
VOL+
VOL- 1. increase or decrease the volume. 2. Navigate left and right the main menu, Channel list and EPG.
1
41 OK Select menu option.
1
42 VOL Increase and decrease the volume.
1
43 CH/PG 1. Change channels. 2. Page between multipage summaries on the iplate.
1
44 AUDIO Select audio options.
1
45 SUBT Display closed captions.
1
46 TEXT Display Teletext.
1
47 SLEEP Configure the Sleep timer.
1
48 EPG Display the Electronic Program Guide (EPG).
1
49 FAV Select Favourite channel groups.
1
50 TV OUT
1
51 ZOOM Zoom into the screen.
1
52 WIDE Switch between aspect ratios. (16:9, 4:3, 4:3 Letter)
1
53 OPTION
1
54 TV/R Switch between TV and Radio.
133
55 TV STB Switches the VCR SCART between Output and Input (from external source ie: Pay TV).
16
Navigating Menus
Using Remote Control to Navigate
Using Front Panel to Navigate
Press MENU ( 1
36 ) button to access the main menu.
Press ( 1
40 ) buttons to move the highlight upward or downward.
Press OK ( 1
41 ) button to confirm a selection or OK a sub-menu.
Within a sub-menu, use ( 1
40 ) to navigate. Press OK to activate
the selected menu item.
Press BACK ( 1
39 ) button to return to the previous level menu.
Press EXIT ( 1
37 ) button to exit the main menu and return to your program.
6
4
3
5
2
1
Press MENU ( 1
17 ) button to access the main menu.
Press ( 1
17 ) buttons to move the highlight upward or downward.
Press OK ( 1
17 ) button to confirm a selection or OK a sub-menu.
Within a sub-menu, use ( 1
17 ) to navigate. Press OK ( 1
17 )
button to activate the selected menu item.
Press MENU ( 1
17 ) button to return to the top level menu.
Press MENU ( 1
17 ) button again to exit the main menu and return to your
program.
6
4
3
5
2
1

17 17
Main Menu
Installation
Edit Channels
PVR Manager
System Settings
Program Guide
Utility
Auto Search
Fast Search
Manual Search
Antenna Power
Initialise STB
Default
Information
Rating Control
Password Setup
Clear Password
Time Zone
Main Menu
Installation
Edit Channels
PVR Manager
System Settings
Program Guide
Utility
Installation
Auto Search
Fast Search
Manual Search
Antenna Power
Initialise STB
Channel Edit
System Settings
Video Settings
Clock Settings
Language Settings
Lock Settings
System information
Utility
Calendar
Tetris
Captured Image
USB Manager
PVR Manager
Timer List
Recording
Timeshift
Skip Time
Bookmark Image
HDD Format
Program Guide
Menu Structure
18
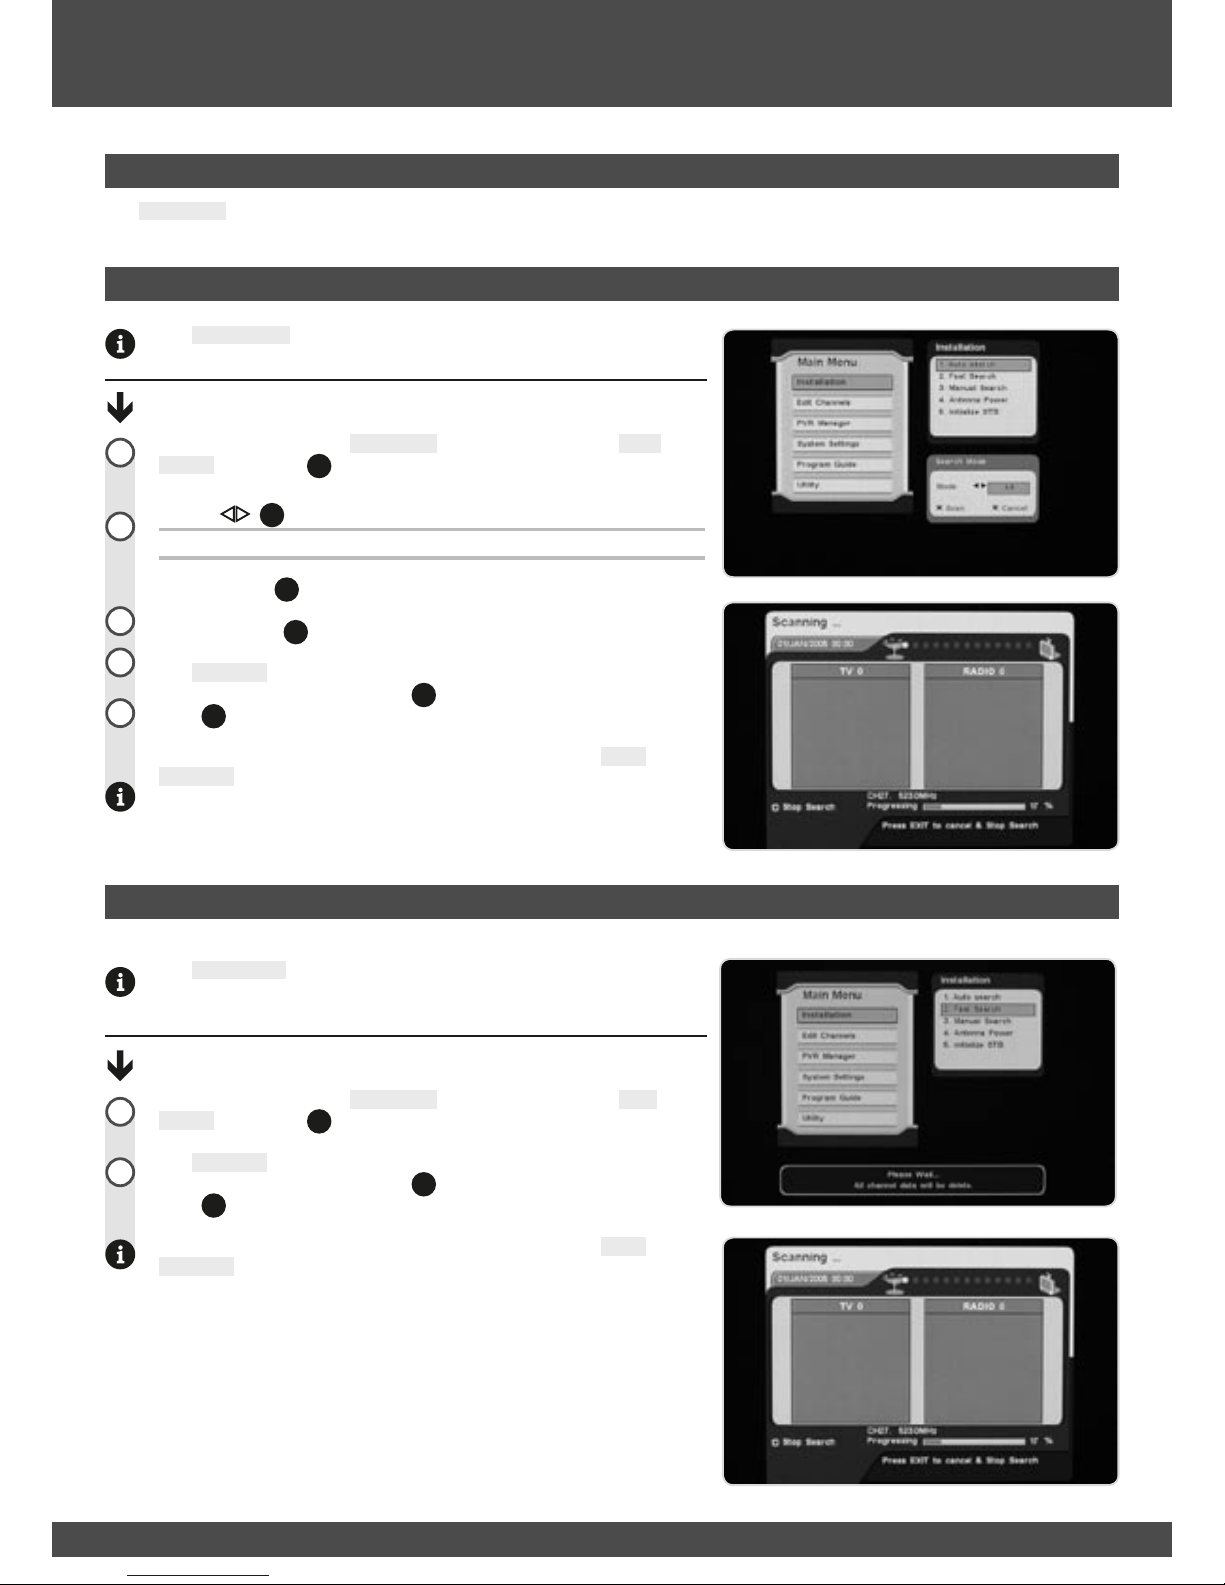
The Fast Search will rapidly scan all available frequencies for both FTA
TV and Digital Radio. This type of scan is performed by the PVR when it
is switched on for the first time.
Fast Search:
Navigate (page 16) to the Installation sub-menu and highlight Fast
Search. Press OK ( 1
41 ) to begin the fast search.
The Scanning menu then displays the progress of the auto search. To
cancel the search, press the RED ( 1
44 ) button or the
EXIT ( 1
37 ) button.
When the channel search is either finished or cancelled, the Scan
Complete menu is displayed.
Main Menu
Auto Search
The Auto Search will automatically scan all available frequecies for TV
and digital radio.
Auto Search:
Navigate (page 16) to the Installation sub-menu and highlight Auto
Search. Press OK ( 1
41 ) to open ‘Auto Search’ sub-menu.
Use the ( 1
40 ) buttons to select the search mode.
Options: ALL: TV and Digital Radio stations
Press the RED ( 1
44 ) button to begin auto search.
Press the BLUE ( 1
47 ) button to cancel auto search.
The Scanning menu then displays the progress of the auto search. To
cancel the search, press the RED ( 1
44 ) button or the
EXIT ( 1
37 ) button.
When the channel search is either finished or cancelled, the Scan
Complete menu is displayed.
Installation Sub-menu
The Installation sub-menu contains settings related specifically to installing and channel searching.
Fast Search
4
3
5
2
1
2
1

19 19
The Scan Complete menu is displayed at the end of a channel search
or whenever a channel search is cancelled. This screen summarises the
broadcasters and channels that have been discovered by the set top box.
Save & Exit:
Press the RED ( 1
44 ) button to save the discovered channels and begin
viewing digital TV.
Press OK ( 1
41 ) button to view the highlighted channel.
Main Menu
Manual Search
Scan Complete Menu
Navigate (page 16) to the Installation sub-menu and highlight Manual
Search. Press OK ( 1
41 ) to open the Manual Search menu.
The Manual Search menu allows you to manually enter channel
parameters, or scan a specific block of channels for broadcasts.
To manually enter individual channel parameters:
Use ( 1
40 ) buttons to highlight an available channel.
Press OK ( 1
41 ) button to select that channel slot for scanning.
Press the RED ( 1
44 ) button to open the manual search sub-menu.
Use ( 1
40 ) buttons to highlight a parameter.
Use ( 1
40 ) buttons to edit the parameter.
When you have entered all of the desired parameters for that channel slot,
press the RED ( 1
44 ) button to begin the manual search.
To manually scan multiple channel slots.
Use ( 1
40 ) buttons to highlight an available channel.
Press OK ( 1
41 ) button to select that channel slot for scanning.
Select another channel slot for scanning or press the RED ( 1
44 ) button to
begin manual search. The Search Mode sub-menu displays. This sub-
menu is similar to the auto search sub-menu. Select whether to search for
just FTA TV programming or for both FTA TV and Radio broadcasts.
The Scanning menu then displays the progress of the auto search. To
cancel the search, press the RED ( 1
44 ) button or the
EXIT ( 1
37 ) button.
When the channel search is either finished or cancelled, the Scan
Complete menu is displayed.
3
1
2
2
1
1
2
1
4
3
4
5
6

20
Main Menu
Antenna Power
The PVR-3790 can power a 5V active antenna. By default this
functionality is disabled to prevent damaging standard passive antennas
and masthead amplifiers.
Active antennas are commonly used in boats, caravans and recreational
vehicles. A standard home installation with a passive antenna should not
require this setting to be activated.
Enabling Active 5VDC Antenna:
Navigate (page 16) to the Installation sub-menu and highlight Antenna
Power. Press OK ( 1
41 ) to open the Antenna Power sub-menu.
Use ( 1
40 ) buttons to select off or on.
Press the RED ( 1
44 ) button to accept the change, or press the BLUE ( 1
47 )
button to cancel.
2
1
3
!
Initialise STB
Initialising the PVR will wipe all of the channels and user settings, restoring
the set top to a factory default state.
Initialising The STB:
Navigate (page 16) to the Installation sub-menu and highlight Initialise
STB. Press OK ( 1
41 ) to open the Enter PIN Code sub-menu.
Use 0 ~9 ( 1
21 ) buttons to enter the PIN code (default 0000).
If the PIN code is incorrect you will be provided with the chance to enter it
again. If the Pin code is correct, the STB will initialise and reboot.
2
1
!
Table of contents
Other NextWave Digital DVR manuals


