Nickelodeon TEENAGE MUTANT NINGA TURTLES NTPM-55 User manual


2
IMPORTANT SAFEGUARDS
When using electrical appliances especially when children are present, basic safety
precautions should always be followed to reduce the risk of re, electric shock, and/or
injury to persons, including the following:
1. READ ALL INSTRUCTIONS.
2. Do not touch hot surfaces. Metal parts will become hot. Use any handles or knobs.
Care must be taken, as burns can occur from touching hot parts or from spilled, hot
liquid.
3. To protect against electrical shock, do not place cord, plug or appliance in water or
other liquid.
4. Close supervision is necessary when any appliance is used by or near children.
5. Do not leave appliance unattended while in use.
6. To disconnect, unplug from wall outlet.
7. Unplug from outlet when not in use and before cleaning. Allow to cool completely
before moving, putting on or taking o parts, or before cleaning.
8. Extreme caution must be used when moving an appliance containing hot oil, food,
water or other hot liquids.
9. Do not operate any electrical appliance with a damaged cord or plug or after
appliance malfunctions or has been dropped or damaged in any manner. Return
appliance to nearest authorized service facility for examination, repair or adjustment.
10. The use of accessory attachments not recommended by the appliance manufacturer
may result in re, electrical shock or injury.
11. Do not use outdoors or for commercial purposes.
12. Do not let cord hang over edge of table or counter, or touch hot surfaces.
13. Do not place appliance on or near a hot gas or electric burner, or in a heated oven
or microwave.
14. Do not use the appliance for other than its intended use.
SAVE THESE INSTRUCTIONS
3
OPERATING INSTRUCTIONS
PRODUCT MAY VARY SLIGHTLY FROM ILLUSTRATIONS
This appliance is for HOUSEHOLD USE ONLY. It may be plugged into an AC electrical
outlet (ordinary household current). Do not use any other electrical outlet.
CORD PLUG
This appliance has a polarized plug (one blade is wider than the other). To reduce the
risk of electric shock, this plug is intended to t into a polarized outlet only one way. If
the plug does not t into the outlet, reverse the plug and try again. If it still does not t,
contact a qualied electrician. Do not attempt to modify the plug in any way.
LINE CORD SAFETY TIPS
1. Never pull or yank on cord or the appliance.
2. To insert plug, grasp it rmly and guide it into outlet.
3. To disconnect appliance, grasp plug and remove it from outlet.
4. Before each use, inspect the line cord for cuts and/or abrasion marks. If any are
found, this indicates that the appliance should be serviced and the line cord replaced.
5. Never wrap the cord tightly around the appliance, as this could place undue stress
on the cord where it enters the appliance and cause it to fray and break.

4
A short power supply cord is provided to reduce the hazards resulting from
entanglement or tripping over a longer cord. Extension cords are available and
may be used if care is exercised in their use. If an extension cord is used:
1) The marked electrical rating of the cord set or extension cord should be at least
as great as the electrical rating of the appliance, and
2) The cord should be arranged so that it will not drape over the countertop or
tabletop where it can be pulled on by children or tripped over unintentionally.
DO NOT OPERATE APPLIANCE IF THE LINE CORD SHOWS ANY DAMAGE, OR IF
APPLIANCE WORKS INTERMITTENTLY OR STOPS WORKING ENTIRELY.
SAFE OPERATING PROCEDURES
• THIS PRODUCT IS NOT A TOY. IT IS NOT INTENDED TO BE USED BY
CHILDREN. Close adult supervision is necessary whenever using this appliance
with children present. For your safety, always read and understand the Use and
Care Manual before attempting to use any electric appliance.
• This is a high wattage appliance and should be operated on a dedicated circuit.
• Solid surface countertops can be easily scratched, cracked, scorched, or damaged,
especially when exposed to heat. To prevent damage, the following precautions
should be observed when using this product:
• Always use a trivet under heat generating sources such as Slow
Cookers, Toaster Ovens, Skillets, etc.
• Do not place hot pans, pots, ceramic or stoneware inserts, etc. directly
on the countertop surface.
• In the event that any foods catch re in the pizza maker, keep the lid closed. Unplug
the cord from the power outlet. Wait until any re is out before opening the pizza lid.
• Do not place cardboard, plastic, paper or other ammable materials near or in the
pizza maker.
• Always remove any cardboard or plastic packaging from pizzas before placing in
the pizza maker. When making other convenience foods, remove the food from
packaging. Do not use any crisping trays or sleeves in the pizza maker. Distribute
food evenly on lower nonstick surface of the pizza maker.
• The outer surface of the appliance may be very hot when operating. Always wear
protective, insulated oven gloves when inserting, removing or handling items from
the pizza oven when hot.
• Do not lean or stand over the pizza maker when opening the lid as steam may be
released.
• Do not place anything on top of the pizza maker.
• Do not operate the pizza maker with the lid open.
• Do not place hands inside the pizza maker during operation.
• Do not insert oversized foods into the pizza maker as this may create risk of re.
• Do not place aluminum foil in the pizza maker.

5
HOW TO USE
BEFORE USING:
1. Carefully unpack the pizza maker. Remove all packaging materials, including those
which may be inside the product.
2. Wipe exterior surfaces with a soft, damp cloth to remove dust particles collected
during packing and handling. Dry thoroughly. Do not use abrasive cleaners. Clean
the interior with a warm, soapy cloth. Rinse with a clean, damp cloth and dry
thoroughly. NEVER IMMERSE THE PRODUCT, CORD OR PLUG IN WATER OR
ANY OTHER LIQUID.
USING THE PIZZA MAKER:
1. Place the pizza maker on a at, level, heat-resistant surface.
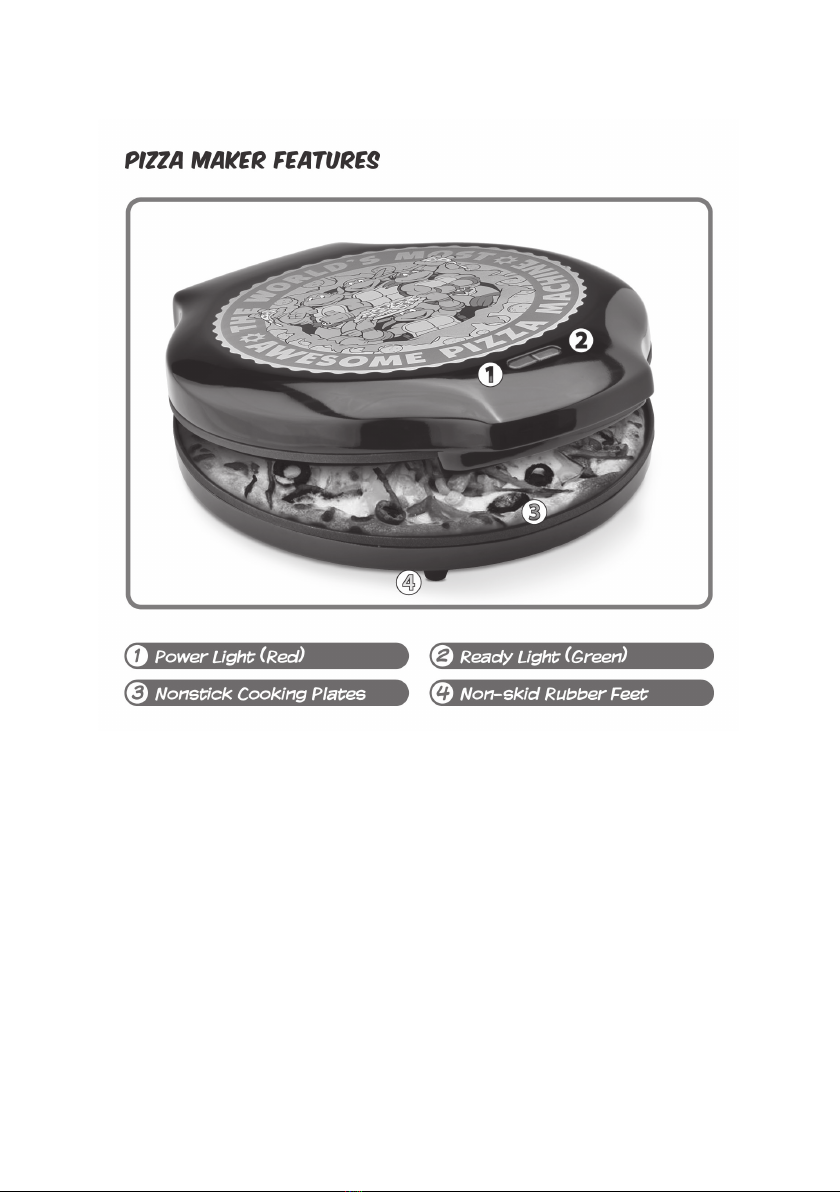
2. Plug the power cord into a 120V AC electrical wall outlet. The red power light will
illuminate and will remain illuminated until the power cord is unplugged from the
outlet.
3. Close the top to allow the pizza maker to heat.
4. After approximately 4 minutes the green ready light will illuminate, indicating that the
pizza maker has reached the proper temperature and is ready for use.
NOTE: The green ready light will cycle on and o during the cooking
process as the thermostat maintains the proper cooking temperature.
5. CAUTION: Pizza maker is HOT. Use oven mitts. Open the top lid using the handle
and avoid making contact with hot surfaces. To avoid accidental burns or contact
with the hot surfaces or steam being released while cooking, always open and close
the lid using oven mitts and by the handle.
6. Place 12-inch or smaller pizza or other food directly on the nonstick bottom surface
of the pizza maker. Be sure to remove any plastic or cardboard packaging.
7. Lower the lid and allow the food to cook. A convenient cooking guide is included on
pages 6-7.
8. When pizza or other food is cooked to desired doneness, unplug the power supply
cord from the outlet. Carefully open the lid using oven mitts. Do not lean or stand
over the pizza maker when opening the lid as hot steam may be released.
9. Remove the pizza using a wooden pizza peel or heat resistant spatula. DO NOT use
metal utensils as they will scratch nonstick surfaces. Slide pizza onto properly
sized plate, cardboard circle or pizza tray. Cut and serve pizza. DO NOT cut pizza
while it is in the pizza maker.
10. Make sure the pizza maker is completely cool before moving or storing.
CARE AND CLEANING
This appliance requires little maintenance. It contains no user serviceable parts. Do not
try to repair it yourself. Refer it to qualied personnel if servicing is needed.
To Clean: Always unplug the appliance from the power source and wait until it cools
down before cleaning. There is no need to take the appliance apart for cleaning. Dry
with a paper towel to absorb excess oils. Brush crumbs from the cooking plates and
wipe with a damp cloth and mild soap. Never immerse in water. Avoid using sharp

6
utensils, as they will scratch the surfaces. Do not use cleansers or oven cleaners on the
cooking plates. To clean the exterior, use a damp cloth with mild soap and towel dry.
To Store: Unplug the appliance and store in its box or in a clean, dry place. Store the
cord loosely coiled; never wrap the cord tightly around the unit. Do not put stress on the
cord where it enters the appliance, as it could cause the cord to fray and break.
COOKING TIPS
PIZZA TOPPINGS:
• Meat should be fully cooked before placing on pizza. Meat should be browned and
drained.
• Fresh vegetables such as onions, green and red peppers, mushrooms and sliced
zucchini will remain quite crisp. For more tender vegetables, sauté, steam or
microwave them until tender before topping a pizza.
• Try carmelizing onions or roasting red peppers over hot charcoal before topping a
pizza.
• Mozzarella, Parmesan and Romano are the most popular cheeses for pizza. For
dierent avors experiment with a variety of cheeses.
COOKING GUIDE
The table should be used as a guideline only. Cooking times should be adjusted for
individual tastes and preferences. Cooking times may vary based on the size, shape and
thickness of pizza or other foods.
TYPE OF FOOD APPROXIMATE
COOKING TIME HINTS
FRESH PIZZA DOUGH
Thin Crust (9” - 12”) 5-6 Minutes Cooking times are for crust
only. Add toppings and nish
cooking until cheese bubbles
or begins to brown.
Medium Crust (9” - 12”) 7-9 Minutes Cooking times are for crust
only. Add toppings and nish
cooking until cheese bubbles
or begins to brown.
Thick Crust (9” - 12”) 10-12 Minutes Cooking times are for crust
only. Add toppings and nish
cooking until cheese bubbles
or begins to brown.
PIZZA
Frozen Pizza 12-15 Minutes
Pre-Made Chilled Crust 7-10 Minutes

7
TYPE OF FOOD APPROXIMATE
COOKING TIME HINTS
Pre-Made Non-Chilled Crust 10-12 Minutes
Store Bought Take and Bake Refer to cooking times
provided on the pizza cooking
instructions.
FROZEN FOODS
Bite Size Bagels 12-18 Minutes Bake 12 minutes for softer
bagel crust. Bake 18 minutes
for crispier bagel crust.
Cheese Sticks 14-16 Minutes Turn halfway through.
Chicken Strips 16-18 Minutes
Chicken Wings 18-20 Minutes Turn halfway through.
Fish Fillets (breaded) 12-14 Minutes
Onion Rings (breaded) 12-14 Minutes Turn halfway through.
Pizza Snacks (bite size) 10-12 Minutes
Potato Skins 12-14 Minutes
Taquitos 10-12 Minutes
OTHER FOODS
Cookies, Chocolate Chip
(Refrigerated)
12-15 Minutes Preheat before baking
cookies. Place 1½” dough
balls on cooking surface and
atten tops slightly. Bottom of
cookies will be more brown
than traditional oven baked
cookies.
Grilled Sandwiches 7-9 Minutes Turn halfway through.
Quesadillas 6-10 Minutes Cooking time depends on
type and amount of
ingredients.
Actual cooking times may dier from cooking times recommended on packaging for
foods you may be cooking. NEVER LEAVE THE PIZZA MAKER UNATTENDED WHILE
OPERATING.

8
MASTER SPLINTER’S HOMEMADE PIZZA
Crust Sauce
1 package active dry yeast ½ cup tomato sauce
½ cup warm water ½ teaspoon dried oregano leaves, crushed
½ teaspoon sugar ½ teaspoon dried basil leaves, crushed
½ teaspoon salt 1 clove garlic, minced
1 tablespoon olive oil Dash of pepper
1½ cups bread our 1 tablespoon tomato paste (optional)
¼ cup grated Parmesan cheese
1 - 1½ cups shredded Mozzarella cheese
Suggested toppings: sliced pepperoni, canned mushrooms (sliced), sliced black olives
Topreparecrust:
Dissolve yeast in warm water in medium-size mixing bowl. Allow to stand about 5
minutes. Stir in sugar, salt and olive oil. Stir in our, stirring to make a sti dough. Turn
onto lightly oured board and knead until smooth and elastic, about 5 minutes. Place in
greased bowl, cover and allow to stand in warm, draft-free spot until dough is doubled
in bulk, about 1 hour.
Topreparesauce:
Combine tomato sauce, oregano, basil, garlic and pepper. Whisk in tomato paste if a
thicker sauce is preferred. Spread sauce over partially baked pizza crust.
Punch down dough and form into pizza crust. Transfer to pizza maker and bake for 7
to 8 minutes or until crust is browned on top. Top pizza as desired, then sprinkle with
Parmesan and Mozzarella cheese. Continue baking in pizza maker for an additional 10
to 14 minutes or until cheese is melted. Carefully remove the pizza from the pizza maker
and transfer to a lightly oured cutting board. Cut, serve and enjoy.
THE MIKEY SPECIAL
1 prepared thin pizza crust (about 10 oz) or prepared focaccia
1 tablespoon olive oil
4 cloves garlic, minced
⅓ cup chopped fresh parsley
1½ cups shredded Mozzarella
3 slices Provolone cheese (about 1 ounce each), sliced into thin strips
⅓ cup grated Parmesan cheese
1 can (14 ounces) artichoke hearts in water, drained and thinly sliced
Brush pizza crust with olive oil. Sprinkle evenly with garlic and top with parsley. Cover
the pizza with all of the cheese and add sliced artichoke hearts. Bake in pizza maker for
10 to 20 minutes. Carefully remove the pizza from the pizza maker. Cut, serve and enjoy.

9
TURTLE POWER GREEK PIZZA
2 boneless, skinless chicken breast halves, cut into 1-inch cubes
½ cup Greek salad dressing
2 tablespoons olive oil, divided
1½ cups Mozzarella cheese, divided
1 thin crust, prepared 12-inch pizza shell or prepared focaccia
1 jar (6 ounces) marinated artichoke hearts, drained and chopped
⅓ cup roasted red peppers, drained and coarsely chopped
10 kalamata olives, drained, pitted and thinly sliced
1½ tablespoons chopped fresh oregano (or 1½ teaspoons dried oregano leaves)
½ teaspoon ground black pepper
½ cup crumbled feta cheese
Place chicken pieces in resealable plastic bag; add salad dressing and marinate 30
minutes in refrigerator.
Place prepared pizza shell in pizza maker and spread ¾ cup Mozzarella cheese over the
pizza shell. Combine artichokes, peppers, olives, oregano and black pepper. Drizzle with
1 tablespoon olive oil; gently stir and set aside.
Heat remaining 1 tablespoon olive oil in a skillet. Drain dressing from chicken and
discard. Add chicken to olive oil in skillet and cook, stirring frequently, until chicken is
fully-cooked. Spoon chicken over crust. Spoon artichoke mixture over chicken. Sprinkle
with remaining ¾ cup Mozzarella cheese and feta. Bake in pizza maker for 12 to 20
minutes or until cheese is browned and bubbly. Carefully remove the pizza from the
pizza maker. Cut, serve and enjoy.
HALF-SHELL HERO PIZZAS
4 English muns - sliced 1 cup marinara or pizza sauce
1 cup shredded Mozzarella 24 thin slices of pepperoni
Dried oregeno (optional)
Arrange 8 English mun halves in the pizza maker. Spread even amounts of sauce,
cheese and toppings over English muns. Bake 10-14 minutes in the pizza maker.

10
COWABUNGA MEXICAN PIZZA
1 prepared thin pizza crust (about 10 oz)
½ can (8 oz) refried black beans
1 envelope (1.25 oz) taco seasoning
½ cup shredded Monterrey Jack cheese
¾ cup shredded cheddar cheese
¼ cup diced tomato, seeded
¼ cup chopped red onion
2 tablespoons chopped fresh cilantro sprigs
⅓ cup canned whole kernel corn
1 jalepeño, seeded and diced (optional)
Kosher salt
In a medium bowl, mix the refried beans with a small amount of water into a spreadable
consistency. Mix in the taco seasoning.
Seed and dice the tomato and jalepeño. Chop the red onion and cilantro.
Spread the refried beans in a thin layer over the pizza dough. Cover the pizza with all
of the cheese, then add other toppings, including the whole kernel corn. Sprinkle with
kosher salt to intensify the avors.
Bake in pizza maker for 10 to 20 minutes. Carefully remove the pizza from the pizza
maker. Cut, serve and enjoy.
DONATELLO’S DESSERT PIZZA
1 prepared thin pizza crust (about 10 oz)
3 tablespoons melted butter
⅓ cup raspberry preserves
1 package (8 oz) cream cheese, softened
⅓ cup sugar
½ teaspoon vanilla
Fresh raspberries, washed and dried
Toppings as desired
Brush butter onto pizza crust. Bake crust for 5 to 7 minutes in pizza maker. Spread
raspberry preserves evenly on crust and bake for another 1 to 2 minutes. Remove from
pizza maker and allow to cool.
In a small bowl, beat cream cheese, sugar and vanilla with electric mixer until uy.
Spread cream cheese mixture over pizza crust. Top with fresh raspberries.
For an added touch, drizzle with melted chocolate and add toppings like toasted almond
slivers, toasted coconut or chocolate shavings.

11
BROTASTIC BREAKFAST PIZZA
1 thin crust, prepared 12-inch pizza shell or prepared focaccia
3 tablespoons olive oil
6-8 strips of bacon, trimmed and chopped
6 eggs, beaten
1½ cups shredded Monterrey Jack cheese
¼ cup crumbled feta cheese
¼ cup chopped red onion
½ cup sliced red bell pepper
Kosher salt
½ avacado, sliced
Brush the pizza crust with olive oil and set the crust aside.
Beat eggs in separate bowl and set aside.
Cook bacon in a skillet over medium-high heat for 4 to 6 minutes or until crispy. Remove
the bacon and allow to cool before chopping. Drain the drippings from the skillet, leaving
1 teaspoon of drippings. Add the eggs to the same skillet and cook 2 to 4 minutes or until
eggs are just rm.
Spoon the eggs evenly over the pizza crust. Add Monterrey Jack cheese, feta, onion,
pepper and bacon.
Bake in pizza maker for 10 to 15 minutes. Carefully remove the pizza from the pizza
maker. Cut into wedges, season with salt and add avacado. Serve and enjoy.

12
ONE YEAR LIMITED WARRANTY
SELECT BRANDS, INC. warrants, subject to the conditions stated below, that from the date of
purchase, this product will be free from mechanical defects for a period of one (1) year. SELECT
BRANDS, INC., at its option, will repair or replace this product found to be defective during the
warranty period. Should this product become defective by reason of improper workmanship or
material defect during the specied warranty period, Select Brands, Inc. will repair or replace the
same eecting all necessary parts replacements for a period of one year from the date of purchase.
Transportation charges on parts, or products in whole, submitted for repair or replacement, under
this warranty, must be borne by the purchaser.
CONDITIONS: This warranty is valid for the original retail purchaser from the date of initial retail
purchase and is not transferable. Keep the original sales receipt. Proof of purchase is required to
obtain warranty service or replacement. Dealers, service centers, or retail stores do not have the
right to alter, modify or in any way, change the terms and conditions of this warranty.
Warranty registration is not necessary to obtain warranty on Select Brands, Inc. products. Save
your proof of purchase receipt.
ABOUT YOUR PRODUCT WARRANTY: Most warranty repairs are handled routinely, but
sometimes requests for warranty service may not be appropriate. For example, warranty service
would NOT apply if the product damage occurred because of misuse, lack of routine maintenance,
shipping, handling, warehousing or improper installation. Similarly, the warranty is void if the
manufacturing date or the serial number on the product has been removed or the equipment has
been altered or modied. During the warranty period, the authorized service dealer, at its option,
will repair or replace any part that, upon examination, is found to be defective under normal use
and service.
NORMAL WEAR: This warranty does not cover normal wear of parts or damage resulting from any
of the following: Negligent use or misuse of the product; Improper voltage or current; Use contrary
to the operation instructions; Deviation from instructions regarding storage and transportation;
Repair or alteration by anyone other than SELECT BRANDS, INC. or an authorized service center.
Further, the warranty does not cover Acts of God, such as re, ood, hurricanes and tornadoes.
SELECT BRANDS, INC. shall not be liable for any incidental or consequential damages caused by
the breach of any express or implied warranty. Except to the extent prohibited by applicable law,
any implied warranty of merchantability or tness for a particular purpose is limited in duration to the
duration of the above warranty. Some states, provinces or jurisdictions do not allow the exclusion
or limitation of incidental o consequential damages or limitations on how long an implied warranty
lasts, so the above limitations or exclusion may not apply to you. This warranty gives you specic
legal rights, and you may also have other rights that vary from state to state or province to province.
HOW TO OBTAIN WARRANTY SERVICE: You must contact SELECT BRANDS, INC. Customer
Service at 1-913-663-4500. A Customer Service representative will attempt to resolve warranty
issues over the phone. If telephone resolution is not possible, the Customer Service representative
will require your assistance in performing routine diagnostic procedures. This warranty is eective
for the time periods listed above and subject to the conditions provided for in this policy.
To register this product and view other ne products, visit us online at www.selectbrands.com
© 2016 Viacom International Inc. All Rights Reserved. Nickelodeon, Teenage Mutant Ninja Turtles
and all related titles, logos and characters are trademarks of Viacom International Inc.
Made in China
Table of contents


