Nightfox 110R User manual

NIGHTFOX 110R
Instruction Manual: EN/DE/FR/IT/ES

2
Contents: English
1. Installing the baeries p5
2. General overview p6
3. Using the Nighox p8
4. Display informaon p9
5. Taking pictures and videos p9
6. Sengs menu navigaon p10
7. Downloading footage to your PC p11
8. Aaching to a helmet p11
9. Viewing footage on the Nighox p12
10. Troubleshoong p12
11. Specicaon p13
Inhalt: Deutsch
1. Einlegen der Baerien S.15
2. Überblick S.16
3. Gebrauch des Nighox S.18
4. Bildschirm Informaonen S.19
5. Aufnehmen von Videos und Fotos S.19
6. Einstellungen S.20
7. Download von Aufnahmen auf Ihren PC S.21
8. Helmbefesgungen S.21
9. Abspielen von Aufnahmen auf dem Nighox S.22
10. Fehlerbehebung S.22
11. Spezikaon S.23

3
- +
Sommaire: Français
1. Installer les piles p25
2. Vue d’ensemble p26
3. Ulisez le Nighox p28
4. Informaons achées p29
5. Prendre des photos et lmer p29
6. Navigaon dans le menu des paramètres p30
7. Transférer les données sur votre PC p31
8. Fixaon au casque p31
9. Voir les photos/vidéos sur le Nighox p32
10. Dépannage p32
11. Spécicaon p33
Indice: Italiano
1. Installare le baerie p35
2. Panoramica generale p36
3. Come ulizzare Nighox p38
4. Informazioni fornite dal display p39
5. Scaare foto e registrare video p39
6. Navigazione nel menu impostazioni p40
7. Scaricare foto e video sul PC p41
8. Accessori per il casco p41
9. Visualizzare foto e video sulla Nighox p42
10. Risoluzione dei problemi p42
11. Speciche p43

4
Contenido: Español
1. Instalación de las baterías p45
2. Descripción general p46
3. Ulización del Nighox p48
4. Información visible en pantalla p49
5. Toma de fotograas y grabación de vídeos p49
6. Navegación en el menú conguración p50
7. Descarga de imágenes a PC p51
8. Accessories del casco p51
9. Visualización de imágenes en el Nighox p52
10. Solución de problemas p52
11. Especicaciones p53
5
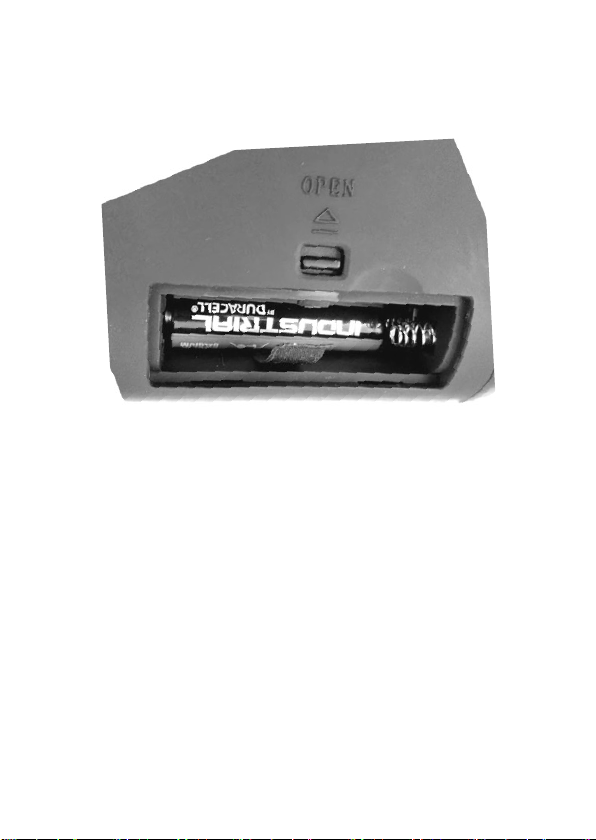
1. Installing the baeries
1. Open the two compartments on the boom of the Nighox.
2. Insert 4x AA alkaline or lithium baeries. Do not use lead acid
baeries. Negave goes on the “spring” connectors (see
picture above.)
3. Close the baery compartments.
+ -

6
2. General overview
1. Power. Press down for two seconds to power on. To power o,
press down again for one second.
2. Mode. Press to ick between 4 modes: Photo (p9), Video (p9),
Gallery (p12) and Sengs (p10).
3. Zoom. Hold down to increase digital zoom.
4. Mount rail. Aach a Nighox mount and addional infrared
torch. See website for more details
5. Screen brightness. Press to adjust viewing screen brightness.
Use UP/DOWN buons to adjust. Then, press ENTER to save.
3
2
1
7
6
5
4
Mount Rail

7
6. OK.
• In Photo mode, OK takes a photo
• In Video mode, OK starts & stops recording
• In Gallery mode, OK opens up the opon menu, to play
or delete the displayed video
• In Sengs mode, OK selects opons on the displayed
menu
7. IR. To see at night, Press IR for 7 levels of brightness (0->1->2-
>3>4>5>6>7>0…)
8. Micro SD card and USB slot. With gold pins facing downwards,
push your Micro SD card into the slot unl it clicks into place.
9. Focus wheel. Turn by hand to focus the image.
10. Lens cap. The lens cap lter must be removed at night.
8
9
10

8
3. Using the Nighox
1. Remove the lens lter cap from the front of the device. The
lter is to be used during day-me only.
2. Turn the Nighox on by holding the ON buon down for two
seconds, unl the display illuminates.
3. Pick an infrared power level by pressing the IR buon. This will
provide illuminaon to the picture. There are 7 brightness
levels. A higher level will provide a brighter picture but will
deplete the baeries quicker.
4. Focus the picture by turning the lens clockwise or an-
clockwise (see arrow 9 on page 5).
5. You can zoom by pressing the ZOOM buon to magnify the
picture by up to 2x. Keep pressing to go back to 1x
magnicaon.
6. Press the MODE buon to switch modes — the Nighox’s four
modes are Photo, Video, Gallery and Sengs. These are
explained in the next secons.
9
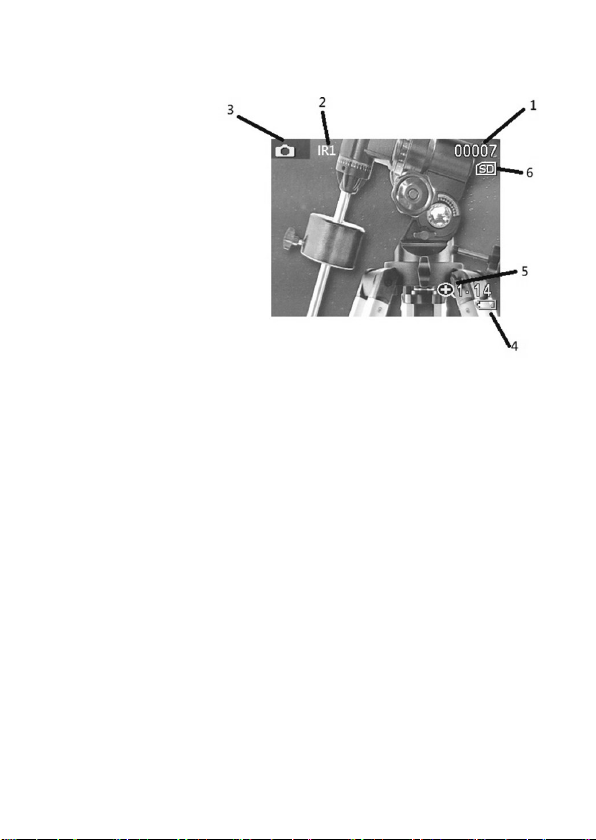
4. Display informaon
5. Taking pictures and videos
1. To take a picture, go to Photo mode (this is the default mode
when the Nighox is switched on.) A camera icon shows at the
top of the screen. To take a photo, press the OK buon.
2. To record a video, go to Video mode. A small video icon will
appear at the top of the screen. To start recording, press the
OK buon. To stop recording, press the OK buon again.
Videos will save automacally onto the Micro SD memory card.
1. No. of photos taken
2. IR power indicator
3. Photo/Video mode icon
4. Baery level indicator
5. Zoom level indicator
6. SD card indicator
10
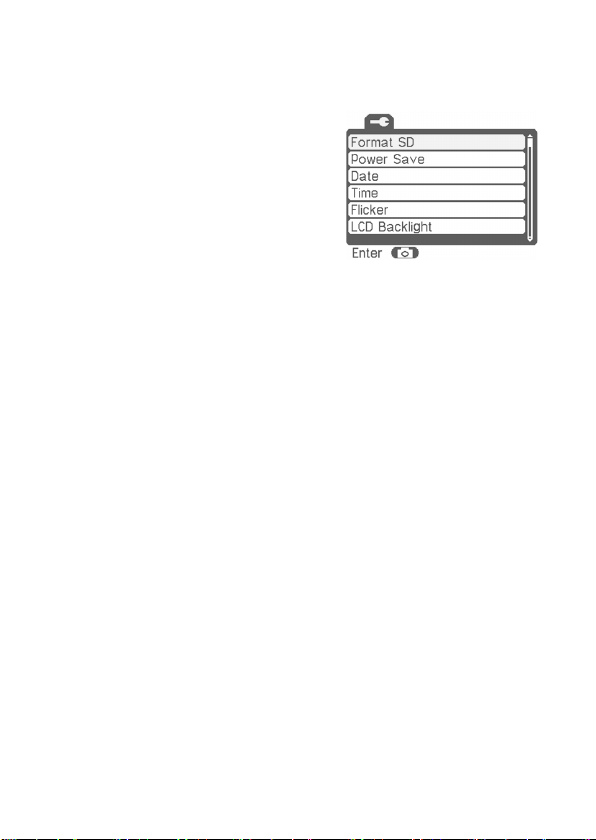
6. Sengs menu navigaon
• To get to the sengs menu, use
the MODE buon to ick through
the photo, video and gallery
modes unl you reach this
sengs menu (pictured).
• Use the ZOOM and IR buons to go up and down, and the OK
buon to enter/exit menus.
• Pressing the MODE buon will go back to Photo mode.
Menu opons:
• Format SD: Erases everything on your installed memory card.
• Power Save: Congure the Nighox to turn o aer a certain
period of non-use.
• Date / Time: Set the date and me used for the video me
stamp.
• Flicker: Select 60Hz for opmum performance.
• LCD Backlight: Change the brightness of the screen. Use the
ZOOM and IR buons to increase/decrease the brightness.
Press OK to save.

11
• Date/Time Tag: Enabling this opon will show a visible me
stamp on your videos and photos.
• Version: Displays soware version installed.
7. Downloading footage to your PC
• The 110R’s micro-USB connecon port is
just above the eyepiece. With the
Nighox o, connect to your computer
using the USB cable. The screen displays
“USB Connected”.
• On Windows, navigate to your File
Explorer. The Nighox may appear as
“DISK”, “REMOVABLE STORAGE” or
something similar, normally preceded
by a “(D:)”.
• Within this drive, your photos and videos will be in a folder
called Media.
8. Aaching to a helmet
• This included adapter uses a GoPro
standard size and connects to the top
of the Nighox. Third party helmet
adapters designed to work with a
GoPro camera will also work with the
110R.

12
9. Viewing footage on the Nighox
• You can review your photos and videos on the Nighox itself.
Keep pressing the MODE buon unl you get to the Gallery
mode.
• Use the Zoom and IR buons to scroll up and down your
photos and videos.
• You can start playing a video by pressing the OK buon on a
selected video, and selecng “Play” from the menu that
appears, using the OK buon
• To delete a photo or video, press the OK buon and select
“Delete” from the menu.
10. Troubleshoong
10.1 Poor image
• Make sure the lens cap is on during the day and o at night
• Check that the Nighox is focused by adjusng the focus wheel
at the front of the device.
• You may wish to use an addional infrared illuminator (or “IR
torch”) to boost the night-me viewing range.

13
10.2 No power
• If the Nighox fails to turn on, check for defecve, missing, or
improperly-installed baeries. Replace or install baeries cor-
rectly.
• Please make sure to use only alkaline or lithium AA baeries.
11. Specicaon
• Magnicaon: 7X (plus 2x oponal digital zoom)
• Objecve aperture: 20mm
• Viewing angle: 5.5°
• Exit pupil distance: 20mm
• Min focus range: 1m
• F# for object lens: 1.311 at night, 2.8 at day
• Viewing distance at night: 120m
• Sensor: CMOS
• Recording resoluon: 640*480
• Display resoluon: 320*240
• IR Power: 1.8W
• Wavelength: 850nm
• Digital zoom: 2x
• Baery life: 2-5hrs, depending on IR usage
• Power supply: 4x AA baeries (not included)
• Memory card: Micro SD (not included), maximum 32GB

14
GERMAN
Inhalt: Deutsch
1. Einlegen der Baerien S.15
2. Überblick S.16
3. Gebrauch des Nighox S.18
4. Bildschirm Informaonen S.19
5. Aufnehmen von Videos und Fotos S.19
6. Einstellungen S.20
7. Download von Aufnahmen auf Ihren PC S.21
8. Helmbefesgungen S.21
9. Abspielen von Aufnahmen auf dem Nighox S.22
10. Fehlerbehebung S.22
11. Spezikaon S.23

15
1. Einlegen der Baerien
1. Önen Sie die Abdeckungen der Baeriefächer an der
Unterseite des Nighox.
2. Legen Sie 4 AA-Alkali- oder Lithium-Baerien ein. Bie keine
Bleibaerien verwenden. Beachten Sie die Polaritätsrichtlinien
(- wird richtung Feder eingelegt).
3. Schließen Sie die Baeriefächer.
+ -

16
2. Überblick
1. Power. Lange gedrückt halten zum Ein-und Ausschalten.
2. Mode. Zum Wechselns zwischen 4 Modi: Foto (S. 19), Video (S.
19), Galerie (S. 22) und Einstellungen (S. 20).
3. Zoom. Drücken Sie Zoom zum Vergrößern.
4. Schienenhalterung. Zum Befesgen einer Nighox-Halterung
und einer zusätzliche Infrarotlampe. Siehe Website für weitere
Details.
5. Bildschirmhelligkeit. Zum Anpassen der Bildschirmhelligkeit.
Verwenden Sie die UP / DOWN-Tasten zum Einstellen. Drücken
Sie ENTER zum Speichern.
3
2
1
7
6
5
4
Schienenhalterung

17
6. OK.
• Im Fotomodus nimmt OK ein Foto auf.
• Im Videomodus startet und stoppt OK die Aufnahme.
• Im Galerie-Modus önet OK das Oponsmenü, um das
angezeigte Video abzuspielen oder zu löschen.
• Im Einstellungsmodus wählt OK Oponen im angezeigten
Menü.
7. IR. IR drücken für 7 Helligkeitsstufen (0->1->2->3>4->5->6->7-
>0…) bei Verwendung im Dunklen.
8. Micro SD-Karte und USB-Steckplatz. Schieben Sie Ihre Micro SD-
Karte mit den Goldsen nach unten in den Steckplatz, bis sie
einrastet.
9. Fokusrad. Per Hand drehen, um das Bild scharf zu stellen.
10. Objekvlter. Nehmen Sie den Objekvlter für den Gebrauch im
Dunklen ab.
8
9
10

18
3. Gebrauch des Nighox
1. Enernen Sie die Objekvlterkappe von der Vorderseite des
Geräts. Der Filter darf nur während des Tages verwendet
werden.
2. Schalten Sie den Nighox ein, indem Sie die ON-Taste zwei
Sekunden lang gedrückt halten, bis das Display aueuchtet.
3. Wählen Sie eine Infrarotstufe durch Drücken der IR-Taste. Es
gibt 7 Helligkeitsstufen. Ein höheres Level liefert ein helleres
Bild, entläd die Baerien jedoch schneller.
4. Stellen Sie das Bild scharf, indem Sie das Objekv im oder
gegen den Uhrzeigersinn drehen (siehe Pfeil 9 auf Seite 15).
5. Sie können zoomen, indem Sie die ZOOM-Taste drücken, um
das Bild um bis zu 2x zu vergrößern. Drücken Sie, um zur 1-
fachen Vergrößerung zurückzukehren.
6. Drücken Sie die MODE-Taste, um den Modus zu wechseln - die
vier Modi des Nighox sind Foto, Video, Galerie und
Einstellungen. Diese werden in den nächsten Abschnien
erläutert.

19
4. Bildschirm Informaonen
5. Aufnehmen von Videos und Fotos
1. Um ein Bild aufzunehmen, gehen Sie in den Fotomodus (dies
ist der Standardmodus, wenn der Nighox eingeschaltet ist.)
Ein Kamerasymbol wird oben auf dem Bildschirm angezeigt.
Um ein Foto aufzunehmen, drücken Sie die OK-Taste.
2. Um ein Video aufzunehmen, wechseln Sie in den Videomodus.
Ein kleines Videosymbol erscheint oben auf dem Bildschirm.
Um mit der Aufnahme zu beginnen, drücken Sie die OK-Taste.
Um die Aufnahme zu stoppen, drücken Sie erneut die OK-
Taste. Videos werden automasch auf der Micro SD-
Speicherkarte gespeichert.
1. Anzahl der aufge-
nommenen Fotos
2. IR-Leistungsanzeige
3. Foto / Video-Modus-
Symbol
4. Baerieanzeige

20
6. Einstellungen
• Um in das Einstellungsmenü zu
gelangen, drücken Sie die MODE-
Taste, um durch den Foto-, Video
- und Galerie-Modus zu bläern,
bis Sie zu diesem
Einstellungsmenü gelangen (siehe
Abbildung).
• Verwenden Sie die ZOOM- und IR-Tasten, um auf und ab zu
scrollen, und die OK-Taste, um Menüs zu önen oder zu
verlassen.
• Drücken Sie die MODE-Taste, um zum Fotomodus
zurückzukehren .
Menüpunkte:
• Format SD: Löscht alles auf Ihrer installierten Speicherkarte.
• Power Save: Kongurieren Sie den Nighox so, dass er nach
einer besmmten Zeit der Nichtbenutzung ausgeschaltet wird.
• Date/Time: Zum Einstellen des Datums und der Uhrzeit für den
Videozeitstempel.
• Flicker: Wählen Sie 60Hz für opmale Leistung.
• LCD Backlight: Zum Ändern der Bildschirmhelligkeit.
Verwenden Sie die Tasten ZOOM und IR, um die Helligkeit zu
erhöhen / verringern. Drücken Sie OK, um zu speichern.
Table of contents
Languages:
Other Nightfox Binoculars manuals


