Nikkei NMP4 User manual


1
NIKKEINMP4MP4PLAYER
INSTRUCTION MANUAL
DRAWINGS AND SPECIFICATIONS ARE SUBJECTTOCHANGE WITHOUT NOTICE

2
Table of Contents
Features 3
Precautions ..3
Warning 3
Button&function .4
MainMenu 5
Music Mode .5
Movie Mode 7
RecordMode ..8
Voice Mode ..8
FM Radio Mode .9
Picture Mode ..10
SystemSetting 11
TextMode .. ..12
VideoConversionTool ..12
Trouble Shooting .. 14

3
Features
●1.8-inchTFTdisplay
●128 x160pixelsdisplayresolution
●Earphone included
●Plays AVI (128x160), AMVvideoformat files
●Plays MP3, WMA, WAVaudio formatfiles
●Picture browsingofJPEG format files
●BuiltinMicro-SDcardslot, supports up to16GB
●Built-in350mAhLi-poly battery
●Built-inFM Radio
●Supports TXTE-bookformat
●Mul-language support
●Available inwiderange ofattractive colors
Precautions
Followthese tips topreservetheoperationallifespanofyourDigitalMediaPlayer:
●Itisrecommendedthatyouallowthe batterytofully charge before usingthe
device for the firsttime.Donotrechargeunattendedfor longer than4 hours.
●Donothangthe player byits earphones or cables
●Never force anycable connectors intothe ports ofyour DigitalMediaPlayer
or computer.Alwaysmake sure thatyourcable connectors are identicalinshape
and size before attemptingtoconnect.
●Whendisconnectingyour digitalmediaplayer from acomputer, use the
Safely Remove Device functiononyour computer.Donotdisconnectyour digital
mediaplayer while transmittingdata.
Warning
●Donotuse this player inextreme temperatures.Keepawayfrom extreme hot,
cold, dry, or damp areas.Alsokeepawayfrom water, fire, and radiation.
●Donotdisassemble your digitalmediaplayer.
●Donotallowyoungchildrentouse your player unsupervised.
●Donotinstall unknown/foreignsoftware ontoyour digitalmediaplayer.
4
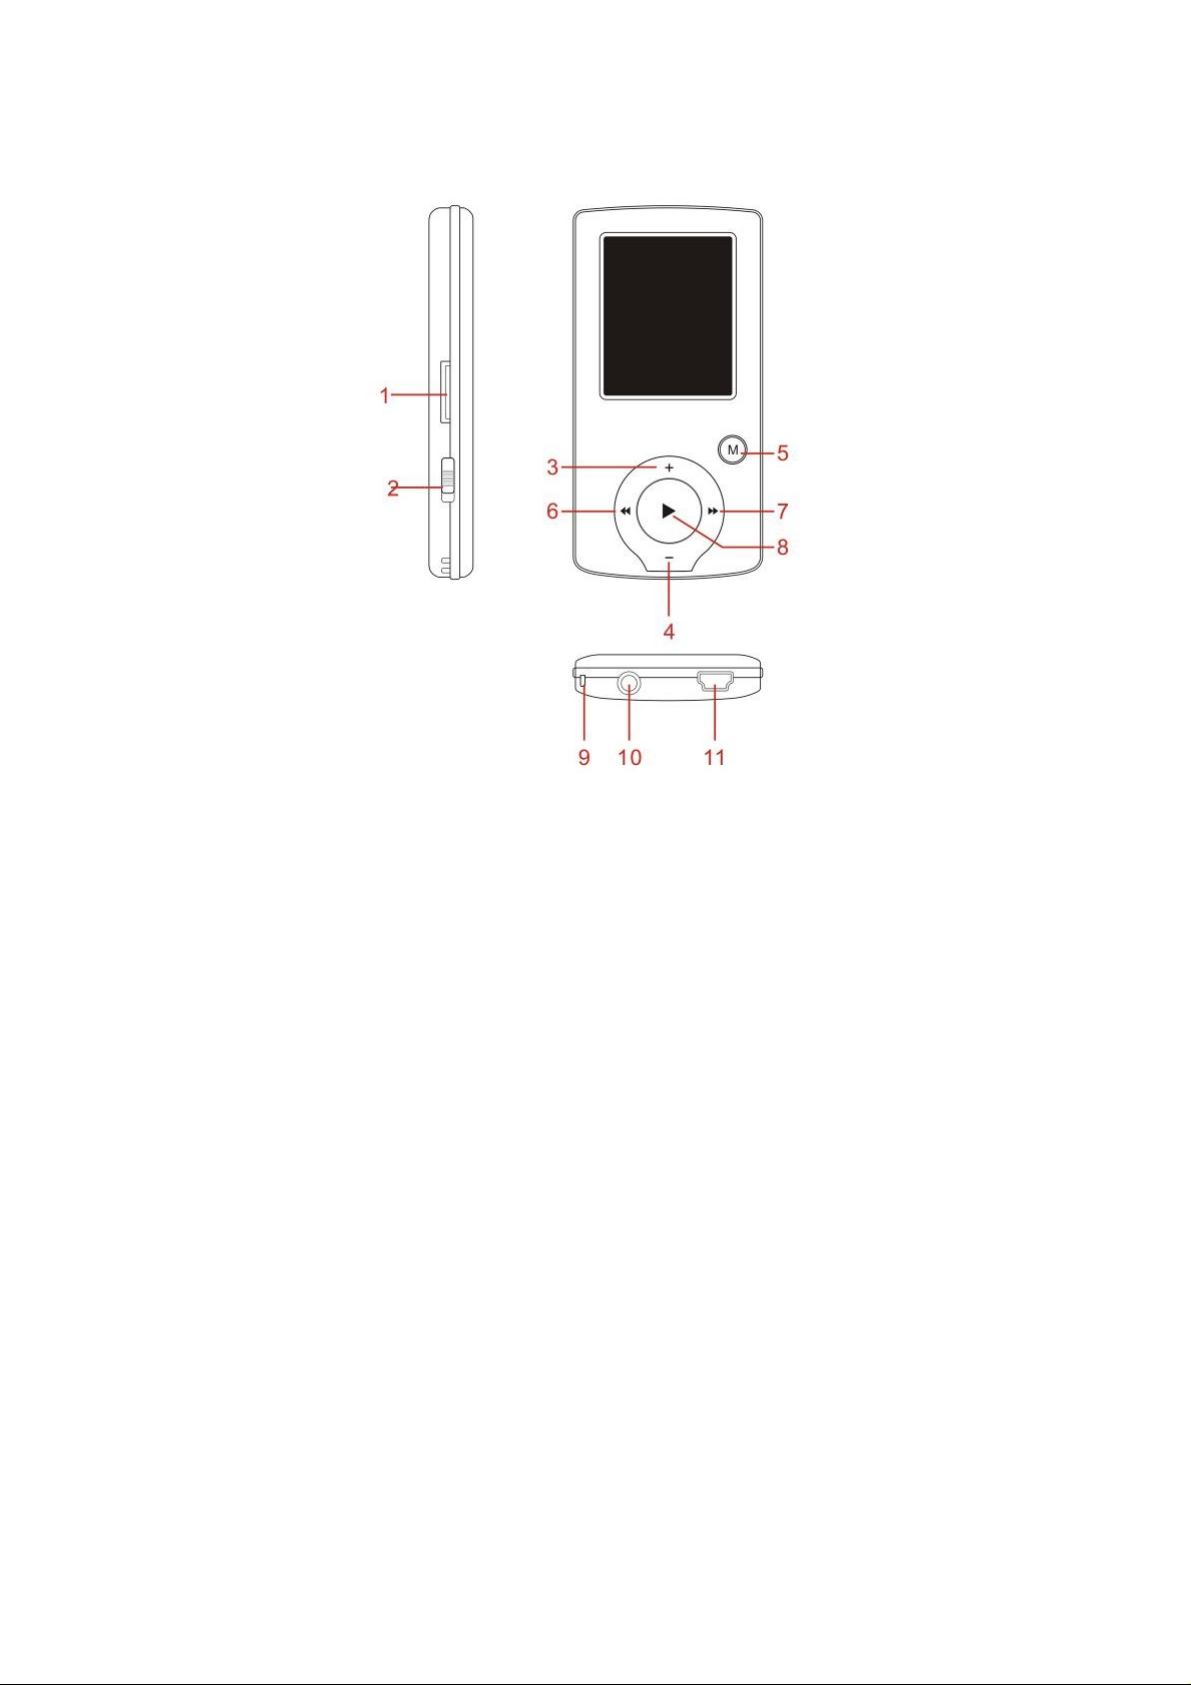
Button&Controls
1.MicroSD Cardslot
2.ON/OFF power switch
3.VOL+
4.VOL-
5.Enter menuandexitfrom sub-menu,confirmselection(under anystatus, hold
[MENU]will enter mainmenu)
6.Last/Backward
7.Next/Forward
8.Play/Pause Power ON/OFF the player
9.Hand strapHole (handstrapnotinclude)
10.Earphone socket
11.USB socket

5
Basic Operation
Power on & Power off:
Power On: Hold (play/stop) buttonfor3 seconds, the player will goto
workingcondition.
Power off: Hold (play/stop) buttonfor 3 seconds, the player will be turnedoff.
Note: whenbatterypower is low, itwill automaticallypower off.
Adjustvolume: WithMP3 mode, AMV/AVI mode, Voice mode, press [VOL-] or
[VOL+]todecrease /increase the volumeone step, while hold[VOL-] or [VOL+]
buttonwill decrease/increase continuously.
ExpansionCard:
Insertthe TFcardtothe MicroSD cardslot. Youcouldsee the Cardfolder inthe
menu.Ifnotwiththe TFcard, There is nocardfolder inthemenu
Charge/Connect/Disconnect fromPC
Connectthe device toPC viaUSB Cable touse itas aRemovable Disk.
Tocharge the deviceor disconnectthe device, Press “Menu button”under USB
connected.
Mainmenu
Hold[MENU]toenter mainmenu. Press [PRE] or [NEXT] toswitchthe modes.
Music
Select “Music”inthe mainmenu
.

Press [MENU]toconfirm selec
tionand thenpress PLAY/STOP[>II]buttontoplay
the song.While music playing,
press [MENU]buttontoenter sub
SelectMUSICmodeinmainm
enu,press [MENU]toconfirmselectionandthen
press PLAY/STOP[>II]buttonto
playthesong.While
buttontoenter sub-menu:
All Songs Display
all the songs
Albumlist Display
the album
Artists Display
the singer ofthe song
Genre Display
the genre ofthe song
Create Playlist Create t
he playlist
Setting
Repeat
Equalizer
Replay
mode Replay
6
select
ionand thenpress PLAY/STOP[>II]
buttontoplay
the song.While music playing, p
ress [MENU]buttontoenter sub-me
nu:
SelectMUSICmodeinmainme
nu,press [MENU]toconfirmselecti
onandthen
press PLAY/STOP[>II]buttonto
playthesong.While musicplaying,p
ress [MENU]
Displaya
ll the songs
Displayt
he album
Displayt
he singer ofthe song
Displayt
he genre ofthe song
Create th
e playlist
Normal,Repeatone;Fold
er;Repeat
Folder; RepeatAll; Random; In
tro.
NATURAL,ROCK,POP,CLASSIC,S
OFT,JAZZ,
DBB
A-Brepeat, when “A”inthe ic
on
blinks, swing[NEXT] toconfirm
start
point, swing[NEXT] as “B”poi
nt .
player will replayfromAtoBa
ccording
tothe settinginthe replaytim
es.(Return
selectionand thenpress PLAY/STOP[>II]bu
ttontoplay
menu:
SelectMUSICmodeinmainmenu,press [MENU]toconfirmselectio
nandthen
musicplaying,pr
ess [MENU]
Normal,Repeatone;Folder
;Repeat
Folder; RepeatAll; Random; Int
ro.
NATURAL,ROCK,POP,CLASSIC,SO
FT,JAZZ,
Brepeat, when “A”inthe ico
n
blinks, swing[NEXT] toconfirm
start
point, swing[NEXT] as “B”point
. The
player will replayfromAtoBacc
ording
tothe settinginthe replaytimes
.(Return

7
toA-Breplaymodebyswing[PRE]
buttoninsuchstatus)
Replaytimes Sethowmanytimesthe A-Bpoint replay
Maximum is 10 times (1-10)
Replaygap setreplaytime gapbetweeneveryreplay
Exit Exitfrom sub-menu
This device supportLyrics display.Tofullydisplaythe contents ofthe song, you
mustmake sure the name ofthe songunder the music folder shouldbe exactly
the same one under LRCfile.e.g
Youput a “song.mp3”inmusic folder; asame name “song.lrc”shouldbe placed
under LRCfile.
Localfolder Indicate the folder ofpresentplayingfile
Delete file Delete the presentplayingsong
Delete All Delete All songs
Ifyouwanttodeleteasongwhile itis playing, press [>II]tostopplaying, then
press Mode button). select “Delete file”, choose the file youwanttodelete,
confirm “Delete”, thenthe screenshowsbelow:
Movie
Select “Movie”inthe mainmenu
Press [MENU]toconfirmselectionand thenpress PLAY/STOP[>II]buttontoplay
the video.While playingvideo.press [MENU]buttontoenter sub-menu.
All the operationis same as Music.

8
RecordMode
Press [MENU]buttontoselectRecordmode inmainmenu, thenpress [MENU]
againenter intorecordingsub-menu.
Localfolder Indicate the folder ofpresentrecordingfile
RECtype: 32KBPS 64KBPS 128KBPS 256KBPS
Exit Exitformsub-menu
After setting,press [>II]tostartrecording.only [>II](play/stop) and[MENU]can
beusedduringrecording.Tostartanewrecordingfile, please press [>II]
(play/stop) buttonshortlywill save presentrecordingfile.
Notedthatthisdevice supports99 voice recordingfiles storageineachdirectory.
Ifthescreendisplays “outofspace”,whichindicates thecurrentdirectoryhas
alreadysaved99 voice recordingfiles, the user needtochange toanewdirectory.
Voice
Press [PRE] or [NEXT]toselectthe Voice mode, thenpress [MENU]toconfirmthe
selection, press [>II]toplaythe recordingfile.
Press [>II]buttontopause playback, swing[PRE] or [NEXT] buttontoselect
recordingfiles.

9
Sub-menuwhile playingstatus:
Repeat Refers to repeat”inmusicmode
Replaymode Refers to “replay”inmusic mode
Exit Exitfrom sub-menu
Sub-menuwhile stopstatus:
Localfolder Indicate the folder ofpresentrecordingfile
DeleteDelete recordingsong
Delete All Delete all recordingfiles
exit Exitfrom the sub-menu
FM mode
Select[PRE] or [NEXT] buttontochoose FM mode andpress [MENU]toconfirm.
Press [>II](play/stop)tosave channel.Ifnochannelis saved,youcanlookfor
channels byautoormanualsearching.Press [MENU]againtogetsub-menu as
below:
Save Save currently tunedfrequency;
Record Recordcurrentpresetchannel;
Delete delete currentpresetchannel;

10
Delete All delete all savedchannels;
AutoSearch AutosearchFM channel
NormalBand Frequencies from 87.5MHz---108MHz;
JapanBand frequencies from76.5MHz---90MHz;
Exit exitfrom FM sub-menu
Autosearch:Holding[PRE] buttonor[NEXT] buttonfortwosecondswill tune
frequencyupwardordownwarduntilaradio stationislocatedthenitstop
automatically.
Manualsearch:swing[PRE] or[NEXT]buttontosearchchannelupwardor
downwardone-stepNotice:Normalband andJapanband canstore20preset
channels respectively.
Picture
Select[PRE] or [NEXT] buttontoselectPicture mode, thenpress [MENU]to
confirm.
Press [MENU]buttonagaintoenter sub-menu:
localfolder choose the folder where picture is saved;
playbackset manualplayor autoplay(there is atime gapfor auto
playfrom1-10 seconds)
Delete file Delete picture;
Delete All Delete all pictures
exit Exitfrom sub-menu
Press [>II](play/stop)buttontodisplaythe picture automatically or manually
accordingtoprevious playingsetting.

11
SYS Setup
Select[PRE] or [NEXT] buttontoselectSYSSetup, thenpress[MENU]toconfirm,
Press [MENU]buttonagaintoenter sub-menu:
Recordtime
Press [MENU]toeditrecordingtime.Swing[NEXT] buttonand
the digitofyear will increase; swing[VOL+]buttontoeditnext
digit, push[PRE] or [NEXT] buttontoadjustthedigit. Press
[MENU]toconfirmthe setting
LCD set
Always light
10 Sec
20 Sec
30 Sec
Language Simple Chinese, English, TradChinese, Japanese, French,
German, Italian, Dutch, Portuguese, Spanish, Swedish, Czech,
Denmark, Polishetc.
Power off
Off time: setself-power off timewhenthe player is stopped
and nobuttonis pressed. The timeunitis seconds.0 means
setoff the function.
Sleeptime: setself-power offtime after lastkeypressed,
regardless ofwhether the player is active or stopped. The time
unitis minutes.
Online modeMultiDrive; Normalonly; Encryptedonly
Memoryinfo. Checkthe memorysize and the remainingmemory
Firmware
version Displaythe player’s firmware version
Firmware
upgrade Firmware canbe upgradedviaconnectiontoPC
Exit Exitfrom the sub-menu

12
TEXT
Select[PRE] or [NEXT] buttontoselectText, thenpress [MENU]toconfirm,
Enter TEXTmodebypressingMode button,thenyoucanreadandeditthearticle
inthedevice.The device only canrecognize the article in “txt.”Format.
Press [MENU]buttonagaintoenter sub-menu:
localfolder choose the folder where picture is saved
playbackset manualplayor autoplay(there is atime gapfor auto
playfrom1-10 seconds)
Delete file Delete picture
Delete all Delete all pictures
Exit Exitfrom sub-menu
Video ConversionTool
Please followthe steps here belowtoinstallthe videoconversiontool.
Unzipthe “VideoConversionTool.rar”whichis storedininternalmemory, Click
onRunSetup.exe tostartthe installationprocess, youmayfindatool named
“AMV/AVI converttool “, clickandopenit, there is awindowappears, choose the
file youwanttoconvert, thenchoose thefolder youwanttoput the new
convertedfile, click “startconverting”is ok.
Video ConversionSteps
1) Unzipthe file, and double clicktothe Setup.exe andinstall it.
2) Double clicktothe Amvtransform.exe.
(folder –ProgramFiles\MediaPlayer Utilities 4.41\AMVConverter)
3) Thenyoucouldsee the below:

13
4) Clicktothe Input file and choose the
videowhichyouneedtoconvert.
5) Clickto for settings.
Choose the AMVandthe resolution
160x120.
6) Clickto for conversion.

14
TroubleShooting
Nopower Checkbatterylevel.
Recharge as per directions inUser Manual
Unable tolocate
or playfiles Checkthatthe file isinacompatible format
Checktosee ifthe file is storedinadifferent directory.
Nomusic is heard
inthe earphones
Checkthe volume level
Checkthe connection(earphone tothe earphone jack)
Checkifyour music file is compatible withyour MP3
player.
Notcharging Checktomake sure thatyour DigitalMediaPlayer is
connectedtoaUSBportonyour computer.
Unable to
downloadmusic.
Checkifyouhave enoughspace onyourDigitalMedia
Player todownloadthe music file.
Checktomake sure thatthe USBcable is connectedtothe
PC andtothe DigitalMediaPlayer.
Computer not
recognizingDigital
MediaPlayer
Checkthatthe USBcable is properlyconnectedtoyour
computer.
Trypluggingthe USBcable intoone ofthe backports of
your computer.
Other manuals for NMP4
1
Table of contents
Other Nikkei Media Player manuals


