Niko 78200 Series User manual

PMXXX-78200R17405 nv Niko sa Industriepark West 40, BE-9100 Sint-Niklaas, Belgium — tel. +32 3 778 90 00 — fax +32 3 777 71 20 — e-mail: support@niko.eu — www.niko.eu NL
XXX-78200
Lees de volledige handleiding vóór installatie en ingebruikname.Bewaar deze handleiding zorgvuldig
voor later gebruik.
1. BESCHRIJVING
Deze digitale tijdschakelaar behoort tot het Niko productgamma van sensoren en actoren. Dit gamma biedt
een aantal comfortfuncties in combinatie met verschillende schakelfuncties.
De aansturing verloopt via een sensor en een actor:
• Een sensor (A) is de zichtbare elektronische component die – automatisch of na manuele bediening –
een uit te voeren schakelcommando naar de aangesloten actor stuurt. Deze component is verkrijgbaar
in alle Niko afwerkingen en kleuren. De sensor wordt op de actor geklikt.
• Met een actor (B) wordt de schakelcomponent bedoeld die de gevraagde handeling afkomstig van de
aangesloten sensor uitvoert zoals het licht schakelen of het omhoog sturen van een rolluik/zonwering.
Dit onderdeel bevindt zich achter de sensor in de inbouwdoos.
De tijdschakelaar (sensor) is uitsluitend geschikt voor gebruik binnenshuis en kan worden gecombineerd
met de volgende actoren:
• 420-00100: sokkel met schakelcontact (10 A, 230 V)
•
420-00200: sokkel met potentiaalvrij contact (4 A, 230 V) waarop een externe drukknop kan
worden aangesloten
• 420-00300: sokkel met twee schakelcontacten (4 A, 230 V) waarop een externe drukknop kan
worden aangesloten
• 420-00400: tweedraadse sokkel (40 – 400 W, 230 V) waarop een externe drukknop kan worden
aangesloten
• 430-00500: Nikobus sokkel
A
B
10A
R,L,C
420-0010X
XXX-78200
4A
R,L
420-0020X
40 - 400W
R
420-0040X 430-0050X
4A
4A
R,L
420-0030X
EXT1EXT1 EXT1 EXT2
EXT2
EXT1
2. ONDERDELEN
2.1. Bedieningstoetsen
Bedieningstoets Functie
schakeltoestand van kanaal 1 wijzigen
schakeltoestand van kanaal 2 wijzigen
dag kiezen1
tijd weergeven
programmeren1
keuze van de uitgang2
reset3
1Enkel gebruiken bij ingebruikname of programmering van de digitale tijdschakelaar.
2Enkel in combinatie met 430-00500 en 420-00300.
3Deze toets niet indrukken met scherpe metalen voorwerpen.
2.2. Display
1 2 3 4 5 6 7
Prog.
88
88:88
C 1 C2
Symbool Functie
1 huidige dag (1 = maandag, 2 = dinsdag, …)
2programmeermode
3 mode voor dag- en tijdsinstelling
4manuele bediening geactiveerd
5: kanaal is niet geschakeld (uit)
: kanaal is geschakeld (aan)
6automatische mode: kanaal wordt automatisch geschakeld; er is een programma actief
7geheugenplaats
3. PROGRAMMERING
De tijdschakelaar keert automatisch terug naar het startscherm als je gedurende 30 seconden geen actie uitvoert
tijdens de programmering.
3.1. Basisinstellingen
De basisinstellingen zijn:
• het aantal kanalen (1 of 2) dat moet worden bediend.
• dag en tijd.
Als je voor de eerste keer de spanning inschakelt (ingebruikname) of telkens na een reset moet je deze
instellingen programmeren.
A. Aantal kanalen instellen
Je kunt de sensor gebruiken in combinatie met een eenkanaals- of tweekanaalsactor. Daarom moet je het
aantal kanalen (1 of 2) instellen dat je kunt bedienen.
Bij ingebruikname of na een reset verschijnen alle symbolen en segmenten kort op het display. Daarna
verschijnt “CH:01” op het display.
Je moet het aantal kanalen slechts eenmaal instellen. Je hoeft dit niet te herhalen na een stroomonderbreking.
Stap Actie Resultaat
1Druk op of . Je stelt het aantal kanalen (1 of 2) in.
2Druk op .Je selectie wordt bevestigd.
Je keert terug naar het startscherm.
B. Dag en tijd instellen
Stap Actie Resultaat
1Druk drie seconden op om de mode te
activeren voor de instelling van dag en tijd.*
De tijd en de dag knipperen.
2Druk op .Je stelt de dag in: 1 = maandag,
2 = dinsdag, …
3Druk op of . Je stelt de tijd in:
• kort drukken: per minuut
•
lang drukken: per vijf minuten en
daarna per uur
4Druk op .De ingestelde dag en tijd worden bevestigd.
Je keert terug naar het startscherm.
*Na een langdurige stroomonderbreking springt de tijdschakelaar automatisch naar de mode om dag en tijd
in te stellen. Ga meteen naar stap 2.
3.2. Dag- of weekprogramma’s instellen (automatische mode)
De tijdschakelaar kan handelingen automatisch – programmagestuurd – uitvoeren. Hiervoor beschikt het
toestel over 24 schakelcommando’s. Elk commando bevat:
• het tijdstip waarop moet worden geschakeld (schakelmoment).
• de dag(en) wanneer het commando van toepassing is.
• de gewenste stand van het kanaal of de kanalen.
Een schakelcommando toevoegen
Stap Actie Resultaat
1Druk drie seconden op .Je gaat naar de programmeermode.
Het eerste schakelcommando (01) verschijnt.
2Druk kort op … … tot het gewenste weekblok of de gewenste dag
verschijnt. In volgorde:
- 1234567 = hele week (maandag tot zondag)
- 123456 = lange werkweek (maandag tot zaterdag)
- 12345 = korte werkweek (maandag tot vrijdag)
- 567 = lang weekend (vrijdag tot zondag)
- 67 = kort weekend (zaterdag en zondag)
- 1 = maandag, 2 = dinsdag (afzonderlijke dagen)
3Druk op of . Je stelt het uur in waarop de handeling moet worden
uitgevoerd:
• kort drukken: per minuut
•
lang drukken: per vijf minuten en daarna per uur
4Druk kort op … … tot de gewenste schakeltoestand van het kanaal/
de kanalen verschijnt. In volgorde:
C1
UIT
AAN
UIT
AAN
UIT
AAN
-
-
C2
UIT
UIT
AAN
AAN
-
-
UIT
AAN
5Druk op .*De volgende geheugenplaats wordt opgeroepen.
6Druk op .Je keert terug naar het startscherm.
*Selecteer je de geheugenplaats na een vrije geheugenplaats, dan verschijnt het aantal geheugenplaatsen
die nog vrij zijn. Voorbeeld: rE:21 = er zijn nog 21 geheugenplaatsen vrij.
➍
➊
➋
➌
➐ ➏➎
08 : 15

NL nv Niko sa Industriepark West 40, BE-9100 Sint-Niklaas, Belgium — tel. +32 3 778 90 00 — fax +32 3 777 71 20 — e-mail: support@niko.eu — www.niko.eu PMXXX-78200R17405
XXX-78200
Een schakelcommando wijzigen
Stap Actie Resultaat
1Druk drie seconden op .Je gaat naar de programmeermode.
Het eerste schakelcommando (01) verschijnt.
2Druk kort op …
…tot jehet tewijzigen schakelcommando geselecteerd
hebt.
3Druk kort op … … tot het gewenste weekblok of de gewenste dag
verschijnt. In volgorde:
- 1234567 = hele week (maandag tot zondag)
- 123456 = lange werkweek (maandag tot zaterdag)
- 12345 = korte werkweek (maandag tot vrijdag)
- 567 = lang weekend (vrijdag tot zondag)
- 67 = kort weekend (zaterdag en zondag)
- 1 = maandag, 2 = dinsdag (afzonderlijke dagen)
4Druk op of . Je stelt het uur in waarop de handeling moet worden
uitgevoerd:
• kort drukken: per minuut
•
lang drukken: per vijf minuten en daarna per uur
5Druk kort op … … tot de gewenste schakeltoestand van het kanaal/
de kanalen verschijnt. In volgorde:
C1
UIT
AAN
UIT
AAN
UIT
AAN
-
-
C2
UIT
UIT
AAN
AAN
-
-
UIT
AAN
6Druk op .Je keert terug naar het startscherm.
Een schakelcommando wissen
Stap Actie Resultaat
1Druk drie seconden op .Je gaat naar de programmeermode.
Het eerste schakelcommando (01) verschijnt.
2Druk kort op … … tot je het te verwijderen schakelcommando
geselecteerd hebt.
3Druk gelijktijdig op en . De inhoud van de geselecteerde geheugenplaats
wordt verwijderd.
4Druk op .Je keert terug naar het startscherm.
3.3. Reset
Jewist alleingevoerdeprogramma’seninstellingen.Detijdschakelaarkeertterugnaar defabrieksinstellingen.
Stap Actie Resultaat
1Houd ingedrukt en druk kort
op .
Alle programma’s en instellingen worden gewist.
De mode voor kanaalinstelling is geactiveerd.
2Druk op of . Je stelt het aantal kanalen in.
3Druk op .Je selectie wordt bevestigd.
Je keert terug naar het startscherm.
4. WERKING EN GEBRUIK
A. Manuele mode
De schakeltoestand kun je op elk moment tijdelijk manueel wijzigen, ook terwijl er een automatisch programma
(automatische mode) loopt.
Stap Actie Resultaat
1Druk kort op .Je wijzigt de schakeltoestand van kanaal 1.
2Druk kort op .Je wijzigt de schakeltoestand van kanaal 2.
Een knipperende C1/C2 met handsymbool ( ) geeft aan dat je het desbetreffende kanaal manueel aangepast
hebt ten opzichte van het programma. Deze toestand is tijdelijk.De tijdschakelaar bevindt zich in manuele mode.
Bij de eerstvolgende verandering die het programma voorziet, wordt de automatische mode opnieuw geactiveerd.
De automatisch geactiveerde schakeltoestand wordt aangegeven met een klokje ( ) bij het kanaal/de kanalen.
B. Permanente mode
Houd of exact drie seconden ingedrukt om de automatische mode uit te schakelen en de manueel
geselecteerde schakeltoestand van het kanaal/de kanalen permanent in te stellen. De geprogrammeerde
schakeltijden veranderen de schakeltoestand niet. De tijdschakelaar bevindt zich nu in permanente mode: C1/
C2 met handsymbool ( ) knippert niet maar brandt permanent.
Als je blijft drukken op of , doorloop je de verschillende modi in onderstaande volgorde:
• permanente mode aan
• permanente mode uit
• automatische mode aan
• permanente mode aan
• …
Druk kort op of om de permanente mode uit te schakelen en terug te keren naar de manuele mode.
C. Functies met externe drukknop
Je kunt de sensor ook bedienen vanop verschillende locaties.
Op de actor kun je één of twee externe drukknoppen aansluiten tussen L en respectievelijk E1 en E2:
• Het contact tussen L en E1 heeft dezelfde functie als .
• Het contact tussen L en E2 heeft dezelfde functie als .
D. In combinatie met Nikobus
Bij de toevoeging of programmering van alle andere Nikobus functies moet je alle sensoren van de actoren
verwijderen.Voordat je de sensor programmeert,plaats je de sensor op de actor en kun je kanaal 1 en 2 manueel
bedienen zodat er een schakelcommando gestuurd wordt op Nikobus.
5. PROBLEEMOPLOSSING
In geval van storingen druk je kort op .
De tijdschakelaar start opnieuw op. De instellingen blijven bewaard.
6. TECHNISCHE GEGEVENS
aantal schakelcommando’s max. 24
min. omschakeltijd 1 minuut
gangreserve (beschikbaar na werking van 12 uur) klok werkt 30 minuten verder
inbouwhoogte 0,8 – 1,5 m
omgevingstemperatuur 0 – 40°C
bewaartemperatuur -25 – 75°C
7. WAARSCHUWINGEN VOOR INSTALLATIE
- De installatie moet worden uitgevoerd door een erkend installateur en volgens de geldende voorschriften.
- Deze handleiding moet aan de gebruiker worden overhandigd. Het moet bij het dossier van de elektrische
installatieworden gevoegden wordenovergedragen aaneventuele nieuweeigenaars. Bijkomendeexemplaren
zijn verkrijgbaar via de website of supportdienst van Niko. Op de Niko website is altijd de meest recente
handleiding van het product terug te vinden.
- Tijdens de installatie moet rekening gehouden worden met (niet-limitatieve lijst):
- de geldende wetten, normen en reglementen.
- de stand van de techniek op het moment van de installatie.
- deze handleiding die alleen algemene bepalingen vermeldt en moet worden gelezen in het kader van elke
specifieke installatie.
- de regels van goed vakmanschap.
Dit product voldoet aan alle toepasselijke Europese richtlijnen en verordeningen. Indien van toepassing, vind je
de EG-verklaring van overeenstemming met betrekking tot dit product op www.niko.eu.
8. NIKO SUPPORT
Heb je twijfel? Of wil je het product omruilen in geval van een eventueel defect? Neem dan contact op met je
groothandel of de Niko supportdienst:
• België: +32 3 778 90 80
• Nederland: +31 880 15 96 00
Contactgegevens en meer informatie vind je op www.niko.eu onder de rubriek “Hulp en advies”.
9. GARANTIEBEPALINGEN
- De garantietermijn bedraagt vier jaar vanaf leveringsdatum. Als leveringsdatum geldt de factuurdatum van
aankoop van het product door de consument. Als er geen factuur voorhanden is, geldt de productiedatum.
- De consument is verplicht Niko schriftelijk te informeren over het gebrek aan overeenstemming, en dit uiterlijk
binnen de twee maanden na vaststelling.
- In geval van een gebrek aan overeenstemming heeft de consument alleen recht op een kosteloze herstelling
of vervanging van het product, wat door Niko bepaald wordt.
- Niko is niet verantwoordelijk voor een defect of schade als gevolg van een foutieve installatie, oneigenlijk of
onachtzaam gebruik, een verkeerde bediening, transformatie van het product, onderhoud in strijd met de
onderhoudsvoorschriften of een externe oorzaak zoals vochtschade of schade door overspanning.
-
De dwingende bepalingen in de nationale wetgeving over de verkoop van consumptiegoederen en de
bescherming van consumenten in landen waar Niko rechtstreeks of via zuster- of dochtervennootschappen,
filialen, distributeurs, agenten of vaste vertegenwoordigers verkoopt, hebben voorrang op bovenstaande
bepalingen.

PMXXX-78200R17405 nv Niko sa Industriepark West 40, BE-9100 Sint-Niklaas, Belgium — tel. +32 3 778 90 00 — fax +32 3 777 71 20 — e-mail: support@niko.eu — www.niko.eu FR
XXX-78200
Veuillez lire le mode d’emploi entièrement avant l’installation et la mise en service. Veuillez conserver
ce mode d’emploi afin de pouvoir le consulter ultérieurement.
1. DESCRIPTION
Cette minuterie numérique appartient à la gamme de capteurs et d’actuateurs de Niko. Cette gamme offre
diverses fonctions de confort en combinaison avec différentes fonctions de commutation.
La commande s’effectue au moyen d’un capteur et d’un actuateur :
• Un capteur(A) estlecomposant électroniquevisible quienvoieà l’actuateurconnecté– automatiquement
ou après une commande manuelle – un ordre de commutation à exécuter. Ce composant est disponible
dans toutes les finitions et couleurs Niko.Le capteur se fixe sur l’actuateur.
• Un actuateur (B) est le composant de commutation qui exécute l’action ordonnée par le capteur
connecté, p.ex. allumer l’éclairage ou remonter un volet/store. Ce composant se trouve derrière le
capteur dans la boîte d’encastrement.
La minuterie (capteur) est exclusivement destinée à une utilisation à l’intérieur et peut être combinée avec
les actuateurs suivants :
• 420-00100 : socle avec contact de commutation (10 A, 230 V)
•
420-00200 : socle avec contact libre de potentiel (4 A, 230 V), sur lequel un bouton-poussoir
externe peut être raccordé
• 420-00300 : socle avec deux contacts de commutation (4 A, 230 V), sur lequel un bouton-poussoir
externe peut être raccordé
• 420-00400 : socle à deux fils (40 – 400 W, 230 V), sur lequel un bouton-poussoir externe peut
être raccordé
• 430-00500 : socle Nikobus
A
B
10A
R,L,C
420-0010X
XXX-78200
4A
R,L
420-0020X
40 - 400W
R
420-0040X 430-0050X
4A
4A
R,L
420-0030X
EXT1EXT1 EXT1 EXT2
EXT2
EXT1
2. COMPOSANTS
2.1. Touches de commande
Touche de commande
Fonction
modifier le statut de commutation du canal 1
modifier le statut de commutation du canal 2
sélectionner le jour1
afficher l’heure
programmer1
sélectionner la sortie2
réinitialiser3
1À utiliser uniquement lors de la mise en service ou de la programmation de la minuterie numérique.
2Uniquement en combinaison avec 430-00500 et 420-00300.
3Ne pas appuyer sur cette touche à l’aide d’objets métalliques pointus.
2.2. Écran
1 2 3 4 5 6 7
Prog.
88
88:88
C 1 C2
Symbole Signification
1 jour actuel (1 = lundi, 2 = mardi, etc.)
2mode de programmation
3 mode de réglage du jour et de l’heure
4commande manuelle activée
5: le canal n’est pas commuté (désactivé)
: le canal est commuté (activé)
6 mode automatique : le canal est commuté automatiquement; un programme est actif
7emplacement mémoire
3. PROGRAMMATION
Si vous n’exécutez aucune action pendant 30 secondes lors de la programmation, la minuterie revient
automatiquement à l’écran de départ.
3.1. Réglages de base
Les réglages de base sont les suivants :
• nombre de canaux (1 ou 2) à commander.
• jour et heure.
Vous devez programmer ces réglages après la mise sous tension de l’appareil pour la première fois (mise en
service) ou après chaque réinitialisation.
A. Réglage du nombre de canaux
Vous pouvez utiliser le capteur en combinaison avec un actuateur à un canal ou à deux canaux. Pour ce faire,
vous devez régler le nombre de canaux (1 ou 2) à commander.
Lors de la mise en service ou après une réinitialisation, tous les symboles et segments apparaissent brièvement
à l’écran. Ensuite, “CH:01” s’affiche.
Vous ne devez régler le nombre de canaux qu’une seule fois. Vous ne devez pas procéder de nouveau à ce
réglage après une panne de courant.
Étape Action Résultat
1Appuyez sur ou . Vous réglez le nombre de canaux (1 ou 2).
2Appuyez sur .Votre sélection est confirmée.
Vous revenez à l’écran de départ.
B. Réglage du jour et de l’heure
Étape Action Résultat
1Appuyez pendant trois secondes sur afin
d’activer le mode de réglage du jour et de
l’heure.*
L’heure et le jour clignotent.
2Appuyez sur .Vous réglez le jour : 1 = lundi, 2 = mardi,
etc.
3Appuyez sur ou . Vous réglez l’heure :
• pression brève : par minute
• pression longue : par cinq minutes,
puis par heure
4Appuyez sur .Le jour et l’heure réglés sont confirmés.
Vous revenez à l’écran de départ.
*Après une panne de courant de longue durée, la minuterie passe automatiquement au mode de réglage du
jour et de l’heure. Allez immédiatement à l’étape 2.
3.2. Réglage de programmes quotidiens ou hebdomadaires (mode automatique)
La minuterie peut exécuter des actions automatiquement (commandées par un programme). Pour ce faire,
l’appareil dispose de 24 commandes de commutation. Chaque commande contient :
• l’heure de commutation (moment de commutation).
• le ou les jours auxquels la commande s’applique.
• l’état souhaité du ou des canaux.
Ajout d’une commande de commutation
Étape Action Résultat
1Appuyez pendant trois secondes
sur .
Vous passez en mode de programmation.
La première commande de commutation (01) apparaît.
2Appuyez brièvement sur … … jusqu’à ce que le bloc de la semaine ou le jour
souhaité apparaisse. Dans l’ordre :
- 1234567 = semaine complète (du lundi au dimanche)
-
123456 =semainede travail longue(du lundiau samedi)
-
12345= semaine de travailcourte (du lundi au vendredi)
- 567 = week-end long (du vendredi au dimanche)
- 67 = week-end court (samedi et dimanche)
- 1 = lundi, 2 = mardi (jours individuels)
3Appuyez sur ou . Vous réglez l’heure à laquelle l’action doit être
exécutée :
• pression brève : par minute
•
pressionlongue :parcinqminutes,puisparheure
4Appuyez brièvement sur … … jusqu’à ce que le statut de commutation souhaité
du canal/des canaux apparaisse. Dans l’ordre :
C1
DESACTIVE
ACTIVE
DESACTIVE
ACTIVE
DESACTIVE
ACTIVE
-
-
C2
DESACTIVE
DESACTIVE
ACTIVE
ACTIVE
-
-
DESACTIVE
ACTIVE
5Appuyez sur .*Vous appelez l’emplacement mémoire suivant.
6Appuyez sur .Vous revenez à l’écran de départ.
*
Sivous sélectionnez l’emplacementmémoire suivantun emplacementmémoire libre,lenombre d’emplacements
mémoires encore libres apparaît. Exemple : rE:21 = il reste 21 emplacements mémoires libres.
➍
➊
➋
➌
➐ ➏➎
08 : 15

FR nv Niko sa Industriepark West 40, BE-9100 Sint-Niklaas, Belgium — tel. +32 3 778 90 00 — fax +32 3 777 71 20 — e-mail: support@niko.eu — www.niko.eu PMXXX-78200R17405
XXX-78200
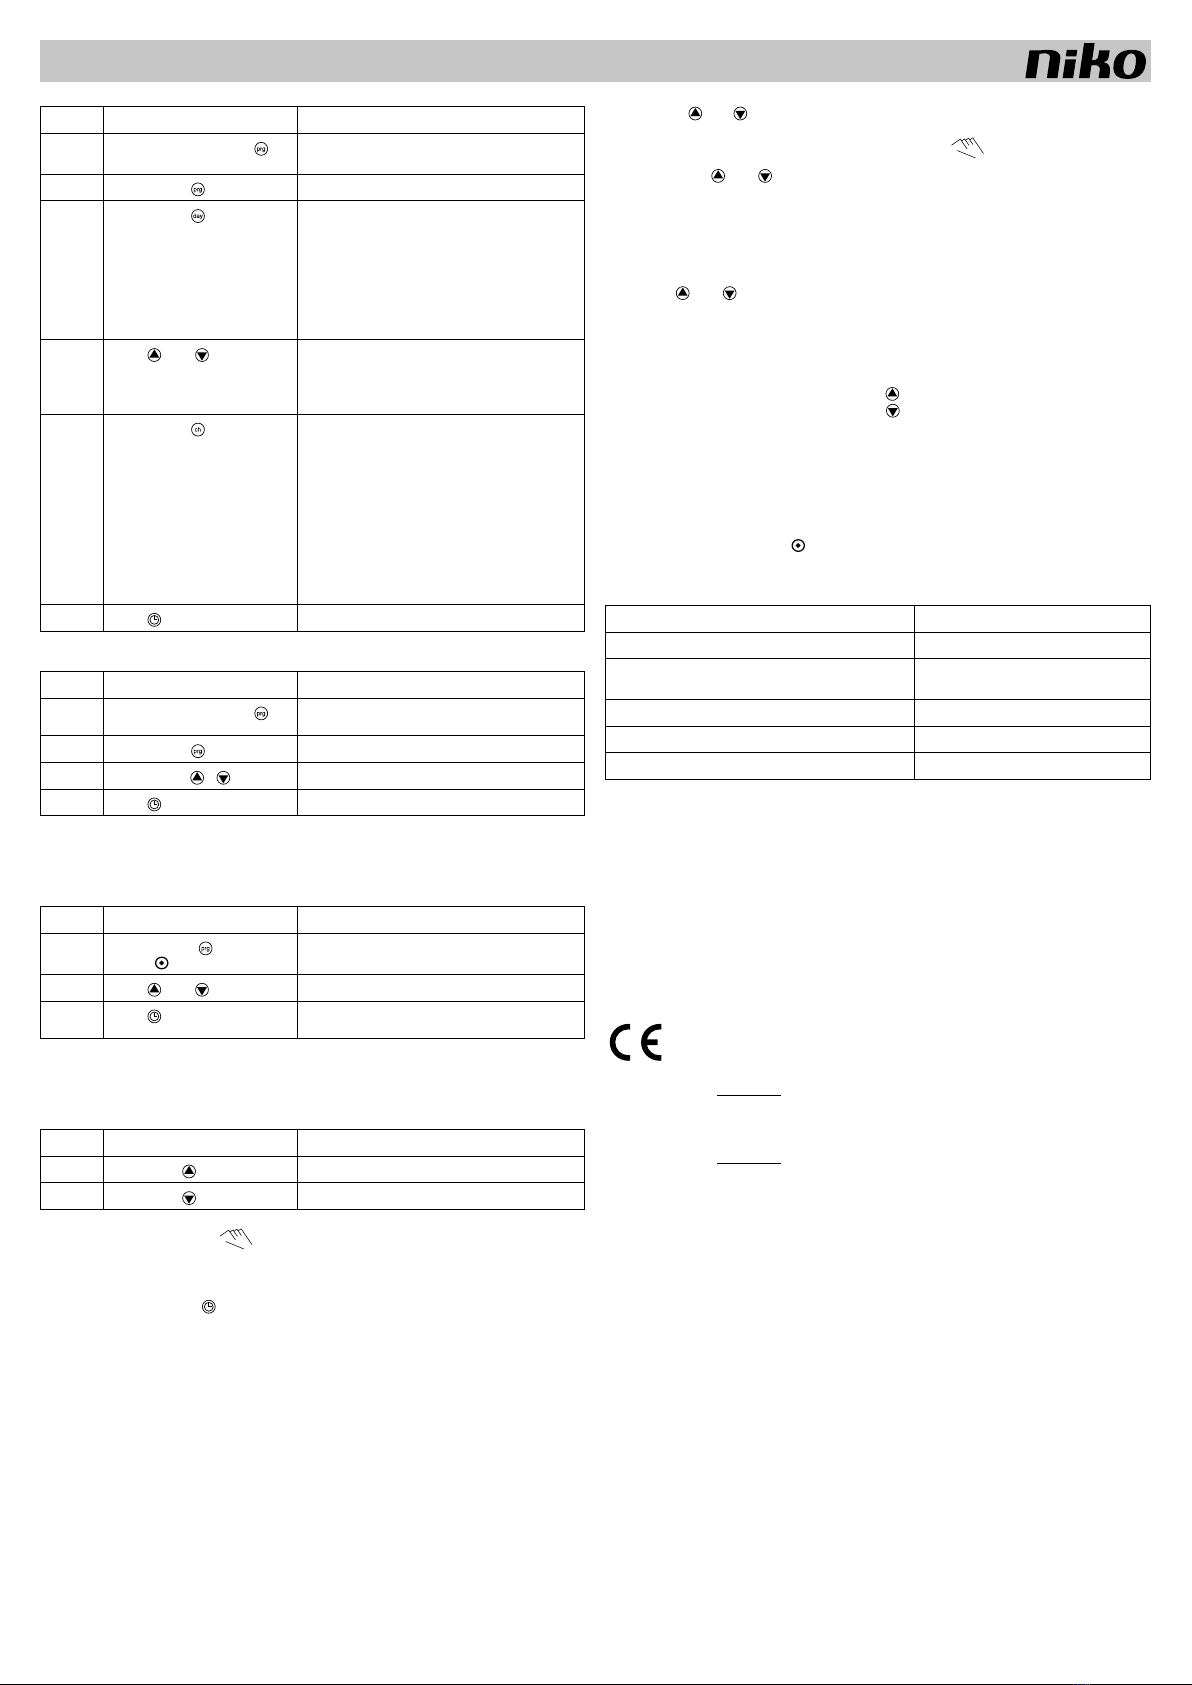
Modification d’une commande de commutation
Étape Action Résultat
1Appuyez pendant trois secondes
sur .
Vous passez en mode de programmation.
La première commande de commutation (01) apparaît.
2Appuyez brièvement sur … … jusqu’à ce que vous ayez sélectionné la commande
de commutation à modifier.
3Appuyez brièvement sur … … jusqu’à ce que le bloc de la semaine ou le jour
souhaité apparaisse. Dans l’ordre :
- 1234567 = semaine complète (du lundi au dimanche)
-
123456 =semainede travail longue(du lundiau samedi)
-
12345= semaine de travailcourte (du lundi au vendredi)
- 567 = week-end long (du vendredi au dimanche)
- 67 = week-end court (samedi et dimanche)
- 1 = lundi, 2 = mardi (jours individuels)
4Appuyez sur ou . Vous réglez l’heure à laquelle l’action doit être
exécutée :
• pression brève : par minute
•
pressionlongue :parcinqminutes,puisparheure
5Appuyez brièvement sur … … jusqu’à ce que le statut de commutation souhaité
du canal/des canaux apparaisse. Dans l’ordre :
C1
DESACTIVE
ACTIVE
DESACTIVE
ACTIVE
DESACTIVE
ACTIVE
-
-
C2
DESACTIVE
DESACTIVE
ACTIVE
ACTIVE
-
-
DESACTIVE
ACTIVE
6Appuyez sur .Vous revenez à l’écran de départ.
Effacement d’une commande de commutation
Étape Action Résultat
1Appuyez pendant trois secondes
sur .
Vous passez en mode de programmation.
La première commande de commutation (01) apparaît.
2Appuyez brièvement sur … … jusqu’à ce que vous ayez sélectionné la commande
de commutation à supprimer.
3Appuyez simultanément sur
et .
Le contenu de l’emplacement mémoire sélectionné
est effacé.
4Appuyez sur .Vous revenez à l’écran de départ.
3.3. Réinitialisation
Vous effacez tous les programmes et réglages mémorisés. La minuterie revient aux réglages d’usine.
Étape Action Résultat
1Maintenez enfoncé et appuyez
brièvement sur .
Tous les programmes et réglages sont effacés.
Le mode de réglage du canal est activé.
2Appuyez sur ou . Vous réglez le nombre de canaux.
3Appuyez sur .Votre sélection est confirmée.
Vous revenez à l’écran de départ.
4. FONCTIONNEMENT ET UTILISATION
A. Mode manuel
Vous pouvez modifier le statut de commutation manuellement à tout moment, de manière temporaire, y compris
pendant l’exécution d’un programme automatique (mode automatique).
Étape Action Résultat
1Appuyez brièvement sur .Vous modifiez le statut de commutation du canal 1.
2Appuyez brièvement sur .Vous modifiez le statut de commutation du canal 2.
L’indication C1/C2 qui clignote, accompagnée d’un symbole représentant une main ( ) indique que vous
avez modifié manuellement le canal en question par rapport au programme. Cette situation est temporaire. La
minuterie se trouve en mode manuel.
Lors de la prochaine modification prévue par le programme, le mode automatique sera réactivé. Le statut de
commutation activé automatiquement est indiqué au moyen d’une petite horloge ( ) à côté du canal/des canaux.
B. Mode permanent
Maintenez ou enfoncé pendant trois secondes exactement afin de désactiver le mode automatique
et de régler de manière permanente le statut de commutation sélectionné manuellement du canal/des canaux.
Les heures de commutation programmées ne modifient pas le statut de commutation. La minuterie se trouve à
présent en mode permanent : l’indication C1/C2, accompagnée d’un symbole représentant une main
( ), ne clignote pas mais est allumée en permanence.
Si vous continuez à appuyer sur ou , vous passez en revue les différents modes dans l’ordre suivant :
• mode permanent activé
• mode permanent désactivé
• mode automatique activé
• mode permanent activé
• …
Appuyez brièvement sur ou pour désactiver le mode permanent et revenir au mode manuel.
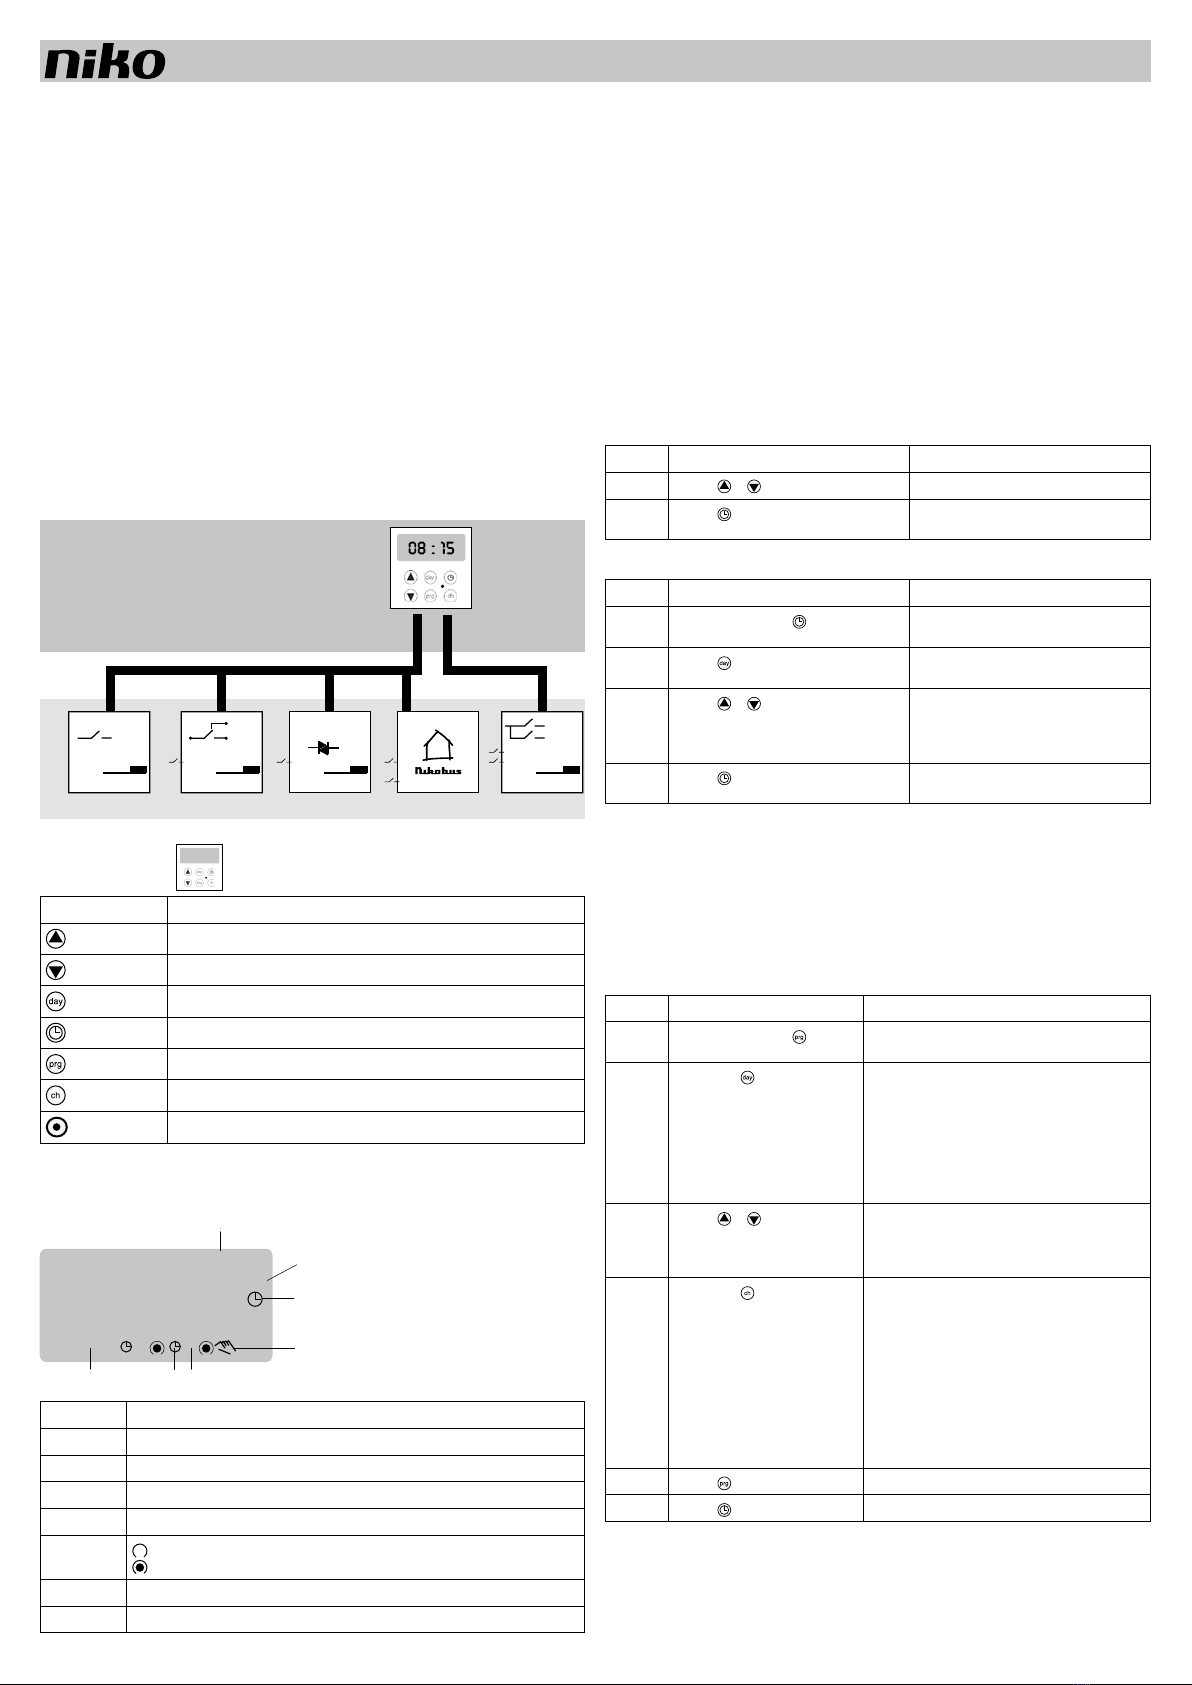
C. Fonctions commandées par un bouton-poussoir externe
Vous pouvez commander le capteur à partir de différents endroits.
Vous pouvez connecter un ou deux boutons-poussoirs externes à l’actuateur, entre L et,respectivement,E1 et E2 :
• Le contact entre L et E1 possède la même fonction que .
• Le contact entre L et E2 possède la même fonction que .
D. En combinaison avec Nikobus
Lors de l’ajout ou de la programmation de toute autre fonction Nikobus, vous devez supprimer tous les capteurs
des actuateurs. Avant de programmer le capteur, placez celui-ci sur l’actuateur. Vous pouvez alors commander
manuellement les canaux 1 et 2 afin qu’une commande de commutation soit envoyée à Nikobus.
5. RÉSOLUTION DES PROBLÈMES
En cas de problème, appuyez brièvement sur .
La minuterie redémarrera. Les réglages seront conservés.
6. DONNÉES TECHNIQUES
nombre de commandes de commutation max. 24
durée de commutation min. 1 minute
réserve(disponibleaprès12heuresdefonctionnement)
l’horloge continue de fonctionner pendant 30 minutes
hauteur d’encastrement 0,8 – 1,5 m
température ambiante 0 – 40°C
température de stockage -25 – 75°C
7. MISES EN GARDE CONCERNANT L’INSTALLATION
- L’installation doit être effectuée par un installateur agréé et dans le respect des prescriptions en vigueur.
- Ce mode d’emploi doit être remis à l’utilisateur. Il doit être joint au dossier de l’installation électrique et être
remis aux nouveaux propriétaires éventuels. Des exemplaires supplémentaires peuvent être obtenus sur le
site Web ou auprès du service support de Niko. Sur le site Web de Niko, vous trouverez toujours le mode
d’emploi le plus récent du produit.
- Il y a lieu de tenir compte des points suivants pendant l’installation (liste non limitative) :
- les lois, les normes et les réglementations en vigueur.
- l’état de la technique au moment de l’installation.
- ce mode d’emploi qui stipule uniquement des dispositions générales et doit être lu dans le cadre de toute
installation spécifique.
- les règles de l’art.
Ce produit est conforme à l’ensemble des directives et règlements européens applicables. Le cas échéant, vous
trouverez la déclaration CE de conformité relative à ce produit sur le site www.niko.eu.
8. SUPPORT DE NIKO
En cas de doute ou si vous voulez échanger le produit en cas de défaut éventuel, veuillez prendre contact avec
votre grossiste ou avec le service support de Niko :
• Belgique : +32 3 778 90 80
• France : +33 820 20 66 25
Vous trouverez les coordonnées et de plus amples informations sur le site www.niko.eu, sous la rubrique “Aide
et conseils”.
9. DISPOSITIONS DE GARANTIE
- Le délai de garantie est de quatre ans à partir de la date de livraison. La date de la facture d’achat par le
consommateur est considérée comme la date de livraison. En l’absence de facture, la date de fabrication
est valable.
- Le consommateur est tenu de prévenir Niko par écrit de tout défaut de conformité, dans un délai maximum
de deux mois après constatation.
- En cas de défaut de conformité, le consommateur peut uniquement prétendre à la réparation gratuite ou au
remplacement gratuit du produit, selon l’avis de Niko.
- Niko ne peut être tenu pour responsable d’un défaut ou de dégâts résultant d’une installation fautive, d’une
utilisation impropre ou négligente, d’une commande erronée, d’une transformation du produit, d’un entretien
contraire aux consignes d’entretien ou d’une cause externe telle que de l’humidité ou une surtension.
- Les dispositions contraignantes de la législation nationale ayant trait à la vente de biens de consommation et à
la protection des consommateurs des différents pays où Niko procède à la vente directe ou par l’intermédiaire
d’entreprises sœurs, de filiales, de succursales, de distributeurs, d’agents ou de représentants fixes, prévalent
sur les dispositions susmentionnées.

PMXXX-78200R17405 nv Niko sa Industriepark West 40, BE-9100 Sint-Niklaas, Belgium — tel. +32 3 778 90 00 — fax +32 3 777 71 20 — e-mail: support@niko.eu — www.niko.eu DE
XXX-78200
Gebrauchsanleitung vor Montage und Inbetriebnahme vollständig durchlesen. Bewahren Sie diese
Gebrauchsanleitung sorgfältig für einen späteren Gebrauch auf.
1. BESCHREIBUNG
Diese digitale Zeitschaltuhr entstammt dem umfangreichen Niko-Produktangebot an Sensoren und Aktoren.
Die Produktreihe bietet eine Vielzahl an miteinander kombinierbaren Komfort- und Schaltfunktionen.
Die Ansteuerung geschieht mittels eines Sensors und eines Aktors:
• Beim Sensor handelt es sich um die sichtbare elektronische Komponente, die entweder automatisch
oder nach manueller Bedienung einen auszuführenden Schaltbefehl an den angeschlossenen Aktor
sendet. Sensoren sind in allen von Niko angebotenen Verarbeitungsformen und Farben erhältlich.
Der Sensor wird auf den Aktor geklickt.
• Ein Aktor ist eine Schaltkomponente zur Ausführung einer bestimmten Funktion in Abhängigkeit
vom angeschlossenen Sensor, z.B. das Schalten des Lichts oder ein Herauf- und Herunterfahren der
Rolllade bzw. Markise. Diese Komponente befindet sich in der Unterputzdose hinter dem Sensor
Die Zeitschaltuhr (Sensor) ist ausschließlich für eine Verwendung in Innenräumen geeignet und lässt sich mit
folgenden Aktoren kombinieren:
• 420-00100: Sockel mit Schaltkontakt (10 A, 230 V)
•
420-00200: Sockel mit potentialfreiem Kontakt (4 A, 230 V), an den ein externer Tastschalter
angeschlossen werden kann
•
420-00300: Sockel mit zwei Schaltkontakten (4 A, 230 V), an die ein externer Tastschalter
angeschlossen werden kann
• 420-00400: Zweidraht-Sockel (40 – 400 W, 230 V), an den ein externer Tastschalter angeschlossen
werden kann
• 430-00500: Nikobus-Sockel
A
B
10A
R,L,C
420-0010X
XXX-78200
4A
R,L
420-0020X
40 - 400W
R
420-0040X 430-0050X
4A
4A
R,L
420-0030X
EXT1EXT1 EXT1 EXT2
EXT2
EXT1
2. KOMPONENTEN
2.1. Bedientasten
Bedientaste Funktion
Schaltzustand von Kanal 1 ändern
Schaltzustand von Kanal 2 ändern
Tag auswählen1
Zeitanzeige
programmieren1
Ausgang wählen2
zurücksetzen3
1Ausschließlich bei Inbetriebnahme oder Programmierung der digitalen Zeitschaltuhr benutzen.
2Ausschließlich mit 430-00500 und 420-00300 kombinierbar.
3Diese Taste niemals mit spitzen Metallgegenständen betätigen.
2.2. Display
1 2 3 4 5 6 7
Prog.
88
88:88
C 1 C2
Symbol Bedeutung
1 aktueller Wochentag (1 = Montag, 2 = Dienstag, etc.)
2Programmiermodus
3Tages- und Zeiteinstellmodus
4manuelle Bedienung ist aktiviert
5: Kanal ist nicht geschaltet (Aus)
: Kanal ist geschaltet (An)
6 Automatikmodus: Kanal wird automatisch geschaltet, da ein Programm aktiv ist
7Speicherplatz
3. PROGRAMMIERUNG
Die Zeitschaltuhr kehrt automatisch zum Startbildschirm zurück, wenn Sie während der Programmierung 30
Sekunden lang keine Aktion ausführen.
3.1. Grundeinstellungen
Sie können folgende Grundeinstellungen ändern:
• Anzahl der zu bedienenden Kanäle (1 bzw. 2).
• Wochentag und Uhrzeit.
Sie müssen diese Einstellungen nach einem Reset programmieren oder wenn Sie zum ersten Mal die Spannung
einschalten (Inbetriebnahme).
A. Anzahl der Kanäle einstellen
Sie können den Sensor in Kombination mit einem 1-Kanal- oder 2-Kanal-Aktor einsetzen. Deswegen müssen
Sie die Anzahl der zu bedienenden Kanäle (1 oder 2) einstellen.
Bei Inbetriebnahme oder nach einem Reset zeigt das Display kurz alle Symbole und Segmente an. Danach
zeigt das Display “CH:01” an.
Sie brauchendie Anzahl derKanäle lediglicheinmaleinzustellen.Auch nacheinem Spannungsausfall brauchen
Sie dies nicht zu wiederholen
Schritt Aktion Ergebnis
1Betätigen Sie oder . Sie stellen die Anzahl der Kanäle (1 bzw. 2) ein.
2Betätigen Sie .Ihre Auswahl wird bestätigt.
Sie kehren wieder zum Startbildschirm zurück.
B. Wochentag und Uhrzeit einstellen
Schritt Aktion Ergebnis
1
Betätigen Sie drei Sekunden lang um den
Wochentag- und Zeiteinstellmodus zu aktivieren.*
Wochentag und Uhrzeit blinken.
2Betätigen Sie .Wochentag einstellen: 1 = Montag, 2 =
Dienstag, etc.
3Betätigen Sie oder . Uhrzeit einstellen:
•
kurzbetätigen:einzelneMinuteneinstellen
•
länger betätigen: blockweise fünf
Minuteneinstellen,danach dieStunden
4Betätigen Sie .Eingestellte Uhrzeit und Wochentag werden
bestätigt.
Sie kehren wieder zum Startbildschirm zurück.
*
Nacheinemlängeren Spannungsausfall kehrtdie Zeitschaltuhr automatischin denTages-und Zeiteinstellmodus
zurück. Gehen Sie direkt zu Schritt 2.
3.2. Tages- bzw. Wochenprogramme einstellen (Automatikmodus)
Die Zeitschaltuhr kannFunktionen automatisch,d.h. programmgesteuert,ausführen. HierfürverfügtdasGerät
über 24 Schaltbefehle, die im Einzelnen folgende Elemente enthalten:
• Zeitpunkt, wann die Schaltfunktion auszuführen ist (Schaltzeitpunkt).
• Tag, an dem der Schaltbefehl auszuführen ist.
• gewünschter Schaltzustand des Kanals/der Kanäle.
Schaltbefehl hinzufügen
Schritt Aktion Ergebnis
1Betätigen Sie drei Sekunden lang .Sie gelangen in den Programmiermodus.
Es wird der erste Schaltbefehl (01) angezeigt.
2Betätigen Sie kurz … … bis der gewünschte Wochenblock bzw. Tag angezeigt
wird. Folgende Zusammensetzungen sind möglich:
- 1234567 = die gesamte Woche (Montag bis Sonntag)
- 123456 = lange Arbeitswoche (Montag bis Samstag)
- 12345 = kurze Arbeitswoche (Montag bis Freitag)
- 567 = langes Wochenende (Freitag bis Sonntag)
- 67 = kurzes Wochenende (Samstag und Sonntag)
- 1 = Montag, 2 = Dienstag (separate Tage)
3Betätigen Sie oder . Sie stellen die Uhrzeit der auszuführenden Funktion
ein:
• kurz betätigen: einzelne Minuten einstellen
•
länger betätigen: blockweise fünf Minuten
einstellen, danach die Stunden
4Betätigen Sie kurz … … bis der gewünschte Schaltzustand des
Kanals/der Kanäle angezeigt wird. Folgende
Zusammensetzungen sind möglich:
C1
AUS
AN
AUS
AN
AUS
AN
-
-
C2
AUS
AUS
AN
AN
-
-
AUS
AN
5Betätigen Sie .*Es wird der nächste Speicherplatz aufgerufen.
6Betätigen Sie .Sie kehren wieder zum Startbildschirm zurück.
*
BeiAuswahlder Speicherplätzenach einemfreien Speicherplatz wirddie Anzahl dernoch freien Speicherplätze
angezeigt. Ein Beispiel: rE:21 = es sind noch 21 Speicherplätze frei.
➍
➊
➋
➌
➐ ➏➎
08 : 15

DE nv Niko sa Industriepark West 40, BE-9100 Sint-Niklaas, Belgium — tel. +32 3 778 90 00 — fax +32 3 777 71 20 — e-mail: support@niko.eu — www.niko.eu PMXXX-78200R17405
XXX-78200
Ändern eines Schaltbefehls
Schritt Aktion Ergebnis
1 Betätigen Sie drei Sekunden lang
.
Sie gelangen in den Programmiermodus.
Es wird der erste Schaltbefehl (01) angezeigt.
2Betätigen Sie kurz … … bis Sie den zu ändernden Schaltbefehl ausgewählt
haben.
3Betätigen Sie kurz … ... bis der gewünschte Wochenblock bzw. Tag
angezeigt wird. Folgende Zusammensetzungen sind
möglich:
- 1234567 = die gesamte Woche (Montag bis Sonntag)
- 123456 = lange Arbeitswoche (Montag bis Samstag)
- 12345 = kurze Arbeitswoche (Montag bis Freitag)
- 567 = langes Wochenende (Freitag bis Sonntag)
- 67 = kurzes Wochenende (Samstag und Sonntag)
- 1 = Montag, 2 = Dienstag (separate Tage)
4Betätigen Sie oder . Sie stellen die Uhrzeit der auszuführenden Funktion ein:
• kurz betätigen: einzelne Minuten einstellen
•
länger betätigen: blockweise fünf Minuten
einstellen, danach die Stunden
5Betätigen Sie kurz … … bis der gewünschte Schaltzustand des
Kanals/der Kanäle angezeigt wird. Folgende
Zusammensetzungen sind möglich:
C1
AUS
AN
AUS
AN
AUS
AN
-
-
C2
AUS
AUS
AN
AN
-
-
AUS
AN
6Betätigen Sie .Sie kehren wieder zum Startbildschirm zurück.
Schaltbefehl löschen
Schritt Aktion Ergebnis
1Betätigen Sie drei Sekunden lang .Sie gelangen in den Programmiermodus.
Es wird der erste Schaltbefehl (01) angezeigt.
2Betätigen Sie kurz … … bis Sie den zu löschenden Schaltbefehl
ausgewählt haben.
3Betätigen Sie gleichzeitig und .Der Inhalt des gewählten Speicherplatzes wird
entfernt.
4Betätigen Sie .Sie kehren wieder zum Startbildschirm zurück.
3.3. Zurücksetzen
Hierüber setzen Sie alle hinzugefügten Programme und Einstellungen zurück. Die Zeitschaltuhr kehrt
wieder auf die Werkseinstellungen zurück.
Schritt Aktion Ergebnis
1Halten Sie und betätigen Sie
kurz .
Alle Programme und Einstellungen werden gelöscht.
Der Kanaleinstellmodus ist aktiviert.
2Betätigen Sie oder . Sie stellen die Anzahl der Kanäle ein.
3Betätigen Sie .Ihre Auswahl wird bestätigt.
Sie kehren wieder zum Startbildschirm zurück.
4. FUNKTIONSWEISE UND BETRIEB
A. Handbetriebsmodus
Sie können zu jeder Zeit den Schaltzustand manuell temporär ändern, selbst wenn ein automatisches Programm
(Automatikmodus) ausgeführt wird.
Schritt Aktion Ergebnis
1Betätigen Sie kurz .Sie ändern den Schaltzustand von Kanal 1.
2Betätigen Sie kurz .Sie ändern den Schaltzustand von Kanal 2.
Die blinkenden C1/C2 zeigen zusammen mit dem Handsymbol ( ) an, dass Sie den entsprechenden Kanal
manuell zum Programm angepasst haben. Dieser Zustand ist lediglich temporär. Die Zeitschaltuhr befindet sich
im Handbetriebsmodus.
Bei der nächsten vom Programm veranlassten Veränderung wird erneut der Automatikmodus aktiviert. Bei
automatisch aktiviertem Schaltzustand erscheint am Kanal/an den Kanälen ein Uhrensymbol ( ).
B. Dauerbetriebsmodus
Halten Sie oder genau drei Sekunden lang betätigt, um den Automatikmodus auszuschalten und um
den manuell gewählten Schaltzustand des Kanals/der Kanäle dauerhaft einzustellen. Der Schaltzustand wird von
den programmierten Schaltzeiten nicht beeinflusst. Die Zeitschaltuhr befindet sich jetzt im Dauerbetriebsmodus:
C1/C2 mit Handsymbol ( ) blinken nun nicht mehr, sondern leuchten dauerhaft.
Wenn Sie oder , permanent betätigen, dann durchlaufen Sie die unterschiedlichen Modi in
untenstehender Reihenfolge:
• Dauerbetriebsmodus an
• Dauerbetriebsmodus aus
• Automatikmodus an
• Dauerbetriebsmodus an
• …
Betätigen Sie kurz oder um den Dauerbetriebsmodus auszuschalten und zurückzukehren zum
Handbetriebsmodus.
C. Funktionen über externen Tastschalter bedienen
Sie können den Sensor auch von unterschiedlichen Orten aus ansteuern.
Sie können am Aktor einen bzw.zwei externe Tastschalter zwischen den Klemmen L und E1 bzw.E2 anschließen:
• Der Kontakt zwischen L und E1 besitzt dieselbe Funktion wie .
• Der Kontakt zwischen L und E2 besitzt dieselbe Funktion wie .
D. Betrieb in Kombination mit Nikobus
Bei Hinzufügen oder Programmieren aller anderen Nikobus-Funktionen müssen Sie alle Sensoren von den Aktoren
entfernen. Wenn Sie den Sensor dann programmieren, fügen Sie den Sensor dem Aktor hinzu und Sie können
Kanal 1 und 2 manuell bedienen, sodass ein Schaltbefehl auf den Nikobus gesendet wird.
5. STÖRUNGSABHILFE
Betätigen Sie im Störungsfall kurz .
Die Zeitschaltuhr wird erneut hochgefahren. Die Einstellungen bleiben dabei erhalten.
6. TECHNISCHE DATEN
Anzahl der Schaltbefehle max. 24
Mindest-Umschaltzeit 1 Minute
Gangreserve (erst nach 12-stündiger Betriebszeit verfügbar) Uhr läuft noch 30 Minuten weiter
Einbauhöhe 0,8 – 1,5 m
Umgebungstemperatur 0 – 40°C
Lagertemperatur -25 – 75°C
7. WARNHINWEISE FÜR DIE INSTALLATION
-
DieInstallationdarf ausschließlichvoneiner Elektrofachkraft unterBerücksichtigungder geltendenVorschriften
ausgeführt werden.
-
Diese Gebrauchsanleitung muss dem Benutzer ausgehändigt werden. Die Gebrauchsanleitung ist den
Unterlagen der elektrischen Anlage beizufügen und muss auch eventuellen neuen Besitzern ausgehändigt
werden. Zusätzliche Exemplare erhalten Sie über die Website von Niko oder über den Kundendienst von
Niko. Die neueste Version der Gebrauchsanleitung erhalten Sie immer auf der Niko-Website.
- Beachten und berücksichtigen Sie bei der Installation unter anderem folgende Punkte:
- die gültigen Gesetze, Normen und Richtlinien.
- den Stand der Technik zum Zeitpunkt der Installation.
-
diein dieserGebrauchsanleitung aufgeführtenAnweisungen,wobei dieseGebrauchsanleitung nurallgemein
gültige Bestimmungen enthält, die für jede Anlage spezifisch angewendet werden müssen.
- die allgemein anerkannten Regeln fachmännischer Arbeit.
Dieses Produkt erfüllt alle anwendbaren europäischen Richtlinien und Verordnungen. Die für dieses Produkt
zutreffende EG-Konformitätserklärung erhalten Sie gegebenenfalls unter www.niko.eu.
8. NIKO UNTERSTÜTZUNG
Bei Zweifel oder falls Sie bei einem eventuellen Defekt des Produkts noch Fragen bezüglich des Umtausches
haben, dann nehmen Sie bitte Kontakt auf mit dem Kundendienst von Niko (Belgien: +32 3 778 90 80) oder
wenden Sie sich an Ihren Großhändler. Kontaktdaten und weitere Informationen erhalten Sie im Internet unter
www.niko.eu in der Rubrik “Unterstützung und Beratung”.
9. GARANTIEBEDINGUNGEN
-
Der Garantiezeitraum beträgt vier Jahre ab Lieferdatum. Als Lieferdatum gilt das Rechnungsdatum zum Zeitpunkt
des Kaufs durch den Endverbraucher. Falls keine Rechnung mehr vorhanden ist, gilt das Produktionsdatum.
- Der Endverbraucher ist verpflichtet, Niko schriftlich über einen Produktmangel innerhalb von zwei Monaten
nach dessen Feststellung zu informieren.
- Im Falle eines Mangels hat der Endverbraucher nur Recht auf kostenlose Reparatur oder Ersatz des Produkts.
Eine Entscheidung darüber obliegt allein Niko.
-
Niko ist nicht für Mängel oder Schäden verantwortlich, die durch fehlerhafte Installation, nicht
bestimmungsgemäßen oder unsachgemäßen Gebrauch, durch falsche Bedienung, Anpassen/Ändern des
Produktes, infolge von unsachgemäßer Wartung entgegen den Wartungsvorschriften oder die sich aus
äußeren Umständen, wie beispielsweise infolge Feuchtigkeit oder Überspannung, ergeben.
- Zwingende Vorschriften der nationalen Gesetzgebung bezüglich des Verkaufs von Konsumgütern und zum
Verbraucherschutz haben vor den obigen Bestimmungen Vorrang in den Ländern, in denen Niko direkt oder
über seine Neben- oder Tochtergesellschaften, Filialen, Vertriebsstellen, Agenten oder über feste Vertreter
verkauft.

PMXXX-78200R17405 nv Niko sa Industriepark West 40, BE-9100 Sint-Niklaas, Belgium — tel. +32 3 778 90 00 — fax +32 3 777 71 20 — e-mail: support@niko.eu — www.niko.eu EN
XXX-78200
Read the complete manual before carrying out the installation and activating the system. Keep the
manual for future reference.
1. DESCRIPTION
This digital time switch is part of the Niko product range of sensors and actuators.This range offers a number
of comfort functions in combination with various switching functions.
The control of this switch occurs via a sensor and an actuator:
• A sensor (A) is the visible electronic component that – automatically or after manual control – sends
a switching command to the connected actuator for being performed. This component is available in
all Niko finishes and colours. The sensor is clicked onto the actuator.
• An actuator (B) is the switching component that performs the action requested by the connected
sensor, such as switching the light or raising a roll-down shutter/sun blind. This component is located
behind the sensor in the flush-mounting box.
The time switch (sensor) is intended for indoor use only and can be combined with the following actuators:
• 420-00100: base with switching contact (10 A, 230 V)
• 420-00200: base with potential-free contact (4 A, 230 V) to which an external push button can
be connected
• 420-00300: base with two switching contacts (4 A, 230 V) to which an external push button can
be connected
• 420-00400: two-wire base (40 – 400 W, 230 V) to which an external push button can be connected
• 430-00500: Nikobus base
A
B
10A
R,L,C
420-0010X
XXX-78200
4A
R,L
420-0020X
40 - 400W
R
420-0040X 430-0050X
4A
4A
R,L
420-0030X
EXT1EXT1 EXT1 EXT2
EXT2
EXT1
2. COMPONENTS
2.1. Control buttons
Control button Function
changes the switch position of channel 1
changes the switch position of channel 2
selects the day1
displays the time
programming1
selection of the output2
reset3
1Use only when activating or programming the digital time switch.
2Only in combination with 430-00500 and 420-00300.
3Do not use sharp metal objects to depress this button.
2.2. Display
1 2 3 4 5 6 7
Prog.
88
88:88
C 1 C2
Symbol Meaning
1 current day (1 = Monday, 2 = Tuesday, …)
2programming mode
3day- and time-setting mode
4manual control is activated
5: channel is not connected (off)
: channel is connected (on)
6 automatic mode: channel is being switched automatically; a program is active
7memory location
3. PROGRAMMING
The time switch automatically returns to the start screen if you do not take any actions for a period of 30 seconds
while programming.
3.1. Basic settings
The basic settings are:
• the number of channels (1 or 2) to be controlled.
• day and time.
You must program these settings when you connect to the power for the first time (activation) and after each reset.
A. Setting the number of channels
You can use the sensor in combination with a single-channel or dual-channel actuator. Therefore, you must
set the number of channels (1 or 2) that you can control.
During activation or after a reset, all of the symbols and segments appear briefly on the display. Thereafter,
“CH:01” appears on the display.
You must set the number of channels only once. You do not have to repeat this step after a power interruption.
Step Action Result
1Press or . You set the number of channels (1 or 2).
2Press .Your selection is confirmed.
You return to the start screen.
B. Setting day and time
Step Action Result
1Press for three seconds to activate the
mode for setting the day and time.*
The time and the day begin to flash.
2Press .You set the day: 1 = Monday,
2 = Tuesday, …
3Press or . You set the time:
• press briefly: set per minute
• press and hold: set per five minutes
and then per hour
4Press .The day and time selected are confirmed.
You return to the start screen.
*
After a lengthy power interruption, the time switch automatically switches to the day- and time-setting
mode. Go directly to step 2.
3.2. Setting day or week programs (automatic mode)
The time switch can perform actions automatically – program-controlled. For this, the device is equipped with
24 switching commands. Each command contains:
• the time when switching must occur (switching moment).
• the day(s) when the command is applicable.
• the desired position of the channel or channels.
Adding a switching command
Step Action Result
1Press for three seconds. You enter the programming mode.
The first switching command (01) appears.
2Press briefly ... … until the desired week block or day appears. In
sequence:
- 1234567 = entire week (Monday through Sunday)
-
123456 = longwork week(MondaythroughSaturday)
- 12345 = short work week (Monday through Friday)
- 567 = long weekend (Friday through Sunday)
- 67 = short weekend (Saturday and Sunday)
- 1 = Monday, 2 = Tuesday (individual days)
3Press or . You set the hour at which the action must be
performed:
• press briefly: set per minute
• press and hold: set per five minutes and then
per hour
4Press briefly ... … until the desired switch position of the channel/
channels appear. In sequence:
C1
OFF
ON
OFF
ON
OFF
ON
-
-
C2
OFF
OFF
ON
ON
-
-
OFF
ON
5Press .*The next memory location is called up.
6Press .You return to the start screen.
*If you select the memory location after an available memory location, then the number of memory locations
that are still available appears. For example: rE:21 = there are still 21 memory locations available.
➍
➊
➋
➌
➐ ➏➎
08 : 15

EN nv Niko sa Industriepark West 40, BE-9100 Sint-Niklaas, Belgium — tel. +32 3 778 90 00 — fax +32 3 777 71 20 — e-mail: support@niko.eu — www.niko.eu PMXXX-78200R17405
XXX-78200
Changing a switching command
Step Action Result
1Press for three seconds. You enter the programming mode.
The first switching command (01) appears.
2Press briefly… … until you have selected the switching command to
be changed.
3Press briefly… … until the desired week block or day appears. In
sequence:
- 1234567 = entire week (Monday through Sunday)
-
123456 = longwork week(MondaythroughSaturday)
- 12345 = short work week (Monday through Friday)
- 567 = long weekend (Friday through Sunday)
- 67 = short weekend (Saturday and Sunday)
- 1 = Monday, 2 = Tuesday (individual days)
4Press or . You set the hour at which the action must be
performed:
• press briefly: set per minute
• press and hold: set per five minutes and then
per hour
5Press briefly… … until the desired switch position of the channel/
channels appear. In sequence:
C1
OFF
ON
OFF
ON
OFF
ON
-
-
C2
OFF
OFF
ON
ON
-
-
OFF
ON
6Press .You return to the start screen.
Deleting a switching command
Step Action Result
1Press for three seconds. You enter the programming mode.
The first switching command (01) appears.
2Press briefly… … until you have selected the switching command
to be deleted.
3Press and simultaneously. The content of the selected memory location is
deleted.
4Press .You return to the start screen.
3.3. Reset
You delete all of the entered programs and settings. The time switch is returned to the factory settings.
Step Action Result
1Press and hold and press
briefly.
All programs and settings are deleted.
The channel-setting mode is activated.
2Press or . You set the number of channels.
3Press .Your selection is confirmed.
You return to the start screen.
4. OPERATION AND USE
A. Manual mode
The switch position can be manually changed temporarily at any time, even while an automatic program
(automatic mode) is running.
Step Action Result
1Press briefly. You change the switch position of channel 1.
2Press briefly. You change the switch position of channel 2.
A flashing C1/C2 with the hand symbol ( ) indicates that you have manually adjusted the relevant channel
relative to the program. This position is temporary. The time switch is now in manual mode.
At the next change planned for the program, the automatic mode will be reactivated.The automatically activated
switch position is indicated by a clock ( ) next to the channel/channels.
B. Permanent mode
Press and hold or for exactly three seconds to deactivate the automatic mode and to permanently
activate the manually selected switch position of the channel/channels. The programmed switching times do
not change the switch position. The time switch is now in permanent mode: C1/C2 with hand symbol ( )
is not flashing but is illuminated permanently.
If you press and hold or , you run through the various modes in the following sequence:
• permanent mode on
• permanent mode off
• automatic mode on
• permanent mode on
• …
Press or briefly to deactivate the permanent mode and to return to the manual mode.
C. Functions with an external push button
You can also control the sensor from various locations.
You can connect one or two external push buttons to the actuator between L and E1 and E2, respectively:
• The contact between L and E1 has the same function as .
• The contact between L and E2 has the same function as .
D. In combination with Nikobus
When adding or programming all of the other Nikobus functions, you must remove all sensors from the actuators.
Before programming the sensor, you place the sensor on the actuator and you can manually control channels 1
and 2 so that a switching command is sent on the Nikobus.
5. TROUBLESHOOTING
In the event of malfunctions, press briefly.
The time switch restarts. The settings are saved.
6. TECHNICAL DATA
number of switching commands max. 24
min. switching time 1 minute
operational reserve (available after 12 hours of operation) clock will continue to work for 30 more minutes
flush-mounting height 0.8 – 1.5 m
ambient temperature 0 – 40°C
storage temperature -25 – 75°C
7. WARNINGS REGARDING INSTALLATION
-
The installation should be carried out by a registered installer and in compliance with the statutory regulations.
- This manual should be presented to the user. It should be included in the electrical installation file, and it
should be passed on to any new owners. Additional copies are available on the Niko website or via the Niko
support service. The latest manual for this product is available on the Niko website at any time.
- During installation, the following should be taken into account (non-exhaustive list):
- the statutory laws, standards and regulations.
- the technology currently available at the time of installation.
- this manual, which only states general regulations and should therefore be read within the scope of each
specific installation.
- the rules of proper workmanship.
This product complies with all of the relevant European guidelines and regulations. If applicable, you can find
the EC declaration of conformity regarding this product at www.niko.eu.
8. NIKO SUPPORT
In case of doubt or for the specific exchange procedure in case of a possible defect, contact the Niko support
service in Belgium at +32 3 778 90 80 or your wholesaler/installer. Contact details and more information can
be found at www.niko.eu under the “Help and advice” section.
9. GUARANTEE PROVISIONS
-
The period of guarantee is four years from the date of delivery. The delivery date is the invoice date of purchase
of the product by the consumer. If there is no invoice, the date of production applies.
- The consumer is obliged to inform Niko in writing about the non-conformity, within two months after stating
the defect.
- In case of a non-conformity, the consumer only has the right to a product repair or replacement free of
charge, which shall be decided by Niko.
- Niko shall not be held liable for a defect or damage resulting from incorrect installation, improper or careless
use,incorrectoperation,transformationof theproduct,maintenance thatdoes notadhere tothe maintenance
instructions or an external cause, such as damage due to moisture or overvoltage.
-
The compulsory regulations of the national legislation concerning the sale of consumer goods and the
protection of the consumer in the countries where Niko sells, directly or via sister companies, subsidiaries,
chainstores, distributors, agents orpermanent salesrepresentatives,takepriority overthe above-mentioned
rules and regulations.

PMXXX-78200R17405 nv Niko sa Industriepark West 40, BE-9100 Sint-Niklaas, Belgium — tel. +32 3 778 90 00 — fax +32 3 777 71 20 — e-mail: support@niko.eu — www.niko.eu SK
XXX-78200
Pred inštaláciou a spustením systému si prečítajte celý návod.Návod uschovajte pre budúce použitie.
1. POPIS
Tieto elektronické spínacie hodiny sú súčasťou produktového radu snímačov a aktorov Niko. Tento rad
ponúka množstvo komfortných funkcií v kombinácii s rôznymi spínacími funkciami.
Ovládanie tohto spínača sa vykonáva pomocou snímača a aktora:
• Snímač (A) je viditeľná elektronická súčiastka, ktorá automaticky alebo ručným ovládaním vysiela na
vykonanie spínací povel do pripojeného aktora. Tento komponent je k dispozícii vo všetkých farbách
a vyhotoveniach Niko. Snímač je zacvaknutý do aktora.
• Aktor je spínací komponent, ktorý vykonáva akciu požadovanú pripojeným snímačom, akým je
napríklad spínanie svetiel alebo ovládanie roliet a markíz. V zapustenej montážnej krabici sa nachádza
za snímačom.
Spínacie hodiny (senzor) sú určené lan na použitie v interiéri a dajú sa kombinovať s týmito aktormi:
• 420-00100: aktor, 1-kanálový, 1-pólový (10 A, 230 V)
• 420-00200: aktor, 1-kanálový 4A, 1-prepínací kontakt + 1 externý vstup 230 V
• 420-00300: aktor, 2-kanálový 4A, 2-spínacie kontakty + 2 externé vstupy 230 V
• 420-00400: aktor, 2-vodičový 40-400W + 1 externý vstup 230 V
• 430-00500: Nikobus aktor
A
B
10A
R,L,C
420-0010X
XXX-78200
4A
R,L
420-0020X
40 - 400W
R
420-0040X 430-0050X
4A
4A
R,L
420-0030X
EXT1EXT1 EXT1 EXT2
EXT2
EXT1
2. KOMPONENTY
2.1. Obslužné tlačidlá
Obslužné tlačidlo Funkcia
mení spínaciu pozíciu kanálu 1
mení spínaciu pozíciu kanálu 2
slúži na nastavenie dňa1
zobrazuje čas
programovanie1
slúži na výber výstupu2
reset3
1Používa sa len pri aktivácii alebo programovaní elektronických spínacích hodín.
2Len v kombinácii s 430-00500 a 420-00300.
3Na stlačenie tohto tlačidla nepoužívajte ostré kovové predmety.
2.2. Displej
1 2 3 4 5 6 7
Prog.
88
88:88
C 1 C2
Symbol Význam
1 aktuálny deň (1 = pondelok, 2 = utorok atď.)
2programovací režim
3 režim pre nastavenie dňa a času
4 je aktivovaný manuálny režim
5: kanál nie je pripojený (vyp.)
: kanál je pripojený (zap.)
6automatický režim: kanál sa zapína automaticky; program je aktívny
7umiestnenie pamäte
3. PROGRAMOVANIE
Ak pri programovaní 30 sekúnd nevykonáte žiadnu akciu, spínacie hodiny sa automaticky vrátia na začiatočnú
obrazovku.
3.1. Továrenské nastavenia
Továrenské nastavenia sú nasledovné:
• počet ovládaných kanálov (1 alebo 2).
• deň a čas.
Tieto nastavenia treba neprogramovať pri prvom zapojení do siete (aktivácia) a po každom resetovaní.
A. Nastavenie počtu kanálov
Senzor sa dá kombinovať s jedno- alebo dvojkanálovým aktorom. Preto je potrebné nastaviť počet kanálov
(1 alebo 2), ktoré sa budú ovládať.
Po prvom spustení alebo po resete sa na krátko rozsvietia všetky symboly a segmenty na displeji. Potom sa
na displeji zobrazí “CH:01”.
Nastavenie kanálov je potrebné urobiť iba raz. Nemusí byť opakované po výpadku napájania.
Krok Akcia Výsledok
1Stlačte alebo .Nastavte počet kanálov (1 alebo 2).
2Stlačte .Váš výber je potvrdený.
Vrátite sa na úvodnú obrazovku.
B. Nastavenie dňa a času
Krok Akcia Výsledok
1Stlačte a 3 sekundy podržte. Tak aktivu-
jete režim na nastavenie dňa a času.*
Na displeji začne blikať čas a deň v týždni.
2Stlačte .Nastavte deň: 1 = pondelok, 2 = utorok atď.
3Stlačte alebo .Nastavte čas:
•
krátke stlačenie: nastavovanie po
1 minúte
•
dlhšie stlačenie: nastavovanie po
5 minútach a potom po 1 hodine
4Stlačte .Potvrďte nastavený deň v týždni a čas.
Vrátite sa na úvodnú obrazovku.
*Po dlhšom výpadku elektrického prúdu sa spínacie hodiny automaticky prepnú do režimu nastavenia dňa v
týždni a času. Prejdite rovno ku kroku 2.
3.2. Nastavenie denného alebo týždenného programu (automatický režim)
Spínacie hodiny môžu vykonávať akcie automaticky – podľa nastaveného programu. Na zariadení si môžete
nastaviť svoj program s 24 spínacími príkazmi. Každý spínací príkaz obsahuje:
• čas, kedy má dôjsť k zopnutiu (spínací čas),
• deň/dni v týždni, kedy sa má príkaz aktivovať a
• želaný stav kanálu, resp. kanálov.
Pridanie spínacieho príkazu
Krok Akcia Výsledok
1Stlačte a 3 sekundy podržte .Vstúpite do programovacieho režimu.
Objaví sa prvý spínací príkaz (01).
2Krátko stláčajte ... ... kým sa neobjaví želaný týždenný blok alebo deň.
Deň/dni sú nastavené v tomto poradí:
- 1234567 = celý týždeň (po – ne)
- 123456 = dni po – so
- 12345 = dni po – pi
- 567 = dni pi – ne
- 67 = víkend (so – ne)
- 1 = pondelok, 2 = utorok atď. (jednotlivé dni)
3Stlačte alebo .Nastavenie času, kedy sa má akcia vykonať:
• krátke stlačenie: nastavovanie po 1 minúte
• dlhšie stlačenie: nastavovanie po 5 minútach
a potom po 1 hodine
4Krátko stláčajte ... ... kým sa neobjaví želaný stav kanálu, resp. kanálov.
Poradie je nasledovné:
C1
V Y P.
Z A P.
V Y P.
Z A P.
V Y P.
Z A P.
-
-
C2
V Y P.
V Y P.
Z A P.
Z A P.
-
-
V Y P.
Z A P.
5Stlačte .*Dôjde k vyvolaniu ďalšieho pamäťového miesta.
6Stlačte .Vrátite sa na úvodnú obrazovku.
*Pokiaľ je zvolené pamäťové miesto, pred ktorým je prázdne pamäťové miesto, na displeji sa zobrazí počet
voľných pamäťových miest. Napríklad: rE21 = 21 voľných pamäťových miest.
➍
➊
➋
➌
➐ ➏➎
08 : 15

SK nv Niko sa Industriepark West 40, BE-9100 Sint-Niklaas, Belgium — tel. +32 3 778 90 00 — fax +32 3 777 71 20 — e-mail: support@niko.eu — www.niko.eu PMXXX-78200R17405
XXX-78200
Zmena spínacieho príkazu
Krok Akcia Výsledok
1Stlačte a 3 sekundy podržte .Vstúpite do programovacieho režimu.
Objaví sa prvý spínací príkaz (01).
2Krátko stláčajte ... ... kým prídete na spínací príkaz, ktorý chcete zmeniť.
3Krátko stláčajte ... ... kým sa neobjaví želaný týždenný blok alebo deň.
Poradie je nasledovné:
- 1234567 = celý týždeň (po – ne)
- 123456 = dni po – so
- 12345 = dni po – pi
- 567 = dni pi – ne
- 67 = víkend (so – ne)
- 1 = pondelok, 2 = utorok atď. (jednotlivé dni)
4Stlačte alebo .Nastavenie času, kedy sa má akcia vykonať:
• krátke stlačenie: nastavovanie po 1 minúte
• dlhšie stlačenie: nastavovanie po 5 minútach
a potom po 1 hodine
5Krátko stláčajte ... ... kým sa neobjaví želaný stav kanálu, resp. kanálov.
Poradie je nasledovné:
C1
V Y P.
Z A P.
V Y P.
ON
V Y P.
Z A P.
-
-
C2
V Y P.
V Y P.
Z A P.
Z A P.
-
-
V Y P.
Z A P.
6Stlačte .Vrátite sa na úvodnú obrazovku.
Zmazanie spínacieho príkazu
Krok Akcia Výsledok
1Stlačte a 3 sekundy podržte .Vstúpite do programovacieho režimu.
Objaví sa prvý spínací príkaz (01).
2Krátko stláčajte ... ... kým prídete na spínací príkaz, ktorý chcete zmazať.
3Zároveň stlačte a . Obsah pamäťového miesta sa tak zmaže.
4Stlačte .Vrátite sa na úvodnú obrazovku.
3.3. Reset
Slúži na zmazanie všetkých zadaných programov a nastavení. Spínacie hodiny sa vrátia do továrenského
nastavenia.
Krok Akcia Výsledok
1Stlačte a podržte a krátko
stláčajte .
Všetky nastavené programy a nastavenia sa zmažú.
Režim nastavovania kanálov je aktivovaný.
2Stlačte alebo .Nastavte počet kanálov.
3Stlačte .Váš výber je potvrdený.
Vrátite sa na úvodnú obrazovku.
4. PREVÁDZKA A POUŽÍVANIE
A. Manuálny režim
Pozícia spínača sa dá dočasne kedykoľvek manuálne zmeniť,a to aj pri automatickom programe (automatický režim).
Krok Akcia Výsledok
1Krátko stlačte .Tým sa zmení spínacia pozícia kanála 1
2Krátko stlačte .Tým sa zmení spínacia pozícia kanála 2.
Blikajúce C1/C2 so symbolom ruky ( ) indikuje, že zodpovedajúci kanál je nastavený manuálne (nie podľa
programu). Táto pozícia je dočasná. Spínacie hodiny sú teraz v manuálnom režime.
Pri ďalšej zmene nastavenej pre daný program sa znovu aktivuje automatický režim. Automaticky aktivovanú
spínaciu pozíciu indikujú hodiny ( ) vedľa kanála/kanálov.
B. Trvalý režim
Stlačte a podržte alebo v trvaní presne tri sekundy,čím deaktivujete automatický režim a natrvalo aktivujete
manuálne zvolenú spínaciu pozíciu kanála/kanálov. Naprogramované časy spínania nemenia spínaciu pozíciu.
Spínacie hodiny sú teraz v trvalom režime: C1/C2 so symbolom ruky ( ) nebliká, ale svieti.
Ak stlačíte a podržíte alebo , prejdete jednotlivé režimy v tomto poradí:
• trvalý režim zapnutý
• trvalý režim vypnutý
• automatický režim zapnutý
• trvalý režim zapnutý
• ...
Krátko stlačte alebo čím deaktivujete trvalý režim a vrátite sa do manuálnemu režimu.
C. Manuálne ovládanie s externým tlačidlovým spínačom
Senzor môžete ovládať aj z rôznych miest.
K aktoru medzi L a E1, resp. E2 môžete pripojiť jeden, resp. dva tlačidlové spínače:
• Kontakt medzi L a E1 má rovnakú funkciu ako .
• Kontakt medzi L a E2 má rovnakú funkciu ako .
D. Kombinácia s Nikobusom
Pre integrovanie všetkých ostatných funkcií Nikobus musia byť všetky ostatné senzory odpojené od aktorov.
Pred začiatkom programovania nasaďte senzor na aktor a manuálne zopnite kanály 1 a 2. Spínací príkaz sa
vyšle do Nikobus modulu.
5. RIEŠENIE PROBLÉMOV
V prípade nefunkčnosti krátko stlačte .
Spínacie hodiny sa reštartujú. Nastavenie sa uloží.
6. TECHNICKÉ ÚDAJE
počet spínacích príkazov max. 24
minimálny spínací čas 1 minúta
rezerva chodu pri výpadku el. napájania (až po 12
hodinách prevádzky)
min. 30 minút so zachovaním nastavení
odporúčaná montážna výška 0,8 – 1,5 m
prevádzková teplota 0 – 40°C
prípustná teplota pri skladovaní -25 – 75°C
7. UPOZORNENIA TÝKAJÚCE SA INŠTALÁCIE
- Inštaláciu musí vykonať kvalifikovaný odborník v súlade s platnými predpismi.
- Tento návod musí byť odovzdaný užívateľovi. Musí byť súčasťou dokumentácie o elektrickej inštalácii a musí
byť odovzdaný každému novému užívateľovi. Ďalšie kópie návodu sú dostupné na web stránke Niko alebo
cez služby zákazníkom. Najnovší návod na inštaláciu tohto výrobku je k dispozícii na internetových stránkach
Niko.
- Počas inštalácie je potrebné brať do úvahy nasledovné (neobmedzuje sa iba na nasledovný zoznam):
- aktuálne zákony, normy a vyhlášky.
- aktuálny stav technológie v čase inštalácie.
- tento návod, ktorý obsahuje iba všeobecné pravidlá, je potrebné použiť s ohľadom na špecifiká každej
inštalácie.
- pravidlá správnej inštalácie.
Tento výrobok spĺňa všetky relevantné Európske predpisy a nariadenia. V prípade potreby nájdete príslušné ES
vyhlásenie o zhode na www.niko.eu.
8. NIKO TECHNICKÁ PODPORA
Tento výrobok spĺňa všetky relevantné Európske predpisy a nariadenia. V prípade potreby nájdete príslušné ES
vyhlásenie o zhode na www.niko.eu.
9. ZÁRUČNÉ PODMIENKY
-
Záručná doba je štyri roky od dátumu dodávky. Za dátum dodávky sa považuje dátum fakturácie alebo
vydania iného daňového dokladu zákazníkovi. Ak takýto doklad nie je k dispozícii, platí dátum výroby.
- Zákazník je povinný písomnou formou informovať Niko o poruche do dvoch mesiacov od jej objavenia.
- V prípade poruchy výrobku má zákazník nárok na bezplatnú opravu alebo výmenu (na základe posúdenia
firmy Niko).
- Niko nenesie zodpovednosť za poruchu alebo poškodenie spôsobené nesprávnou inštaláciou, nesprávnym
alebo nedbalým použitím, prepravou výrobku, nesprávnou údržbou, alebo vonkajšími vplyvmi ako sú zvýšená
vlhkosť či prepätie.
- Záväzné zákony národnej legislatívy, týkajúce sa predaja tovaru a ochrany zákazníka platné v krajinách,
kde sa predávajú výrobky Niko, priamo alebo cez sesterské či dcérske spoločnosti, reťazce, distribútorov,
agentov alebo stálych predajných zástupcov, sú nadriadené vyššie uvedeným pravidlám a nariadeniam.
Table of contents
Languages: